Moparts
572 B1 engine install
Posted By: 440Jim
572 B1 engine install - 04/06/22 12:48 PM
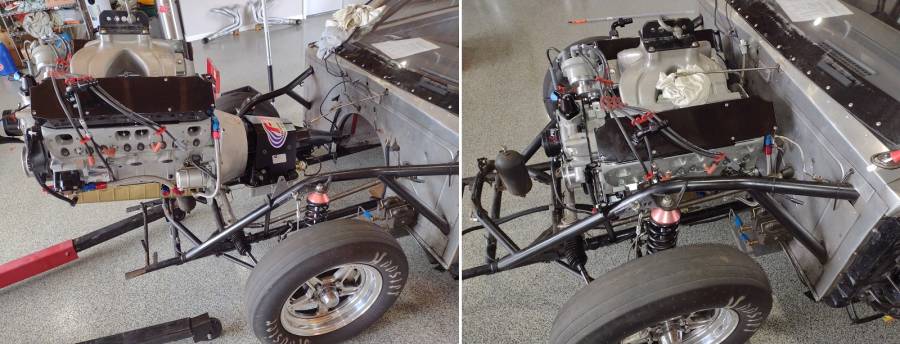
After months of looking for a dyno shop in NC to test my new B1 engine; I just decided to put it in the Daytona and go to a few test and tune sessions.
I got the engine sitting in the car on the mounts (front motor plate and midplate) yesterday.
Other things to do:
- Upgrade fuel pump (I have the new pump)
- Install driveshaft and connect shifter to transmission
- Install radiator, trans cooler
- Fill with fluids
- Modify throttle rod for the +4" height of the new engine/intake
- Make a new hood scoop mount. The scoop mounts to the engine, not the hood.
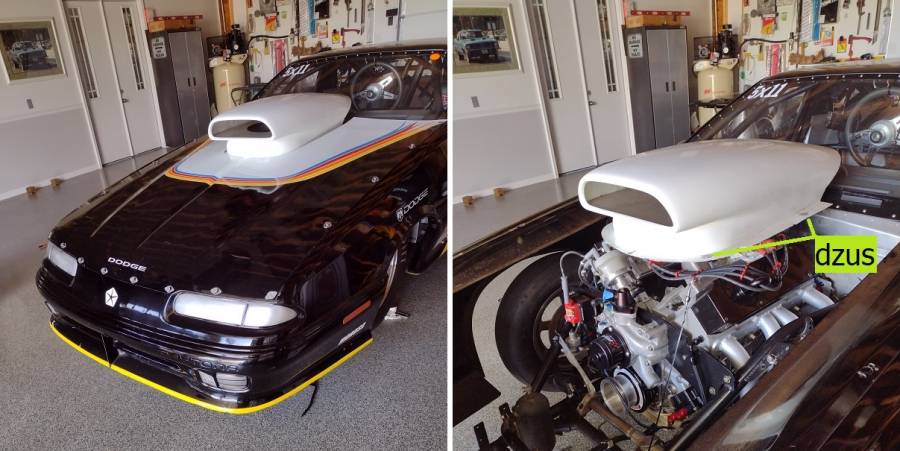
The added height may not be pretty this year, the scoop may be above the hood. Just so I can race it.
Posted By: 440Jim
Re: 572 B1 engine install - 04/06/22 12:54 PM
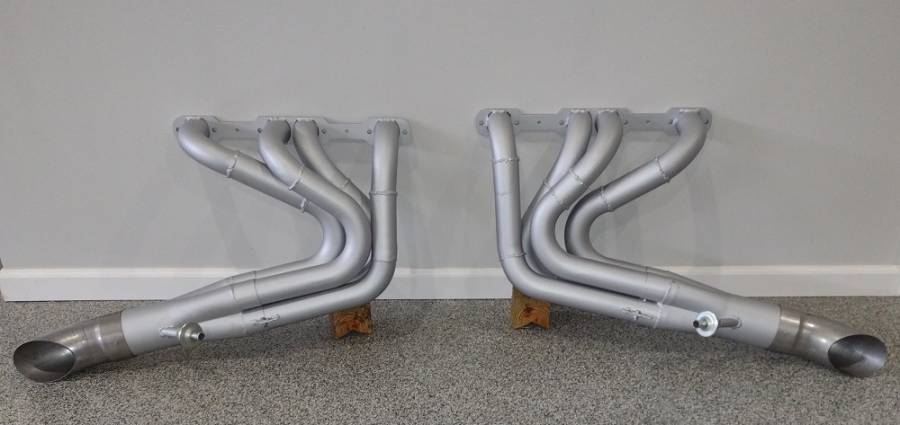
Headers. 2-1/8 to 2-1/4 primary tubes, 29" long, 4" collectors.
Posted By: JERICOGTX
Re: 572 B1 engine install - 04/06/22 01:04 PM
Looks good Jim. Can't wait to hear the results. Sure wish my garage was that clean.
Posted By: madscientist
Re: 572 B1 engine install - 04/06/22 01:18 PM
Hey Jim, I’d like to read through the thread you posted about fitting your engine to the dyno but I can’t find it. Can you post a link to it here???
TIA
Posted By: an8sec70cuda
Re: 572 B1 engine install - 04/06/22 01:35 PM
Very nice Jim! Looking forward to the first track results w/ it.
Posted By: 440Jim
Re: 572 B1 engine install - 04/06/22 02:07 PM
Hey Jim, I’d like to read through the thread you posted about fitting your engine to the dyno but I can’t find it. Can you post a link to it here???
TIA
Posted By: madscientist
Re: 572 B1 engine install - 04/06/22 04:15 PM
Hey Jim, I’d like to read through the thread you posted about fitting your engine to the dyno but I can’t find it. Can you post a link to it here???
TIA
Thank You
Posted By: 440Jim
Re: 572 B1 engine install - 04/06/22 07:50 PM
Other things to do:
- Upgrade fuel pump (I have the new pump)
- Install driveshaft and connect shifter to transmission
- Install radiator, trans cooler
- Fill with fluids
- Modify throttle rod for the +4" height of the new engine/intake
- Make a new hood scoop mount. The scoop mounts to the engine, not the hood.
The added height may not be pretty this year, the scoop may be above the hood. Just so I can race it.
Today, I installed the driveshaft, connected shifter linkage to trans, connected trans brake wires, trans temp wire, and put the headers on.
Kind'a sucks working on the floor under the car, but it is done.
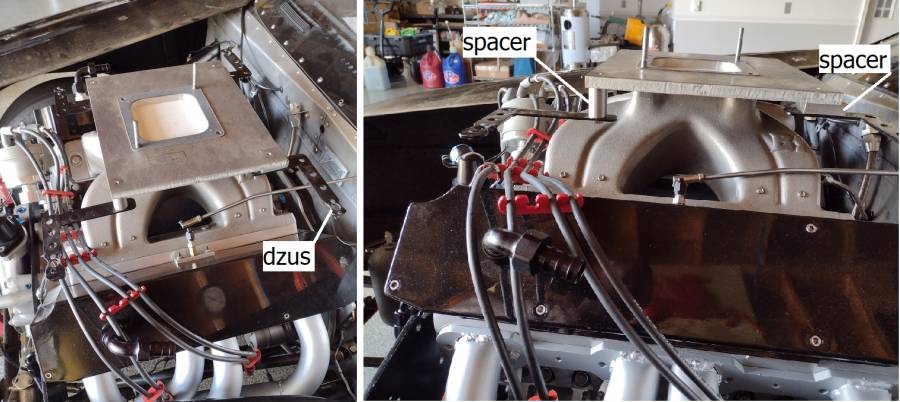
It looks like I got lucky with the hood scoop mount.
My old setup used a 1/2" aluminum "carb spacer" plate with spacers to set the height of the hood scoop dzus fasteners.
It had the dzus spacers on top of the plate, and I just gave it a try putting the same spacers under the plate. It is close !
I may have to adjust those spacers 1/4 to 1/2 inch to set the scoop better, but it went on. The carb will be higher inside the scoop, but I think there will be enough room from the carb to the top of the scoop.
Posted By: 440Jim
Re: 572 B1 engine install - 04/06/22 07:51 PM
View with the hood in place.
Posted By: Clanton
Re: 572 B1 engine install - 04/06/22 08:26 PM
Did you get an aluminum drive shaft or CF?
Posted By: 440Jim
Re: 572 B1 engine install - 04/06/22 08:40 PM
I am using the same one that came with the car when I bought it.
Steel, 1350 u-joints, complete Strange Engineering 9" rear.
Posted By: 440Jim
Re: 572 B1 engine install - 04/06/22 09:28 PM
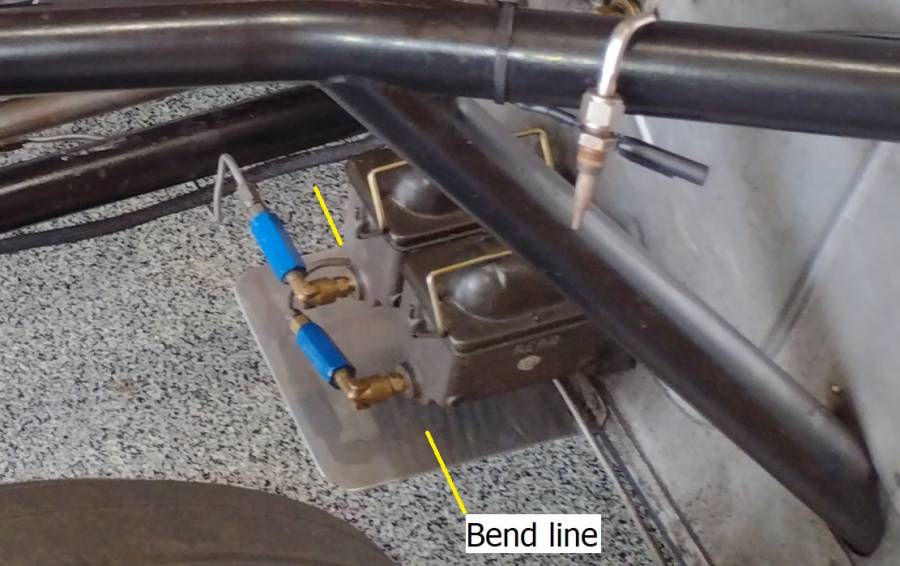
Before lunch, I removed and put a small bend in the heat shield between the brake master cylinder and the header. Give it some air space. Reinstalled. The new headers slope down, the old ones went all the way down then backwards level.
Posted By: 440Jim
Re: 572 B1 engine install - 04/11/22 02:13 AM
Here is a strange one...
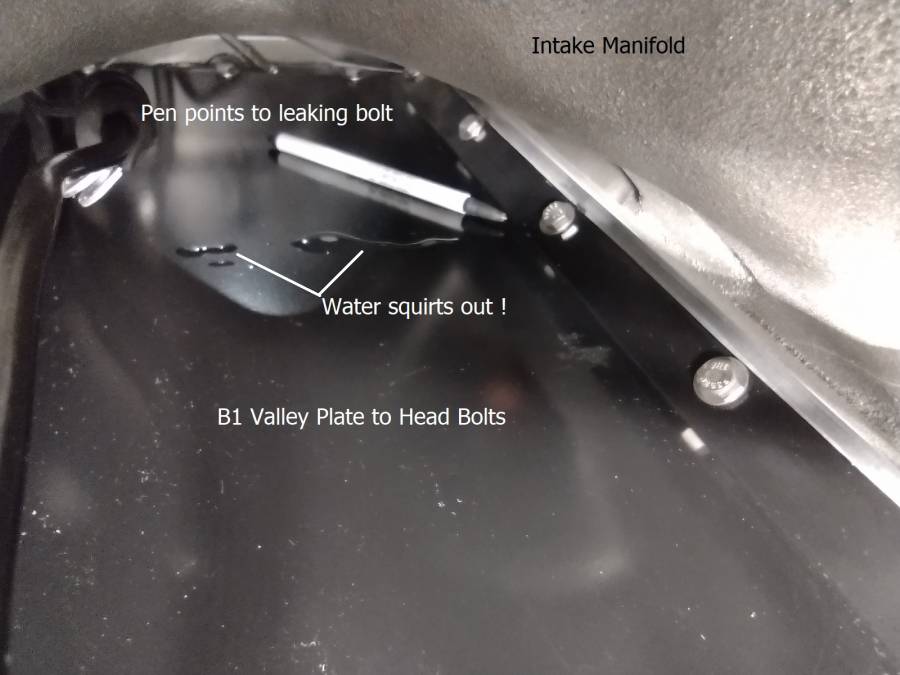
I put water in my B1 engine tonight and ran the electric water pump to purge air as it circulates.
Just as the pump sounded like it was building a little pressure, I noticed water on top of the valley plate (under the intake manifold).
After drying and repeating a couple times, I was able to isolate it to near the center bolt that secures the valley plate to the head.
Very strange... Anyone ever heard of B1 big block heads hitting water in any of those valley plate threaded bolt holes?
Does that larger round hole above the center connect to water? I am not sure right now if the RB intake spacers cover that.
But the intake gaskets I am using basically sit on top of the valley plate (I cut them to fit) above the valley plate. So it should be covered.
I removed the bolt, and dried it with compressed air. Put RTV on the bolt threads and reinstalled. After curing overnight, I will try running the water pump again tomorrow.

Posted By: EvilB1Dart
Re: 572 B1 engine install - 04/11/22 03:25 AM
Wow. Looking great Jim! How far off the ground is the car!?! Looks low and FAST! Nice!
Posted By: 440Jim
Re: 572 B1 engine install - 04/11/22 03:46 PM
Sealing that valley plate mounting hole with RTV did nothing.
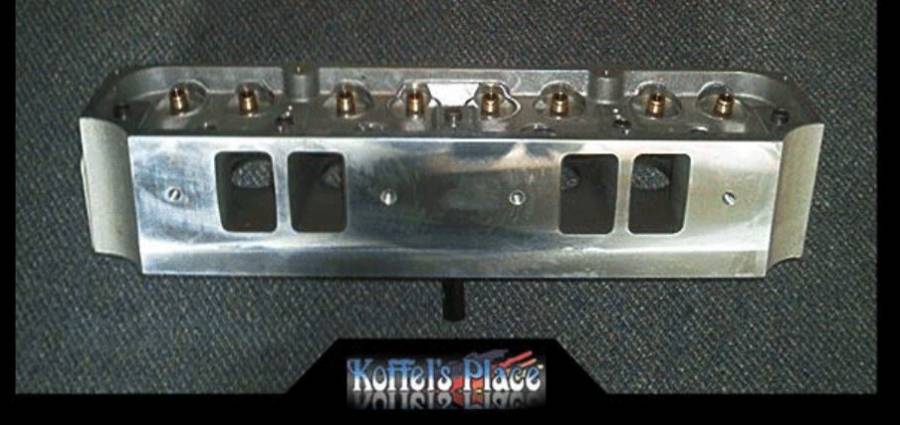
So, I pulled the intake manifold and that 3/4" dia hole does go to the water jacket. It is drilled pretty deep before hitting water.
Just the very bottom of it was not covered by my intake gasket. Just a sliver shooting water out.
I called Koffel's place and they said that hole is not there from the factory. Surprise, the guy I bought these heads from must have drilled it to modify the water cooling pattern.
I will just plug them and put it back together.
Posted By: B1duster
Re: 572 B1 engine install - 04/11/22 03:54 PM
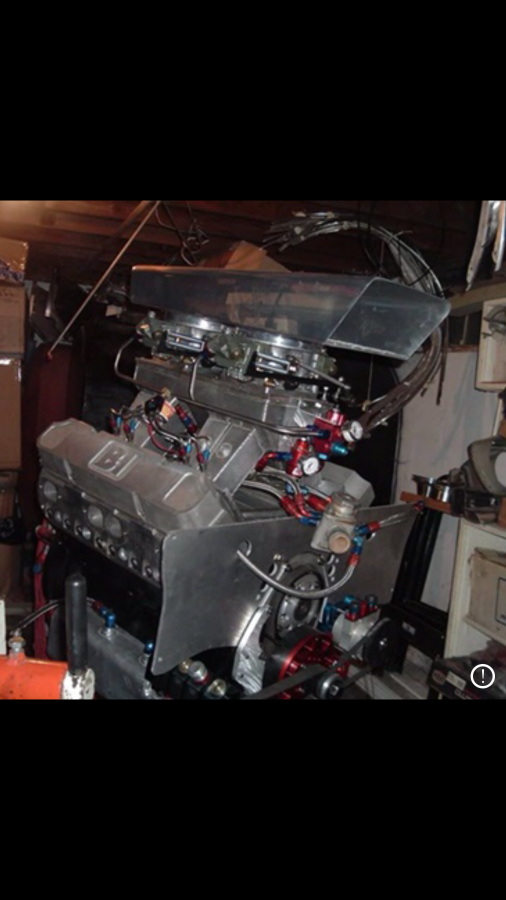
That larger hole is for cooling system.
Posted By: 440Jim
Re: 572 B1 engine install - 04/11/22 08:35 PM
Did you do that cooling modification to your B1 heads?
I am guessing this is an alternative way to do the same mod others have done between the exhaust ports. For water return to pump?
I wonder if this was a half finished modification. Since there is no way to connect a fitting, it is just a 0.75" dia hole. No threads, etc.
Posted By: B1duster
Re: 572 B1 engine install - 04/11/22 09:20 PM
I didn’t do it, I bought it that way. I believe the fitting is screwed Into intake flange, I’d have to look. This motor might have hole between exhaust ports also, not sure.
Posted By: AndyF
Re: 572 B1 engine install - 04/11/22 10:24 PM
Is it 0.750 or is it 23/64 diameter? If it is 23/64 then the guy might have drilled it for a 1/2 inch NPT thread but just never got around to tapping it.
Posted By: B1duster
Re: 572 B1 engine install - 04/11/22 11:26 PM
I think it’s a pretty common B1 cooling mod. I also have a low deck B1 sheet metal intake with the same setup. Has a bung welded to the flange and An fitting in the same spot.
Posted By: AndyF
Re: 572 B1 engine install - 04/12/22 12:36 AM
If the holes are exactly 3/4 inch then pick up a couple of Lawson expansion plugs and drive them in there just like you would on the end of factory heads.
https://www.lawsonproducts.com/lawson/Steel-Expansion-Plug-Regular-34/3085.lp
Posted By: 440Jim
Re: 572 B1 engine install - 04/12/22 12:44 AM
It was drilled very close to 0.750" dia.
I was going to just buy a steel "freeze" plug for that size.
But, I made some O-ring plugs on my lathe from aluminum stock to match thermal expansion of the hole in the head.
When I put them in, they are snug on the O-ring (compression), and I put a smear of RTV above the O-ring for secondary sealing and so it doesn't move.
It can't come out since the intake (RB spacers) basically cover all of it.
EDIT: Friend gave me some O-ring design info. A more typical design would be 0.082" depth (vs my 0.089") and more room for the O-ring width 0.143" (vs my 0.105").

Posted By: B1duster
Re: 572 B1 engine install - 04/12/22 02:08 AM
Nice fix
Posted By: Cab_Burge
Re: 572 B1 engine install - 04/12/22 02:13 AM
I would have been tempted to try a brass freeze plug driven with interference fit


Good luck on this

Posted By: AndyF
Re: 572 B1 engine install - 04/12/22 02:31 AM
That should work. Do you have a pressure checker for the coolant system? I have a little hand operated pressure checker that pumps the coolant system up to 10 or 15 lbs. It is handy for finding leaks before I leave the garage.
Posted By: Al_Alguire
Re: 572 B1 engine install - 04/12/22 05:49 PM
Well I have had a B1 or 12 and I have NEVER done it. We do pull water from the exhaust side between the siamesed exhaust ports but not on the intake side. Easy fix plug the whole guess I never paid enough attention to the earlier pics of the heads.
Posted By: markz528
Re: 572 B1 engine install - 04/13/22 04:40 PM
It was drilled very close to 0.750" dia.
I was going to just buy a steel "freeze" plug for that size.
But, I made some O-ring plugs on my lathe from aluminum stock to match thermal expansion of the hole in the head.
When I put them in, they are snug on the O-ring (compression), and I put a smear of RTV above the O-ring for secondary sealing and so it doesn't move.
It can't come out since the intake (RB spacers) basically cover all of it.
As a self-proclaimed O-Ring junkie, I LOVE IT!
Posted By: Leigh
Re: 572 B1 engine install - 04/13/22 05:39 PM
Nice solution. 👍
Posted By: 440Jim
Re: 572 B1 engine install - 04/13/22 05:44 PM
Note to Moparts.com readers:
A friend of mine emailed me some actual design criteria for O-ring grooves. (Thank you)
My part is a little on the tight side for width, but it will be fine.
A more typical design would be 0.082" depth (vs my 0.089") and more room for the O-ring width 0.143" (vs my 0.105").
Posted By: AndyF
Re: 572 B1 engine install - 04/13/22 06:42 PM
Parker has o-ring design manuals that you can download. I have one taped to the wall by my CAD station since I use it all the time.
Posted By: 440Jim
Re: 572 B1 engine install - 04/19/22 08:59 PM
Crap.
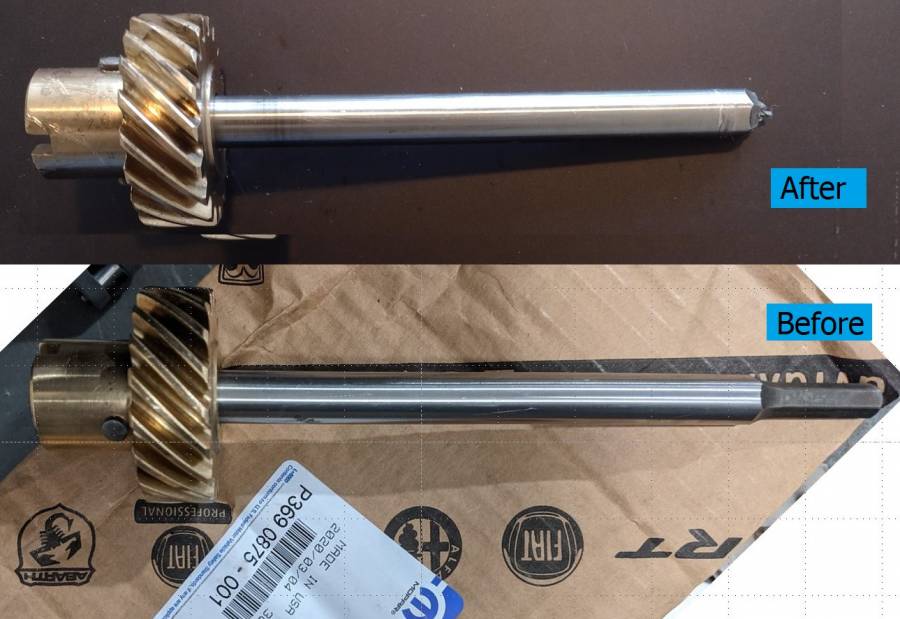
Setback today. I broke the drive hex on the oil pump drive.
I have primed this motor with a drill at least a dozen times during different phase of the build (no lifters, with lifters but no pushrods, pushrods no rockers, and fully assembled.
I have run the engine in the garage about 4 times before today. But when I started it today it had zero oil pressure.
I will have to pull the oil pump and do some investigating to see if anything else has a problem.
Posted By: rickraw
Re: 572 B1 engine install - 04/19/22 09:20 PM
Bronze teeth look ok, maybe debris got in the pump? Hard to believe, your build looks really sanitary.
Posted By: markz528
Re: 572 B1 engine install - 04/19/22 10:18 PM
Well that's not good.............
Posted By: AndyF
Re: 572 B1 engine install - 04/19/22 10:55 PM
That is no good but at least it broke in your garage rather than at 160 mph in the lights.
Posted By: Cab_Burge
Re: 572 B1 engine install - 04/20/22 12:25 AM
Crap.
Setback today. I broke the drive hex on the oil pump drive.
I have primed this motor with a drill at least a dozen times during different phase of the build (no lifters, with lifters but no pushrods, pushrods no rockers, and fully assembled.
I have run the engine in the garage about 4 times before today. But when I started it today it had zero oil pressure.
I will have to pull the oil pump and do some investigating to see if anything else has a problem.
I've had that happen more than once

Look inside the oil pump to see what locked it up

Posted By: Al_Alguire
Re: 572 B1 engine install - 04/20/22 05:09 PM
Well that stinks, but as pointed out couldn't be a better time for it. Time to see what locked it up.
Posted By: 440Jim
Re: 572 B1 engine install - 04/20/22 07:34 PM
I unbolted the rack and pinion so I could remove the steering shaft and get the oil pump out without removing the engine.

The hex tip of the oil pump drive was still in the oil pump, as expected.
There was no debris in the oil pump. The pump turns smoothly by hand (with a hex rod inserted).
I measured the outer gear to body clearance and it was fine at 0.009" (brass feeler gage). Spec should be less than 0.014"
The tip clearance between inner and outer rotors is within spec (less than 0.010"). It was less than 0.006"
Could an engine backfire cause this with stiff valve springs? The day it happened I tried using the MSD start ignition retard, and the engine didn't like it. But then it started the next try (and no oil pressure).

.jpg)
Posted By: Al_Alguire
Re: 572 B1 engine install - 04/20/22 08:32 PM
I would never say never on the backfire, but can't imagine how that could occur, but again never say never. I personally hate start retards they seem to cause more issues than they solve. With a separate start and ignition circuit, like 99% of racecars have I have never seen the need for them. I would lean more toward a defect in the oil pump shaft itself, that shaft sure does not look like it was "twisted" off at all. Curious what weight oil and ambient temp?? Maybe a slight alignment problem, I have seen it before and on a older version of a World block......But you would likely notice that on install.
Posted By: 440Jim
Re: 572 B1 engine install - 04/20/22 09:09 PM
I don't normally use the start retard. I just decided to try it.
I do have the separate starter and ignition switches, which is how I normally start the car.
I have never broke one of these oil pump drives before. But I only ran a roller cam 1 season. That was my 540 KB, 440-1 head motor; which sold that fall.
I am using 10W-30 oil, and it was just after lunch, so the ambient was about 70 degrees.
The previous day I set the ignition timing (32 deg) and valve lash HOT. Just before lunch I verified the COLD 0.006" lash.
I will try to get a better picture of the break with my Olympus camera instead of my phone.
But it is, what it is. I just need to check around for any other signs of a problem.
During an early mock up of the block, I did insert this bronze gear drive in the block to check it turned smoothly in the block bushing.
Posted By: B1MAXX
Re: 572 B1 engine install - 04/20/22 09:27 PM
I broke one one time, It was because of the face/gear to cover clearance. It was one of the old dc extra thick gears with spacer. It was obvious what the problem was though. Yours doesn't look bad. Just throwing that out there.
Posted By: B1MAXX
Re: 572 B1 engine install - 04/20/22 09:36 PM
One thing I will add is when I use aluminum covers on them I use a split lock on the bolts and overly tighten them. I know I'm getting a little off topic. sorry.
It could be a shaft failure, too hardened.
Posted By: AndyF
Re: 572 B1 engine install - 04/20/22 09:45 PM
Use a long hex rod to check the feel of the oil pump once it has been torqued onto the block. Sometimes the oil pump housing will distort and bind up the gears. In your case it should be fine since you had run it before, but who knows. Might have been a bit of extra resistance coupled with a weak shaft.
Kind of scary, that little hex tip is what keeps a $20,000 engine from eating itself.
Posted By: B1MAXX
Re: 572 B1 engine install - 04/20/22 09:51 PM
It would be interesting to know what the hardness is. I bet there's a way to check it. Probably in my old Machinery handbook.
Awesome effort! Sorry, dumb question, but it looks like the hex end was too short? At least based on how that broken off part looks in that picture?
Posted By: 440Jim
Re: 572 B1 engine install - 04/21/22 01:34 AM
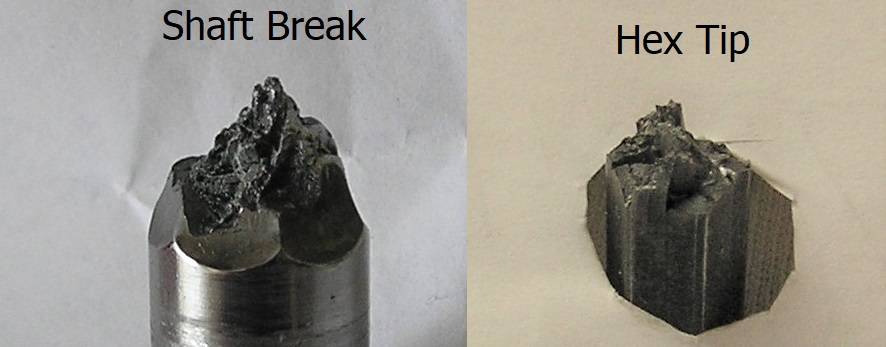
I will try to get a better picture of the break with my Olympus camera instead of my phone.
A better picture, for whatever it is worth. (Yea its broke and needs to be replaced)
I agree it is a strange looking break. More a brittle fracture than a malleable twist. But the tip should have some hardness, just not brittle.
And it was running after the break, so the ends may have touched, if the broken tip didn't fall farther into the pump recess. It doesn't look like they rubbed.
I will drain the oil pan into a clean plastic tub and look for any engine debris there.
Posted By: 440Jim
Re: 572 B1 engine install - 04/21/22 01:39 AM
Awesome effort! Sorry, dumb question, but it looks like the hex end was too short? At least based on how that broken off part looks in that picture?
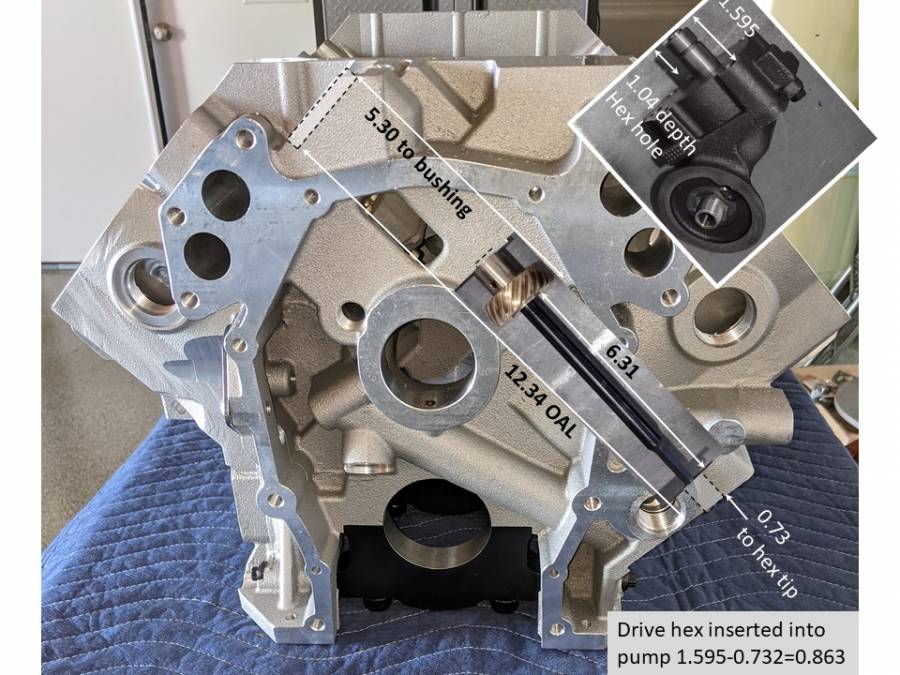
Are you looking at the "Before/After" picture, or the picture with the measurements & specs?
I think it looks normal length.

Posted By: 440Jim
Re: 572 B1 engine install - 04/21/22 01:44 AM
Use a long hex rod to check the feel of the oil pump once it has been torqued onto the block. Sometimes the oil pump housing will distort and bind up the gears. In your case it should be fine since you had run it before, but who knows. Might have been a bit of extra resistance coupled with a weak shaft.
I think you are mentioning a possible block error (like Al ) that the oil pump machined pad isn't perfectly aligned with the shaft/bushing in the block.
I have primed the engine many times in the past couple weeks with the oil pump bolted up and the drill "felt" normal turning the pump.
Posted By: sr4440
Re: 572 B1 engine install - 04/21/22 01:53 AM
During mock up, did you install the oil pump drive and tighten down the distributor to check to make sure the oil pump shaft had some clearance? I have seen more than one that bottomed out into the gears.
Joe
Posted By: dragon
Re: 572 B1 engine install - 04/21/22 02:16 AM
I broke one when I changed a oil pump to a different brand the shaft was too long and I did not notice the distubuter was not seated all the way tighten it down when I started motor made noise found shaft broke because it was too long
Posted By: Cab_Burge
Re: 572 B1 engine install - 04/21/22 03:25 AM
I had one twist off on the engine after running it to warm the oil up on the dyno after 10 to 15 minutes, this was a new World iron block that had not been machined correctly on the oil pump mount pad, it had a tiny ring (.0003 to .0009 or so) that was sticking out around the oil pump drive hole but not enough to see or feel until using a straight edge across it trying to find out why it broke that shaft off while dyno testing that motor in Boise ,ID for a customer who lived and race there.
I had called my wife to have her bring me the last new one I had in stock back home in Bend and had her drive to Burns, OR (about halfway between Boise, ID and Bend)
The dyno operator found that ridge and had removed it by the time I got back and took it in to the shop the next morning


I hate Murphy


To be honest, the intermediate shaft looked too short on the computer I saw this on. Def didn't see any measurements & specs.
Posted By: 440Jim
Re: 572 B1 engine install - 04/21/22 02:08 PM
To be honest, the intermediate shaft looked too short on the computer I saw this on. Def didn't see any measurements & specs.
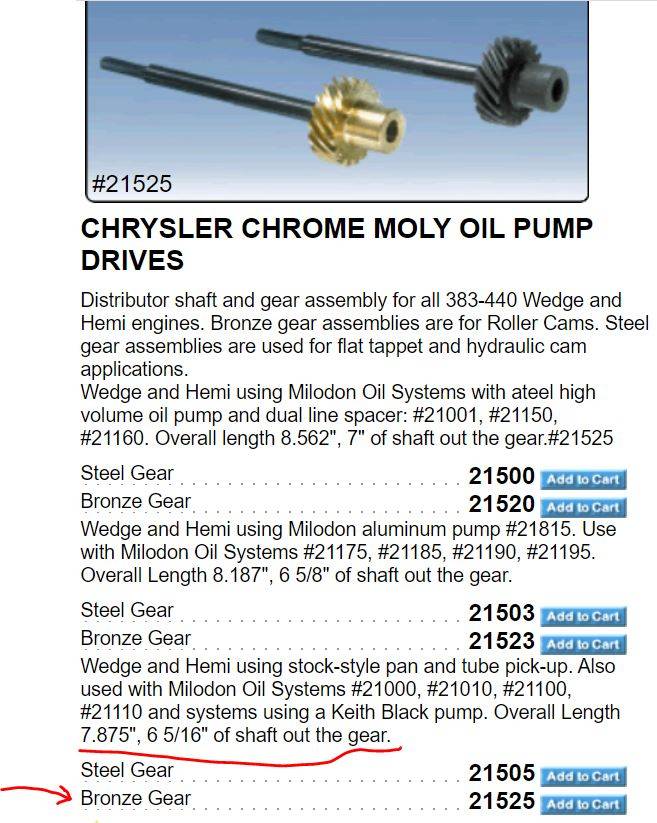
I do remember measuring this shaft after I bought it last year (April 2021). That is when I took the "Before" picture with the MP packaging. But I can't find a record of my measurement.
As I recall, it matched the spec length. I was checking to make sure it wasn't longer for certain other Milodon pumps.
Absolutely, looking at your oil pump the only way it could be too short is some type of manufacturing defect. Problem must be on my end, I missed where you measured and depending on what I view on, the broken piece looks short or “normal”

sorry for the distraction and best of luck

Posted By: Cab_Burge
Re: 572 B1 engine install - 04/21/22 05:40 PM
That looks like bad metal to me


Maybe when they forged it , it packed all the bad material in one spot

I've seen similar problems on other motor parts like a broken ring with a oval bubble in the material were it broke

Posted By: an8sec70cuda
Re: 572 B1 engine install - 04/21/22 06:12 PM
That looks like bad metal to me


Maybe when they forged it , it packed all the bad material in one spot

I've seen similar problems on other motor parts like a broken ring with a oval bubble in the material were it broke


I'm no metallurgist, but that break looks like bad material.

Posted By: B1MAXX
Re: 572 B1 engine install - 04/21/22 10:11 PM
too much heat treat does that to good metal.
Posted By: markz528
Re: 572 B1 engine install - 04/21/22 11:06 PM
One time I made tapered collets for my magnetic sine vise. I made an oops on the heat treat (didn't read the instructions correctly). It broke when I dropped it to the floor - it was a really small piece.. It was rock hard with zero toughness. Brittle as all heck.
Posted By: HardcoreB
Re: 572 B1 engine install - 04/22/22 01:52 PM
Wow Jim! The up-side, as has been said, is that it happened where it did. Sorry. This is going to be an impressive runner when it gets out though.
Posted By: 440Jim
Re: 572 B1 engine install - 04/25/22 02:10 AM
I will drain the oil pan into a clean plastic tub and look for any engine debris there.
I drained the oil into a clean plastic tub. Then I filtered it with a cone shaped disposable paint filter. Zero debris or anything. So it is good to know no other hidden engine wear/damage.
I don't see any pump to drive hex problems. The depth of the hex hole in the oil pump is much deeper than the bronze gear oil pump drive shaft reaches. Hole depth 1.04", and the calculated insertion is only 0.863"
I will double check my measurements.
Posted By: moparacer
Re: 572 B1 engine install - 04/26/22 10:11 PM
Wow, just seen this thread. Stinks you are having trouble Jim.....
I just put a new Milodon oil pump drive in mine last week so I am a bit worried now seeing this.
How much oil pressure are you running?
Posted By: DavidDean
Re: 572 B1 engine install - 04/26/22 10:21 PM
Very Nice ! Where's the like button ?
Posted By: 440Jim
Re: 572 B1 engine install - 04/27/22 12:57 AM
How much oil pressure are you running?
I have only run this engine for a few minutes (several short runs) in the garage before the hex drive broke.
Since the oil was still cold, it made plenty of oil pressure. This pump and relief valve spring typically made 60-65 psi with warm oil and higher than idle type RPM.
I didn't notice any oil pressure issues until it went to zero.

I expect to start it again on Wednesday. The investigation is done, the new bronze gear oil pump drive shaft is installed, and I put a new oil pump in just in case.
I primed it with a drill late today (Tuesday) and it all seems normal.

Posted By: ZIPPY
Re: 572 B1 engine install - 04/27/22 02:44 PM
Good comeback from the freak failure.
I heard of one other brand new MP intermediate shaft snapping like that at a local race shop, close to 20 years ago.
The builder scrapped it, put in a different brand and never had another issue.
Thinking it has to be bad heat treat or similar, like the guys are saying. Just glad to see you caught it now!
Posted By: 440Jim
Re: 572 B1 engine install - 04/27/22 07:14 PM
OK, things went well this afternoon.
- I primed the engine with a drill (again), before installing the oil pump drive and distributor.
- The engine fired right up !

And oil pressure was 70 psi at 1700 rpm.

- After running a few minutes in the garage, I turned it off and checked for anything unusual. Looked fine.
- Started again and drove up and down the driveway 4 times to check the transmission in all gears, including reverse.
This was the first drive with my PG since I put the 1.80 straight cut planetary gears in it (was stock 1.76). All good.
- After letting it cool in the garage and doing more checks; I drove it up and down the driveway a couple more times for fun.

Good day all around. Sunny, 60 degrees; and the car moves!
b.jpg)
Posted By: GY3
Re: 572 B1 engine install - 04/27/22 07:20 PM
Awesome!
Always a good thing when it goes smoothly.
Great news. Do you have a trip to the track planned soon.
Posted By: an8sec70cuda
Re: 572 B1 engine install - 04/27/22 07:43 PM
Any new black marks in the driveway?

Posted By: 440Jim
Re: 572 B1 engine install - 04/27/22 08:07 PM
LOL,
I am too much of a neat freak to put tire marks on my new concrete driveway.
Unfortunately, no local tracks have a test and tune this week. Usually two tracks have Thurs evening T&T, but they are having special events all week.
And Farmington typically has a Friday night test session with motorcycles, street cars, etc. But I don't know what the surface is like with mainly street cars and motorcycles.
GALOT Motorsports Park - Spring Fling Big Dollar racing.
I may be able to Test at Piedmont, if they allow it during their Tuesday or Thursday special events (May 3 or 5). I need to phone them.
Farmington Dragway has a Mopar event Sat May 7.
Posted By: 572B1
Re: 572 B1 engine install - 04/27/22 09:33 PM
Well done Jim, you put in a really big effort with that engine. the car looks great also. hope it runs well. Rob.
Posted By: gregsdart
Re: 572 B1 engine install - 04/27/22 10:19 PM
Good to hear you are ready to roll, Jim! Time for fun!


.jpg)


b.jpg)