Moparts

Heater Control Panel, Radio Faceplate, and Dash Bezel

Posted By: filmsurgeon

Heater Control Panel, Radio Faceplate, and Dash Bezel - 05/07/13 07:25 AM

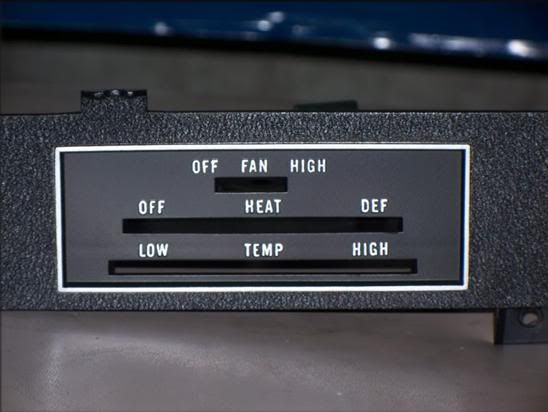
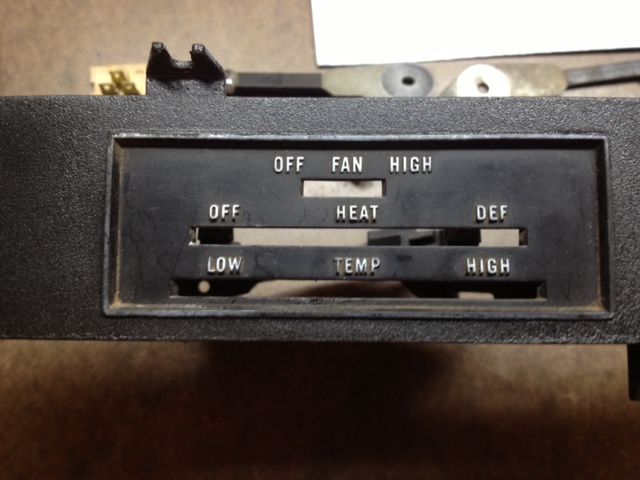
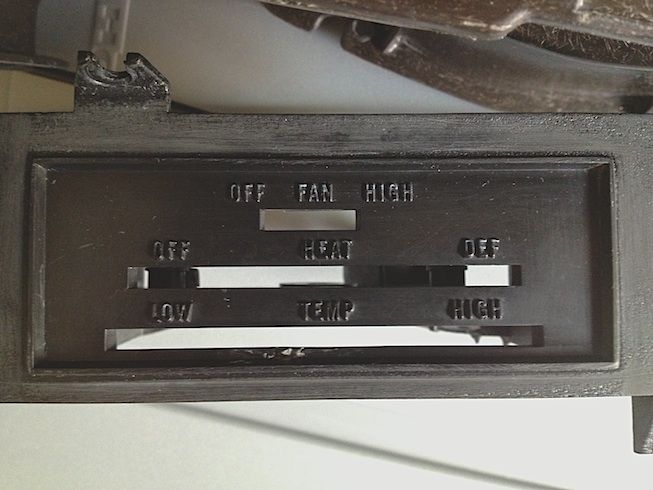
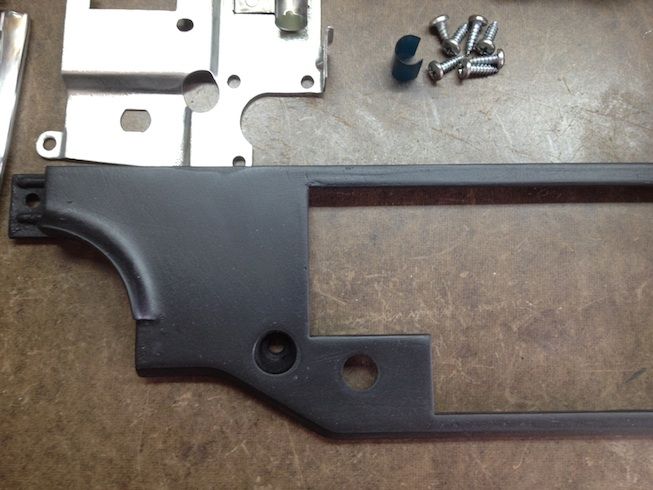
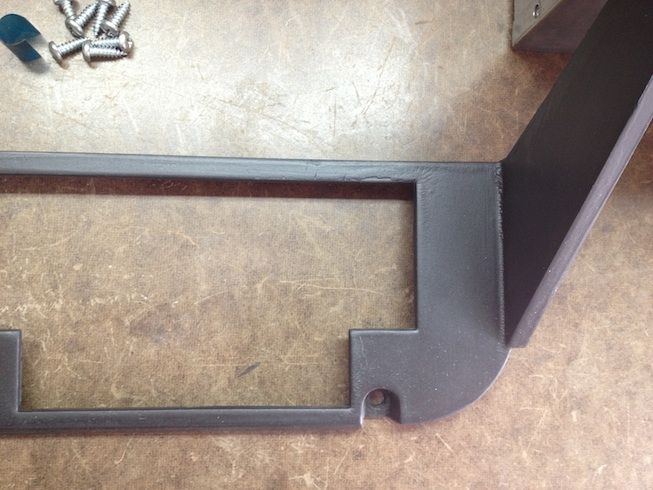
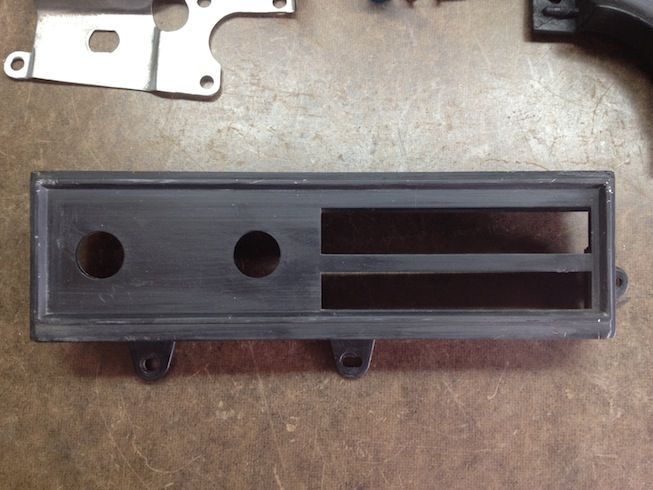
Can anyone help me on how best to DIY "restore" these components? First photo is a restored (or repop, not sure) heater control panel; second is mine as it came out of the car; third is prepped for restoration. I know I can do the lettering with a white paint marker/pen, but what can I do to get the correct textured/crinkle finish paint (what paint/what process). Also, was the raised boarder surrounding the lettering originally chrome? How can I best do this? I don't need concourse restoration, just something that looks "close enough" to factory. I also need to do the same textured/crinkle finish for the radio dash bezel (4th & 5th photos). For the radio faceplate (6th photo): I am fairly certain the rectangular raised boarder (surrounding the knobs, chrome push-buttons, and station lens) was also chrome like the heater control panel. I would need to do this as well. Any advice on any aspect of restoring these pieces is greatly appreciated. I wish I could send these to a professional for "correct restoration", but I simply can't afford it. These are all for a '70 Challenger w/Rallye Dash. Thanks.


Posted By: Silver70

Re: Heater Control Panel, Radio Faceplate, and Dash Bezel - 05/07/13 07:56 AM

For the silver, I use a silver/metallic sharpie. Maybe not the best way, but it's cheap. I believe 70s had a ribbed texture and not wrinkled like the parts pictured. Although maybe it changed during 70 from early to late production
Posted By: mopars_1

Re: Heater Control Panel, Radio Faceplate, and Dash Bezel - 05/07/13 07:57 AM

texture is part of the plastic, not paint. the smooth radio bezel is for standard dash cars (70-74 cudas and 71-74 challengers). to duplicate the chrome look, Ive heard that some higher end nail polishes look pretty convincing. the radio face plate is suppose to have chrome around the perimeter also.
Posted By: mopars_1

Re: Heater Control Panel, Radio Faceplate, and Dash Bezel - 05/07/13 07:58 AM

Quote:

For the silver, I use a silver/metallic sharpie. Maybe not the best way, but it's cheap. I believe 70s had a ribbed texture and not wrinkled like the parts pictured. Although maybe it changed during 70 from early to late production


the ribbed one was only used on standard dashes for 70 challengers only. ralleys used the pebble grain
Posted By: TONY_DAGOSTINO

Re: Heater Control Panel, Radio Faceplate, and Dash Bezel - 05/07/13 01:57 PM

hi,
the texture on the heater panel and the radio bezel weren't in the plastic

it was paint

the best match youll have is a black wrinkle paint,
it does need to be heated for best wrinkle results, so be careful not to use too much heat or youll damage the plastic,

a hair drier or heat gun on low will do it,

although ive gotten best results from letting the item sit in the bright sun after the wrinkle paint has been applied
Posted By: mopars_1

Re: Heater Control Panel, Radio Faceplate, and Dash Bezel - 05/07/13 04:36 PM

Quote:

hi,
the texture on the heater panel and the radio bezel weren't in the plastic

it was paint

the best match youll have is a black wrinkle paint,
it does need to be heated for best wrinkle results, so be careful not to use too much heat or youll damage the plastic,

a hair drier or heat gun on low will do it,

although ive gotten best results from letting the item sit in the bright sun after the wrinkle paint has been applied


I stand corrected
Posted By: TONY_DAGOSTINO

Re: Heater Control Panel, Radio Faceplate, and Dash Bezel - 05/07/13 05:49 PM

that's what moparts is good for

I still learn stuff all of the time and probably will till the end
Posted By: filmsurgeon

Re: Heater Control Panel, Radio Faceplate, and Dash Bezel - 05/07/13 07:42 PM

Quote:

hi,
the texture on the heater panel and the radio bezel weren't in the plastic

it was paint

the best match youll have is a black wrinkle paint,
it does need to be heated for best wrinkle results, so be careful not to use too much heat or youll damage the plastic,

a hair drier or heat gun on low will do it,

although ive gotten best results from letting the item sit in the bright sun after the wrinkle paint has been applied


Thanks Tony. Any opinions on who makes the best wrinkle paint? BTW - is it wrinkle, crinkle, or crackle? Or are they really all the same? Seems that images I've seen where others have done wrinkle finish, it actually looks like "wrinkles", and not like the original texture of the paint on the radio dash bezel and heater control panel.
Posted By: 318 Stroker

Re: Heater Control Panel, Radio Faceplate, and Dash Bezel - 05/07/13 08:16 PM

I can absolutely tell you how to professionally do the letters. I did mine and it looks fantastic.

I went to the hobby store and bought a bottle of Testors white model paint, in the small square jar, and a bottle of Testors brush cleaner, and a small, cheap brush. About 7-8 dollar investment.

The only other thing you need is a brand new pencil with an unused eraser on it.

I lightly chucked the heater panel into my vise, with some towels for protection, just to hold it vertical and steady, letters facing up. All you need the brush for is to daub a small blob of the white paint onto a piece of scrap cardboard. Lightly daub the pencil eraser into the blob, then lightly wipe the eraser onto the cardboard, so that all you have on the end of the eraser is a light film of white paint. Lightly start touching the raised letters, with the eraser at a perfect 90 degree angle to the letters. Don't try to completely cover every spot you touch on the first daub. Just keep repeating the above steps.

Took me a little experimenting, but once I got the procedure perfected, took about 10 mins. to make the letters look perfect. Too much paint on the eraser, and the excess paint will run down the sides of the raised letters. If that happens, use the brush cleaner and a rag or paper towel to wipe the boo-boo, and go at it again with less paint on the eraser.

As for the edge, yes it's chrome. I used the silver/chrome paint pen. Not as chromey as it should be, but I'm happy with the results. As for the black, I can't help you. I didn't repaint my black, just scrubbed it real good with cleaners before I painted it.

Good luck and I know you will be happy with the results...
Posted By: filmsurgeon

Re: Heater Control Panel, Radio Faceplate, and Dash Bezel - 05/07/13 08:23 PM

Quote:

I can absolutely tell you how to professionally do the letters. I did mine and it looks fantastic.

I went to the hobby store and bought a bottle of Testors white model paint, in the small square jar, and a bottle of Testors brush cleaner, and a small, cheap brush. About 7-8 dollar investment.

The only other thing you need is a brand new pencil with an unused eraser on it.

I lightly chucked the heater panel into my vise, with some towels for protection, just to hold it vertical and steady, letters facing up. All you need the brush for is to daub a small blob of the white paint onto a piece of scrap cardboard. Lightly daub the pencil eraser into the blob, then lightly wipe the eraser onto the cardboard, so that all you have on the end of the eraser is a light film of white paint. Lightly start touching the raised letters, with the eraser at a perfect 90 degree angle to the letters. Don't try to completely cover every spot you touch on the first daub. Just keep repeating the above steps.

Took me a little experimenting, but once I got the procedure perfected, took about 10 mins. to make the letters look perfect. Too much paint on the eraser, and the excess paint will run down the sides of the raised letters. If that happens, use the brush cleaner and a rag or paper towel to wipe the boo-boo, and go at it again with less paint on the eraser.

As for the edge, yes it's chrome. I used the silver/chrome paint pen. Not as chromey as it should be, but I'm happy with the results. As for the black, I can't help you. I didn't repaint my black, just scrubbed it real good with cleaners before I painted it.

Good luck and I know you will be happy with the results...


Thanks. That's a GREAT tip for the white lettering.
Posted By: Silver70

Re: Heater Control Panel, Radio Faceplate, and Dash Bezel - 05/07/13 08:57 PM

Quote:

Quote:

For the silver, I use a silver/metallic sharpie. Maybe not the best way, but it's cheap. I believe 70s had a ribbed texture and not wrinkled like the parts pictured. Although maybe it changed during 70 from early to late production


the ribbed one was only used on standard dashes for 70 challengers only. ralleys used the pebble grain


Wasn't sure, thanks for clearing that up... my car has a standard dash and it's been years since I worked on the other style.
Posted By: skicker

Re: Heater Control Panel, Radio Faceplate, and Dash Bezel - 05/08/13 12:53 AM

Quote:

I can absolutely tell you how to professionally do the letters. I did mine and it looks fantastic.

I went to the hobby store and bought a bottle of Testors white model paint, in the small square jar, and a bottle of Testors brush cleaner, and a small, cheap brush. About 7-8 dollar investment.

The only other thing you need is a brand new pencil with an unused eraser on it.

I lightly chucked the heater panel into my vise, with some towels for protection, just to hold it vertical and steady, letters facing up. All you need the brush for is to daub a small blob of the white paint onto a piece of scrap cardboard. Lightly daub the pencil eraser into the blob, then lightly wipe the eraser onto the cardboard, so that all you have on the end of the eraser is a light film of white paint. Lightly start touching the raised letters, with the eraser at a perfect 90 degree angle to the letters. Don't try to completely cover every spot you touch on the first daub. Just keep repeating the above steps.

Took me a little experimenting, but once I got the procedure perfected, took about 10 mins. to make the letters look perfect. Too much paint on the eraser, and the excess paint will run down the sides of the raised letters. If that happens, use the brush cleaner and a rag or paper towel to wipe the boo-boo, and go at it again with less paint on the eraser.

As for the edge, yes it's chrome. I used the silver/chrome paint pen. Not as chromey as it should be, but I'm happy with the results. As for the black, I can't help you. I didn't repaint my black, just scrubbed it real good with cleaners before I painted it.

Good luck and I know you will be happy with the results...


That sure beats me trying to use a paint pen holding it in one hand while the other hand shakes like a dog chittin razor blades. I think mine would have turned out the same using a 2" brush. Thx for the tip!

Attached picture 7697603-Wipers.JPG
Posted By: 318 Stroker

Re: Heater Control Panel, Radio Faceplate, and Dash Bezel - 05/08/13 04:52 AM

Quote:

Quote:

I can absolutely tell you how to professionally do the letters. I did mine and it looks fantastic.

I went to the hobby store and bought a bottle of Testors white model paint, in the small square jar, and a bottle of Testors brush cleaner, and a small, cheap brush. About 7-8 dollar investment.

The only other thing you need is a brand new pencil with an unused eraser on it.

I lightly chucked the heater panel into my vise, with some towels for protection, just to hold it vertical and steady, letters facing up. All you need the brush for is to daub a small blob of the white paint onto a piece of scrap cardboard. Lightly daub the pencil eraser into the blob, then lightly wipe the eraser onto the cardboard, so that all you have on the end of the eraser is a light film of white paint. Lightly start touching the raised letters, with the eraser at a perfect 90 degree angle to the letters. Don't try to completely cover every spot you touch on the first daub. Just keep repeating the above steps.

Took me a little experimenting, but once I got the procedure perfected, took about 10 mins. to make the letters look perfect. Too much paint on the eraser, and the excess paint will run down the sides of the raised letters. If that happens, use the brush cleaner and a rag or paper towel to wipe the boo-boo, and go at it again with less paint on the eraser.

As for the edge, yes it's chrome. I used the silver/chrome paint pen. Not as chromey as it should be, but I'm happy with the results. As for the black, I can't help you. I didn't repaint my black, just scrubbed it real good with cleaners before I painted it.

Good luck and I know you will be happy with the results...


That sure beats me trying to use a paint pen holding it in one hand while the other hand shakes like a dog chittin razor blades. I think mine would have turned out the same using a 2" brush. Thx for the tip!


You're welcome... Guys use paintbrushes, toothpicks, etc. I'd have been in your boat using them... I'd heard of the eraser method, and I first tried a big pink eraser. Not good results, as the eraser was too big and soft. That's when I hit on the pencil eraser, and that was the perfect solution.

You could probably remove your paint, and do my method, possibly with the piece still in the car. Would be worth a try.
Posted By: filmsurgeon

Re: Heater Control Panel, Radio Faceplate, and Dash Bezel - 06/05/13 12:16 AM

Turns out I won't be "restoring" my heater control panel after all. I discovered a couple of things upon further inspection and comparison against photos of other's panels. Don't know how this happened, or why it was done, but the section on the backside where the support bracket attaches is completely gone (see 1st photo). Aso, the mounting tab on the left side is broken (see 2nd photo). I just went ahead and ordered a repop panel instead. I hope I'll be satisfied with it. Regarding the lower back support bracket (see 3rd photo with red circle): Does anyone know where I can get one of these? I could possibly make one if someone could share photos and/or measurements. Also, In my search of photos, I found this (see last photo). Did the fan/blower switch have a knob as seen/circled in the photo? Any/all other fan/blower switches I've seen, look like mine w/o the knob. Thanks.


Posted By: N9671X2

Re: Heater Control Panel, Radio Faceplate, and Dash Bezel - 06/05/13 01:54 AM

Another plug for using a pencil eraser as stamp for the paint, did a bunch of these and it is pretty much impossible to screw it up.
Posted By: JulesdaWiperman

Re: Heater Control Panel, Radio Faceplate, and Dash Bezel - 06/05/13 02:12 AM

You have the wrong blower switch installed or someone pushed a knob on an original shaft.
It should look like this.

Attached picture 7731241-IMG_0529.jpg
Posted By: JulesdaWiperman

Re: Heater Control Panel, Radio Faceplate, and Dash Bezel - 06/05/13 02:16 AM

It looks like you have a brand new dash wiring harness.
If so what year did you order?
The reason I ask is if your car is a 70 , why do you have a 72-74 3 speed wiper switch installed?
The dash wiring for a 70 has different plugs for the wiper switch. Did you switch the plug?
Jules
Posted By: burdar

Re: Heater Control Panel, Radio Faceplate, and Dash Bezel - 06/05/13 02:21 AM

He used my picture to highlight the bracket he needs.
Posted By: JulesdaWiperman

Re: Heater Control Panel, Radio Faceplate, and Dash Bezel - 06/05/13 02:26 AM

Make absolutely sure you have a good ground for the screw right under the dimmer switch.
I circled it in black.
There should be NO paint between the switch plate and the dash frame.
Now is the time to test that before it is in the car.
Jules

Attached picture 7731262-HeaterControlPanel_Back_Bracket_Annotate_zpsbd40888f.jpg
Posted By: JulesdaWiperman

Re: Heater Control Panel, Radio Faceplate, and Dash Bezel - 06/05/13 02:28 AM

Understood Darren. Sorry about that.
Jules
Posted By: filmsurgeon

Re: Heater Control Panel, Radio Faceplate, and Dash Bezel - 06/05/13 06:46 AM

Quote:

You have the wrong blower switch installed or someone pushed a knob on an original shaft.
It should look like this.


Thanks Jules and all. My blower switch looks like the one have pictured Jules. The photo I attached was from a Google search. I thought it was strange when I saw it. That's why I questioned it here. I'll definitely take your advice on the ground for the dimmer switch. Any help on the heater control panel lower support bracket would be much appreciated. Thanks.
Posted By: filmsurgeon

Re: Heater Control Panel, Radio Faceplate, and Dash Bezel - 06/07/13 06:41 AM

Quote:

You have the wrong blower switch installed or someone pushed a knob on an original shaft.
It should look like this.


Yes. This is how mine looks. I found the photo with the knob pushed onto the lever when I did a Google image search. Thought it was unusual.


Posted By: filmsurgeon

Re: Heater Control Panel, Radio Faceplate, and Dash Bezel - 06/07/13 06:51 AM

Any help on the bracket? Thanks.

Posted By: burdar

Re: Heater Control Panel, Radio Faceplate, and Dash Bezel - 06/07/13 02:05 PM

Put a want add on the sites your on.
Posted By: filmsurgeon

Re: Heater Control Panel, Radio Faceplate, and Dash Bezel - 06/07/13 07:29 PM

Quote:

Put a want add on the sites your on.


Thanks. I just now posted in "Parts Wanted" here, and on Cuda-Challenger. I am willing to make a bracket if anyone can share photos using a tape measure against the bracket to show dimensions.

BTW - Just got the new reproduction heater control panel. It's beautiful. Whoever is making these, should also make the radio dash bezel. That way the textures will match.

Attached picture 7734259-BackOfDash_Original_2.jpg
Posted By: filmsurgeon

Re: Heater Control Panel, Radio Faceplate, and Dash Bezel - 06/08/13 06:00 AM

Here are photos of the repop heater control panel with all the original components installed. I am very satisfied with the end result.


Posted By: PhillyRag

Re: Heater Control Panel, Radio Faceplate, and Dash Bezel - 06/09/13 08:03 AM

original bkt.
Believe same for all setups.

Attached picture 7735985-a.jpg
Posted By: filmsurgeon

Re: Heater Control Panel, Radio Faceplate, and Dash Bezel - 06/09/13 04:34 PM

Quote:

original bkt.
Believe same for all setups.


Thank you. That's a HUGE help.
Posted By: filmsurgeon

Re: Heater Control Panel, Radio Faceplate, and Dash Bezel - 06/09/13 06:11 PM

Quote:

He used my picture to highlight the bracket he needs.


Does anyone know if the same lower support bracket was used for the control panel on A/C and non-A/C cars? The picture with the bracket circled in red is slightly different (where it mounts to the back of the panel) than the bracket in the 2nd photo which is from an A/C equipped car. Thanks.


Posted By: PhillyRag

Re: Heater Control Panel, Radio Faceplate, and Dash Bezel - 06/11/13 07:28 AM

Yes the same.
The pics are of only 1 bkt. The chamfer shows reversed because bkt was flipped over for pics.
Posted By: filmsurgeon

Re: Heater Control Panel, Radio Faceplate, and Dash Bezel - 06/11/13 08:21 PM

Quote:

Yes the same.
The pics are of only 1 bkt. The chamfer shows reversed because bkt was flipped over for pics.


Thanks. I know the two brackets in the 2nd photo are the same (just flipped). The 1st photo shows a different style bracket where it mounts to the back of the control panel. That's what I'm looking for clarification on; the circled area of the bracket in first photo, and the circled area(s) of the bracket in the 2nd photo. The one in the 1st photo is attached to a non-A/C control panel, the one in the 2nd photo is from an A/C car. Why are they different?
Posted By: fbernard

Re: Heater Control Panel, Radio Faceplate, and Dash Bezel - 12/31/13 04:09 PM

I know it's a mildly old post, but since I'm reading all of filmsurgeon's posts to aid in my ragtop restoration...
There's another way to mask & paint the heater controls, using a rubber-based compound to mask the flat surfaces inside the rectangle and around it (and inside the letters). I used to use something called Maskol (made by Humbrol) back when I was painting models as a kid, it's just liquid rubber that flows reall well so you can use it to fill the lows, let it dry, and paint the highs with anything you want (a rattle can, or a brush and paint for example). The layer of Maskol gets painted too, but you just tear it off once the paint is dry.
It might be possible to use liquid rubber products like plasti-dip too (not sure about that, I've only used the aerosol version).

I haven't checked my heater control yet to see if it needs to be redone, so I might try it soon.
© 2024 Moparts Forums