|
 Re: CARE TO SHARE YOUR WIRING PHOTOS............OR,
[Re: mopar65]
#1303923
Re: CARE TO SHARE YOUR WIRING PHOTOS............OR,
[Re: mopar65]
#1303923
09/15/12 09:06 AM
09/15/12 09:06 AM
|
Joined: Jan 2003
Posts: 8,082
Tulsa OK
Bad340fish

master
|
master
Joined: Jan 2003
Posts: 8,082
Tulsa OK
|
I built a relay panel and put it in my glovebox, on that side of the car I also ran my main power wire to a disribution point. The only factory wiring I use is for the lights and wipers, everything else comes out of that relay panel. I removed all the factory engine compartment wiring and seperated it from the light harness. This leaves one of the bulkhead connectors unused(except the horn wire). To get the remaining factory stuff lit back up I just hooked onto the wire that came out of the amp gauge and ran it to my power block. This cleaned up a ton of engine wiring, killed the bulkhead connector that always jacks up, and brought new power to the lights and wipers it all works good now.  Now, after building this thing it would have been very close to the same price to buy some of the nicer ones. All that crap adds up, the relays, the wire, the fuse block, etc etc. I like it, it works great. I switch it all off of my shifter console. But, I think if I did it again I would have bought somebodies panel and wired it to my console. FYI I bought some 10 conductor wire that had 10 different 16 gauge wires in it that were all different colors. This made one nice wire I was able to run under the carpet to my shifter console(TA shifter). I actually didn't buy it, I got 10 feet of it and the supplier didn't want to mess with such a small amount so they gave it to me. EDIT: in the picture its not done, you can see where the devices that run off of it wire in there on the right side of the picture(where the sharpie numbers are). I also built it with relays there for every switch on my TA console. I don't use a few of them but they are there if I need them to be. I also numbered the relays like the cylinders so it would be easy to remember lol. The relays are cheap and available almost everywhere in case I forget to bring spares with me. I just got done with dragweek(well one more day of racing but made the drive) and this all worked great.
Last edited by Bad340fish; 09/15/12 09:10 AM.
68 Barracuda Formula S 340
|
|
|
Re: CARE TO SHARE YOUR WIRING PHOTOS............OR,
[Re: Thumperdart]
#1303924
09/15/12 09:31 AM
09/15/12 09:31 AM
|
Joined: Jun 2003
Posts: 52,972
Romeo MI
MR_P_BODY
Master
|
Master
Joined: Jun 2003
Posts: 52,972
Romeo MI
|
I did a 80% re-wire job on the Rampage... I kept the rear light harness... the rest is new... all from scratch ... I'll see if I have any pics or I'll take a couple today of the fuse block area(this is behind the drivers seat on the back wall of the cab) EDIT I have 6 relays but they are near the item they will power... 1 at the back at the fuel pump, 1 near the blower motor for the heater, 4 up front to run head lights, fan and water pump.... if you put the relay near the item they will run you just need to run a small wire to trigger the relay then the heavier wires are short distance 
Last edited by MR_P_BODY; 09/15/12 09:38 AM.
|
|
|
Re: CARE TO SHARE YOUR WIRING PHOTOS............OR,
[Re: MR_P_BODY]
#1303929
09/15/12 11:08 AM
09/15/12 11:08 AM
|
Joined: Feb 2003
Posts: 1,942
Metro Detroit
OUTLAWD
top fuel
|
top fuel
Joined: Feb 2003
Posts: 1,942
Metro Detroit
|
I looked at the kits a few months ago...after pricing relays, etc, I got a relay box from Leash. After switches, indicating LEDs and connectors, I ended up spending $200-300...BUT its how I wanted it, not how painless thought I should do it. And I have 8 40A relays, so there is room for growing...i.e. solenoids and heaters  I used a newer car style MEGA fuse to feed my main relay panel, and installed the denso alternator at the same time. so the factory wiring is controlling the lights/wipers and that's it. It itsn't perfect, but its a ton better than the wiring job I did when I was 16...haha
Faster, Faster until the thrill of speed overcomes the fear of death...
71 Swinger - slowly collecting dust/parts
66 Belv. II - just a streetcar
88 Mustang - turbo LS beater
|
|
|
Re: CARE TO SHARE YOUR WIRING PHOTOS............OR,
[Re: bonefish]
#1303936
09/16/12 04:28 AM
09/16/12 04:28 AM
|
Joined: Jul 2010
Posts: 3,502
SOUTH JERSEY
HEMIFRED
master
|
master
Joined: Jul 2010
Posts: 3,502
SOUTH JERSEY
|
other than for the fuel pump relays have no place in a race car. ARC overhead switch panel is one of if not tops in popularity states on their site states: Quote:
Question: Are relays needed with the Pro Stock models?
Answer: No. The switches in the Pro Stock models are engineered for use in a race car environment. The nitrous side of 3701 models is powered off the ignition fuse. If your nitrous and ignition current draw is less than 20 amps, relays are not needed.
I question the logic of having a switch that turns on a relay located a short distance from it.
Then still have to send the same amount of current to an accessory mounted thru the same size wire as would with no relay.
home of the
Sox and Martin Hemi Duster
|
|
|
Re: CARE TO SHARE YOUR WIRING PHOTOS............OR,
[Re: HEMIFRED]
#1303937
09/16/12 08:41 AM
09/16/12 08:41 AM
|
Joined: Oct 2003
Posts: 21,345
Marysville, O-H-I-O
70Cuda383
Too Many Posts
|
Too Many Posts
Joined: Oct 2003
Posts: 21,345
Marysville, O-H-I-O
|
wiring isn't that bad. just take your time, and go slow. use a different color wire for everything, although anything that's simply a "12v supply" or "12v switched supply" or "ground" you could use the same color but be careful.
make a note of what colors you used for each run, so you can troubleshoot later.
I built a wire harness for this Packard. it had circuits for: front power seats, front/rear power windows, convertible top motor, fuel tank sending unit, power rear antennas, tail lights, rear dome and courtesy lights, rear cigarette lighters, and an auxiliary electric fuel pump.
took me probably 20 hours, but both ends of every wire was crimped, soldered, and heat shrunk! --VERY time consuming to do it that way!
Last edited by 70Cuda383; 09/16/12 08:43 AM.
**Photobucket sucks**
|
|
|
Re: CARE TO SHARE YOUR WIRING PHOTOS............OR,
[Re: HEMIFRED]
#1303938
09/16/12 09:31 AM
09/16/12 09:31 AM
|
Joined: Jun 2003
Posts: 52,972
Romeo MI
MR_P_BODY
Master
|
Master
Joined: Jun 2003
Posts: 52,972
Romeo MI
|
Quote:
other than for the fuel pump relays have no place in a race car. ARC overhead switch panel is one of if not tops in popularity states on their site states: Quote:
Question: Are relays needed with the Pro Stock models?
Answer: No. The switches in the Pro Stock models are engineered for use in a race car environment. The nitrous side of 3701 models is powered off the ignition fuse. If your nitrous and ignition current draw is less than 20 amps, relays are not needed.
I question the logic of having a switch that turns on a relay located a short distance from it.
Then still have to send the same amount of current to an accessory mounted thru the same size wire as would with no relay.
If it has more than 20 amps I put a relay on it.. sure
alot of switches may say they can carry 20 amps but
when you start arcing them on and off it takes a toll
on them... a couple of things in a race/street car
pull more than 20... couple of things off hand... the
fan and fuel pump... some elec water pumps... I put
a relay on the head lights but then I changed over
to a modrn type which doesnt need the relay but I
still left it on there.....
I try to keep the same wire colors as the factory used
so I can use the service manual wiring diagram and
if I change a color I write it in the manual on the
fuse diagram page... this is just the way I do it
|
|
|
Re: CARE TO SHARE YOUR WIRING PHOTOS............OR,
[Re: 70Cuda383]
#1303939
09/16/12 09:45 AM
09/16/12 09:45 AM
|
Joined: Jan 2003
Posts: 10,088
Frostbitefalls MN (Rocky&Bullw...
gregsdart
I Live Here
|
I Live Here
Joined: Jan 2003
Posts: 10,088
Frostbitefalls MN (Rocky&Bullw...
|
Quote:
took me probably 20 hours, but both ends of every wire was crimped, soldered, and heat shrunk! --VERY time consuming to do it that way!
I did my race car that way, zero failures since 1997.
8.582, 160.18 mph best, 2905 lbs 549, indy 572-13, alky
|
|
|
Re: CARE TO SHARE YOUR WIRING PHOTOS............OR,
[Re: gregsdart]
#1303940
09/16/12 10:52 AM
09/16/12 10:52 AM
|
Joined: Feb 2005
Posts: 5,207
Menomonee Falls
DemonDust
master
|
master
Joined: Feb 2005
Posts: 5,207
Menomonee Falls
|
Quote:
Quote:
took me probably 20 hours, but both ends of every wire was crimped, soldered, and heat shrunk! --VERY time consuming to do it that way!
I did my race car that way, zero failures since 1997.
I'm guessing you buy the connectors without insulation on them? Then use heat shrink to seal them?
|
|
|
Re: CARE TO SHARE YOUR WIRING PHOTOS............OR,
[Re: 70Cuda383]
#1303941
09/16/12 01:10 PM
09/16/12 01:10 PM
|
Joined: Jul 2004
Posts: 19,318
State of confusion
Thumperdart
OP
I Live Here
|
OP
I Live Here
Joined: Jul 2004
Posts: 19,318
State of confusion
|
Thanxxx again.............looks like I`ve got my work cut out for me but it`s WAY over due.  peace!
72 Dart 470 n/a BB stroker street car `THUMPER`...Check me out on FB Dominic Thumper for videos and lots of carb pics......760-900-3895.....
|
|
|
Re: CARE TO SHARE YOUR WIRING PHOTOS............OR,
[Re: Thumperdart]
#1303942
09/16/12 01:56 PM
09/16/12 01:56 PM
|
Joined: Jan 2005
Posts: 3,699
Newport, Mi
Evil Spirit
master
|
master
Joined: Jan 2005
Posts: 3,699
Newport, Mi
|
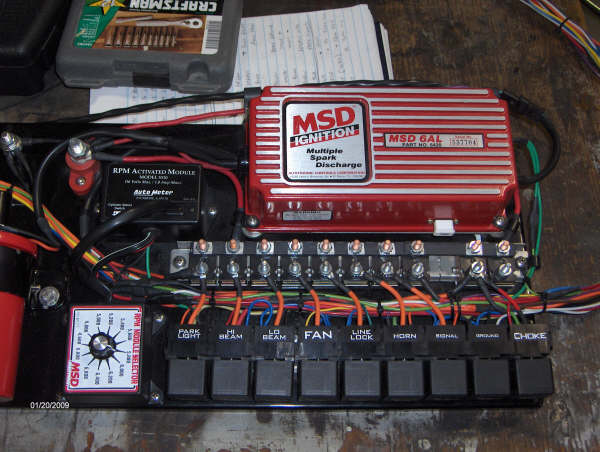
Assuming the battery is in the rear I relay the fuel pump at the rear. Everything else gets controlled by a power board with self reseting breakers and relays. Anything over 5 amps gets a relay to protect the switch. Many times I use a master relay to drop the grounds out on relays controling items that don't need to run during cranking, like fans, water pumps, etc. I like to run a common power board because when you put the relays all over at the fans, pumps, etc., you have to run 2 wires to each one - a trigger and an amperage wire. Running a common power board you only run the load wire - half the wiring and there is no more amp drop than the other way. Here's a pic of a power board I did for a 68 Dart a couple years ago.
Free advice and worth every penny...
Factory trained Slinky rewinder.........
|
|
|
Re: CARE TO SHARE YOUR WIRING PHOTOS............OR,
[Re: DemonDust]
#1303943
09/16/12 02:09 PM
09/16/12 02:09 PM
|
Joined: Jan 2003
Posts: 10,088
Frostbitefalls MN (Rocky&Bullw...
gregsdart
I Live Here
|
I Live Here
Joined: Jan 2003
Posts: 10,088
Frostbitefalls MN (Rocky&Bullw...
|
Quote:
Quote:
Quote:
took me probably 20 hours, but both ends of every wire was crimped, soldered, and heat shrunk! --VERY time consuming to do it that way!
I did my race car that way, zero failures since 1997.
I'm guessing you buy the connectors without insulation on them? Then use heat shrink to seal them?
Or you can warm them up and twist off the plastic covering. Shrink tube is the only way to fly.
8.582, 160.18 mph best, 2905 lbs 549, indy 572-13, alky
|
|
|
Re: CARE TO SHARE YOUR WIRING PHOTOS............OR,
[Re: DemonDust]
#1303944
09/16/12 02:24 PM
09/16/12 02:24 PM
|
Joined: Jan 2005
Posts: 3,699
Newport, Mi
Evil Spirit
master
|
master
Joined: Jan 2005
Posts: 3,699
Newport, Mi
|
Quote:
Quote:
Quote:
took me probably 20 hours, but both ends of every wire was crimped, soldered, and heat shrunk! --VERY time consuming to do it that way!
I did my race car that way, zero failures since 1997.
I'm guessing you buy the connectors without insulation on them? Then use heat shrink to seal them?
I buy my supplies in bulk from Waytek Wire or Del City - almost pennies on the dollar compared to parts store rack prices. Del City is slightly better on some items, since they don't have a line minimum on most items, where with Waytek it's usually a $5 line minimum. 
Free advice and worth every penny...
Factory trained Slinky rewinder.........
|
|
|
Re: CARE TO SHARE YOUR WIRING PHOTOS............OR,
[Re: Evil Spirit]
#1303945
09/16/12 09:21 PM
09/16/12 09:21 PM
|
Joined: Feb 2005
Posts: 5,207
Menomonee Falls
DemonDust
master
|
master
Joined: Feb 2005
Posts: 5,207
Menomonee Falls
|
Quote:
Quote:
Quote:
Quote:
took me probably 20 hours, but both ends of every wire was crimped, soldered, and heat shrunk! --VERY time consuming to do it that way!
I did my race car that way, zero failures since 1997.
I'm guessing you buy the connectors without insulation on them? Then use heat shrink to seal them?
I buy my supplies in bulk from Waytek Wire or Del City - almost pennies on the dollar compared to parts store rack prices. Del City is slightly better on some items, since they don't have a line minimum on most items, where with Waytek it's usually a $5 line minimum.
Just checking the sites. Have you tried the terminals with heat shrink and solder combined? I watched the video, looks like it works very well..
|
|
|
Re: CARE TO SHARE YOUR WIRING PHOTOS............OR,
[Re: DemonDust]
#1303946
09/17/12 12:29 AM
09/17/12 12:29 AM
|
Joined: Jan 2005
Posts: 3,699
Newport, Mi
Evil Spirit
master
|
master
Joined: Jan 2005
Posts: 3,699
Newport, Mi
|
Quote:
Quote:
Quote:
Quote:
Quote:
took me probably 20 hours, but both ends of every wire was crimped, soldered, and heat shrunk! --VERY time consuming to do it that way!
I did my race car that way, zero failures since 1997.
I'm guessing you buy the connectors without insulation on them? Then use heat shrink to seal them?
I buy my supplies in bulk from Waytek Wire or Del City - almost pennies on the dollar compared to parts store rack prices. Del City is slightly better on some items, since they don't have a line minimum on most items, where with Waytek it's usually a $5 line minimum.
Just checking the sites. Have you tried the terminals with heat shrink and solder combined? I watched the video, looks like it works very well..
Yeah - the insulated/shrink wrapped butt connectors are convenient, but I prefer the seperate crimped connector/heat shrink way. First I can do a visual inspection on the crimp. Second is cost. (These are Waytek Wire prices)
Price of 100 16-14 brazed seam non-insulated butt connectors and 4 - 4' sticks of heat shrink is about $7, or 7 cents each.
Pre insulated heat shrink 16-14 butt connectors start at $21 per 100 pcs, and the premium ones that have the solder in them are $69 per 100 pcs., so in other words they are 21 - 69 cents each, or 3 to 10 times the cost.
The shrink wrap is smaller diameter when finished, so it isn't as bulky looking as the pre-insulated pieces. Look at the board pic I posted above - the terms are nice and neat when finished.
For some simple repairs I do use the (expensive) pre-fabs, but for whole systems I tend to use the shrink wrap method.
Free advice and worth every penny...
Factory trained Slinky rewinder.........
|
|
|
Re: CARE TO SHARE YOUR WIRING PHOTOS............OR,
[Re: Evil Spirit]
#1303947
09/17/12 08:23 AM
09/17/12 08:23 AM
|
Joined: Oct 2003
Posts: 21,345
Marysville, O-H-I-O
70Cuda383
Too Many Posts
|
Too Many Posts
Joined: Oct 2003
Posts: 21,345
Marysville, O-H-I-O
|
Same here. when you're fabricating your own wire harness, keeping bulk down can really help keep everything neat and orderly. the heat shrink tubing adds virtually no bulk, and gives you a nice neat, professional end to the wires.
I actually have been strongly considering building my own wire harness for my Cuda when the time comes, might not save me any time, but will save material costs, plus it will allow me to run only the wires I need, fix the factory issues, and allow me to neatly hide the wires where possible.
**Photobucket sucks**
|
|
|
Re: CARE TO SHARE YOUR WIRING PHOTOS............OR,
[Re: 70Cuda383]
#1303948
09/17/12 01:32 PM
09/17/12 01:32 PM
|
Joined: Jan 2004
Posts: 4,633
Motor City
6PKRTSE
master
|
master
Joined: Jan 2004
Posts: 4,633
Motor City
|
I couldn't find the link but Yellow Bullet had a "lets see your wiring skills" post & there was some awesome pictures & ideas posted over very many pages worth of pics.
1963 Belvedere 440 Max Wedge Tribute
1970 Charger R/T S.E. 440 Six Pack
1970 Challenger R/T, 528 Hemi
1970 Charger 500 S.E. 440 4 BBL
1970 Plymouth Road Runner 383
1974 Chrysler New Yorker 440
1996 2500 RAM 488 V-10 4X4
2004 3500 Dually Cummins 4x4
2012 Challenger R/T Classic.
|
|
|
|
|

 ...........I`m willing to give it a shot.


