Moparts
Jake's Challenger/Rust
Posted By: jake71
Jake's Challenger/Rust - 11/08/09 06:25 PM
I'm trying this over since I screwed it all up last time. If this pic works, I'll follow it with more info and tons of pics.

Posted By: jake71
Re: Jake's Challenger/Rust - 11/08/09 06:49 PM
Finally figured it out!
OK, this is going to be fun.
Here's some more of the project.
I bought it last May from a guy named Bob in Bells, Texas. Long drive, lots of money and little experience in knowing what to look for in a 38 year old project car. I bought it off ebay and apparently was the second buyer. The first one fell through for some reason and I lucked into an the project to beat all.
When I arrived back home with my new found love, I was met with laughter and heckling from my wife and friends. A little embarrassed, I defended my treasure with utmost enthusiasm. More heckling and laughter. They'll see!
I really didn't know what I was doing or where to begin but figured taking it apart and removing the rusty parts would probably be a good start. I'm looking through all the computers in the shop and house for some "as purchased" pics but for now I'll start with what I've got.

Posted By: jake71
Re: Jake's Challenger/Rust - 11/08/09 06:50 PM
I'm just going to post a few pics as they tell a story by themselves.

Posted By: jake71
Re: Jake's Challenger/Rust - 11/08/09 06:51 PM
Another

Posted By: jake71
Re: Jake's Challenger/Rust - 11/08/09 06:53 PM
At this point I was really thinking I was in trouble!

Posted By: jake71
Re: Jake's Challenger/Rust - 11/08/09 06:54 PM
More

Posted By: jake71
Re: Jake's Challenger/Rust - 11/08/09 06:55 PM
There were snails living in the frame rails!

Posted By: jake71
Re: Jake's Challenger/Rust - 11/08/09 06:56 PM
After getting some of the rusty sheet metal out of the way, the project looked more manageable.

Posted By: jake71
Re: Jake's Challenger/Rust - 11/08/09 06:58 PM
Gotta go for a bit. Promised the family lunch.
Posted By: okie
Re: Jake's Challenger/Rust - 11/08/09 09:13 PM
I know him, his name is Bob Romig and he is a certified CROOK. He can restore a car as good as anybody if he wants to. He repainted my 70 340 Swinger and now I've got to file a lawsuit on him so I can get some one to redo it right now. He done another friends 69 1/2 RoadRunner and it is just like mine. I will never have any other dealings with him. Sorry about the car you bought, he had proballey screwed some one out of it. I hope you can get it fixed. but we need to get the word out on him, he doesn't need to be working on are selling any cars. Just remember who he was and what he has done. Ronnie in Okla.
Posted By: Scotts72Rallye
Re: Jake's Challenger/Rust - 11/08/09 11:17 PM
Quote:
When I arrived back home with my new found love, I was met with laughter and heckling from my wife and friends. A little embarrassed, I defended my treasure with utmost enthusiasm. More heckling and laughter.They'll see!
Good luck with the car, make them eat their words!! 
Scott
Posted By: anlauto
Re: Jake's Challenger/Rust - 11/08/09 11:27 PM
You should have supported the car a little better before removing all the sheet metal.

What is the car originally? R/T ? R/T/S/E ? 440 383 Hemi???
Inquiring minds want to know...
Posted By: jake71
Re: Jake's Challenger/Rust - 11/09/09 12:10 AM
The car is an R/T, B5 blue, white longitudinal stripe, black top, 383HP, A/C power stearing, manual drums, automatic.
I know I've seen people bracing these things all over but looking at it, the only place that needed bracing was the trunk pan rear cross member to roof frame while on the rotisserie. I did that until it was time to put the pan in and then just supported the car on stands and everything stayed put. I even had it on the rotisserie with the floor pans out and doors hung with no bracing. No matter which way I spun it on the rotisserie, it didn't flex at all and the doors still opened and closed smoothly.
Probably not the best place to try my luck but it all worked out fine.

Posted By: jake71
Re: Jake's Challenger/Rust - 11/09/09 12:12 AM
Here's a scary one for ya.

Posted By: jake71
Re: Jake's Challenger/Rust - 11/09/09 12:15 AM
Another of it hovering.

Posted By: anlauto
Re: Jake's Challenger/Rust - 11/09/09 12:19 AM
That's not scary.....
This is scary

Check out other pictures of my 71 Cuda restoration...
http://agar.homestead.com/myridesbarrelcuda.html

Posted By: jake71
Re: Jake's Challenger/Rust - 11/09/09 12:26 AM
I stand corrected sir, that IS scary. You still working on that one?
Posted By: jake71
Re: Jake's Challenger/Rust - 11/09/09 12:35 AM
Oops, didn't see the link. That's awesome! Hope mine can come close some day.
Posted By: moparpollack
Re: Jake's Challenger/Rust - 11/09/09 12:35 AM
Quote:
That's not scary.....
This is scary
Check out other pictures of my 71 Cuda restoration...
http://agar.homestead.com/myridesbarrelcuda.html
No the purple 340 chally vert you did was scarry. 
Posted By: jake71
Re: Jake's Challenger/Rust - 11/09/09 12:37 AM
Since we're here, I'll show some more of what happened with the floors. Here's the rails coated and ready for the pan.

Posted By: jake71
Re: Jake's Challenger/Rust - 11/09/09 12:38 AM
And here's the floor all marked out for hole locations for plug welding.

Posted By: jake71
Re: Jake's Challenger/Rust - 11/09/09 12:39 AM
Now to drill a million holes.

Posted By: jake71
Re: Jake's Challenger/Rust - 11/09/09 12:43 AM
Here's the front Goodmark pan and rear AMD pans welded in. The Goodmark front fit very nice, but the rears they sell as 70-74 are not correct for 70 so these are AMD rears. They fit well but the curve coming up to the rocker on the passenger side started too soon and was pretty crooked.

Posted By: anlauto
Re: Jake's Challenger/Rust - 11/09/09 12:58 AM
Quote:
No the purple 340 chally vert you did was scarry.
Watch for pictures of that car coming up the end of this year...The owner chose his own body shop and got screwed over, but finally the car is painted and now it's just being polished...To say the paint turned out nice is a tremendous under-  statement...It's been in three shops in the past two years...
Posted By: jake71
Re: Jake's Challenger/Rust - 11/09/09 01:08 AM
Had to fill a few holes under the rear seat. Sure do love the Mig.

Posted By: jake71
Re: Jake's Challenger/Rust - 11/09/09 01:11 AM
No more holes. Love that 3M Roloc disc!

Posted By: Anonymous
Re: Jake's Challenger/Rust - 11/09/09 01:13 AM
Thats one helluva project
Posted By: jake71
Re: Jake's Challenger/Rust - 11/09/09 01:19 AM
Now on to the rusty wheel houses. Both sides were pretty rough around the bottom rears. After the stories I read about the after market parts available, I decided to try to make some patches. They were compound curves so it took a while to figure it out but it worked. Here's before.

Posted By: jake71
Re: Jake's Challenger/Rust - 11/09/09 01:26 AM
Here's another.

Posted By: jake71
Re: Jake's Challenger/Rust - 11/09/09 01:35 AM
Some more

Posted By: jake71
Re: Jake's Challenger/Rust - 11/09/09 01:36 AM
And on to the repairs

Posted By: jake71
Re: Jake's Challenger/Rust - 11/09/09 01:38 AM
This was all new to me so if it looks like a newbie did it, well that's why.

Posted By: jake71
Re: Jake's Challenger/Rust - 11/09/09 01:38 AM
And more

Posted By: jake71
Re: Jake's Challenger/Rust - 11/09/09 01:39 AM
More

Posted By: jake71
Re: Jake's Challenger/Rust - 11/09/09 01:41 AM
I did the passenger side with hammers and sand bags but the driver's side I bought the Harbor Freight stretching/shrinking tool which worked excellent!

Posted By: jake71
Re: Jake's Challenger/Rust - 11/09/09 01:42 AM
One more

Posted By: RUNCHARGER
Re: Jake's Challenger/Rust - 11/09/09 02:36 AM
Good job. It's always nice to see a guys first attempt at a resto and the workmanship is far above what most "pro" bodymen do.
Sheldon
Posted By: jake71
Re: Jake's Challenger/Rust - 11/09/09 03:07 AM
Quote:
Thats one helluva project
It is but it sure has been quite a bit of fun.
Posted By: jake71
Re: Jake's Challenger/Rust - 11/09/09 03:09 AM
Quote:
Good job. It's always nice to see a guys first attempt at a resto and the workmanship is far above what most "pro" bodymen do.
Sheldon
Thank you very much. I always feel like I'm doing the right things but there's still always that nagging thought that something I'm doing will come back to haunt me later.
Posted By: jake71
Re: Jake's Challenger/Rust - 11/09/09 03:20 AM
Quote:
I know him, his name is Bob Romig and he is a certified CROOK. He can restore a car as good as anybody if he wants to. He repainted my 70 340 Swinger and now I've got to file a lawsuit on him so I can get some one to redo it right now. He done another friends 69 1/2 RoadRunner and it is just like mine. I will never have any other dealings with him. Sorry about the car you bought, he had proballey screwed some one out of it. I hope you can get it fixed. but we need to get the word out on him, he doesn't need to be working on are selling any cars. Just remember who he was and what he has done. Ronnie in Okla.
Sorry to hear it didn't go well with him. I can't really say too much about the guy. He may have kind of screwed me on some details like saying he had a clear title. Not exactly. It wasn't in his name and it wasn't signed by the previous owner. Something I'll have to deal with. I found the last owner at the same address since 1982 so I'll see if I can't work out a deal with him to have him do some paperwork for me. He said he didn't know if the motor was good, which I didn't really care about since it was a '65 newport motor, but it was cracked on both sides and it looked like it had just been set in there for the sale judging by the fact there was nothing hooked up and the motor mounts were brand new. Still, I got the project I was looking for and he was a pleasure to chat with. Again I'm sorry your dealings with him didn't go so well. Good luck with getting your paint job fixed up.
Posted By: BBCoronet
Re: Jake's Challenger/Rust - 11/09/09 03:37 AM
A Man with balls!......98%+ of us would have either passed on buying that or parted it out. It just goes to show us all that if a "Man made it a Man can fix it" I guess that makes you The Man!

I get tired of hearing guys cry about a little rust or missing parts on project cars. The big surge in scrap prices last year really hacked away at old cars all over the country.....Parts cars are becoming project cars now. I think you'll see more and more parts car being fixed now especially with the parts that are being made. Excellent work and Keep us posted!!
Posted By: Scotts72Rallye
Re: Jake's Challenger/Rust - 11/09/09 12:22 PM
Quote:
He may have kind of screwed me on some details like saying he had a clear title. Not exactly. It wasn't in his name and it wasn't signed by the previous owner. Something I'll have to deal with. I found the last owner at the same address since 1982 so I'll see if I can't work out a deal with him to have him do some paperwork for me.
It would scare me a bit to put all the time and money into the car and not have the title in my name. Do yourself a favor and get the title put in your name ASAP, especially if the seller has a bad rep. Once again good luck to you! 
Scott
Posted By: AZ-Nick
Re: Jake's Challenger/Rust - 11/09/09 01:51 PM
Quote:
Quote:
He may have kind of screwed me on some details like saying he had a clear title. Not exactly. It wasn't in his name and it wasn't signed by the previous owner. Something I'll have to deal with. I found the last owner at the same address since 1982 so I'll see if I can't work out a deal with him to have him do some paperwork for me.
It would scare me a bit to put all the time and money into the car and not have the title in my name. Do yourself a favor and get the title put in your name ASAP, especially if the seller has a bad rep. Once again good luck to you!
Scott

Posted By: HemiChallenger
Re: Jake's Challenger/Rust - 11/09/09 03:12 PM
Awesome project! I love the in depth sheetmetal repair projects. Im sure you will show everyone who gave ya crap something else. People are always amazed at these projects and if you get any negative comments dont worry about them, normally its someone who is unable to do the work! Ill be staying tuned
Posted By: MLR426
Re: Jake's Challenger/Rust - 11/09/09 05:38 PM
Quote:
That's not scary.....
This is scary
Check out other pictures of my 71 Cuda restoration...
http://agar.homestead.com/myridesbarrelcuda.html
Your right Alan that is scary..But the Challenger
took me right out of my socks.
logan426
Posted By: jake71
Re: Jake's Challenger/Rust - 11/09/09 06:10 PM
Quote:
Awesome project! I love the in depth sheetmetal repair projects. Im sure you will show everyone who gave ya crap something else. People are always amazed at these projects and if you get any negative comments dont worry about them, normally its someone who is unable to do the work! Ill be staying tuned
Thanks for the words of encouragement, I'm having fun and the laughter is slowing down a bit. I don't believe the friends and family can quite see a finished product yet but soon I'll be blocking and should make a big difference.
Stay tuned, lots more pics coming as I'm further along that what it seems.
Posted By: 70shaker6pk
Re: Jake's Challenger/Rust - 11/09/09 08:47 PM
Great work, can't wait to see more pic's.
Posted By: jake71
Re: Jake's Challenger/Rust - 11/09/09 08:52 PM
OK, got some from the rear frame rails where apparently some did some clearancing with a big heavy thing presumably for the air shocks to fit. The black stuff is POR15.

Posted By: jake71
Re: Jake's Challenger/Rust - 11/09/09 08:54 PM
One more before

Posted By: jake71
Re: Jake's Challenger/Rust - 11/09/09 08:55 PM
Slice

Posted By: jake71
Re: Jake's Challenger/Rust - 11/09/09 08:57 PM
Other side

Posted By: jake71
Re: Jake's Challenger/Rust - 11/09/09 08:58 PM
Hot glue

Posted By: jake71
Re: Jake's Challenger/Rust - 11/09/09 09:00 PM
Done welding and finished with 50 grit Roloc

Posted By: jake71
Re: Jake's Challenger/Rust - 11/09/09 09:02 PM
Other side.

Posted By: dan6412
Re: Jake's Challenger/Rust - 11/10/09 06:34 AM
Go Man Go
I know how it feels. When I drug my RoadRunner home it was a striped rusted shell and no one could under stand why I was waisting my time on it. Now when some one stops to ask if its for sale (if I leave it in the driveway for more than a few hours) my wife says not a chance in hell!
Pleas keep the pic's coming
Posted By: jake71
Re: Jake's Challenger/Rust - 11/10/09 02:13 PM
OK, I spent last night removing the roof so I didn't get time to post more but now that the bleeding has stopped, here ya go. (I'll post the roof pics later)
This is a rusty spot at the firewall to floorpan on the passenger side that needed patched.

Posted By: jake71
Re: Jake's Challenger/Rust - 11/10/09 02:14 PM
I can't find the pics of the patch I made or the welding process but this is how it came out.

Posted By: jake71
Re: Jake's Challenger/Rust - 11/10/09 02:15 PM
Here she is all prepped for the trunk pan and the process of the installation.

Posted By: jake71
Re: Jake's Challenger/Rust - 11/10/09 02:17 PM
Some more

Posted By: jake71
Re: Jake's Challenger/Rust - 11/10/09 02:18 PM
I sure hope the POR15 is as good as they say. It seems pretty tuff.

Posted By: jake71
Re: Jake's Challenger/Rust - 11/10/09 02:20 PM
Here's the pan all laid out for plug weld holes.

Posted By: jake71
Re: Jake's Challenger/Rust - 11/10/09 02:22 PM
Here we're all drilled and deburred. I coated the deburred areas on the back with weld through primer before laying the pan in place.

Posted By: jake71
Re: Jake's Challenger/Rust - 11/10/09 02:27 PM
And the frame rails marked for grinding through the POR15 for weld through primer. Later I determined I could save myself this extra work and time by just skipping this step and using my Dremel tool with a little burr bit in it. Just lay the part in place and burr the POR15 just inside the plug weld hole to expose the metal for welding. It works awesome.

Posted By: jake71
Re: Jake's Challenger/Rust - 11/10/09 02:29 PM
All welded in. The Goodmark pan was a very good fit that required only massaging the edges here and there. No cutting at all.

Posted By: jake71
Re: Jake's Challenger/Rust - 11/10/09 02:31 PM
Here are some close up shots to show how well it fit even with the hand made patches around the bottom of the wheel houses.

Posted By: jake71
Re: Jake's Challenger/Rust - 11/10/09 02:32 PM
I've got a few of these. Let me know if it's too much and I'll back off a bit.

Posted By: jake71
Re: Jake's Challenger/Rust - 11/10/09 02:33 PM
For your viewing pleasure.

Posted By: jake71
Re: Jake's Challenger/Rust - 11/10/09 02:34 PM
And more.

Posted By: jake71
Re: Jake's Challenger/Rust - 11/10/09 02:36 PM
Like I said, I have a few of these but I always wish there just a few more detail shots for reference when I'm looking at these posts.

Posted By: jake71
Re: Jake's Challenger/Rust - 11/10/09 02:37 PM
Almost done.

Posted By: jake71
Re: Jake's Challenger/Rust - 11/10/09 02:37 PM
Last one.

Posted By: jake71
Re: Jake's Challenger/Rust - 11/10/09 02:38 PM
Well, thank you all for your time and well wishes. I'll be back later with more.
Posted By: Gavin
Re: Jake's Challenger/Rust - 11/10/09 05:59 PM
Keep 'em coming, can't have too many pictures!!
Fabulous work, well done
Posted By: ridenlow12
Re: Jake's Challenger/Rust - 11/10/09 07:29 PM
Keep'em comming. This is very good diy information to have and not have to pay for
Posted By: jrwoodjoe
Re: Jake's Challenger/Rust - 11/10/09 07:34 PM
Great pics showing the progress. WOW, you are a brave man. I don't think I could have tackled that but it looks like you are doing a FANTASTIC job with it. Looking forward to more pics.
Joe
Posted By: kb73rr
Re: Jake's Challenger/Rust - 11/10/09 08:10 PM
You're doing an amazing job! You are definitely saving one that many people would consider too far gone. So much the better when you're done.
I have one question. Hopefully it won't open up a can of worms. Are you using the POR15 self-etching primer (spray) or the brush on stuff?
I had a lot of sheet metal work done on my car including a bunch of rust repair fabrications just like you're doing. The guy who did the work was well regarded pro with about 20 years experience. He does some very high dollar cars including a number of Autorama show winners. Every last millimeter of bare metal got cleaned with skotchbrite, rinsed and wiped, then coated with SEM self-etching primer. The skotchbrite and rinse had to be done within minutes of spraying the primer. He said it was the only way to guarantee it wouldn't rust. Five years later and none of the work he did shows any indications of rust.
I did my front and back bumper mounts/supports myself. I used POR15. I did the front ones before I learned about the SEM, and didn't use it. I did the back the same way he did with the scotchbrite, rinse and SEM before the POR. That was also 5 years ago, and the car has never been caught in anything worse than a light drizzle since. The back still looks 100% perfect, the front is showing a little rust. That just my personal experience. Your results may vary ha ha ha.
Anyhow - here is a big pat on the back for your work and thanks for your time posting it!
Posted By: rockerbob
Re: Jake's Challenger/Rust - 11/10/09 10:47 PM
Quote:
I've got a few of these. Let me know if it's too much and I'll back off a bit.
You are doing a great job. Please keep the pic's comming.  Thanks so much!
Posted By: jake71
Re: Jake's Challenger/Rust - 11/11/09 12:07 AM
Quote:
You're doing an amazing job! You are definitely saving one that many people would consider too far gone. So much the better when you're done.
I have one question. Hopefully it won't open up a can of worms. Are you using the POR15 self-etching primer (spray) or the brush on stuff?
I had a lot of sheet metal work done on my car including a bunch of rust repair fabrications just like you're doing. The guy who did the work was well regarded pro with about 20 years experience. He does some very high dollar cars including a number of Autorama show winners. Every last millimeter of bare metal got cleaned with skotchbrite, rinsed and wiped, then coated with SEM self-etching primer. The skotchbrite and rinse had to be done within minutes of spraying the primer. He said it was the only way to guarantee it wouldn't rust. Five years later and none of the work he did shows any indications of rust.
I did my front and back bumper mounts/supports myself. I used POR15. I did the front ones before I learned about the SEM, and didn't use it. I did the back the same way he did with the scotchbrite, rinse and SEM before the POR. That was also 5 years ago, and the car has never been caught in anything worse than a light drizzle since. The back still looks 100% perfect, the front is showing a little rust. That just my personal experience. Your results may vary ha ha ha.
Anyhow - here is a big pat on the back for your work and thanks for your time posting it!
Thank you for the compliment. It was pretty far gone but they're getting harder to find, especially these options, and I figure it will be well worth the experience. At least I didn't just pay someone to do it all for me right? I know some stuff is out of people's scope but I always admire someone doing what they can on their own car.
As for the POR15, I did it like the directions said. They have their metal prep that you spray on and rinse off. That stuff has a pretty harsh reaction with bare metal. It smells like rust converter and it really seems to etch the metal pretty well. I'm going to scuff all that I can reach before any sprayables go on and then the entire thing is getting a couple coats of direct to metal epoxy primer. I hope that this is the right thing to do. The guy at my local paint supply house seems to think I will never have any problems. Hope he's right!
Posted By: jake71
Re: Jake's Challenger/Rust - 11/11/09 12:10 AM
Quote:
Keep 'em coming, can't have too many pictures!!
Fabulous work, well done
Thank you very much. It means alot coming from any admirer but after seeing your work I'm proud of the compliment. Great metal work!
Posted By: jake71
Re: Jake's Challenger/Rust - 11/11/09 12:12 AM
Quote:
Quote:
I've got a few of these. Let me know if it's too much and I'll back off a bit.
You are doing a great job. Please keep the pic's comming. Thanks so much!
Thank you. I'm happy you are enjoying it, kinda feels like my own little TV show!
Posted By: jake71
Re: Jake's Challenger/Rust - 11/11/09 12:19 AM
Quote:
Great pics showing the progress. WOW, you are a brave man. I don't think I could have tackled that but it looks like you are doing a FANTASTIC job with it. Looking forward to more pics.
Joe
Thanks Joe, I'm sure you could tackle it. It just took some time thinking about things like:
What the heck else do I need to be doing(that can't wait)
I bleed alot from other stuff too!
My wife probably loves me enough for this.?
Surely they make a tool for this.
Etc.
Posted By: jake71
Re: Jake's Challenger/Rust - 11/12/09 02:29 AM
Quote:
You're doing an amazing job! You are definitely saving one that many people would consider too far gone. So much the better when you're done.
I have one question. Hopefully it won't open up a can of worms. Are you using the POR15 self-etching primer (spray) or the brush on stuff?
I had a lot of sheet metal work done on my car including a bunch of rust repair fabrications just like you're doing. The guy who did the work was well regarded pro with about 20 years experience. He does some very high dollar cars including a number of Autorama show winners. Every last millimeter of bare metal got cleaned with skotchbrite, rinsed and wiped, then coated with SEM self-etching primer. The skotchbrite and rinse had to be done within minutes of spraying the primer. He said it was the only way to guarantee it wouldn't rust. Five years later and none of the work he did shows any indications of rust.
I did my front and back bumper mounts/supports myself. I used POR15. I did the front ones before I learned about the SEM, and didn't use it. I did the back the same way he did with the scotchbrite, rinse and SEM before the POR. That was also 5 years ago, and the car has never been caught in anything worse than a light drizzle since. The back still looks 100% perfect, the front is showing a little rust. That just my personal experience. Your results may vary ha ha ha.
Anyhow - here is a big pat on the back for your work and thanks for your time posting it!
I'm currently doing an experiment with SEM rust converter to find out just how long we have after grinding to bare metal before the rust starts to take hold. I'll post with conclusions.
Posted By: jake71
Re: Jake's Challenger/Rust - 11/12/09 03:08 AM
So I had the trunk floor in and the tail light panel was sitting in corner looking totalled. I don't mind spending a couple bucks when needed, but I don't like to waste them! I figured with all the work it's taken to get the aftermarket stuff installed , I'd better give this panel a shot. Much to my delight, it's not that tough. Take your time and make it happen! The repop stuff is great when you don't have an option but if yours looks marginal, fix it. The more I get into this project the more it becomes apparent that you can fix almost anything.

Posted By: jake71
Re: Jake's Challenger/Rust - 11/12/09 03:09 AM
More to come.

Posted By: jake71
Re: Jake's Challenger/Rust - 11/12/09 03:11 AM
Yep, more.

Posted By: jake71
Re: Jake's Challenger/Rust - 11/12/09 03:12 AM
I love pizza

Posted By: jake71
Re: Jake's Challenger/Rust - 11/12/09 03:13 AM
Yep

Posted By: jake71
Re: Jake's Challenger/Rust - 11/12/09 03:14 AM
Bad huh?

Posted By: jake71
Re: Jake's Challenger/Rust - 11/12/09 03:15 AM
It sure looked broken to me!

Posted By: jake71
Re: Jake's Challenger/Rust - 11/12/09 03:17 AM
Got to working on it instead of staring wild eyed and thinking I can't afford this.

Posted By: jake71
Re: Jake's Challenger/Rust - 11/12/09 03:18 AM
Worked more.

Posted By: jake71
Re: Jake's Challenger/Rust - 11/12/09 03:20 AM
It kept happening. More work.

Posted By: jake71
Re: Jake's Challenger/Rust - 11/12/09 03:22 AM
More but it's getting easier!

Posted By: jake71
Re: Jake's Challenger/Rust - 11/12/09 03:24 AM
Metal rocks!

Posted By: jake71
Re: Jake's Challenger/Rust - 11/12/09 03:25 AM
Cut it off and weld on a new one!

Posted By: jake71
Re: Jake's Challenger/Rust - 11/12/09 03:27 AM
It sure is hard to come up with something to say every post!

Posted By: jake71
Re: Jake's Challenger/Rust - 11/12/09 03:30 AM
I have to go in to my family now, but I'll be back soon. Thank you all for your support!
Posted By: jake71
Re: Jake's Challenger/Rust - 11/12/09 03:56 AM
Just a quick note. I sandblasted the heck out of most of the parts shown in my posts. The trick to not warping the part is to slow down the air speed. I did alot of experimenting with sand blasting due to the huge amount of posts claiming total destruction of panels from heat. It is not the heat! The speed at which the sand hits the metal has to be slowed to a point that ti does not "peen" it. Sand being thrown at metal at a high rate of speed has the same effect as a whole bunch of little dudes beating on the panel with little dude hammers! I saw first hand what happens with high velocity sand blasting on metal. It warps from the "hammer effect" not heat.Food for thought.
Posted By: SRT6776
Re: Jake's Challenger/Rust - 11/12/09 04:16 AM
Awesome project thread, I am really enjoying following along
Posted By: Anonymous
Re: Jake's Challenger/Rust - 11/12/09 05:06 AM
Do you have a pic of the tool you are using for grinding the welds down. You are doing awesome work.
Posted By: RUNCHARGER
Re: Jake's Challenger/Rust - 11/12/09 05:22 AM
I too am impressed by your grinding and wonder what you use?
Sheldon
Posted By: kb73rr
Re: Jake's Challenger/Rust - 11/12/09 01:26 PM
Quote:
Just a quick note. I sandblasted the heck out of most of the parts shown in my posts. The trick to not warping the part is to slow down the air speed. I did alot of experimenting with sand blasting due to the huge amount of posts claiming total destruction of panels from heat. It is not the heat! The speed at which the sand hits the metal has to be slowed to a point that ti does not "peen" it. Sand being thrown at metal at a high rate of speed has the same effect as a whole bunch of little dudes beating on the panel with little dude hammers! I saw first hand what happens with high velocity sand blasting on metal. It warps from the "hammer effect" not heat.Food for thought.
Good observation and totally correct. Sandblasting effectively peens the surface just like shot peening causing compressive stresses and that can cause bending and warping. The amount of bending is a function of the media type, blast pressure, impingement angle, and time. Specially made little pieces of metal called "Almen Strips" are used during commercial shot peening and abrasive blasting procedures as part of the process and quality control. You blast the Almen Strip just as you would the part your going to be working on and measure the amount of bending to verify the process is working correctly. The strip will bend in an arch up toward the surface that has been blasted.
We make jet engine parts where I work. Sometimes we do abrasive blasting to prepare the surface for dry film lube coating and we do this test every time. Incidently, if you flip the blasted strip over and blast the reverse side exactly the same, it will straighten back out. However, that's not likely to fix a warped body panel.
Posted By: Gavin
Re: Jake's Challenger/Rust - 11/12/09 09:42 PM
Quote:
The repop stuff is great when you don't have an option but if yours looks marginal, fix it.
Those are wise words indeed!!
+ another request for info on your grinding (I think you said it was a Roloc disc earlier??). Really nice clean up
Posted By: jake71
Re: Jake's Challenger/Rust - 11/12/09 11:23 PM
+ another request for info on your grinding (I think you said it was a Roloc disc earlier??). Really nice clean up
OK, here's the tool. They sell them at Harbor Freight but the discs themselves aren't nearly as durable as the ones made by 3M. I use the 36 grit to knock the welds down close to flush then finish with the 50 grit discs. They just twist into the adapter with a 1/4 turn so it's fast and easy to change them. They last quite a long time if you don't run them at high speed. Run 'em slow and you'll get the hang of it quickly. I love them moe than any of my other grinding methods for accuracy and finish. Hope you like them.

Posted By: ridenlow12
Re: Jake's Challenger/Rust - 11/13/09 01:22 PM
I use to catch a lot of flack for useing harbor freight tools but the hold up well if you dont abuse them! Plus the price is right, btw awesome work...
Posted By: demon440
Re: Jake's Challenger/Rust - 11/13/09 06:10 PM
I just noticed this thread.
WoW... I hope you didn't pay anything for that car.
Like I have said before,we have thrown away nicer cars than that.
I would not waste my time or money on anything that far gone.
Good Luck !
Posted By: RUNCHARGER
Re: Jake's Challenger/Rust - 11/13/09 06:22 PM
It's an R/T Challenger, I WOULD spend my time and money on something that far gone. At least when you build something with your hands you have a sense of acomplishment. A lot better than writing a cheque at some musclecar dealer for a bondo bucket someone else flipped.
Sheldon
Posted By: jake71
Re: Jake's Challenger/Rust - 11/13/09 06:41 PM
Quote:
I just noticed this thread.
WoW... I hope you didn't pay anything for that car.
Like I have said before,we have thrown away nicer cars than that.
I would not waste my time or money on anything that far gone.
Good Luck !
That hurt a little, but I'm OK. Thanks for lookin'.
Posted By: jake71
Re: Jake's Challenger/Rust - 11/13/09 06:42 PM
Quote:
It's an R/T Challenger, I WOULD spend my time and money on something that far gone. At least when you build something with your hands you have a sense of acomplishment. A lot better than writing a cheque at some musclecar dealer for a bondo bucket someone else flipped.
Sheldon
Thank you. It's a big project but I'm having fun with it and don't have a time crunch to contend with. It gets done when it gets done.
Posted By: CuriousYella70
Re: Jake's Challenger/Rust - 11/13/09 08:09 PM
Quote:
Quote:
I just noticed this thread.
WoW... I hope you didn't pay anything for that car.
Like I have said before,we have thrown away nicer cars than that.
I would not waste my time or money on anything that far gone.
Good Luck !
That hurt a little, but I'm OK. Thanks for lookin'.
Yeah, that was a bit uncalled for. I salute you for taking a car that most people wouldnt even look at twice and restoring it! So the he** what if its rusted and needs a whole new back end? You're saving a piece of mopar history and I personally think you're doing a great thing and so far, a great job!! Keep it up! People will say the same thing when they see me start my thread on my 70 R/T Charger which needs a whole new back end but so what, all that matters is that you're having fun and enjoying every second of it and if you ever need any help, i'm a part of the Southern Colorado Mopars Club - we're always willing to help out another mopar guy!
Posted By: demon440
Re: Jake's Challenger/Rust - 11/14/09 06:26 AM
I didn't say he was doing anything wrong.
Just don't understand why you would want to
start with such a rough car to begin with.
As far as it being an R/T, so what.
By the time he gets it finished, he will easily
have twice as much invested in it than it is worth.
There are still lot's of good deals out there,
just need to look a little harder.
Here is my $1500. Demon.
Take care, sorry if I offended you.
.jpg "5604087-floor(Medium).jpg")
Posted By: jake71
Re: Jake's Challenger/Rust - 11/14/09 02:39 PM
Quote:
I didn't say he was doing anything wrong.
Just don't understand why you would want to
start with such a rough car to begin with.
As far as it being an R/T, so what.
By the time he gets it finished, he will easily
have twice as much invested in it than it is worth.
There are still lot's of good deals out there,
just need to look a little harder.
Here is my $1500. Demon.
Take care, sorry if I offended you.
No harm done. Everyone is entitled to their own opinion. I felt that what I paid for it might be a little high but it was the project I had been looking for. I paid in the range I had been seeing them go for in similar condition. As for the time and money I'll have in it, That's not really an issue as I'm planning to keep it. I tried fishing for many years and the money I put in that was only returned to me in fun value. One of my friends spends alot of money on sailing and he'll never get any of that money back but he's having fun. If I were in this for the money I'd be a fool but It's all about the pleasure of putting this one back on the road and knowing how it was done.
Posted By: Anonymous
Re: Jake's Challenger/Rust - 11/14/09 05:18 PM
Quote:
Quote:
I didn't say he was doing anything wrong.
Just don't understand why you would want to
start with such a rough car to begin with.
As far as it being an R/T, so what.
By the time he gets it finished, he will easily
have twice as much invested in it than it is worth.
There are still lot's of good deals out there,
just need to look a little harder.
Here is my $1500. Demon.
Take care, sorry if I offended you.
No harm done. Everyone is entitled to their own opinion. I felt that what I paid for it might be a little high but it was the project I had been looking for. I paid in the range I had been seeing them go for in similar condition. As for the time and money I'll have in it, That's not really an issue as I'm planning to keep it. I tried fishing for many years and the money I put in that was only returned to me in fun value. One of my friends spends alot of money on sailing and he'll never get any of that money back but he's having fun. If I were in this for the money I'd be a fool but It's all about the pleasure of putting this one back on the road and knowing how it was done.
Well said
and I second that

Posted By: 67Satty
Re: Jake's Challenger/Rust - 11/14/09 06:12 PM
Quote:
Like I have said before,we have thrown away nicer cars than that.
I would not waste my time or money on anything that far gone.
Good Luck !
You seem to say this a lot on people's threads. I don't see what the point is  .
.
To me, it looks like he is having fun learning how to weld a car together. There's a lot of satisfaction in that (cutting out rust and welding in new metal) that can't be measured in dollars.
There are very, very few cars left out there that make any financial sense to restore. You can almost always find something finished for less than what it would cost to purchase plus restore. So what?
Posted By: minivan
Re: Jake's Challenger/Rust - 11/15/09 12:22 AM
Quote:
Here is my $1500. Demon.
Take care, sorry if I offended you.
Just to compare I can post a pic of my kids $700 olds cutlass.......
Posted By: Scott Carl
Re: Jake's Challenger/Rust - 11/16/09 05:52 AM
Looks like a great project, Jake. I thought I had a lot to do on mine but you have me beat
However, if I had that much to do I would do it too. Its not about the time / money when you are doing it for the simple reason of enjoyment. Mine will never be worth what I have into it either but I don't care. I plan to make it nice and hopfully enjoy it for another 30 or so years. My grand kids can then repair my damages and mistakes if they so desire. If you want to take the time to look, here's my project:
https://board.moparts.org/ubbthreads/show...e=0#Post4838122
Posted By: jake71
Re: Jake's Challenger/Rust - 11/16/09 06:21 AM
Quote:
Looks like a great project, Jake. I thought I had a lot to do on mine but you have me beat However, if I had that much to do I would do it too. Its not about the time / money when you are doing it for the simple reason of enjoyment. Mine will never be worth what I have into it either but I don't care. I plan to make it nice and hopfully enjoy it for another 30 or so years. My grand kids can then repair my damages and mistakes if they so desire. If you want to take the time to look, here's my project: https://board.moparts.org/ubbthreads/show...e=0#Post4838122
I've been watching yours for a while now and it's projects like yours that keep me going! Thank you for stating your take on these projects. It's a hobby to me and obviously to you also. There's a lot of pride to be had in resurrecting one of these beauties and I hope more people will start taking it for face value. Great job so far and let me know if there's anything I can do to help. I don't have much experience but I do have pics!
Posted By: jake71
Re: Jake's Challenger/Rust - 11/16/09 10:29 PM
Sorry I've been away a couple days. Here's some more og the progress.
The tail light panel came out great in my opinion so I plug welded it back in after careful measuring. Lots to consider here. Also, the goodmark trunk pan was a little confusing because the back lip for the tail light panel was bent the wrong direction so I had to carefully bend it up.

Posted By: jake71
Re: Jake's Challenger/Rust - 11/16/09 10:35 PM
I figured that as long as the trunk was still easy to access with the quaarters off, I smooyh out the pan a little where the welds were and put some surfacer on it.

Posted By: jake71
Re: Jake's Challenger/Rust - 11/16/09 10:40 PM
That last one shows the tail light panel in primer with the trunk latch bracket welded in. I don't remember if that was AMD or Goodmark. I think it was Goodmark and it went in nicely. I also had taken the spare tire and jack brackets off of the old pan, blasted them in the blast cabinet and welded them in.Here's another of the trunk in primer surfacer.

Posted By: jake71
Re: Jake's Challenger/Rust - 11/16/09 10:52 PM
I had some rust around the rear window area that needed fixed before I could get started with the quarter panels so here it is.

Posted By: jake71
Re: Jake's Challenger/Rust - 11/16/09 10:53 PM
Another

Posted By: jake71
Re: Jake's Challenger/Rust - 11/16/09 10:54 PM
Underneath

Posted By: jake71
Re: Jake's Challenger/Rust - 11/16/09 10:55 PM
More underneath

Posted By: jake71
Re: Jake's Challenger/Rust - 11/16/09 10:59 PM
The window channel was rusted pretty bad in the bottom corners and in the trim screw indents. I can't seem to find the pics of the corners still rusty but try to imagine rust and you'll get the picture. Here's the trim screw areas. I made little pieces and butt welded them in. They aren't exactly the same shape but they are the right depth and angle. Originals were sort of rounded out like a bowl.

Posted By: jake71
Re: Jake's Challenger/Rust - 11/16/09 11:01 PM
The other side was the same way. Here's a pic of the patch. I hadn't discovered the Roloc grinding discs yet so the finish isn't quite as nice but it gets epoxy primed and all that.

Posted By: jake71
Re: Jake's Challenger/Rust - 11/16/09 11:02 PM
Here's a different angle.

Posted By: jake71
Re: Jake's Challenger/Rust - 11/16/09 11:03 PM
A shot of the bottom corner window channel repair.

Posted By: jake71
Re: Jake's Challenger/Rust - 11/16/09 11:06 PM
OK, I'm working on the roof right now(no peeking)so I'll be back tomorrow with some more updates. The roof skin is AMD and my first impression is that it may actually be perfect. It's beautiful. More on that later.
Thanks all
Posted By: rockerbob
Re: Jake's Challenger/Rust - 11/17/09 12:16 AM
Ok I'll be here waiting. I think you are doing a good thing.
Posted By: mopars_1
Re: Jake's Challenger/Rust - 11/17/09 03:05 AM
wow! I applaud you on your persistance. looks like a fun project to say the least! any mopar deserves a restoration in my book
Posted By: p d'ro
Great Work.... - 11/17/09 05:22 PM
This is coming along super fast! How many kids do you have?? Wow.
Hey, not to hijack but my friend in Atlanta has a very similar car/condition for sale. 70 R/T 2 owner car that has been acid dipped and shows a lot of issues. Has orig. motor that was rebuilt and stored. Anyway, PM me if interested. 5k would take it. Some new metal included.
Anyway, like I said, keep rolling. I forwarded your thread to my friend for motivation. His was his High School car in 1983, but it takes dedication and desire, which you obviously have!
Pete
Posted By: scatpacktom
Re: Great Work.... - 11/17/09 11:19 PM
First, the job you are doing is AWESOME. I love to follow along with the rebirth of some cool iron in these threads.
Second, I sure wouldn't let somebody tell me what to do with my money or my time. Some of us could care less what its worth in the end.
I've got a B7 U code 70 that will require the same treatment.
Keep up the good work
Posted By: 68KillerBee
Re: Jake's Challenger/Rust - 11/18/09 06:48 AM
Quote:
Quote:
Here is my $1500. Demon.
Take care, sorry if I offended you.
Just to compare I can post a pic of my kids $700 olds cutlass.......
Ya, I'll get you some of my 68 bee when i got it for 1400. which is of course better in the mopar hierarchy than an a body  .
.
your car is awesome. many don't have the skill and even fewer the dedication that you do. keep it up 
Posted By: jake71
Re: Jake's Challenger/Rust - 11/21/09 01:22 AM
Sorry I haven't been back but I got very busy with the business. I'll try really hard to post some updates tomorrow if I can get away. I have tons more pics and info. Thanks for your patience.
Posted By: Skeez
Re: Jake's Challenger/Rust - 11/22/09 01:26 AM
WOW!! Bravo man. You are doing one helluva job! I will say this though, don't EVER call yourself a Newbie again! You've got some mad skills, and a boatload of patience. I've seen "professional shops" perform absolute hack jobs just to make a buck or two. I'm suprised no one on this board has asked if you will do their car for them yet

Keep up the good work, I can't wait to see it finished
Posted By: jake71
Re: Jake's Challenger/Rust - 11/22/09 05:59 PM
OK, here's a few of the process of trying to get her ready for quarters.
This is the frame work under the quarters that had some serious rust issues.

Posted By: jake71
Re: Jake's Challenger/Rust - 11/22/09 06:00 PM
More of the same.

Posted By: jake71
Re: Jake's Challenger/Rust - 11/22/09 06:03 PM
Ya start cutting and it always seems terrible 'till you get to the clean metal and then it's the same old thing. It doesn't really matter how big the patch is, it's all the same. Some just take a little more welding and grinding time.

Posted By: jake71
Re: Jake's Challenger/Rust - 11/22/09 06:04 PM
And cutting.

Posted By: jake71
Re: Jake's Challenger/Rust - 11/22/09 06:07 PM
Here's the first part of the patch. If I would have had the Harbor Freight stretcher when I did this, I would have done it in one piece.

Posted By: jake71
Re: Jake's Challenger/Rust - 11/22/09 06:07 PM
Here's the next piece.

Posted By: jake71
Re: Jake's Challenger/Rust - 11/22/09 06:08 PM
Here it is all ground back down smooth.

Posted By: jake71
Re: Jake's Challenger/Rust - 11/22/09 06:17 PM
After what seemed like a never ending battle with rust, it was finally time to get her ready for the quarters and dutchman panel. I thoroughly cleaned everything I would never see again and hosed her down with Dupont DTM black epoxy primer to seal it all up. Getting to this point was very satisfying and really wasn't that hard. I just had to look at her every day that I had time to work on her and reallize I wouldn't be done any time soon. It's a hobby ya know.

Posted By: jake71
Re: Jake's Challenger/Rust - 11/22/09 06:37 PM
OK, so it gets a little hairy here for a while. The Goodmark quarters and dutchman panel left me with quite a bit of work. I reallize they aren't OEM but I somehow expected a little bit better fit. I think that knowing what I know now I would have gently removed the stock panels, repaired them and reinstalled them. I don't know if AMD panels would have fit better but I know these required TONS of work.
So I got them all clamped in place and plug welded the jams, massaging as I went, and that part went pretty smooth. I also welded the wheel house and roof pillar also making some adjustments along the way and I'll have to section the quarters where they meet the vertical portion of the rear window channel as they weren't quite wide enough to make the distance.
I knew I was in for some work in the trunk gap area as even when the quarters were on the floor it was pretty obvious that the line on the inside gutter area was wavy and again not wide enough to make for a decent trunk lid to quarter gap.
So, using an AMD deck lid, I found things to be further out than I had originally suspected. The deck lid was beautiful and was very straight and square. When I installed it to get an idea of where I was, the lid sat pretty high above the quarters. I figured maybe this was normal so I got out the old Harbor Freight Port-A-Power and got to pushing things into shape. I had to be careful not to go too far because I still had to widen the tops of the quarters to get my gaps to look right.
Ok, here's some pics and I'll try to be as clear as possible as we go through this. If you need more detail, let me know and I'll try to explain better and might have more pics to make it more clear.
Again, thank you for your interest and patience and I hope this helps someone somehow.

Posted By: jake71
Re: Jake's Challenger/Rust - 11/22/09 06:46 PM
After getting the quarters pretty clos to level with the decklid, I started checking the gaps and found nothing would line up. I then squared the decklid with the car with lots of careful measuring and tightened it down as a gide for the rest of the work.
I started with the passenger side and just cut a slit from front to back and used a straight edge and screwdriver to work it into a decent gap. I'll have to work it some more once the gutters are in, but I'm now at a good starting point here.

Posted By: jake71
Re: Jake's Challenger/Rust - 11/22/09 06:47 PM
Coming along.

Posted By: jake71
Re: Jake's Challenger/Rust - 11/22/09 06:49 PM
Just butt welding the seem back together slowly and cooling it with compressed air to minimize warping. It came out pretty good but I still have work to do.

Posted By: jake71
Re: Jake's Challenger/Rust - 11/22/09 06:50 PM
Now here's the drivers side. Wow was it off!

Posted By: jake71
Re: Jake's Challenger/Rust - 11/22/09 06:52 PM
This gap was way out there so just butt welding wasn't going to cut it. I had to take 3/16" filler rod and bridge the gap and in some places, 2 of them side by side.

Posted By: jake71
Re: Jake's Challenger/Rust - 11/22/09 06:58 PM
It was a little intimidating cutting into these new panels but it had to be done or all the work so far would have netted me a very crummy driver at best. I really want this car to be a thing of beauty when finished and this is the only way to keep from feeling like a total hack. I'm going to flip her over on the rotisserie when this all lines up grind the inside so it will never look like it was done. I don't care if true afficionados can tell it's not stock, I just want the average car guy to respect her for who she was/is.

Posted By: jake71
Re: Jake's Challenger/Rust - 11/22/09 06:59 PM
This one gives some perspective.

Posted By: jake71
Re: Jake's Challenger/Rust - 11/22/09 07:01 PM
Starting to look like it should. Note the portion towards the front I left open to show how much it had to be pushed over as it got further forward.

Posted By: jake71
Re: Jake's Challenger/Rust - 11/22/09 07:02 PM
Better view of the gap still needing filled in front.

Posted By: jake71
Re: Jake's Challenger/Rust - 11/22/09 07:04 PM
I have to get some stuff done now but next time I will get the dutchman panel up here. It too was in need of serious work to get good gaps/fitting at all.
Posted By: RUNCHARGER
Re: Jake's Challenger/Rust - 11/23/09 12:44 AM
Had you considered narrowing the back 6 inches of the quarters rather than sectioning where you did? Also curious if you measured stock quarters to arrive at your plan of attack? This is getting to be the best thread on Moparts BTW.
Sheldon
Posted By: jake71
Re: Jake's Challenger/Rust - 11/23/09 01:21 AM
Quote:
Had you considered narrowing the back 6 inches of the quarters rather than sectioning where you did? Also curious if you measured stock quarters to arrive at your plan of attack? This is getting to be the best thread on Moparts BTW.
Sheldon
I did look at all aspects for hours before I cut into the new panels and the problem was definately that the quarters narrowed on top as you got closer to the dutchman panel. It's hard to get an exact measurement across the top with the curves and all, but I believe I'm within about 1/32" of stock. I kept the stock quarters for this sort of thing and am sure glad I did.
Thank you for the input though. This is just as much about getting information as it is giving it for me as I'm not a pro.
Jake
Posted By: jake71
Re: Jake's Challenger/Rust - 11/23/09 01:22 AM
Quote:
Quote:
Had you considered narrowing the back 6 inches of the quarters rather than sectioning where you did? Also curious if you measured stock quarters to arrive at your plan of attack? This is getting to be the best thread on Moparts BTW.
Sheldon
I did look at all aspects for hours before I cut into the new panels and the problem was definately that the quarters narrowed on top as you got closer to the dutchman panel. It's hard to get an exact measurement across the top with the curves and all, but I believe I'm within about 1/32" of stock. I kept the stock quarters for this sort of thing and am sure glad I did.
Thank you for the input though. This is just as much about getting information as it is giving it for me as I'm not a pro.
Jake
When I post the pics of the dutchman panel everything comes into persective.
Thanks again
Jake
Posted By: RUNCHARGER
Re: Jake's Challenger/Rust - 11/23/09 01:48 AM
I figured you had but just was curious. I've done a lot of sheetmetal work on these cars too and quite often it takes longer to come up with the best plan of attack than it does to do the actual work. I think thats why quite a few amateur restos are better than store bought restos, and a lot of people just don't understand that.
I think your posts will go a long way to show people doing their first or second resto just what is involved and what can be done.
Sheldon
Posted By: JDMopar
Re: Jake's Challenger/Rust - 11/23/09 02:04 AM
Posted By: scatpacktom
Re: Jake's Challenger/Rust - 11/23/09 02:47 AM
I was just thinking the same thing

Posted By: DusterKrazy
Re: Jake's Challenger/Rust - 11/25/09 05:52 PM
Prove them wrong!
Your project is coming along nicely!
Look at what I drug in about two years ago that needs everything.
https://board.moparts.org/ubbthreads/show...e=4&fpart=1Lots of people asked...
*Why do ya wanna fix that POS?
*Why bother?
*Or you are kidding right?
Just wait..But then again. Us Mopar guys have to be slightly nuts to do what we do

Congrats on progress
Posted By: Jambbii
Re: Jake's Challenger/Rust - 11/28/09 06:10 PM
Great job! I know I don't have the time or will power to tackle something that major. Can't wait to see it done!
Posted By: 71DemonRON
Re: Jake's Challenger/Rust - 11/28/09 07:07 PM
Quote:
Prove them wrong!
Your project is coming along nicely!
Look at what I drug in about two years ago that needs everything.
https://board.moparts.org/ubbthreads/show...e=4&fpart=1
Lots of people asked...
*Why do ya wanna fix that POS?
*Why bother?
*Or you are kidding right?
Just wait..But then again. Us Mopar guys have to be slightly nuts to do what we do
Congrats on progress
Just wait..But then again. Us Mopar guys have to be slightly nuts to do what we do
Posted By: indy dart
Re: Jake's Challenger/Rust - 11/28/09 11:06 PM
Jake, I am blown away with your skills and determination. I just cant believe you have never done this at this level. Keep it up sir. We love the progress. Makes me want to get out of my easy chair and do more on mine. You will be driving this by spring.
Posted By: jake71
Re: Jake's Challenger/Rust - 12/02/09 02:52 AM
OK, I've been working on the roof and found that my Harbor Freight spot welder is not capable of good welds so I have been working on some modifications and will post my results. So far I have been able to get close to factory welds with some modified microwave parts. I will post instructions and how to's soon.
Posted By: idrivevintage
Re: Jake's Challenger/Rust - 12/15/09 05:33 PM
Posted By: burdar
Re: Jake's Challenger/Rust - 12/15/09 06:40 PM
Looks like your doing some good work there. The guy that's going my car had to section the Goodmark front fenders just like what your having to do to the rear. The fenders sat a lot lower than the hood and the gap was too big.
The full quarters seemed to fit my car a lot better then how they're fitting on your car for whatever reason. Some welding rod needed to be added to the sides of the trunk lid to take up the gap but nothing had to be done to the top of the quarters to my knowledge. I was using a factory trunk lid though...that might have been part of it.
Keep up the great work.
Posted By: topfueldart
Re: Jake's Challenger/Rust - 12/16/09 09:36 AM
My first time viewing this post, and I must say WOW. You are doing amazing. Keep up the great work, I will be checking in on a regular basis. You are proving that almost nothing is "too far gone" if you have the determination to do the work.
Posted By: JamaicaBlue
Re: Jake's Challenger/Rust - 12/25/09 01:53 AM
Any updates? This is the one post I keep coming back to.
Posted By: T2R9
Re: Jake's Challenger/Rust - 01/01/10 10:12 PM
Oh Jake where art thou!

Posted By: jake71
Re: Jake's Challenger/Rust - 01/09/10 01:59 PM
Hello all,
Sorry I've not been back in a while. It's been pretty busy around here with work and the holidays, not to mention the things I've been neglacting around the house. Luckily my wife is very patient and understanding of my obsessive personality or I'd be living in this drafty old Dodge!
Anyway, last I posted, I was working on a spot welder and that's a long story. To make it short, the first coupl attempts didn't quite have enough juice so I went BIG and now I've got a little too much power but I will get right. For now I decided to just go with good old plug welds as they are something I can do right now and get back to progress on the car.
So here's some more on the back of the car. The quarters are pretty close now so I started working on the dutchman panel. It was way off on contour and length so I just cut the ends off and started over.

Posted By: jake71
Re: Jake's Challenger/Rust - 01/09/10 02:03 PM
I used the Harbor Freight stretcher/shrinker to form a new end for both sides and butt-welded them in to the dutchman panel. It was a little intimidating at first bacause of the compound curves, but it really was pretty easy. It only took about an hour to do each side and the fit is near perfect. I say near perfect because I don't believe anything can be truly perfect on this sort of thing.

Posted By: jake71
Re: Jake's Challenger/Rust - 01/09/10 02:05 PM
That was the new piece clamped and ready for welding.
Here it is welded and ground smooth.

Posted By: jake71
Re: Jake's Challenger/Rust - 01/09/10 02:09 PM
It went pretty smooth and fit really well. I got it in place and put a few tack welds in place to hold it in position so I could get in the trunk and weld it properly without having to worry about clamps being in the way, it's pretty tight in there as it is. I'll dremel those tacks off later.

Posted By: jake71
Re: Jake's Challenger/Rust - 01/09/10 02:12 PM
Doesn't look too bad for a heating guy.

Posted By: jake71
Re: Jake's Challenger/Rust - 01/09/10 02:52 PM
And at this point, I'm feeling like some new scenery. Here's a shot of the whole panel.

Posted By: jake71
Re: Jake's Challenger/Rust - 01/09/10 02:55 PM
So like I said, I was needing something new to look at and I got more than I bargained for. I drilled the roof off to replace it with a new AMD piece and found it was a very good thing I did. The skin looked pretty rough but I had no idea how bad the structure was.

Posted By: jake71
Re: Jake's Challenger/Rust - 01/09/10 02:56 PM
There a few here so hang with me.

Posted By: jake71
Re: Jake's Challenger/Rust - 01/09/10 02:57 PM
I'm sure glad I had gained some experience by this point or this stuff would have been very intimidating to see.

Posted By: jake71
Re: Jake's Challenger/Rust - 01/09/10 02:59 PM
It sure looked bad at first. Then it looked worse.

Posted By: jake71
Re: Jake's Challenger/Rust - 01/09/10 03:00 PM
Almost everywhere I looked it was the same story.

Posted By: jake71
Re: Jake's Challenger/Rust - 01/09/10 03:01 PM
Another.

Posted By: jake71
Re: Jake's Challenger/Rust - 01/09/10 03:02 PM
I really didn't even think I was going to need gutters!

Posted By: jake71
Re: Jake's Challenger/Rust - 01/09/10 03:03 PM
I could have actually used a whole roof!

Posted By: jake71
Re: Jake's Challenger/Rust - 01/09/10 03:05 PM
This didn't even look that bad until I hit it with the wire wheel!

Posted By: jake71
Re: Jake's Challenger/Rust - 01/09/10 03:08 PM
OK, so before anyone gets too dicouraged, we better get to the promising pics. I was pretty concerned there wouldn't be any good metal to be found but it wasn't as bad as it looked. Still a bunch of work but doable.

Posted By: jake71
Re: Jake's Challenger/Rust - 01/09/10 03:10 PM
One at a time I cleand the areas up and treated with POR15 and started making patches.

Posted By: jake71
Re: Jake's Challenger/Rust - 01/09/10 03:11 PM
The welding and fab work took almost three days but it really was fun seeing it come together!

Posted By: jake71
Re: Jake's Challenger/Rust - 01/09/10 03:13 PM
I ran out of poster board for making templates so I ran to the "craft store" and got some more.

Posted By: jake71
Re: Jake's Challenger/Rust - 01/09/10 03:14 PM
Now we're back in business!

Posted By: jake71
Re: Jake's Challenger/Rust - 01/09/10 03:20 PM
I made the strip alomg the back from two pieces with the shrinker/stretcher. It fit perfectly and actually only took about an hour start to finish.

Posted By: jake71
Re: Jake's Challenger/Rust - 01/09/10 03:22 PM
Here I've got it all clamped in and ready for welding.

Posted By: jake71
Re: Jake's Challenger/Rust - 01/09/10 03:24 PM
Here it's welded and ground smooth. These were the last spot welds the HF gun was able to make before it's demise.

Posted By: jake71
Re: Jake's Challenger/Rust - 01/09/10 03:25 PM
Here's some more of the drivers side.

Posted By: jake71
Re: Jake's Challenger/Rust - 01/09/10 03:27 PM
It really did go surprisingly well.

Posted By: jake71
Re: Jake's Challenger/Rust - 01/09/10 03:37 PM
That's about it for the drivers side.

Posted By: jake71
Re: Jake's Challenger/Rust - 01/09/10 03:38 PM
One more of the front patch.

Posted By: jake71
Re: Jake's Challenger/Rust - 01/09/10 03:40 PM
Now off to the passenger front corner.

Posted By: jake71
Re: Jake's Challenger/Rust - 01/09/10 03:41 PM
As you can see, I had to cut pretty far to find solid metal on this one.

Posted By: jake71
Re: Jake's Challenger/Rust - 01/09/10 03:44 PM
I cleaned it all out and treated the metal. Got started on the patch which I had to make from three pieces due to the complex shape. Even 16 gauge metal was no problem for the shrinker!

Posted By: jake71
Re: Jake's Challenger/Rust - 01/09/10 03:46 PM
Another piece of the puzzle.

Posted By: jake71
Re: Jake's Challenger/Rust - 01/09/10 03:47 PM
Little bit of smooting with the Roloc disc and not too bad.

Posted By: jake71
Re: Jake's Challenger/Rust - 01/09/10 03:48 PM
Different angle.

Posted By: jake71
Re: Jake's Challenger/Rust - 01/09/10 03:51 PM
There were a few more patches made but you pretty much get the picture.
Removed all the rust with the wire wheel and treated with POR15.

Posted By: Anonymous
Re: Jake's Challenger/Rust - 01/09/10 03:56 PM
Posted By: jake71
Re: Jake's Challenger/Rust - 01/09/10 04:01 PM
After all my experiences with the after market panels, this was a nervous point. Test fit the AMD skin and was pleasantly surprised that with minimal massaging, it fit!
The only problem was that I had no clue what to use for bonding it to the center roof support. Off to Ed's Auto Paint to find out.
We came up with SEM #39977. It's called panel vibration control material. It has about 45 to 60 minutes working time so you can get things all lined up and stays somewhat pliable. It's not the same color but I really don't care as long as it does the job.
After many trial runs at setiing the roof in exactly the right position, I applied the SEM product and carefully set the panel in place once and for all. Here's a shot of the adhesive.

Posted By: jake71
Re: Jake's Challenger/Rust - 01/09/10 04:02 PM
Now to go around and clamp and weld.

Posted By: jake71
Re: Jake's Challenger/Rust - 01/09/10 04:05 PM
And where it met the quarters was exactly the same amount of screwed up (quarters) as the stock roof. Luckily I had split the quarters to spread them out prior to setting the roof in place.

Posted By: jake71
Re: Jake's Challenger/Rust - 01/09/10 04:09 PM
All the way through the install, I was impressed with the fit and quality of the AMD panel. It was a nice change of pace.
Well, I'm off to get the door gaps straight. More sectioning of the Goofmark quarters. They are really bad around the door gaps. They get further and closer all the way down the side. Oh well, it's still fun right?

Posted By: jake71
Re: Jake's Challenger/Rust - 01/09/10 04:10 PM
Thanks Superfreak, I really am enjoying it.
Posted By: redmay
Re: Jake's Challenger/Rust - 01/09/10 07:38 PM
Jake your doing one hell of a job and the results of your labor will be top notch when you are finished .Keep up the great work and thanks for the pictures .
Posted By: jake71
Re: Jake's Challenger/Rust - 01/09/10 08:21 PM
Quote:
Jake your doing one hell of a job and the results of your labor will be top notch when you are finished .Keep up the great work and thanks for the pictures .
Thanks Joe, I sure hope you're right!
Posted By: DodgeMaterial
Re: Jake's Challenger/Rust - 01/11/10 05:39 AM
Jake - Amazing work!
Posted By: JS29R0B
Re: Jake's Challenger/Rust - 01/11/10 02:29 PM
Quote:
I ran out of poster board for making templates so I ran to the "craft store" and got some more.

ROTFLOL now I know how you keep your nerves in check on this project!
Keep up the good work!
Posted By: SRT6776
Re: Jake's Challenger/Rust - 01/12/10 03:54 PM
Awesome
Posted By: 68SportSatvert
Re: Jake's Challenger/Rust - 01/12/10 06:10 PM
Jake,
Truly first class work!!!! What HF spot welding gun did you use? How well did it work? You really inspire me to get mine done. Too bad I'm in Afghanistan until December!!! I'll have to look you up when I get back to Cheyenne. You should have it close to finished by then.
Posted By: jake71
Re: Jake's Challenger/Rust - 01/13/10 12:17 AM
Quote:
Jake,
Truly first class work!!!! What HF spot welding gun did you use? How well did it work? You really inspire me to get mine done. Too bad I'm in Afghanistan until December!!! I'll have to look you up when I get back to Cheyenne. You should have it close to finished by then.
It was the 230 volt one but as I said, it didn't make very far before it burned up. The rest of the welding has been done with a mig welder. Do look me up when you get home and I'll share more experiences and money saving tips. Be safe!
Posted By: 68SportSatvert
Re: Jake's Challenger/Rust - 01/13/10 04:44 PM
Thanks!!! I can't wait to see your handy work.
Posted By: jake71
Re: Jake's Challenger/Rust - 01/14/10 01:10 AM
I'm still having fun. How 'bout you folks?
I did get a bunch of work done on the door gap on the drivers side and have some pics but I haven't put them on the computer yet. I'll put them up soon though.
Anybody know how you're supposed to fill the void where the quarter meets the roof? I don't really want to learn how to lead it in but I don't think filler is OK to do to a void that deep. Suggestions would be greatly appreciated.
Thanks all!
Posted By: ihv800
Re: Jake's Challenger/Rust - 01/14/10 01:36 AM
Jake, I've greatly enjoyed seeing your progress! Very impressive work and I look forward to seeing it evolve from a car most wouldn't touch to a true jewel! For the void, I would suggest something like fiberstrand or "Kitty Hair." They are a fiberglass reinforced filler, very strong and waterproof as apposed to regular plastic filler. Once again, great job!
Posted By: jake71
Re: Jake's Challenger/Rust - 01/14/10 02:46 PM
Quote:
Jake, I've greatly enjoyed seeing your progress! Very impressive work and I look forward to seeing it evolve from a car most wouldn't touch to a true jewel! For the void, I would suggest something like fiberstrand or "Kitty Hair." They are a fiberglass reinforced filler, very strong and waterproof as apposed to regular plastic filler. Once again, great job!
I had thought about that, I'm just afraid something might go wrong down the road. I've seen where guys have said they've seen beautiful cars with lines that eventually show up there. The fiber hair stuff does seem to be pretty tuff and, like you said, won't hold moisture. I'm thinking about maybe making a piece to weld in there. In the grand scheme of things I guess it's really not that much work.
Thanks for the input and if you're ever in the neighborhood, stop by. I'm in Loveland.
Posted By: 68427vette
Re: Jake's Challenger/Rust - 01/14/10 10:41 PM
awsome,, i just finished a buddies 69 mustang,, same issues,, this is my latest: coming home tomorrow!!
http://cgi.ebay.com/ebaymotors/Dodge-Cha...5fCarsQ5fTrucks
Posted By: jake71
Re: Jake's Challenger/Rust - 01/15/10 01:09 AM
Quote:
awsome,, i just finished a buddies 69 mustang,, same issues,, this is my latest: coming home tomorrow!!
http://cgi.ebay.com/ebaymotors/Dodge-Cha...5fCarsQ5fTrucks
That sure looks like an awesome car to build! Looks like a decent deal too! Good luck and keep us posted!
Posted By: ihv800
Re: Jake's Challenger/Rust - 01/15/10 05:42 AM
If I'm ever up that way I would love to see it in person!
I believe it is Eastwood that makes a product that you use like regular plastic filler but has properties similar to lead once cured, not sure of the name. I have no experience with it though, but something you might check into?
Posted By: v269
Re: Jake's Challenger/Rust - 01/15/10 06:21 AM
Posted By: jake71
Re: Jake's Challenger/Rust - 01/16/10 05:02 PM
Well, I really haven't had much time to work on her lately but I did get the drivers door to quarter gap pretty well lined up. It took some time but it came out good and that's one less thing keeping me from the shiny stuff!
I started with stripping the door to get a better view of the gap. The door and quarter being all different colors gives some strange illusions.

Posted By: jake71
Re: Jake's Challenger/Rust - 01/16/10 05:05 PM
The paint comes off quickly but the factory primer takes a little more work. It actually seems to have stained the metal. Seems like it was pretty good stuff.

Posted By: jake71
Re: Jake's Challenger/Rust - 01/16/10 05:10 PM
After wiping it all down with laquer thinner and wax and grease remover, I hit it with 80 grit on the DA and it cleaned real nice. I had to go around with 50 grit Rolocs and clean up some pits but they weren't bad at all. The worst part was the huge amount of little dents all over it. It looked as if it played target for a BB gun at some point. There was also a 1 1/2 foot gouge down the side that was about 1/2 inch deep. I went through over a hundred pulling studs getting it all straightened out but it came out real nice.

Posted By: jake71
Re: Jake's Challenger/Rust - 01/16/10 05:12 PM
After lots of that it started to look like this.

Posted By: jake71
Re: Jake's Challenger/Rust - 01/16/10 05:16 PM
So now it was time for getting to the whole point of this work and get the gap straight. Here are some pics where I cut along the gap with a cut-off wheel and started manipulating the gap with a screwdriver. When I had each place looking good, I tacked it ther with the mig.

Posted By: jake71
Re: Jake's Challenger/Rust - 01/16/10 05:17 PM
After finishing the welding and grinding it back smooth, it looked pretty darn good I thought.

Posted By: jake71
Re: Jake's Challenger/Rust - 01/16/10 05:20 PM
I forgot to show ya the before gap so here it is. You can't see just how bad it looked from the picture but I couldn't stand looking at it.

Posted By: jake71
Re: Jake's Challenger/Rust - 01/16/10 05:38 PM
So once I got the gap straight, I figured I'd better get the metal protected from sweaty hands and the occasional "poster board spill". So I went on down to Ed's Auto paint and he turned me on to some really great stuff. In the past, I've used regular body filler to skim coat panels but I could never get it on thin enough so it took a LONG time to block it all back off. This stuff is not a heck of a lot thicker than primer so it's easier to put it on real thin. It also sands very easily and feathers out beautifully.
This stuff.

Posted By: jake71
Re: Jake's Challenger/Rust - 01/16/10 05:43 PM
So it went really well. After blocking the glaze, you could see through most of it. The thickest spot was only measurable with a straight edge and up to .008" feeler gauge. It never seemed to work out this way before, but then again I don't need it ready for Friday night this time either!

Posted By: jake71
Re: Jake's Challenger/Rust - 01/16/10 05:47 PM
Now to seal it up with some epoxy. This stuff dries to a pretty decent sheen which allows me to see if surfacer will finish it up. It will on this one. Hope the rest goes this smooth!
After a day of this, it's time for some liquid refreshments and some staring.

Posted By: jake71
Re: Jake's Challenger/Rust - 01/16/10 05:50 PM
So I'm not going to be working on her 'till I can kick this crappy cold but I was wondering if any of you might have a couple pictures I could see of what this area used to look like. It's one of the next areas I'd like to attack but I don't know how it's supposed to look. Thanks in advance!

Posted By: 68SportSatvert
Re: Jake's Challenger/Rust - 01/17/10 01:42 AM
Jake - Still looking GREAT!!! I just remembered there is a Challenger shell over in a yard just north of Brighton. I believe the Name is Seven Sons or something like that. I know it starts with the word Seven. The car was cut up but there may be some good cowl pieces you could cut off of it.
Posted By: 68427vette
Re: Jake's Challenger/Rust - 01/17/10 03:17 AM
do you have any as brought home photos, trailer photos,, i just got mine home, i think i'm swimming in your pond.....jc
Posted By: FC7 cuda
Re: Jake's Challenger/Rust - 01/17/10 04:43 AM
Jake where did you get this car from ?what did it cost?
Posted By: jake71
Re: Jake's Challenger/Rust - 01/17/10 04:52 PM
Quote:
Jake - Still looking GREAT!!! I just remembered there is a Challenger shell over in a yard just north of Brighton. I believe the Name is Seven Sons or something like that. I know it starts with the word Seven. The car was cut up but there may be some good cowl pieces you could cut off of it.
I think I know the one you're talking about. West side of 85? I'll have to go back and take a look as I only remember it as being pretty well scrap. Thanks for the reminder and as always the kind words!
Jake
Posted By: jake71
Re: Jake's Challenger/Rust - 01/17/10 04:53 PM
Quote:
do you have any as brought home photos, trailer photos,, i just got mine home, i think i'm swimming in your pond.....jc
I'll have to see if I can find any. My computer crashed right after the first pictures were loaded but some of them were on my wife's computer so I'll have to look there.
Posted By: jake71
Re: Jake's Challenger/Rust - 01/17/10 04:56 PM
Quote:
Jake where did you get this car from ?what did it cost?
I got it from guy named Bob Romig in Bells, Texas. I paid a bit much @ $4500.00 but that was my fault. I'm still glad to have it and I'm learning more than I thought I'd ever need to know.
Posted By: jake71
Re: Jake's Challenger/Rust - 01/17/10 05:01 PM
I've had some inquiries about the rotisserie. I did build it from plans I bought from e-bay. They cost like $10.00 and were very thorough. I went on e-bay to try and find him but he's not there anymore so I guess it's probably OK to post the plans if they're no longer available for purchase right? If any of you are going to use these plans, contact me as there are a couple things that I would do differently.
Posted By: FC7 cuda
Re: Jake's Challenger/Rust - 01/17/10 05:49 PM
You got skills !!!!
Posted By: jake71
Re: Jake's Challenger/Rust - 01/17/10 11:27 PM
Quote:
You got skills !!!!
Thanks Roger! I like to call it patience and willingness to do it over until I get it right! 
Posted By: jake71
Re: Jake's Challenger/Rust - 01/18/10 08:28 PM
Quote:
Quote:
do you have any as brought home photos, trailer photos,, i just got mine home, i think i'm swimming in your pond.....jc
I'll have to see if I can find any. My computer crashed right after the first pictures were loaded but some of them were on my wife's computer so I'll have to look there.
Ok, I'm trying Photobucket as I've just reallized you guys are having to download each picture. Hang with me as this stuff normally takes me more than one try to get it to work.


Posted By: jake71
Re: Jake's Challenger/Rust - 01/18/10 08:36 PM
Posted By: burdar
Re: Jake's Challenger/Rust - 01/18/10 09:38 PM
May I make one suggestion? When you copy/paste, put one line in between each link. That way your pics don't run together and they are easier to see.
Those gaps are looking really good.
Posted By: jake71
Re: Jake's Challenger/Rust - 01/18/10 11:12 PM
Quote:
May I make one suggestion? When you copy/paste, put one line in between each link. That way your pics don't run together and they are easier to see.
Those gaps are looking really good.
Thank you.
And I was trying to figure out to do that. I'll try that in a little bit-Thanks
Posted By: jake71
Re: Jake's Challenger/Rust - 01/19/10 01:40 AM
Just got 2/3 of my XV Motorsports orde. Frame connectors and radiator support. Frame ties look like they're going to work with LOTS of grinding. I will post before, during and afters.
And yes I know it's not factory but neither is the stroked out 383!
Posted By: jake71
Re: Jake's Challenger/Rust - 01/20/10 12:22 AM
Anyone else have weld-in frame connectors that don't fit? I was thinking that since I already have 2 hours fitting and grinding time into one side, making me about 1/4

way there, I could make templates and cut them into 11" pieces and fax them to maybe save someone all the trouble. Especially if a guy is trying to do this on the floor! You could tape the pieces together and check fit on your car? Just a thought. Let me know if anyone's interested. Back to grinding!
Posted By: VITC_GTX
Re: Jake's Challenger/Rust - 01/20/10 04:38 AM
Simply amazing what you have done already. It's awesome!!
Posted By: 67Charger
Re: Jake's Challenger/Rust - 01/20/10 06:24 AM
Your progress is truly inspirational for me to got out into my garage and tackle my '68 head on. I started a similar post, hoping it will keep me motivated to follow in your footsteps. I'll be picking your brain regarding what tools and methods you've been using.
Posted By: 68SportSatvert
Re: Jake's Challenger/Rust - 01/20/10 12:37 PM
I bought the connectors from John at US Cartool. He is a vendor and MOPARTS member. They were great and needed minimal grinding to fit.
Posted By: 68427vette
Re: Jake's Challenger/Rust - 01/20/10 04:09 PM
can you post a photo of the shrinker/stretcher you are using.....
and i'll send you a link to the "shaker car" soon. eeekkkk
how was your cowl bottom, door hinge area.....
Posted By: jake71
Re: Jake's Challenger/Rust - 01/20/10 04:40 PM
Thanks a bunch Van. It's always nice to hear it doesn't look too bad from the outside looking in!
Posted By: jake71
Re: Jake's Challenger/Rust - 01/20/10 04:44 PM
Quote:
Your progress is truly inspirational for me to got out into my garage and tackle my '68 head on. I started a similar post, hoping it will keep me motivated to follow in your footsteps. I'll be picking your brain regarding what tools and methods you've been using.
Thank you and feel free to ask as I'll probably have an answer, just use it at your own risk! I'm still learnung myself and make mistakes.
Posted By: jake71
Re: Jake's Challenger/Rust - 01/20/10 04:47 PM
Quote:
I bought the connectors from John at US Cartool. He is a vendor and MOPARTS member. They were great and needed minimal grinding to fit.
Good to know for next time. My pans aren't factory so I can't say the connectors are necessarily the problem but it doesn't seem as though the connectors were made at the correct height. The shape seems to be pretty good though.
Posted By: jake71
Re: Jake's Challenger/Rust - 01/21/10 03:03 AM
Posted By: 68427vette
Re: Jake's Challenger/Rust - 01/21/10 01:35 PM
Just Curious.. what do you think,
do you think you should have pre-loaded the chassis before you hung those quarters.??
i accually could nt sleep last night, thinking about that.... i usually make mine a roller,with motor in, hang quarters,weld, take it apart then put it back on the rack.. finish up the welding.. what do you guys think?? I dont want to bust your bubble......... just a thought..

jc
Posted By: JS29R0B
Re: Jake's Challenger/Rust - 01/21/10 02:55 PM
Even though XV's connectors need a little work, after they are installed I think they look much cleaner since the are formed instead of 3 pieces welded together IMO.
I installed some on my 70 Roadrunner and they needed very little work to fit but my car also has all of the original floor pans.
Posted By: jake71
Re: Jake's Challenger/Rust - 01/23/10 02:16 AM
I do also believe they will look more factory except that they are welded and not flanged and spot-welded. I'm still grinding but I'm almost ready to start welding them in.Tomorrow I'll have them all welded in. I just really have to take my time as they aren't in a grinding friendly place so my welds have to look good.Wish me luck!
Posted By: jake71
Re: Jake's Challenger/Rust - 01/23/10 10:31 PM
Quote:
can you post a photo of the shrinker/stretcher you are using.....
and i'll send you a link to the "shaker car" soon. eeekkkk
how was your cowl bottom, door hinge area.....
Door hinge area and cowl bottom weren't too bad. I'm going to be fixing the minor problems there soon so stay tuned!
Here ya go. This thing is worth every penny!


Posted By: jake71
Re: Jake's Challenger/Rust - 01/23/10 10:50 PM
Posted By: Skeez
Re: Jake's Challenger/Rust - 01/24/10 12:13 AM
Very nicely done
I can't wait to see this when it's finished
Posted By: JDMopar
Re: Jake's Challenger/Rust - 01/24/10 03:09 AM
Posted By: Anonymous
Re: Jake's Challenger/Rust - 01/24/10 05:21 AM
Jake
thats some serious welding skills you have, obviously you have past experience.
Posted By: 68SportSatvert
Re: Jake's Challenger/Rust - 01/24/10 09:12 AM
I noticed the r/c helis and plane. Gotta have good, steady hands to fly one of those helis!!! Beautiful work!
Posted By: jake71
Re: Jake's Challenger/Rust - 01/24/10 03:21 PM
Quote:
Just Curious.. what do you think,
do you think you should have pre-loaded the chassis before you hung those quarters.??
i accually could nt sleep last night, thinking about that.... i usually make mine a roller,with motor in, hang quarters,weld, take it apart then put it back on the rack.. finish up the welding.. what do you guys think?? I dont want to bust your bubble......... just a thought.. jc
Well, I've stared at it quite a bit as every bit of input counts. I personally don't think that having the suspension and engine in would really affect anything because the car just sits on top of all of that stuff. I may be wrong but I hope not. Anyone else have an opinion on this?
Posted By: jake71
Re: Jake's Challenger/Rust - 01/24/10 03:23 PM
Quote:
I noticed the r/c helis and plane. Gotta have good, steady hands to fly one of those helis!!! Beautiful work!
It sure does take some concentration! I've crashed all of them but the biggest one-they're a handful for sure!
Posted By: jake71
Re: Jake's Challenger/Rust - 01/24/10 03:27 PM
Quote:
Jake
thats some some serious welding skills you have, obviously you have past experience.
Thanks Superfreak! Yes, I've been welding since I was a kid. My Dad, his Dad and his brothers all had welders and torches and stuff like that so if something metal in the family was broke, it wasn't for long!-Jake
Posted By: jake71
Re: Jake's Challenger/Rust - 01/24/10 03:30 PM
Quote:
Very nicely done I can't wait to see this when it's finished
Thank you Skeez! Comments like this give me the confidence I need to keep this thing rolling along.
Posted By: DusterKrazy
Re: Jake's Challenger/Rust - 01/24/10 09:49 PM
The work is turning out great
Posted By: JS29R0B
Re: Jake's Challenger/Rust - 01/25/10 02:10 PM
Posted By: jake71
Re: Jake's Challenger/Rust - 01/26/10 01:53 AM
Quote:
So I'm not going to be working on her 'till I can kick this crappy cold but I was wondering if any of you might have a couple pictures I could see of what this area used to look like. It's one of the next areas I'd like to attack but I don't know how it's supposed to look. Thanks in advance!
Anyone got this? I can't find a good pic and it's coming up soon on my list of to-dos. 

Posted By: VITC_GTX
Re: Jake's Challenger/Rust - 01/26/10 02:15 AM
Quote:
Very nicely done I can't wait to see this when it's finished
And at the rate he is going it will be done soon!!!!! Great job
Posted By: joewhite440
Re: Jake's Challenger/Rust - 01/26/10 03:52 AM
Hope this is what you need. I scanned it from a picture of a 71 I did a while back. Hope this helps.
Exceptional work on the car Jake.
Joe Sr

Posted By: 3eighty3
Re: Jake's Challenger/Rust - 01/26/10 03:40 PM
I've also got a pic of the corner of the firewall/windshield for comparison:
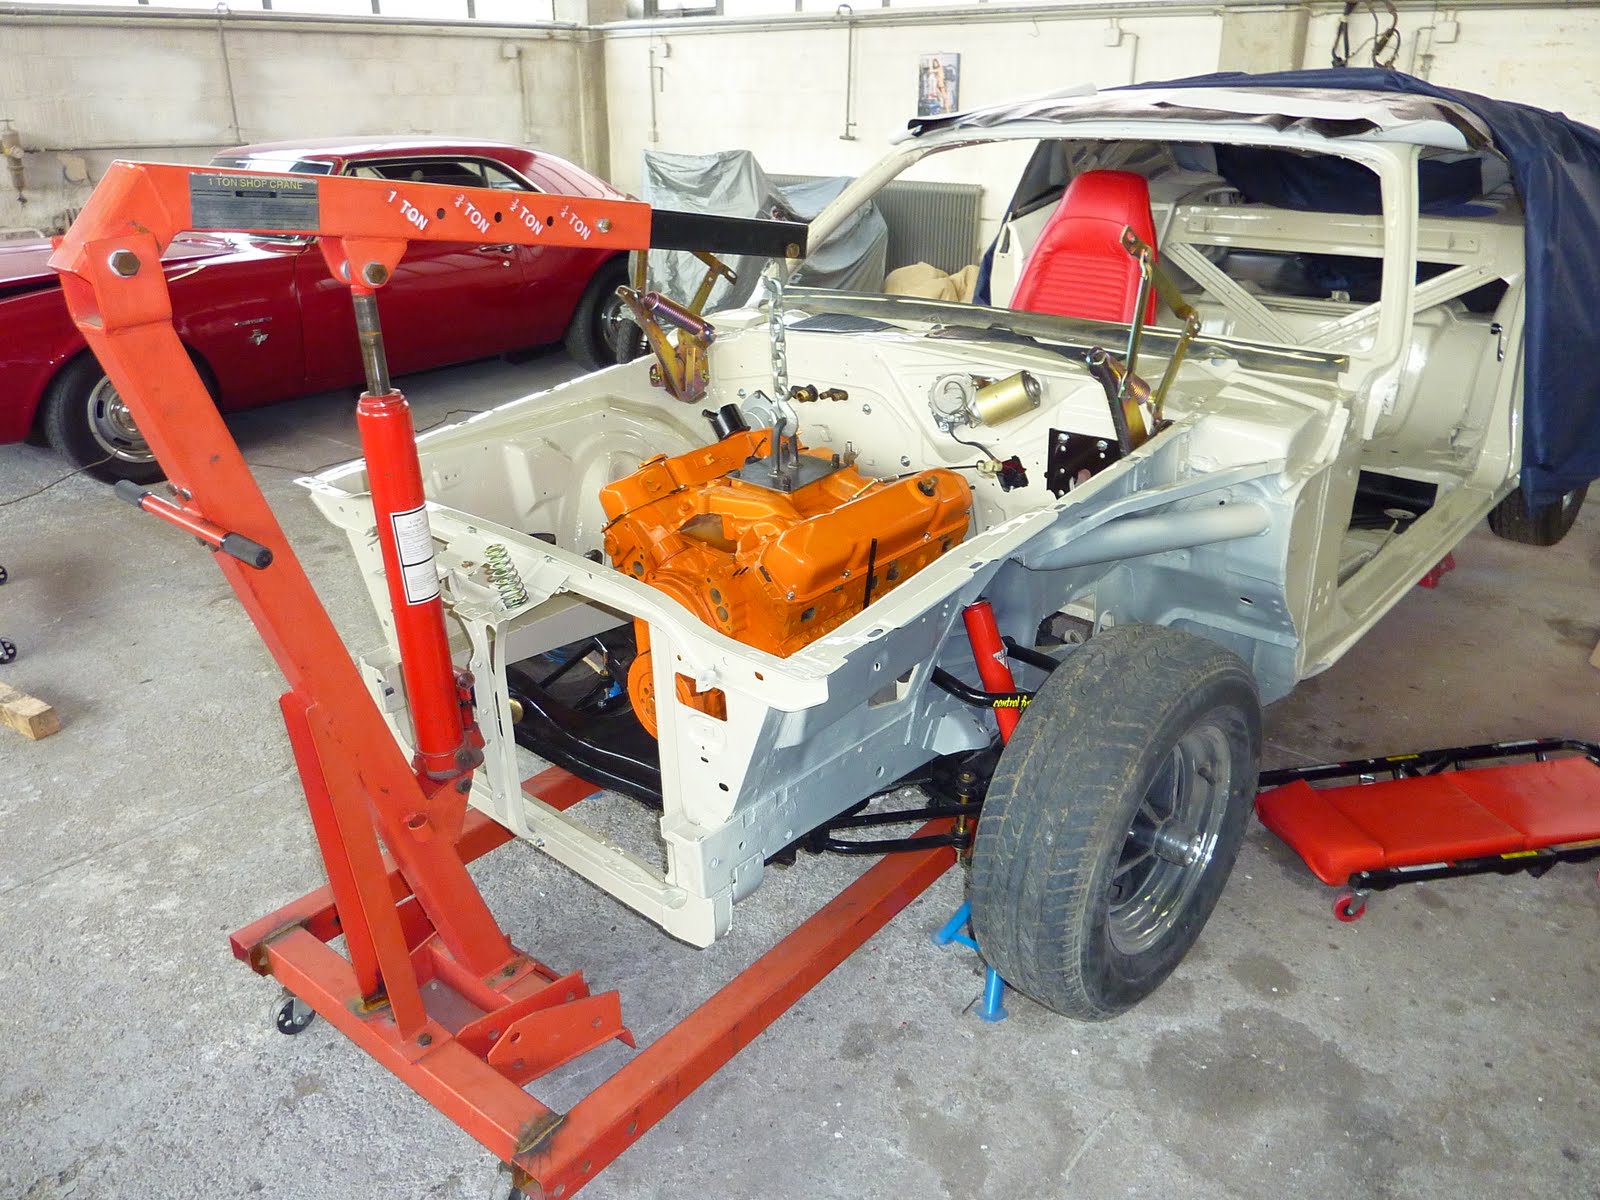
_________________________________________
Cuda blog
Posted By: Quapman
Re: Jake's Challenger/Rust - 01/27/10 01:31 AM
Holy schmomboly!
Man, you sure this is your first crack at a major metalworking project?
Amazingly impressive.
Posted By: jake71
Re: Jake's Challenger/Rust - 01/28/10 02:44 PM
Quote:
Very nicely done I can't wait to see this when it's finished
Thanks Skeez, I figure probably still another year or two 'till completion! Hopefully paint and back on it's feet by mid Summer.
Posted By: jake71
Re: Jake's Challenger/Rust - 01/28/10 02:50 PM
Quote:
Hope this is what you need. I scanned it from a picture of a 71 I did a while back. Hope this helps.
Exceptional work on the car Jake.
Joe Sr
Excellent! That's what I was hoping it looked like as I have just enough metal left on one side so I don't have to go find one to measure from. Thanks Joe!
Posted By: jake71
Re: Jake's Challenger/Rust - 01/28/10 02:53 PM
Quote:
Quote:
Very nicely done I can't wait to see this when it's finished
And at the rate he is going it will be done soon!!!!! Great job
Thanks Van! And if what you mean by soon is a year or two, you're hopefully right!
Posted By: jake71
Re: Jake's Challenger/Rust - 01/28/10 02:58 PM
Quote:
I've also got a pic of the corner of the firewall/windshield for comparison:
Thanks Thomas, all pictures help. I think I've got it now.
Awesome car you've got there! You've done alot of the things I plan to do so being that you're ahead of me, I'll be able too see how it works out before I even do it!
Thanks again-Jake
_________________________________________
Cuda blog
Posted By: jake71
Re: Jake's Challenger/Rust - 01/28/10 03:03 PM
Quote:
Holy schmomboly!
Man, you sure this is your first crack at a major metalworking project?
Amazingly impressive.
Thanks Steve! It is definately my first car project this extensive. Prior to this I've done some playing around and painted a couple cars but never really had the chance to do it the right way. I've done alot of welding in the past though.
Thanks for watching and as always, the comments are a great help.
Jake
Posted By: camdog440
Re: Jake's Challenger/Rust - 01/28/10 03:44 PM
You should start a new thread that gets a big sticky...
MIG Welding 101!
I would like to learn how to use my dern welder!... especially on sheetmetal... without blowing thru it.
You are skilled for sure!
Posted By: cuda-sweden
Re: Jake's Challenger/Rust - 01/30/10 03:05 PM
Posted By: TonyS451
Re: Jake's Challenger/Rust - 01/30/10 04:14 PM
Ive been around Moparts for several years and this has got to be one of the best documented restoration threads I have seen. And while this may be your first stab at a project this extensive, you are clearly not a beginner (man I wish I had 1/2 your skills!). Exceptional work, and I look forward to watching your progress!
Posted By: jake71
Re: Jake's Challenger/Rust - 02/06/10 03:45 PM
Am I the only one who gets up early on a Saturday morning just to stare at the car and make engine noises with my mouth? And yes, it counts if you're doin' it in your head!

Posted By: jake71
Re: Jake's Challenger/Rust - 02/06/10 03:55 PM
Quote:
Ive been around Moparts for several years and this has got to be one of the best documented restoration threads I have seen. And while this may be your first stab at a project this extensive, you are clearly not a beginner (man I wish I had 1/2 your skills!). Exceptional work, and I look forward to watching your progress!
Thank you very much! I really enjoy this site a bunch. You guys keep me going and I've never learned more about this stuff than I have by watching everyone here do their thing.-Jake
Posted By: Anonymous
Re: Jake's Challenger/Rust - 02/06/10 10:01 PM
Quote:
Am I the only one who gets up early on a Saturday morning just to stare at the car and make engine noises with my mouth? And yes, it counts if you're doin' it in your head!
Not by a long shot.
Posted By: jake71
Re: Jake's Challenger/Rust - 02/07/10 03:20 AM
Quote:
Quote:
Am I the only one who gets up early on a Saturday morning just to stare at the car and make engine noises with my mouth? And yes, it counts if you're doin' it in your head!
Not by a long shot.
Sweet! I feel better!
Posted By: 71DemonRON
Re: Jake's Challenger/Rust - 02/07/10 04:28 AM
Quote:
Quote:
Quote:
Am I the only one who gets up early on a Saturday morning just to stare at the car and make engine noises with my mouth? And yes, it counts if you're doin' it in your head!
Not by a long shot.
Sweet! I feel better!
Count me in on any day of the week, just have more time on most Saturdays 
Posted By: jake71
Re: Jake's Challenger/Rust - 02/14/10 07:34 PM
Ok, I haven't really had much time lately to work on her but here's where I'm at. I wasn't thrilled with the results on this but I don't feel there's going to ever be a problem with the way it came out. I just for some reason didn't quite have the results I wanted. The other side should be a lot better now that I know what to do. Like I've said, this is my first whack at a project like this and I'm learning as I go.
So I seem to have put these in here in reverse order but If you start with the last pic and work up, it'll make more sense.
Another after glaze and blocking.

After glaze and blocking. It came out really good.

Another shot of the void.

After all that adjusting and welding, I had a bit of a void. I measured a max depth of a little less than an 1/8 inch. I probably didn't really need to but I used fiber hair filler here before hitting it with glaze just to make sure I wouldn't have problems in the future.

All ground smooth and ready to start with the filler work. There's a small spot here that I blew through with the grinder but I welded it shut and ground it smooth again.

All welded in and ready for grinding.

I cut a strip of metal to weld in so I wouldn't have to deal with lead or the possibility of filler cracking and falling out in the future. Here it is tacked in place ready for welding.

Another shot.

I must have been sleeping when I welded this spot together 'cause my elevations weren't quite right and I didn't notice 'till now. So, here we go again with sectioning, tweaking and welding it all back together.


Posted By: 68SportSatvert
Re: Jake's Challenger/Rust - 03/02/10 04:02 PM
Where you hiding at these days??

Posted By: Anonymous
Re: Jake's Challenger/Rust - 03/03/10 04:00 AM
He is probably going to show us a painted car next.
Posted By: jake71
Re: Jake's Challenger/Rust - 03/06/10 02:20 PM
Thanks for the encouragement guys! I've been busy with my daughter building her solar system diorama. It took a little longer than expected since I had to teach her how to calculate the required resistance to keep from blowing up the stars (LEDs) and it can also be a little tricky to get an 8 year old to not burn daddy while he's holding wires for her to solder!
Anyway, Momma says I can play with my toys today so I'm going back after the trunk gaps. I've done quite a bit with them but I'm not very happy yet so I'll be sectioning and welding pretty much all day. I'll try to have something up here by the end of the weekend.
Thanks again guys-Jake
Posted By: jake71
Re: Jake's Challenger/Rust - 03/09/10 08:57 PM
Quote:
He is probably going to show us a painted car next.
Not quite a painted car yet, I'm pretty sure even though you're building a car, chassis and all, you're gonna beat me to the road! Nice work!
So on to what I spent my Saturday doing. I wasn't totally satisfied wuth the trunk gaps after my first attempt so I figured I'd better get 'em straight or I'll always know I should've!
So, I cut the quarter again. This time I cut the gutter to light panel as well where I just kind of tried to fudge that on try 1, that'll teach me!
It looks really jacked here but that's just 'cause the back of the quarter popped over from the gutter when I cut it.

More of bird's eye view.

Gettin' closer. I also should mention that I've had to use a port-a-power quite a bit to get the quarter and gutter up to where they belong.

And another shot. It sure can be deceiving to look at with the welds and different colors all over the place. It takes a straight edge and a piece of string to see that it really is straight.

And here I used a piece of filler rod welded to the deck lid to get a nice tight gap. It really came out nice and I'm very happy I did it over again. BUT, I did, as us newbies will, screw up at this point. I had read that it's ok to weld up to an inch at a time without having to worry about warpage so I figured on the heavy edge welding a piece of filler was the place to try this. Not so good. I "oil canned" my brand new deck lid. I've never really done much with shrinking metal before and was really not sure how to do it especially since I couldn't get to the back side with a dolly. I tried using the stud gun for heat and then hitting it with compressed air and took most of the stretch out but it still was kind of flimsy and now had little dents all over from the stud gun. Then I figured maybe just hit it in the low spots with a bit of mig weld and air to rapid cool it. Bingo! Don't know if that's the normal way but it worked for me and made it so I could sleep that night! Just have to finish pulling the little dents out and shopuld be ready to move to the other side.

The stud gun dents. Nothing to worry about compared to the oil canning!

Need to do a little dolly work along the edge to smooth out the spots where the trunk lid edge sits a little low but it really was starting to look like I had hoped it would.

Another angle.

And the cut in the corner welded up. I also used a piece of filler rod here to fill the gap.

Ok, I gotta run for now but I have more pics of this portion of the project to show ya when I get back. Thanks for checkin' it out!
Posted By: mopars_1
Re: Jake's Challenger/Rust - 03/09/10 09:19 PM
you do great work jake
I dont think Ill be buying goodmark quarters anytime soon.. lol
Posted By: DetMatt
Re: Jake's Challenger/Rust - 03/09/10 11:05 PM
I'm going to have to spend some time going through this thread from the begining, it looks like you are doing some great work. I've got a similar restoration going on my `68 Road Runner and have a `70 A66 Challenger project after that.
Good stuff brother, save them don't crush them!.
Posted By: 68427vette
Re: Jake's Challenger/Rust - 03/11/10 01:22 PM
it just makes me think,,with all the trouble with quarters, do you think you had something out of line? or not braced up? enough? that's alot of cutting.. welding?? Am i the only one thinking this?? looks great though!!! and yes and i wont be buying those also,, did you see the GOLD challenger resto?/
https://board.moparts.org/ubbthreads/show...e=0&fpart=1 he had problems also with goodmark 1/4's, the amd seam to fit nicer, cant wait for there front fenders they are working on..
Posted By: jake71
Re: Jake's Challenger/Rust - 03/11/10 04:36 PM
Thanks for checkin' it out DetMatt! Every comment is kind of a booster to keep me moving on this. I really had no idea how big of a project this would turn out to be but I'm glad I took it on. I've learned tons along the way and still learn something every time I look at it!
Keep us posted on your projects as well. Take care-Jake
Posted By: jake71
Re: Jake's Challenger/Rust - 03/11/10 04:45 PM
Quote:
it just makes me think,,with all the trouble with quarters, do you think you had something out of line? or not braced up? enough? that's alot of cutting.. welding?? Am i the only one thinking this?? looks great though!!! and yes and i wont be buying those also,, did you see the GOLD challenger resto?/
https://board.moparts.org/ubbthreads/show...e=0&fpart=1
he had problems also with goodmark 1/4's, the amd seam to fit nicer, cant wait for there front fenders they are working on..
I sure did do a lot of measuring before and during on the quarter project and the overall placement is good but the quarters were simply not the right shape. I'm having to re do some of my work simply because of my lack of experience causing me to not get it quite right the first time. The quarter to lid gaps were very wavy and couldn't possibly have been due to improper placement/support during the install. These things were simply stamped wrong and if I had it to do over, I'd have waited for the AMD or just restored the original panels and put them back on. Every edge on the Goodmark panels was either wavy or not sharp enough or, most of the time, both.
Yes I have been watching the gold one too. That thing is really coming along nice! They sure do make it look easy sometimes!
Thanks for the interest and comments. It keeps me on my toes and everyone's perspective is of importance to me as sometimes I simply might not have considered in that way. Thanks-Jake
Posted By: Anonymous
Re: Jake's Challenger/Rust - 03/20/10 08:19 PM
Oh Jakey
are you working on the car or are youuuu sleeping?
Sleeping is the enemy with the amount of things I have to do around here I don't know whether to

or
or

I must be

Posted By: rhamson
Re: Jake's Challenger/Rust - 03/23/10 09:46 PM
These are some great posts. You have given me some good ideas as to how I may need to stretch my Goodfart quarter panels. The deck filler I bought was from AMD and they don't nearly match quarter panels the way I had hoped. I may have to stretch everything like you did to massage them into place.
Keep up the good work and I will be watching to learn more from your saga.
Posted By: jake71
Re: Jake's Challenger/Rust - 03/24/10 09:32 PM
Quote:
Oh Jakey
are you working on the car or are youuuu sleeping? Sleeping is the enemy with the amount of things I have to do around here I don't know whether to or or I must be
Ok, ya got me! I went up to the house and took a nap right after I posted on your thread! I did do some work but it was really just more touching up the lines on the drivers trunk gaps.
I'll hopefully be getting back on it this weekend. I'm trying to keep a decent pace but business has had most of my time lately.
Posted By: jake71
Re: Jake's Challenger/Rust - 03/24/10 09:38 PM
Quote:
These are some great posts. You have given me some good ideas as to how I may need to stretch my Goodfart quarter panels. The deck filler I bought was from AMD and they don't nearly match quarter panels the way I had hoped. I may have to stretch everything like you did to massage them into place.
Keep up the good work and I will be watching to learn more from your saga.
Glad you're able to get something from my project. This really is a great place to get info and with all the things I've learned here I'm glad I can give some back.
As for the deck filler, I did try to just work the ends a little at first but soon reallized that the length and contour on the ends was just too far off. When I finally decided to just whack a couple inches off the ends it really just came together easy from there. Good luck with yours and keep us posted.
Posted By: 68SportSatvert
Re: Jake's Challenger/Rust - 04/13/10 04:54 PM
Jake - Where you hiding?? You got that thing done yet??
Posted By: JS29R0B
Re: Jake's Challenger/Rust - 04/13/10 05:10 PM
Quote:
Jake - Where you hiding?? You got that thing done yet??
He had a heart attck after the electric bill showed up from running the welder!

Great work Jake... It is very rewarding to see hard work pay off and you sure have dedicated enough of it. I love seeing Mopars getting rescued and brought back to life. I have been there with you on the panel tear down and replacement on my cuda and truly understand the amount of time you have invested. I have countless hours invested and could never recover it by selling the car.
We installed an aftermarket (Sherman) quarter on our challenger and didn't have any fit issues. Maybe we got lucky. The AMD panels fit good too, and all the aftermarket parts really are much better than the old quarter skins that we used to have to work with.
I can't wait to see the finished product. A++++

Posted By: Scott Carl
Re: Jake's Challenger/Rust - 05/08/10 03:05 AM
WOW, Jake!! You've made great progress. The last time I looked in was when there was only 4 pages here. Looking forward to seeing it complete. Your project and others like it are what inspires me to keep going on mine
Posted By: Scotts72Rallye
Re: Jake's Challenger/Rust - 06/15/10 01:51 AM
What happened to Jake?
Last post was in April.
Posted By: jake71
Re: Jake's Challenger/Rust - 06/17/10 04:01 AM
Sorry folks, business has been taking up a whole bunch of my time. I'm not goofing off, just busy. Hopefully within a couple of weeks I'll get something done on her. I'm really missing working on her and she's very close to going to priming and blocking so it's driving me nuts but I gotta take care of the business stuff when it needs me or, well, you know. Thanks for thinking about me and hopefully I'll be back here with bloody knuckles soon!
Posted By: Scotts72Rallye
Re: Jake's Challenger/Rust - 06/17/10 09:29 PM
Posted By: 67Charger
Re: Jake's Challenger/Rust - 06/22/10 04:41 AM
I'm with ya'... Work has just been a blitz lately, averaging 70 hours a week for the last 6 weeks. Finally got to make some headway on her on Saturday.
Posted By: JamaicaBlue
Re: Jake's Challenger/Rust - 08/05/10 11:49 PM
What happened to this thread...at the rate Jake was going it should be done by now
Posted By: Dave Watt
Re: Jake's Challenger/Rust - 09/21/10 04:23 PM
Posted By: jake71
Re: Jake's Challenger/Rust - 09/21/10 11:50 PM
Hey Folks! It won't be long now and I'll be back on her. I spoke with Jeff (jsbrown) just last night and should be seeing the rear valance from AMD in a month or two and until then I'm going to finish all the little welding, patching and grinding needed to get the jams, engine bay and underneath in epoxy.
This summer was a really busy one with the business and now I should have a little more time like last winter to get some work done on the car. It's still in the same condition it was last time I posted so those of you watching to see how one guy is doing it didn't miss anything. The rest of you, keep the feedback and constructive criticism coming as I get the ball rolling again. It always helps.
Thanks All,
Jake
Posted By: Anonymous
Re: Jake's Challenger/Rust - 09/22/10 04:33 AM
Glad to see you back, you have left a few people in with-drawls. Good luck with the rest of the build.
Posted By: jake71
Re: Jake's Challenger/Rust - 10/23/10 01:43 AM
Ok, I really don't see myself having the time to really get into the body again until after Thanksgiving as the business is still a " full time job". So, I figured I'd get the power plant started. I've gone through lots of back and forth on correct and FUN and I've finally come to the conclusion that I'm really doing this for me and plan to keep this car 'till I die! Screw correct! I'm not going to be shaving door handles and what not but I do think some extra power and handling upgrades are in order. After all, it's 2010 and this is not a #'s car anyway! I do plan to keep the original paint scheme and not totally screw up the original guys thoughts on this car but I do feel that some upgrades are in order.
That being said, I've decided on building a 496" stroker motor out of the 383 hp motor I have. I did quite a bit of research on all of the various vendors who make the rotating assemblies and decided, after multiple and lengthy conversations with Kim at 440 Source, to go ahead with the big block Chrysler guys over there. I found out that they were recently bought out and don't actually do any work on the parts any more but after talking with Kim extensively I still feel that with the correct planning and communication with my machinist, this should all turn out to be a fun and satisfying project.
My goal is to build a motor in the 600 to 700 hp range that will be streetable and run on pump gas. I'm no genious when it comes to engines. Well, let me just say that I've really never been succesful on building a high horsepower motor that I could really be proud of. I feel that along with all of the other things I'm learning about this project, I should also be able to walk-the-walk on the performance side as well.
After much reading and watching the How To Super Tune video from Wayne Smothers, I now have enough knowledge to know when to ask questions!
Again, this is for your pleasure only. Don't consider the things that I do to be necessarily the right thing but more the way I chose to do them.
Posted By: jake71
Re: Jake's Challenger/Rust - 10/23/10 02:22 AM
So here's the starting point of the build. I have only planned for the short block so far as I'm still learning about all of the resources available for figuring out the heads, cam, lifters and so on.
I found a 1970 383HP motor on Craig's List. It was a little rusty but it looked ok to me. $250.00
I took it to US Automotive Machine and Performance here in Loveland CO and discussed my goals with Tom and Jeff. After a little back and forth on who to get the parts from, they both agreed that after checking with their vendors, they'd also go with 440 Source for the rotating assembly. I initially was a bit concerned with Tom's recommendation to go with his vendor, who for diplomatic reasons shall remain nameless, but was greatly relieved when I returned a few days later to learn that he and Jeff had done some research on their own and felt that 440 Source had all of the bases covered and were now straying from just the bottom line for making a buck but were actually putting me, the customer, first.
So, Jeff being the apparent right machinist for the job went ahead and started cutting on my block to essentially "blue print" it and find out how far we needed to take it to clean up the bores. He found at about .043 over we were looking pretty good and stopped. The right thing to do as he doesn't have the new pistons to correctly do a finish bore and hone.
My turn. There's surely going to be a lot of this back and forth here. Since 440 Source doesn't give any discounts to the the machine shops, Tom had me order the parts myself to save on taxes. Another thing to consider when talking to the machine shop. Can he make a buck on the parts? After all, labor in most businesses pays the overhead so where's the guys profits? I'll discuss how I intend to make it profitable to them once I've got my short block back and we're square on the agreed upon pricing.
My experience has been great with these guys and I believe most shops will be honest, but let the buyer be ware! You might be the guy who comes in when the guys rent is do!
So anyway, $250 for the block,$1997 for the rotating assembly, $70 for upgrading to the ARP rod bolts, $50 for the upgrade to the chamferred main bearings, $374 for a main girdle kit with billet steel main caps, and a few bucks for misc. bolts, timimg pointer etc coming to a total of $2801.39 from 440 Source.
So without figuring machine work I'm into this for $3051.39. (I love you Kate!)
Stay tuned for the updates, I'm learning just as much as some of you watching! To the others, I still do appreciate the comments and suggestions!
Posted By: mopars_1
Re: Jake's Challenger/Rust - 10/23/10 02:28 AM
you could go the FAST rout
all the power to you though for the upgrades! sounds like a blast
Posted By: jake71
Re: Jake's Challenger/Rust - 10/23/10 02:35 AM
I almost forgot to include some dates for a time line!
I dropped of the block with Tom and Jeff on 10/19.
Got the necessary info from Jeff on 10/21 to place my order with 440 Source.
Placed my order with Kim at 440 Source on 10/21 @ 2 PM.
Now waiting for the estimated 5 business days shipping so Jeff can get back to work on my beast!
More to come!

Posted By: jake71
Re: Jake's Challenger/Rust - 10/23/10 02:44 AM
Oops! I almost forgot. I would like to thank Wayne Smothers for the fantastic information on his DVD! I'm certainly no motor guru but I have noticed a huge difference in my confidence and ability to have a conversation about a performance engine build and have experienced a few times the "deer-in-the-headlights" look from guys that normally would have run the conversation! Still love 'em but hay, let's learn! Thanks Wayne!
Posted By: jake71
Re: Jake's Challenger/Rust - 10/27/10 02:28 AM
Got my tracking number from 440 source and I'm scheduled for delivery tomorrow sometime from FedEx. Looking forward to the shiny-go-faster stuff!
Posted By: jake71
Re: Jake's Challenger/Rust - 10/27/10 02:32 AM
Quick note on the body. No rear valance for another 45-60 days from AMD. Anyone have a decent one with exhaust cutouts for sale? I can't do much more on the back without this piece to make sure I've got things in the right place. Thanks in advance!

Posted By: 67Charger
Re: Jake's Challenger/Rust - 01/23/11 06:19 AM
...well...?
Posted By: Anonymous
Re: Jake's Challenger/Rust - 01/23/11 07:13 AM
He said to hell with it and gave up..... I think.

Posted By: jake71
Re: Jake's Challenger/Rust - 01/23/11 09:34 PM
Ok fellas, I'm here and I haven't given up! It's been really crazy around here lately and I've just been a bit overwhelmed. I have not by choice learned how to rebuild a 722.6 Mercedes transmission. Pretty cool but it took me 4 tries!!! I ended up making a tool to hydraulically test it and found that two of the o-ring seals were actually to thin and it wasn't sealing! If anyone has one of these in their Mopar and needs help, I have a stupid amount of info I'm more than willing to share!
Back to the cool stuff. I have a nearly complete engine for the rust bucket. After lots and lots of reading and discussions I came up with this combo.
496 stroker kit from 440 source (.060 over)
10.4:1 compression
Indy Little EZ cnc heads (295cc intake)
Indy single plane Wedge intake
Comp 272 intake 276 exhaust @ .050 gross .621 .621 108 separation cam
Barry Grant 950 RS Race Demon carb (don't have yet)
TTI 1 7/8" headers (don't have yet)
Melling high volume oil pump
440 source main girdle with billet steel caps
2 piece Indy valley plate
Indy supplied roller lifters and and rockers
All ARP and Manley fasteners
440 source oil pan
Cometic .060 head gaskets and oil pan gasket
440 source water pump
440 source SFI fluid damper
440 source SFI flex plate
440 source 1/2" oil pick-up
#77 Muggy welding rod (We'll get into that later)
This has been a very frustrating experience and I'll post the sequence of events here soon. I've certainly got the itch again now and I'll fill you all in here within a couple days. Let's just say things are not always as they appear to be!

Posted By: jake71
Re: Jake's Challenger/Rust - 01/23/11 09:35 PM
P.S. I'm not goofing off, I'm trying to find my shop under all of this crap!
Posted By: jake71
Re: Jake's Challenger/Rust - 01/23/11 09:45 PM
Hey SuperFreak, I know your ride doesn't really require it but have you done anything with the rotisserie? Just curious 'cause you have some pretty amazing fab skills and I'd like to see how you might improve on the design!

Posted By: jake71
Re: Jake's Challenger/Rust - 01/24/11 04:26 AM
Me too, my shop was a mess! I spent all day today cleaning and organizing but I've got a ways to go yet!
Keep doin' it when you can and we'll get there when we get there!
Posted By: jake71
Re: Jake's Challenger/Rust - 02/09/11 09:09 PM
Posted By: jake71
Re: Jake's Challenger/Rust - 02/09/11 09:49 PM
Ok, so the build was a big learning experience. I don't really know how much of this is normal and how much was "other than normal" but here's the way it went down.
Everything went well during the initial ordering and receiving except the intake mix up. After about a week in the machine shop I was told the sonic test was good and the line bore guy was getting my caps and block honed. That took about a week and a half. No problem there except that I figured there would be a report on the sonic test. I didn't get one.
So the machine shop gets the block back and finishes the bore and torque plate hone supposedly to fit each individual piston. The reason I say supposedly is because in the past when I got my block and pistons back the pistons were numbered-these were not and only one had benn handled. I say that with some confidence as everything that was touched was pretty dirty.
Afew days pass and the machinist calls me to come see something. At first I thought maybe he had finished the work and I would be able to take it home. Not the case. He wanted to show me that my dirty piston was a little in the hole. Not a seemingly big deal, how high is it I asked? I don't know he replied! I'm getting a little scared at this point. So I said can we measure it? He says he's been trying but keeps getting different numbers! I'm officially scared! The tools being used obviously weren't up to the task so I stayed there for about an hour and a half trying to get a accurate measurement with no deck bridge. After putting the piston and rod assembly in all for corners we found that the deck wasn't machined even from side to side so I had him deck it to blue print taking only what was necessary to clean the lower side and that meant taking .019" off the high side. At this point I still didn't know what my deck height was but I was pretty sure it was even now. I did buy a deck bridge and check it when I got it home and it was even with .021" proud pistons. No problem.
Back to the machine shop. Last minute he calls me and asks if I want the block machined for a 1/2" oil pick up and says I really ought to. I had read in many places that it wasn't necessary for my application but I figured it can't hurt for $25. He cracked the block! I went to look at the finished product and immediately saw the crack in the pick up boss.

He gave me the

look and said he'd try to find someone to weld it up for me. I said that's ok, I'll handle it. I just wanted my block home before anything else happened!
So that was my experience with the machine shop. More on the repair of the block later. Thanks for checking it out and sorry it's so long!
Posted By: jake71
Re: Jake's Challenger/Rust - 02/09/11 10:12 PM
Almost forgot another big one! When I went to check out the deck height problem, the machinist wanted to show me how good the cam fit was in the bearings. You had to turn it with a wrench! He said that was pretty darn good for a Chrysler block! When he pulled the cam out it was pretty hard to miss the deep sctatches in my sexy new Dura Bond coated bearings! Not thrilled about that one. So now I own a cam bearing installation tool and really nice new bearings and screwed up old bearings. He kept giving me a hard time about wanting put my motor together because that's the fun part but in my eyes, if you can't get the cam from the bag to the bearings without getting it dirty...
So when I got my cam tool I pushed the bearings and found out what the problem was. He apparently had 3 of the bearings cocked while driving them in as you could see on the opposing surface of all of the scuffing, the bearings were crushed like a beer can! I drove the exact same brand and type of new bearing in and my CLEAN cam now spun freely by hand! Not bad for a Chrysler!
Posted By: jake71
Re: Jake's Challenger/Rust - 02/10/11 07:05 AM
Another thing I forgot to mention is that my machinist at one point said to me, as though he was trying to make sure I'd feel confident in my build, I " I brushed the hell out of the oil galleys". Well, I pulled the freshly installed plugs and found large chunks of rust scale! So a brushing I went. Don't assume anything!
Posted By: jake71
Re: Jake's Challenger/Rust - 02/10/11 07:22 AM
So, the cracked oil pick up boss was a fairly easy fix though it took all day to do it correctly. I used Muggy 77 rod and put a pass in to fill the crack and then made several passes over the boss to build it up to a stout thickness being carefull to peen it after every pass not welding more than an inch at a time. The rod is supposed to be more like cast iron in that it has a similar expansion/contraction rate.I felt very confident in the process as I have welded a few cast iron pieces in the past and this seemed to go rather well.The hardest part was that since I penetrated through the threads, running a tap through would just hang up on the weld. The only way I could figure to fix the threads was to use my Dremel tool with the thin wafer cutting discs and slice through the weld until I had good uniform threads. That took a while! After all was said and done, it was virtually perfect and I ran a 1/2" nipple into the boss and torqued it way down to check the integrity of the boss-it held just fine and I feel it'll be the last thing to go in my block.
If anyone has any questions as to how to repair a crack in cast, I'm not an expert but I've had some pretty good experiences with it and would like to share. The old oven methods don't always apply. Thanks again for hangin' with me. I'm almost done with organizing my shop and will be back at the body soon!
Posted By: 68427vette
Re: Jake's Challenger/Rust - 02/10/11 03:13 PM
please post this machine shop name, number, and location,, SO WE NEVER GO THERE!!!
i hope you paid $0.00 for his time and his f(*(& CK ups!!
what a piece of work!!!

can't even install a cam. must be working of fridays, or taking to many breaks.

Posted By: Dave Watt
Re: Jake's Challenger/Rust - 02/10/11 04:18 PM
Wow, how does this machine shop stay in business if they are that incompetent? At least tell us what city it's in.
Posted By: 68427vette
Re: Jake's Challenger/Rust - 02/11/11 07:18 PM
i'd say, Loveland Colorado jc
Posted By: demon440
Re: Jake's Challenger/Rust - 02/12/11 05:52 AM
What kind of machinist doesn't own a
depth mic. ?
I am a cnc machinist for Kennametal and I
have 2 of them, one digital and one old school.
Posted By: DmanSRT71
Re: Jake's Challenger/Rust - 02/25/11 04:56 AM
I'm guessing that's 'cause you're a real machinist....and that other joker isn't

more please. now.
Quote:
What kind of machinist doesn't own a
depth mic. ?
I am a cnc machinist for Kennametal and I
have 2 of them, one digital and one old school.
Your challenger definetly inspires me that My challenger is repairable and will get done someday. There's many days that go by, that i fear my dream wont come true and i'll never get to enjoy a finished product. But like i said, posts/stories like yours bring my hopes back that someday it'll get finished. KEEP IT COMMING!!!
Posted By: jake71
Re: Jake's Challenger/Rust - 07/20/11 02:27 AM
So, I bet it seems I've given up! Nope, just had some other stuff takin' up my time. I've got some pics and info to post but for now I'm just really on here for a favor. I really need a driver door latch and can only find later models or passenger latches. Anybody got one they'd be willing to part with? Of course I'd be happy to pay a fair price and I promise I won't be the guy that ends up with a six page story about "he said the check is in the mail"!
Anyway, I'm actually blocking on the main shell right now and it's really starting to look like a car again! I do still have a little metal work to do on the front and I have to fit the rear valance I got from Jeff (jsbrown). It looks really nice but I don't think the ends are quite rightwhere it mounts. It shouldn't be a cutting/welding problem, just some hammer and dolly manipulation I think.
Sooo, if any of you have a line on the door latch, I'd really like to hear about it!
Pics to come!
Posted By: 70chall440
Re: Jake's Challenger/Rust - 07/20/11 04:35 PM
Jake - give Rocket Resto a call. they are good friends of mine have a lot of parts. I am pretty sure they would have the latch. OLYMPIA, WA 98501 PHONE (360) 705-0943. FAX (360) 705-9366
TOM@ROCKETRESTO Tell them you were referred by Mike in Yelm.
Posted By: jake71
Re: Jake's Challenger/Rust - 07/20/11 11:33 PM
Sweet, I'll give 'em a call! Thanks Mike!
Posted By: lahatte
Re: Jake's Challenger/Rust - 09/09/11 12:55 AM
Hi Jake,
Thanks very much for your detailed postings. I'm doing something similar to what you are doing, that is, building a new car body. I am putting pictures online, but unfortunately no descriptions.
See
www.claylahatte.com.I was glad to see what you did on the gaps. Even though there are many reasons to replace them, I'm hoping to keep the original quarters on this car. Either way, I'm sure I will need to do some work to make the gaps nice.
I also look forward to learning how your engine runs when it's done.
Thanks.
Clay
Posted By: dvw
Re: Jake's Challenger/Rust - 01/16/12 02:52 PM
Any paint yet? whats happening with the project?
Doug
Posted By: jake71
Re: Jake's Challenger/Rust - 01/16/12 04:12 PM
Nope, no paint yet, but it gets a little closer almost every weekend! I'm currently working on installing 2010 Challenger seats, front and rear. Big project but cool!Had to modify the rear seat back due to a height problem so I'm learning to sew! I'll try to get some time to get some pics up here soon. Thanks for checkin' in on me!
 Look forward to your update


