Moparts
Modern Bullitt build
Posted By: Keepat
Modern Bullitt build - 05/01/14 11:58 PM
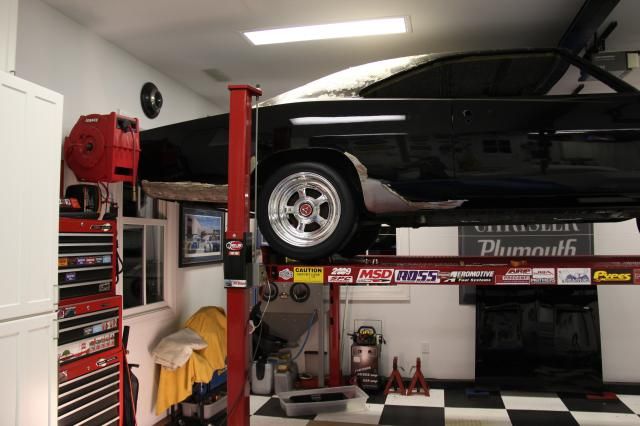
I started the restoration of my 1968 Dodge Charger with a plan to build a modern Bullitt. The outside of the car will look like the movie car with exception to the wheels, tires and a lower stances.
IÆm planning on a set of one off 17ö wheels to match the look of the hubcaps use on the Bullitt Charger. This will allow larger brakes and wider tires. This hubcap was made to look like a mag wheel and now
IÆm going to have a wheel made to look like a hubcap. The motor will be a gen III Hemi 6.4 or the new Hellcat if it would fit under the stock hood? And a 6 speed manual trans. I have a lot of details to work out but for now
I will bag and tag the parts and get the car media blasted.
Thanks
Pat

This how car looked when I bought it a 1 Į years ago.

And now the parts start coming off!
Posted By: Turbo224
Re: Modern Bullitt build - 05/02/14 04:39 PM
Looks like a pretty clean car to start your project with. Looking forward to pictures!
Posted By: burdar
Re: Modern Bullitt build - 05/02/14 07:39 PM
I like the concept! I'll be watching.

Posted By: Duster08
Re: Modern Bullitt build - 05/05/14 04:47 PM
Sweet ride
Posted By: Keepat
Re: Modern Bullitt build - 05/21/14 02:07 PM
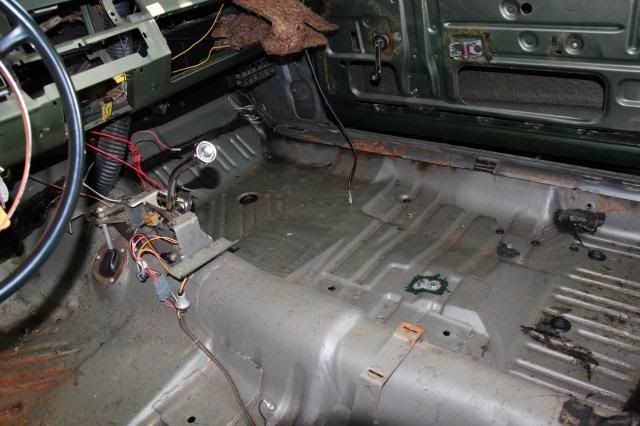
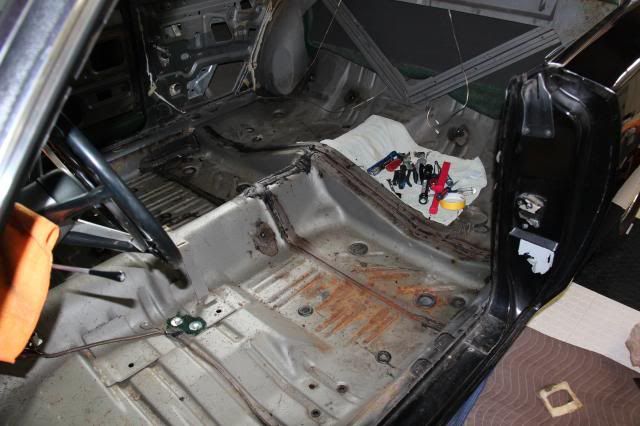
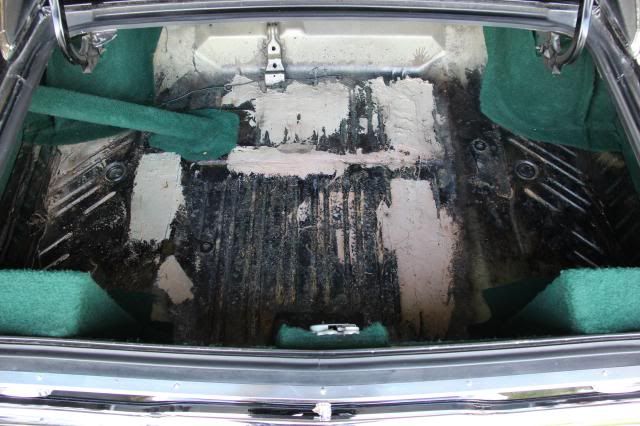
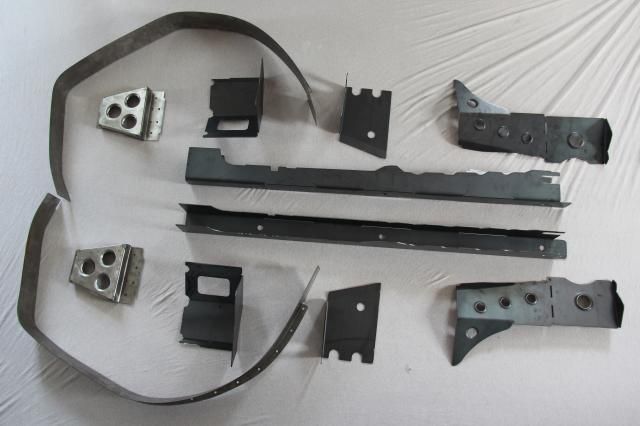
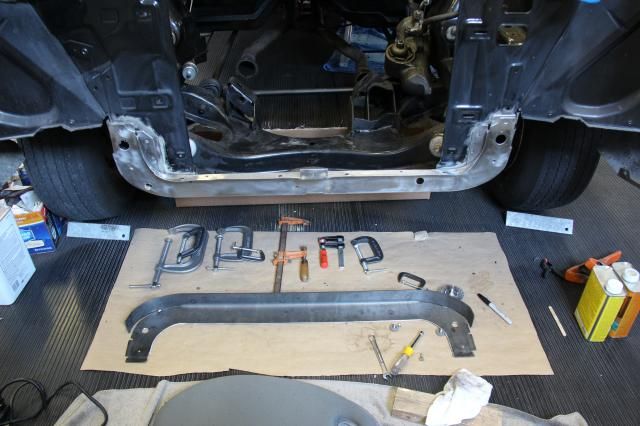
Still bagging and tagging the charger so I can get the car to the media blaster. Overall the car is in great shape with all of its original sheet metal and no accidents. The front fenders have never been off the car as I had to remove the great factory undercoating to get to the fasteners for the splash guards. The media blaster IÆm sure will uncover a few surprises. But for now here is the Good the Bad and the Ugly to date.
The Good, all of the frame rails are in excellent condition with only one small area of rust on the right side trans cross member and no accidents front or rear.
The Bad, a little rust on the driverÆs side floor that will take an 8ö x 12ö patch panel
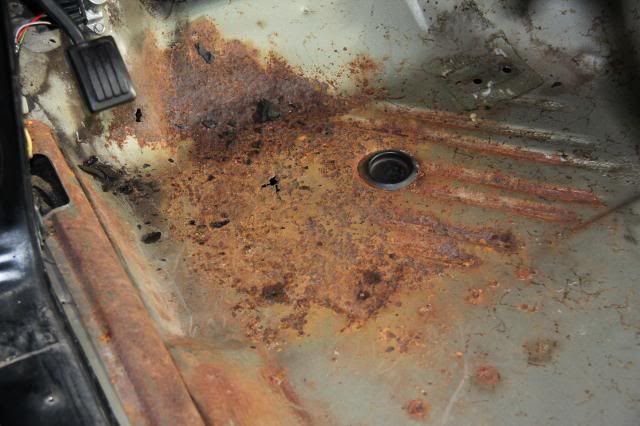
And the Ugly, I knew I would be replacing the trunk floor when I bought the car, but the back yard patch job is Ugly! On the good side both trunk drop and frame rails are rust free.
Thanks
Pat
Posted By: Keepat
Re: Modern Bullitt build - 05/22/14 03:06 AM
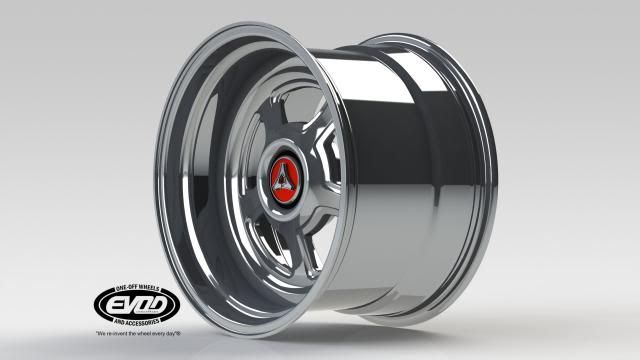
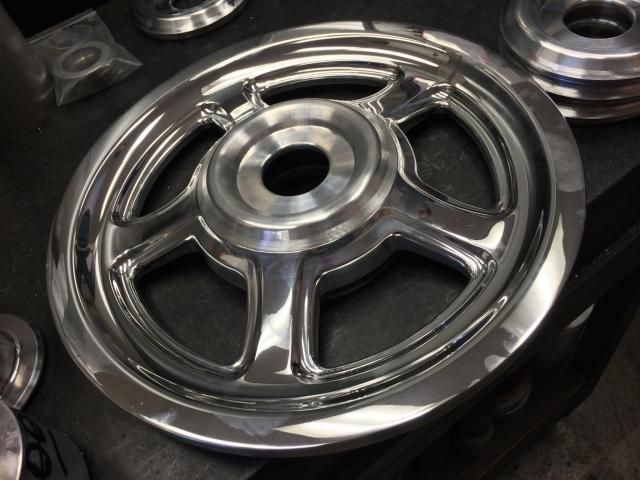
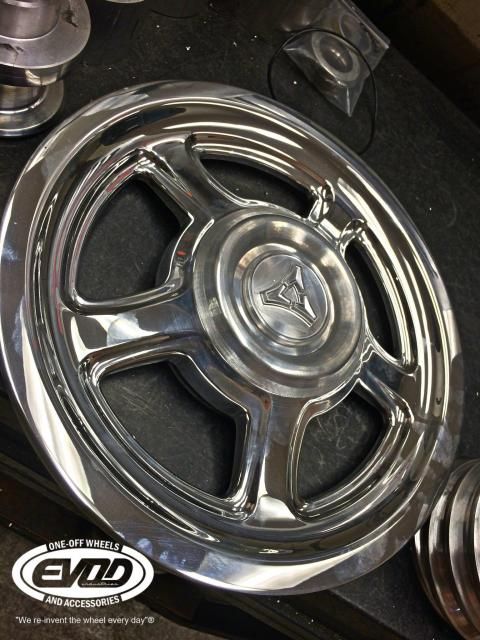
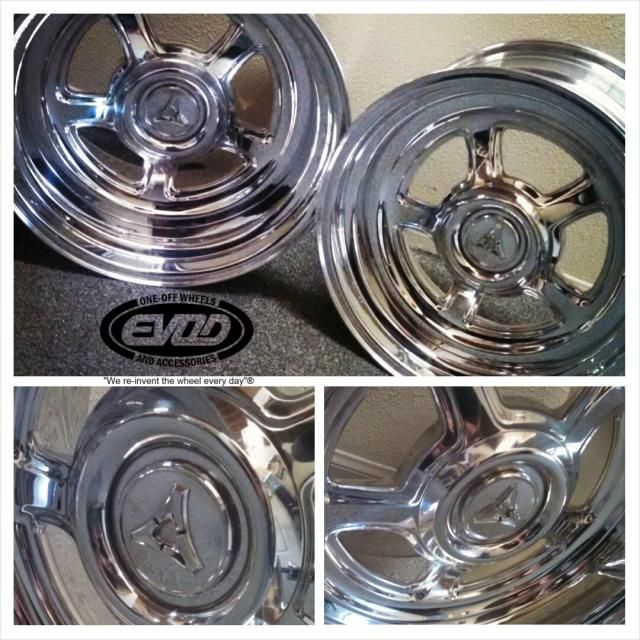
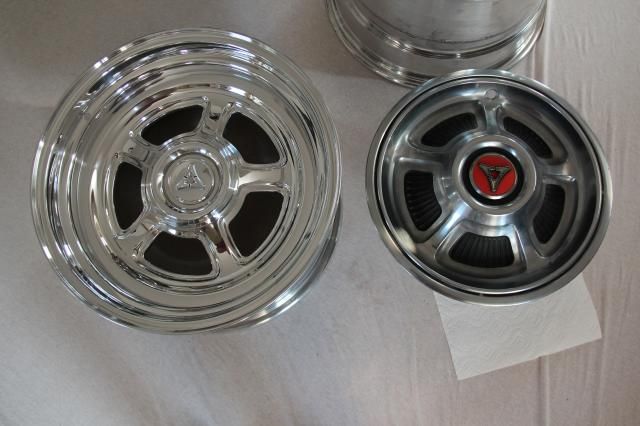
I received the 1st rendering of the custom wheel IÆm having made to look like the hubcaps used on the Bullitt Charger. There are a few small changes that need to be made, such as the center emblem is not orientated correctly. There will be a tool that will fit the emblem which will allow access to the lug-nuts. IÆm very happy with the 1st drawings of this one off wheel and look forward to seeing them made.
This is the original hubcap

And here is the custom version of the hubcap


Thanks
Pat
Posted By: bobbyb
Re: Modern Bullitt build - 05/22/14 12:47 PM
Cool
I like the wheels.
Great job on the wheels, I like them alot!! Can't wait to see this car come together. I loved your last car, lots of inspiration for my current build is coming from your old ride.
Posted By: Keepat
Re: Modern Bullitt build - 05/24/14 02:21 AM
Quote:
Great job on the wheels, I like them alot!! Can't wait to see this car come together. I loved your last car, lots of inspiration for my current build is coming from your old ride.
Yeah I enjoyed that first charger so much I decided to do it again, this one I'm sure will be a lot easier because the first one was a basket case as it was already disassembled before I bought it.
Thank you!
Pat
Posted By: ihv800
Re: Modern Bullitt build - 05/24/14 03:51 AM
I've dreamt of building a Bullitt Charger for a long time. I've tossed plans around on what to do about wheels. I like the looks of the wheel covers, but am a bigger fan of styled wheels. I always thought how awesome it would be to have some custom wheels made that mimicked the full wheel covers. Those will be sweet, and in my opinion make the look of the car! Look forward to all you do to it.
Posted By: Keepat
Re: Modern Bullitt build - 05/24/14 04:24 PM
Posted By: Keepat
Re: Modern Bullitt build - 05/28/14 03:54 AM
Received a few more wheel drawing with the logo upright and the black around the cut outs removed. Next drawings will have the extra material remove that was black as I think it may look better??

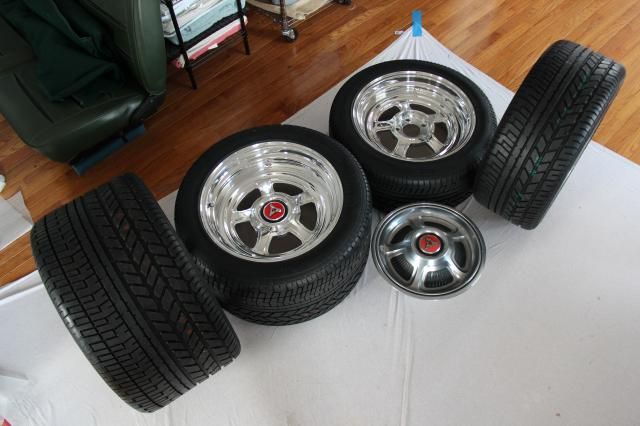
This is the front wheel 17x9 with a 5 Įö back space


And this is the back wheel 17x11 with a 6 Įö back space
Thanks
Pat
Posted By: Keepat
Re: Modern Bullitt build - 05/29/14 12:15 AM
This is the final design of the wheel and the order is in! No black in the openings and the openings are larger. I should see them in 6 to 8 weeks.
Thanks!
Pat

Posted By: hemidart1
Re: Modern Bullitt build - 05/29/14 12:22 AM
Very cool
Posted By: RUNCHARGER
Re: Modern Bullitt build - 05/29/14 02:51 AM
Love the wheels and restoring the parts when pulling them is the best strategy to avoid getting overwhelmed when the car is all apart and everything is dirty. That's why projects sit for years and then get sold.
Sheldon
Posted By: Keepat
Re: Modern Bullitt build - 05/30/14 12:29 AM
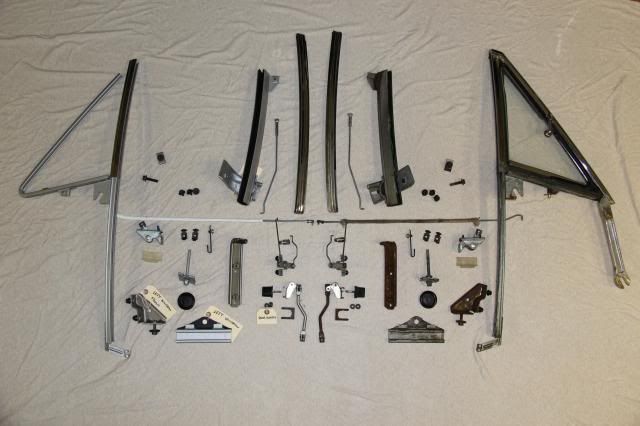
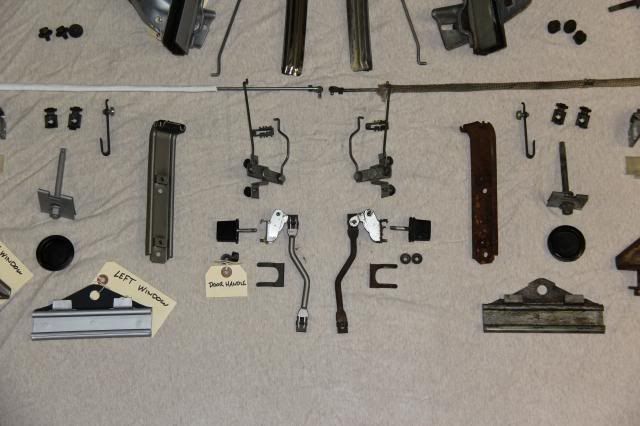
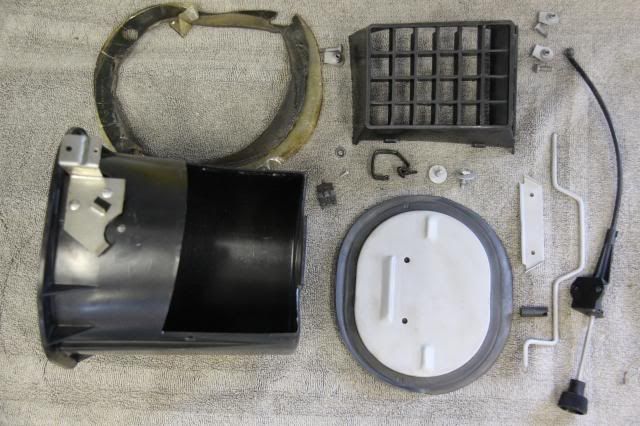
Disassembled both doors so I can send out the vent window and door handles for re-chroming. Here are a few picture of the left doors hardware cleaned and painted along with the right doors hardware as it came out.
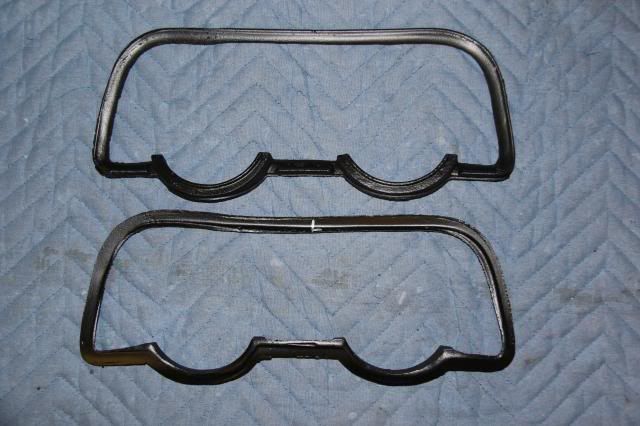
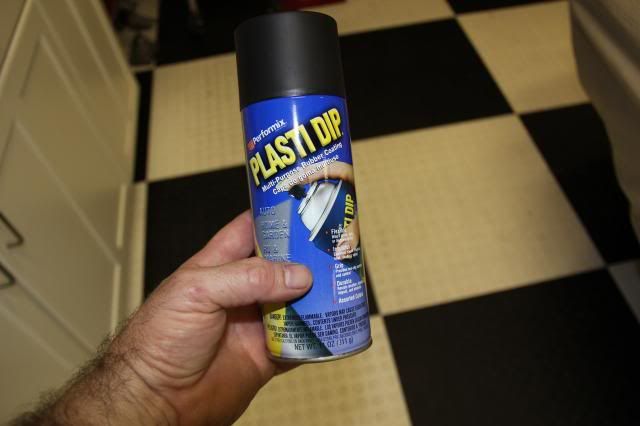
I remembered from my last 68 charger that reproduction the tail light gaskets didnÆt fit well. This time I was able to remove the original gasket without much damage and used an upholstery steamer to expand the foam. Then I sprayed a few coats of Plasti-Dip to fill in any damage. They should work like new!
Thanks
Pat
Posted By: Keepat
Re: Modern Bullitt build - 06/09/14 02:50 AM
Still removing and restoring as I go, but not much photogenic stuff to post. One of the things I restored was the rearview mirror and I took a few pictures of my sons 68 mustang with it.
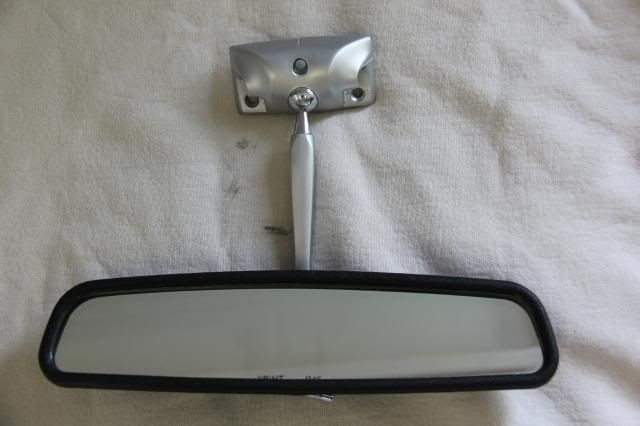
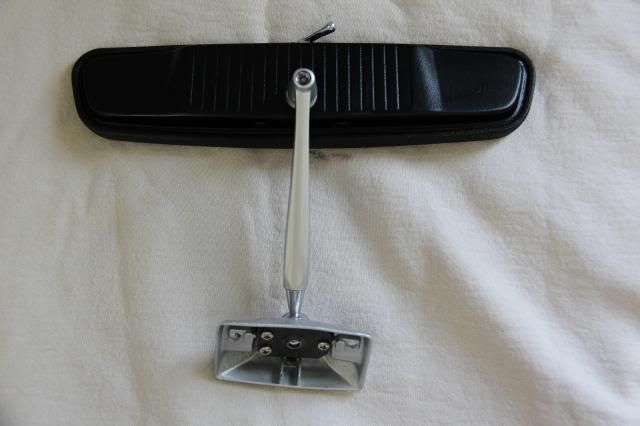
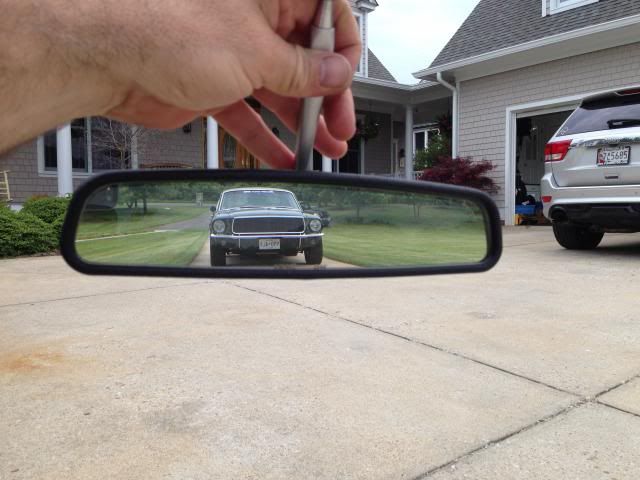
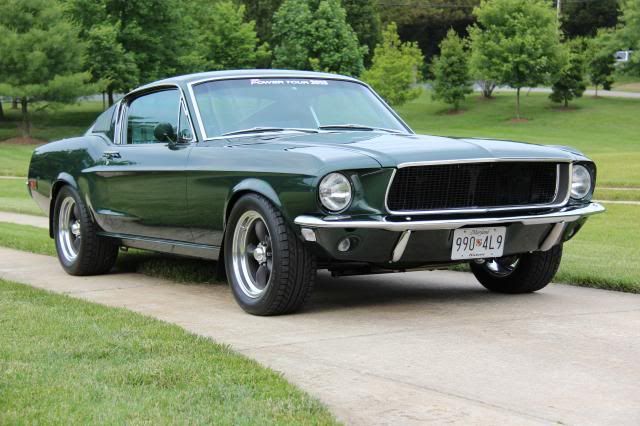
Soon my Charger will look as good as his Fastback but it will be a lot faster ;-)
Thanks!
Pat
Posted By: Keepat
Re: Modern Bullitt build - 06/13/14 11:55 PM
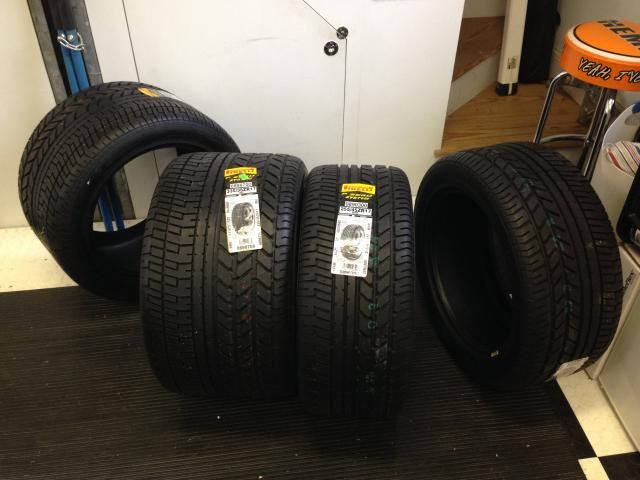
Received my tires yesterday, 255/45 and 335/35. Hope to get the wheels in a few weeks, then I can test
fit the front wheel/tires but will have to wait until I mini tub the rear to see the back wheels/tires under the car.
Thanks!
Pat

Posted By: mickm
Re: Modern Bullitt build - 06/18/14 10:35 PM
those 355's are massive!

how do you plan on getting them under there, are you going to mini tub it?
Posted By: Keepat
Re: Modern Bullitt build - 06/21/14 12:10 AM
Quote:
those 355's are massive! how do you plan on getting them under there, are you going to mini tub it?
Yes, mini tub and RMS 4 link. As the trunk is rusted and is the only part of the floor that needs to be replaced that'll give me the room to work in the tubs with the old floor out.
Thanks
Pat
Posted By: Keepat
Re: Modern Bullitt build - 06/30/14 08:59 PM
Posted By: cdp
Re: Modern Bullitt build - 07/01/14 03:20 AM
who are you sending your vent window parts off to for rechroming?
Posted By: Keepat
Re: Modern Bullitt build - 07/01/14 04:10 AM
Quote:
who are you sending your vent window parts off to for rechroming?
The past three cars I used Paul's Chrome And this will be the 4th car! Not cheap but I'm not sure you'll find better chrome work and pot metal repair work anywhere else.
Thanks
Pat
Posted By: Keepat
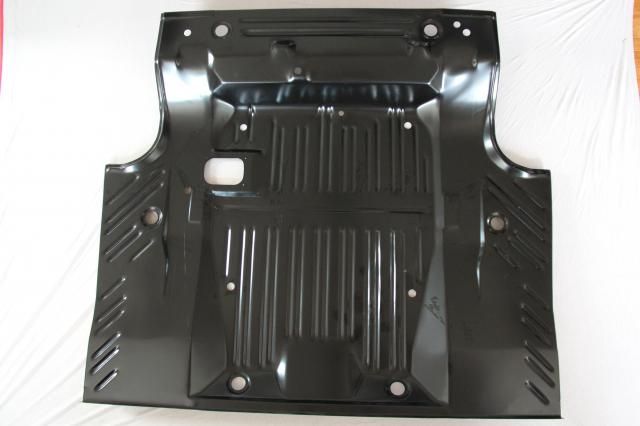
Re: Modern Bullitt build - 07/14/14 01:13 AM
Went to Chrysler Carlisle and picked up a AMD trunk floor and US Car Tool chassis stiffening kit and mini tub kit and a few other things. It was hot but a great day!
Posted By: Keepat
Re: Modern Bullitt build - 07/14/14 02:10 AM
Removed the glue and green paint from the fuel fill pipe and sanded the lead coating with 400- 600 and 800 then clear coated it. Note use a respirator and glove when sanding lead.

Posted By: Keepat
Re: Modern Bullitt build - 07/21/14 05:09 AM
Posted By: Anonymous
Re: Modern Bullitt build - 07/22/14 02:17 AM
Looks good.
You're moving right along.
Posted By: cdstl
Re: Modern Bullitt build - 07/22/14 01:16 PM
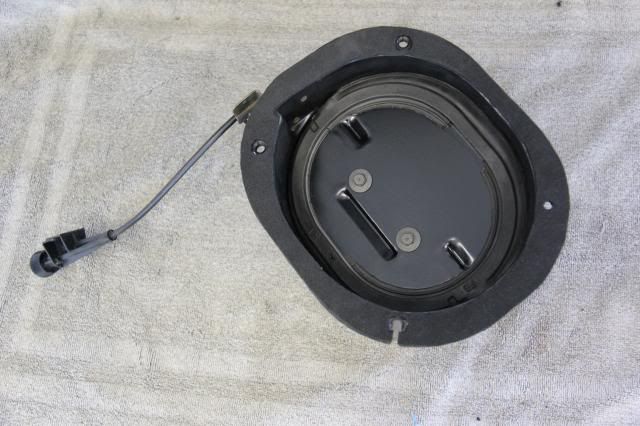
Quote:
I have been trying to restore the parts as I remove them instead of at the end of the project. The left side vent box is the last item I did and it cleaned up nicely. Here are a few before and after pictures.
Thanks!
Pat
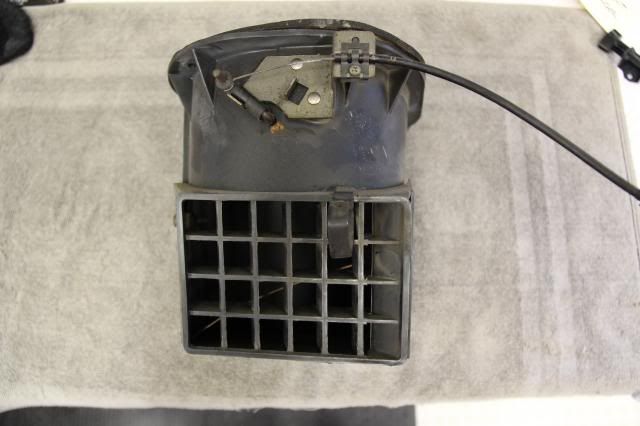

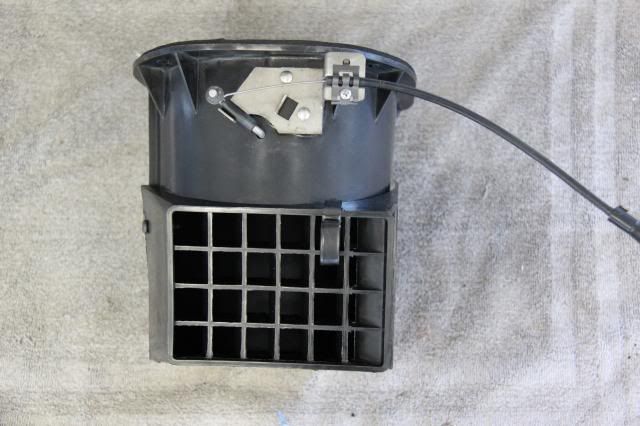
Where did you get the rivets for the vent box? I am thinking about tinning and leading the galvanized parts on a heater box. Is that what you did with these pieces?
Thanks
Posted By: Keepat
Re: Modern Bullitt build - 07/26/14 09:33 PM
Quote:
Quote:
I have been trying to restore the parts as I remove them instead of at the end of the project. The left side vent box is the last item I did and it cleaned up nicely. Here are a few before and after pictures.
Thanks!
Pat
Where did you get the rivets for the vent box? I am thinking about tinning and leading the galvanized parts on a heater box. Is that what you did with these pieces?
Thanks
I didn't remove the rivets just cleaned and cleared the parts
Thanks
Pat
Posted By: Keepat
Re: Modern Bullitt build - 07/26/14 09:34 PM
Evod said the wheel should ship late next week and sent a picture of one of the center sections.
Thanks
Pat
Posted By: cdp
Re: Modern Bullitt build - 07/27/14 04:52 AM
sweet! Would love to see the same thing done with the 1970 dodge full wheel cover.
Posted By: Keepat
Re: Modern Bullitt build - 07/28/14 03:55 AM
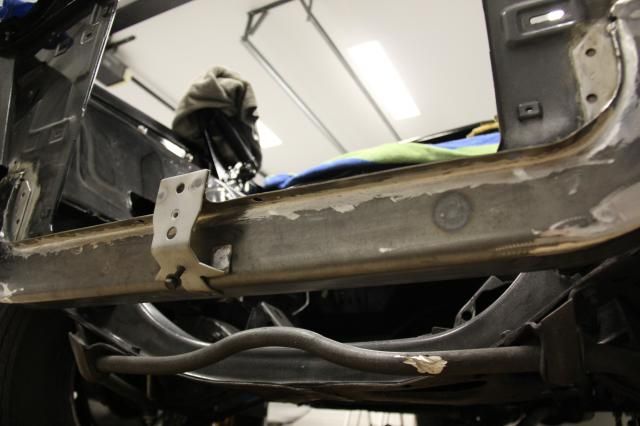
I installed the US Car Tool core support today and fit great with just a little grinding. I order it without the holes as I like the original look. Next to the subframe connectors and torque boxes it is one the best stiffener you can add to a Mopar! I ground down and radiuses the weld so it would look original. You could jack the car up from the core support now!
Thanks
Pat


Posted By: Keepat
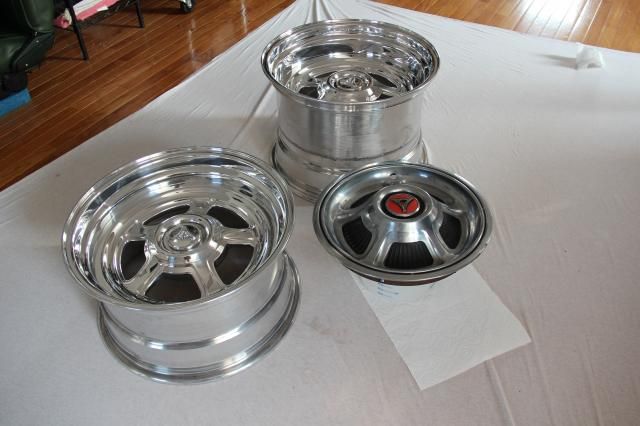
Re: Modern Bullitt build - 07/29/14 12:09 AM
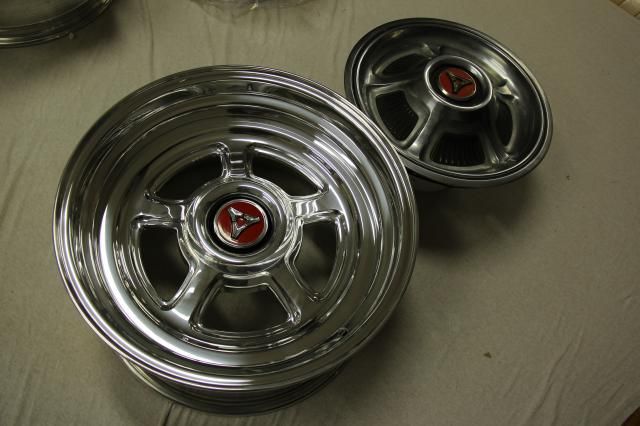
I received another picture of my wheels today. This one with the complete center cap.
Thanks!
pat
Posted By: cdp
Re: Modern Bullitt build - 07/29/14 06:51 PM
Hmmm....

wouldn't it be nice if Ma-Mopar (Fiat) made available the new 707 HP supercharged Hemi as a crate motor with wiring/electronics for resto mods?
That would be a Bullitt for sure!
Posted By: Keepat
Re: Modern Bullitt build - 07/31/14 02:52 PM
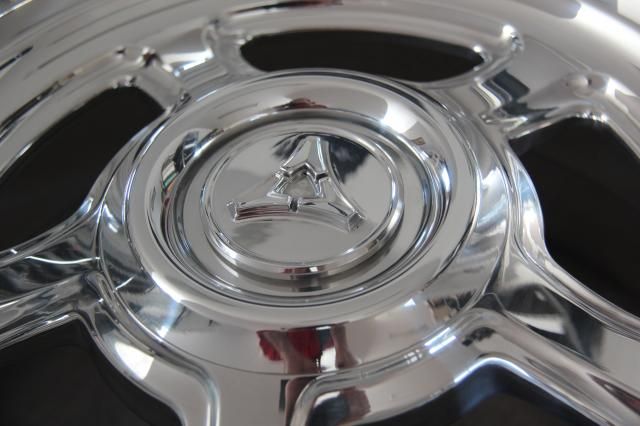
I received a few more pictures of my front wheels. The red and black paint in the center cap should make them pop!
Thanks!
Pat
Posted By: Keepat
Re: Modern Bullitt build - 08/09/14 04:15 PM
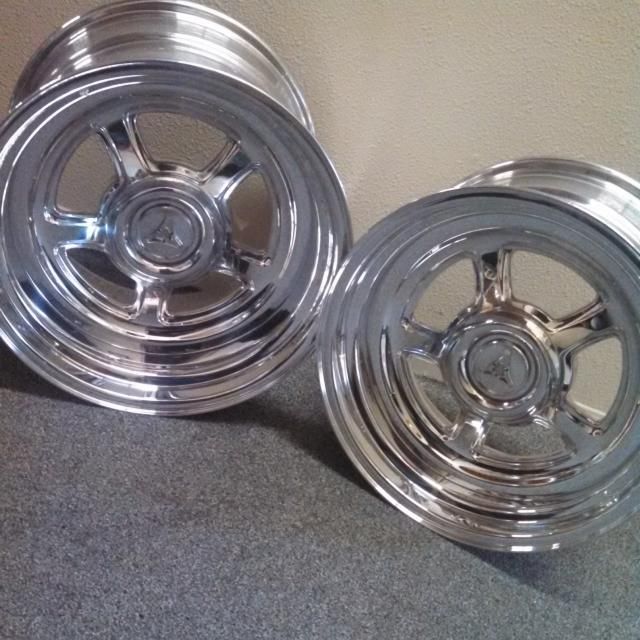
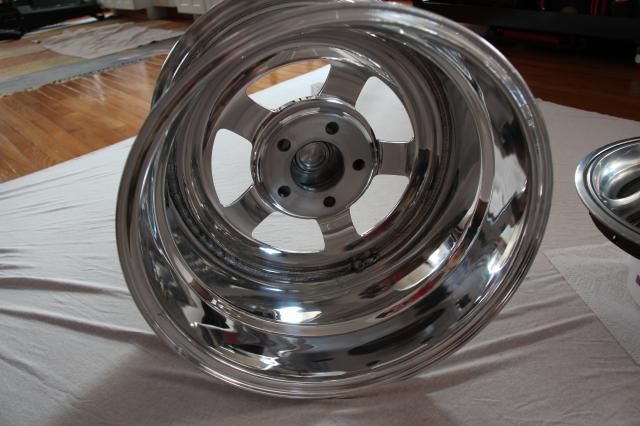
Received the wheels Friday and they exceeded my expectations. I will paint the red and black details in the center cap soon and hope to get the tires mounted next week.
Thanks
Pat
Posted By: MuuMuu101
Re: Modern Bullitt build - 08/09/14 06:27 PM
So, are those centers going to be reproduced? I bet that will be another way to get the haters against big wheels to join the dark side. The Year One Rallye and Magnum wheels worked a little, but these things just look awesome.
Posted By: Keepat
Re: Modern Bullitt build - 08/10/14 09:48 PM
As it was a Dodge only hub cap for just a few years I'm not sure there will be enough demand for this wheel on the market to justify putting it in production. Selfishly I hope not ;-)
Thanks
Pat
Posted By: Keepat
Re: Modern Bullitt build - 08/19/14 01:55 PM
Posted By: MuuMuu101
Re: Modern Bullitt build - 08/20/14 12:32 AM
Quote:
As it was a Dodge only hub cap for just a few years I'm not sure there will be enough demand for this wheel on the market to justify putting it in production. Selfishly I hope not ;-)
Thanks
Pat
Remove the Dodge logo off the center and you won't have a Dodge only wheel but a good looking, aftermarket 5-spoke wheel.
Posted By: Keepat
Re: Modern Bullitt build - 08/22/14 02:46 AM
IÆm still working on the colors but I think it is close to the original hub cap colors. I also ordered the motor today, an aluminum gen III 6.1 Hemi stroked to 426 ci and about 650 hp
Thanks
Pat


Posted By: 6PKRTSE
Re: Modern Bullitt build - 08/22/14 03:14 PM
Those wheels are awesome even though I am not a fan of large dia wheels on musclecars. One of my dream cars is to also have a Bullit Clone 68 Charger someday. I'll bet those were not cheap.... Awesome decision to have them made.
Posted By: Keepat
Re: Modern Bullitt build - 08/30/14 03:22 AM
Posted By: Keepat
Re: Modern Bullitt build - 08/30/14 03:42 AM
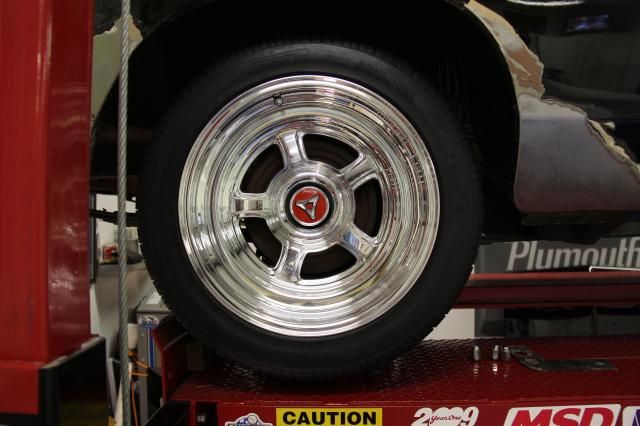
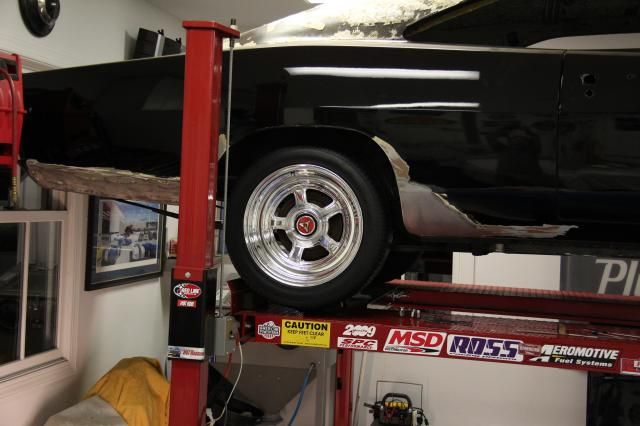
I also had the tires mounted on the new wheels but I have yet to cut in the mini tub so I had to put the front wheels on the rear for pictures as the 12ö wheel with the 335 tire donÆt fit the car yet.
Thanks
Pat
Posted By: Keepat
Re: Modern Bullitt build - 08/31/14 07:52 PM
I plan on testing a 3/16 black line on the outer rim as it is on the original hub cap. IÆm having 17 7/8öx 3/16 vinyl ring made to check the look.

Posted By: Keepat
Re: Modern Bullitt build - 09/03/14 02:49 AM
Posted By: Keepat
Re: Modern Bullitt build - 09/14/14 12:21 AM
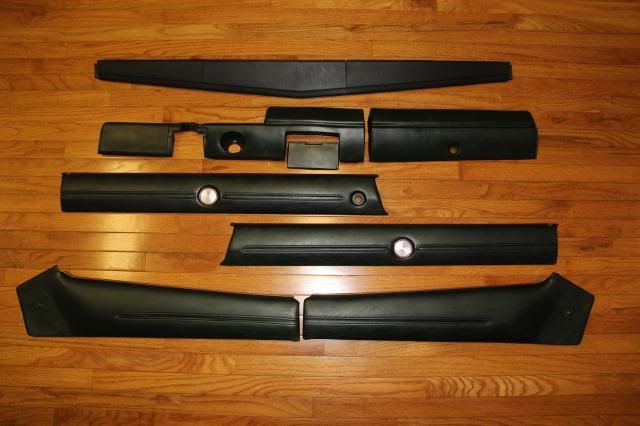
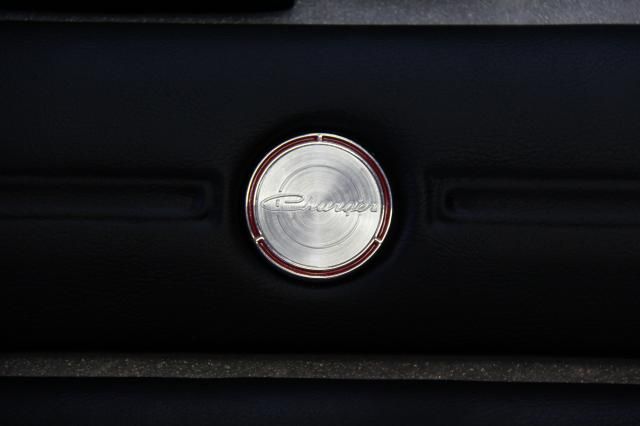
Received my dash and door pads from Just Dashes and they look great. This is the 2nd Charger dash and door pads they have done for me just wish they could replicate the stiching :-( here are a few before and after pictures
Thanks
Pat

Posted By: Keepat
Re: Modern Bullitt build - 09/20/14 04:06 AM
Posted By: Dan Halen
Re: Modern Bullitt build - 09/24/14 02:34 AM
I've seen your old silver car,

This one will be even better!
Posted By: Keepat
Re: Modern Bullitt build - 09/24/14 11:56 PM
The silver Charger was a fun car to build that why I'm doing another one! Did you see the silver charger in person?
Thanks!
Pat
[IMG]http://i264.photobucket.com/albums/ii196/keepat/carstuff001.jpg~original[/IMG]
Posted By: Keepat
Re: Modern Bullitt build - 10/20/14 10:34 PM
Received a few pictures of the motor Indy is building for the charger. As soon as the 2nd FAST throttle body shows up I will drive out for the Dyno and bring it home.
Thanks
Pat


Posted By: Anonymous
Re: Modern Bullitt build - 10/21/14 03:59 AM
That looks pretty.
Posted By: MuuMuu101
Re: Modern Bullitt build - 10/21/14 04:09 AM
OoooOoooooOoo... Shiny.

Posted By: Keepat
Re: Modern Bullitt build - 10/23/14 04:23 AM
Posted By: Keepat
Re: Modern Bullitt build - 10/29/14 03:09 AM
Posted By: Anonymous
Re: Modern Bullitt build - 10/29/14 05:55 AM
Nice work.
Posted By: Keepat
Re: Modern Bullitt build - 11/07/14 03:50 PM
Drove to Reilly Motorsports yesterday to pick up the front and rear suspension for the charger. Bill Reilly is a great guy and he had everything ready for pickup! Also stopped in Hazleton PA for the best chili dogs at JimmyÆs! I will post a few more picture of the RMS part when I get them out of the boxes.
Thanks
Pat


Posted By: Keepat
Re: Modern Bullitt build - 11/09/14 09:06 PM
Posted By: Keepat
Re: Modern Bullitt build - 11/13/14 05:24 AM
I assemble the new front wheel hubs, hats and the rotors. I used the same Wilwood 13ö 6 piston brakes on my last 68 Chargers and they worked great!
Thanks
Pat


Posted By: ihv800
Re: Modern Bullitt build - 11/14/14 04:47 AM
Build looks awesome. What is your procedure for metal finishing your welds down on the patch work? It looks fantastic!
Posted By: rhamson
Re: Modern Bullitt build - 11/14/14 03:41 PM
Looking good. I love the frame stiffening. You can't do enough in my estimation. More horsepower, more torque more trouble with these unibodies.
Posted By: Keepat
Re: Modern Bullitt build - 11/16/14 03:45 PM
Quote:
Build looks awesome. What is your procedure for metal finishing your welds down on the patch work? It looks fantastic!
I'm not sure I have any secret techniques that you can't already find online. The most important thing to remember is taking your time and don't let the panel get too hot. As I stitch weld I'd like to grind down the small welds close to the panel surface as I go Instead of grinding all the welds down when you're done. This helps keep the panel temperature low and It also helps when you're connecting the stitch welds as the panel thickness is more consistent with your amp setting on the welder.
Thanks
Pat
Posted By: Keepat
Re: Modern Bullitt build - 11/23/14 04:27 PM
Picked up the new motor for the charger and watched a few pulls on the dyno yesterday at Indy Cylinder Head. The folks at Indy were great accommodating our dyno session and pick up on a Saturday.
The motor spec are, Aluminum 6.1 GEN 3 block that has a 4.125 bore and a 4.050 stroke, which makes it 433 ci. The crankshaft and H-beam rods are from Comstar. Diamond pistons are 10.5 to 1 and the 6.1 heads are fully CNC. Comp cam Hydraulic roller cam .572/.576 with .240/.244. MSD ignition and Fast EFI dual throttle bodies.
On 92 octane she had an average of 635 hp and 536 Lb ft of torque.
I'll post a few pictures later today
Thanks
Pat
Posted By: Keepat
Re: Modern Bullitt build - 11/24/14 03:30 AM
Posted By: moparpollack
Re: Modern Bullitt build - 11/24/14 05:18 AM
Sweet looking bullet!
Posted By: Keepat
Re: Modern Bullitt build - 11/27/14 05:03 AM
Posted By: rhamson
Re: Modern Bullitt build - 12/01/14 03:43 PM
Looks great Pat. This car will be a screamer.
Posted By: Keepat
Re: Modern Bullitt build - 12/03/14 02:26 AM
I move the Charger to KurtÆs Hot Rod shop to start the really dirty part of the restoration. I will do the body work and paint here as we did on my sonÆs Mustang.
Thanks
Pat


Posted By: Keepat
Re: Modern Bullitt build - 12/05/14 01:01 AM
Received the T-56 6 speed transmission I ordered from Silver Sport Transmission today, along with the clutch, flywheel, peddles, and Quick time bell housing. So now I have most of the drivetrain component.
Thanks
Pat


Posted By: rhamson
Re: Modern Bullitt build - 12/05/14 03:40 PM
Sweet!
Posted By: Keepat
Re: Modern Bullitt build - 12/18/14 04:06 PM
Picked up a cool sissor lift for the shop and it will work get to put the motor in
Thanks
Pat

Posted By: brianz426
Re: Modern Bullitt build - 12/31/14 11:17 PM
Great job. Looking forward to the finished product.
Posted By: Keepat
Re: Modern Bullitt build - 01/04/15 02:11 AM
Posted By: Keepat
Re: Modern Bullitt build - 01/05/15 04:57 AM
I cut the bottom of the US Car Tool spring relocation mount so they are flush with the frame and filled the lower holes. Then cut the rust free factory frame rails for the spring relocation mounts.
Thanks
Pat


Posted By: rhamson
Re: Modern Bullitt build - 01/08/15 06:27 PM
Looking Good Pat! When you are done I think this car could easily have outrun the Mustang.
Posted By: Keepat
Re: Modern Bullitt build - 01/11/15 05:06 AM
I have the spring relocation mounts installed. The US Car Tool spring mount have an alignment flange that bolts to the original forward spring perch but I had to cut it off as the Reilly Motorsport Street Lynx centers to the original frame (36 Šö)


I used the frame cutouts to make templates to match the shape on the new spring mounts.


With spring mounts tacked welded on I will fit the upper crossbar before welding in.
Thanks
Pat
Posted By: Keepat
Re: Modern Bullitt build - 01/14/15 11:17 PM
Before welding in the new RMS cross member I add a gusset inside the frame to help distribute the load to both side of the frame. I also had to make two shims to fill the small gap of the cross member.


I used a spot welded to hold the shim in place.

When it is welded in I will remove the original cross member.
Thanks
Pat
Posted By: hemi68charger
Re: Modern Bullitt build - 01/14/15 11:25 PM
Wow... Very impressive.. I dig the vision of the wheels.....
Posted By: Keepat
Re: Modern Bullitt build - 01/17/15 03:30 AM
Quote:
Wow... Very impressive.. I dig the vision of the wheels.....
Thank You sir!
Posted By: Keepat
Re: Modern Bullitt build - 01/17/15 03:32 AM
The Plasma cutter and spot weld cutter make short work of removing the right side inter wheel well. It would nice if it goes back in as easy, wishful thinking!
Thanks
Pat


Posted By: aspenrt360
Re: Modern Bullitt build - 01/17/15 03:34 AM
Really nice work! and the wheels are like art!

Posted By: mattsmopars
Re: Modern Bullitt build - 01/17/15 04:33 AM
Congrats! Very very nice charger!
Matt
Posted By: Keepat
Re: Modern Bullitt build - 01/19/15 03:03 AM
Posted By: 69Cuda340S
Re: Modern Bullitt build - 01/19/15 04:03 PM
Excellent work!
Posted By: Keepat
Re: Modern Bullitt build - 01/20/15 12:02 AM
Quote:
Excellent work!
Thank you sir!
Posted By: Keepat
Re: Modern Bullitt build - 01/22/15 04:52 PM
Posted By: Keepat
Re: Modern Bullitt build - 02/07/15 04:33 AM
Posted By: Keepat
Re: Modern Bullitt build - 02/23/15 03:49 AM
Out of town for a few days working at the Miami boat show, but got back on the Charger this weekend. Remove most of the paint, undercoating, and surface rust in the trunk.
Thanks
Pat


Heat-gun and a putty knife and then wipe down with lacquer thinner makes quick remove of the original sound deadening.


Posted By: moparpollack
Re: Modern Bullitt build - 02/23/15 05:44 AM
How do you plan to put the one piece trunk pan in? Just curious as I only seen it done with the quarters cut off.

Posted By: Keepat
Re: Modern Bullitt build - 02/23/15 03:49 PM
Quote:
How do you plan to put the one piece trunk pan in? Just curious as I only seen it done with the quarters cut off.
With the inter wheel wells out and the package tray cross braces removed the full trunk pan will go in from the back seat, then I will install the inter wheel well.
Thanks
Pat
Posted By: rhamson
Re: Modern Bullitt build - 02/25/15 04:16 PM
Nice work Pat! Keep it up.
Posted By: Keepat
Re: Modern Bullitt build - 02/28/15 05:10 PM
Before installing the trunk floor I started on the back window as it would be easier to clean up the welds under the window frame without the trunk floor.


Made a few template of the corner before cutting the rust out as to match the shape.

Welded in the lower half of the corner before cutting out the top half to help hold the shape.


Use the trim to confirm the shape as I tacked welded the new metal in.


One corner done and one to go.
Thanks
Pat
Posted By: Stewpar
Re: Modern Bullitt build - 02/28/15 05:48 PM
Very impressive to say the least, I am enjoying following this thread........
Posted By: Keepat
Re: Modern Bullitt build - 02/28/15 06:41 PM
Quote:
Very impressive to say the least, I am enjoying following this thread........
Thank you sir!
Posted By: 69Cuda340S
Re: Modern Bullitt build - 03/01/15 05:53 AM
Nice work on that window channel.
Posted By: Keepat
Re: Modern Bullitt build - 03/04/15 04:54 AM
The right side was a little more work but turned out nice.


Next project is the trunk floor and mini tubs.
Thanks!
Pat
Posted By: Keepat
Re: Modern Bullitt build - 03/08/15 05:09 AM
Posted By: Keepat
Re: Modern Bullitt build - 03/13/15 04:24 PM
Posted By: Keepat
Re: Modern Bullitt build - 03/15/15 04:08 AM
nicely done sir!
you are making me consider ripping my rear wheel wells out so I can do the same.
Posted By: RTSrunner
Re: Modern Bullitt build - 03/16/15 08:28 AM
Quote:
Really nice work! and the wheels are like art!
I agree.I always liked the style of that wheel cover,and as a wheel they are awesome! RT
Posted By: davesmopars
Re: Modern Bullitt build - 03/16/15 06:16 PM
Looks awesome! Nice work
Posted By: Keepat
Re: Modern Bullitt build - 03/17/15 01:54 AM
Thank you gentlemen!
Pat
Posted By: Keepat
Re: Modern Bullitt build - 03/22/15 10:06 PM
Best mini tub job I have ever seen. Looks factory.
Posted By: Keepat
Re: Modern Bullitt build - 03/24/15 01:01 AM
Quote:
Best mini tub job I have ever seen. Looks factory.
Thank you! It was a lot of work keeping it looking original but I think it was worth it!
Pat
Posted By: Keepat
Re: Modern Bullitt build - 03/24/15 03:50 AM
US Car Tool supplied custom trunk hinge supports with the mini tub kit but IÆm not sure how they fit and they donÆt look right for this build so I modified the original mounts. I made a cardboard template and transferred the shape to the original mount. This finishes the original look I was working on.
Thanks
Pat


Posted By: Keepat
Re: Modern Bullitt build - 03/29/15 04:23 AM
With the inter wheel wells out the aft end of the rockers is open. So before they go in for good I vacuumed, cleaned , and sprayed Eastwood internal frame coating inside. Over 46 years old on the east coast they look great inside and now they should be good for another 46 years. I wonder if IÆll be good for another 46 years??
Thanks
Pat
Before and after


Posted By: Keepat
Re: Modern Bullitt build - 04/06/15 02:35 AM
Epoxy the inside of the trunk and rear frame rails with DuPont 2505S DTM epoxy primer/sealer today.
Now its ready to weld the trunk floor and inter wheel wells in.
Thanks
Pat


Posted By: Stewpar
Re: Modern Bullitt build - 04/07/15 11:21 PM
Awesome!
Posted By: Keepat
Re: Modern Bullitt build - 04/12/15 12:12 AM
Welded in the trunk floor today and hope to put the inter wheel wells in tomorrow. The floor fit great with little persuasion. I was able put a bead of seam sealer at the tail panel and where the interior floor meets the trunk floor. I also used my spot weld wherever I could reach and plug welded what was left.
Thanks
Pat


Posted By: larry4406
Re: Modern Bullitt build - 04/12/15 12:43 AM
Nice. Details please on the spot welder.
Posted By: Keepat
Re: Modern Bullitt build - 04/12/15 06:28 PM
Larry,
The spot welder is a 220v Miller model LMSW 52T with timer control. ItŌĆÖs a nice unit but it is heavy and is best to use with 2 people. I have used it to restore 3 cars now and looks and works like new.
Thank You!
Pat
Posted By: Keepat
Re: Modern Bullitt build - 04/13/15 02:45 AM
Epoxy primer the inter wheel wells along with few other parts today. I hope to install them permanently tomorrow.
Thanks
Pat


Posted By: Keepat
Re: Modern Bullitt build - 04/27/15 02:08 AM
I have been away from the Charger for a few days as my youngest graduated culinary school (CIA) in NY. He is only home for 3 weeks then back to school for a business degree.
I welded in the wheel wells and have the bumper & trunk supports painted and ready to install.
Thanks
Pat


Posted By: rhamson
Re: Modern Bullitt build - 04/27/15 02:27 PM
Looking good Pat. I think if the bad guy in Bullitt had been driving this one he might have gotten away.
Posted By: Keepat
Re: Modern Bullitt build - 04/28/15 12:57 AM
Thanks Ralph, hope you're making progress on your challenger!
Pat
Posted By: upnover
Re: Modern Bullitt build - 04/30/15 03:42 AM
looking good, lots of work!
Posted By: Keepat
Re: Modern Bullitt build - 04/30/15 03:55 AM
All the metalwork in the back of the car is complete and now it is time for the front of the car, motor, 6 speed, and RMS suspension. (The fun stuff)
Thanks
Pat


Posted By: Mopar Mark
Re: Modern Bullitt build - 04/30/15 04:50 AM
Are the supports that go from the "under the seat" floor section original or repro? If repro where can I find them?
Thanks,
Mark
Posted By: Keepat
Re: Modern Bullitt build - 04/30/15 05:08 AM
Only the trunk floor is reproduction, all the parts under the seat are original to this car. I would be surprised if the parts that you are looking for or not available. Good luck!
Thanks
Pat
Posted By: gregsrt
Re: Modern Bullitt build - 04/30/15 07:43 AM
Wow, that's some nice work there. I don't think it will ever rust now.
Posted By: Keepat
Re: Modern Bullitt build - 05/01/15 02:17 AM
I just remembered today marks one year into this build that IŌĆÖm shooting to finish by next spring. It is so true how fast time flyŌĆÖs by as we get older :-(
Pat
Posted By: rhamson
Re: Modern Bullitt build - 05/01/15 04:28 PM
Still on the rotisserie waiting to get some money for suspension parts to put her back on her wheels and start the body work. Thanks for asking.
Posted By: Keepat
Re: Modern Bullitt build - 05/04/15 02:53 PM
I drop the K member and remove the bump stops from the frame rails. The K member has SSBC disc brakes and is in good shape with a tight steering box and I would like to sell it if anyone is interested? I will post it for sale soon.
Thanks
Pat


Posted By: Keepat
Re: Modern Bullitt build - 05/04/15 06:04 PM
Posted By: Keepat
Re: Modern Bullitt build - 05/05/15 03:46 AM
Even with all my calculations, double checking with the different venders, and other threads with similar suspensions it was a relief seeing the front wheel on the car with great clearance and no rubbing issues with in the fender.
Thanks
Pat


Posted By: Keepat
Re: Modern Bullitt build - 05/09/15 02:06 AM
I mocked up the steering U-joints and cut the shaft to fit, nice hardware supplied by RMS!
Thanks
Pat


Posted By: Keepat
Re: Modern Bullitt build - 05/14/15 05:05 AM
Posted By: NV69B7RR
Re: Modern Bullitt build - 05/14/15 03:34 PM
Nice work, I really like how you used the guide for making a clean cut. Can't wait to see your car finished!
Posted By: Keepat
Re: Modern Bullitt build - 05/17/15 01:56 AM
Fabricated an aluminum K member dolly as I will be installing and removing the motor and trans a lot over the next few week to fit the tunnel to the transmission.


I will have a scissor jack at the trans end to help adjust the fit in the car.

With K member dolly made I move the motor from the house to the Hot Rod shop. This is as close as the motor has gotten to the charger and it is about to get closer!
Thanks
Pat
Posted By: Keepat
Re: Modern Bullitt build - 05/18/15 04:33 PM
Got to love a Plasma cutter! Used about 7 layers of tape for a guide and cut!
Thanks
Pat
 [img]http://i949.photobucket.com/albums/ad340/kurts68fastback/th_IMG_3182_zpslqfcsvbc.mp4
[/img]
Click on pic for video.

Posted By: 69Cuda340S
Re: Modern Bullitt build - 05/21/15 02:29 AM
Nice work!
Posted By: Keepat
Re: Modern Bullitt build - 05/24/15 03:39 AM
Posted By: minivan
Re: Modern Bullitt build - 05/24/15 04:22 AM
Dayum, that is coming out really nice...
Posted By: Keepat
Re: Modern Bullitt build - 05/24/15 03:55 PM
Posted By: rhamson
Re: Modern Bullitt build - 05/27/15 07:14 PM
You do great work Pat! Keep it up.
Posted By: Keepat
Re: Modern Bullitt build - 05/28/15 08:56 PM
You do great work Pat! Keep it up.
Thanks Ralph!
Posted By: Keepat
Re: Modern Bullitt build - 05/28/15 08:57 PM
I have the trans tunnel tack-welded in place and ready to double check the trans fit.
I open the tunnel about 3ŌĆØ at the front and about 1 1/4ŌĆØ at the tail shaft. Now I need to make an removable shifter cover that will use the original shifter boot.
Thanks
Pat


Posted By: rhamson
Re: Modern Bullitt build - 05/29/15 02:44 PM
I have the trans tunnel tack-welded in place and ready to double check the trans fit.
I open the tunnel about 3ŌĆØ at the front and about 1 1/4ŌĆØ at the tail shaft. Now I need to make an removable shifter cover that will use the original shifter boot.
Thanks
Pat
How are you keeping track of the drive shaft geometry? Since this transmission goes in much higher than stock, will it affect the pinion angle at the differential? Or are you going to equal the two out after you get the transmission set?
Posted By: Keepat
Re: Modern Bullitt build - 05/30/15 08:10 PM
Ralph,
I have the angle of the of the trans set the same as the stock trans and will adjust to the rear as it will be lower then stock by 2" +/-
Thanks
Pat
Posted By: Keepat
Re: Modern Bullitt build - 06/01/15 05:00 PM
The biggest part of the trans tunnel is finished and all that is left is lifting the aft end of the tunnel to meet the new height of the trans tunnel. But before that IŌĆÖm starting on the cross member that will be made from 3/8 aluminum, IŌĆÖll post a few drawings of the cross member design soon.
Thanks
Pat

Posted By: Keepat
Re: Modern Bullitt build - 06/04/15 03:48 AM
Test fit the TTI headers and they fit great! Left side just touches the corner of the starter but there are no gasket installed yet and should clear when in. I also started on the cross member by making a plywood template. I should have it mocked up over the weekend and make the aluminum cross member next week.
Thanks
Pat


Posted By: Keepat
Re: Modern Bullitt build - 06/07/15 03:41 PM
I finished mocking up the cross member with plywood and will duplicate in aluminum. This design will eliminate the need for the over the trans cross member. I think with a few modifications this cross member could also be used with a stock torsion bar suspension as well.
Thanks
Pat


Posted By: Keepat
Re: Modern Bullitt build - 06/13/15 05:33 AM
Had a friend weld the aluminum cross member for me and I think it looks great! With a little adjustment it fit as good as it looks!
Thanks
Pat


I add a flange at each end and I need to weld on the end caps to the original cross member. Also reused the original crush brace for the new hole I added for the cross member.


Posted By: Keepat
Re: Modern Bullitt build - 06/13/15 06:28 PM
For anyone interested here is a drawing of how I think this cross-member could be made to work with a stock torsion bar suspension.
Thanks
Pat

Posted By: minivan
Re: Modern Bullitt build - 06/14/15 03:36 AM
I always look forward to your posts and pic updates.. Amazing ideas and fab work...
Posted By: Keepat
Re: Modern Bullitt build - 06/14/15 03:45 AM
I always look forward to your posts and pic updates.. Amazing ideas and fab work...
Thank you sir, I'm glad you enjoyed it.
Pat
Posted By: Keepat
Re: Modern Bullitt build - 06/15/15 03:32 AM
Cut the aft end of the trans tunnel and tacked it in place and now it is looking close to original.
Thanks
Pat


Posted By: Pacnorthcuda
Re: Modern Bullitt build - 06/15/15 04:08 AM
Is anybody else following this thread and thinking 'damn there are people on Moparts with amazing automotive skills' ?
Posted By: Mr. Smurf
Re: Modern Bullitt build - 06/15/15 03:36 PM
Yes....
Ed
Posted By: sparcy
Re: Modern Bullitt build - 06/16/15 05:22 AM
yep
Posted By: minivan
Re: Modern Bullitt build - 06/16/15 03:55 PM
Is anybody else following this thread and thinking 'damn there are people on Moparts with amazing automotive skills' ?
Effin A... I know how much time and labor it took just to take one apart and put it back together like the factory did.. Lots of wire wheel time.....
Posted By: Keepat
Re: Modern Bullitt build - 06/16/15 09:52 PM
Thank you gentlemen! I'm glad you enjoyed it, thanks for following the progress.
Pat
Posted By: Keepat
Re: Modern Bullitt build - 06/18/15 02:13 AM
A few pictures of the new cross member installed with the transmission.
Thanks
Pat


Posted By: Keepat
Re: Modern Bullitt build - 06/21/15 05:56 AM
Posted By: 2JcodeChargers
Re: Modern Bullitt build - 06/23/15 01:23 AM
Holy crap!
Pat, you're the man.
Posted By: Keepat
Re: Modern Bullitt build - 06/23/15 02:56 AM
This is the shifter that came with the T56 and I would like to find an original 1968 T handle shifter that I can modified the T handle to trigger a relay for the reverse lockout on the new trans. If anyone has one or knows where to get one please let me know. IŌĆÖll check at Carlisle in a few weeks.
Thanks
Pat


Posted By: JMCFAN
Re: Modern Bullitt build - 06/26/15 08:13 PM
Is anybody else following this thread and thinking 'damn there are people on Moparts with amazing automotive skills' ?
yup!
Posted By: rhamson
Re: Modern Bullitt build - 06/27/15 06:12 PM
This is looking great Pat. You are an inspiration to just make it work.
Posted By: Keepat
Re: Modern Bullitt build - 06/28/15 10:19 PM
Test fit the hood today to check the clearance for the air cleaner and was happy to see there is 2 ┬ĮŌĆØ at the front throttlebody and 3 ┬ĮŌĆØ at the rear throttlebody. My earlier estimates were at about 2 3/8ŌĆØ and where an 1/8ŌĆØ more may not sound like much, it is a lot! Before ordering the modern-man Indy intake I could not find any info on the hood clearance other than the folks at Indy saying it will fit. Not sure it if would be the same with the stock K member?
Thanks
Pat


Posted By: rgreule
Re: Modern Bullitt build - 07/01/15 10:51 PM
awesome build!! keep up the good work
Posted By: Keepat
Re: Modern Bullitt build - 07/04/15 06:14 PM
Today I started fitting the backseat to see what modifications would be needed to fit the min-tubs. Both inter wheel wells have been moved inboard about 2 ┬ĮŌĆØ each. After the 1st test fit I was pleasantly surprised to find very little modifications would be required, and most importantly the stock seat cover could be used!


The seat needed no modification as the seat frame cleared the wheel well.


The two tabs at the bottom of each wheel well needed to be moved to their original location. The tabs hold the seat back down.


These two metal rods need to be moved in about 1 ┬ĮŌĆØ on each side to clear the wheel well.

Here you can see the 2 rods moved and the original rod to show the difference.

Fits great just need new black seat covers.
Thanks
Pat
Posted By: Hooligan
Re: Modern Bullitt build - 07/05/15 10:27 PM
Hi Pat!
I have been following your outrageous build with complete envy and utter disbelief of your amazing talent! I am a huge fan! Never before have I seen such gorgeous work done with incredible precision! I want to praise you a whole lot more, but now I want to thank you for the enjoyment that you are providing myself and to the other members who can't wait for more, more, more!
I have no negative thoughts or complains, but I have to wonder why you didn't use your spectacular imagination and skills to design and fabricate your own custom front and rear suspensions! Your terrific transmission cross member blew my mind away!
I am just starting a pro touring '72 Satellite, and you are a huge inspiration to me! I'll never reach the level of quality of your work! You stand alone in my opinion, and I have seen a lot of custom cars! I'm not impressed with the big name shops that build those high dollar cars with a team of guys and gals. I sure hope when you finish your Charger that you build another great Mopar!
Thanks again, Steve
Posted By: Keepat
Re: Modern Bullitt build - 07/06/15 04:44 AM
Hi Pat!
I have been following your outrageous build with complete envy and utter disbelief of your amazing talent! I am a huge fan! Never before have I seen such gorgeous work done with incredible precision! I want to praise you a whole lot more, but now I want to thank you for the enjoyment that you are providing myself and to the other members who can't wait for more, more, more!
I have no negative thoughts or complains, but I have to wonder why you didn't use your spectacular imagination and skills to design and fabricate your own custom front and rear suspensions! Your terrific transmission cross member blew my mind away!
I am just starting a pro touring '72 Satellite, and you are a huge inspiration to me! I'll never reach the level of quality of your work! You stand alone in my opinion, and I have seen a lot of custom cars! I'm not impressed with the big name shops that build those high dollar cars with a team of guys and gals. I sure hope when you finish your Charger that you build another great Mopar!
Thanks again, Steve
Hi Steve,
Thank you for your comments and for following this build i'm glad you and others are enjoying it! As for designing and making my own suspension, "man must know his limitations" (Dirty Harry ;-)
The next car will be a old woody for my wife, but I'm not sure what make it will be? Could be another Mopar??
Good luck with your pro touring project, I'll look forward to watching your progress!
Thanks again for the kind words
Pat
Posted By: Keepat
Re: Modern Bullitt build - 07/12/15 03:43 AM
I picked up an aluminum air cleaner from Chris with Classic Haulage at Carlisle PA yesterday. Chris is a nice guy and he makes a great aluminum Hemi type air cleaner. A chrome plated repro of the original steel air cleaner is now available but as my motor is all aluminum I keep the aluminum theme. I need to make a custom filter base and get a 426 Hemi Head air cleaner sticker to finish the look.
Thanks
Pat


Posted By: Keepat
Re: Modern Bullitt build - 07/19/15 02:51 AM
I removed the fenders and doors for the 1st time since the factory installed them in 1968. One of the things that attracted me to this car is it has all of its original body panels and has never been in an accident! The doors, fenders, trunk, hood, and a few other parts will go to the soda blaster Monday and the hinges will get shipped to SMS to be rebuilt. Interesting to find that the left and right fender had the same size shims with exception of 1 additional 1/16 shim on the bottom right rocker.
Thanks
Pat


Posted By: Keepat
Re: Modern Bullitt build - 07/25/15 03:16 AM
I received the Vintage Air system and fit the air handler on the firewall so I can mark the existing hole that I donŌĆÖt need. The system comes with large plate to cover up the hole on the engine side but I plan on welding the holes and not using the plate.
Thanks
Pat


Posted By: Keepat
Re: Modern Bullitt build - 07/26/15 11:57 PM
The plan is to make some custom AC lines and run them in the right side fender well. But before I can start on the line I need to fit the US Car Tool inter fender brace. The fit was close but needed a little modification to fit great.


The problem with the fit was the factory welded the shock tower brace 3/8ŌĆØ forward from where it should be. To get the new brace to fit I cut about 3/8ŌĆØ off the front edge of the factory brace so the it would let the new brace slide back to meet the firewall and cowl.


Just a few screw to hold it in place and will weld it on with jack stand under the frame rails at the wheels. You can see how far off the factory mount is off in the last picture, I will re-cut the arch to match before welding.
Thanks
Pat
Posted By: 69Cuda340S
Re: Modern Bullitt build - 07/28/15 02:54 AM
Awesome work! Looking forward to seeing more progress!
Posted By: Keepat
Re: Modern Bullitt build - 08/02/15 03:31 PM
I picked up the doors, fenders, hood, and trunk from the media blaster and Epoxy sealed them with DuPont DTM primer/sealer. No surprises, panels look great only one spot of rust on the bottom of the right door.
Thanks
Pat


Posted By: Keepat
Re: Modern Bullitt build - 08/09/15 10:16 PM
I started bending the stainless steel air conditioning lines that will be hidden under the right side fender, I will also make S/S heater lines to run under the fender.
Thanks
Pat


Posted By: Keepat
Re: Modern Bullitt build - 08/10/15 04:46 AM
The small AC line only took about 45 minutes as I had the 1st line to use for a template. Need to get a few fitting for the hot water lines this week.
Thanks
Pat


Posted By: Keepat
Re: Modern Bullitt build - 08/12/15 04:31 AM
I need two more fitting and I can finish the water lines. Now if I find a 3ŌĆØ mandrel pipe bender to borrow I could do the exhaust ;-)
Thanks
Pat


Posted By: rhamson
Re: Modern Bullitt build - 08/19/15 02:50 PM
I need two more fitting and I can finish the water lines. Now if I find a 3ŌĆØ mandrel pipe bender to borrow I could do the exhaust ;-)
Thanks
Pat
Looking good Pat. This will be the ultimate Charger.
Posted By: Keepat
Re: Modern Bullitt build - 08/20/15 02:05 AM
I received the back ordered EFI fuel tank from Tanks today. The tank looks stock but it is set up for an in tank fuel pump and it has baffles spot welded inside along with a 6ŌĆØ X 6ŌĆØ fuel tray. This looks like a nicely made tank for anyone putting a EFI system on their Charger!
Thanks
Pat


Posted By: Keepat
Re: Modern Bullitt build - 08/20/15 03:03 AM
Looking good Pat. This will be the ultimate Charger.
Thanks Ralph! I hope you're well and having a good summer.
Pat
Posted By: Keepat
Re: Modern Bullitt build - 08/26/15 02:02 AM
I finished test fitting the evaporator and making the heater and AC line inside the car. Welded 4 ┬╝-20 studs on the firewall and top of cowl to hold the evaporator instead of the through-bolts and screws. I also put the heater control valve under the dash hide it.
Thanks
Pat


Posted By: Keepat
Re: Modern Bullitt build - 08/28/15 03:11 AM
With the help of a few of the members from the DC forum I cut in the outboard dash AC vents use some great measurements, pictures, and part of an AC dash for an original template.
Thanks
Pat


Posted By: Keepat
Re: Modern Bullitt build - 08/29/15 03:55 AM
Finished the AC and heater lines at the motor, all that is left is one short line to make from the drier to the inter fender bulkhead fitting.


After bending the S/S line I had a friend weld the fitting on instead of silver soldering them on.


The short braided soft lines for the heater and AC running forward and down will help to de-clutter the engine bay.
Thanks
Pat
Posted By: not_a_charger
Re: Modern Bullitt build - 08/29/15 04:42 PM
Of all of the cool cars I've seen on Moparts since I started coming here in 1999, this is my favorite, and by a wide margin. Thank you for taking the time to document this incredible build. Your talent is off the charts.
Posted By: Keepat
Re: Modern Bullitt build - 08/29/15 08:00 PM
Of all of the cool cars I've seen on Moparts since I started coming here in 1999, this is my favorite, and by a wide margin. Thank you for taking the time to document this incredible build. Your talent is off the charts.
Thank you! This car has been fun to build and I have enjoyed documenting and Posting the progress. Thank you for your comments.
Pat
Posted By: Hooligan
Re: Modern Bullitt build - 08/29/15 10:15 PM
Oh yes! It's a good thing that you have documented every aspect of your amazing build, because then you will know how to build another Charger when I take possession of this one! Ha-ha-ha! I am so envious of your awesome car and incredible skills! This is definitely the best build threat ever! There so much more great things to say, but I don't want to keep you from all the fun you are having, while providing us lucky members some wonderful entertainment! Go Pat go!
Posted By: Keepat
Re: Modern Bullitt build - 08/30/15 10:01 PM
Oh yes! It's a good thing that you have documented every aspect of your amazing build, because then you will know how to build another Charger when I take possession of this one! Ha-ha-ha! I am so envious of your awesome car and incredible skills! This is definitely the best build threat ever! There so much more great things to say, but I don't want to keep you from all the fun you are having, while providing us lucky members some wonderful entertainment! Go Pat go!
Thank You sir!
Today I replaced the right side radiator core support so I can use the larger radiator. The new part fit nice and I spot-welded it in place. I hope to test fit the new radiator next week.
Thanks
Pat


Posted By: Keepat
Re: Modern Bullitt build - 09/05/15 02:16 AM
All the AC lines are finished and the drier & condenser have been test fit. So far IŌĆÖm very happy with the Vintage Air Mopar B Body system. IŌĆÖm getting closer to putting the car on the rotisserie.
Thanks
Pat


Posted By: SattyNoCar
Re: Modern Bullitt build - 09/06/15 08:47 PM
I'm envious of your skills sir!

One question about the AC line routing, are you going to make some kind of cover/shield to protect them from road debris? My luck, a rock, or even worse, a blow out would take out all that hard work.....


Posted By: Keepat
Re: Modern Bullitt build - 09/06/15 09:22 PM
I had one bad spot in the right side cowl vent that needed a small repair, but fortunately it was accessible. The right side cowl vent is not used with new Vintage Air system; there is a plate that will cover it. Now I can water test it with a rust converter and spray it down with sealer. If anyone has a proven method for access, cleaning, and coating the inside of the cowl please let me know.
Thanks
Pat


Posted By: Keepat
Re: Modern Bullitt build - 09/06/15 09:40 PM
I'm envious of your skills sir!
One question about the AC line routing, are you going to make some kind of cover/shield to protect them from road debris? My luck, a rock, or even worse, a blow out would take out all that hard work.....
The S/S lines are over kill for this job as they are rated for over 2500 PSI working pressure. I think they could take the shrapnel as good as the fender has for over 45 years. The AC lines will get a 3/16 neoprene insulator that will also help protect them as the undercoating protected the inside of the fender.
Thank You!
Pat
Posted By: Keepat
Re: Modern Bullitt build - 09/09/15 04:02 AM
Posted By: Keepat
Re: Modern Bullitt build - 09/10/15 08:09 PM
I received my Griffin radiator yesterday so with the motor still in the car I test fitted it. IŌĆÖm going to weld a 90 degree pipe on the thermostat housing so it will have a short top hose.
Thanks
Pat


Posted By: 69Cuda340S
Re: Modern Bullitt build - 09/13/15 03:06 PM
If anyone has a proven method for access, cleaning, and coating the inside of the cowl please let me know.
In threads over on the a-body forum I have seen people remove windshield and drill out all the outer cowl spot welds and remove top outer shell of cowl. Then you will have full access. Other than that you cant get in there.
Posted By: Keepat
Re: Modern Bullitt build - 09/16/15 10:54 PM
Disassembled the brake pedal assembly and added the clutch pedal. Next I will fit the assembly to the Hydroboost and hydraulic clutch.
Thanks
Pat


Posted By: Keepat
Re: Modern Bullitt build - 09/19/15 04:21 PM
Posted By: Keepat
Re: Modern Bullitt build - 09/24/15 05:29 PM
Mounted the clutch reservoir and used ┬╝ S/S tubing for the line.
Thanks
Pat


Posted By: Q5_Ed
Re: Modern Bullitt build - 09/25/15 10:26 AM
Very awsome project! Here is my cowl removed to repair old holes from racing in the top center of inner cowl. I hated to do it but only way to get full access. On a plus now can clen up vent holes correctly.

Posted By: Keepat
Re: Modern Bullitt build - 09/25/15 01:38 PM
Thanks for the great picture! Mine looks a lot like yours inside so I'm going to try to chemically treated without removing the cowl.
Thank you!
Pat
Posted By: Keepat
Re: Modern Bullitt build - 09/28/15 01:30 AM
I bent the Hydroboost and power steering lines to fit in the left side inter fender well. I used 3/8ŌĆØ stainless steel .035 wall tubing. All this test fitting, wiring, and line bending just to pull it all out before the bodywork starts is a lot of work!! IŌĆÖm sure I will enjoy having all this work behind me after the car is painted. Wait that sound like IŌĆÖm looking forward to the bodywork ;-(
Thanks
Pat


Posted By: Keepat
Re: Modern Bullitt build - 10/03/15 01:36 AM
Went to Carlisle today and pickup my original front and back seats that I had dropped off with Legendary this past spring. They recover the front & back seat and I went with their Rallye front seat upgrade. IŌĆÖm very happy with the look, shape, and fit!
Thanks
Pat


Posted By: SomeCarGuy
Re: Modern Bullitt build - 10/03/15 07:07 AM
Did you beef the lower rad support ala the old XV brace?
Posted By: Keepat
Re: Modern Bullitt build - 10/03/15 01:41 PM
Did you beef the lower rad support ala the old XV brace?
It is a US Car Tool lower rad support that I special ordered without the holes in it so it looks original. Fit and worked great!
Thank you!
Pat
Posted By: Keepat
Re: Modern Bullitt build - 10/03/15 10:21 PM
I finished up the power steering lines and cooler. Front brake lines are next.
Thanks
Pat


Posted By: Q5_Ed
Re: Modern Bullitt build - 10/06/15 02:50 AM
Pat can you describe they method and tools, sanding grit etc. of how you stripped and clean paint on outside of inner fenders and framerails, firewall etc??
Also what was the blasters method and media used on doors etc?
How did you prep the metal before primer if anything?
Looking for some DIY tips!
Thanks
Ed B
Posted By: Keepat
Re: Modern Bullitt build - 10/06/15 03:39 AM
P
Pat can you describe they method and tools, sanding grit etc. of how you stripped and clean paint on outside of inner fenders and framerails, firewall etc??
Also what was the blasters method and media used on doors etc?
How did you prep the metal before primer if anything?
Looking for some DIY tips!
Thanks
Ed B
Hi Ed, I started with a heat gun and putty knife to soften up and scrape off all the undercoating. Then I used some lacquer thinner and wiped off all of the leftover undercoating. Next I started with a 6 inch DA sander with 80 grit paper and also used a 3 inch DA sander for some of the tight spots. And lastly finished up using a 4" grinder with a wire wheel attachment for all the nooks and crannies.
The doors, fenders, hood and trunk lid we're all soda blasted. And you must clean and neutralize any of the soda residue with the product called hold tight before priming. Doors and fenders are easy because you can take them outside and power wash them with the hold tight. The hold tight also prevents any flash rusting as a result of the water.
I hope this helps and good luck with your project!
Thanks
Pat
Absolutely awesome work and just a stunning car even now.

Posted By: Keepat
Re: Modern Bullitt build - 10/07/15 02:11 AM
Absolutely awesome work and just a stunning car even now.
Thank you sir! I'm looking forward to getting into paint as you are! What black are you using and who makes the paint?
Thanks again!
Pat
Posted By: Q5_Ed
Re: Modern Bullitt build - 10/10/15 03:44 AM
Thanks for the info
Posted By: Keepat
Re: Modern Bullitt build - 10/10/15 10:36 PM
Posted By: SomeCarGuy
Re: Modern Bullitt build - 10/13/15 09:02 AM
Any idea on your hours involved on this?
Posted By: Keepat
Re: Modern Bullitt build - 10/13/15 11:04 PM
Any idea on your hours involved on this?
Hours in the full car project to date I'm not sure! hours to make the inter fender covers 7 hours
Thanks
Pat
Posted By: Keepat
Re: Modern Bullitt build - 10/16/15 03:59 AM
I will be using PPG DBC basecoat/clearcoat. I would have done the whole car in DCC single stage but being that the roof is painted pewter I will do basecoat on the exterior. I used DCC single stage on the inside, trunk, and engine compartment.I mixed 50/50 with urethane clear on the last coat.

Posted By: Keepat
Re: Modern Bullitt build - 10/18/15 02:32 PM
I will be using PPG DBC basecoat/clearcoat. I would have done the whole car in DCC single stage but being that the roof is painted pewter I will do basecoat on the exterior. I used DCC single stage on the inside, trunk, and engine compartment.I mixed 50/50 with urethane clear on the last coat.
The single stage paint certainly makes a lot of sense inside the car and the trunk area, I may do the same thing? On the bottom of the car friend of mine is a painter for commercial vehicles and they been using a clear coat that is graffiti proof and he has used it on the bottoms of cars that he's done and it make road grime clean up really easy. It sounds interesting and I need to look into that and see just how well it works.
Thank you
Pat
I know PPG makes a graffiti resistant paint that they use on New York city subway cars. I have a friend who is the local PPG rep. I could check with him as to what it is. I have become a friend of urethane truck bed liner coating. I did paint the underside of my car but after i finished i realized that i just don't want a trophy piece that I have to keep super clean. When sprayed with a schutz gun it looks like factory undercoating and is tough as nails. hit it with a hose and its all clean again. Plus its a sound deadener.

Posted By: Keepat
Re: Modern Bullitt build - 10/18/15 09:14 PM
I know PPG makes a graffiti resistant paint that they use on New York city subway cars. I have a friend who is the local PPG rep. I could check with him as to what it is. I have become a friend of urethane truck bed liner coating. I did paint the underside of my car but after i finished i realized that i just don't want a trophy piece that I have to keep super clean. When sprayed with a schutz gun it looks like factory undercoating and is tough as nails. hit it with a hose and its all clean again. Plus its a sound deadener.
Any info from the PPG rep would great!
THANK YOU!
Pat
Posted By: Keepat
Re: Modern Bullitt build - 10/23/15 03:51 PM
Posted By: Keepat
Re: Modern Bullitt build - 10/26/15 01:30 AM
Posted By: Keepat
Re: Modern Bullitt build - 10/29/15 03:23 AM
Posted By: Keepat
Re: Modern Bullitt build - 10/29/15 03:27 AM
There are 2 small computers that I needed to mount under the dash. One controls the EFI that I mounted on Vintage Air mount so that the troubleshooting light is just viewable under the dash (sorry no pictures) The 2nd controls the ignition and I mounted it to a plate that covers the unused right side cowl vent.
Thanks
Pat


Posted By: ihv800
Re: Modern Bullitt build - 10/31/15 04:32 AM
You're a phenomenal metal worker, and I love detail oriented stuff, this checks all the right boxes. All that tubing work is nothing short of incredible, simply art!
Posted By: Keepat
Re: Modern Bullitt build - 10/31/15 03:02 PM
You're a phenomenal metal worker, and I love detail oriented stuff, this checks all the right boxes. All that tubing work is nothing short of incredible, simply art!
Thank you sir!
Posted By: Keepat
Re: Modern Bullitt build - 11/14/15 04:46 PM
Posted By: Keepat
Re: Modern Bullitt build - 11/15/15 08:25 PM
Posted By: Keepat
Re: Modern Bullitt build - 11/20/15 04:00 AM
I bent the right front brake line to run along the seam between the firewall and floor. This is much cleaner than the original run in the middle of the firewall.
Thanks
Pat


Posted By: mopar4don
Re: Modern Bullitt build - 11/20/15 02:20 PM

Looks GREAT Pat
Posted By: Keepat
Re: Modern Bullitt build - 11/20/15 08:08 PM
Looks GREAT Pat
Thank You Don!
Posted By: Keepat
Re: Modern Bullitt build - 11/22/15 07:41 PM
Posted By: Keepat
Re: Modern Bullitt build - 11/28/15 03:14 AM
ItŌĆÖs not a ported head intake runner, but it will have fuel running through it. What do you think it is?

Answer will be in the next post
Thanks
Pat
Posted By: Keepat
Re: Modern Bullitt build - 11/28/15 03:44 AM
Posted By: Keepat
Re: Modern Bullitt build - 11/30/15 03:04 AM
Posted By: Keepat
Re: Modern Bullitt build - 12/02/15 03:59 AM
The fuel tank access cover is done, now I can bend the fuel lines
Thanks
Pat


Posted By: Keepat
Re: Modern Bullitt build - 12/04/15 03:37 AM
I received the new RMS rear sway bar kit today just in time before I bend the fuel lines. I will locate the sway bar mounts first, so I can route the lines around them. This kit has been in the works for over a year and it was worth the wait! It is a great looking kit and very reasonably priced!
Thanks
Pat

Posted By: Keepat
Re: Modern Bullitt build - 12/06/15 04:02 AM
Posted By: Anonymous
Re: Modern Bullitt build - 12/06/15 05:40 PM
Nice work.
Posted By: Keepat
Re: Modern Bullitt build - 12/07/15 12:15 AM
Posted By: Keepat
Re: Modern Bullitt build - 12/14/15 04:59 AM
Posted By: Keepat
Re: Modern Bullitt build - 12/20/15 03:24 PM
I finished the rear fuel lines and all that is left is the Much II tank vent system.
Thanks
Pat


Posted By: Keepat
Re: Modern Bullitt build - 12/24/15 03:17 AM
Posted By: PasiR
Re: Modern Bullitt build - 12/25/15 12:11 PM
Very nice work and details - I like this!
Posted By: Keepat
Re: Modern Bullitt build - 12/26/15 01:02 AM
Very nice work and details - I like this!
Thank you sir, I appreciate your comment!
I hope you have a Great holiday!
Pat
Posted By: Keepat
Re: Modern Bullitt build - 12/27/15 05:41 AM
Posted By: Darius
Re: Modern Bullitt build - 12/29/15 03:09 PM
Un believable creativity here Bro! This is so clean . Having built engineering scale models of Oil refineries and nuclear power plants I truly appreciate your piping design and layout. Perfection!
Posted By: Keepat
Re: Modern Bullitt build - 12/29/15 07:06 PM
Un believable creativity here Bro! This is so clean . Having built engineering scale models of Oil refineries and nuclear power plants I truly appreciate your piping design and layout. Perfection!
Thank you! sound like you have a cool job or is it a hobby building scale models?
Pat
Posted By: Keepat
Re: Modern Bullitt build - 12/29/15 07:07 PM
Posted By: Darius
Re: Modern Bullitt build - 12/29/15 11:10 PM
Un believable creativity here Bro! This is so clean . Having built engineering scale models of Oil refineries and nuclear power plants I truly appreciate your piping design and layout. Perfection!
Thank you! sound like you have a cool job or is it a hobby building scale models?
Pat
It was a job I had in the late '70's. I worked at Ralph Parsons Engineering in Pasadena and Bechtel in San Francisco. Unfortunately ,the commute was so bad I decided to go back to cabinet making which led to me starting my own shop and I have been in the residential remodeling business ever since.
BIG fun building those models to perfecting scale as part of the design process. The models were then used on site by the contractors for 3d reference. It was one of those jobs where they had to kick me out at closing time.
Posted By: Keepat
Re: Modern Bullitt build - 01/02/16 07:29 PM
I put the charger on the rotisserie so I can finish the bottom and prime it. I also have a small floor repair.
Thanks
Pat


Posted By: Keepat
Re: Modern Bullitt build - 01/04/16 05:25 AM
Had a few helpers stop by the shop today ;-)
Pat

Posted By: tpabayflyer
Re: Modern Bullitt build - 01/04/16 08:17 PM
Yeah! They are waiting for you to finish so they can join you in a window down, B-body cruise!
Posted By: Bullitt Guy
Re: Modern Bullitt build - 01/04/16 09:52 PM
I have been following this build since last summer and am amazed at your attention to detail and fabrication. This is an amazing project.
I have a Bullitt replica that I restored in 2006, stock appearing with addition of some suspension upgrades.
http://vancouverclassiccars.com/VancouverClassicCars/DODGE_CHARGER.htmlThe car has this appearance full time now.
http://s285.photobucket.com/user/paulolds/media/Dodge%20Charger/IMG_3016.jpg.htmlYou should plan to bring your completed car to MCACN in Chicago when finished.
Paul
Posted By: Keepat
Re: Modern Bullitt build - 01/05/16 12:22 AM
Yeah! They are waiting for you to finish so they can join you in a window down, B-body cruise!
They do like to cruise with the window down ;-)
Pat
Posted By: Keepat
Re: Modern Bullitt build - 01/05/16 12:27 AM
Paul,
Awesome Bullitt Charger you have!!! I hope my Charger looks as nice as yours 1 day! Thank you for links as it is always great to see other black 68 Chargers.
Thanks again!
Pat
Posted By: Keepat
Re: Modern Bullitt build - 01/08/16 04:36 PM
Posted By: mopar4don
Re: Modern Bullitt build - 01/08/16 04:40 PM
Keep them pics coming!
I absolutely love it!
Your thread helps me a lot as I will be adding these to my Charger
Posted By: Keepat
Re: Modern Bullitt build - 01/08/16 08:01 PM
Keep them pics coming!
I absolutely love it!
Your thread helps me a lot as I will be adding these to my Charger
Don, You keep the pictures coming also, as I enjoy following your build!
Thank you!
Posted By: mopar4don
Re: Modern Bullitt build - 01/08/16 08:41 PM
Keep them pics coming!
I absolutely love it!
Your thread helps me a lot as I will be adding these to my Charger
Don, You keep the pictures coming also, as I enjoy following your build!
Thank you!
Pat, It's obvious you've done this before.
Guys like me (novice) are learning from guys like you.
So thank you!
I will keep my pics coming on my build (I am behind)
Posted By: Keepat
Re: Modern Bullitt build - 01/11/16 02:47 AM
Posted By: sparcy
Re: Modern Bullitt build - 01/13/16 02:02 AM
AMAZING ABSOLUTELY AMAZING WORK !!! BEN FOLLOWING THIS RITE ALONG , MAKES ME WANT TO TAKE MY PROJECT TO THE NEXT LEVEL !!! LOVE IT !!!!!!
Posted By: Keepat
Re: Modern Bullitt build - 01/13/16 04:24 AM
AMAZING ABSOLUTELY AMAZING WORK !!! BEN FOLLOWING THIS RITE ALONG , MAKES ME WANT TO TAKE MY PROJECT TO THE NEXT LEVEL !!! LOVE IT !!!!!!
THANK YOU SIR ;-)
Pat
Posted By: Keepat
Re: Modern Bullitt build - 01/14/16 03:36 AM
Posted By: Keepat
Re: Modern Bullitt build - 01/18/16 12:31 AM
Posted By: rhamson
Re: Modern Bullitt build - 01/19/16 09:24 PM
Good work Pat. I love the way over the top" engineering you are doing on this project. Patience is your virtue.
Posted By: Keepat
Re: Modern Bullitt build - 01/20/16 02:07 AM
Good work Pat. I love the way over the top" engineering you are doing on this project. Patience is your virtue.
Thank you Ralph, I hope you're well and move along with your challenge your project?
Pat
Posted By: PasiR
Re: Modern Bullitt build - 01/20/16 03:49 PM
Very nice driveshaft loop!
Posted By: Keepat
Re: Modern Bullitt build - 01/21/16 01:56 AM
Very nice driveshaft loop!
Thank You! I'm really happy with how it turned out.
Pat
Posted By: Keepat
Re: Modern Bullitt build - 01/22/16 04:23 PM
Posted By: CJD AUTOMOTIVE
Re: Modern Bullitt build - 01/22/16 06:03 PM
Been watching this one, and it is really turning out nice. Your attention to detail and fab skills is what separates this car from the rest. Too bad most will never notice or appreciate the time and skills required. Keep it up!!
Posted By: mopar4don
Re: Modern Bullitt build - 01/22/16 06:25 PM
I know for one, I APPRECIATE the time you take to show your work! It sure helps guys like me with there build.
Say Pat, can you tell me why your putting the torq boxes in now without the weight of the motor?
Posted By: tpabayflyer
Re: Modern Bullitt build - 01/22/16 07:33 PM
The driveshaft/extra crossmember is a fantastic idea and should help give your car roll cage like rigidity with all the extra supports you have installed to shore up the flimsy unibody! I also installed the subframe connectors/ torque boxes in my Challenger without any drivetrain installed. I'm not sure how the factory did this but I am sure it will lessen any amount of frame deflection and movement once the drivetrain is installed.... My car will be put on an alignment rack and setup for optimism performance so I am sure factory specs won't work for me......
Posted By: Keepat
Re: Modern Bullitt build - 01/22/16 10:51 PM
Been watching this one, and it is really turning out nice. Your attention to detail and fab skills is what separates this car from the rest. Too bad most will never notice or appreciate the time and skills required. Keep it up!!
Thank you Craig!
Posted By: Keepat
Re: Modern Bullitt build - 01/22/16 10:56 PM
I know for one, I APPRECIATE the time you take to show your work! It sure helps guys like me with there build.
Say Pat, can you tell me why your putting the torq boxes in now without the weight of the motor?
Don, I did install the frame connectors when the car was complete and on the ground, and with the frame connectors installed I didn't see any problem with adding torque boxes when the car was on the rotisserie. It is so much nicer welding right side up instead of upside down ;-)
Thank you!
Pat
Posted By: Keepat
Re: Modern Bullitt build - 01/22/16 10:59 PM
The driveshaft/extra crossmember is a fantastic idea and should help give your car roll cage like rigidity with all the extra supports you have installed to shore up the flimsy unibody! I also installed the subframe connectors/ torque boxes in my Challenger without any drivetrain installed. I'm not sure how the factory did this but I am sure it will lessen any amount of frame deflection and movement once the drivetrain is installed.... My car will be put on an alignment rack and setup for optimism performance so I am sure factory specs won't work for me......
I am very happy with the way the crossmember driveshaft loop came out and considering the modification I made to the factory crossmember I think it added a lot more rigidity to the frame. Thank you!
Pat
Posted By: Keepat
Re: Modern Bullitt build - 01/28/16 04:06 PM
Posted By: Keepat
Re: Modern Bullitt build - 02/02/16 04:37 AM
Posted By: Stewpar
Re: Modern Bullitt build - 02/03/16 04:30 AM
Pat:
I personally ignore this thread for periods of time so that I can spend more time looking at more pictures and updates. The work you do is amazing, your creativity and attention to detail are out of this world. I will be both happy and sad when this build is done!
Posted By: Keepat
Re: Modern Bullitt build - 02/03/16 04:08 PM
Pat:
I personally ignore this thread for periods of time so that I can spend more time looking at more pictures and updates. The work you do is amazing, your creativity and attention to detail are out of this world. I will be both happy and sad when this build is done!
Funny my wife would like me to do the same thing with the build ;-)
Thank You!
Pat
Posted By: not_a_charger
Re: Modern Bullitt build - 02/03/16 04:50 PM
Cannot wait to see the finished product. This is one of the best threads Moparts has ever had, and the car is certainly going to be one of the nicest anywhere.
Posted By: Keepat
Re: Modern Bullitt build - 02/03/16 10:01 PM
Cannot wait to see the finished product. This is one of the best threads Moparts has ever had, and the car is certainly going to be one of the nicest anywhere.
Thank you sir!!!
Pat
Posted By: Keepat
Re: Modern Bullitt build - 02/03/16 10:02 PM
Fitted and welded the last torque box (left front) next up is welding the unused holes in the firewall.
Thanks
Pat


Posted By: Keepat
Re: Modern Bullitt build - 02/06/16 04:53 PM
The RMS suspension requires a few holes drill through the frame and they tell you not to over tighten these bolts so you donŌĆÖt collapse the frame. So I welded in 2 reinforcements to help prevent that from happening. The 1/8ŌĆØ plate is welded on both sides.
Thanks
Pat


Posted By: Hooligan
Re: Modern Bullitt build - 02/06/16 08:34 PM
AMAZING work and imagination! What planet are you from???
Posted By: Keepat
Re: Modern Bullitt build - 02/06/16 09:20 PM
AMAZING work and imagination! What planet are you from???
LOL, I'm pretty sure earth but some of my friends think it's planet Uranus ;-)
Thank you!
Pat
Posted By: Bullitt Guy
Re: Modern Bullitt build - 02/16/16 10:39 PM
Pat
what grit sanding discs are you using to get that bare metal look after welding?
Paul
Posted By: Keepat
Re: Modern Bullitt build - 02/17/16 07:30 PM
Pat
what grit sanding discs are you using to get that bare metal look after welding?
Paul
Paul,
I finish up with 80 grit paper on DA, I'll try to do is a little better pictorial of the process from raw weld to finish panel in the next couple weeks.
Thanks
Pat
PS. Cool screening Name!
Where did you get that long vipe grip clamp? That could come in REALLY handy at times!
Posted By: Keepat
Re: Modern Bullitt build - 02/17/16 10:40 PM
It is an awesome clamp that I purchased from a supplier at one of the Carlisle events. It's one of those tools that you don't use a lot but when you need it nothing else will work as good. Below is a link for the company that sells them.
Thanks
Pat
http://www.stronghandtools.com/stronghandtools/products/longreach.php
Posted By: Keepat
Re: Modern Bullitt build - 02/21/16 12:40 AM
I started filling all of the unused holes in the engine well and have the left inner fender and core support finished, so far over 50 holes.
Thanks
Pat


Posted By: Keepat
Re: Modern Bullitt build - 02/21/16 11:46 PM
Posted By: Keepat
Re: Modern Bullitt build - 02/21/16 11:53 PM


I like to use a 90 degree Die grinder with 2ŌĆØ 36 grit disc to take the welds down. Keep it moving and always use new disc when working small areas as worn disc will just heat the metal instead of cutting the weld down. When the welds are mostly cut down you can hammer and dolly the panel flat and then finish off the leftover weld with a 60 grit disc.

Note before hammer and dolly the panel you will need to grind down the weld on the back side!


The last thing I do is use a 6ŌĆØ random orbital sander with a ┬ŠŌĆØ foam pad and 100 grit paper to clean the metal.
Thanks
Pat
Posted By: Jalaska907
Re: Modern Bullitt build - 02/25/16 08:03 AM
Hey there! First off, I just want to say thank you for the build thread. Very impressive fabrication skills. I do have a question though, I was wondering what thickness metal you use for body panel repair, and metal thickness for the sheet metal work your doing? Thanks, looking foreword to watching this build.
Justin
Posted By: Keepat
Re: Modern Bullitt build - 02/26/16 12:25 AM
Hey there! First off, I just want to say thank you for the build thread. Very impressive fabrication skills. I do have a question though, I was wondering what thickness metal you use for body panel repair, and metal thickness for the sheet metal work your doing? Thanks, looking foreword to watching this build.
Justin
Justin,
All of the body panels I have matched the same 20 gauge steel that was used originally. For most of the structural components that I added to the bottom of the car I used 14 gauge to 1/8" steel and some 3/16". Thanks for following along!
Pat
Posted By: sparcy
Re: Modern Bullitt build - 02/26/16 04:11 AM
this build is one of my favorites .!!! you and the srt8 roadrunner guy are over the top !!! I use the info from both of you !! your welding skills are so impressive !! THANKYOU !!!
Posted By: Keepat
Re: Modern Bullitt build - 02/26/16 03:23 PM
this build is one of my favorites .!!! you and the srt8 roadrunner guy are over the top !!! I use the info from both of you !! your welding skills are so impressive !! THANKYOU !!!
The community of car guys sharing ideas and techniques is what makes these forums so cool!
Thank you!
Pat
Posted By: larry4406
Re: Modern Bullitt build - 02/27/16 03:57 PM
I like that drill extension for the wire brush. Who makes that and where to buy?
Excellent build!
Posted By: Keepat
Re: Modern Bullitt build - 02/28/16 04:58 AM
I like that drill extension for the wire brush. Who makes that and where to buy?
Excellent build!
Larry,
I'm not sure who makes the extension but I bought it Home Depot
Thanks
Pat
Posted By: Keepat
Re: Modern Bullitt build - 02/29/16 03:31 AM
Posted By: Keepat
Re: Modern Bullitt build - 03/01/16 10:56 PM
I had a mold made of the front bumper guard mount so I could make a carbon-fiber version of it. The steel mount weighs about 6 lbs and the carbon-fiber replacement will weigh about 1 lbs. After I pull the 1st part IŌĆÖll post a few pictures and if anyone is interested I could make a few more? I think I will paint mine black to look original but they could be left clear to show the carbon-fiber if you like?
Thanks
Pat


Posted By: MuuMuu101
Re: Modern Bullitt build - 03/01/16 11:41 PM
You work with Carbon Fiber too!? What are you using for your molds? I have some vacuum bag material at home. I was planning on making some Carbon Fiber components for the Dart in the next couple of years.
Posted By: Keepat
Re: Modern Bullitt build - 03/01/16 11:58 PM
You work with Carbon Fiber too!? What are you using for your molds? I have some vacuum bag material at home. I was planning on making some Carbon Fiber components for the Dart in the next couple of years.
Yes, working around yachts for over 35 years one can learn a few things along the way ;-) We have a large vacuum bag machine that is use to make the hardtop for our 55 Fleming. The green part in the pictures is the mold pulled from the original part.
Thanks
Pat
Posted By: MuuMuu101
Re: Modern Bullitt build - 03/02/16 02:10 AM
You work with Carbon Fiber too!? What are you using for your molds? I have some vacuum bag material at home. I was planning on making some Carbon Fiber components for the Dart in the next couple of years.
Yes, working around yachts for over 35 years one can learn a few things along the way ;-) We have a large vacuum bag machine that is use to make the hardtop for our 55 Fleming. The green part in the pictures is the mold pulled from the original part.
Thanks
Pat
I'll look at it at home. I can't see pictures on my work computer. But very cool, regardless. My carbon fiber work was done in college not too long ago. I made body panels for a small off-roading car and created carbon fiber coupons for a test I did for my senior project.
Posted By: larry4406
Re: Modern Bullitt build - 03/04/16 01:02 PM
I like that drill extension for the wire brush. Who makes that and where to buy?
Excellent build!
Larry,
I'm not sure who makes the extension but I bought it Home Depot
Thanks
Pat
I looked at these yesterday at Home Depot - the ones they had have a "quick connect" hex type chuck vs a 3-jaw chuck. I would like one with a 3-jaw.
Posted By: Keepat
Re: Modern Bullitt build - 03/05/16 11:05 PM
The CF part is all sealed up, vacuum bag and going into the heater box for the next 24 hours at about 140┬░
Thanks
Pat


Posted By: Keepat
Re: Modern Bullitt build - 03/06/16 10:51 PM
Posted By: Keepat
Re: Modern Bullitt build - 03/06/16 10:54 PM
Posted By: minivan
Re: Modern Bullitt build - 03/09/16 12:09 AM
Really like the boxed in upper... Hard to believe the difference from stock.....
Posted By: Keepat
Re: Modern Bullitt build - 03/19/16 10:25 PM
1st coat of primer on the engine bay and fender wells.
Thanks
Pat


That must be a nice feeling to see that primer
Posted By: larry4406
Re: Modern Bullitt build - 03/24/16 12:10 PM
Very nice! The boxed upper radiator support looks excellent.
Posted By: Keepat
Re: Modern Bullitt build - 03/25/16 07:11 AM
That must be a nice feeling to see that primer
Yes it is nice to be working on the body work as I'm starting to see the end of this project
Thanks
Pat
Posted By: Keepat
Re: Modern Bullitt build - 03/25/16 07:15 AM
Very nice! The boxed upper radiator support looks excellent.
Thanks Larry, I very happy with it and maybe one day US car tool will make the part for others?
Thanks again!
Pat
Posted By: josh7965
Re: Modern Bullitt build - 03/29/16 09:39 PM
Very nice! The boxed upper radiator support looks excellent.
Thanks Larry, I very happy with it and maybe one day US car tool will make the part for others?
Thanks again!
Pat
if they made one for an e body i would be a buyer. nice work the car looks great
Posted By: Keepat
Re: Modern Bullitt build - 03/29/16 11:27 PM
Received my restored dash and instrument panel from Auto instruments very happy with their workmanship and the re-plastic plating.
Thanks
Pat


Posted By: Keepat
Re: Modern Bullitt build - 03/29/16 11:47 PM
Very nice! The boxed upper radiator support looks excellent.
Thanks Larry, I very happy with it and maybe one day US car tool will make the part for others?
Thanks again!
Pat
if they made one for an e body i would be a buyer. nice work the car looks great
Josh, I reached out to US cart tool and suggested they should manufacture this part, you should also do the same thing as it might motivate them to start making it for both E and B body Mopar's
Thank you
Pat
Posted By: Keepat
Re: Modern Bullitt build - 04/03/16 07:30 PM
Removed all the paint and carpet glue from the floor, next is the inside of the firewall (fun!)
Thanks
Pat


Posted By: Keepat
Re: Modern Bullitt build - 04/22/16 03:53 AM
After a few failed attempts we finally came up with the correct formula to make the bumper guard crossmember. We were having problems with the carbon fiber bunching up on top of the mold when in the vacuum bag. The carbon fiber on the mold side look excellent so we decided to hand lay a final layer of carbon fiber on the top side after it was removed from the mold. I'm not sure if I'm going to go with the carbon fiber look or if I'm going to end up painting it black so it would be undetectable. The steel crossmember is about 6 pounds and I ended up with the carbon fiber weighing in at 1 lb. 4 oz.
Thanks
Pat


Posted By: 69Cuda340S
Re: Modern Bullitt build - 05/02/16 01:37 AM
Outstanding work! Looking forward to more progress pictures.
Posted By: Keepat
Re: Modern Bullitt build - 05/02/16 06:51 PM
Outstanding work! Looking forward to more progress pictures.
Bill, Thank You! There is progress just nothing photogenic.
Pat
Posted By: Keepat
Re: Modern Bullitt build - 05/06/16 12:44 AM
Posted By: Keepat
Re: Modern Bullitt build - 05/15/16 11:23 PM
Posted By: Keepat
Re: Modern Bullitt build - 05/22/16 07:03 PM
I used a Dremel with a wire brush to scuff the pits, and then block sanded the roof before skim coating it with body filler. Block sanded it again and sprayed a coat of high build primer. FUN! :-(
Thanks
Pat


Posted By: Keepat
Re: Modern Bullitt build - 06/05/16 07:46 PM
Posted By: Keepat
Re: Modern Bullitt build - 06/19/16 02:20 AM
After removing the sound deadening held up with contact cement I was able to prep and prime the inside of the roof. Before spraying the epoxy primer and coated the inside of the roof framing with a rust encapsulator.
Thanks
Pat


Posted By: Keepat
Re: Modern Bullitt build - 06/19/16 02:47 AM
Then I prep and sprayed the floors and package tray. Next IŌĆÖll seam seal the floor.
Thanks
Pat


Posted By: larry4406
Re: Modern Bullitt build - 06/19/16 01:43 PM
Very nice!
What brand of epoxy are your spraying (SPI)?
Posted By: Keepat
Re: Modern Bullitt build - 06/19/16 02:29 PM
Larry,
I'm spraying DuPont 2590S epoxy primer/sealer. Easy to mix and spray and lay down great!
Thank You!
Pat
Posted By: MattW
Re: Modern Bullitt build - 06/22/16 12:23 AM
I've been lurking around for awhile and I must say that your are the definition of hot rodding!
I am at a point where I'm thinking of pulling the plug on putting my paper weight together. Then I come here and you give me the bug again to finish it.
Thanks for the information on your build. You have inspired and educated me.
Matt
Posted By: Keepat
Re: Modern Bullitt build - 06/22/16 04:46 AM
I've been lurking around for awhile and I must say that your are the definition of hot rodding!
I am at a point where I'm thinking of pulling the plug on putting my paper weight together. Then I come here and you give me the bug again to finish it.
Thanks for the information on your build. You have inspired and educated me.
Matt
Matt,
Thank you for your kind words, comments like yours inspire me to post the build.
Thanks again, now get out in the garage and finish your project ;-)
Pat
Posted By: Keepat
Re: Modern Bullitt build - 07/02/16 08:14 PM
Cleaned and painted the inside of the cowl and painted inside firewall along with the bottom of the Cowl. I use a paint that looks like the color of steel as this will make it a little brighter under the dash when working on it. With the car on the rotisserie it was very easy to use a self leveling seem sealer fill the original firewall panel seams.
Thanks
Pat


Posted By: Keepat
Re: Modern Bullitt build - 07/03/16 04:44 PM
Using some cardboard I mocked up the rear brake cooling vents. I will make these up using .065 aluminum and have them powder coated black. I will make up the discharge side at the brake when the rear and wheels are back on.
Thanks
Pat


Posted By: 71rm23
Re: Modern Bullitt build - 07/03/16 11:02 PM
I just came across this build. I must be slow or something. Anyway, all I can say is WOW! I went through EVERY page. I'm blown away
Posted By: Keepat
Re: Modern Bullitt build - 07/04/16 01:14 AM
I just came across this build. I must be slow or something. Anyway, all I can say is WOW! I went through EVERY page. I'm blown away
I'm slow also, been working on his car for over two years and I think I have another year to go ;-) thanks for checking out the build.
Pat
Posted By: Keepat
Re: Modern Bullitt build - 07/08/16 02:52 AM
Posted By: HUSTLESTUFF
Re: Modern Bullitt build - 07/11/16 01:33 PM
I think a NACA Duct in the torque box would do the same and belly pan the bottom of the car. Mike
Posted By: Keepat
Re: Modern Bullitt build - 07/11/16 06:28 PM
I think a NACA Duct in the torque box would do the same and belly pan the bottom of the car. Mike
A duct in the bottom of the torque box would work great with a belly pan. But I'm not planing on putting a belly pan on this car. Hard to see and fix problems on a street car
Thanks
Pat
Posted By: UCUDANT
Re: Modern Bullitt build - 07/12/16 04:56 AM
Wow, you do some outstanding/thorough work.
Posted By: Keepat
Re: Modern Bullitt build - 07/13/16 01:06 AM
Wow, you do some outstanding/thorough work.
Thank you, it my therapy, but I think a psychiatrist would be cheaper ;-)
Pat
Posted By: Keepat
Re: Modern Bullitt build - 07/17/16 11:30 PM
Not a productive weekend on the charger as I went to Carlisle, but I did spray some hi build primer on the hood and trunk lid today.
Thanks
Pat

Posted By: rhamson
Re: Modern Bullitt build - 07/28/16 08:12 PM
Looking good Pat. Keep up the good work.
Posted By: Keepat
Re: Modern Bullitt build - 07/31/16 12:15 AM
Looking good Pat. Keep up the good work.
Hi Ralph, I hope you are well! How is your Challenger project?
Pat
Posted By: Keepat
Re: Modern Bullitt build - 07/31/16 08:58 PM
Posted By: gch
Re: Modern Bullitt build - 07/31/16 10:16 PM
I admire you patience,dedication,and skills.
Posted By: Keepat
Re: Modern Bullitt build - 08/01/16 01:28 AM
I admire you patience,dedication,and skills.
49 % Patience, 49 % dedication, 2 % skills ;-)
Thank you
Pat
Posted By: Keepat
Re: Modern Bullitt build - 08/01/16 01:29 AM
Posted By: Keepat
Re: Modern Bullitt build - 08/05/16 09:45 PM
Posted By: Keepat
Re: Modern Bullitt build - 08/18/16 10:22 PM
Not much to show the last two weeks as I've been out of town but I did get some more some seam sealer done around the trunk and quarters.
Thanks
Pat
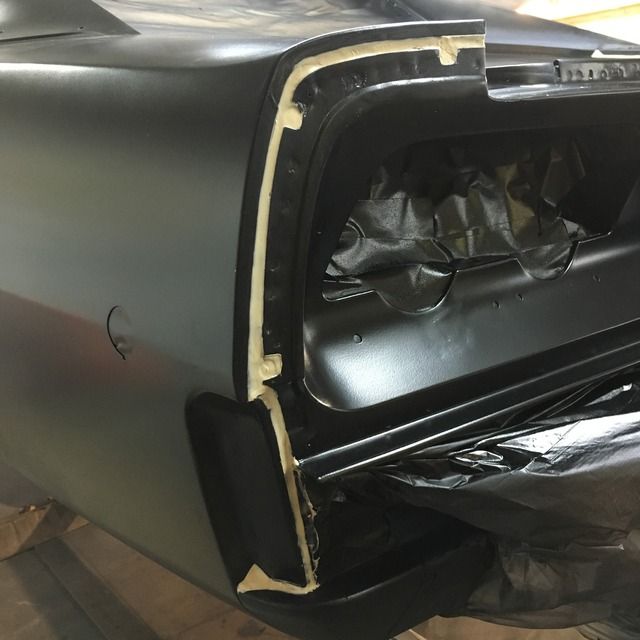
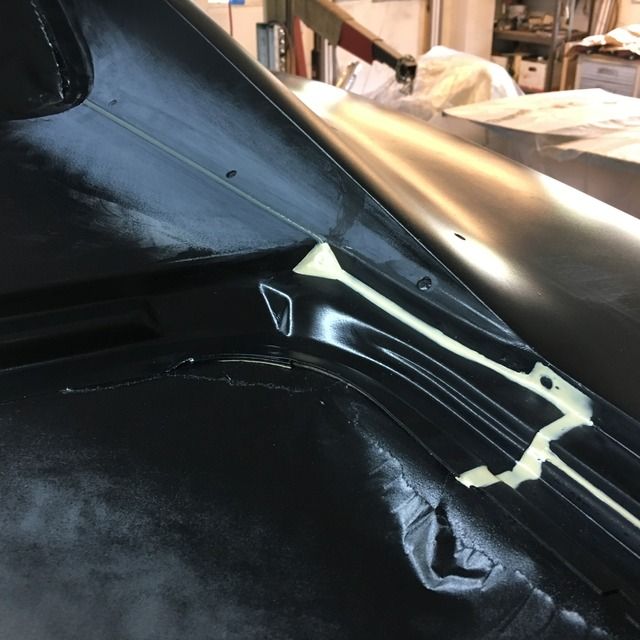
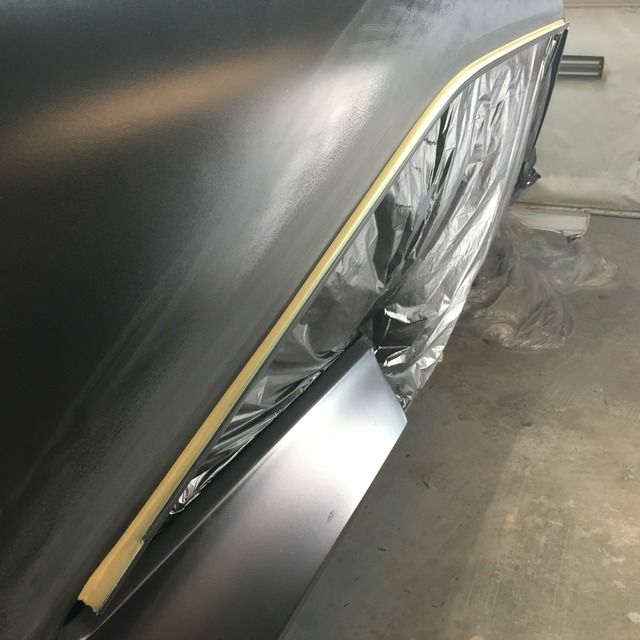
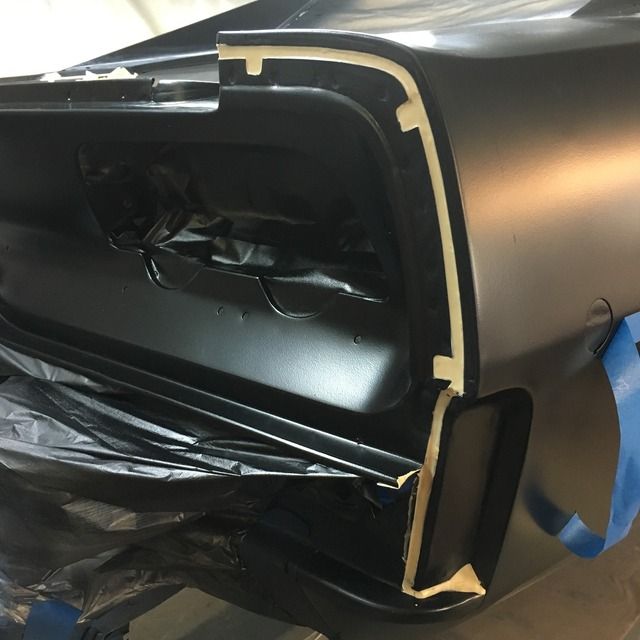
Posted By: 69Cuda340S
Re: Modern Bullitt build - 08/19/16 12:47 PM
Awesome work!
Posted By: Keepat
Re: Modern Bullitt build - 08/19/16 07:59 PM
Posted By: Hemi Allstate
Re: Modern Bullitt build - 08/20/16 04:33 AM
I agree!
Very nice work!
Mark
Posted By: rhamson
Re: Modern Bullitt build - 08/22/16 07:33 PM
Prepping the interior, jambs, engine compartment and trunk for finish paint before I get her off of the rotisserie. So many details and forgotten pet peeves I am tidying up along the way. It is just as well as the weather is lightening up with the humidity to paint. I am also collecting the suspension parts for the wheels to be mounted.
Posted By: rhamson
Re: Modern Bullitt build - 08/22/16 07:35 PM
Looking good Pat!
Posted By: Keepat
Re: Modern Bullitt build - 08/23/16 02:47 PM
I agree!
Very nice work!
Mark
Thanks Mark!
Posted By: Keepat
Re: Modern Bullitt build - 08/23/16 02:56 PM
Prepping the interior, jambs, engine compartment and trunk for finish paint before I get her off of the rotisserie. So many details and forgotten pet peeves I am tidying up along the way. It is just as well as the weather is lightening up with the humidity to paint. I am also collecting the suspension parts for the wheels to be mounted.
Ralph, good to hear you are making progress on your car. Alex and I were talking about driving over to see you in his/your old Challenger soon!
Thanks
Pat
Posted By: MattW
Re: Modern Bullitt build - 08/26/16 03:03 PM
I just came across this build. I must be slow or something. Anyway, all I can say is WOW! I went through EVERY page. I'm blown away
I'm slow also, been working on his car for over two years and I think I have another year to go ;-) thanks for checking out the build.
Pat
I'm in the same boat. As a matter of fact my boat is still in storage! Lol
Pat I have a question for you. Do you get more satisfaction from doing the project or from driving it?
I get more from fixing things that enjoying them?
I could easily GET my car finished but then I think what do I do when Its done?
Anyways thanks for posting your progress.
Matt
Posted By: Keepat
Re: Modern Bullitt build - 08/26/16 07:24 PM
I just came across this build. I must be slow or something. Anyway, all I can say is WOW! I went through EVERY page. I'm blown away
I'm slow also, been working on his car for over two years and I think I have another year to go ;-) thanks for checking out the build.
Pat
I'm in the same boat. As a matter of fact my boat is still in storage! Lol
Pat I have a question for you. Do you get more satisfaction from doing the project or from driving it?
I get more from fixing things that enjoying them?
I could easily GET my car finished but then I think what do I do when Its done?
Anyways thanks for posting your progress.
Matt
Hi Matt,
I enjoy the parts hunt and build the most, along with the 1st drive. I also like to drive the cars I build cross country, but that's about it. As this car has less then a year to go I'm already looking for the next project which will be a 194? Woody wagon for my wife. She help me with my 1st full restoration of a 1964 GTO back in the mid 80's so it's time for her to get back in the garage to help with her woody ;-)
Thank you
Pat
Posted By: Anonymous
Re: Modern Bullitt build - 08/27/16 04:25 PM
Wow!!!!
You definitely have some great fabricating skills and looks to be top notch quality. This will be one cool looking charger when done.
Robert
Posted By: Keepat
Re: Modern Bullitt build - 08/28/16 01:12 AM
Wow!!!!
You definitely have some great fabricating skills and looks to be top notch quality. This will be one cool looking charger when done.
Robert
Robert,
Thank you! but when will it be done??? I'm working on the 3rd year of what I thought would be a two year build ;-(
Pat
Posted By: Keepat
Re: Modern Bullitt build - 08/28/16 08:58 PM
Posted By: Keepat
Re: Modern Bullitt build - 09/13/16 09:20 PM
Posted By: rhamson
Re: Modern Bullitt build - 09/17/16 02:28 PM
Sounds great. Just let me know when you guys plan on coming over. I would love to see my/his old car all done. I am now trying to get my car into the frame shop. The front rail is bent about 3/4" out of level. I have it off of the rotisserie and on it's wheels. I have also painted the interior and jambs to start hanging the sheet metal as soon as the frame is straight.
Posted By: Keepat
Re: Modern Bullitt build - 10/08/16 07:59 PM
Still making progress just not a lot of photogenic things show. A lot of boring sanding to prep the bottom and engine well for base-coat clear-coat.
Thanks
Pat


Posted By: Keepat
Re: Modern Bullitt build - 11/09/16 02:09 AM
Indy used pictures and specs of my motor in their on line add for the 6.1 :-)
click on the link and scroll to the bottom.
Pat
http://www.indyheads.com/6.1hemiengines.html
Posted By: Keepat
Re: Modern Bullitt build - 12/04/16 09:00 PM
Just starting to get back to work on the charger as I've been very busy at work. I did put some time in on the steering wheel project and I'm happy with my progress so far. I found another steering wheel with good chrome on the spokes. And I decided to leave small 1" sections of the original plastic wood grain in place to help position the outer ring as well as locate the inner ring that I made smaller in diameter. My plan was to use a product called West System which is a two-part epoxy that has a variety of fillers to help color, thicken, and add strength. I started by making a small mold of the shape I was looking for and just move it around using plumbers putty too damn up the ends when I filled it with a epoxy. This worked OK but didn't give me the results I was looking for so I decided to make a full mold. After using it to make the top half of the steering wheel I modified it to clear the spokes and used it again for the bottom half of the steering wheel. This worked great and other than a few air pockets which I can fill-in along with the holes that I drilled so I could use a syringe to inject epoxy into the bottom of the mold I think it turned out great. I plan on making it a darker shade of brown and then comes the tedious part of replicating the wood grain.
Thanks
Pat


This is a picture of the partial mold that I started using


Here's the mold has been waxed and filled with epoxy


First pull of the new mold

Then I cut the mold to clear the spokes and flip the steering wheel to redo the shape on the backside of the steering wheel.

 [img]http://i949.photobucket.com/albums/ad340/kurts68fastback/image_zps5dorh8i1.jpeg
[/img]
Posted By: 69Cuda340S
Re: Modern Bullitt build - 12/10/16 03:53 PM
Wow that steering wheel looks great!
Posted By: Keepat
Re: Modern Bullitt build - 12/11/16 02:39 PM
It's getting there, we'll see how good it looks after I'm done with fake wood grain.
Thank you
Pat
Posted By: coronet69
Re: Modern Bullitt build - 12/15/16 11:05 AM
wow i have read from 1 to 19 at a stretch yesterday
really good work!
what tool do you use to cut the metal, to cut a small pcs from a frame
Posted By: Keepat
Re: Modern Bullitt build - 12/16/16 08:52 PM
wow i have read from 1 to 19 at a stretch yesterday
really good work!
what tool do you use to cut the metal, to cut a small pcs from a frame
19 pages in 1 day, you must have been bored ;-)
For cutting metal a Plasma cutter works great with a guide and I also use a small Dremmel tool.
Thank you & welcome to the site!
Pat
Posted By: coronet69
Re: Modern Bullitt build - 12/17/16 05:53 PM
Home with the flu

Have some holes I have to fix on my coronet, maybe i have to buy a plasma cutter... there are cheap ones at aliexpress for about $200, But Im not sure if it will work?
Posted By: Keepat
Re: Modern Bullitt build - 12/22/16 05:11 AM
Posted By: mopar4don
Re: Modern Bullitt build - 12/22/16 02:23 PM
Beautiful job Pat!
Posted By: 70B5Cuda
Re: Modern Bullitt build - 12/22/16 05:41 PM
Ridiculously cool work...
Posted By: Keepat
Re: Modern Bullitt build - 12/22/16 07:53 PM
Thanks Don and Merry Christmas to you and yours!
Pat
Posted By: Keepat
Re: Modern Bullitt build - 12/22/16 07:53 PM
Ridiculously cool work...
Thank you sir!
Pat
Posted By: MoparCar
Re: Modern Bullitt build - 12/23/16 04:33 AM
What an awesome build and talent you have!!!
Thanks for sharing!
Wes
Posted By: NV69B7RR
Re: Modern Bullitt build - 12/23/16 08:34 PM
Wow, just wow!! To say your level of detail is amazing would be an understatement! That wheel is over the top and something that I can say I have never really seen most restorers tackle themselves. I can't wait to see updates on this build. You have a talent that few builders do, keep up the beautiful work!
Posted By: Keepat
Re: Modern Bullitt build - 12/24/16 04:14 AM
Wow, just wow!! To say your level of detail is amazing would be an understatement! That wheel is over the top and something that I can say I have never really seen most restorers tackle themselves. I can't wait to see updates on this build. You have a talent that few builders do, keep up the beautiful work!
I'm not to sure about talent, more like rocks in my head ;-)
Thank you!
Pat
Posted By: Anonymous
Re: Modern Bullitt build - 01/01/17 05:51 AM
Nicely done!
Posted By: Keepat
Re: Modern Bullitt build - 01/09/17 03:53 PM
Reassemble my home made paint booth over the weekend. I used boat shrink wrap for the walls and ceilings.

These two walls can roll up to get the car in and out.

Four 20x20x4 intake filters.


Window box holds two 20x20 fans and track for quick change 20x25x1 discharge filters.


A little clean up and the paint booth will be ready. This will be the 3rd car to be painted in this home made booth.
Thanks
Pat
Posted By: MoparCar
Re: Modern Bullitt build - 01/09/17 06:47 PM
Great build and booth! What are you using for a fan and is it a positive or negative pressure booth?
Thanks Wes
Posted By: Keepat
Re: Modern Bullitt build - 01/09/17 11:56 PM
Great build and booth! What are you using for a fan and is it a positive or negative pressure booth?
Thanks Wes
Wes,
I'm using two 20 x 20" fans pulling the air out of the booth, with air in to the booth from the four large intake filters.
Thanks
Pat
Posted By: larry4406
Re: Modern Bullitt build - 01/10/17 01:21 AM
Pat - nice booth! I will have to steal some of this. Weather in the Washington DC area not real good now. What if anything you doing for heat?
Posted By: Keepat
Re: Modern Bullitt build - 01/10/17 02:18 AM
Larry,
The shop has 2 electric baseboard heater that keep the shop right around 60┬░, you can see one mounted just above the row of lights in the third picture above. Fortunately my shop rent includes the electric ;-)
Thank you
Pat
Posted By: Keepat
Re: Modern Bullitt build - 01/15/17 08:16 PM
Scored a nice 68 console Inland shifter on craigslist. My plan is to cut the base off and modify the shifter for my T 56 six speed using the T handle to engage a micro switch to operate the electronic reverse shut out on the T56
Thanks
Pat

Posted By: JERICOGTX
Re: Modern Bullitt build - 01/18/17 04:41 PM
I'm really looking forward to seeing this car, painted, and the assembly progress. yet, I'll be kinda bummed when it's all done. The detail, and seeing the work put into it, has been interesting. Keep up the good work.
BTW, you make me feel lazy LOL.
Posted By: minivan
Re: Modern Bullitt build - 01/18/17 09:25 PM
I'm really looking forward to seeing this car, painted, and the assembly progress. yet, I'll be kinda bummed when it's all done. The detail, and seeing the work put into it, has been interesting. Keep up the good work.
My thoughts exactly... This car reminds me of a "riddler award" car.. So many hidden aspects to it...
I say this due to watching Chip Foose describe his "riddler" winning car one time... So many things you just don't realize until it is shown to you...
Posted By: Keepat
Re: Modern Bullitt build - 01/20/17 01:16 AM
I'm really looking forward to seeing this car, painted, and the assembly progress. yet, I'll be kinda bummed when it's all done. The detail, and seeing the work put into it, has been interesting. Keep up the good work.
BTW, you make me feel lazy LOL.
Thank You sir!
Posted By: Keepat
Re: Modern Bullitt build - 01/20/17 01:17 AM
I'm really looking forward to seeing this car, painted, and the assembly progress. yet, I'll be kinda bummed when it's all done. The detail, and seeing the work put into it, has been interesting. Keep up the good work.
My thoughts exactly... This car reminds me of a "riddler award" car.. So many hidden aspects to it...
I say this due to watching Chip Foose describe his "riddler" winning car one time... So many things you just don't realize until it is shown to you...
Thank you!!
Pat
Posted By: Keepat
Re: Modern Bullitt build - 01/20/17 01:36 AM
I epoxy sealed, base coated, and cleared the bottom of the car today
Thank you!
Pat


Posted By: Keepat
Re: Modern Bullitt build - 02/20/17 03:27 AM
Landing gear is on and she will be on the ground soon. Then I'll hang the doors, fender, hood and trunk to set & correct the gaps.
Thanks
Pat


Posted By: rhamson
Re: Modern Bullitt build - 02/21/17 07:33 PM
Looking good Pat. Keep up the good work!
Posted By: Keepat
Re: Modern Bullitt build - 02/24/17 03:33 AM
Looking good Pat. Keep up the good work!
Thank you sir! FYI Alex bought a 1970 Cuda for his next project.
Pat
Posted By: rhamson
Re: Modern Bullitt build - 03/01/17 08:24 PM
Love Cuda's.
Posted By: Keepat
Re: Modern Bullitt build - 03/09/17 05:32 AM
Off the rotisserie and on four wheels ;-)
Thanks
Pat


Posted By: Keepat
Re: Modern Bullitt build - 03/12/17 01:25 AM
Posted By: Keepat
Re: Modern Bullitt build - 03/12/17 06:16 PM
The subject of small dings and dents was brought up, so I thought I would post a few pictures of how an old body man showed me an easy technique to work them out if you have access to the other side. Using a spring-loaded center punch with a filed down blunt end.
Start with locating and marking the dent from the backside. Then unscrew the spring-loaded center punch a few turns as to lessen the blow for the first try. It may take two or three strikes to get the panel flush, along with changing the tension on the spring loaded center punch. You may need to move the impact point a 16th of an inch in either direction to work the dent out.
Thanks
Pat


Posted By: mopar4don
Re: Modern Bullitt build - 03/13/17 01:38 PM
Hey Nice tip Pat, And thank you for sharing.
Say what is that on the inside of the door? Something to cushion the blow of the center punch?
Posted By: Keepat
Re: Modern Bullitt build - 03/13/17 02:31 PM
Hey Nice tip Pat, And thank you for sharing.
Say what is that on the inside of the door? Something to cushion the blow of the center punch?
Don,
That is just an optical illusion, I scraped away some of the sound deadening on the inside of the door so that the punch would make direct contact with the metal.
Thanks
Pat
Posted By: mopar4don
Re: Modern Bullitt build - 03/13/17 02:52 PM
Hey Nice tip Pat, And thank you for sharing.
Say what is that on the inside of the door? Something to cushion the blow of the center punch?
Don,
That is just an optical illusion, I scraped away some of the sound deadening on the inside of the door so that the punch would make direct contact with the metal.
Thanks
Pat
Ahhh, I see it now!
Posted By: Keepat
Re: Modern Bullitt build - 03/14/17 03:22 PM
With the right side fender hung she is starting to look like a charger again :-)
Thanks
Pat

Posted By: jpilone
Re: Modern Bullitt build - 03/14/17 06:16 PM
Awesome work!! You should sell your services for the steering wheel!!
Posted By: Keepat
Re: Modern Bullitt build - 03/14/17 10:15 PM
Awesome work!! You should sell your services for the steering wheel!!
If I did that my hobby would become a job and I already have 1 job and not looking for another ;-)
Thanks
Pat
Posted By: mopar4don
Re: Modern Bullitt build - 03/14/17 10:19 PM
With the right side fender hung she is starting to look like a charger again :-)
Thanks
Pat
That is one FINE looking charger!
Posted By: Keepat
Re: Modern Bullitt build - 03/20/17 03:41 AM
Doors and fenders are closely aligned after a lot of massaging. Just need put the hood on and then I can start on the final gap alignment.
Thanks
Pat


Posted By: Keepat
Re: Modern Bullitt build - 03/22/17 05:10 AM
Posted By: Bill_LBSR
Re: Modern Bullitt build - 03/25/17 02:33 AM
Your attention to detail and skills are impressive. This thread is motivation for me to finally start on my 69 charger project.
Posted By: Keepat
Re: Modern Bullitt build - 03/26/17 02:10 PM
Your attention to detail and skills are impressive. This thread is motivation for me to finally start on my 69 charger project.
Bill, Good to hear, I'll look foward to following your thread!
Thank You!
Pat
Posted By: MattW
Re: Modern Bullitt build - 03/26/17 11:12 PM
Nice work!!
You my friend have OCD!!! Would love to have you do my car.
Matt
Posted By: Keepat
Re: Modern Bullitt build - 03/28/17 02:52 AM
Nice work!!
You my friend have OCD!!! Would love to have you do my car.
Matt
Matt,
I think most people on this site have OCD, Obsessive Chrysler Disorder ;-)
Thanks
Pat
Posted By: Keepat
Re: Modern Bullitt build - 03/30/17 04:25 AM
Posted By: larry4406
Re: Modern Bullitt build - 03/30/17 12:27 PM
Excellent job Pat!
Posted By: mopar4don
Re: Modern Bullitt build - 03/30/17 10:24 PM
Nice job Pat. say do you have any pics show that rod from the inside of the door? I think I may have to do this to my car.
Posted By: Keepat
Re: Modern Bullitt build - 03/31/17 04:13 AM
Don, Here are a few pictures of the inside of the door.
Thank you
Pat


Posted By: larry4406
Re: Modern Bullitt build - 03/31/17 01:37 PM
Pat - what kind of rod is that and how did you weld it (TIG or MIG)? TIG rod?
Posted By: Keepat
Re: Modern Bullitt build - 03/31/17 02:46 PM
Larry, I used 1/8" tig welding rod (ER 70S-3)
Thank you
Pat
Posted By: mopar4don
Re: Modern Bullitt build - 03/31/17 03:46 PM
WOW, I cant even tell you did anything!
Awsome job! I will remember this when I get to the same point.
Thank you
Posted By: Keepat
Re: Modern Bullitt build - 04/07/17 04:17 AM
Posted By: larry4406
Re: Modern Bullitt build - 04/07/17 11:45 AM
Pat - are you using TIG or MIG welding?
Posted By: mopar4don
Re: Modern Bullitt build - 04/07/17 01:53 PM
Amazing work Pat!
Thank you so much for sharing your hard work!
It gives guys like me incentive to keep working on our projects!
The rod you used (ER 70S-3), Is this the same as the mig wire you are using?
Not sure if it matters?
Don
Posted By: Keepat
Re: Modern Bullitt build - 04/08/17 01:32 AM
Pat - are you using TIG or MIG welding?
Larry, All Mig welding. I'm still in the practicing stages of Tig welding. Tig welding is sort of like playing drums, you use your hands and feet and when it's done right you make a cool sound. Right now my Tig welding sounds like a monkey playing the bongos ;-)
Thanks
Pat
Posted By: Keepat
Re: Modern Bullitt build - 04/08/17 01:35 AM
Amazing work Pat!
Thank you so much for sharing your hard work!
It gives guys like me incentive to keep working on our projects!
The rod you used (ER 70S-3), Is this the same as the mig wire you are using?
Not sure if it matters?
Don
Don,
Yes, same type of wire I use in my Mig welder, just a lot smaller.
Thank you
Pat
Posted By: larry4406
Re: Modern Bullitt build - 04/08/17 02:23 AM
Thanks Pat. I'm trying to learn MIG.
Posted By: Keepat
Re: Modern Bullitt build - 05/29/17 04:58 AM
Still working on the bodywork but took a little break from the block sanding and made a filler between the grill mount and radiator support. I borrowed the idea from another member. I need to weld a small plate around the hood latch and install a few fasteners before I paint it.
Thanks
Pat


Posted By: Keepat
Re: Modern Bullitt build - 05/31/17 03:50 AM
I very happy with how it turned out with the hood latch plate welded in
Thanks.
Pat


Posted By: larry4406
Re: Modern Bullitt build - 05/31/17 12:10 PM
Very cool Pat!
Posted By: Keepat
Re: Modern Bullitt build - 06/02/17 12:01 AM
Posted By: jpilone
Re: Modern Bullitt build - 06/02/17 07:49 PM
I love that filler panel at the hood latch. Very clever!
Posted By: Keepat
Re: Modern Bullitt build - 06/11/17 04:19 PM
I love that filler panel at the hood latch. Very clever!
Thank you!
3rd and maybe final coat of primer on the hood and tops of both fenders? Very happy with all the gaps. This bodyworks part of the build sucks, I'm starting to get Popeye the sailor man forearm ;-)
We also have a new addition to the family :-)
Thanks
Pat


Santino "Sonny" Corleone
Posted By: larry4406
Re: Modern Bullitt build - 06/11/17 04:28 PM
Awesome gaps and pup!
Posted By: Keepat
Re: Modern Bullitt build - 06/13/17 06:31 PM
Posted By: mopar4don
Re: Modern Bullitt build - 06/13/17 06:44 PM
Wow, you should make your charger into a rube goldberg machine!
Posted By: Keepat
Re: Modern Bullitt build - 06/14/17 12:03 AM
Wow, you should make your charger into a rube goldberg machine!
Sometimes I feel like Rube Goldberg is working on it ;-)
Pat
Posted By: Keepat
Re: Modern Bullitt build - 06/26/17 01:39 AM
Mud work is done on the passenger side, and I sprayed 3 coats of high build primer now it's ready for some blocking sanding and another 3 coats of high build primer.
Thanks
Pat


I was hoping to post an update but it looks like photobucket is holding all of my photos hostage for a $400 a year payment to use their so-called free site :-(
Posted By: Keepat
Re: Modern Bullitt build - 07/03/17 06:09 PM
<a href="https://postimg.org/image/g3wvn0ge1/" target="_blank"><img src="https://s20.postimg.org/g3wvn0ge1/IMG_8366.jpg" alt="IMG_8366"/></a>
Posted By: jpilone
Re: Modern Bullitt build - 07/03/17 07:40 PM
it says your photobucket account needs updating to allow 3rd party hosting.
Posted By: Keepat
Re: Modern Bullitt build - 07/04/17 03:24 AM
it says your photobucket account needs updating to allow 3rd party hosting.
Unfortunately photobucket has change their policy and is holding my photos hostage for a $400 a year fee. I'm not sure I'll be able to retrieve the photos but I will come up with a new program moving forward. Sorry
Pat
Posted By: larry4406
Re: Modern Bullitt build - 07/05/17 01:25 PM
it says your photobucket account needs updating to allow 3rd party hosting.
Unfortunately photobucket has change their policy and is holding my photos hostage for a $400 a year fee. I'm not sure I'll be able to retrieve the photos but I will come up with a new program moving forward. Sorry
Pat
Pat - I hope you have your photo's still saved somewhere else!. Love this thread and the work you are doing.
Lots of forums I frequent the posters have also gotten screwed by photobucket and the pics are lost.
Posted By: WyleECoyote
Re: Modern Bullitt build - 07/06/17 02:17 AM
Pat, et. al. - I motion to start a quasi "go fund me" account to pay the $400 for you for this year so you (and US) don't lose your photos! I've had intentions for month's to save all of your pictures and comments; so much valuable information you've shared with us.
I'll start with a $50 first donation. I can pay you through PayPal; send me a PM with your info.
What say you other members that love this thread!??
Let's pull together and make this happen!
Ron
Posted By: Keepat
Re: Modern Bullitt build - 07/07/17 03:00 AM
Pat, et. al. - I motion to start a quasi "go fund me" account to pay the $400 for you for this year so you (and US) don't lose your photos! I've had intentions for month's to save all of your pictures and comments; so much valuable information you've shared with us.
I'll start with a $50 first donation. I can pay you through PayPal; send me a PM with your info.
What say you other members that love this thread!??
Let's pull together and make this happen!
Ron
Ron,
Thank you so much for the very generous offer! This is not about the money for me, it's all about an online company changing the rules and expecting people to pay and I'm just not going to do it. What's to keep them from upping the charge every year, so I'm not interested in participating in their greed.
Thank you
Pat
Posted By: Keepat
Re: Modern Bullitt build - 07/23/17 03:40 AM
With the bodywork close to being finished I started fitting the bumpers. Both ends needed to bent out a fraction to be parallel with the quarter panel. Then I cut about a 1/4" off of each side for a better fit. Paul's Chrome will de-chrome the bumpers and then finish the welding, they will also weld on the studs for the mounts.
Thanks
Pat


Right side before

Left side after

Posted By: larry4406
Re: Modern Bullitt build - 07/23/17 01:59 PM
Pat - the bumper mod looks nice!
Glad to see you posting again. This is my favorite build and I'm an ebody guy!
I wish I had saved your pictures of the upper radiator support bracing mod you did.
Posted By: Keepat
Re: Modern Bullitt build - 07/23/17 06:59 PM
Pat - the bumper mod looks nice!
Glad to see you posting again. This is my favorite build and I'm an ebody guy!
I wish I had saved your pictures of the upper radiator support bracing mod you did.
PM your email and I'll send you the upper radiator support pictures
Thanks
Pat
Posted By: Keepat
Re: Modern Bullitt build - 07/28/17 04:14 AM
The front bumper is now ready to head to the Paul's. Cut about 3/4 of an inch out of the front 3/8" from each side.
Thanks
Pat


Before

After

Before

After

Posted By: Keepat
Re: Modern Bullitt build - 07/30/17 09:56 PM
With moving the rear bumper tighter to the car I had to shave the bumper guards to fit the lower valance. Started by removing the lower mounting tab and grinding away approximately 3/16" on the bottom edge to clear the valance. Then welding the tab back on.
Thanks
Pat


Here you can see how much I needed to grind off


Posted By: Keepat
Re: Modern Bullitt build - 08/13/17 04:59 PM
Front valance required more work than the tail panel as there were a lot of factory imperfections. Someone also cut a couple of notches that required welding, just when I thought I was done with all the metalwork. Back to the block sanding :-(
Thanks
Pat


Posted By: Keepat
Re: Modern Bullitt build - 08/20/17 04:12 AM
Posted By: larry4406
Re: Modern Bullitt build - 08/20/17 02:47 PM
Nice job Pat!
What made you decide to go with aluminum brackets? Yours seem to be in excellent shape. Just wanting to shave a little bit of weight?
Posted By: Keepat
Re: Modern Bullitt build - 08/20/17 05:24 PM
Nice job Pat!
What made you decide to go with aluminum brackets? Yours seem to be in excellent shape. Just wanting to shave a little bit of weight?
Larry,
Yes all of my original mounts are in very good condition but I was just trying to cut more weight off the front of the car.
Thank you
Pat
Posted By: Keepat
Re: Modern Bullitt build - 08/21/17 12:07 AM
The right side mounts are bent, just need to be welded and then the welds ground down. I will test fit when the bumpers return from Paul's chrome before I paint the mounts, I'm sure they will need a little tweaking to fit.
Thanks
Pat


Posted By: cdstl
Re: Modern Bullitt build - 08/21/17 01:25 PM
How are you bending the aluminum?
thx
Posted By: Keepat
Re: Modern Bullitt build - 08/23/17 02:27 AM
How are you bending the aluminum?
thx
I'm using everything from vice grips to C clamps to a large vice, block of wood and a hammer ;-)
Thanks
Pat
Posted By: larry4406
Re: Modern Bullitt build - 08/24/17 02:23 AM
How are you bending the aluminum?
thx
I'm using everything from vice grips to C clamps to a large vice, block of wood and a hammer ;-)
Thanks
Pat
I sometimes resort to choice words as well..
Posted By: Scott Carl
Re: Modern Bullitt build - 08/25/17 06:20 PM
Love the fab work you're doing on bumpers. I drew the bumpers in on my 74 Challenger (Just another 74 Challenger thread) to make them more like earlier models. Rears were easy but fronts were a bit more of a challenge. (in-board ones hit frame rails when moved in) I hadn't considered just fabbing new ones so I chopped up stock ones

Bumpers seem to fit well but after seeing your mods, I may revisit possible mods on mine before I finish. Blacking out mine (all black car)
Keep up good work. Would love to see earlier pics that are currently not viewable due to PhotoBucket issues. Cant wait to see final project!
Scott
Posted By: Keepat
Re: Modern Bullitt build - 08/27/17 07:04 PM
Love the fab work you're doing on bumpers. I drew the bumpers in on my 74 Challenger (Just another 74 Challenger thread) to make them more like earlier models. Rears were easy but fronts were a bit more of a challenge. (in-board ones hit frame rails when moved in) I hadn't considered just fabbing new ones so I chopped up stock ones
Bumpers seem to fit well but after seeing your mods, I may revisit possible mods on mine before I finish. Blacking out mine (all black car)
Keep up good work. Would love to see earlier pics that are currently not viewable due to PhotoBucket issues. Cant wait to see final project!
Scott
Scott,
Photo Bucket screwed up a lot of Great threads on a lot of forums, very sore subject. I hope to follow up and replace the photos one day but it's just very time-consuming as you know. Thank you.
Pat
Posted By: Keepat
Re: Modern Bullitt build - 08/27/17 09:55 PM
More primer and block sanding ;-(
Pat


Posted By: Keepat
Re: Modern Bullitt build - 08/28/17 03:05 AM
Finished welding up the right side bumper mounts and ground down all the welds. When painted black I think it would hard to tell that they're not original.
Thanks
Pat


Posted By: cdstl
Re: Modern Bullitt build - 08/30/17 02:17 PM
How did you go about making the bends for your bumper mounts?
Thanks
Posted By: Keepat
Re: Modern Bullitt build - 09/03/17 08:02 PM
With a lot of brute force I managed to hit what I'm working on more often then my thumb ;-)
I hope these pictures help.
Pat


Posted By: cdstl
Re: Modern Bullitt build - 09/03/17 09:24 PM
Wow. Nice work
Posted By: Keepat
Re: Modern Bullitt build - 09/05/17 01:18 AM
Finished the bumper mounts, time to get back to block sanding and bodywork :-(
Thanks
Pat


Posted By: Keepat
Re: Modern Bullitt build - 09/12/17 10:56 PM
Google chrome has a fix for the photobucket picture problem ;-)
https://chrome.google.com/webstore/d...fegnfnflicjjgj
Posted By: rhamson
Re: Modern Bullitt build - 09/13/17 03:31 PM
Looking good Pat. Are you going back to black?
Posted By: Keepat
Re: Modern Bullitt build - 09/14/17 02:41 AM
Looking good Pat. Are you going back to black?
Yes black with a black top just like the Bullitt Charger
Thanks
Pat
Posted By: dangina
Re: Modern Bullitt build - 09/14/17 04:41 PM
bravo on the aluminum brackets they turned out great!!!! its always been a mod I've wanted to do, and your way makes sense to me.
Posted By: Keepat
Re: Modern Bullitt build - 09/14/17 07:40 PM
bravo on the aluminum brackets they turned out great!!!! its always been a mod I've wanted to do, and your way makes sense to me.
Thank you, I was very happy with how they turned out and I think when painted it will look very original
Thanks again
Pat
Posted By: Keepat
Re: Modern Bullitt build - 09/18/17 03:18 PM
Sprayed the last coat of primer on the car and ready for the 320 blocking
Thanks
Pat


Posted By: Keepat
Re: Modern Bullitt build - 09/19/17 12:25 AM
I used a level with a straight edge to help to find the center of the style line for laying out tape on the body line. When level, sliding the straight edge will leave a mark dead center of the body line. I'm sure there are many other ways of doing this but I found this work good for my old eyes ;-)
Thanks
Pat


Posted By: larry4406
Re: Modern Bullitt build - 09/19/17 12:05 PM
Pat - what is the purpose of the tape on the style line? A marker for sanding?
Posted By: Keepat
Re: Modern Bullitt build - 09/19/17 03:43 PM
Larry, Yes, the tape is used as a guide for block sanding as to keep a straight and true body line. After that top section is sanded I will tape just above the first tape line and then stand the next section.
Thanks
Pat
Posted By: larry4406
Re: Modern Bullitt build - 09/19/17 11:53 PM
Larry, Yes, the tape is used as a guide for block sanding as to keep a straight and true body line. After that top section is sanded I will tape just above the first tape line and then stand the next section.
Thanks
Pat
Very clever - I imagine this will make the style line quite sharp.
Posted By: Keepat
Re: Modern Bullitt build - 09/23/17 10:16 PM
With the body lines taped I blocked sanded the top 1/3 and bottom 1/3 of the sides with 320 grit sand paper. Then using the 1st tape line as a guide, I ran tape above or below the first tape line so I could block sand the center section of the car. This creates straight but sharp body lines that need softened. After removing all the tape I went back over both sides with 400 grit sand paper softening the body lines.
600 grit paper is next one step away from sealer :-)
Thanks
Pat


Posted By: 68_661charger
Re: Modern Bullitt build - 09/24/17 04:57 PM
When you move the tape from the bottom of the body line to the top of the line, do you put it on the exact line as before or a 1/16 higher? You mentioned "just above". I figure on the exact line would make it real sharp and leaving a space wouldnt really be sanded. Thanks!
Posted By: Keepat
Re: Modern Bullitt build - 09/24/17 09:21 PM
When you move the tape from the bottom of the body line to the top of the line, do you put it on the exact line as before or a 1/16 higher? You mentioned "just above". I figure on the exact line would make it real sharp and leaving a space wouldnt really be sanded. Thanks!
The two tape lines touch. With all of the block sanding completed I removed all the tape and sanded the entire panel with 400 grit paper to soften the body lines
I hope this helps
Thanks
Pat
Posted By: 68_661charger
Re: Modern Bullitt build - 09/24/17 11:11 PM
The two tape lines touch. Yes Thank you.
Posted By: Keepat
Re: Modern Bullitt build - 09/29/17 12:55 AM
I had a few people ask what materials I was using for primer, filler and paint so I thought I would pass this information on here as well.
Starting with all the paint stripped I sprayed the bare metal with Cromax epoxy DTM primer #2599S (DuPont product). From there I used all Evercoat products for the filler and high build primer. Evercoat Rage ultra body filler #100125 was used for the first layer over the Cromax epoxy primer, except for any edges or corners I used Evercoat Everglass #100622 Next was a skim coat of Evercoat polyester glazing putty #100400.
With all the filler sanded to 220 I sprayed 2 layer of Evercoat Super build primer #100730. Block sanded that down with 220 grit paper and sprayed two coats of Evercoat Finish Sand #100738. Sounds like a broken record but I block sanded that back down again with 220 grit paper.
Then last two coats of Evercoat Finish Sand #100738 and started block standing at 320 then to 400 grit paper.
For the sealer, basecoat and clearcoat I will be using all PPG products.
I will use PPG's DP90LF epoxy primer sealer. Then PPG Omni basecoat. And then we will follow it up with PPG's DC4000 clearcoat.
Thanks
Pat
Posted By: JERICOGTX
Re: Modern Bullitt build - 09/30/17 02:18 PM
I feel better about my choice of primer now. I bought the same stuff.
Posted By: Mr T2U
Re: Modern Bullitt build - 09/30/17 04:17 PM
For the sealer, basecoat and clearcoat I will be using all PPG products.
I will use PPG's DP90LF epoxy primer sealer. Then PPG Omni basecoat. And then we will follow it up with PPG's DC4000 clearcoat.
Thanks
Pat
i am not questioning you with my comments. you know what you are doing. i have been lightly following your build on IMBOC. i was scrolling down and saw this thread in the main board.
you might want to think about using a better sealer. epoxy thinned out as a sealer tends to shrink after a few weeks. that's the chemical nature of epoxy. it starts out as a thermo-plastic product for the first 2 weeks. after the first 2 weeks it becomes a thermo-set product. during this transfer it will shrink giving your smooth paint some texture. this might be a good thing, because a smooth paint job with some light texture is almost impossible to do.
i have been using PPG epoxy since the 80's and have seen this happen a LOT.
i myself use the envirobase ECS sealer line now. this is hands down the best sealer i have ever used. the biggest problem with it is it must be sprayed with a really good spray gun due to the high solids of the product. and you shouldn't spray it over bare metal. i give bare spots a little spray with SXA 1031.
your choice of the 4000 clear coat is a good one. this is a high solid clear that holds a shine and is extremely durable. it is also bakes well.
i use EC 530, fast cure, and 550, slow cure, clear coat. management doesn't want to stock 2 different catalysts for the 2000, fast, and 4000, slow, clears or this is what i would use.
Posted By: Keepat
Re: Modern Bullitt build - 09/30/17 05:24 PM
I feel better about my choice of primer now. I bought the same stuff.
I love using Evercoat primer very easy to sand and extremely easy to work with.
Pat
Mr T
Thank you for your comments. I will do a test spray out with this PPG epoxy as I have not used it before. I have only used DuPont products in the past but to get this particular shade of black I had to switch to PPG.
Thanks again
Pat
Posted By: Mr T2U
Re: Modern Bullitt build - 09/30/17 06:37 PM
i have been using PPG products since around 1982. i don't remember when i attended my first training class when i first started using DBU base coat clear coat system.
if you have any PPG questions pm me here or at IMBOC under the same name.
i have a 08 bullitt.
epoxy thinned out used as a sealer is really old tech, i used to use it over 20 years ago. but now just about any PPG 2K sealer would be a better choice because it will be designed as a sealer from the start epoxy wasn't designed as a sealer when it was developed
.
omni base coat works pretty good for what it is but DBC base coat would be a better choice. there is a activator, DX57, for it. it will give the base coat a little help cross linking to help it dry and cure faster. it will also help with durability helping the clear coat adhere better to the base coat. it will spray exactly the same as omni base coat and the same spray techniques are the same. just don't spray the last coats on to dry, the clear coat might de-laminate. omni will have the same problems.
there isn't a activator for omni base. as far as color if it can be made in omni they can make it in DBC.
again i am NOT criticizing your choices of products to use. what you have listed will work just fine. i just hate to see you put so much time and money into a project and have problems with it later on.
Posted By: Keepat
Re: Modern Bullitt build - 10/01/17 10:44 PM
Mr T
Thank you for your insight and your comments. I have already purchased the materials, not that I can't change? I have two very close friends that have also painted cars for well over 35 years and they're holding my hand through this process, as they have done with previous cars I have restored.
Again I appreciate you chiming in, always good to get another perspective.
Pat
Posted By: Keepat
Re: Modern Bullitt build - 10/08/17 12:32 AM
Ok, this is the 4th and it will be the last primer coat! The 3rd coat was very close but not for black.
Thanks
Pat


Posted By: GY3
Re: Modern Bullitt build - 10/11/17 09:57 PM
Can't wait to see it in black!
Posted By: Keepat
Re: Modern Bullitt build - 10/21/17 02:34 PM
Was out of town for a few days and while away a package from the gates of Valhalla all shiny and chrome was delivered (actually it was my bumpers from Paul's chrome ;-) I will test mount them this weekend to confirm the fit along with my new aluminum bumper mounts.
Thanks
Pat


Posted By: JERICOGTX
Re: Modern Bullitt build - 10/21/17 06:22 PM
Impressive!
Posted By: larry4406
Re: Modern Bullitt build - 10/22/17 02:47 PM
Awesome build! Can't wait to see it finished.
I downloaded the photobucket hack for chrome and can see all of the pictures now and saved my favorites.
Posted By: Keepat
Re: Modern Bullitt build - 10/22/17 06:58 PM
Awesome build! Can't wait to see it finished.
I downloaded the photobucket hack for chrome and can see all of the pictures now and saved my favorites.
Larry,
It's great that somebody found a way around the photo buckit block out! I glad you load it and can get all the photos
Thank you
Pat
Posted By: Keepat
Re: Modern Bullitt build - 10/22/17 06:59 PM
Posted By: Keepat
Re: Modern Bullitt build - 10/27/17 03:00 AM
For the first time in over 3 years my Charger has moved! Only about 15' ;-) from one side of the shop to the other but it's definitely a big milestone. I will start to clean the paint booth to get it ready for painting. All the block sanding (600 grit) is finished. I just need to take the fenders, doors, hood, and trunk off and detail the jams.
Thanks
Pat


Posted By: Keepat
Re: Modern Bullitt build - 11/09/17 04:38 AM
All the body panels are removed, still need to do some detail sanding in the door jams. I also drilled the holes for the power windows in the doors as well as the jams
Thanks
Pat


Posted By: larry4406
Re: Modern Bullitt build - 11/10/17 01:53 AM
Pat - what is that power window cable management piece? Very nice.
Posted By: Keepat
Re: Modern Bullitt build - 11/13/17 03:13 AM
Pat - what is that power window cable management piece? Very nice.
I bought it from electric life but I can't seem to locate it on their website they may have discontinued it??
Thanks
Pat
https://www.electric-life.com/product-category/wire-looms/rubber-wire-looms/
Posted By: Keepat
Re: Modern Bullitt build - 11/16/17 03:22 PM
Larry,
Correction I bought the wire looms from New Relics see link below
Thanks
Pat
https://www.nu-relics.com/Conduit-s/188.htm
Posted By: larry4406
Re: Modern Bullitt build - 11/17/17 02:37 AM
Its funny but I noticed this week that they look near identical to the ones in my 2012 ford focus!
Posted By: Keepat
Re: Modern Bullitt build - 11/19/17 09:15 PM
Most everything is sanded inside and out to 600 grit. Just the bottom of the hood left to do :-)
Thanks
Pat


Posted By: Anonymous
Re: Modern Bullitt build - 11/30/17 04:26 AM
Man I wish I was at this stage. Looking good.
Posted By: Keepat
Re: Modern Bullitt build - 12/01/17 04:47 PM
Man I wish I was at this stage. Looking good.
And I wish I was pass this stage ;-)
Thank you!
Pat
Posted By: minivan
Re: Modern Bullitt build - 12/01/17 07:50 PM
Man I wish I was at this stage. Looking good.
And I wish I was pass this stage ;-)
Thank you!
Pat
NO way man... You are going to be bored stiff when this car is done...... LOL
Posted By: larry4406
Re: Modern Bullitt build - 12/02/17 01:09 AM
Man I wish I was at this stage. Looking good.
And I wish I was pass this stage ;-)
Thank you!
Pat
NO way man... You are going to be bored stiff when this car is done...... LOL
If heŌĆÖs bored he can do mine no charge. I will even help. ¤śē
Posted By: Keepat
Re: Modern Bullitt build - 12/02/17 05:06 AM
Man I wish I was at this stage. Looking good.
And I wish I was pass this stage ;-)
Thank you!
Pat
NO way man... You are going to be bored stiff when this car is done...... LOL
Not a chance when this one's done I'll be onto the next one. Been promising my wife a woody wagon with modern drive.
Thanks
Pat
Posted By: larry4406
Re: Modern Bullitt build - 12/02/17 02:38 PM
Man I wish I was at this stage. Looking good.
And I wish I was pass this stage ;-)
Thank you!
Pat
NO way man... You are going to be bored stiff when this car is done...... LOL
Not a chance when this one's done I'll be onto the next one. Been promising my wife a woody wagon with modern drive.
Thanks
Pat
When it comes time for the woody wagon, let us know where you post the build so we can follow along.
Posted By: Keepat
Re: Modern Bullitt build - 12/03/17 03:06 PM
Will do!
Thanks
Pat
Posted By: Keepat
Re: Modern Bullitt build - 12/08/17 03:36 PM
Paint booth is cleaned and ready for painting to start. I just need outside temps to be upper 40s to keep the shop temps above 65.
Thanks
Pat


Posted By: Keepat
Re: Modern Bullitt build - 12/14/17 04:59 AM
Painted 26 small parts with single stage black. Saturday planning on painting the inside of the doors and fenders with basecoat / clearcoat.
Thanks
Pat


Posted By: Keepat
Re: Modern Bullitt build - 12/16/17 10:55 PM
Painted the inside of the doors and fenders today.
Thanks
Pat


Sealer

Base

Clear
Posted By: Keepat
Re: Modern Bullitt build - 12/24/17 12:27 AM
Painted the 1st outside part of the car ;-)
Thanks & Merry Christmas!
Pat


Posted By: mopars_1
Re: Modern Bullitt build - 12/24/17 12:36 AM
So excited to see this project come together!!
Posted By: Keepat
Re: Modern Bullitt build - 12/24/17 02:13 AM
I think I see light at the end of the tunnel, hopefully itŌĆÖs not a train wreck ;-)
Thank you!
Pat
Posted By: Keepat
Re: Modern Bullitt build - 12/24/17 07:40 PM
Got a little Christmas eve paining in before the family shows up this afternoon.
Thanks
Pat


Posted By: larry4406
Re: Modern Bullitt build - 12/25/17 01:56 AM
Pat - quite impressive!
Thanks for showing and wish you and your family the best of the holidays!
Posted By: crlush
Re: Modern Bullitt build - 12/27/17 09:15 PM
Lookin sweet!

Posted By: Keepat
Re: Modern Bullitt build - 12/30/17 01:40 AM
Painted both doors today with my new SATA 4000 spray-gun, awesome spray gun!!
Thanks
Pat

Primed

1 coat of Sealer

3 coats of base coat

3 coats of clear coat
Posted By: Keepat
Re: Modern Bullitt build - 12/31/17 04:02 AM
Painted the fenders today, and as with the rest of the body panels everything will be wet sanded with 1000 grit and two more coats of clear will be applied.
Thanks
Pat


Posted By: Anonymous
Re: Modern Bullitt build - 01/08/18 06:45 AM
Looking good.
Posted By: Keepat
Re: Modern Bullitt build - 01/10/18 02:05 PM
Posted By: Keepat
Re: Modern Bullitt build - 01/10/18 02:05 PM
Painted the trunk lid and a few small parts last night. Last big part to do is the hood and then I will pull the body in the booth.
Thanks
Pat


Posted By: larry4406
Re: Modern Bullitt build - 01/11/18 02:05 PM
Pat - the mirror finish you are achieving is astonishing!
Posted By: Keepat
Re: Modern Bullitt build - 01/12/18 04:58 AM
Pat - the mirror finish you are achieving is astonishing!
Thanks Larry!
Paint the bottom of the hood. I think the light at the end of the tunnel is getting brighter after I cleaned the overspray on my glasses ;-)
Thanks
Pat


Posted By: Keepat
Re: Modern Bullitt build - 01/22/18 02:41 AM
After block/wet sanding the 1st coats of clear with 800 grit I sprayed the final 2 coats of clear on the doors this weekend.
Thanks
Pat


Posted By: GY3
Re: Modern Bullitt build - 01/23/18 03:37 AM
Wow! Very nice work!
Posted By: Keepat
Re: Modern Bullitt build - 01/25/18 03:14 AM
Posted By: crlush
Re: Modern Bullitt build - 01/25/18 03:28 PM
Looks awesome, will look like a black mirror when your done! Cant wait to see your car all assembled.
Posted By: Keepat
Re: Modern Bullitt build - 02/02/18 03:50 PM
Looks awesome, will look like a black mirror when your done! Cant wait to see your car all assembled.
I hope ;-)
Thank you!
Posted By: Keepat
Re: Modern Bullitt build - 02/02/18 03:51 PM
This hood has been a pain in the a$$! First time I tried to paint it I found a bodywork blemish that I missed. After fixing the bodywork, I tried for the 2nd time to paint the hood only to have reaction between the sealer and basecoat that crinkled paint. So once again I blocked sanded, primed and blocked sanded again :-( The 3rd time turn out to be the charm as the hood sprayed out great. The body is next!
Thanks
Pat


Posted By: Anonymous
Re: Modern Bullitt build - 02/03/18 04:00 AM
Hope you don't plan on parking in regular public parking stalls. That would give me hurt failure finding a big scratch or dent from some A hole. Looks pretty awesome to me.
Posted By: ihv800
Re: Modern Bullitt build - 02/04/18 06:24 AM
I've enjoyed this build since the beginning. You're an artist, the paint work is looking great, all you're prep obviously is paying off! Can't wait to see the body in paint!
Posted By: Keepat
Re: Modern Bullitt build - 02/04/18 06:22 PM
Hope you don't plan on parking in regular public parking stalls. That would give me hurt failure finding a big scratch or dent from some A hole. Looks pretty awesome to me.
The 1st time I drove my fully restored #matching 1972 Pontiac T/A some knucklehead was cutting his grass shooting it out into the road and a rock put a chip in my passengers door :-(
Thanks
Pat
Posted By: Keepat
Re: Modern Bullitt build - 02/04/18 06:25 PM
I've enjoyed this build since the beginning. You're an artist, the paint work is looking great, all you're prep obviously is paying off! Can't wait to see the body in paint!
Thank you for following along the past few years, I hope this year I finish it ;-)
Pat
Posted By: FrankenScamp
Re: Modern Bullitt build - 02/21/18 10:02 AM
I canŌĆÖt be the only ŌĆśjonesinŌĆÖ for an update.
Hope things are going smooth.

Posted By: Keepat
Re: Modern Bullitt build - 02/24/18 04:31 AM
I canŌĆÖt be the only ŌĆśjonesinŌĆÖ for an update.
Hope things are going smooth.
sorry no updates was out of town working the Miami boat show, back on the Charger nextweek!
Thanks
Pat
Posted By: Keepat
Re: Modern Bullitt build - 03/03/18 11:25 PM
Posted By: rhamson
Re: Modern Bullitt build - 03/12/18 04:28 PM
Looking Good Pat.
Posted By: Keepat
Re: Modern Bullitt build - 03/18/18 09:29 PM
Posted By: 70B5Cuda
Re: Modern Bullitt build - 03/20/18 03:13 AM
DAAAAAAAAAAAAAAAAAAAAANG! (in my best Joe Dirt voice)
Posted By: Keepat
Re: Modern Bullitt build - 03/21/18 01:39 AM
:-)
Posted By: Keepat
Re: Modern Bullitt build - 03/26/18 09:14 PM
Posted By: FrankenScamp
Re: Modern Bullitt build - 03/27/18 10:18 AM
Always watching......
Posted By: Anonymous
Re: Modern Bullitt build - 03/28/18 03:09 AM
Obviously you are putting vinyl on top correct???
Posted By: Keepat
Re: Modern Bullitt build - 03/28/18 03:44 PM
Always watching......
Thanks!
Posted By: Keepat
Re: Modern Bullitt build - 03/28/18 03:46 PM
Obviously you are putting vinyl on top correct???
IŌĆÖm not a big fan of vinyl roofs but it needs to have one to be a true Bullitt replica.
Thanks
Pat
Posted By: Keepat
Re: Modern Bullitt build - 03/31/18 04:42 AM
I painted the trunk from the fetal position ;-) body is next!
Thanks


Posted By: Anonymous
Re: Modern Bullitt build - 04/01/18 06:58 AM
You do beautiful paint.
Posted By: Keepat
Re: Modern Bullitt build - 04/07/18 09:47 PM
Posted By: FrankenScamp
Re: Modern Bullitt build - 04/07/18 10:07 PM
This is like a strip tease....but in reverse.
Great pics, thanks.
Posted By: Keepat
Re: Modern Bullitt build - 04/07/18 10:17 PM
This is like a strip tease....but in reverse.
Great pics, thanks.
The real one would be much more fun to watch ;-)
Posted By: Anonymous
Re: Modern Bullitt build - 04/08/18 06:38 AM
What spray gun are you using and what is your air line setup?
Posted By: Keepat
Re: Modern Bullitt build - 04/08/18 02:25 PM
IŌĆÖm using in Eastwood three stage air dryer
https://www.eastwood.com/ew-4-stage-desiccant-system-1-2-in-npt.html My sealer and base gun is a Devilbiss is Tekna
And my clear coat gun is a Sata 4000B
Thanks
Pat
Posted By: Keepat
Re: Modern Bullitt build - 04/15/18 02:27 PM
Posted By: chargervert
Re: Modern Bullitt build - 04/15/18 04:59 PM
Pat,your car looks amazing in color! Your attention to fit and finish is just incredible! You knocked it out of the park with those wheels! This is going to be one sinister Charger!
Posted By: Keepat
Re: Modern Bullitt build - 04/16/18 01:13 AM
Pat,your car looks amazing in color! Your attention to fit and finish is just incredible! You knocked it out of the park with those wheels! This is going to be one sinister Charger!
ItŌĆÖs been so long since IŌĆÖve had those wheels on the car I think it will be like the first time when I put them back on hopefully this summer.
Thank you!
Pat
Posted By: GY3
Re: Modern Bullitt build - 04/16/18 11:08 PM
Anxious to see it in all its glory!
Posted By: Keepat
Re: Modern Bullitt build - 04/22/18 10:11 PM
;-)
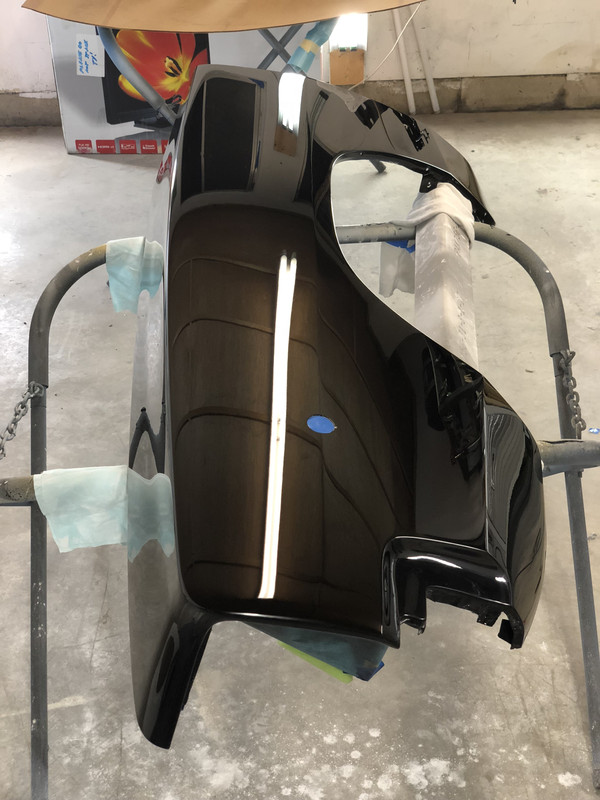
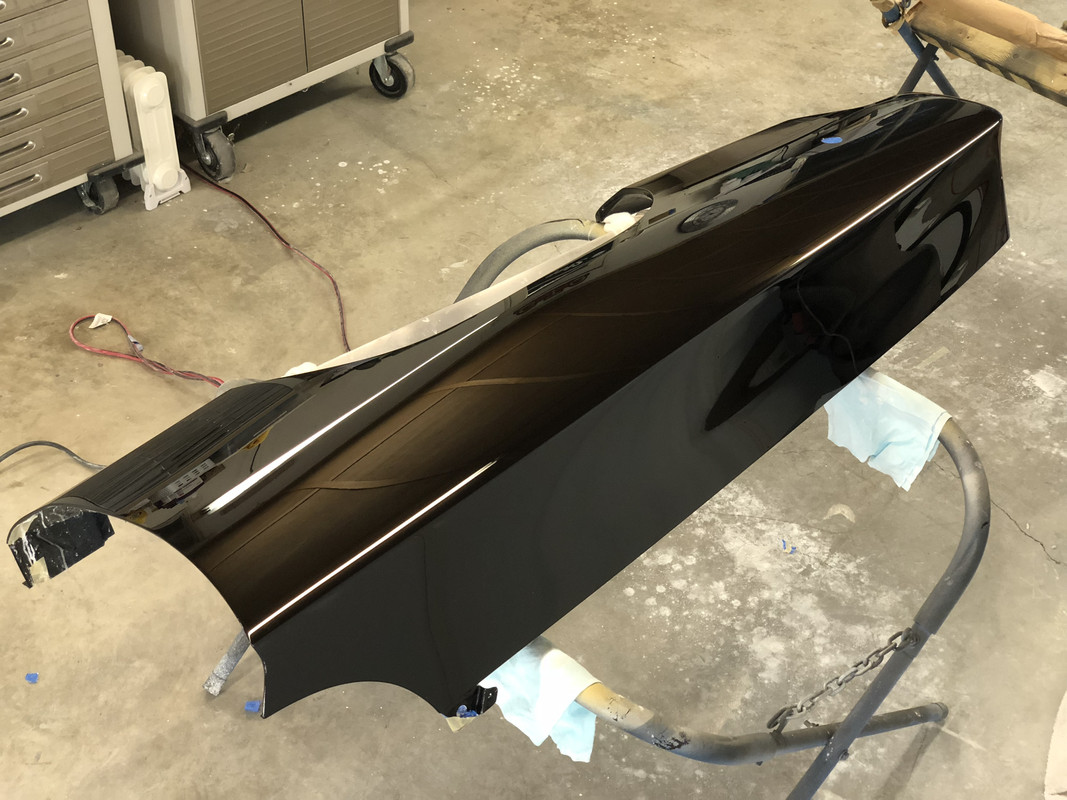
Posted By: larry4406
Re: Modern Bullitt build - 04/22/18 11:55 PM
Awesome Pat!
One of my favorite builds!
Posted By: magnumcharger
Re: Modern Bullitt build - 04/24/18 02:14 PM
Too bad all of your first photos of this thread are un-seeable now!
Posted By: MoparJunkie
Re: Modern Bullitt build - 04/24/18 04:54 PM
Yeah.... I had to go back and repost mine. F'n photobucket....

Posted By: CDN72SE
Re: Modern Bullitt build - 04/24/18 06:46 PM
Wooo hoo!!!
Posted By: Keepat
Re: Modern Bullitt build - 04/26/18 12:07 AM
Awesome Pat!
One of my favorite builds!
Thanks Larry!
Posted By: Keepat
Re: Modern Bullitt build - 04/26/18 12:09 AM
Too bad all of your first photos of this thread are un-seeable now!
Yes that is a bummer one of the reasons why I started a Facebook page and started reloading all of my old photos.
https://m.facebook.com/modernbullitt/Thanks
Pat
Posted By: Keepat
Re: Modern Bullitt build - 04/26/18 12:11 AM
Posted By: whayden2003
Re: Modern Bullitt build - 05/04/18 04:14 AM
Hello Keepat. Looking good. Come over here to check out the content. Lol
Posted By: Keepat
Re: Modern Bullitt build - 05/06/18 02:33 PM
Hello Keepat. Looking good. Come over here to check out the content. Lol
Lots of cool projects on this site however this thread is still moving along painfully slow;-)
Thanks
Pat
Posted By: Keepat
Re: Modern Bullitt build - 05/08/18 02:05 PM
Clear is all blocked with 800 grit and I hope to spray the last 2 coats of clear this weekend. Last of the painting ;-) on to the color sanding and polishing :-(
Thanks
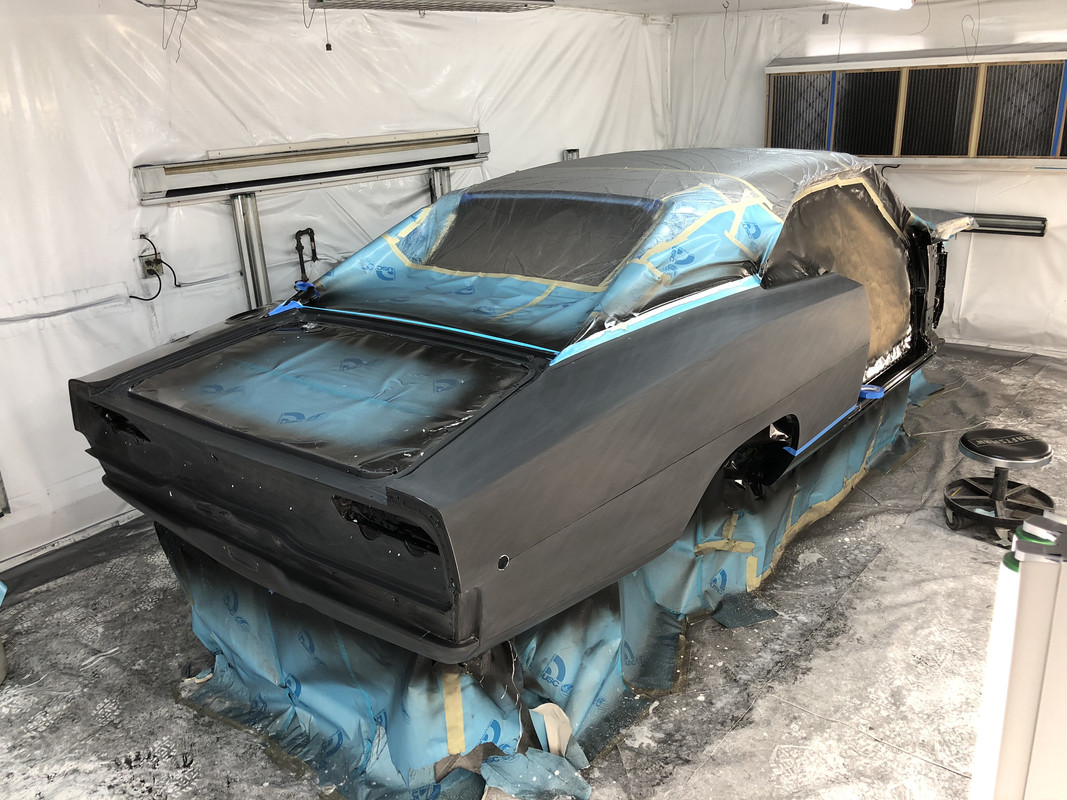
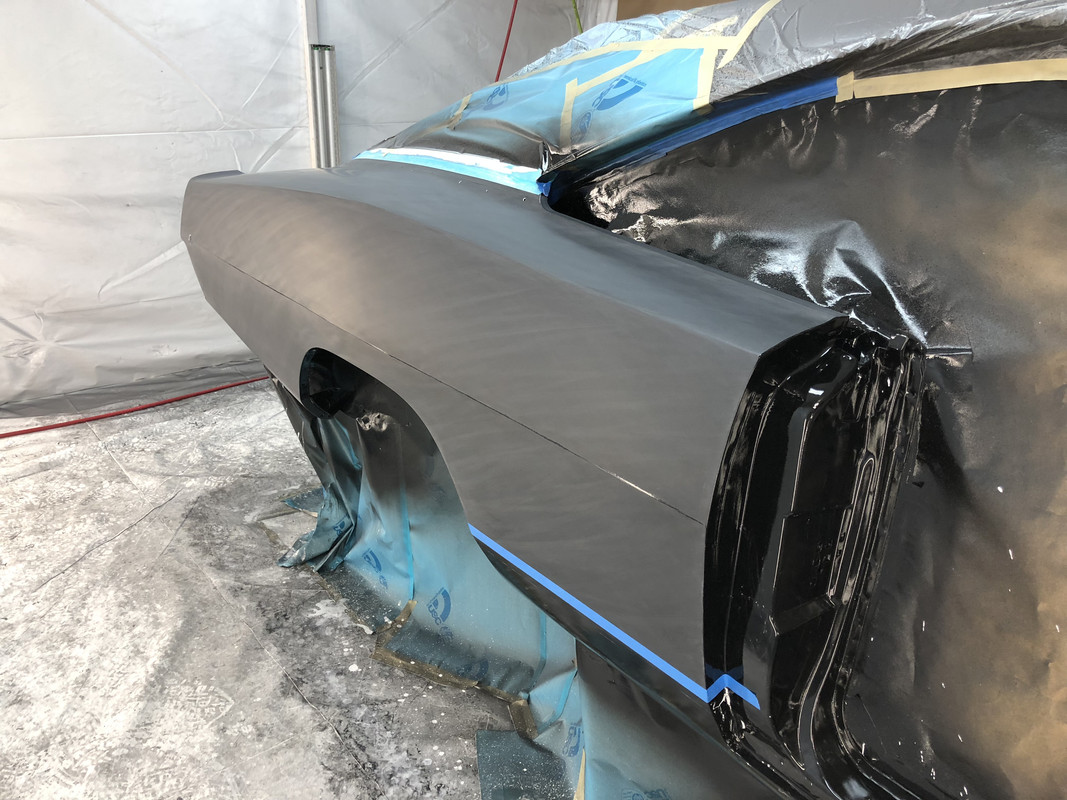
Posted By: JERICOGTX
Re: Modern Bullitt build - 05/08/18 06:28 PM
Will you be doing the tail panel in satin black or gloss?
Posted By: Keepat
Re: Modern Bullitt build - 05/09/18 02:27 AM
Will you be doing the tail panel in satin black or gloss?
Satin:-)
Posted By: Keepat
Re: Modern Bullitt build - 05/14/18 03:01 AM
Posted By: mopars_1
Re: Modern Bullitt build - 05/14/18 05:12 AM
Ooooh my!! This is such an amazing car!
Posted By: Keepat
Re: Modern Bullitt build - 05/14/18 02:06 PM
Ooooh my!! This is such an amazing car!
Thank you sir!
Posted By: ihv800
Re: Modern Bullitt build - 05/16/18 03:40 AM
Gorgeous work! I appreciate the time you took on those Charger body lines, they look perfect!
Posted By: cdp
Re: Modern Bullitt build - 05/20/18 02:05 AM
Drooling! So, if you got room, and you work cheap...I got a project for you. LOL.
That is going to be the coolest Bullet Charger on the planet!
Posted By: Keepat
Re: Modern Bullitt build - 05/25/18 10:06 PM
Drooling! So, if you got room, and you work cheap...I got a project for you. LOL.
That is going to be the coolest Bullet Charger on the planet!
Thanks but no room;-)
Pat
Posted By: Keepat
Re: Modern Bullitt build - 05/25/18 10:08 PM
Gorgeous work! I appreciate the time you took on those Charger body lines, they look perfect!
My forearm and hand appreciate that IŌĆÖm allmost done ;-)
Thank you!
Posted By: Keepat
Re: Modern Bullitt build - 05/25/18 10:09 PM
Posted By: larry4406
Re: Modern Bullitt build - 05/25/18 10:46 PM
WOW!
Talk about a mirror finish!
Keep it up Pat!
Posted By: 71 Charger R/T
Re: Modern Bullitt build - 05/26/18 03:45 AM
You sir, Impress me!
Posted By: Keepat
Re: Modern Bullitt build - 06/02/18 01:51 PM
Thank you gentlemen!
Body is all sanded to 2500 grit, 3000 and polishing this weekend :-)
Thanks
Pat
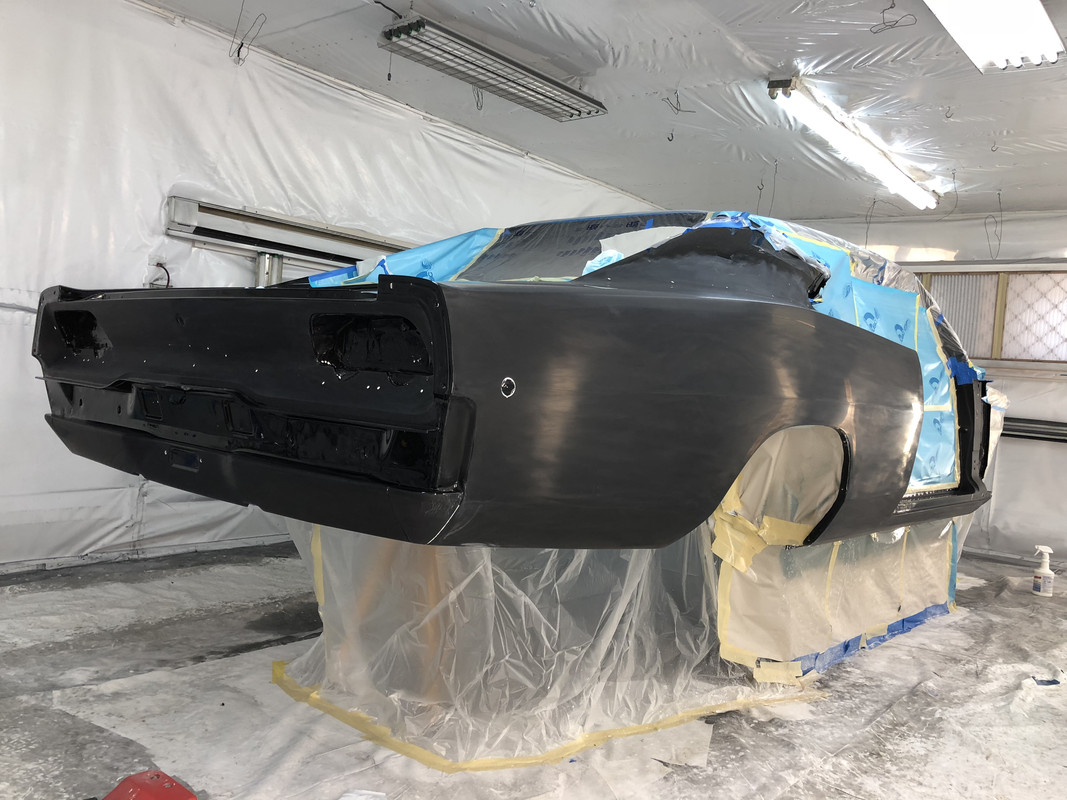

Posted By: Keepat
Re: Modern Bullitt build - 06/02/18 10:22 PM
1st cut, 3 more steps to go.
Thanks
Pat
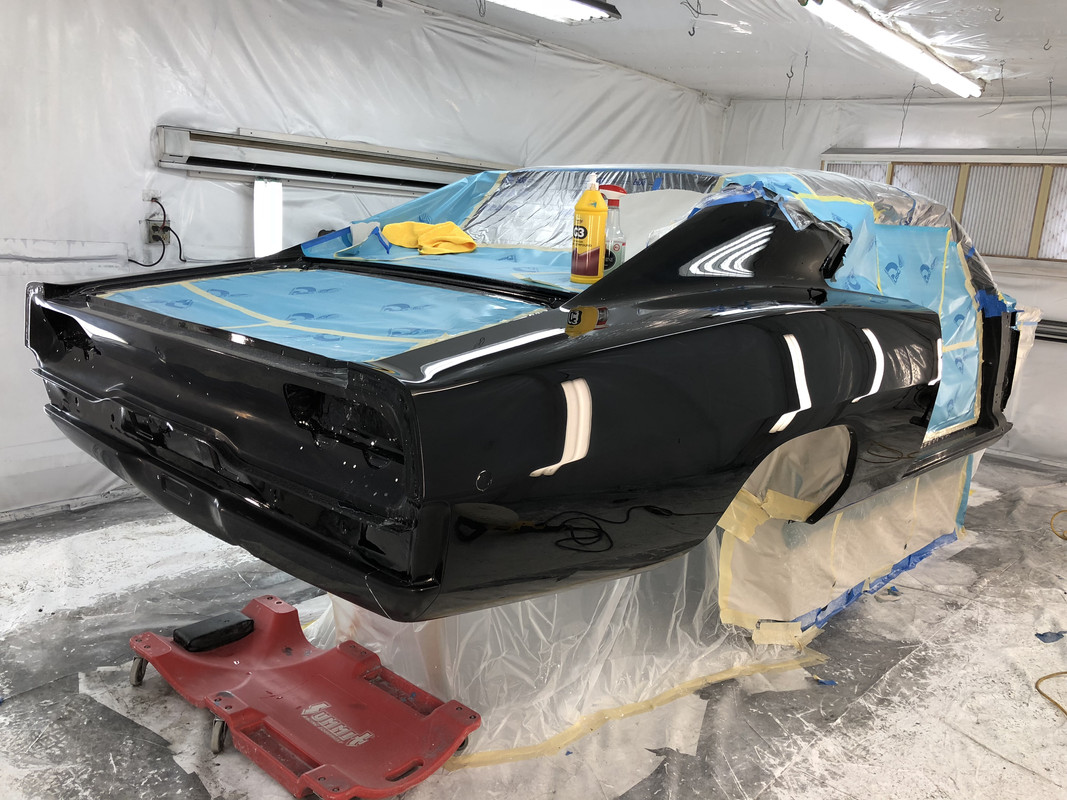
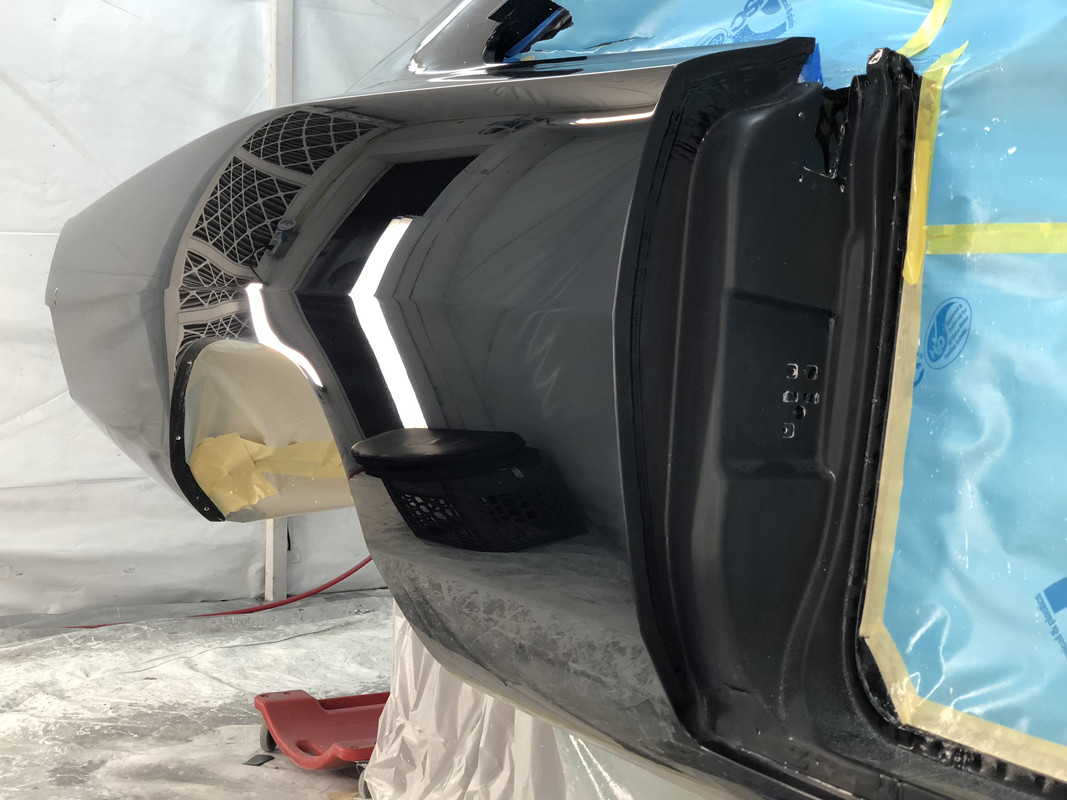
Posted By: CDN72SE
Re: Modern Bullitt build - 06/04/18 06:56 PM
Wow!!
Posted By: Anonymous
Re: Modern Bullitt build - 06/05/18 04:16 AM
Perfectionist at its finest!!!
Posted By: Keepat
Re: Modern Bullitt build - 06/25/18 01:27 PM
Still color sanding and polishing, mid size car my a$$ ;-)
Thanks
Pat
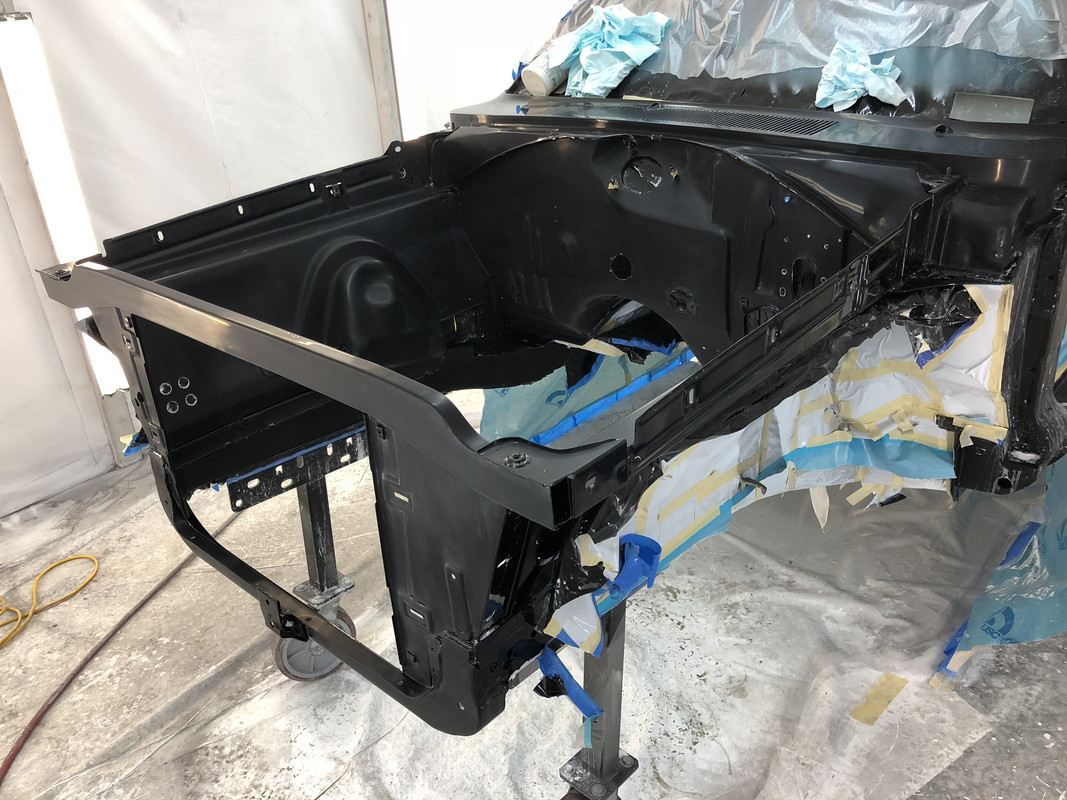
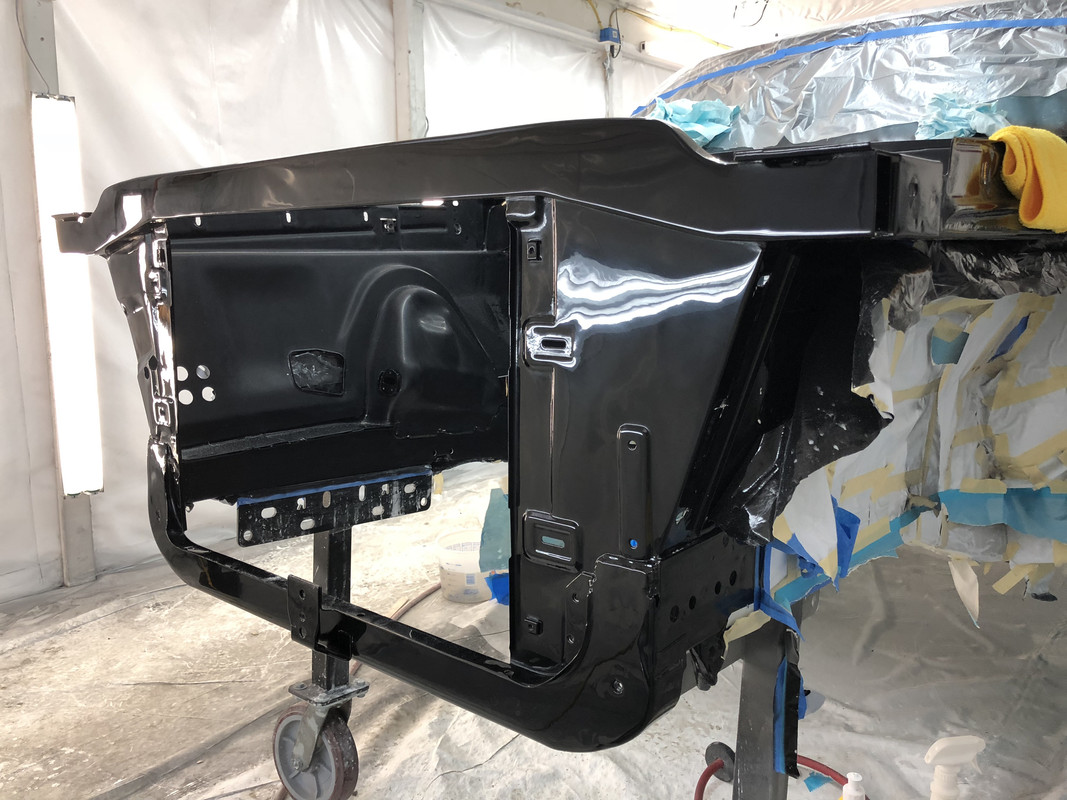
Posted By: FrankenScamp
Re: Modern Bullitt build - 06/26/18 11:03 PM
A labor of love, right?

Thanks for the update
Posted By: Keepat
Re: Modern Bullitt build - 06/27/18 03:35 AM
A labor of love, right?
Thanks for the update
Yes! It is labor and I know IŌĆÖll love it when itŌĆÖs done ;-)
Posted By: Keepat
Re: Modern Bullitt build - 07/04/18 01:00 AM
Big engine bay to color sand and polish
Thanks
Pat
http://youtu.be/dkg8AXZWpSg
Posted By: Anonymous
Re: Modern Bullitt build - 07/12/18 04:46 AM
Good lord that looks awesome.
Posted By: Keepat
Re: Modern Bullitt build - 07/12/18 01:21 PM
Good lord that looks awesome.
Thank you sir!
Posted By: Keepat
Re: Modern Bullitt build - 07/29/18 03:48 PM
Posted By: FrankenScamp
Re: Modern Bullitt build - 09/11/18 08:13 AM
Hope allŌĆÖs well.
Posted By: larry4406
Re: Modern Bullitt build - 10/13/18 10:29 PM
Pat - hope all is well! We need our fix!
Posted By: Keepat
Re: Modern Bullitt build - 10/23/18 01:39 PM
All is well, just took a little brake from the Charger to work on a surviver 1934/64 Chevy Gasser
Thanks
Pat
Posted By: FrankenScamp
Re: Modern Bullitt build - 10/25/18 04:59 AM
Thanks for checking in. Have fun with the Chevy.
Posted By: Vinny P
Re: Modern Bullitt build - 10/26/18 02:10 AM
Pat,
GREAT looking wheels! However, the center cap scale seems small in comparison to what I imagine would be necessary to accommodate the 4.5" bolt pattern. How would the center caps mount? I can't wait to see them on the Charger.
Thank you,
Vinny
Posted By: Keepat
Re: Modern Bullitt build - 11/25/18 04:59 PM
Just starting the restoration and polishing of all of the exterior stainless steel. Fun!
Thanks
Pat

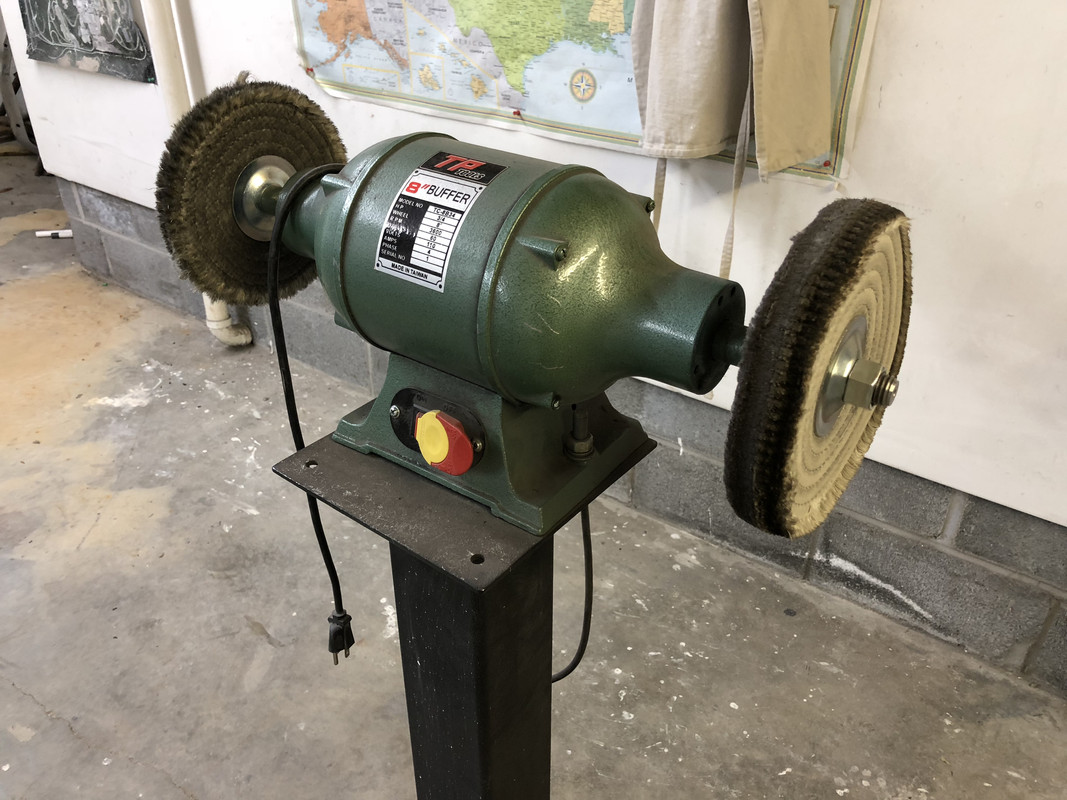
Posted By: larry4406
Re: Modern Bullitt build - 11/25/18 06:43 PM
Excellent!
Back in the saddle!
Posted By: Keepat
Re: Modern Bullitt build - 11/26/18 09:00 PM
Posted By: CDN72SE
Re: Modern Bullitt build - 11/28/18 08:01 PM
Quite a difference, nice.
Posted By: UCUDANT
Re: Modern Bullitt build - 11/30/18 04:27 PM
Nice work I still just absolutely love your wheel idea, This is going to be a cool car.
Posted By: JERICOGTX
Re: Modern Bullitt build - 11/30/18 08:10 PM
Where did you get the polishing wheel from?
Posted By: Keepat
Re: Modern Bullitt build - 12/01/18 02:55 AM
Quite a difference, nice.
A lot of work to get stainless to look like chrome but itŌĆÖs getting there
Thank you
Posted By: Keepat
Re: Modern Bullitt build - 12/01/18 02:57 AM
Nice work I still just absolutely love your wheel idea, This is going to be a cool car.
Thank you, IŌĆÖm so looking forward to seeing those wheels on the car again, as itŌĆÖs been so long since IŌĆÖve seen them :-)
Posted By: Keepat
Re: Modern Bullitt build - 12/01/18 02:57 AM
Posted By: Keepat
Re: Modern Bullitt build - 12/27/18 04:59 AM
Posted By: larry4406
Re: Modern Bullitt build - 12/27/18 04:15 PM
Very clever Pat! Nice work.
Posted By: Keepat
Re: Modern Bullitt build - 01/02/19 05:11 AM
Posted By: larry4406
Re: Modern Bullitt build - 01/02/19 01:15 PM
Pat - impressive work on the dash and wiring! That harness kit is pretty interesting.
Posted By: Keepat
Re: Modern Bullitt build - 01/02/19 08:40 PM
Pat - impressive work on the dash and wiring! That harness kit is pretty interesting.
Thank you sir!
Posted By: Keepat
Re: Modern Bullitt build - 01/21/19 03:54 AM
Posted By: Keepat
Re: Modern Bullitt build - 01/21/19 10:02 PM
Posted By: rhamson
Re: Modern Bullitt build - 01/24/19 09:54 PM
You have given me many ideas to think about Pat.
Posted By: Keepat
Re: Modern Bullitt build - 02/03/19 06:34 PM
The grill repairs are done and itŌĆÖs all sanded to 600 grit, time for paint!
Thanks
Pat
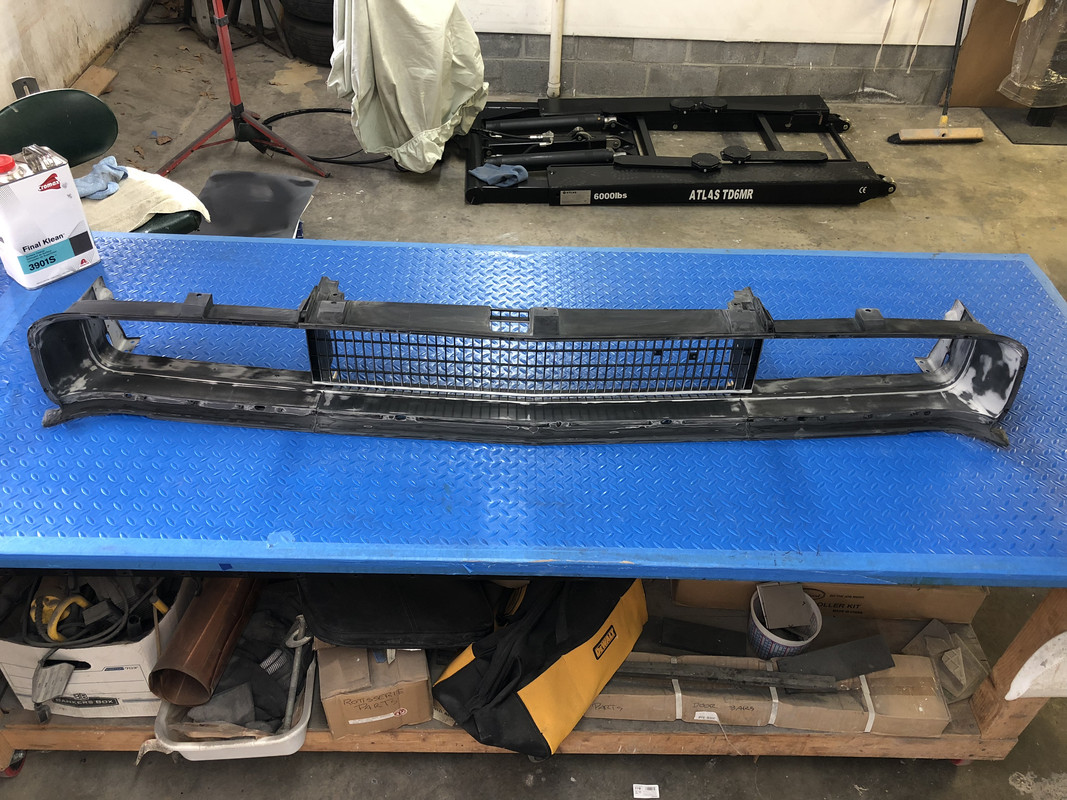
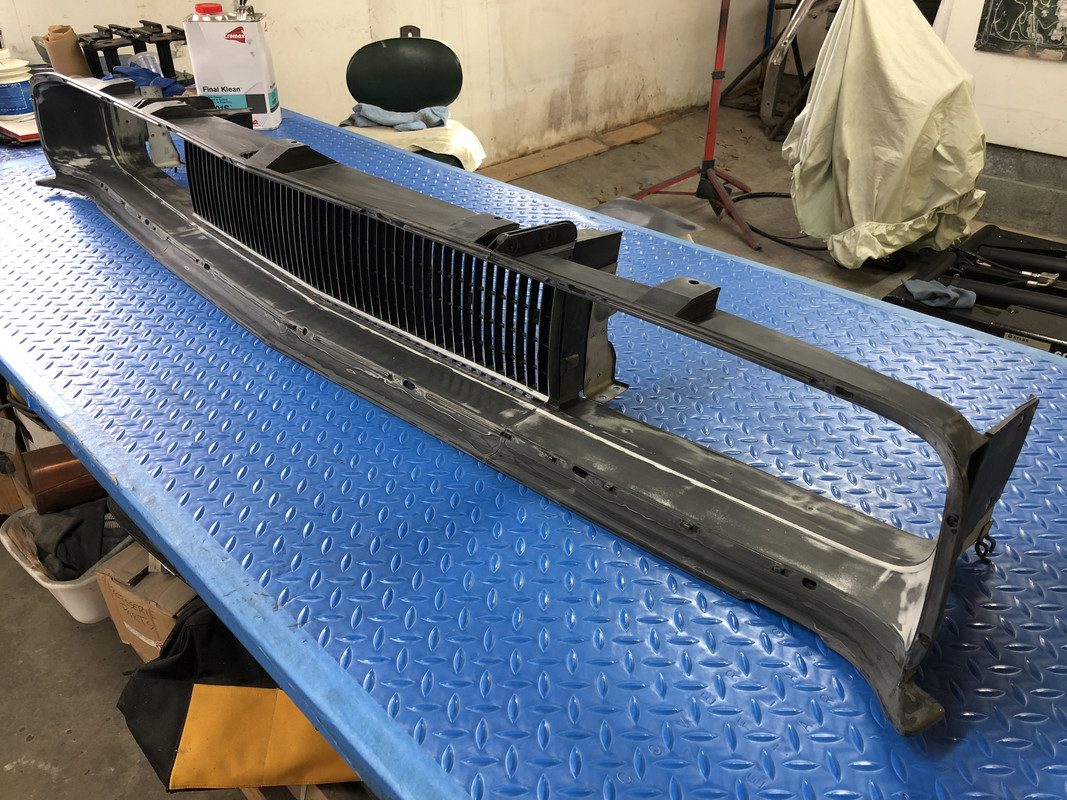
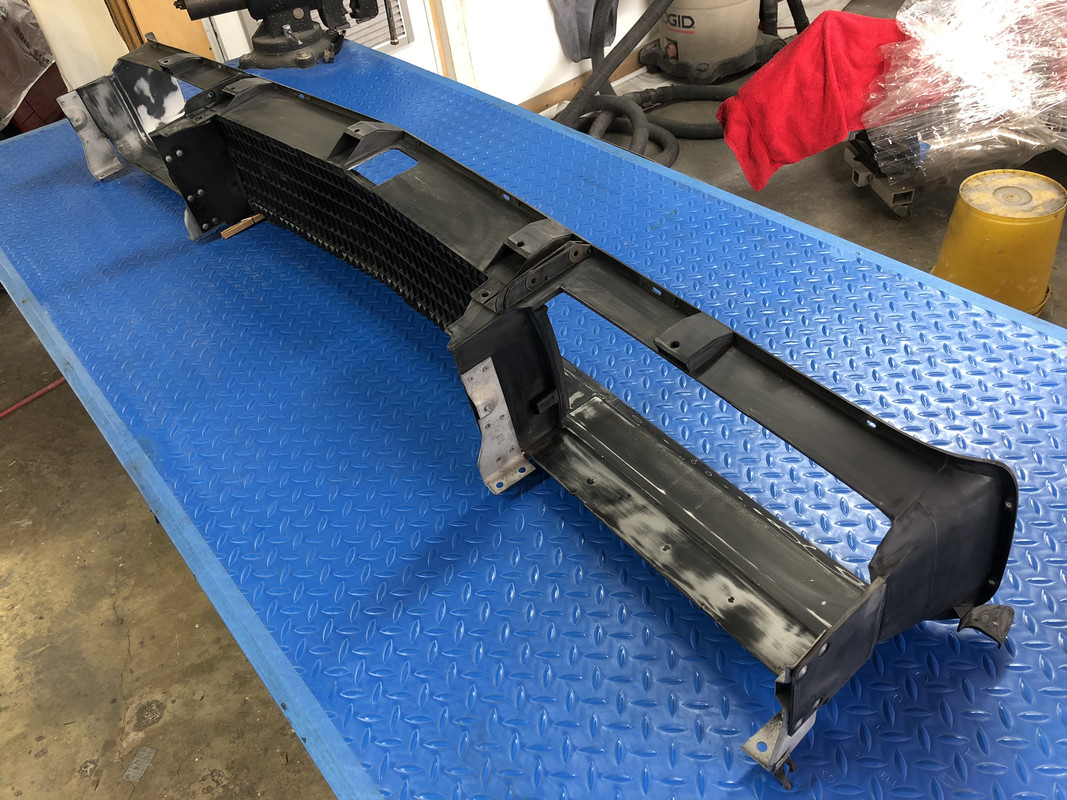 screen capture software
Posted By: larry4406
Re: Modern Bullitt build - 02/04/19 01:53 AM
Looks good Pat!
Posted By: Keepat
Re: Modern Bullitt build - 02/10/19 12:55 AM
Posted By: larry4406
Re: Modern Bullitt build - 02/10/19 02:45 PM
Pat - the dash looks sweet!
That radio looks quite impressive! Link?
Posted By: Keepat
Re: Modern Bullitt build - 02/10/19 05:06 PM
Pat - the dash looks sweet!
That radio looks quite impressive! Link?
Thanks
Pat
Posted By: Hooligan
Re: Modern Bullitt build - 03/13/19 08:39 PM
Awesome, amazing, mind blowing build! Best build thread I ever saw! I am learning a lot here. Thanks! BTW... what brand of epoxy did you use on your grille repairs? And info on the fibers you added too.
Posted By: Keepat
Re: Modern Bullitt build - 03/26/19 07:19 PM
Awesome, amazing, mind blowing build! Best build thread I ever saw! I am learning a lot here. Thanks! BTW... what brand of epoxy did you use on your grille repairs? And info on the fibers you added too.
Sorry for the delayed response, The glue I used is called five-minute epoxy from West System, they also sell the chopped fibers and capasill use for a thickening agent. You can find both at West Marine.
Thank you
Pat
Posted By: Hooligan
Re: Modern Bullitt build - 03/28/19 02:14 AM
Awesome, amazing, mind blowing build! Best build thread I ever saw! I am learning a lot here. Thanks! BTW... what brand of epoxy did you use on your grille repairs? And info on the fibers you added too.
Sorry for the delayed response, The glue I used is called five-minute epoxy from West System, they also sell the chopped fibers and capasill use for a thickening agent. You can find both at West Marine.
Thank you
Pat
Not to worry Pat. Many thanks for the info. Looking forward to seeing more of your fabulous fabricating skills!
Posted By: Keepat
Re: Modern Bullitt build - 06/30/19 06:24 PM
Posted By: rdrnr6970
Re: Modern Bullitt build - 06/30/19 07:06 PM
Very cool!Nice paint and dash!
Posted By: Keepat
Re: Modern Bullitt build - 07/09/19 01:01 PM
Posted By: jpilone
Re: Modern Bullitt build - 07/09/19 02:08 PM
Very impressive work!
Any idea on how much longer till it's moving under it's own power?
Posted By: Keepat
Re: Modern Bullitt build - 07/10/19 12:05 AM
Very impressive work!
Any idea on how much longer till it's moving under it's own power?
I have given up on guessing when this car will be completed ;-)
Thanks
Pat
Posted By: JERICOGTX
Re: Modern Bullitt build - 07/19/19 02:43 PM
Very impressive work!
Any idea on how much longer till it's moving under it's own power?
I have given up on guessing when this car will be completed ;-)
Thanks
Pat
It's a hobby. Enjoy the ride...
Posted By: Keepat
Re: Modern Bullitt build - 07/20/19 01:45 PM
Had a setback on the vinyl top. There was a wrinkle on the driver side seam that I initially thought was from me over or under stretching the top when I glue that side down? But after investigating it a little closer it turned out the top was stitched crooked. I bought this top along with all of the interior components over 4 years ago from Legendary Auto Interior. I sent them pictures and a description of the problem and they quickly came back and said they would send me a new vinyl top. ThatŌĆÖs first class customer service in my book! I was taught a long time ago by the guy I work for, donŌĆÖt judge one by their mistakes but rather by their solutions!
Fortunately the top removed relatively easily and I was able to remove the contact cement by rubbing it with mineral spirits. I get to start over sometime next week when I receive the new top.
Thanks
Pat
![[Linked Image]](https://i.postimg.cc/m2Yk3MjW/3-C24-C359-0-CB4-43-DC-A9-DC-E5-BBCEE20173.jpg)
![[Linked Image]](https://i.postimg.cc/15Q5zXQC/57-EA2046-8988-419-F-8069-46420-BE644-C5.jpg)
![[Linked Image]](https://i.postimg.cc/903XZFqf/E0-AD7-FA7-6208-4470-A684-CF398-AF2-F8-FC.jpg)
Posted By: Keepat
Re: Modern Bullitt build - 08/18/19 06:46 PM
Posted By: Anonymous
Re: Modern Bullitt build - 08/23/19 03:25 PM
As usual your work is very impressive.
Which spray gun did you use again for painting the car?
Robert
Posted By: Keepat
Re: Modern Bullitt build - 09/17/19 11:00 PM
Posted By: Keepat
Re: Modern Bullitt build - 09/17/19 11:22 PM
As usual your work is very impressive.
Which spray gun did you use again for painting the car?
Robert
Robert, IŌĆÖm sorry I missed your question! I used a Sata jet 4000 B
Thanks
Pat
Posted By: Anonymous
Re: Modern Bullitt build - 09/21/19 04:52 AM
Thanks Pat.
Posted By: Keepat
Re: Modern Bullitt build - 09/22/19 05:56 PM
Posted By: larry4406
Re: Modern Bullitt build - 09/23/19 09:53 AM
Pat - that headliner looks very nice!
I like the insulation and black vinyl cover over as well.
Posted By: CDN72SE
Re: Modern Bullitt build - 09/26/19 06:15 PM
Excellent work as usual, though I think you are giving me a false sense of security that I can do mine, lol.
Also like the black Vinyl idea.
Posted By: Keepat
Re: Modern Bullitt build - 11/15/19 02:16 AM
Posted By: Hemi Allstate
Re: Modern Bullitt build - 11/15/19 06:05 PM
Impressive work ! Very nice!
Mark
Posted By: Keepat
Re: Modern Bullitt build - 11/17/19 11:26 PM
As usual your work is very impressive.
Which spray gun did you use again for painting the car?
Robert
Thank you!
Pat
Posted By: Keepat
Re: Modern Bullitt build - 11/17/19 11:27 PM
Install the brake and clutch master cylinder and pedal assembly today.
Thanks
Pat
![[Linked Image]](https://i.postimg.cc/3NsSrzmB/9-D7-B9-A07-FBD5-4-F88-8788-848104-F45-D7-B.jpg)
![[Linked Image]](https://i.postimg.cc/CMRw1DbB/752-A6-A93-EAF1-4-B01-8-EB6-B872-D15-F8-B30.jpg)
![[Linked Image]](https://i.postimg.cc/mZKBFDSd/912820-B7-B828-4-FFF-AF2-A-8-C7-C1-F970-E96.jpg)
Posted By: Keepat
Re: Modern Bullitt build - 11/21/19 01:30 AM
Installed the quarter extensions and the shaved & shortened rear bumper.
Thanks
Pat
![[Linked Image]](https://i.postimg.cc/jjMKYwCz/6572-E6-AD-1-F2-B-4-FBA-803-B-F01-A9-ED4-D7-FD.jpg) host pictures
host pictures![[Linked Image]](https://i.postimg.cc/K8N44YRY/D63-BC28-A-563-D-44-F1-A70-D-EBCCC3-DECE80.jpg)
![[Linked Image]](https://i.postimg.cc/5N8XdgJL/6742-D1-D1-7-D53-401-D-9387-FCAD2-AA0-E063.jpg)
![[Linked Image]](https://i.postimg.cc/kg9BnSMZ/A83-BD207-EAB2-4-A31-9-B5-B-FF4156-ABAE63.jpg)
Posted By: Anonymous
Re: Modern Bullitt build - 11/21/19 03:25 AM
By "shaved" do you mean the sides where it wraps around to the 1/4 panel?
Looks fabulous by the way.
Posted By: modelmakerinc
Re: Modern Bullitt build - 11/21/19 11:55 AM
Pat, As everyone else has said extremely impressive work and work environment, the time you take to photograph and document the build is equally as impressive.
Its a real shame that Photobucket blurs out all the previous pictures

.
Couple questions:
1) With all of those lines and respective parts did you do a prefit prior to paint and body work or are you fabricating and installing all as you go?
2) on the vinyl roof install, i understand the center panel install but when you move to the side panels, Do you have any help, someone holding it up on one end? getting that wide a panel over an arched roof section and not touch the sail panel is a magic trick.
Henry
Posted By: Keepat
Re: Modern Bullitt build - 11/21/19 12:41 PM
By "shaved" do you mean the sides where it wraps around to the 1/4 panel?
Looks fabulous by the way.
Shaved refers to the bolt holes that were removed, But I also cut the bumpers down by a total of 3/4ŌĆ£, 3/8ŌĆØ on each side.
Thank you!
Pat
Posted By: Keepat
Re: Modern Bullitt build - 11/21/19 12:44 PM
Pat, As everyone else has said extremely impressive work and work environment, the time you take to photograph and document the build is equally as impressive. With all of those lines and respective parts did you do a prefit prior to paint and body work or are you fabricating and installing all as you go?
Henry
Everything has been fitted to the car with exception of exhaust. I made all of the brake, fuel and AC lines over three years ago. (wow has it been that long :-)
Thank you!
Pat
Posted By: Keepat
Re: Modern Bullitt build - 11/22/19 03:12 PM
Starting to look like a 68 Charger!
Thanks
Pat
![[Linked Image]](https://i.postimg.cc/6Q0wD5pD/9203163-E-2-B90-49-B0-94-C1-0-AA1-AB55-B004.jpg)
![[Linked Image]](https://i.postimg.cc/90ScJ8Q0/500-F41-DD-768-B-45-A4-8-B98-199-FEE2-BA2-C1.jpg)
Posted By: Keepat
Re: Modern Bullitt build - 11/30/19 12:12 AM
Posted By: Keepat
Re: Modern Bullitt build - 11/30/19 12:16 AM
I also installed the rear. Shooting to put the engine transmission & front suspension in the car over the weekend.
Thanks
Pat
![[Linked Image]](https://i.postimg.cc/Y96D0cqC/2-E99-E5-D0-F44-A-451-C-83-D5-25-E59-AFFC6-FF.jpg)
![[Linked Image]](https://i.postimg.cc/x8gsGKmr/B752-FC65-F71-F-4-F2-D-9436-41-FCAB3-B6-BA6.jpg)
![[Linked Image]](https://i.postimg.cc/VLWSRK50/9-E27-E1-B1-F58-E-48-F6-86-BE-C6-E1970391-BB.jpg)
![[Linked Image]](https://i.postimg.cc/P5fCF183/F4-B97741-9-D32-4532-8147-CA34-E0-E30-E3-C.jpg)
Posted By: T2R9
Re: Modern Bullitt build - 11/30/19 10:41 PM
Wow,nice work! This whole build is perfection!
Posted By: larry4406
Re: Modern Bullitt build - 12/01/19 10:26 AM
Wow,nice work! This whole build is perfection!
Agreed, simply stunning work quality and photography.
Keep it up Pat!
Posted By: Keepat
Re: Modern Bullitt build - 12/08/19 01:53 AM
Only 1 spot for a temperature sender on this gen3 Hemi, and I need two, 1 for the fuel injection and 1 for the gauge. I had to remove a freeze plug and make a plate that I could drill for an additional temperature sender.
I also have all of the wiring set and ready to enter and pass through the firewall through a split grommet. This will allow all of the plug-in connectors to pass through a single 2 1/4ŌĆØ hole hidden just above the transmission.
Thanks
Pat
![[Linked Image]](https://i.postimg.cc/zGQFNPw8/4182-D0-B8-375-B-4-F1-E-B111-702535-D9-BA9-E.jpg)
![[Linked Image]](https://i.postimg.cc/7Ztm6L4v/8-FF56-ACE-83-A6-432-A-A8-A5-D181-A7716-BD0.jpg)
![[Linked Image]](https://i.postimg.cc/rs99LVjP/8400-C83-E-F6-AE-4-F5-D-AA3-B-17-B83-B59-EE70.jpg)
![[Linked Image]](https://i.postimg.cc/WbX7W4hD/31-C5-E003-3-C02-4260-AE69-6-EF29796-EC6-D.jpg)
![[Linked Image]](https://i.postimg.cc/Z5nx1hdw/67912-D2-F-C3-C2-402-D-A855-EC8-CD2-A500-AC.jpg)
![[Linked Image]](https://i.postimg.cc/BQqgBFQ9/47-FA3-FE1-5482-4766-9162-1-E66-CB104757.jpg) post pictures
post pictures
Posted By: larry4406
Re: Modern Bullitt build - 12/08/19 12:35 PM
Pat - very clever solution to adding another temperature port! Excellent work and photo's as well.
Posted By: Keepat
Re: Modern Bullitt build - 12/08/19 01:28 PM
Pat - very clever solution to adding another temperature port! Excellent work and photo's as well.
Thank you sir!
Posted By: Keepat
Re: Modern Bullitt build - 12/09/19 03:40 AM
Posted By: MadMopars
Re: Modern Bullitt build - 12/09/19 03:54 AM
That's awesome! Very nice work! You should be extremely pleased. -Trent
Posted By: FrankenScamp
Re: Modern Bullitt build - 12/09/19 11:56 AM
Lots of progress lately....very cool!
Looks great.
Posted By: rocksmopar
Re: Modern Bullitt build - 12/09/19 12:23 PM
Love the body lift you are using..
Posted By: Keepat
Re: Modern Bullitt build - 12/20/19 11:50 PM
That's awesome! Very nice work! You should be extremely pleased. -Trent
Trent,
It is definitely the part of the build
Thank you!
Pat
Posted By: Keepat
Re: Modern Bullitt build - 12/20/19 11:51 PM
Lots of progress lately....very cool!
Looks great.
Thank you!
Posted By: Keepat
Re: Modern Bullitt build - 12/20/19 11:55 PM
Love the body lift you are using..
Yes, a must have for the middle aged ;-)
Posted By: Keepat
Re: Modern Bullitt build - 12/20/19 11:55 PM
Posted By: Keepat
Re: Modern Bullitt build - 12/26/19 02:10 PM
Posted By: Anonymous
Re: Modern Bullitt build - 12/28/19 12:43 AM
I can honestly say that the quality of your work is absolutely outstanding!!!
Posted By: larry4406
Re: Modern Bullitt build - 12/28/19 01:26 PM
I can honestly say that the quality of your work is absolutely outstanding!!!
Agreed! I think this is one of the best builds out here on net.
Posted By: Keepat
Re: Modern Bullitt build - 12/30/19 03:55 AM
Posted By: Keepat
Re: Modern Bullitt build - 01/05/20 04:14 AM
Posted By: Keepat
Re: Modern Bullitt build - 01/07/20 12:14 AM
Posted By: FrankenScamp
Re: Modern Bullitt build - 01/07/20 03:39 AM
IŌĆÖm going to start saving up now, for a plane ticket to Maryland to see this car when it is done.
Thanks, again, for the update. Cheers. ¤æŹ
Posted By: larry4406
Re: Modern Bullitt build - 01/07/20 09:45 PM
IŌĆÖm going to start saving up now, for a plane ticket to Maryland to see this car when it is done.
Thanks, again, for the update. Cheers. ¤æŹ
I know I want to see it and thank god I am only one state away!
Posted By: DAYCLONA
Re: Modern Bullitt build - 01/19/20 10:26 PM
The attention to details and quality work on all facets of this build are simply outstanding!
Mike
Posted By: Keepat
Re: Modern Bullitt build - 01/20/20 02:59 AM
The attention to details and quality work on all facets of this build are simply outstanding!
Mike
Thank you sir!
Posted By: Keepat
Re: Modern Bullitt build - 01/20/20 03:01 AM
With the battery being relocated to the trunk and needing a few direct to battery power connections I made a breaker/switchbox to be located in the trunk. The 12ŌĆØx 9ŌĆØ box holds a remote battery disconnect and starter solenoid. It also has a series of breakers for the alternator line, dash power, subwoofer, fuel pump, fuel injection, and a few other low amperage items. I still have a few details to work out, then disassemble the box and paint it black along with labels for the breakers before I install it.
Thanks
Pat
![[Linked Image]](https://i.postimg.cc/15Vg3GsN/4-A6-ED752-F700-4-C91-BFFB-BB8309269137.jpg) multi photo hosting
multi photo hosting![[Linked Image]](https://i.postimg.cc/9Mf05TL0/80-C06250-B5-F8-47-A7-973-D-AE5-DECF45306.jpg)
![[Linked Image]](https://i.postimg.cc/0NnjBZdh/A65-E4806-4255-4693-87-DE-9-A603-E6-BF88-B.jpg)
Posted By: larry4406
Re: Modern Bullitt build - 01/20/20 12:17 PM
Pat - nice switch box!
What tool do you use to crimp the lugs (assuming they are crimped)?
Posted By: Keepat
Re: Modern Bullitt build - 01/20/20 01:13 PM
Pat - nice switch box!
What tool do you use to crimp the lugs (assuming they are crimped)?
![[Linked Image]](https://i.postimg.cc/BQ0mw3TV/F23-A06-DD-F70-A-41-D8-B4-D0-FE3-F307745-AA.jpg)
Posted By: Keepat
Re: Modern Bullitt build - 01/25/20 07:09 PM
Posted By: Keepat
Re: Modern Bullitt build - 02/09/20 09:56 PM
Posted By: WyleECoyote
Re: Modern Bullitt build - 02/25/20 04:31 AM
Pat -
Based on my tracking of your project, the program I created and plotted your progress, the algorithm-flowchart prediction and evaluation concludes that I'll be arriving IN your driveway on May 20, 2020 with my Road Runner for you to begin your next project. I look forward in working with you to get this project completed!!! LOL. *Poof* Okay, I'm back to reality; DREAM over. Wow. Just an amazing honor to witness your craft, talent, and ability. So grateful for you to take your personal, valuable time to not only document this exquisite build, but to share it with us. Thank you Sir. You're an inspiration to say the least.
Respectfully,
Ron Madden
Posted By: Keepat
Re: Modern Bullitt build - 03/01/20 06:04 PM
Pat -
Based on my tracking of your project, the program I created and plotted your progress, the algorithm-flowchart prediction and evaluation concludes that I'll be arriving IN your driveway on May 20, 2020 with my Road Runner for you to begin your next project. I look forward in working with you to get this project completed!!! LOL. *Poof* Okay, I'm back to reality; DREAM over. Wow. Just an amazing honor to witness your craft, talent, and ability. So grateful for you to take your personal, valuable time to not only document this exquisite build, but to share it with us. Thank you Sir. You're an inspiration to say the least.
Respectfully,
Ron Madden
Ron,
Thanks for your forecast and IŌĆÖll do my best to stay on time but donŌĆÖt hold your breath ;-)
Good luck with your very cool road runner project and thank you for following along with my project.
Pat
Posted By: Keepat
Re: Modern Bullitt build - 03/04/20 12:06 AM
Finished up the tail light wiring, subwoofer & speakers, and started on the power window wiring.
Found a nice set of JL 5 x 7 speakers. They fit the factory speaker holes in the package tray without cutting.
With all four windows using a special switch that utilizes the original crank handle I decided to put the separate 4 window controller switch assembly under the dash so the car will look as though it has manual windows (like the movie car;-)
![[Linked Image]](https://i.postimg.cc/XY2FCC5w/37-B2-D33-E-55-B8-4160-A5-D3-67-BEE4415-E46.jpg)
![[Linked Image]](https://i.postimg.cc/prDzhcQT/0-E4-A7738-6406-4-B37-A3-EC-71096-BF11550.jpg)
[uurl]
![[Linked Image]](https://i.postimg.cc/NfkRQVfC/88-B1-F9-A4-9814-4-BDB-A6-B9-409-EC38-EAACE.jpg)
![[Linked Image]](https://i.postimg.cc/kXmx399t/A28-F563-D-7-B94-4-C22-A702-478-A3-C236-F07.jpg)
![[Linked Image]](https://i.postimg.cc/L5djsF1w/C9975750-DB2-D-412-F-A2-EC-70-A83877-DB88.jpg)
[][/url]
Posted By: larry4406
Re: Modern Bullitt build - 03/06/20 10:39 AM
Nice work Pat as usual!
What is this special power window switch that uses the original crank handle? That sounds pretty slick!
Posted By: not_a_charger
Re: Modern Bullitt build - 03/06/20 11:28 AM
I apologize if I missed this part, but what led you to use the Inland shifter? And did you make any modifications to it? I know that these were not well loved.
Posted By: Keepat
Re: Modern Bullitt build - 03/07/20 01:19 PM
Nice work Pat as usual!
What is this special power window switch that uses the original crank handle? That sounds pretty slick!
Larry, they are pretty cool and very robust we install them on my sons bullitt mustang. They move about 15┬░ in either direction and you could never bend or break it as theyŌĆÖre over built. See link below.
Thank you!
Pat
https://www.autoloc.com/catalog/Pow...-Handle-Crank-Switch---Fits-All-Vehicles
Posted By: Keepat
Re: Modern Bullitt build - 03/07/20 01:27 PM
I apologize if I missed this part, but what led you to use the Inland shifter? And did you make any modifications to it? I know that these were not well loved.
One reason is that itŌĆÖs believe this is the shifter that was used in the movie car. But it also allowed me to use the T handle to operate a small switch inside the shifter to engage the electronic reverse shut out on the six speed transmission. The only part of the inland shifter that is used is the shaft, T handle, and knob. Little more information on the FB link below.
Thanks
https://www.facebook.com/495913940789909/posts/956998638014768?d=n&sfns=mo
Posted By: Keepat
Re: Modern Bullitt build - 03/08/20 01:46 PM
Posted By: rdrnr6970
Re: Modern Bullitt build - 03/08/20 07:13 PM
Now that's neat!

Posted By: CDN72SE
Re: Modern Bullitt build - 03/11/20 05:55 PM
Oh my goodness!!
Posted By: rocksmopar
Re: Modern Bullitt build - 03/12/20 12:15 PM
Now that looks tough..
Posted By: Keepat
Re: Modern Bullitt build - 03/16/20 11:06 PM
Posted By: Keepat
Re: Modern Bullitt build - 03/25/20 02:45 PM
Posted By: larry4406
Re: Modern Bullitt build - 03/25/20 09:05 PM
Pat - Nice job yet again!
The reflections in the paint is simply amazing.
Did you cad plate your latch hardware or farm it out? If you did it your self, details please.
-larry
Posted By: Keepat
Re: Modern Bullitt build - 03/26/20 04:56 PM
Pat - Nice job yet again!
The reflections in the paint is simply amazing.
Did you cad plate your latch hardware or farm it out? If you did it your self, details please.
-larry
I wish I could do my own plating!! Stephen Fournier with S.F restoration automobile re-plate all of my door latches.
Thank you!
Pat
Posted By: Keepat
Re: Modern Bullitt build - 04/02/20 06:02 PM
Posted By: Keepat
Re: Modern Bullitt build - 04/02/20 06:05 PM
Posted By: Red383
Re: Modern Bullitt build - 04/02/20 08:09 PM
Very nice work.
Question about the windows switches though. Is there a way to put all windows down from the drivers seat?
Posted By: Keepat
Re: Modern Bullitt build - 04/02/20 09:14 PM
Very nice work.
Question about the windows switches though. Is there a way to put all windows down from the drivers seat?
ThereŌĆÖs a 4 gang switch I mounted under the dash. A little more details two pages back.
Thanks
Pat
Posted By: ornocar
Re: Modern Bullitt build - 04/03/20 02:30 PM
Hello !! long-time lurker on here....like 15 years lurker haha - I just have to comment on this. I am gearhead all my life, I like everything that burns rubber and gasoline, I have seen and followed many many great builds of different cars over the years - exotics, muscle cars,all kinds of vintage iron, home made hot rods - you name it...I loved them all, but THIS thing takes the cake ... I think that many members used all the superlatives you can use...I will just say: if I ever win the lotto , I will be banging on your door - you name the price haha !!!
Growing up in eastern block full of underpowered piles, car that could squeal the tires was considered a rocket. I was around 8 years old and total car nut watching tv over easter holidays - when this bad guy in glasses buckled-up the seatbelt and put the hammer down, it changed my life (seriously - career and everything) BEST BUILD EVER ! Best regards - Roman
Posted By: Keepat
Re: Modern Bullitt build - 04/03/20 06:18 PM
Hello !! long-time lurker on here....like 15 years lurker haha - I just have to comment on this. I am gearhead all my life, I like everything that burns rubber and gasoline, I have seen and followed many many great builds of different cars over the years - exotics, muscle cars,all kinds of vintage iron, home made hot rods - you name it...I loved them all, but THIS thing takes the cake ... I think that many members used all the superlatives you can use...I will just say: if I ever win the lotto , I will be banging on your door - you name the price haha !!!
Growing up in eastern block full of underpowered piles, car that could squeal the tires was considered a rocket. I was around 8 years old and total car nut watching tv over easter holidays - when this bad guy in glasses buckled-up the seatbelt and put the hammer down, it changed my life (seriously - career and everything) BEST BUILD EVER ! Best regards - Roman
Roman, Thank you for the kind words and for following along with this extremely long build. Like you I was also change by the movie Bullitt! Stay tune I think the end is getting near ;-)
Thanks again!
Pat
Posted By: Keepat
Re: Modern Bullitt build - 04/08/20 07:08 PM
Posted By: Chally426
Re: Modern Bullitt build - 04/10/20 01:52 PM
What did you spray on the inside of those quarters?
Posted By: DynoDave
Re: Modern Bullitt build - 04/10/20 07:23 PM
Love the cooling duct design!
Posted By: Keepat
Re: Modern Bullitt build - 04/10/20 11:32 PM
What did you spray on the inside of those quarters?
I rolled Hercuiner bed liner inside both doors in quarters.
Pat
Posted By: Keepat
Re: Modern Bullitt build - 04/10/20 11:33 PM
Love the cooling duct design!
Thank you sir! IŌĆÖm hoping the front ducts come out as well.
Pat
Posted By: Keepat
Re: Modern Bullitt build - 04/14/20 12:05 AM
Posted By: Keepat
Re: Modern Bullitt build - 04/17/20 08:21 PM
I received the 2nd version of my custom 3D printed fender tag from Dan at
http://www.nextgendesignsnc.com/ . We made a few changes in the font size, letters in the alphabet and spacing. Hope to paint it black and install it on the inner fender soon. Dan is great to work with, and IŌĆÖm very happy with the tag!
Thanks
Pat
![[Linked Image]](https://i.postimg.cc/jdMB4fyZ/594-AA568-D1-B7-4-BD3-B206-3882-C7151-ED3.jpg)
![[Linked Image]](https://i.postimg.cc/XYMdhHKJ/315010-C3-B0-A2-4-C12-BCE3-3035589-CC7-D4.jpg)
Posted By: DynoDave
Re: Modern Bullitt build - 04/18/20 01:37 AM
First time I've seen those 3D printed.
Posted By: rdrnr6970
Re: Modern Bullitt build - 04/18/20 06:26 PM
This whole modern Bullitt build is simply amazing!
Posted By: Keepat
Re: Modern Bullitt build - 04/26/20 02:09 PM
Rear brake coolers painted and installed. Still working on a few ideas for the air intake screen.
Thanks
Pat
![[Linked Image]](https://i.postimg.cc/Hx10rgfC/EB387-C9-E-5144-4494-8-C13-CB03-EDB2-EA40.jpg)
![[Linked Image]](https://i.postimg.cc/6qwhmX0h/8045-EE35-F2-AA-49-B0-BB55-5-D9-FF58-B3-C19.jpg)
![[Linked Image]](https://i.postimg.cc/yNZX6dpP/AD2-C16-E3-9-EC4-41-BF-850-C-AF50-D333419-E.jpg)
Posted By: Anonymous
Re: Modern Bullitt build - 04/26/20 02:47 PM
With cooling only one side of the rotor do you have any concerns of possible warping?
Posted By: Keepat
Re: Modern Bullitt build - 04/26/20 03:23 PM
With cooling only one side of the rotor do you have any concerns of possible warping?
Not sure that could happen as the air is not that cool. Note that the air is actually directed towards the center so that it gets drawn in and out by the veins in between the disc, cooling both sides.
Thanks
Pat
Posted By: Keepat
Re: Modern Bullitt build - 05/17/20 08:38 PM
Posted By: DynoDave
Re: Modern Bullitt build - 05/17/20 11:41 PM
So much cool stuff!
But I think I like the thick blocks of foam for laying on the best!
Posted By: Keepat
Re: Modern Bullitt build - 05/26/20 12:21 PM
So much cool stuff!
But I think I like the thick blocks of foam for laying on the best!
Back and knees saver;-)
Posted By: Keepat
Re: Modern Bullitt build - 05/26/20 12:22 PM
Posted By: Keepat
Re: Modern Bullitt build - 06/06/20 07:28 PM
Posted By: DAYCLONA
Re: Modern Bullitt build - 06/16/20 03:34 AM
I Installed the passenger side rear window and trim. The AMD quarter glass was a heavy 1/16ŌĆØ taller on the rear 12 inches compared to the original. So I had to sand it down with a DA sander to get the best fit. All of the AMD glass has a rough finish on edge so I use the DA sander starting with 60 grit and working my way to 180 to polished edges that show
Your a brave man! last time I was "polishing" the edge of tempered side glass with a DA, it was going great one moment, then the next the glass just sort of disappeared from my hand! got a little "gun shy" after that..Lol!...great work as always!
Mike
Posted By: Keepat
Re: Modern Bullitt build - 06/19/20 09:10 PM
I Installed the passenger side rear window and trim. The AMD quarter glass was a heavy 1/16ŌĆØ taller on the rear 12 inches compared to the original. So I had to sand it down with a DA sander to get the best fit. All of the AMD glass has a rough finish on edge so I use the DA sander starting with 60 grit and working my way to 180 to polished edges that show
Your a brave man! last time I was "polishing" the edge of tempered side glass with a DA, it was going great one moment, then the next the glass just sort of disappeared from my hand! got a little "gun shy" after that..Lol!...great work as always!
Mike
Mike,
Working with tempered glass is never fun, but as long as you do not let the glass get hot it can work. I would only sand the edge of the glass for about 30 seconds then stopping to let it cool.
Thank you!
Pat
Posted By: Keepat
Re: Modern Bullitt build - 06/24/20 11:35 AM
Posted By: Keepat
Re: Modern Bullitt build - 07/11/20 09:51 PM
Posted By: 70B5Cuda
Re: Modern Bullitt build - 07/12/20 04:26 AM
WOW....that's all I've got. Can't wait to see pics of it on the street
Posted By: not_a_charger
Re: Modern Bullitt build - 07/13/20 10:50 AM
This car is amazing.
Posted By: UCUDANT
Re: Modern Bullitt build - 07/14/20 01:16 PM
Posted By: GY3
Re: Modern Bullitt build - 07/14/20 06:41 PM
TOO PERFECT!
I would be afraid to drive it!
Posted By: Keepat
Re: Modern Bullitt build - 07/18/20 05:05 PM
WOW....that's all I've got. Can't wait to see pics of it on the street
Me too! Thanks!
Posted By: Keepat
Re: Modern Bullitt build - 07/18/20 05:06 PM
Posted By: Keepat
Re: Modern Bullitt build - 07/18/20 05:07 PM
TOO PERFECT!
I would be afraid to drive it!
IŌĆÖll drive it!
Thanks!
Pat
Posted By: Keepat
Re: Modern Bullitt build - 07/26/20 08:46 PM
Posted By: larry4406
Re: Modern Bullitt build - 07/27/20 10:07 AM
Very nice Pat!
At first I thought you were going to say you drove it over!
Nice house garage with lift and house. Looks like you are on the water! Nice place.
I hope to see it in person one day.
-larry
Posted By: mopar4don
Re: Modern Bullitt build - 07/27/20 07:05 PM
WOW
Posted By: Greenwood
Re: Modern Bullitt build - 07/27/20 10:54 PM
This is absolutely the finest GenII Charger build out there, bar none. I have to comment on your wheels. Your "template" was always a good looking wheel, and you have done a masterful job of turning a wheel cover into a wheel. They're stunningly perfect. Outstanding!
Posted By: Keepat
Re: Modern Bullitt build - 07/28/20 11:53 PM
Larry & Don, thank you!
This is absolutely the finest GenII Charger build out there, bar none. I have to comment on your wheels. Your "template" was always a good looking wheel, and you have done a masterful job of turning a wheel cover into a wheel. They're stunningly perfect. Outstanding!
IŌĆÖm not sure about your first statement, but thank you sir!
Pat
Posted By: rdrnr6970
Re: Modern Bullitt build - 07/29/20 02:14 PM
Great stuff thanks!
Posted By: Keepat
Re: Modern Bullitt build - 08/04/20 12:30 AM
I received a note from a member on the Pro Touring forum. He said he has been following my charger build thread and that it was his favorite thing on the Internet, well almost! He says it hurts his feelings every time he opens an update on the Charger and sees the tires IŌĆÖm using on the car.
It turns out he works for Michelin North America. He said they would like to give me a set of their tires because IŌĆÖm building exactly the level of vehicle and build that they want to be associated with.
Needless to say I said YES! So cool that a large corporation like Michelin would think that my home built project car is worthy of their attention.
The rear wheel (335/35-17 Michelin Pilot Sports) showed up today and I should see the front wheels (275/40-17) soon.
This is very cool, I am very honored, and I will pay it forward!!
Thank you Michelin!!
Pat
![[Linked Image]](https://i.postimg.cc/QtRjX1f1/4-E710230-EDD8-452-C-9-B3-F-672031-C3-FE22.jpg)
![[Linked Image]](https://i.postimg.cc/hPRK68zq/5898162-D-A9-BF-432-B-B39-A-030-C6-DBC7-CC9.jpg)
![[Linked Image]](https://i.postimg.cc/XNCVs1v8/ED7-BF24-A-1-E3-B-43-C3-9-A74-D6-F293-A88-F6-C.jpg)
![[Linked Image]](https://i.postimg.cc/hvTchvYw/296-BEDD9-B88-A-4-CD0-BA22-9-CF935-E08581.jpg)
Posted By: larry4406
Re: Modern Bullitt build - 08/04/20 10:46 AM
Free is good!
What does the Michelin tire offer that the Pirelli doesn't?
Posted By: rdrnr6970
Re: Modern Bullitt build - 08/04/20 01:56 PM
You should really feel proud of what you've done with the charger!And Michelin tire sponsorship is great!
Posted By: Anonymous
Re: Modern Bullitt build - 08/04/20 11:32 PM
Since you want to pay it forward, does this mean you will give me the car and keep the older tires?

Posted By: CDN72SE
Re: Modern Bullitt build - 08/05/20 08:21 PM
Good job Michelin, very cool.
Posted By: Keepat
Re: Modern Bullitt build - 09/27/20 01:10 PM
I finally got around to that time consuming and tedious job of painting the grill. As suggested by others I use SEM trim black #39143 and titanium metallic #15253. The Testors 1/16 fine line tape works perfect!
Thanks
Pat
![[Linked Image]](https://i.postimg.cc/k4Dv28PD/F8264-A66-380-F-4-E80-8-AF2-8963-DBBF2175.jpg)
![[Linked Image]](https://i.postimg.cc/bwHTWpRY/9168-EA4-F-06-A7-4081-B88-C-37-D5-A227-E8-BF.jpg)
![[Linked Image]](https://i.postimg.cc/TPd9XFkV/6-B54-B27-D-00-AA-484-C-AD64-C795-D21-E93-EB.jpg)
![[Linked Image]](https://i.postimg.cc/W16B8RFg/C1-A08931-969-C-4663-AB79-626846-FFAFB8.jpg)
Posted By: FrankenScamp
Re: Modern Bullitt build - 09/27/20 10:59 PM
Tedious indeed, but fun. I put hours and hours into prepping/painting the grille I got for my car.
Someone had probably 4 coats of black, brushed on(

) house paint on there I had to meticulously scrape off before I could do anything.
I only put the effort in because it was basically free, and I really wanted a 70-71 style grille to replace my 72 grille.
Thanks for the update! Looks great

IŌĆÖve been jonesŌĆÖn
Posted By: Keepat
Re: Modern Bullitt build - 09/28/20 11:13 PM
Tedious indeed, but fun. I put hours and hours into prepping/painting the grille I got for my car.
Someone had probably 4 coats of black, brushed on(
) house paint on there I had to meticulously scrape off before I could do anything.
I only put the effort in because it was basically free, and I really wanted a 70-71 style grille to replace my 72 grille.
Thanks for the update! Looks great
IŌĆÖve been jonesŌĆÖn
Four coats of paint ouch!! The things we do for the love of the car hobby;-)
Thank you!
Pat
Posted By: Keepat
Re: Modern Bullitt build - 09/30/20 12:54 AM
Posted By: larry4406
Re: Modern Bullitt build - 09/30/20 09:36 AM
Pat that grille looks fantastic!. Looks like very tedious work to accomplish that.
Posted By: Anonymous
Re: Modern Bullitt build - 10/02/20 04:02 AM
Posted By: Keepat
Re: Modern Bullitt build - 10/02/20 08:49 PM
Pat that grille looks fantastic!. Looks like very tedious work to accomplish that.
It was fun and IŌĆÖm looking forward to doing another one......... NOT:-)
Thanks
Pat
Posted By: Neil
Re: Modern Bullitt build - 10/02/20 11:36 PM
This car 100% deserves to be in all the car magazines when it's done.
Posted By: Keepat
Re: Modern Bullitt build - 10/04/20 11:49 PM
This car 100% deserves to be in all the car magazines when it's done.
Neil, That would be great, But right now I just wanted to be able to drive in and out of my garage ;-)
Thank you!
Pat
Posted By: Keepat
Re: Modern Bullitt build - 10/22/20 01:05 AM
are those LED head lights? Wondering what you did to get them to sit in the buckets? Reason I ask is we just did a 72 GMC that the customer bought all 4 LED headlights to the tune of over a grand. They don't sit in the buckets worth a crap.
Posted By: Keepat
Re: Modern Bullitt build - 10/23/20 09:49 AM
are those LED head lights? Wondering what you did to get them to sit in the buckets? Reason I ask is we just did a 72 GMC that the customer bought all 4 LED headlights to the tune of over a grand. They don't sit in the buckets worth a crap.
Yes LED lights by Delta. Click on the link below and you can see that I had to open up the hole in the buckets to fit the new lights.
Thanks
Pat
https://www.facebook.com/495913940789909/posts/735293970185237?d=n&sfns=mo
Posted By: SattyNoCar
Re: Modern Bullitt build - 10/24/20 09:23 PM
Would you happen to have any part numbers?
I saw in your facebook link where you bought them, but I'm not 100% clear on what you bought.
I'm looking at #'s 15093 and 15094. Are these what you used?
Thanks!
Posted By: Keepat
Re: Modern Bullitt build - 10/25/20 01:46 AM
Would you happen to have any part numbers?
I saw in your facebook link where you bought them, but I'm not 100% clear on what you bought.
I'm looking at #'s 15093 and 15094. Are these what you used?
Thanks!
I think you left one digit out of your classic industry part #
153093 & 153095
![[Linked Image]](https://i.postimg.cc/tJMMw7L4/92528327-6932-4729-B86-E-865-A759-DC9-BD.jpg)
Posted By: SattyNoCar
Re: Modern Bullitt build - 10/25/20 07:38 PM
You're right, I did.

BTW 15309
5 is a radiator support for a '78 Chevy.........
We're both doin' good with numbers.

Appreciate the reply!
Posted By: Keepat
Re: Modern Bullitt build - 10/25/20 10:44 PM
You're right, I did.
BTW 15309
5 is a radiator support for a '78 Chevy.........
We're both doin' good with numbers.
Appreciate the reply!
Oops, I did get it right once ;-)
Thanks
Pat
Posted By: Keepat
Re: Modern Bullitt build - 10/30/20 09:56 PM
Posted By: Anonymous
Re: Modern Bullitt build - 11/03/20 04:40 AM
Absolutely beautiful!!!
Posted By: Keepat
Re: Modern Bullitt build - 12/19/20 04:22 PM
Posted By: larry4406
Re: Modern Bullitt build - 12/19/20 09:47 PM
Pat - as always excellent porn!
What is the filter media?
Posted By: Keepat
Re: Modern Bullitt build - 12/20/20 01:40 PM
Pat - as always excellent porn!
What is the filter media?
K&N and UNI foam, 1st layer sprayed with air cleaner fluid.
Thank you
Pat
Posted By: Keepat
Re: Modern Bullitt build - 01/21/21 08:03 PM
Received a set of 3ŌĆØ TTI exhaust this week. Looking forward to installing the system and adding electric cut outs. After it is modified to fit I will send it out to be ceramic coated to match the headers.
Thanks
Pat
![[Linked Image]](https://i.postimg.cc/T1p8mRGC/732296-E5-E57-F-4-AE0-B070-05-B6-DED6-C8-C1.jpg)
![[Linked Image]](https://i.postimg.cc/636xWrPs/F351-A61-D-06-A5-46-EB-8-F3-A-9-EA4-AEC6-C2-D7.jpg)
![[Linked Image]](https://i.postimg.cc/HL9C1ZB4/E7-AA49-F9-1255-4-FFD-B4-F2-C39-E547-BD854.jpg)
![[Linked Image]](https://i.postimg.cc/v8qbmKM0/11-B01227-48-C1-48-E8-85-E8-3-AFC4-DDDF2-F5.jpg)
Posted By: FrankenScamp
Re: Modern Bullitt build - 01/21/21 10:17 PM
Very cool!
Thanks for that last pic.
Posted By: Keepat
Re: Modern Bullitt build - 01/25/21 02:34 AM
Posted By: larry4406
Re: Modern Bullitt build - 01/25/21 12:08 PM
Nice Pat!
Sounds wicked! And that's a good thing!
-larry
Posted By: Keepat
Re: Modern Bullitt build - 01/28/21 02:17 AM
Posted By: 69Cuda340S
Re: Modern Bullitt build - 01/28/21 10:13 PM
Beautiful car!
Posted By: cudaerik
Re: Modern Bullitt build - 01/29/21 12:46 PM
inspiring thread to follow as I've never seen a build on this level being documented. Thanks! Are you using Butyl rubber sealant on both window and body side of the gasket?
Posted By: Keepat
Re: Modern Bullitt build - 01/29/21 10:55 PM
inspiring thread to follow as I've never seen a build on this level being documented. Thanks! Are you using Butyl rubber sealant on both window and body side of the gasket?
Yes I use the butyl rubber sealant on both the metal side of the rubber gasket as well as the glass side of the rubber gasket. After the glass was installed but before the rubber flap was pushed in position I ran a very small bead between the rubber gasket in the glass.
Thanks
Pat
Posted By: SRT6776
Re: Modern Bullitt build - 01/30/21 12:37 AM
Are you keeping it or selling it when its done?
Posted By: Keepat
Re: Modern Bullitt build - 01/30/21 01:37 AM
Are you keeping it or selling it when its done?
Keeper!
Posted By: Keepat
Re: Modern Bullitt build - 01/31/21 10:27 PM
Posted By: Keepat
Re: Modern Bullitt build - 02/01/21 12:15 AM
Posted By: NITROUSN
Re: Modern Bullitt build - 02/01/21 01:03 AM
Windshield trim install with no problems other than sore palms;-)
Pat
I found that if you use a plastic trim stick and get behind each clip and flex the clips pretty good it will allow the trim to go in a whole lot easier.
Posted By: SRT6776
Re: Modern Bullitt build - 02/02/21 02:24 PM
Are you keeping it or selling it when its done?
Keeper!
Congrats if you are, any level build/documented like this tends to be on the auction block 2 weeks after completion. Can't wait to see it when its done, gorgeous car.
Posted By: Keepat
Re: Modern Bullitt build - 02/10/21 11:32 PM
Posted By: Keepat
Re: Modern Bullitt build - 02/15/21 05:08 PM
Posted By: mopar4don
Re: Modern Bullitt build - 02/15/21 08:56 PM
Wow, now that is some art work!
Beautiful Pat
Posted By: Keepat
Re: Modern Bullitt build - 02/15/21 11:29 PM
Wow, now that is some art work!
Beautiful Pat
Thanks Don! I think this is the closest IŌĆÖll ever get to metal sculpture;-)
Pat
Posted By: Greenwood
Re: Modern Bullitt build - 02/18/21 05:23 AM
A question/comment. Is there a reason you went with an X-pipe over an H-pipe crossover? My own ear likes the more "classical" sound of the H-pipe. Can't wait to see you take it for the first drive, though.
Posted By: ek3
Re: Modern Bullitt build - 02/18/21 03:26 PM
this will be to nice to ever see the streets ! very nice. outstanding work.....
Posted By: Keepat
Re: Modern Bullitt build - 02/19/21 12:01 PM
A question/comment. Is there a reason you went with an X-pipe over an H-pipe crossover? My own ear likes the more "classical" sound of the H-pipe. Can't wait to see you take it for the first drive, though.
Going with the X pipe will make for a much cleaner installation of the exhaust cut outs as I can install them right at the first curve aft of the headers. After over six years I am so looking forward to driving this car down the road!
Thanks
Pat
Posted By: Keepat
Re: Modern Bullitt build - 02/19/21 12:03 PM
this will be to nice to ever see the streets ! very nice. outstanding work.....
WonŌĆÖt make it this year but be sure this car will go on the hotrod power tour in 2022.
Thanks
Pat
Posted By: Keepat
Re: Modern Bullitt build - 02/21/21 04:46 PM
Posted By: Keepat
Re: Modern Bullitt build - 02/25/21 01:36 AM
Posted By: MadMopars
Re: Modern Bullitt build - 02/25/21 04:58 AM
Beautiful work, as always!
That being said, when are you going to get that roller rear end out of there and get the Dana installed?
Posted By: Keepat
Re: Modern Bullitt build - 02/25/21 03:05 PM
Beautiful work, as always!
That being said, when are you going to get that roller rear end out of there and get the Dana installed?
Maybe we should put a Dana in my sonŌĆÖs 68 Mustang to balance things out;-)
Thank you!
Pat
Posted By: Keepat
Re: Modern Bullitt build - 02/28/21 11:30 PM
Posted By: larry4406
Re: Modern Bullitt build - 03/01/21 11:21 AM
Pat your craftsmanship and attention to detail is amazing!
I hope to see this car one day.
-larry
Posted By: Keepat
Re: Modern Bullitt build - 03/02/21 02:10 AM
Pat your craftsmanship and attention to detail is amazing!
I hope to see this car one day.
-larry
Thanks Larry! It will be at Carlisle this summer!
Pat
Posted By: larry4406
Re: Modern Bullitt build - 03/02/21 10:50 AM
Pat your craftsmanship and attention to detail is amazing!
I hope to see this car one day.
-larry
Thanks Larry! It will be at Carlisle this summer!
Pat
Thanks Pat - I hope to make it this year!
Posted By: Keepat
Re: Modern Bullitt build - 03/05/21 03:12 AM
Posted By: DynoDave
Re: Modern Bullitt build - 03/11/21 12:24 AM
That's beautiful work.
Posted By: Keepat
Re: Modern Bullitt build - 03/11/21 12:42 AM
That's beautiful work.
Thank you Dave! IŌĆÖm happy with how it turned out, considering it was my first custom exhaust.
Pat
Posted By: Keepat
Re: Modern Bullitt build - 03/13/21 09:32 PM
Just one fender on and itŌĆÖs starting to look like itŌĆÖs ready for the road
Thanks
Pat
![[Linked Image]](https://i.postimg.cc/fWmPq976/417-CFC1-C-F341-4607-AADC-8-F57-A376-CF4-C.jpg)
![[Linked Image]](https://i.postimg.cc/HsmhqkBj/79-DB2098-21-C8-422-F-9472-7-BF962-E5304-F.jpg)
![[Linked Image]](https://i.postimg.cc/d00MzVQG/7259-FE15-958-C-460-F-AAE5-AFCB1707-EB80.jpg)
Posted By: NITROUSN
Re: Modern Bullitt build - 03/14/21 07:56 PM
Very nice. What do you plan to use for a hood? Looks like the air cleaner is high for normal hood clearance. Maybe an illusion.
Posted By: Keepat
Re: Modern Bullitt build - 03/14/21 10:58 PM
Very nice. What do you plan to use for a hood? Looks like the air cleaner is high for normal hood clearance. Maybe an illusion.
Stock hood just clears by about 3/16ŌĆØ
Thanks
Pat
Posted By: FrankenScamp
Re: Modern Bullitt build - 03/15/21 11:31 PM
,
Great pic. Thanks! Amazing......
Posted By: Keepat
Re: Modern Bullitt build - 03/16/21 10:06 AM
,
Great pic. Thanks! Amazing......
Thank you sir!
Posted By: Keepat
Re: Modern Bullitt build - 03/18/21 01:35 PM
IŌĆÖm amazed at how much space all the parts to a car take in oneŌĆÖs garage during a restoration. ItŌĆÖs great bolting all the big parts back on the Charger and all the space it frees up for the next project;-)
Thanks
Pat
![[Linked Image]](https://i.postimg.cc/RF6zc0h1/405-FEED0-F49-C-4-A08-B400-361-E02-F8-F3-A4.jpg)
![[Linked Image]](https://i.postimg.cc/Y0QKsy1h/3348-B453-3-F4-C-44-BE-873-B-ED056-B050-BE6.jpg)
Posted By: Mopar300F
Re: Modern Bullitt build - 03/22/21 05:19 PM
Been following this one all along, absolutely amazing.
Posted By: Neil
Re: Modern Bullitt build - 03/22/21 06:48 PM
So has everyone else by looking at the number of views this one has.

Posted By: Keepat
Re: Modern Bullitt build - 03/23/21 12:55 AM
Been following this one all along, absolutely amazing.
Thanks for not losing interest on this extremely slow build;-)
Posted By: Keepat
Re: Modern Bullitt build - 03/23/21 12:57 AM
So has everyone else by looking at the number of views this one has.
Yeah that number is crazy, but it has been over 7 years!
Thanks all!!
Posted By: Keepat
Re: Modern Bullitt build - 03/23/21 12:58 AM
Install the hood turn signals and gave the hood one last cut and buff before I mount it.
Thanks
Pat
![[Linked Image]](https://i.postimg.cc/66CyKhYF/4-B39-F7-DA-9-F6-E-408-D-A0-CA-DC52-F385-E937.jpg)
![[Linked Image]](https://i.postimg.cc/15HXn3xH/5-F7-B4-DAA-758-F-40-FC-A952-88491446-D5-E5.jpg)
![[Linked Image]](https://i.postimg.cc/wMYMJtTW/A06-C6-EE6-4-AA9-489-F-815-D-EA21-BB230-F5-A.jpg)
![[Linked Image]](https://i.postimg.cc/ZKZ05yQn/EB02-FDB5-77-C4-4-EF1-8225-7-B8905-B8-D9-E9.jpg)
Posted By: larry4406
Re: Modern Bullitt build - 03/23/21 09:44 AM
Pat your paint/finish is a mile deep mirror!
Unbelievable what you are achieving!
Posted By: Keepat
Re: Modern Bullitt build - 03/23/21 02:08 PM
Pat your paint/finish is a mile deep mirror!
Unbelievable what you are achieving!
Larry,
The real work is keeping it that way;-(
Thank you!
Pat
Posted By: ek3
Re: Modern Bullitt build - 03/24/21 04:42 AM
Pat your paint/finish is a mile deep mirror!
Unbelievable what you are achieving!
Larry,
The real work is keeping it that way;-(
Thank you!
Pat
amen brother ... to nice to even let people look at it ! proof a man with patience gets what he wants !
Posted By: CDN72SE
Re: Modern Bullitt build - 03/25/21 06:46 PM
Amazing!
Posted By: Keepat
Re: Modern Bullitt build - 03/31/21 10:41 AM
Posted By: not_a_charger
Re: Modern Bullitt build - 03/31/21 04:58 PM
Since you plan to drive this beast, will you be doing a ceramic coating, or a clear wrap on the areas most vulnerable to stone chips, etc?
Posted By: Keepat
Re: Modern Bullitt build - 04/01/21 12:24 AM
Since you plan to drive this beast, will you be doing a ceramic coating, or a clear wrap on the areas most vulnerable to stone chips, etc?
That is the plan! I ceramic coated my viper last year and prior to that we did a few customers boats and IŌĆÖve been very happy with the performance, so I plan on doing it to the charger and also coating bottom.
Thanks
Pat
Posted By: NITROUSN
Re: Modern Bullitt build - 04/01/21 01:40 AM
Very nice. Any pics on the antenna motor mounting?
Posted By: Keepat
Re: Modern Bullitt build - 04/01/21 03:03 PM
Very nice. Any pics on the antenna motor mounting?
Hard to see in the picture but I had to make a small L bracket to hold the motor
Thanks
![[Linked Image]](https://i.postimg.cc/rwkD9Dr6/FC498-BB2-18-EA-44-D2-9-D95-425491-A86812.jpg) image post
image post
Posted By: larry4406
Re: Modern Bullitt build - 04/02/21 09:44 AM
That retract antenna is a nice find!
Pat this build is absolutely top notch. I can't get over how well executed every thing is on this build. The planning and workmanship is amazing.
Thanks for showing your work.
Posted By: Keepat
Re: Modern Bullitt build - 04/02/21 07:55 PM
That retract antenna is a nice find!
Pat this build is absolutely top notch. I can't get over how well executed every thing is on this build. The planning and workmanship is amazing.
Thanks for showing your work.
Larry, thanks for following along with this 7 year build and for your kind comments! The project is getting closer to the end and IŌĆÖm looking forward to driving it soon!
Thank You!
Pat
Posted By: NITROUSN
Re: Modern Bullitt build - 04/02/21 10:22 PM
Very nice. Any pics on the antenna motor mounting?
Hard to see in the picture but I had to make a small L bracket to hold the motor
Thanks
image post Thanks for the photo.
Posted By: Keepat
Re: Modern Bullitt build - 04/03/21 08:48 PM
Posted By: Mopar300F
Re: Modern Bullitt build - 04/04/21 11:15 PM
Will there be a separate switch for the Antennae of will it extend and retract when the radio is on/off?
My dad had a 68 New Yorker with power antennae and there was a switch on the dash near the radio.
Posted By: Keepat
Re: Modern Bullitt build - 04/05/21 01:10 AM
Will there be a separate switch for the Antennae of will it extend and retract when the radio is on/off?
My dad had a 68 New Yorker with power antennae and there was a switch on the dash near the radio.
The new but original looking stereo has a power antenna output.
Thanks
Pat
Posted By: Keepat
Re: Modern Bullitt build - 04/14/21 09:44 AM
Posted By: Keepat
Re: Modern Bullitt build - 04/17/21 06:59 PM
My LO horn is bad, looking for a replacement Prestolite horn. Please see picture for part numbers. IŌĆÖm not concerned with date code but would like to have the same horn.
Thanks
Pat
![[Linked Image]](https://i.postimg.cc/mrsGxMZW/8918687-F-3-E0-E-4-C60-A919-F0-A7364-FBEF3.jpg)
Posted By: Neil
Re: Modern Bullitt build - 04/17/21 07:21 PM
Just the grainy texture that is the issue? If the horn still works I'd just work the surface smooth with primer/sanding and repaint it.
Posted By: Keepat
Re: Modern Bullitt build - 04/17/21 07:45 PM
Just the grainy texture that is the issue? If the horn still works I'd just work the surface smooth with primer/sanding and repaint it.
No, does not work.
Posted By: Neil
Re: Modern Bullitt build - 04/17/21 09:28 PM
Sorry, my mistake. I see they sell reproduction horns in sets, but they appear to be the Spartan type.
Posted By: Mopar300F
Re: Modern Bullitt build - 04/17/21 09:42 PM
I have read you can get a stuck horn working again by spraying WD40 into it.
Posted By: Keepat
Re: Modern Bullitt build - 04/17/21 10:08 PM
Sorry, my mistake. I see they sell reproduction horns in sets, but they appear to be the Spartan type.
Yes I think classic industries sells them. But I really like to keep the same style horn as the old one that still works.
Thank you!
Posted By: Keepat
Re: Modern Bullitt build - 04/17/21 10:08 PM
I have read you can get a stuck horn working again by spraying WD40 into it.
I will give that a try!
Thank you!
Pat
Posted By: DynoDave
Re: Modern Bullitt build - 04/18/21 02:39 PM
The carbon fiber piece is sexy looking. Is that commercially available, or did you make it / have it made?
![[Linked Image]](https://i.postimg.cc/DyvtJKQT/38-C93-A63-8125-4-A2-B-823-C-C0-F80-F3396-DD.jpg)
What is the motor in this picture?
Posted By: Neil
Re: Modern Bullitt build - 04/18/21 04:10 PM
It appears the horns can be serviced if you want to dig into it vs buying another. Might be possible to soak it in Evaporust to clean the contacts up as well?
https://board.moparts.org/ubbthreads/ubbthreads.php/topics/566967/prestolite-horn-repair-101.html
Posted By: Keepat
Re: Modern Bullitt build - 04/18/21 04:31 PM
The carbon fiber piece is sexy looking. Is that commercially available, or did you make it / have it made?
What is the motor in this picture?
Replaced the vacuum canisters with electric motors to operate the headlight doors.
Thanks
Posted By: Keepat
Re: Modern Bullitt build - 04/18/21 04:35 PM
Good stuff! Thanks for posting the link, I will give it a try!
Pat
Posted By: Keepat
Re: Modern Bullitt build - 04/21/21 01:40 AM
Posted By: larry4406
Re: Modern Bullitt build - 04/21/21 09:44 AM
Nice work Pat!
What are you using to weld the aluminum brake duct scoops? Spool gun in a MIG?
Posted By: Keepat
Re: Modern Bullitt build - 04/21/21 11:41 AM
Nice work Pat!
What are you using to weld the aluminum brake duct scoops? Spool gun in a MIG?
Larry, Easy to mistake my ugly welds for a spool meg welder;-) but IŌĆÖm slowly getting more comfortable with TIG welding as long as I know IŌĆÖm going to grind and polish the welds down;-)
Thanks
Pat
Posted By: NITROUSN
Re: Modern Bullitt build - 04/21/21 06:55 PM
Pat your wheel opening stainless moldings are they original or reproductions? If reproductions what company and how did they fit? Thanks.
Posted By: Keepat
Re: Modern Bullitt build - 04/21/21 07:20 PM
Pat your wheel opening stainless moldings are they original or reproductions? If reproductions what company and how did they fit? Thanks.
They are original, just needed a little massaging and a good polishing. I think there are 2 manufacturers for them 1 bad and 1 ok.
Good luck!
Pat
Posted By: Keepat
Re: Modern Bullitt build - 04/27/21 09:40 AM
Posted By: DynoDave
Re: Modern Bullitt build - 04/29/21 01:34 AM
Mounted the front bumper, and painted & installed the front brake air ducts. The air ducts are inconspicuous painted black.
Man I'll say they do. Very stealthy.
Posted By: Mopar300F
Re: Modern Bullitt build - 04/30/21 01:24 AM
I canŌĆÖt help but think that you could have used the signal light opening for your duct work, build a faux screen that looked like a lens and built an led light into them.
Posted By: Keepat
Re: Modern Bullitt build - 05/05/21 05:16 PM
The repro parking light fit and look much better then the ones I used 15 years ago on my 1st Charger.
Thanks
Pat
![[Linked Image]](https://i.postimg.cc/P5Qnt31j/29-EB3843-5-B57-4837-BB15-B113406-CB9-DB.jpg)
![[Linked Image]](https://i.postimg.cc/htBqRWzs/4-CB7-D798-9-F79-45-B2-A1-AD-E51690-E40655.jpg)
![[Linked Image]](https://i.postimg.cc/CM9gJfwW/BCDF5055-1-E72-437-E-B85-B-C3578-F3-BBD84.jpg)
![[Linked Image]](https://i.postimg.cc/sDSRLDX1/02-BAB18-A-5-F5-D-4713-84-CC-8-F1-D916-CC855.jpg)
Posted By: Keepat
Re: Modern Bullitt build - 05/09/21 11:47 PM
Posted By: FrankenScamp
Re: Modern Bullitt build - 05/10/21 03:10 AM
Sounds killer!!! Love it.....
Posted By: Keepat
Re: Modern Bullitt build - 05/11/21 01:25 AM
Sounds killer!!! Love it.....
Thank you sir!
Pat
Posted By: Keepat
Re: Modern Bullitt build - 05/18/21 12:16 PM
Posted By: DynoDave
Re: Modern Bullitt build - 05/19/21 04:10 AM
I have not heard of weld Bond before. Nice work on those though.
Posted By: Mopar300F
Re: Modern Bullitt build - 05/19/21 05:20 PM
Where did you get the map pocket chrome squares. I did my interior 10 years ago and Legendary no longer had them.
Paul
Posted By: Keepat
Re: Modern Bullitt build - 05/20/21 02:02 AM
I have not heard of weld Bond before. Nice work on those though.
Thanks!
Posted By: Keepat
Re: Modern Bullitt build - 05/20/21 02:04 AM
Where did you get the map pocket chrome squares. I did my interior 10 years ago and Legendary no longer had them.
Paul
Year One sells the repro map pocket chrome squares!
Pat
Posted By: Keepat
Re: Modern Bullitt build - 05/20/21 02:05 AM
LegendaryŌĆśs carpet set fits great with a few modifications and the addition of some foam to fill the gap around the modified shifter tunnel. ItŌĆÖs nice that they make this carpet extra long at the firewall so you cannot see any of firewall. Just letting it relax for a few days with a some 25 pound lead bags.
Thanks
Pat
![[Linked Image]](https://i.postimg.cc/JhFKRJLg/CD1-BAF4-D-444-A-4-D14-9-DD9-D9589960374-C.jpg)
![[Linked Image]](https://i.postimg.cc/gJ6sjJc0/C153-D916-F6-EA-44-BA-89-C6-9023-D464-BA0-B.jpg)
![[Linked Image]](https://i.postimg.cc/bwTBfsdc/F2-FBEDAC-C25-C-4670-B16-A-69-B6-FAB4-CBE0.jpg)
Posted By: larry4406
Re: Modern Bullitt build - 05/20/21 11:43 PM
You never disappoint Pat!
Posted By: Keepat
Re: Modern Bullitt build - 05/24/21 05:23 PM
I decided to reuse the original door sills. The reproŌĆśs donŌĆÖt look as nice as the originals after polishing, even with a few dents and scratches.
Thanks
Pat
![[Linked Image]](https://i.postimg.cc/02Yd8JNH/5-A5517-AC-6-B2-F-4499-97-EE-3-FFB5-A2-A077-F.jpg)
![[Linked Image]](https://i.postimg.cc/52pBzdLB/2-D24-D59-E-8248-4-BCD-91-DB-4125-B9126337.jpg)
![[Linked Image]](https://i.postimg.cc/7Zq1bYGP/9-CD61608-0524-4-F20-8-D8-D-50-A0-B93-C2-D58.jpg)
![[Linked Image]](https://i.postimg.cc/MK2m2YzQ/1570-E719-73-AF-4-AEC-80-DF-04-F9-AD75-A60-B.jpg)
Posted By: Mopar300F
Re: Modern Bullitt build - 05/24/21 06:13 PM
As a serious 68 fan and Bullitt Charger owner myself, this is the most amazing Charger I have ever seen. Been following the thread for 5+ years and am anxiously waiting to see the final result. Next up would be seats. Bone stock or modified?
Posted By: Keepat
Re: Modern Bullitt build - 05/24/21 10:46 PM
As a serious 68 fan and Bullitt Charger owner myself, this is the most amazing Charger I have ever seen. Been following the thread for 5+ years and am anxiously waiting to see the final result. Next up would be seats. Bone stock or modified?
Stock looking seats but with modern bolsters. I think most people will be fooled that theyŌĆÖre not original.
Thanks for following along and sorry itŌĆÖs taken so long;-)
Pat
![[Linked Image]](https://i.postimg.cc/XXSpV5cN/251-A65-BA-DD3-C-41-E9-AE5-F-6-AE96-F2-F2448.jpg)
Posted By: Keepat
Re: Modern Bullitt build - 05/24/21 11:47 PM
Received an email from Carlisle events to be part of their featured vehicle display at the Chrysler nationals. (Thank you Ed Buczeskie!) It will be great showing the vehicle for the first time in Carlisle as this is where I saw the car for the first time prior to buying it 9 years ago. Having an indoor space to show my black Charger pretty much assures everyone that we will have a rain free and relatively cool weekend;-)
Posted By: Hemi Allstate
Re: Modern Bullitt build - 05/25/21 12:09 AM
Congratulations ! Well deserved !
A truly fabulous build ! Top shelf all the way !
Mark
Posted By: Keepat
Re: Modern Bullitt build - 05/25/21 12:29 PM
Congratulations ! Well deserved !
A truly fabulous build ! Top shelf all the way !
Mark
Mark, Thank you!!
Pat
Posted By: DynoDave
Re: Modern Bullitt build - 05/25/21 12:54 PM
Received an email from Carlisle events to be part of their featured vehicle display at the Chrysler nationals. (Thank you Ed Buczeskie!) It will be great showing the vehicle for the first time in Carlisle as this is where I saw the car for the first time prior to buying it 9 years ago. Having an indoor space to show my black Charger pretty much assures everyone that we will have a rain free and relatively cool weekend;-)
Posted By: Mopar300F
Re: Modern Bullitt build - 05/27/21 06:02 PM
Thought I would share a photo of my 68 Bullitt Charger, pretty much stock , factory 383 4 speed and 3.23 posi. Some suspension modifications and the engine was balanced and blueprinted at rebuild. Only 67,000 miles on the car.
<a href="https://app.photobucket.com/u/paulolds/p/1b6370cd-2498-4078-adf4-6d9f64381af8" target="_blank"><img src="https://hosting.photobucket.com/images/ll49/paulolds/1F011105-0357-425D-A398-7FE3929AB92E.jpeg?width=590&height=370&fit=bounds" border="0" alt="1F011105-0357-425D-A398-7FE3929AB92E"/></a>
https://app.photobucket.com/u/paulolds/p/1b6370cd-2498-4078-adf4-6d9f64381af8?mode=zoom<a href="https://app.photobucket.com/u/paulolds/a/d80e3ae0-86e8-4c01-bfe3-bdd613713886/p/011e15ca-b5b1-4e16-b287-2453975232e5" target="_blank"><img src="https://hosting.photobucket.com/albums/ll49/paulolds/Dodge%20Charger/.highres/8E783EB0-EECF-4EAA-991F-4842BC98EBD5-18447-00002B605B2B1D78_zps9c200aef.jpg?width=590&height=370&fit=bounds" border="0" /></a>
Posted By: Keepat
Re: Modern Bullitt build - 05/27/21 11:48 PM
Thought I would share a photo of my 68 Bullitt Charger, pretty much stock , factory 383 4 speed and 3.23 posi. Some suspension modifications and the engine was balanced and blueprinted at rebuild. Only 67,000 miles on the car.
<a href="https://app.photobucket.com/u/paulolds/p/1b6370cd-2498-4078-adf4-6d9f64381af8" target="_blank"><img src="https://hosting.photobucket.com/images/ll49/paulolds/1F011105-0357-425D-A398-7FE3929AB92E.jpeg?width=590&height=370&fit=bounds" border="0" alt="1F011105-0357-425D-A398-7FE3929AB92E"/></a>
https://app.photobucket.com/u/paulolds/p/1b6370cd-2498-4078-adf4-6d9f64381af8?mode=zoom Looks awesome, thank you for sharing!
Pat
Posted By: Keepat
Re: Modern Bullitt build - 05/28/21 11:06 AM
Posted By: Keepat
Re: Modern Bullitt build - 05/29/21 03:28 PM
FYI canŌĆÖt use the legendary rally seats with the standard charger long armrest. The side bolster Hits the last 2 inches of the armrest. It could work but eventually would leave a dent in the seat fabric. Not a problem if youŌĆÖre also replacing the door panels but if you reusing your door panels they will be an imprint from the longer armrest base.
Thanks
Pat
![[Linked Image]](https://i.postimg.cc/DzPTbP5S/E3931-FE9-A6-BA-438-F-926-A-EC2-C9-D43-EBE4.jpg)
![[Linked Image]](https://i.postimg.cc/K8LFm2Mr/625930-A9-FF57-469-D-9-B85-BC71-D15-EC6-EA.jpg)
![[Linked Image]](https://i.postimg.cc/7YhZ8d9m/69-BBAB48-2-A1-C-4-EE7-92-AB-0-ABF88-F0-E845.jpg)
Posted By: Keepat
Re: Modern Bullitt build - 06/01/21 12:37 AM
Posted By: Keepat
Re: Modern Bullitt build - 06/05/21 05:58 PM
One small step for my charger and one giant leap for me;-)
https://youtu.be/r7djVQujh00
Posted By: FrankenScamp
Re: Modern Bullitt build - 06/05/21 07:30 PM
Awesome!!!
That had to feel pretty good. Congrats! ¤Ź╗
¤śÄ¤śÄ
Posted By: Keepat
Re: Modern Bullitt build - 06/05/21 10:17 PM
Awesome!!!
That had to feel pretty good. Congrats! ¤Ź╗
¤śÄ¤śÄ
YES! Thanks!
Posted By: larry4406
Re: Modern Bullitt build - 06/06/21 10:55 AM
Hell yes!
Where is the like button?!!!
Posted By: DynoDave
Re: Modern Bullitt build - 06/08/21 02:16 PM
Excellent!
Green Mustangs are scurrying away in fear...
Posted By: Keepat
Re: Modern Bullitt build - 06/08/21 07:12 PM
Excellent!
Green Mustangs are scurrying away in fear...
I know of 1 that is not;-)
Thanks!
Posted By: Keepat
Re: Modern Bullitt build - 06/09/21 12:36 AM
Aligned the low and highbeam lights and installed the plastic bezels.
![[Linked Image]](https://i.postimg.cc/13GGZnkH/867-E804-B-E217-4856-A9-CD-F493-BA8-BFFC0.jpg)
![[Linked Image]](https://i.postimg.cc/8k7ng4tm/E396239-A-35-B9-4241-AAE2-812-A38127-AB8.jpg)
![[Linked Image]](https://i.postimg.cc/jjRzqqKr/5-B362830-1-C29-4-ACD-934-A-E95-CE684-FEA6.jpg)
Also picked up some new garage art
![[Linked Image]](https://i.postimg.cc/52VPvV1s/6-B4-BD3-F1-254-B-4904-A159-D2-DF2-BF47-A0-D.jpg)
Finally got around to blacking out the hood turn signal lenses. I used black vinyl that matches the paint great.
![[Linked Image]](https://i.postimg.cc/52SsSR2b/58050-E43-3-BF5-4052-B19-F-F29-E93-B67-B1-B.jpg)
![[Linked Image]](https://i.postimg.cc/y62p1RG4/F6-C3144-B-8-B7-F-4586-840-A-0-C098-A665800.jpg)
And I got the driver side front fender splashguard and stainless tubing covers installed
![[Linked Image]](https://i.postimg.cc/3RcpZgGK/2-E09-D4-A1-1-D70-4-DE9-9-EFF-2603554-CDADE.jpg)
![[Linked Image]](https://i.postimg.cc/PqK1CGrv/5-AA845-C9-F8-D9-4-E9-B-AEEA-953-EBDFB75-F7.jpg)
Thanks
Pat
Posted By: NITROUSN
Re: Modern Bullitt build - 06/11/21 12:18 AM
Beyond nice.
Posted By: 69Cuda340S
Re: Modern Bullitt build - 06/15/21 02:36 AM
Wow that car is amazing. And the craftsmanship is second to none!!
Posted By: Keepat
Re: Modern Bullitt build - 06/16/21 01:00 AM
Posted By: Keepat
Re: Modern Bullitt build - 06/16/21 01:03 AM
Wow that car is amazing. And the craftsmanship is second to none!!
I hope Mr. None doesnŌĆÖt come to Carlisle;-)
Thank You!!
Pat
Posted By: Keepat
Re: Modern Bullitt build - 06/29/21 10:22 AM
Posted By: rdrnr6970
Re: Modern Bullitt build - 06/29/21 06:35 PM
Very cool!Great craftsmanship!
Posted By: rhamson
Re: Modern Bullitt build - 07/02/21 05:26 PM
The car looks sweet Pat. You should be proud of how well it turned out. Have fun at Carlisle!
Posted By: Keepat
Re: Modern Bullitt build - 07/04/21 01:03 AM
The car looks sweet Pat. You should be proud of how well it turned out. Have fun at Carlisle!
I hope you are going to Carlisle? IŌĆÖm talking Alex into taking your/his old Challenge for the 1st time!
Thank you and happy 4th!!
Posted By: 69Cuda340S
Re: Modern Bullitt build - 07/04/21 01:02 PM
I hope Mr. None doesnŌĆÖt come to Carlisle;-)
Thank You!!
Pat
Sorry I won't be able to see it there this year due to conflict. Hopefully next year. Had intake to head coolant leak for a couple of years so car was not road worthy of any type of trip. Finally got around to fixing it over the winter. Been up to Markets at Shrewsbury twice this year. Anyway, Charger looks fabulous hope everyone has a great time at Carlisle this year.

Posted By: Keepat
Re: Modern Bullitt build - 07/04/21 07:04 PM
Posted By: larry4406
Re: Modern Bullitt build - 07/05/21 11:02 AM
Nice trunk storage Pat! Those were a great find and excellent proportions.
I plan on being at Carlisle on Saturday and am looking forward to seeing the car in person!
-larry
Posted By: Keepat
Re: Modern Bullitt build - 07/05/21 11:26 AM
Nice trunk storage Pat! Those were a great find and excellent proportions.
I plan on being at Carlisle on Saturday and am looking forward to seeing the car in person!
-larry
Larry, cool look forward to meeting you! I think IŌĆÖll be in building T or Y not sure which one yet?
Thanks
Pat
Posted By: larry4406
Re: Modern Bullitt build - 07/10/21 06:36 PM
Nice trunk storage Pat! Those were a great find and excellent proportions.
I plan on being at Carlisle on Saturday and am looking forward to seeing the car in person!
-larry
Larry, cool look forward to meeting you! I think IŌĆÖll be in building T or Y not sure which one yet?
Thanks
Pat
Pat - I spied your car for quite a bit this morning in Building T but could not find you. Car is fantastic! Hope to met you one day and hear that beast on the open road!
Now that this one is behind you, what's next?
-larry
Posted By: FrankenScamp
Re: Modern Bullitt build - 07/10/21 11:10 PM
It all looks great! Congrats on your success with the car. Sooooo many tiny details on this build.
Glad I got to watch the(years long) show.
Thanks so much for sharing this with us.
¤Ź╗¤Ź╗
Shawn
Posted By: Keepat
Re: Modern Bullitt build - 07/11/21 01:46 AM
It all looks great! Congrats on your success with the car. Sooooo many tiny details on this build.
Glad I got to watch the(years long) show.
Thanks so much for sharing this with us.
¤Ź╗¤Ź╗
Shawn
Shawn,
Thank you for your kind words and for checking out the build!
Pat
Posted By: Keepat
Re: Modern Bullitt build - 07/11/21 01:52 AM
Nice trunk storage Pat! Those were a great find and excellent proportions.
I plan on being at Carlisle on Saturday and am looking forward to seeing the car in person!
-larry
Larry, cool look forward to meeting you! I think IŌĆÖll be in building T or Y not sure which one yet?
Thanks
Pat
Pat - I spied your car for quite a bit this morning in Building T but could not find you. Car is fantastic! Hope to met you one day and hear that beast on the open road!
Now that this one is behind you, what's next?
-larry
Larry,
IŌĆÖm sorry I missed you! Next car will be a late 30s or 40s vintage woody that I will build with/for my wife.
A very similar build with an old looking wagon inside and out with modern running gear.
Thank you and again IŌĆÖm sorry I missed you!
Pat
Posted By: larry4406
Re: Modern Bullitt build - 07/11/21 10:34 AM
Nice trunk storage Pat! Those were a great find and excellent proportions.
I plan on being at Carlisle on Saturday and am looking forward to seeing the car in person!
-larry
Larry, cool look forward to meeting you! I think IŌĆÖll be in building T or Y not sure which one yet?
Thanks
Pat
Pat - I spied your car for quite a bit this morning in Building T but could not find you. Car is fantastic! Hope to met you one day and hear that beast on the open road!
Now that this one is behind you, what's next?
-larry
Larry,
IŌĆÖm sorry I missed you! Next car will be a late 30s or 40s vintage woody that I will build with/for my wife.
A very similar build with an old looking wagon inside and out with modern running gear.
Thank you and again IŌĆÖm sorry I missed you!
Pat
Pat - make sure the 30-40's project is a mopar so you can post it here! If not, let us know where to watch!
Posted By: Keepat
Re: Modern Bullitt build - 07/12/21 01:04 AM
Posted By: rhamson
Re: Modern Bullitt build - 07/12/21 03:24 PM
Couldn't make it as a prior commitment got in the way. The car looks over the top fantastic. Great job! Maybe I will see it locally in the future around here. Congratulations!
Posted By: DynoDave
Re: Modern Bullitt build - 07/12/21 05:08 PM
An amazing car. Looks like it had a great first outing at Carlisle!
Posted By: Plum440
Re: Modern Bullitt build - 07/13/21 08:27 AM
Saw her at Carlisle... Amazing!! Your craftsmanship and attention to detail are quite impressive to say the least. I tip my hat to you, Sir.
Posted By: CDN72SE
Re: Modern Bullitt build - 07/13/21 09:53 PM
Excellence from beginning to end, thanks for sharing your restoration with us!!
Posted By: Neil
Re: Modern Bullitt build - 07/13/21 10:21 PM
Amazing build! Normally I cringe when people start messing around trying to make a better 68-70 Charger than the factory did, but this one was done right 100%.
Now that the 1st one is done when does mass production start, and where do we leave our deposits? Asking for some friends.
Posted By: Keepat
Re: Modern Bullitt build - 07/14/21 12:52 AM
Couldn't make it as a prior commitment got in the way. The car looks over the top fantastic. Great job! Maybe I will see it locally in the future around here. Congratulations!
Thanks Ralph! IŌĆÖm sure we will run across each other at some point!
Pat
Posted By: Keepat
Re: Modern Bullitt build - 07/14/21 12:53 AM
An amazing car. Looks like it had a great first outing at Carlisle!
Thank you sir, it was fun but I am glad that itŌĆÖs over!
Posted By: Keepat
Re: Modern Bullitt build - 07/14/21 12:55 AM
Saw her at Carlisle... Amazing!! Your craftsmanship and attention to detail are quite impressive to say the least. I tip my hat to you, Sir.
Thank you for checking it out, big show hard to see at all!
Posted By: Keepat
Re: Modern Bullitt build - 07/14/21 12:56 AM
Excellence from beginning to end, thanks for sharing your restoration with us!!
Thank you for hanging in there all these years;-)
Posted By: Keepat
Re: Modern Bullitt build - 07/14/21 01:00 AM
Amazing build! Normally I cringe when people start messing around trying to make a better 68-70 Charger than the factory did, but this one was done right 100%.
Now that the 1st one is done when does mass production start, and where do we leave our deposits? Asking for some friends.
I agree 2nd GEN chargers need no modifications they are timeless just the way they are!
We are excepting cryptocurrency for all future orders;-)
Thank You!
Pat
Posted By: Keepat
Re: Modern Bullitt build - 07/19/21 12:53 AM
Put a little over 30 miles on the car this morning. I stopped at a small airport to snap a few pictures by a very cool old hanger. Car ran and performed well! A few small glitches, biggest being the speedometer is not working. I need to troubleshoot if itŌĆÖs a cable, gear or gauge problem?
Thanks
Pat
![[Linked Image]](https://i.postimg.cc/Xv9RmcXB/CD67-D46-B-CB33-421-C-B021-1-AC5-E23-DF903.jpg)
![[Linked Image]](https://i.postimg.cc/qBNPdTtd/ABEA13-E8-B3-CC-498-A-93-F8-B785-FD69-E97-A.jpg)
![[Linked Image]](https://i.postimg.cc/GhY6HxJ7/693-FBBDD-EDA1-4850-9-E14-2-A9-E91-EFA05-B.jpg)
![[Linked Image]](https://i.postimg.cc/RZL8TCYw/83-D79931-2-BDC-452-C-9-F3-C-BC578-C3-D0-B91.jpg)
Posted By: NITROUSN
Re: Modern Bullitt build - 07/19/21 02:09 AM
Absolutely beautiful Pat. Having finished my build I know what you went through. Your build went beyond and over the top. Master craftsmanship at its ultimate period. Did I say period.
Posted By: Keepat
Re: Modern Bullitt build - 07/20/21 12:01 AM
Absolutely beautiful Pat. Having finished my build I know what you went through. Your build went beyond and over the top. Master craftsmanship at its ultimate period. Did I say period.
Thank you sir! Congrats on finishing your build as well!
Pat
Posted By: rdrnr6970
Re: Modern Bullitt build - 07/20/21 04:46 PM
Saw youre charger in carlsile pics.Wow!What a car ,looks great!Thanks for sharing the great build of the charger!
Posted By: A990
Re: Modern Bullitt build - 07/21/21 09:54 PM
Great car, great thread.
If the odometer worked then the speedometer head is inop.
Posted By: Keepat
Re: Modern Bullitt build - 08/13/21 12:32 AM
Put the car on the pro-form scales today. It looks like all of the weight savings between the aluminum engine, bumper mounts, 9ŌĆØ rear and RMS coil over suspension shaved off 300 lbs from the factory weight of a hemi 4 speed car. This is amazing considering all of the additional unibody reinforcements I made to the car. My car is 3/4 full of fuel and weighs 3664 lbs. Specs I find online for a factory hemi 4-speed, Dana car comes in at 3974 lbs. That is awesome considering I was shooting for about 200 lbs lighter! The other cool thing is that itŌĆÖs a bit better than a 45/55 split.
Thanks
Pat
![[Linked Image]](https://i.postimg.cc/HxdVxb1R/2-A8-ED866-B28-F-4020-8945-82-BD66974-FA0.jpg)
![[Linked Image]](https://i.postimg.cc/tRrYq1Sv/AEF7-D598-4349-4427-80-C5-BED423116689.jpg)
![[Linked Image]](https://i.postimg.cc/1XYtJTV1/F59-BF47-C-2792-4379-A937-5-E5-E15-A4471-E.jpg)
Posted By: OzCharger69
Re: Modern Bullitt build - 08/18/21 11:21 PM
Very nice. Any pics on the antenna motor mounting?
Hard to see in the picture but I had to make a small L bracket to hold the motor
Thanks
image post What can I say, wow wow wow, what a top notch build, I adored every bit of the 45 pages.
I'm just about to install a power antenna on my 69 charger that doesn't even have a fender hole for the antenna. May I ask if this is the antenna you used? Would you remember what fender angle adapter you needed?
https://www.retromanufacturing.com/...omatic-power-antenna?variant=31333675406I'm thinking of using this one
https://www.retromanufacturing.com/collections/antennas/products/fully-automatic-mini-power-antennaThanks for any help!
Posted By: Keepat
Re: Modern Bullitt build - 08/19/21 11:17 AM
Order the one in the link I have below it has the correct Mopar looking antenna base. Check with Crutchfield they may have it $40 cheaper than when buying it. Good luck with your building thanks for checking out my project!
Pat
https://www.retromanufacturing.com/products/1968-70-dodge-coronet-fully-automatic-power-antenna
Posted By: Keepat
Re: Modern Bullitt build - 08/22/21 05:02 PM
Posted By: BigBlockGTS
Re: Modern Bullitt build - 08/22/21 07:39 PM
That got me pretty d*mn excited for a thirty second video. Both cars look and sound amazing. Hope you enjoy it for years to come.
Posted By: Keepat
Re: Modern Bullitt build - 08/22/21 09:30 PM
That got me pretty d*mn excited for a thirty second video. Both cars look and sound amazing. Hope you enjoy it for years to come.
That is the plan!! My daughter-in-law is trying to talk me into building her the green beetle in the movie.
I may have to find a Volkswagen forum to start that build;-)
Thank You!
Pat
Posted By: Keepat
Re: Modern Bullitt build - 09/23/21 02:22 PM
Picked up the next car a 1966 Pontiac GTO a few weeks ago in Minnesota. Original paint, chrome, interior, engine, trans, and rear! Unmolested 61,000 mile surviver. Car only had 16000 miles in 2002. Amazing documentation from all 3 owners.
No restoration for this car just paint correction cleaning and detailing preservation!
Drove it 1200 mile back home, used/ leaked 1/2 qt of oil. Ran great and made about 13+ mpg.
Thanks
Pat
![[Linked Image]](https://i.postimg.cc/qRh0ZQyx/63-DB118-A-F66-F-4-E39-B9-A1-41-B26735-A39-F.jpg)
![[Linked Image]](https://i.postimg.cc/zvTNqBdL/347-AD9-B7-1-CB8-4-B66-B296-BD53-E4-AB89-C5.jpg)
![[Linked Image]](https://i.postimg.cc/Yqwkb69Q/D9925-C80-21-E9-4547-9-E27-4-F318-E2-FE69-B.jpg)
Posted By: DynoDave
Re: Modern Bullitt build - 09/23/21 11:19 PM
Had to save this as one of my rotating desktop backgrounds! Congrats on such a successful build.
That GTO is sharp! I love Pontiacs too. A lot of the same rebellious spirit in that division as in Ma MOPAR.

Posted By: Keepat
Re: Modern Bullitt build - 12/21/21 12:09 AM
Posted By: larry4406
Re: Modern Bullitt build - 12/21/21 12:26 PM
Nice shop Pat!
I like those lights. What are they?
Big Ass fan is a nice addition.
Jackshaft door operators as well!
What is the size? Ceiling looks to be 12-14'?
Exterior shot?
Keep us posted on your next project.
-larry
Posted By: Keepat
Re: Modern Bullitt build - 12/21/21 02:21 PM
Nice shop Pat!
I like those lights. What are they?
Big Ass fan is a nice addition.
Jackshaft door operators as well!
What is the size? Ceiling looks to be 12-14'?
Exterior shot?
Keep us posted on your next project.
-larry
LED 4x2 panel lights, IŌĆÖll let you know how they work.
https://www.amazon.com/dp/B0849TG3B3/ref=tsm_1_tp_tcThe shop is 48ŌĆÖx32ŌĆÖ with 13ŌĆÖ ceiling just enough room for the tall two post lift.
Thank You!
![[Linked Image]](https://i.postimg.cc/3R9Lkycm/92-C20-B4-E-1204-475-A-B304-D606828896-F7.jpg)
Posted By: DynoDave
Re: Modern Bullitt build - 12/22/21 01:19 PM
Nice place Keepat!
Posted By: second 70
Re: Modern Bullitt build - 12/23/21 05:41 PM
Nice shop Pat!
I like those lights. What are they?
Big Ass fan is a nice addition.
Jackshaft door operators as well!
What is the size? Ceiling looks to be 12-14'?
Exterior shot?
Keep us posted on your next project.
-larry
LED 4x2 panel lights, IŌĆÖll let you know how they work.
https://www.amazon.com/dp/B0849TG3B3/ref=tsm_1_tp_tcThe shop is 48ŌĆÖx32ŌĆÖ with 13ŌĆÖ ceiling just enough room for the tall two post lift.
Thank You!
Hey Keepat I really can't tell on your both your doors but the lower panels on the left door seem to be bent in the middle. I had the same thing and it's the door bending in the middle when it opens. It will end up tearing the panels open. I didn't have a clue since I use the same jackshaft openers you do. I didn't catch it until I unhooked it and operated it by hand.
The fix is to add struts to door. At less that $25 each I just added them to each panel.


Posted By: Keepat
Re: Modern Bullitt build - 12/23/21 10:09 PM
Nice shop Pat!
I like those lights. What are they?
Big Ass fan is a nice addition.
Jackshaft door operators as well!
What is the size? Ceiling looks to be 12-14'?
Exterior shot?
Keep us posted on your next project.
-larry
LED 4x2 panel lights, IŌĆÖll let you know how they work.
https://www.amazon.com/dp/B0849TG3B3/ref=tsm_1_tp_tcThe shop is 48ŌĆÖx32ŌĆÖ with 13ŌĆÖ ceiling just enough room for the tall two post lift.
Thank You!
Hey Keepat I really can't tell on your both your doors but the lower panels on the left door seem to be bent in the middle. I had the same thing and it's the door bending in the middle when it opens. It will end up tearing the panels open. I didn't have a clue since I use the same jackshaft openers you do. I didn't catch it until I unhooked it and operated it by hand.
The fix is to add struts to door. At less that $25 each I just added them to each panel.
Thanks for the note, and good eyes! Actually the bottom panel is bent from the previous owner closing the door by stepping on that lip.
My garage door opener man is coming back as soon as I put a coat of paint on the outside of the door to readjust the springs for the new weight of the doors.
Thank You!
Pat
Posted By: Keepat
Re: Modern Bullitt build - 02/16/22 02:08 AM
We are registered for the HotRod power tour this June. Kurt in his Bullitt Mustang and me in the Bullitt Charger. IŌĆÖm excited to hit the open road with both car! It will be about 2800 miles round trip. ItŌĆÖs been about 9 years since going on the tour with KurtŌĆÖs Mustang.
Thanks
Pat
![[Linked Image]](https://i.postimg.cc/vBXz7NP1/170-DEF29-BC6-C-4-C34-9-A30-E8-BABFB31386.jpg)
![[Linked Image]](https://i.postimg.cc/FzRxTVqT/26703-E88-014-C-4-B43-B134-3-E8-E314-B558-B.jpg)
![[Linked Image]](https://i.postimg.cc/9QqL31fS/A8-E609-BC-DEA2-472-B-9-F79-4-D7-CA9-E494-A9.jpg)
Posted By: larry4406
Re: Modern Bullitt build - 02/16/22 10:58 AM
Awesome Pat!
Posted By: DynoDave
Re: Modern Bullitt build - 02/17/22 01:03 AM
That's going to be a fun trip!
Posted By: Keepat
Re: Modern Bullitt build - 02/18/22 12:16 AM
Posted By: larry4406
Re: Modern Bullitt build - 02/19/22 11:15 AM
Nice shop Pat!
Color me green with envy.
Posted By: second 70
Re: Modern Bullitt build - 02/19/22 04:48 PM
Pat, I use the Mitsubishi split units in my garage and great room. I spent a little extra and got the H2i hyper heat pump so it would work if weather got super cold. 100% @ 5 and 74% @ -13. Even so they work so much better above 32 and for air. My inside units are the fancy 9K and 18K that work off the 1 outside multi zone 24BTU unit. Is yours multi zone or do you have 2 outside units? Are you using it for heat and air or just air?
These are the units I have.
https://skipthewarehouse.com/mitsubishi-mxz3c24nahz2u1-24000-btu-hyper-heat-heat-condenser Great looking garage. Mike
Posted By: Keepat
Re: Modern Bullitt build - 02/20/22 12:54 PM
Nice shop Pat!
Color me green with envy.
Thank You sir!
Posted By: Keepat
Re: Modern Bullitt build - 02/20/22 12:58 PM
Pat, I use the Mitsubishi split units in my garage and great room. I spent a little extra and got the H2i hyper heat pump so it would work if weather got super cold. 100% @ 5 and 74% @ -13. Even so they work so much better above 32 and for air. My inside units are the fancy 9K and 18K that work off the 1 outside multi zone 24BTU unit. Is yours multi zone or do you have 2 outside units? Are you using it for heat and air or just air?
These are the units I have.
https://skipthewarehouse.com/mitsubishi-mxz3c24nahz2u1-24000-btu-hyper-heat-heat-condenser Great looking garage. Mike
Mike, The Mitsubishi mini splitŌĆśs are amazing units so efficient and produce heat in very low temperatures where traditional heat pumps struggle. I have a single 36K unit outside feeding the two 18k air handlerŌĆśs
Thanks
Pat
Posted By: 69Cuda340S
Re: Modern Bullitt build - 02/21/22 03:50 AM
That new shop is awesome!
Posted By: SomeCarGuy
Re: Modern Bullitt build - 02/24/22 06:48 PM
I use a lot of Sunpro lights, they are awesome. IŌĆÖve not used the flat panels yet. I just put up some of their other shop lights this past fall and already bought enough to do the other bay. They really look good.
The power tour with the bullitt duo is off the hook. Mega kudos on that.
Posted By: Keepat
Re: Modern Bullitt build - 02/24/22 11:30 PM
That new shop is awesome!
Thank You sir!
Posted By: Keepat
Re: Modern Bullitt build - 02/24/22 11:32 PM
I use a lot of Sunpro lights, they are awesome. IŌĆÖve not used the flat panels yet. I just put up some of their other shop lights this past fall and already bought enough to do the other bay. They really look good.
The power tour with the bullitt duo is off the hook. Mega kudos on that.
I am also very happy with the shop lights. Was concerned that they would be too bright so I put them on three different switches.
Thank You!
Pat
Posted By: Keepat
Re: Modern Bullitt build - 03/11/22 12:28 AM
Just finished reading the May issue of the Mopar Collector Guide and got a cool surprise. On the second to the last page they tell you whatŌĆÖs coming up in the next issue. I see a picture of my car on the top right hand corner with the caption Modernized Bullitt 1968 Charger tribute car. Looking forward to the next issue;-)
Thanks
Pat
![[Linked Image]](https://i.postimg.cc/1zVn9qKj/A6-E9-ED0-D-47-E9-4-CE9-9-A4-B-277-FD63-F1-D4-B.jpg)
![[Linked Image]](https://i.postimg.cc/FRfZXzfr/29-CA2033-A1-F9-4-C39-81-E7-1595-E9-F9-D226.jpg)
Posted By: SomeCarGuy
Re: Modern Bullitt build - 03/11/22 04:51 AM
I saw that this week and instantly thought of this thread. Pumped to see the write up.
Posted By: Keepat
Re: Modern Bullitt build - 03/15/22 11:07 AM
Posted By: second 70
Re: Modern Bullitt build - 03/15/22 03:51 PM
If I had a 318 emblem I'd send it to you for unmarked drawer.
Posted By: Keepat
Re: Modern Bullitt build - 03/15/22 07:20 PM
If I had a 318 emblem I'd send it to you for unmarked drawer.
Good eyes! That is a difficult Emblem to find. Looks like I may have to get it from Australia??
Thanks
Pat
Posted By: larry4406
Re: Modern Bullitt build - 03/17/22 10:06 AM
Shop is coming along nicely!
I think the emblems on the cabinets is a very cool touch. Never seen that before.
What brand are the cabinets?
Posted By: Keepat
Re: Modern Bullitt build - 03/17/22 11:15 AM
Shop is coming along nicely!
I think the emblems on the cabinets is a very cool touch. Never seen that before.
What brand are the cabinets?
Thank You!
Pat
Posted By: rdrnr6970
Re: Modern Bullitt build - 03/17/22 11:36 AM
Wow!Great stuff!Cool charger and mustang and a great shop!Thanks for sharing!
Posted By: Keepat
Re: Modern Bullitt build - 03/17/22 03:47 PM
Wow!Great stuff!Cool charger and mustang and a great shop!Thanks for sharing!
Thank You sir!
Posted By: SomeCarGuy
Re: Modern Bullitt build - 03/18/22 04:09 AM
WhatŌĆÖs better? The car build or the shop build?
Posted By: Keepat
Re: Modern Bullitt build - 03/18/22 06:35 PM
WhatŌĆÖs better? The car build or the shop build?
The cars!! But the shop is/was fun to setup.
Thanks
Pat
Posted By: DynoDave
Re: Modern Bullitt build - 03/19/22 12:03 AM
A beautiful work space!
Posted By: Keepat
Re: Modern Bullitt build - 04/12/22 06:06 PM
Posted By: larry4406
Re: Modern Bullitt build - 04/12/22 09:01 PM
Damn Sweet Pat!
Posted By: FrankenScamp
Re: Modern Bullitt build - 04/12/22 09:32 PM
Impressive.

Have fun on the Power Tour.
Posted By: Keepat
Re: Modern Bullitt build - 04/12/22 11:52 PM
Posted By: Keepat
Re: Modern Bullitt build - 04/12/22 11:54 PM
Impressive.
Have fun on the Power Tour.
Thanks, IŌĆÖm so looking forward to the road trip with my son!
Pat
Posted By: BigBlockGTS
Re: Modern Bullitt build - 04/15/22 08:09 PM
Can I just come over and stand in that shop? I will bring a dish to catch the drool from getting on the floor.
Posted By: Keepat
Re: Modern Bullitt build - 04/17/22 01:40 AM
Can I just come over and stand in that shop? I will bring a dish to catch the drool from getting on the floor.
Stop by anytime! No need for a drool dish, IŌĆÖll give you a mop;-)
Thank you!
Pat
Posted By: SomeCarGuy
Re: Modern Bullitt build - 04/19/22 05:06 PM
New MCG was in box today! CanŌĆÖt wait to read the article.
Posted By: Keepat
Re: Modern Bullitt build - 04/19/22 08:16 PM
New MCG was in box today! CanŌĆÖt wait to read the article.
Very cool! Good to hear theyŌĆÖre hitting the streets, I have yet to get my copy:-(
Thanks
Pat
Posted By: Keepat
Re: Modern Bullitt build - 04/20/22 11:15 PM
Picked up a few things for the road trip this June;-)
Thanks
Pat
![[Linked Image]](https://i.postimg.cc/PrkyyTMR/B8-F3-D186-6-EAA-456-D-AF3-A-AA09-DA670-FC3.jpg)
![[Linked Image]](https://i.postimg.cc/8PBHn9KP/496-B5691-AA47-4022-A26-E-4-D11807-D38-FE.jpg)
![[Linked Image]](https://i.postimg.cc/L89TdDwk/F7-F27-DB2-8-D24-4-DA6-97-AD-0830-B6-F1-FEC6.jpg)
Posted By: SomeCarGuy
Re: Modern Bullitt build - 04/25/22 09:47 AM
Sounds like they were throughly impressed. Did they approach you at a show?
Posted By: Keepat
Re: Modern Bullitt build - 04/25/22 02:46 PM
Sounds like they were throughly impressed. Did they approach you at a show?
It was a very nice article, and much appreciated! Yes they approach me the 1st day of the show, and ask if I could hang around after the show for a few photos. Then they followed up with an hour phone call a few months later.
Thank You!
Pat
Posted By: 69Cuda340S
Re: Modern Bullitt build - 04/26/22 03:41 AM
New shop looks great!! Love how bright it is with those windows letting in the natural light.
Posted By: ZIPPY
Re: Modern Bullitt build - 04/26/22 01:31 PM
Beautiful. The car by itself is enough, but the amount of work you personally did to it is (to me) the best part.
The shop is freaking amazing as well, and looks like something that should be on Garagejournal.com, if it isn't yet.
Posted By: Keepat
Re: Modern Bullitt build - 04/26/22 07:10 PM
New shop looks great!! Love how bright it is with those windows letting in the natural light.
Best part is all the windows are 8ŌĆÖ high so you get the sun light but still have privacy.
Thank You!
Pat
Posted By: Keepat
Re: Modern Bullitt build - 04/26/22 07:13 PM
Beautiful. The car by itself is enough, but the amount of work you personally did to it is (to me) the best part.
The shop is freaking amazing as well, and looks like something that should be on Garagejournal.com, if it isn't yet.
Thank you sir! To me that is the funnest part of the car hobby, trying to build and do all of the work myself. Now I just need to figure out how I can do the chrome work myself;-)
Pat
Posted By: Keepat
Re: Modern Bullitt build - 06/21/22 12:16 AM
2022 Hot Rod Power Tour was a blast! 8 days, 8 states, and over 2800 miles! The tour started in Memphis and we took two days to get there. From there it went to Nashville speedway, then down to Hoover Alabama, and on to Pensacola Florida and ended at the Atlanta motor speedway.
We stopped in some cool places along the way such as the pickers Nashville store along with their Columbia car dealership, Jack Daniels distillery, The Wellborn musclecar museum, and the Tuskegee airbase,
We had a few mechanical issues consisting of, a bad alternator, 2 hour fix. A leaky O ring fitting to the hidroboost, 1 1/2 hour fix. And The plastic gear for the speedometer broke at 2300 miles, IŌĆÖll fix that when I change all the fluids;-)
KurtŌĆÖs mustang fuel gauge stop working halfway through the tour and his power window switch stop working. All of which was fun and makes the trip that much more exciting! The best part is the cars went through the tour with no dents, scratches or nicks of any kind;-)
Driving across the country in old muscle cars is an absolute blast! We didnŌĆÖt get arrested:-), didnŌĆÖt have an accident, nobody stole the cars and we had a Great time! The power tour started this journey, restoring these two cars. And it was great to complete this journey having both cars perform so well on the tour!Been about nine years since our last tour 2013 and I only hope is that not that long before our next one;-)
Thanks
Pat
![[Linked Image]](https://i.postimg.cc/d0cb5QYX/67470-BE9-C663-4-F7-D-8-C38-0-D3874-D5-CDC3.jpg)
![[Linked Image]](https://i.postimg.cc/HnPGzQY4/F1-C084-A3-977-F-40-CF-BC3-E-57878996-B7-F0.jpg)
![[Linked Image]](https://i.postimg.cc/Wp9PsPGF/3-EFE2983-8-B92-477-B-8-E95-B58-BB94-AE4-FC.jpg)
![[Linked Image]](https://i.postimg.cc/cHhGKpPz/AE715-D2-F-820-A-4440-9-B44-7624-EBCB9-F64.jpg)
![[Linked Image]](https://i.postimg.cc/gJVkgtQy/D6-C6-E401-859-D-4265-BE84-52-CC5-D8-CAF6-D.jpg)
![[Linked Image]](https://i.postimg.cc/Pxs5zn3r/EFFC24-AC-F8-A0-4-A7-B-A70-D-F8-CA2-F8-FF28-D.jpg)
![[Linked Image]](https://i.postimg.cc/q78Trhw4/30384-A40-6939-4791-BA7-E-C858-B28-AAEF4.jpg)
![[Linked Image]](https://i.postimg.cc/vTmF5PsZ/99094011-7-CC6-45-A3-804-B-2-DB5-D05795-F5.jpg)
![[Linked Image]](https://i.postimg.cc/vHBbnmYt/1-E986-CFD-6-B27-4694-8531-EDB506-D60-D02.jpg)
![[Linked Image]](https://i.postimg.cc/bJpjwyVb/121941-AA-D6-E5-4-E30-920-A-65-D309473-D3-D.jpg) [img]https://i.postimg.cc/x1ZC8zLm/C4-DFF903-6049-4-C35-9-D7-B-FB8-D70419156.jpg[/img][img]https://i.postimg.cc/3xNN3B07/80-F33-EF6-CB95-4060-A6-C2-DD019834-EB4-D.jpg[/img][img]https://i.postimg.cc/jdZCV95Z/BF64598-C-D58-E-48-DE-BAF9-F7686387369-D.jpg[/img]
[img]https://i.postimg.cc/x1ZC8zLm/C4-DFF903-6049-4-C35-9-D7-B-FB8-D70419156.jpg[/img][img]https://i.postimg.cc/3xNN3B07/80-F33-EF6-CB95-4060-A6-C2-DD019834-EB4-D.jpg[/img][img]https://i.postimg.cc/jdZCV95Z/BF64598-C-D58-E-48-DE-BAF9-F7686387369-D.jpg[/img]
Posted By: larry4406
Re: Modern Bullitt build - 06/21/22 09:58 AM
Pat I am sure that was an absolute blast!
Great to see the car being used!
I am green with envy!
Posted By: 69Cuda340S
Re: Modern Bullitt build - 06/23/22 05:38 PM
Great pics of the power tour. Glad to hear it went reasonably well. Couple issues with the cars but now that those are worked out probably smoother sailing going forward.
Posted By: Keepat
Re: Modern Bullitt build - 07/08/22 11:52 PM
Received a couple of cool poster of the cars on the power tour. One of the drivers looks mentally unstable;-)
![[Linked Image]](https://i.postimg.cc/wBB36h5d/D830-B302-5-B0-C-403-A-8-FE7-2-E132-B91-F8-C0.jpg)
![[Linked Image]](https://i.postimg.cc/T30pMkD9/49-B4-F051-C032-48-A6-B879-184-A974-DE4-E3.jpg)
Posted By: larry4406
Re: Modern Bullitt build - 07/09/22 02:21 PM
Very cool Pat! You are infamous now!
Posted By: DynoDave
Re: Modern Bullitt build - 08/04/22 08:38 PM
That is awesome Pat! Memories for a lifetime for sure.
Posted By: rdrnr6970
Re: Modern Bullitt build - 08/04/22 10:43 PM
Very,very cool!
Posted By: 69Cuda340S
Re: Modern Bullitt build - 08/07/22 01:19 AM
Love the posters!


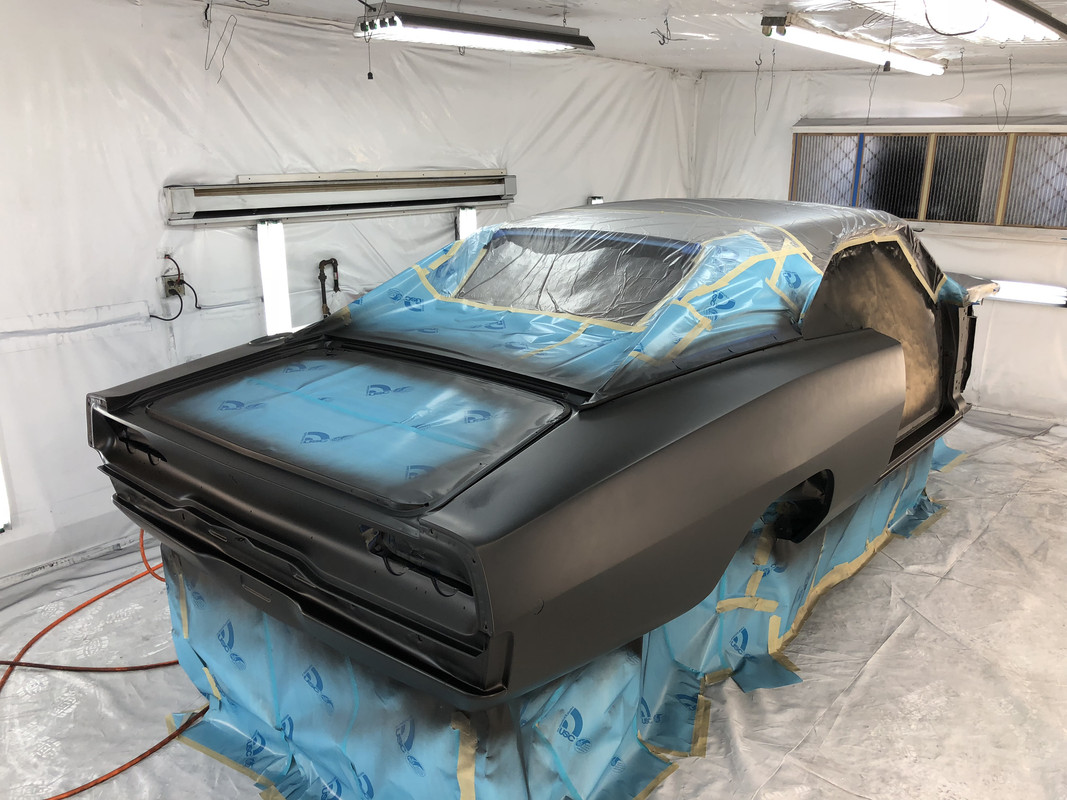
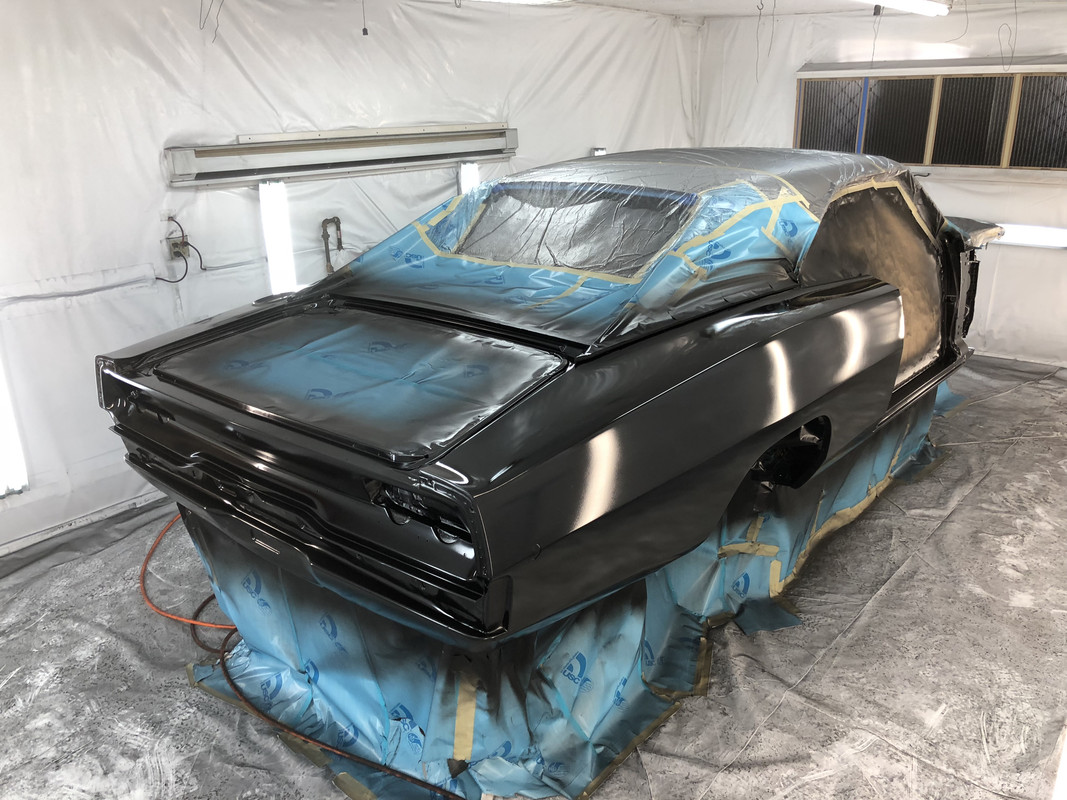
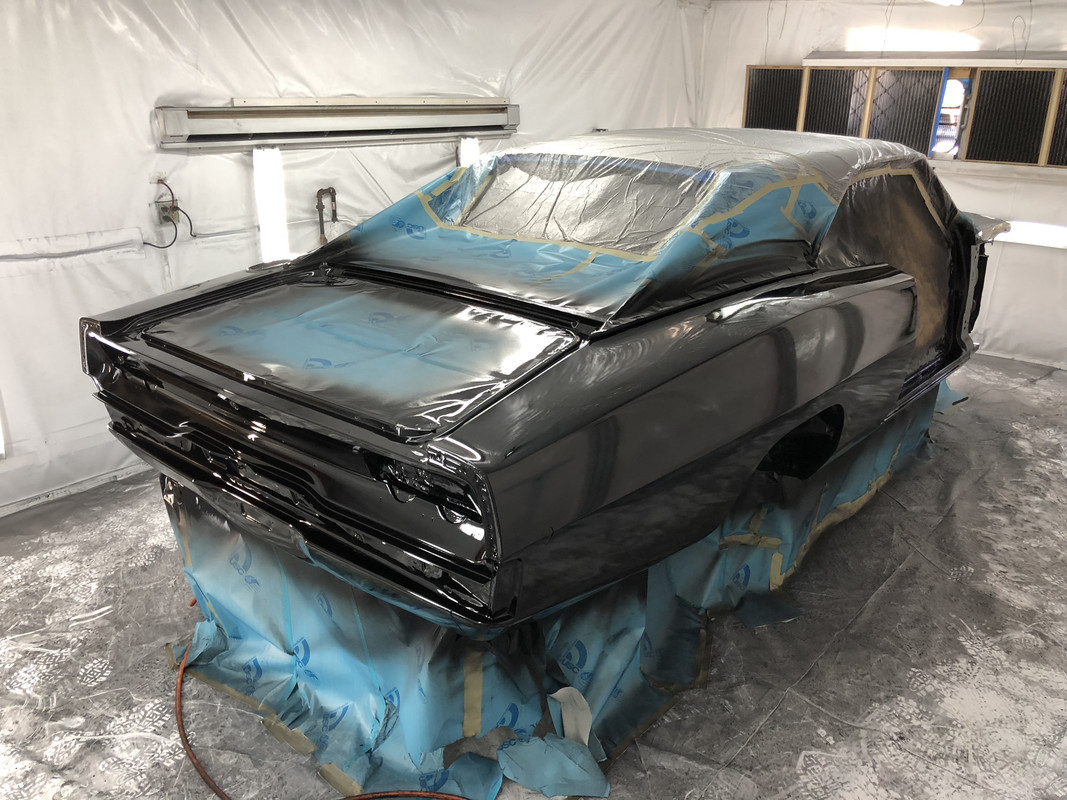
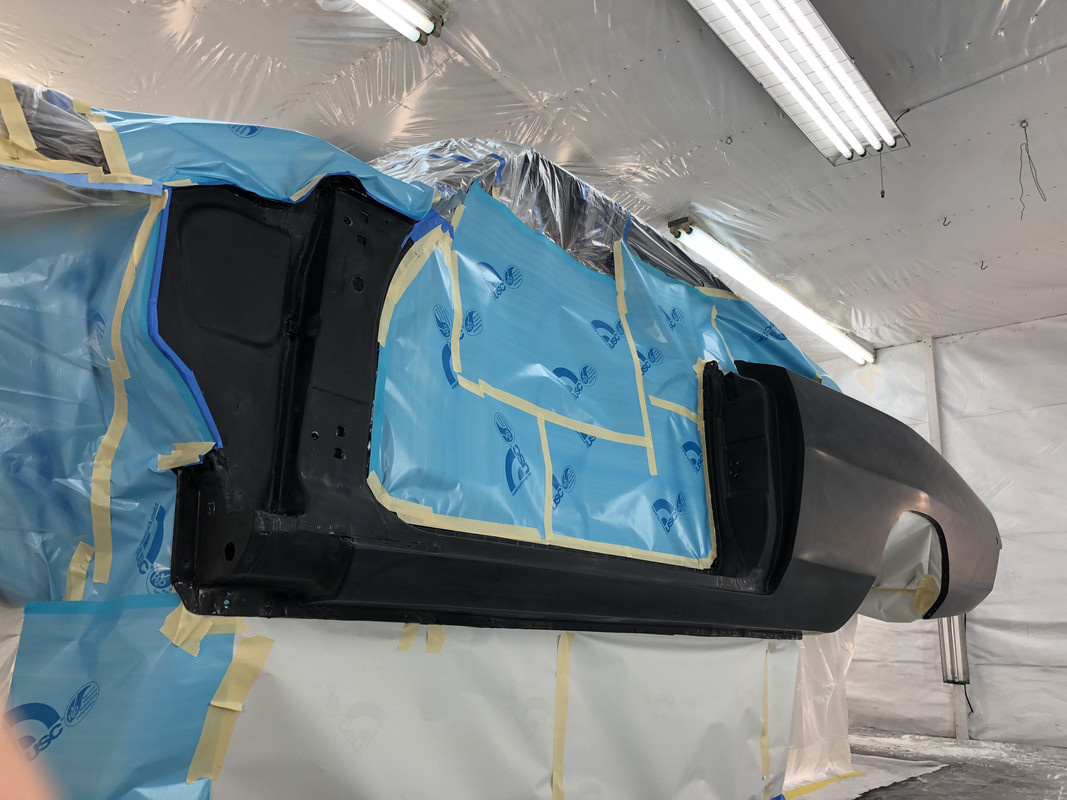
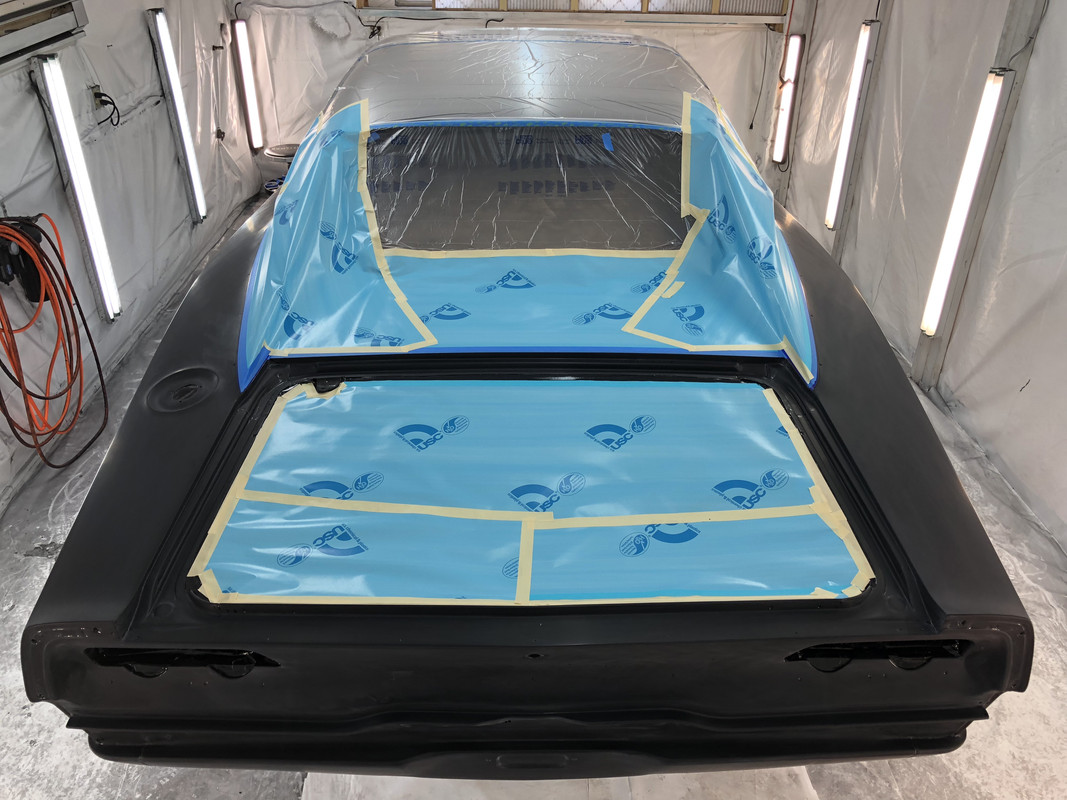
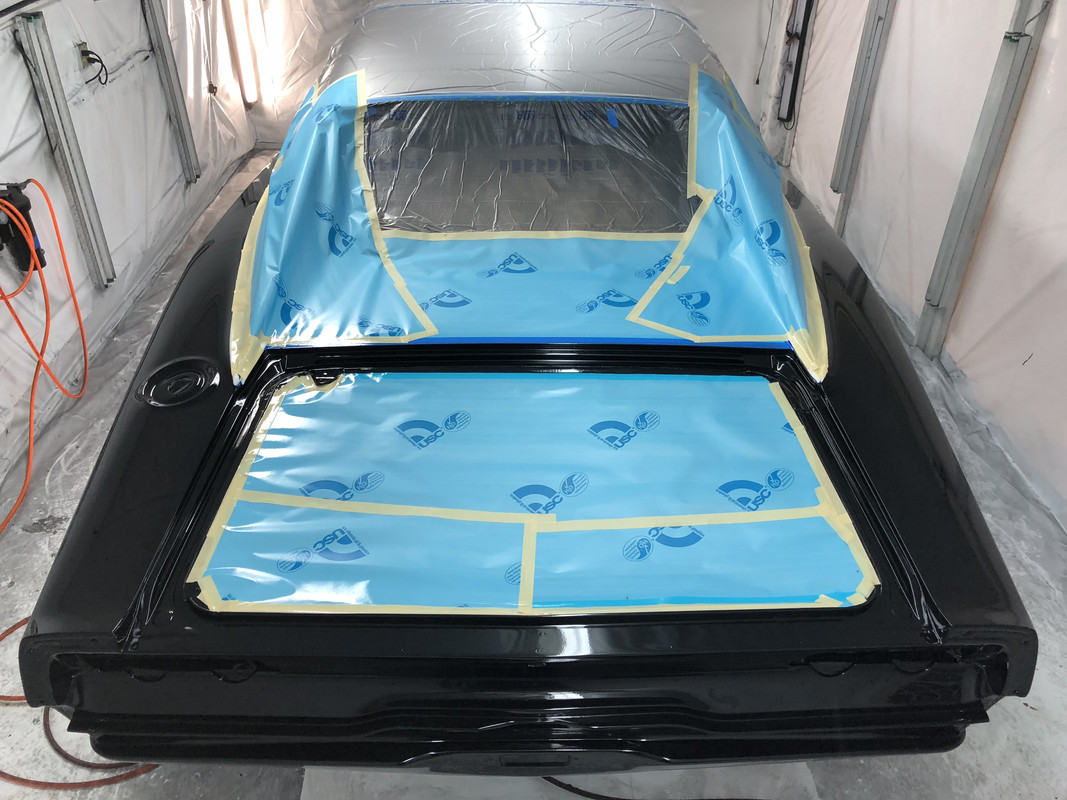
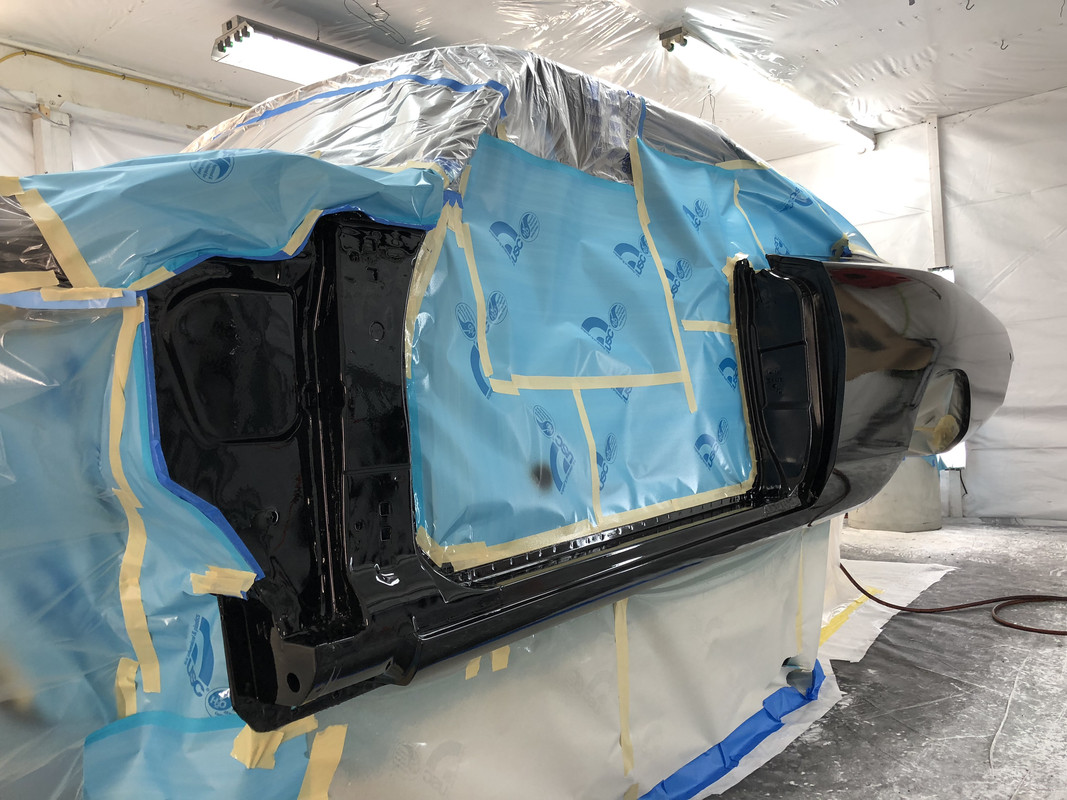
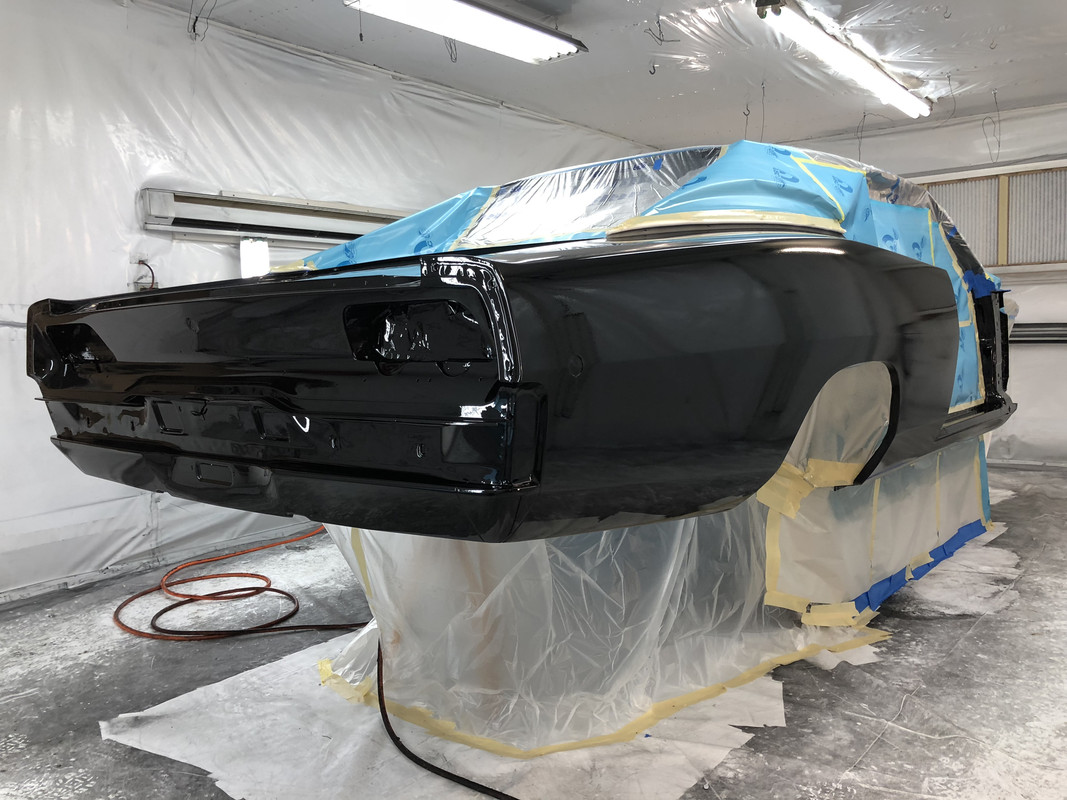
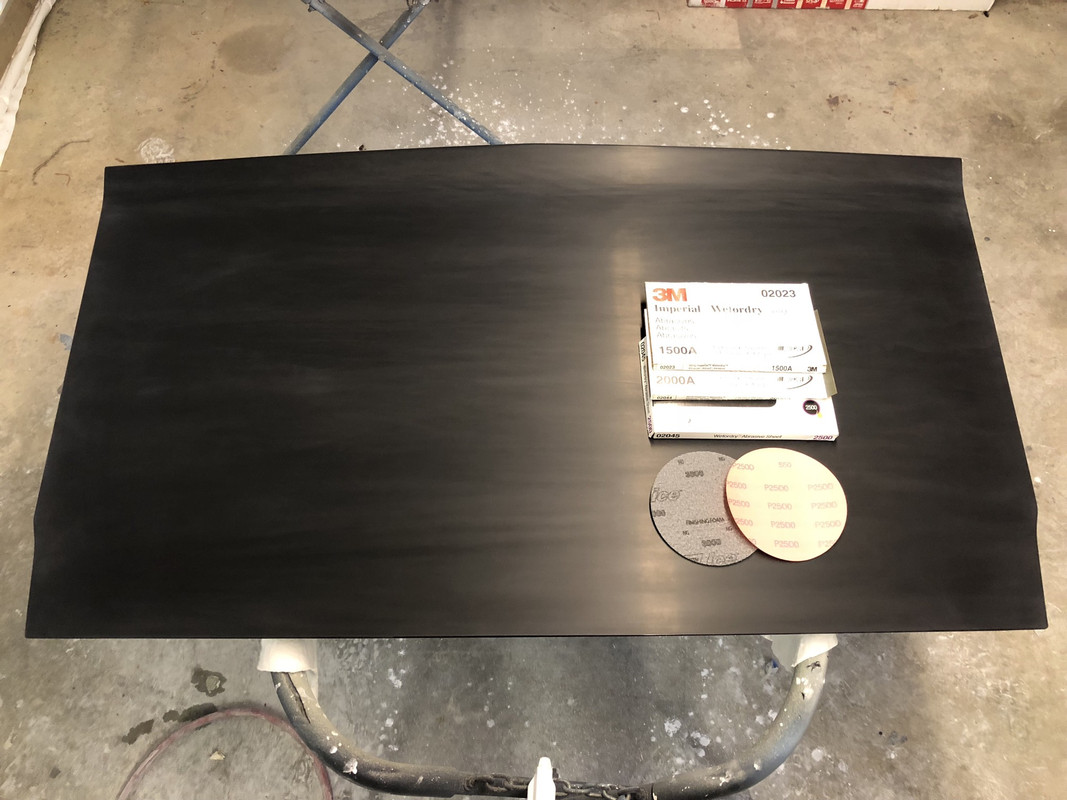

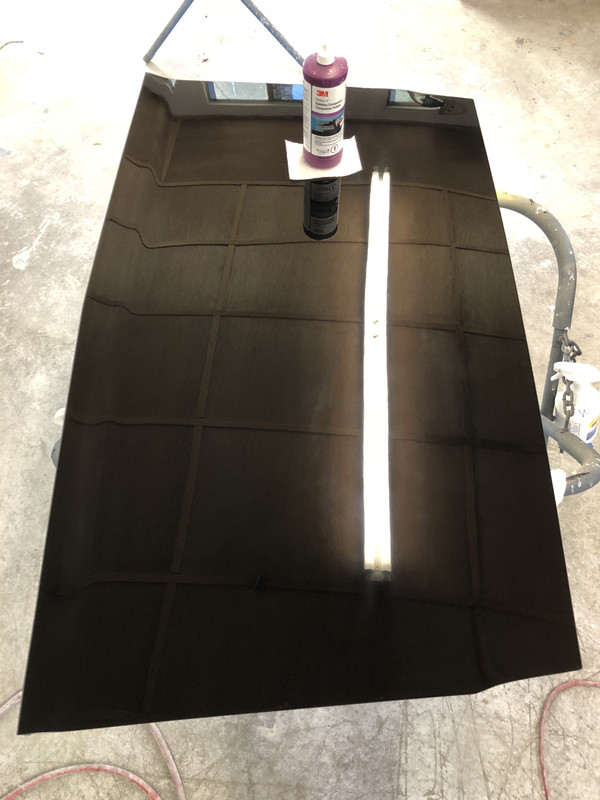
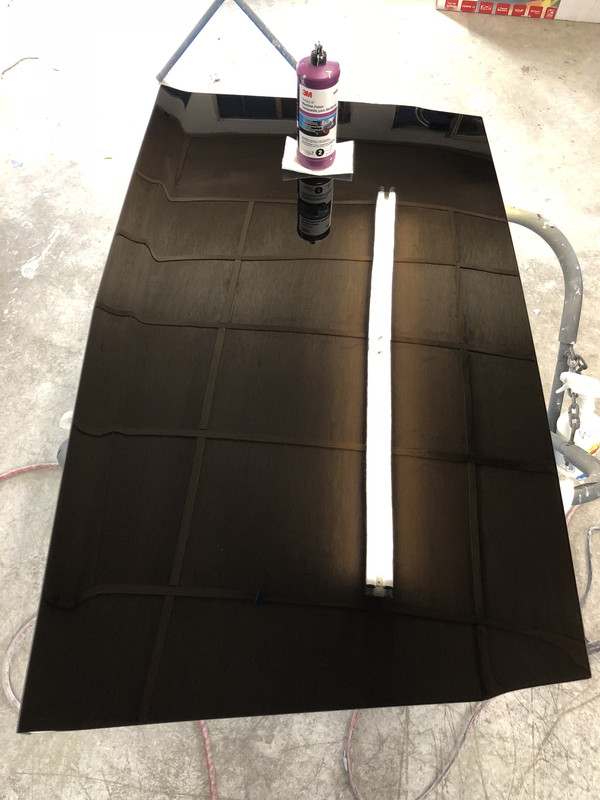
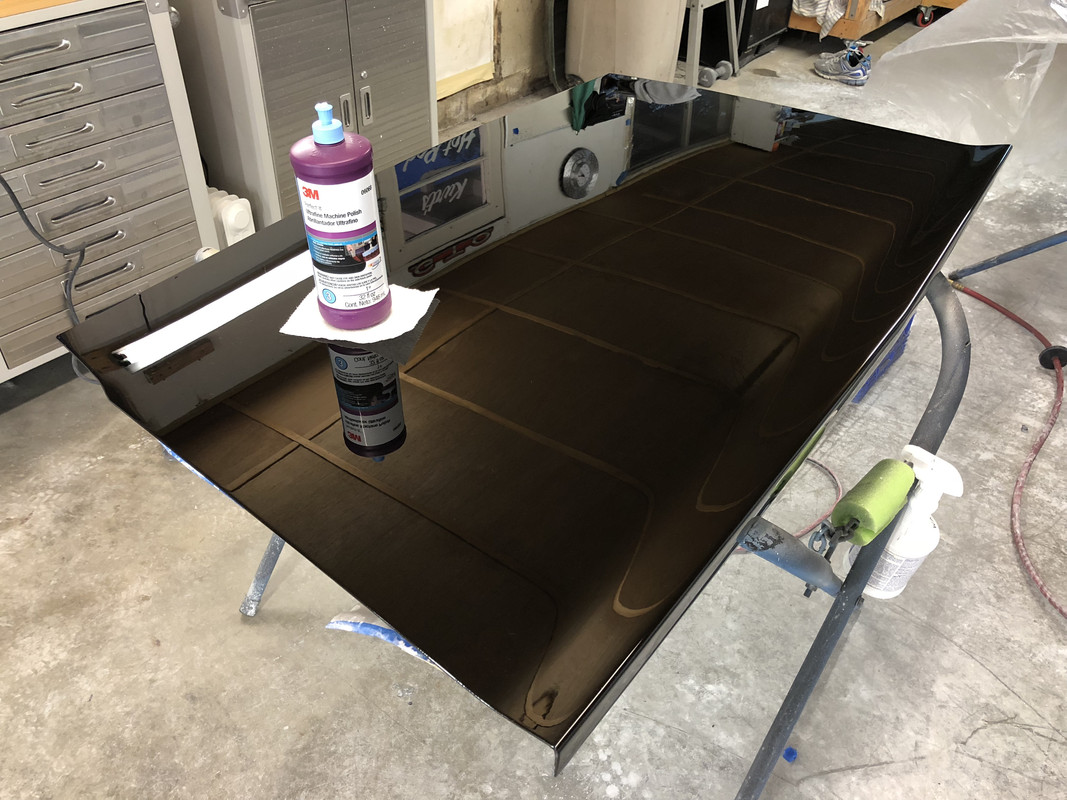
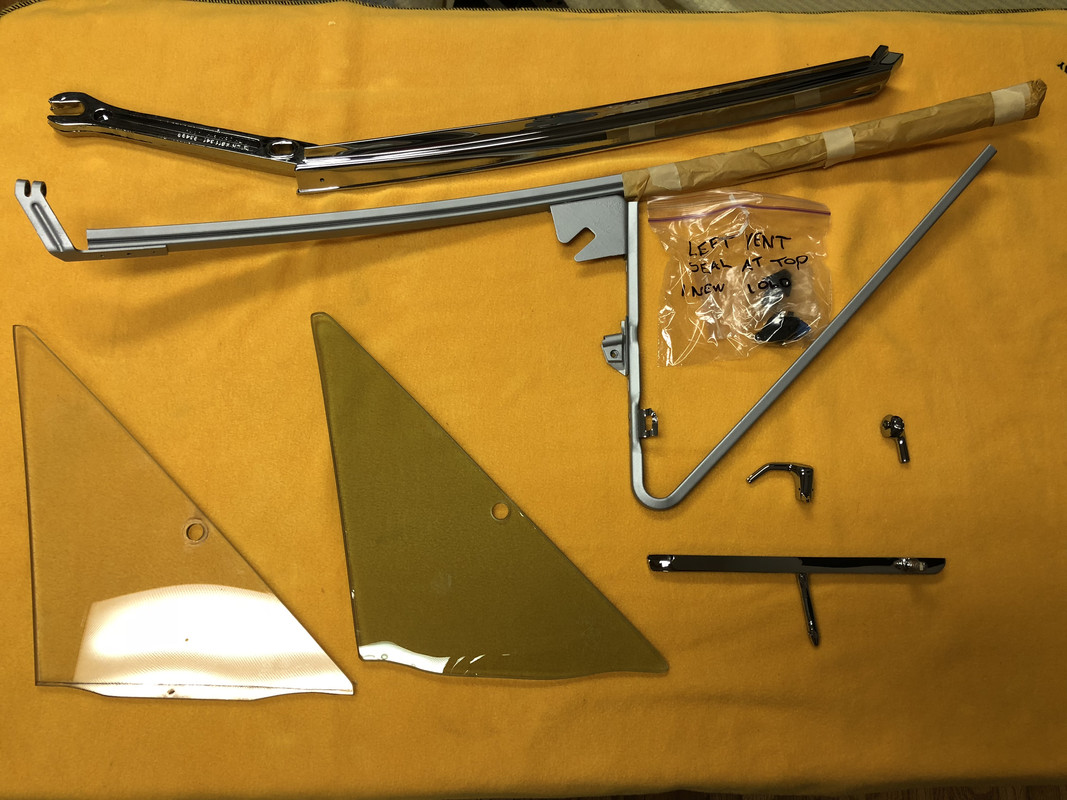
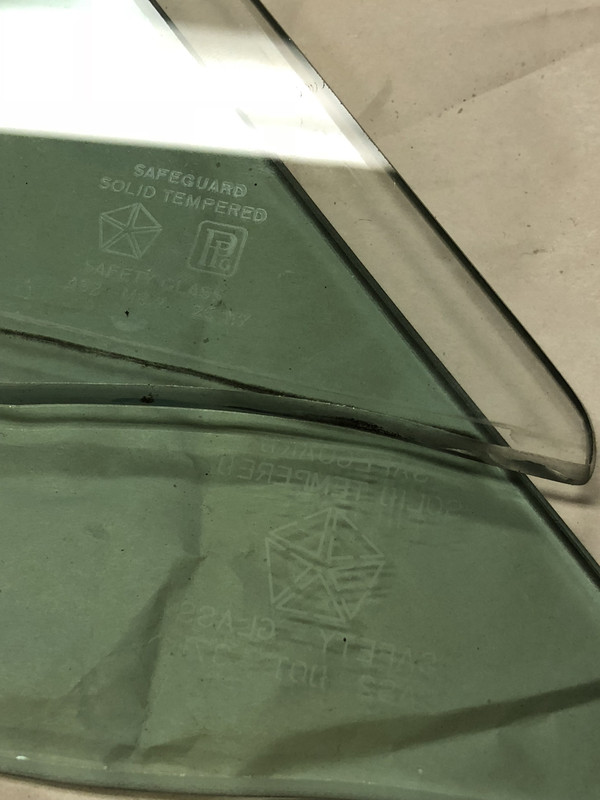
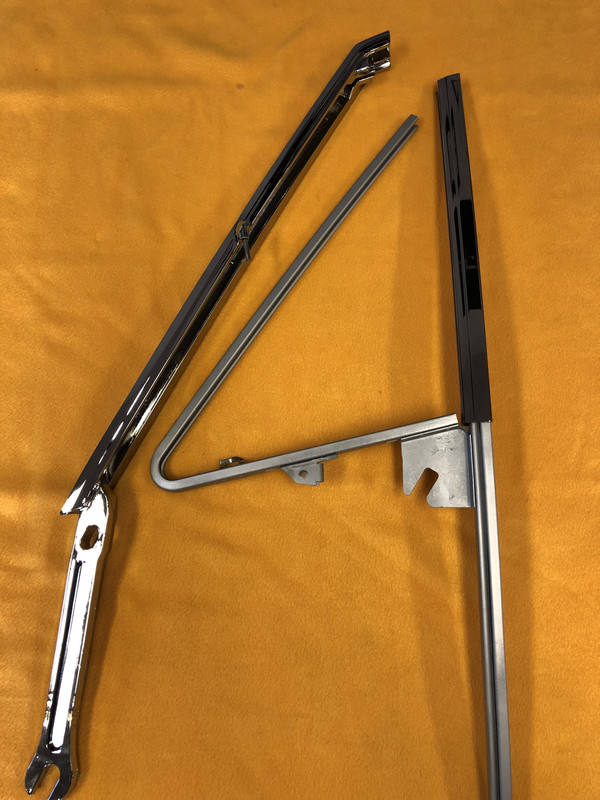
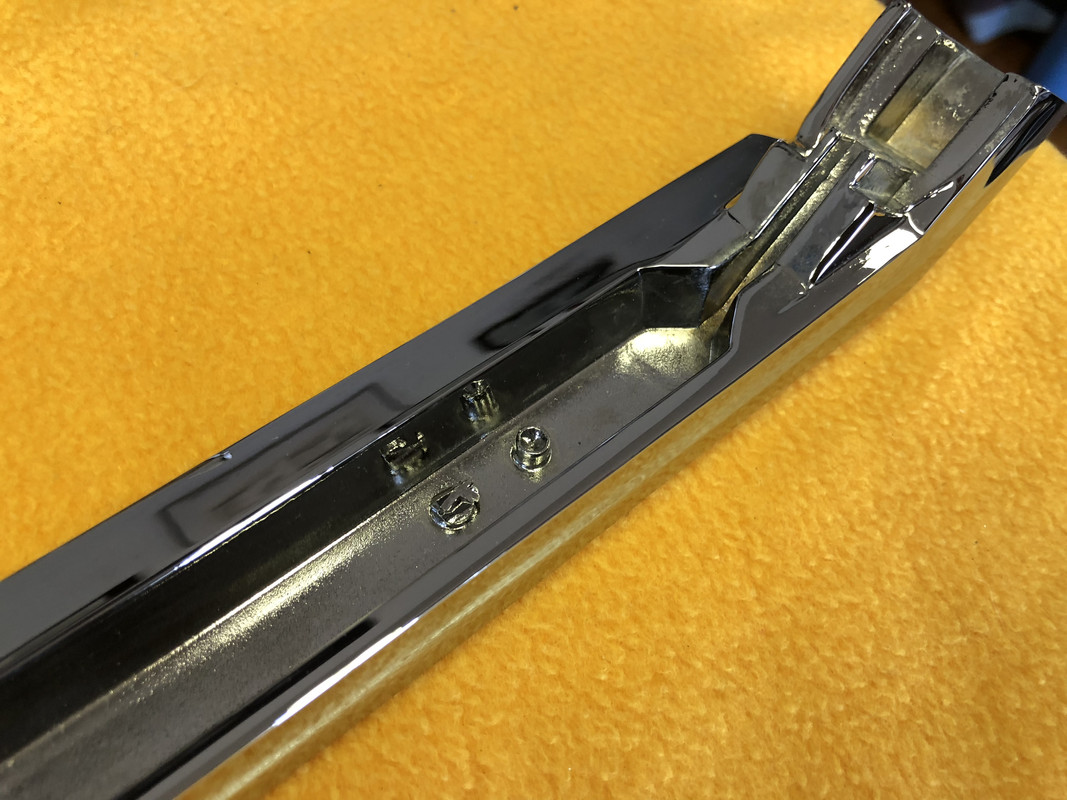
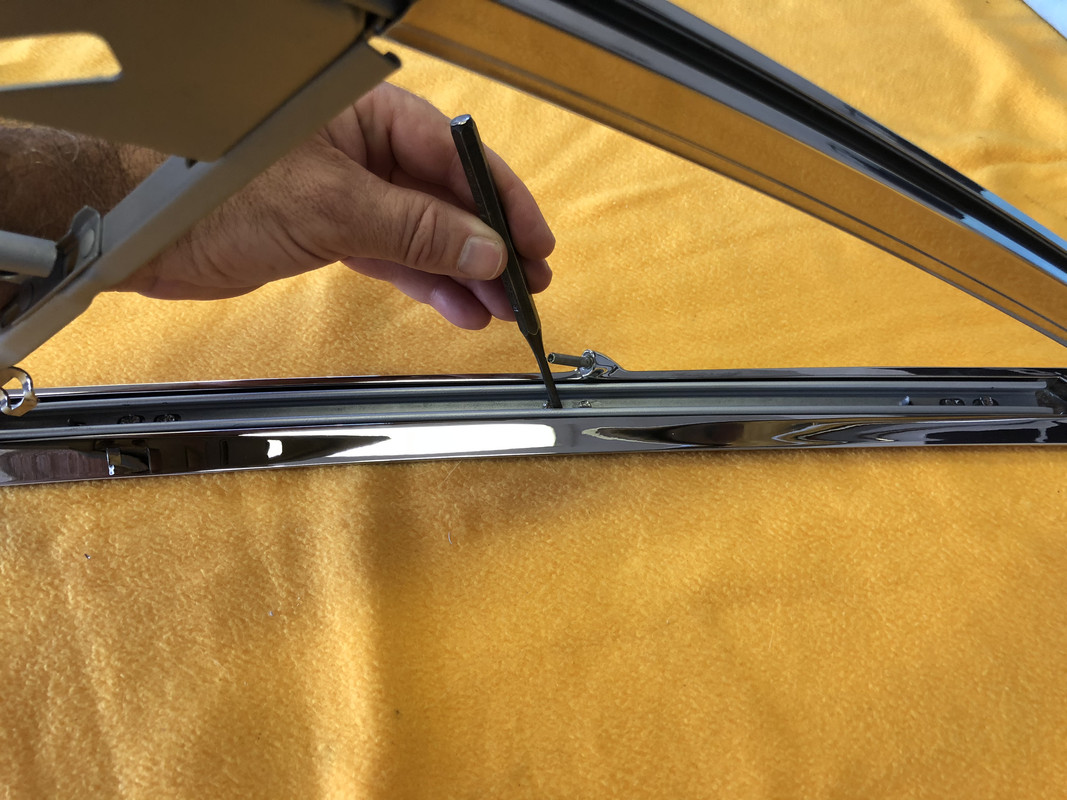
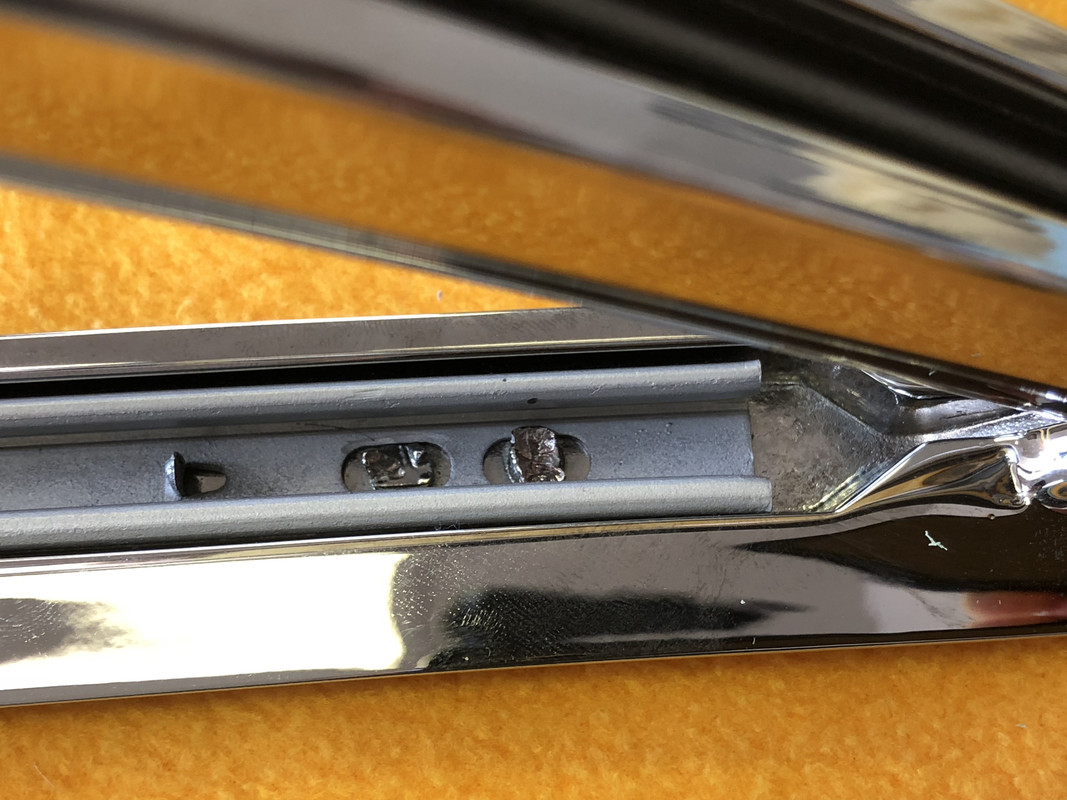
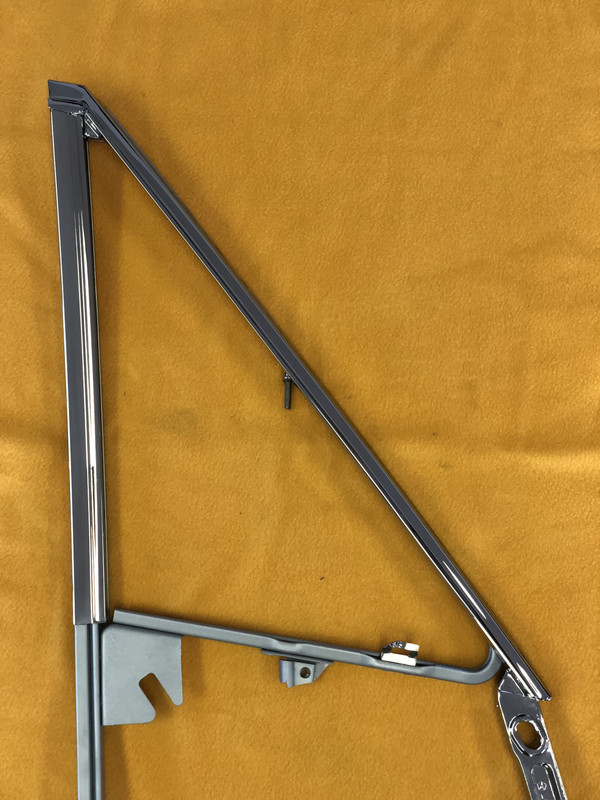
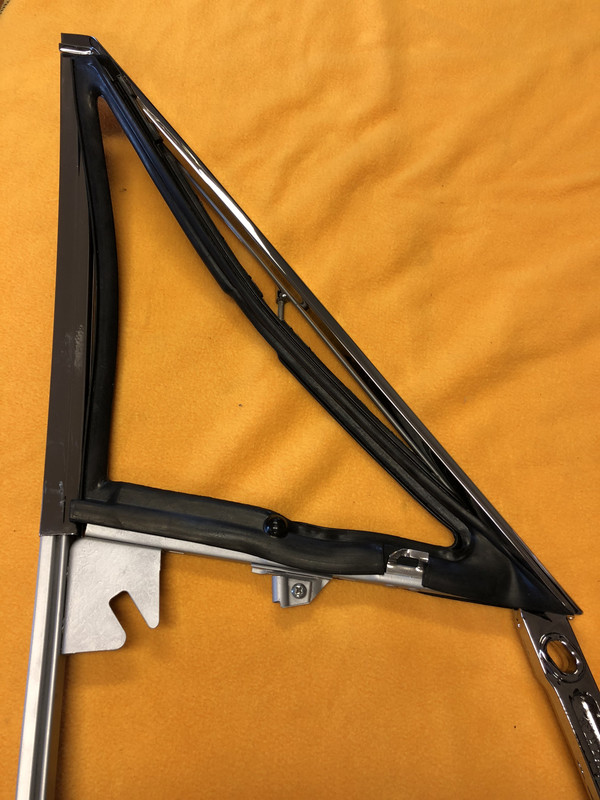
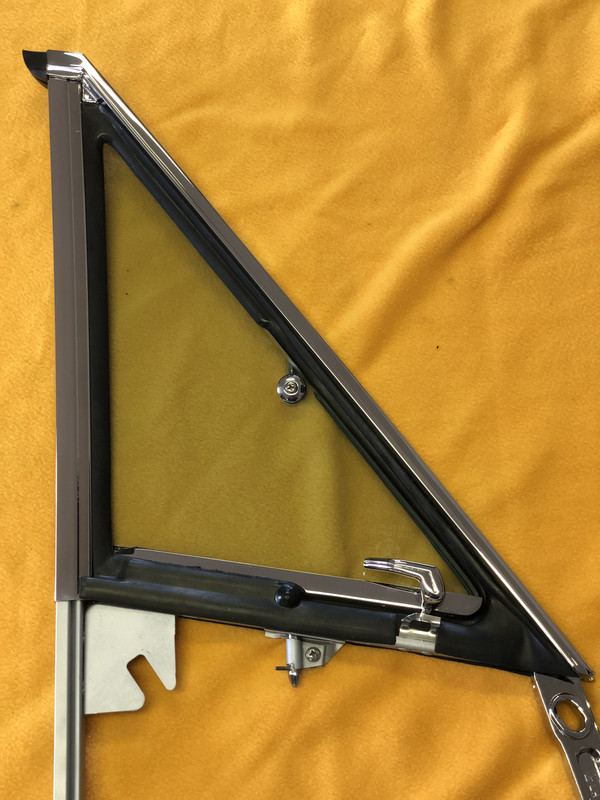

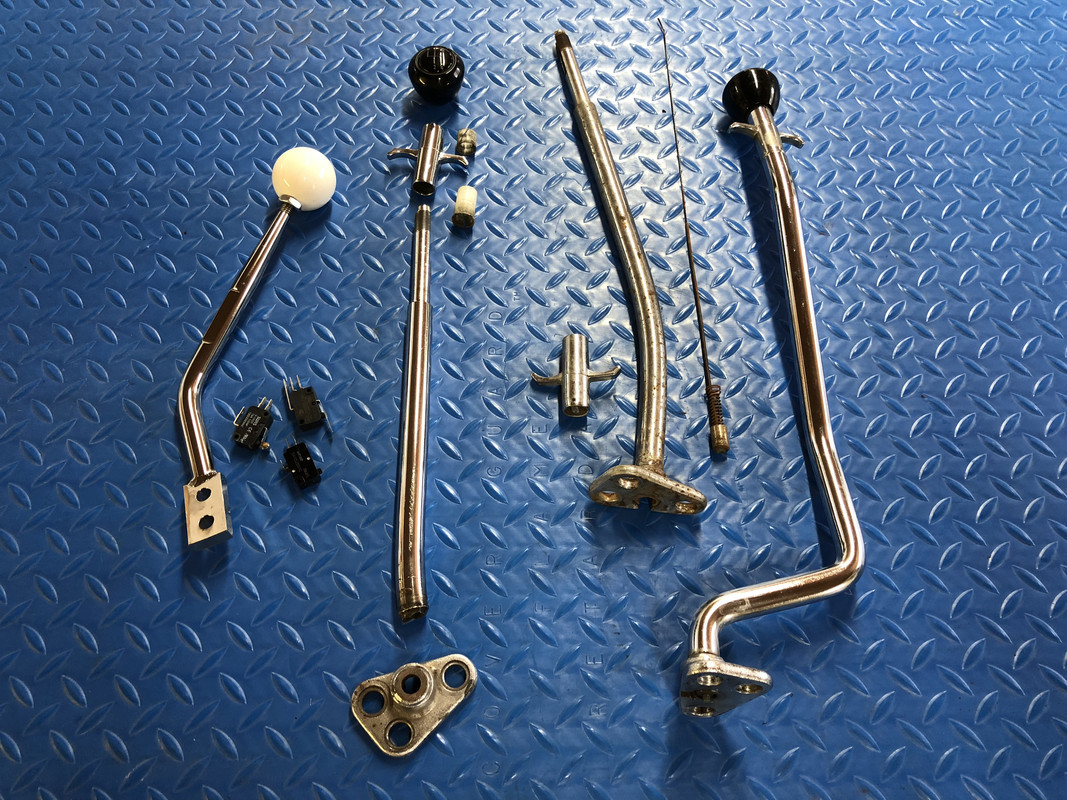
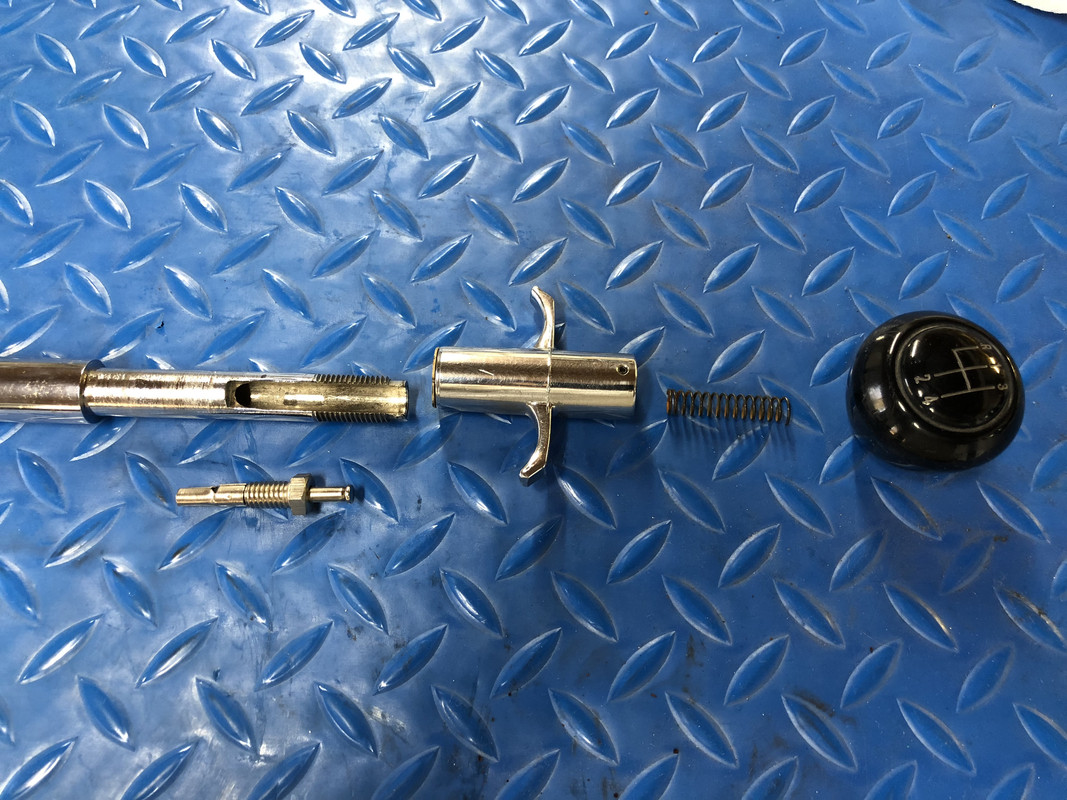
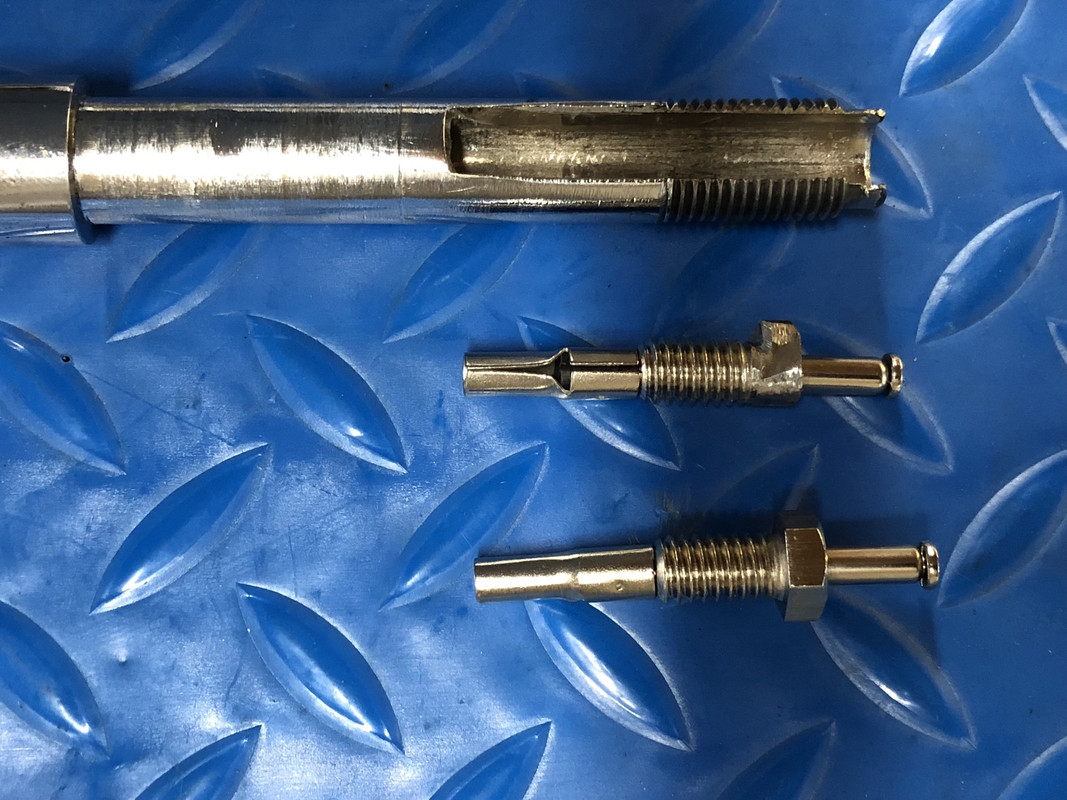


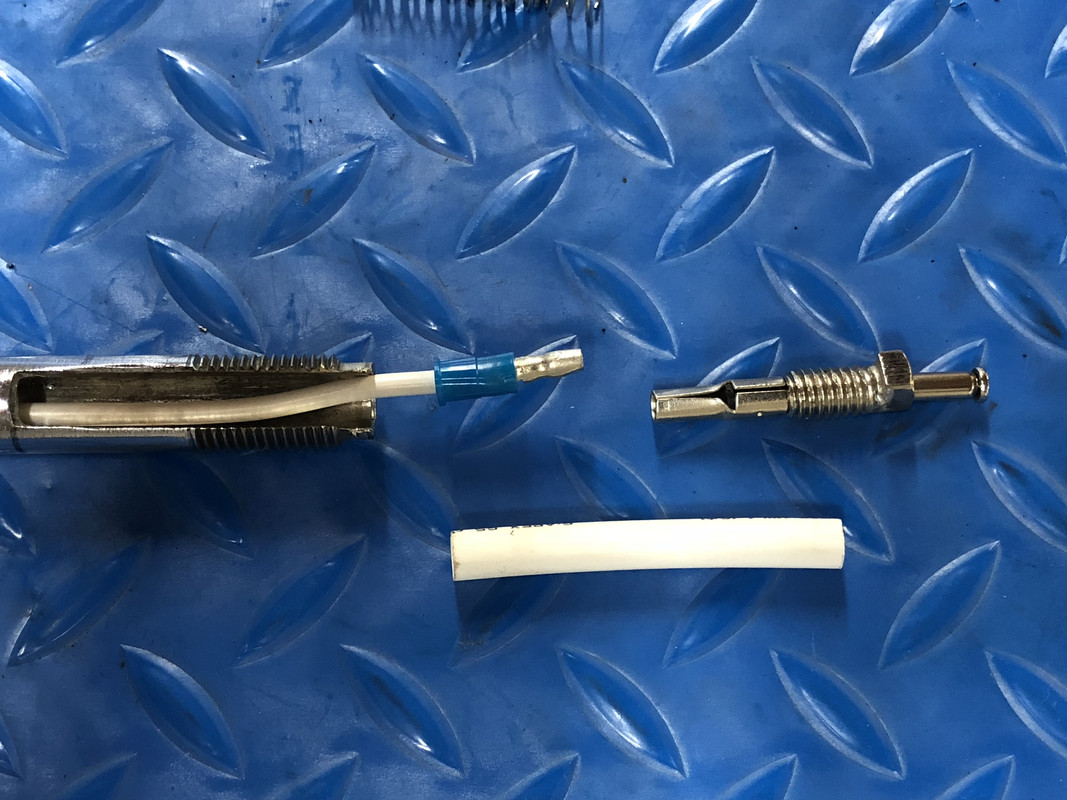
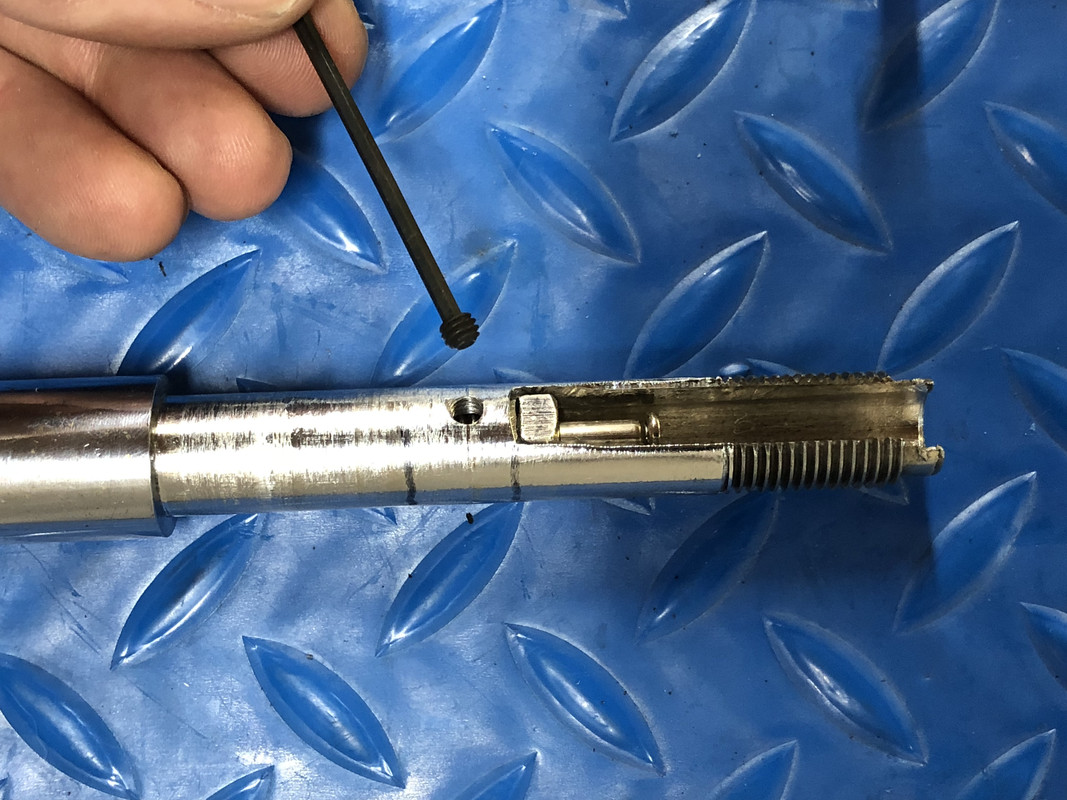
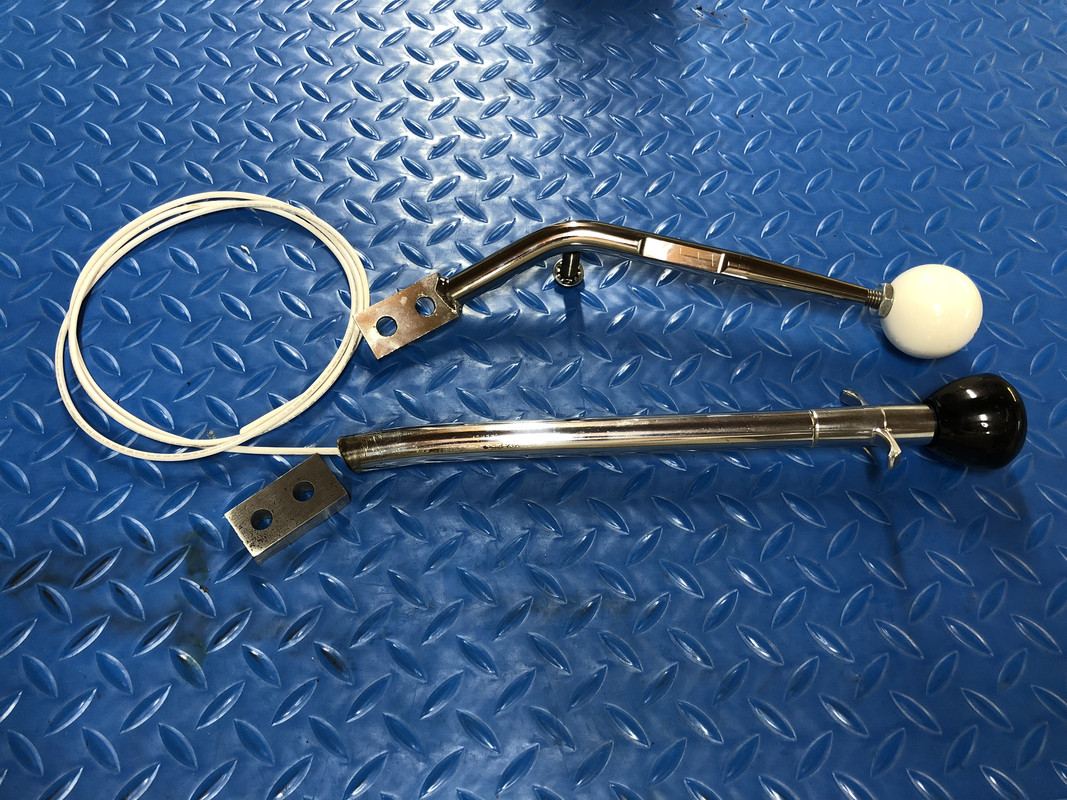
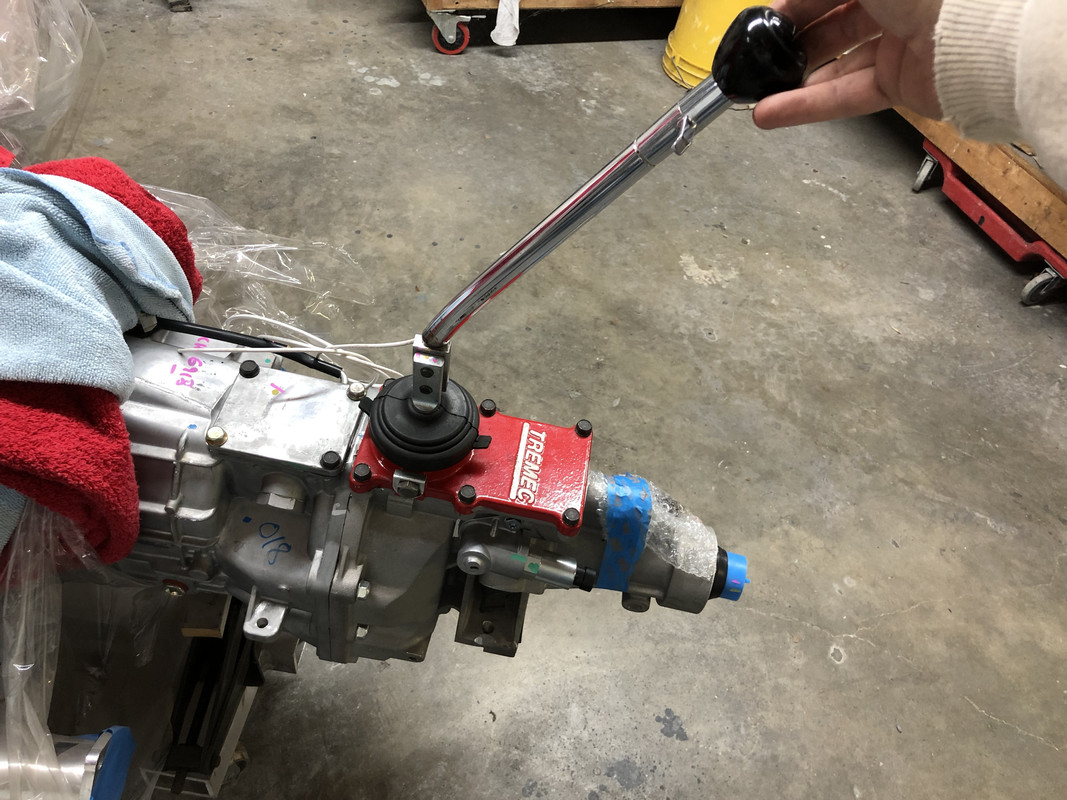
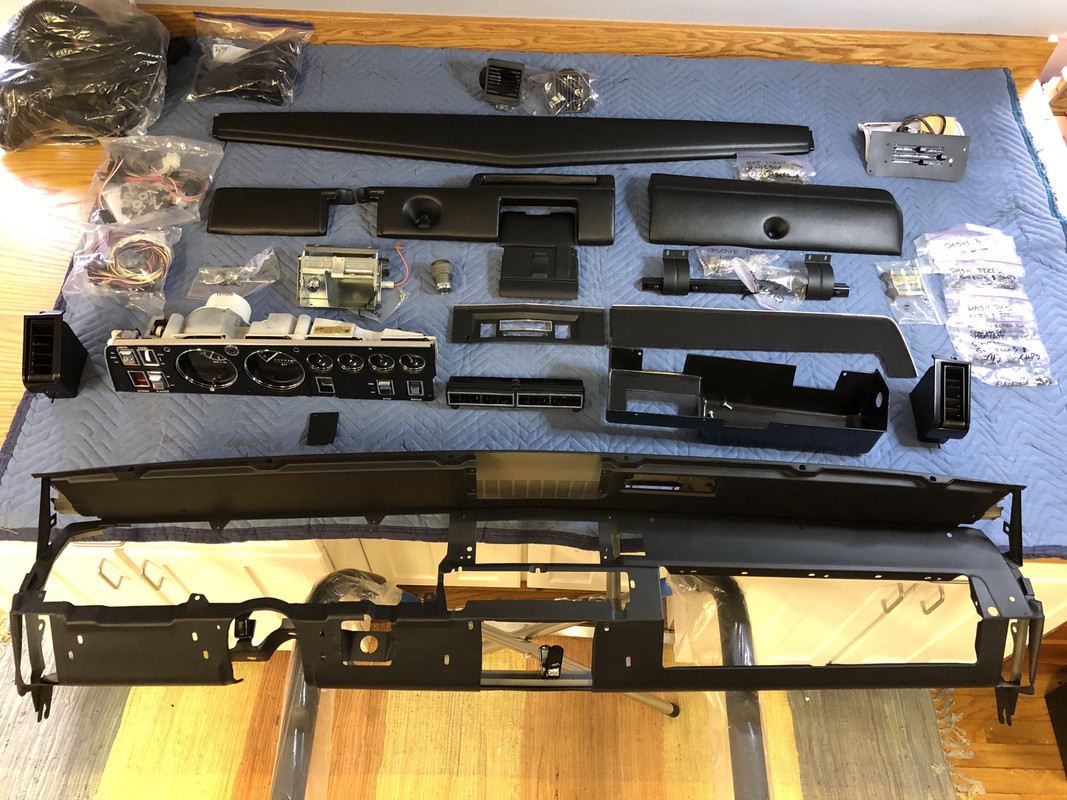
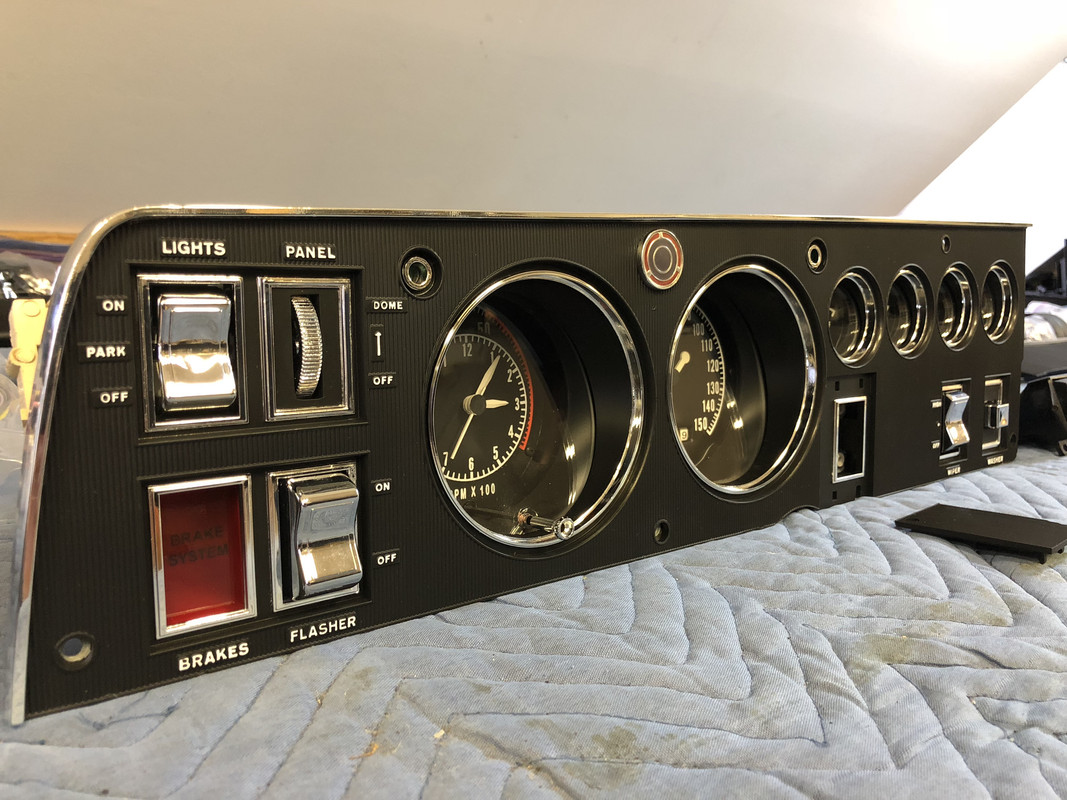

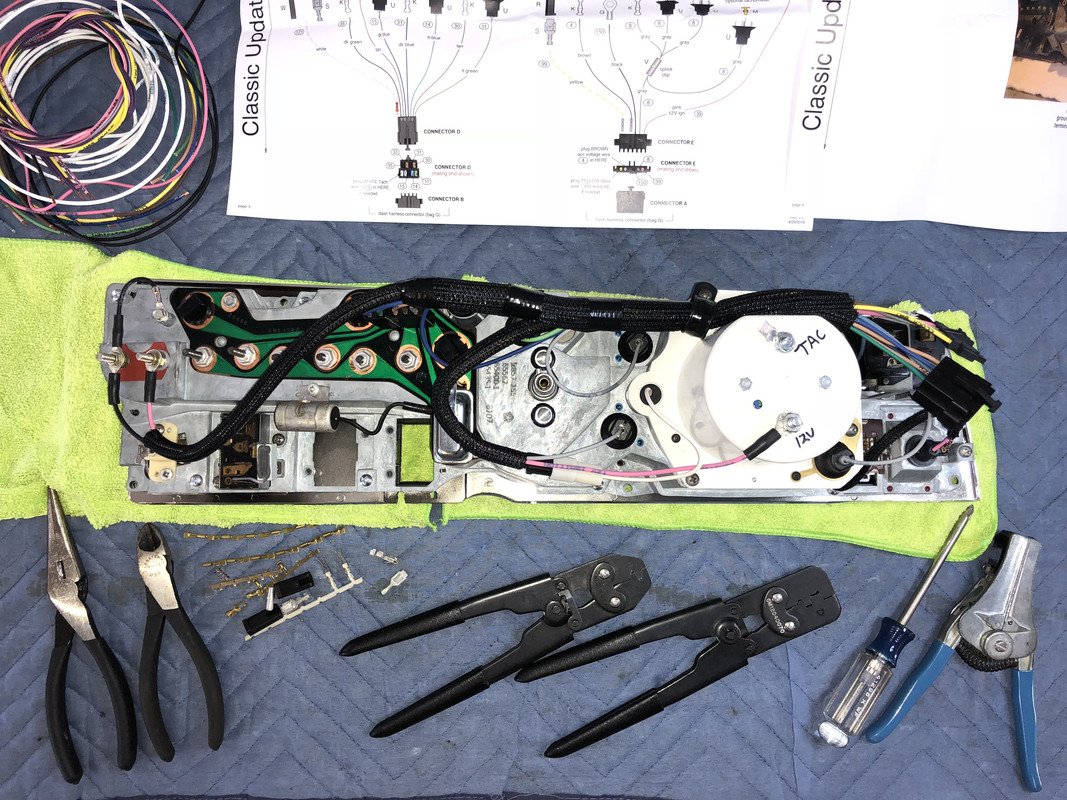
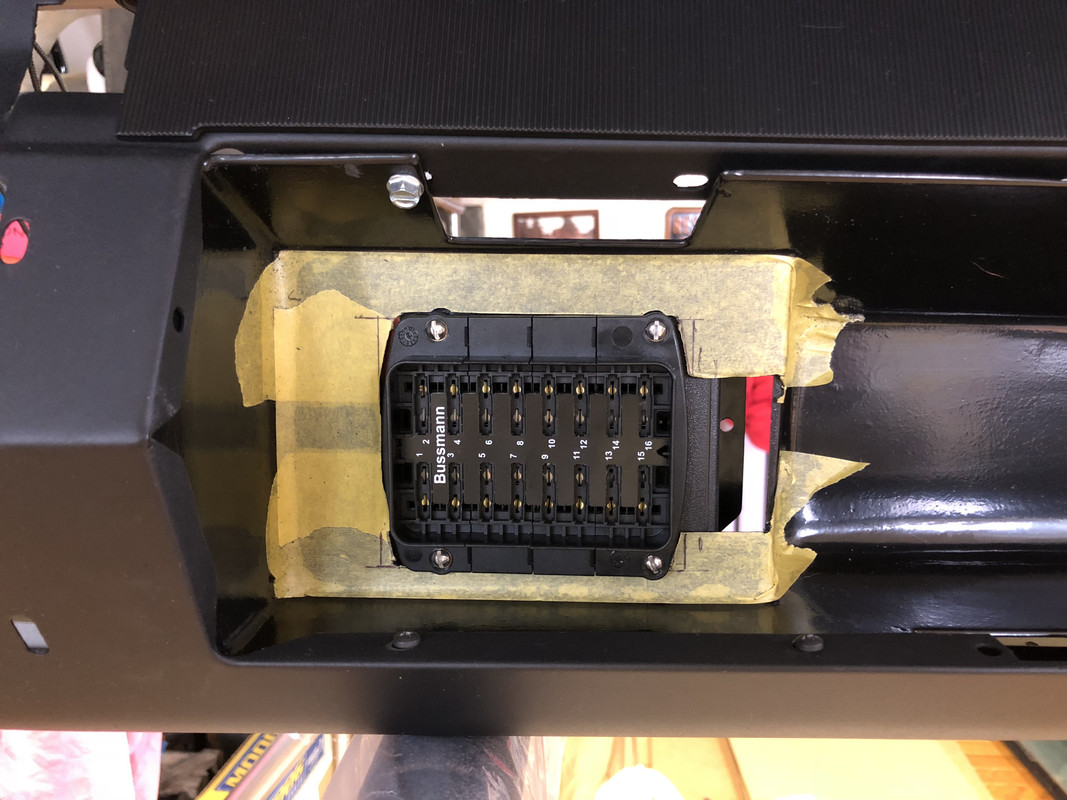
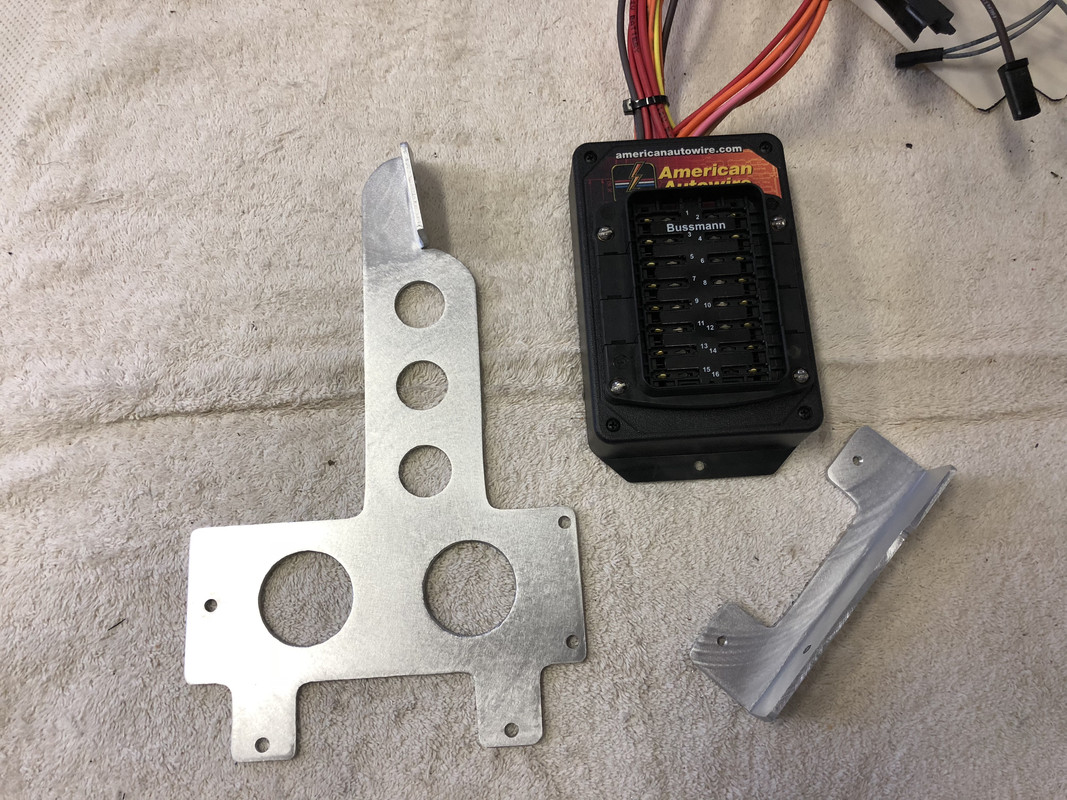
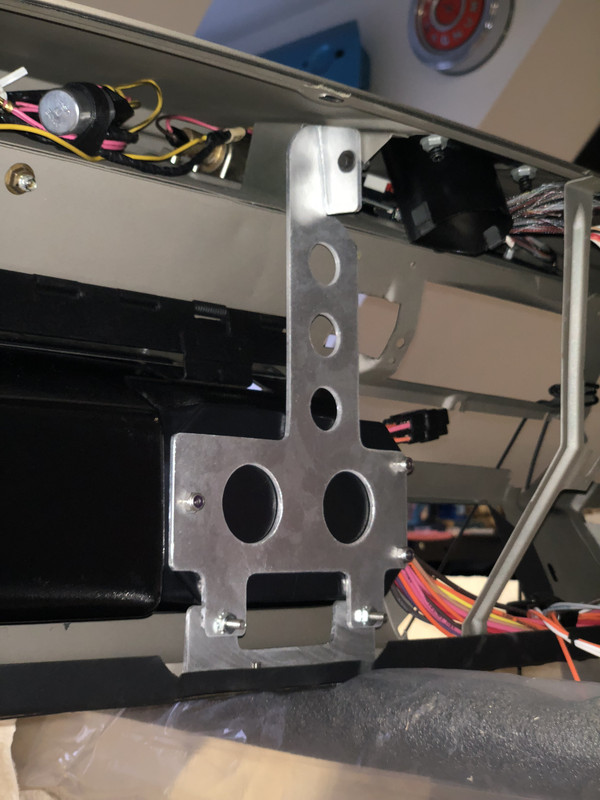
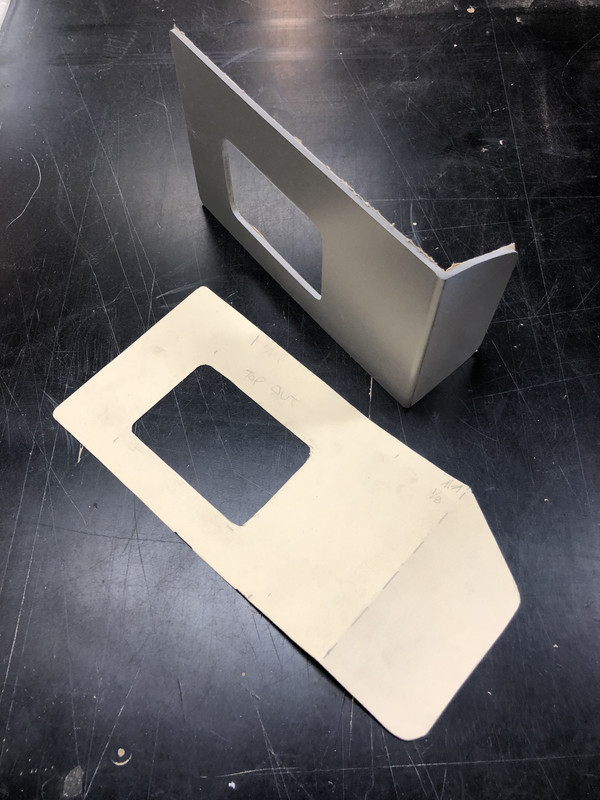

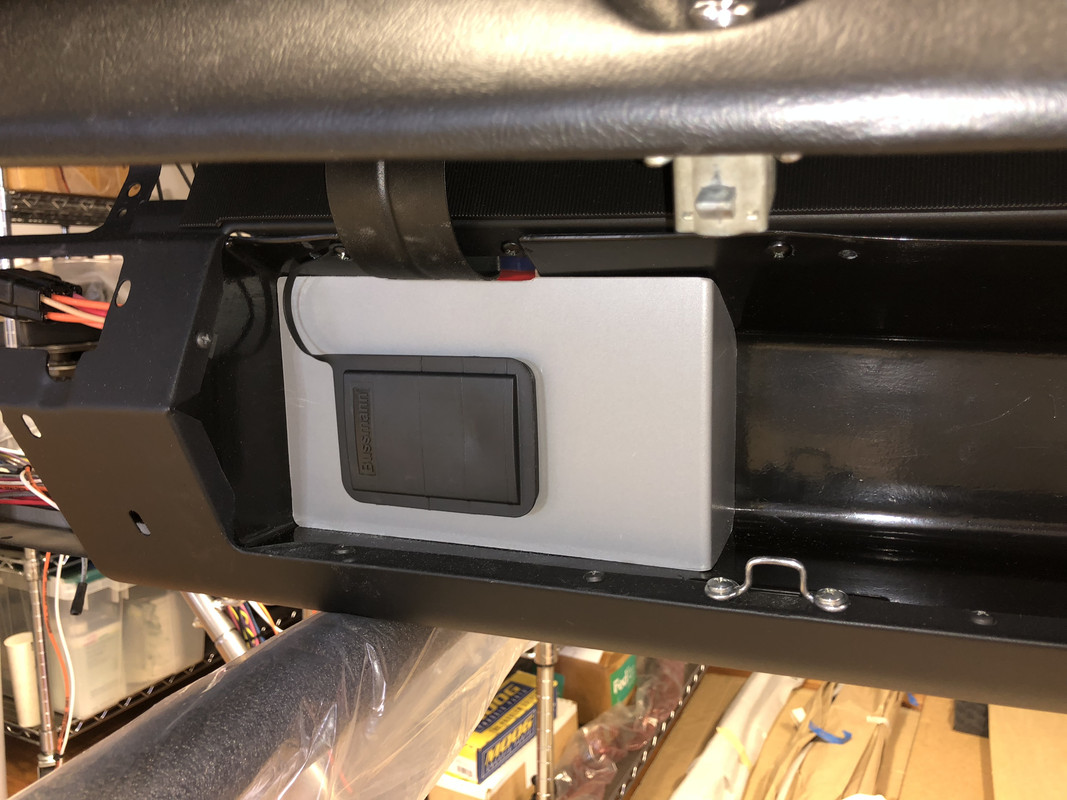
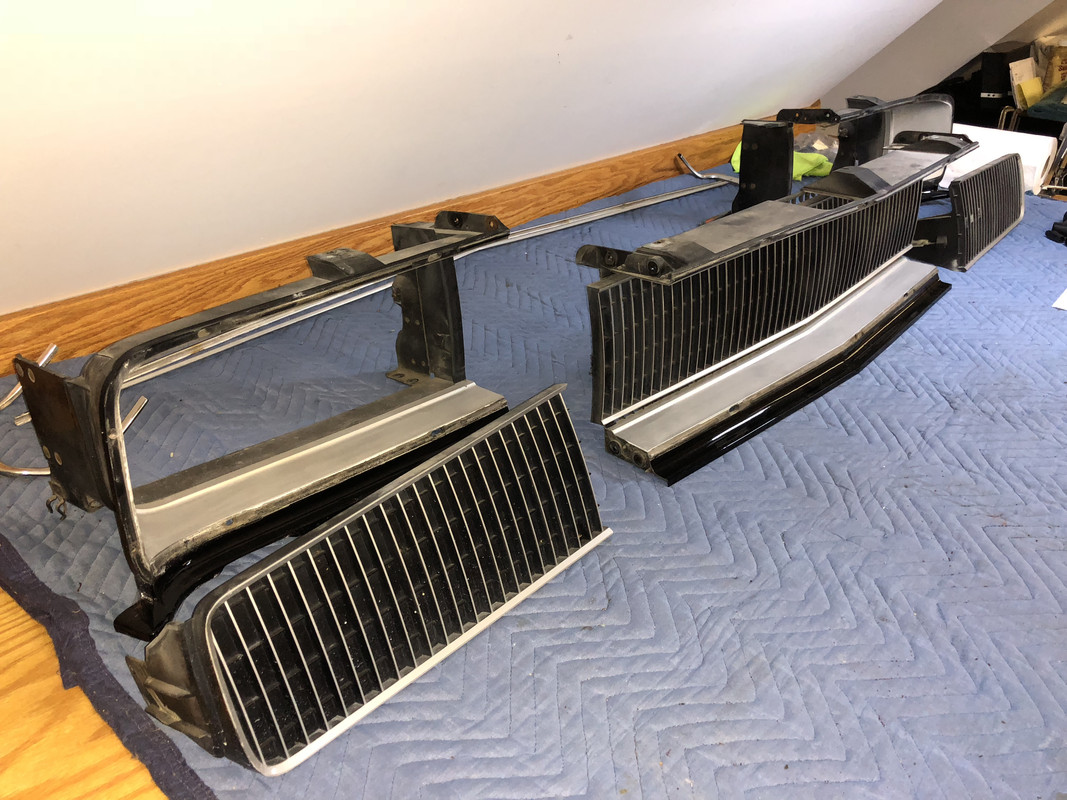
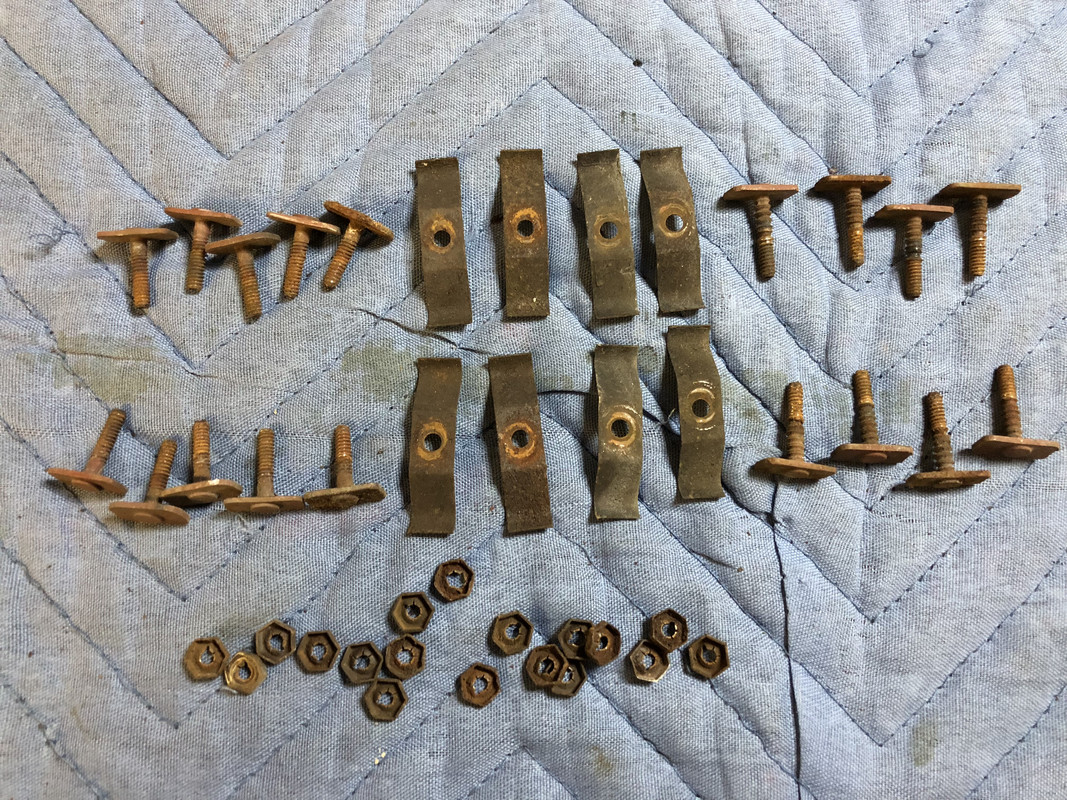
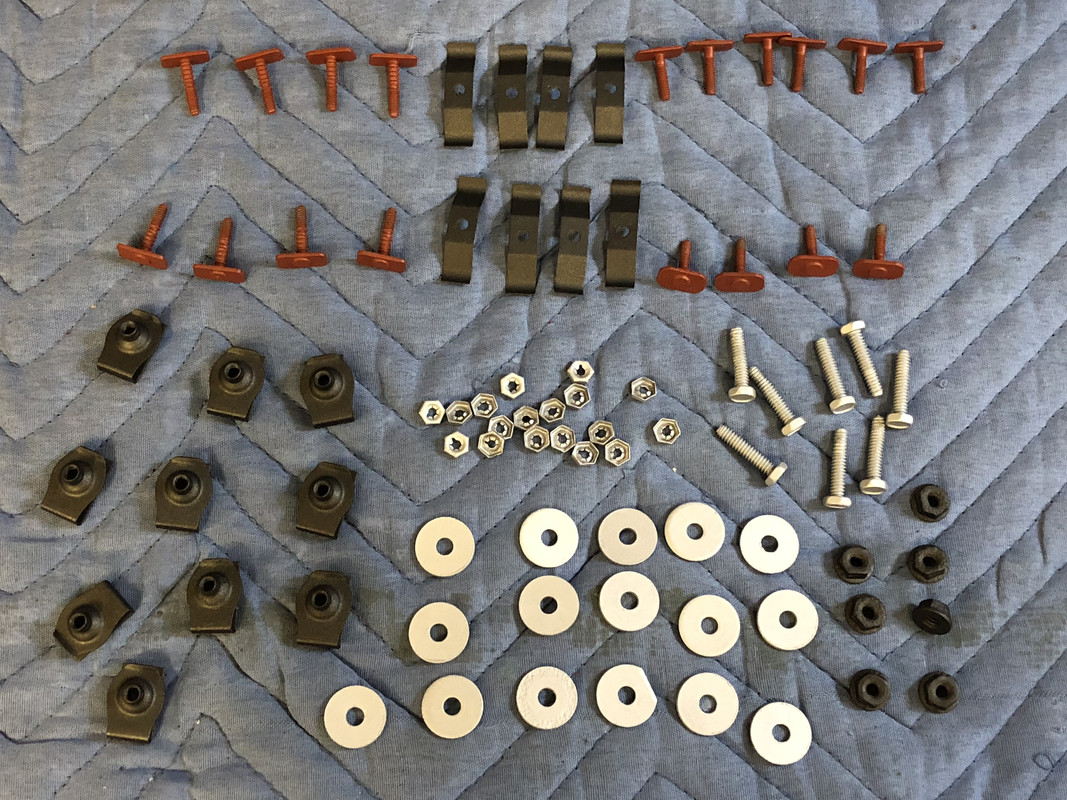

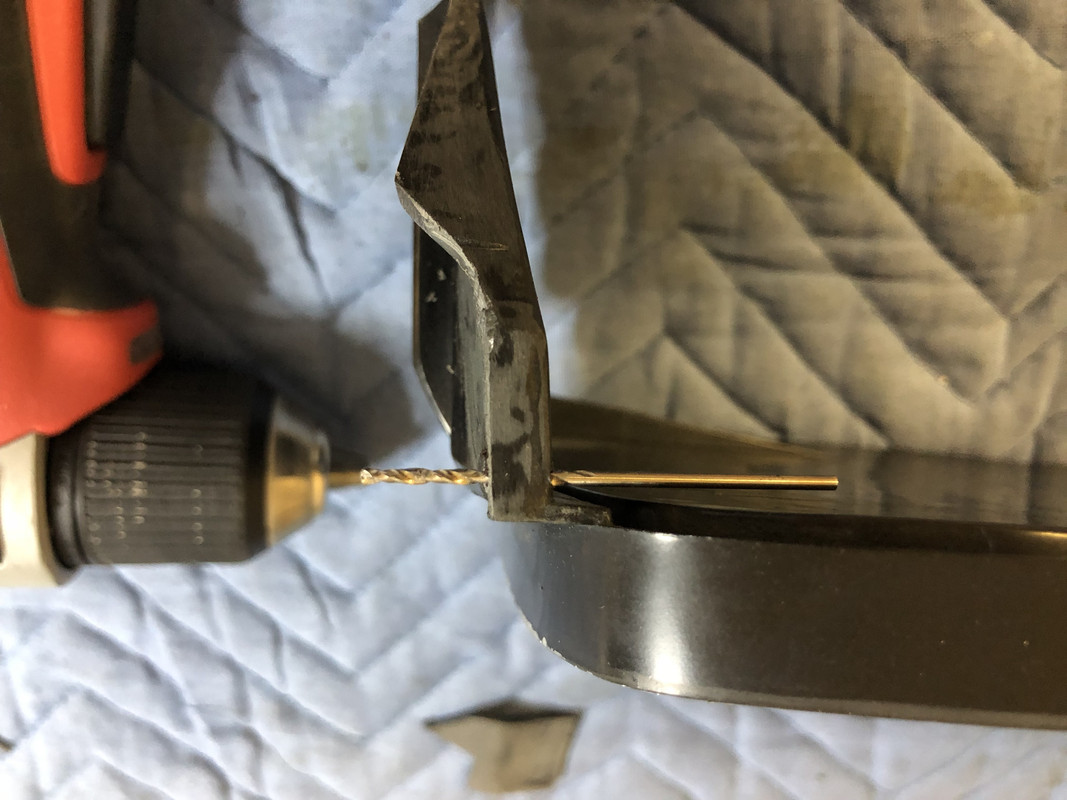
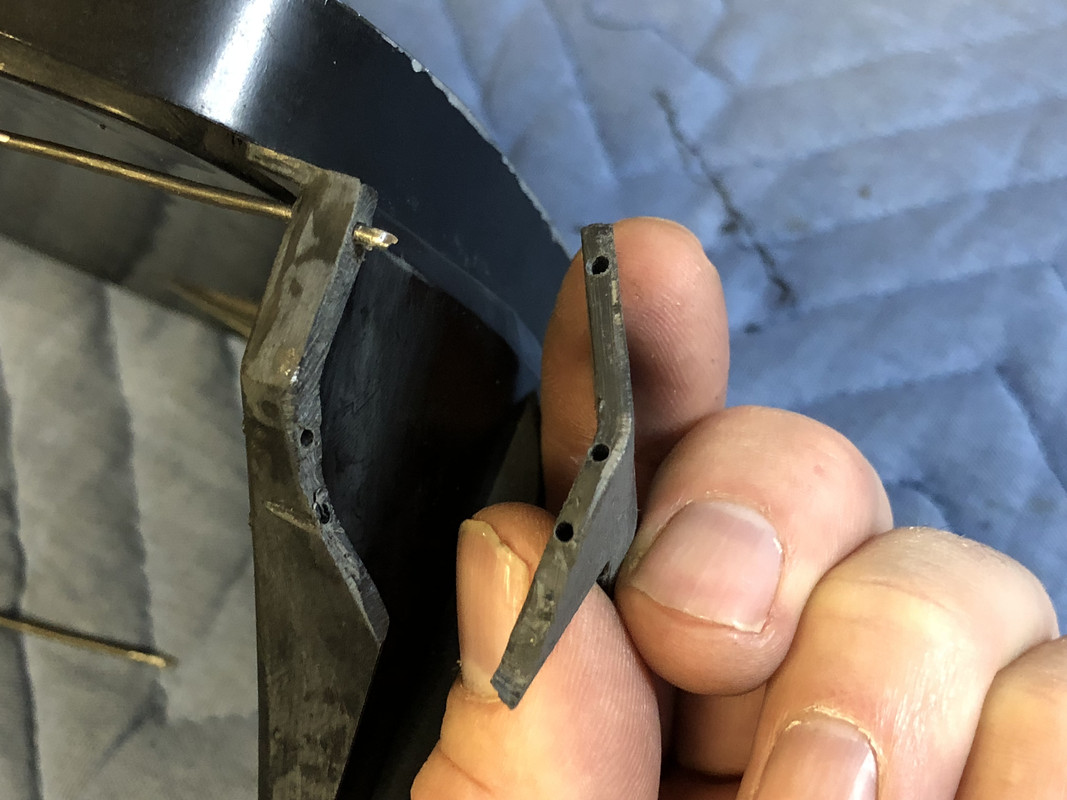

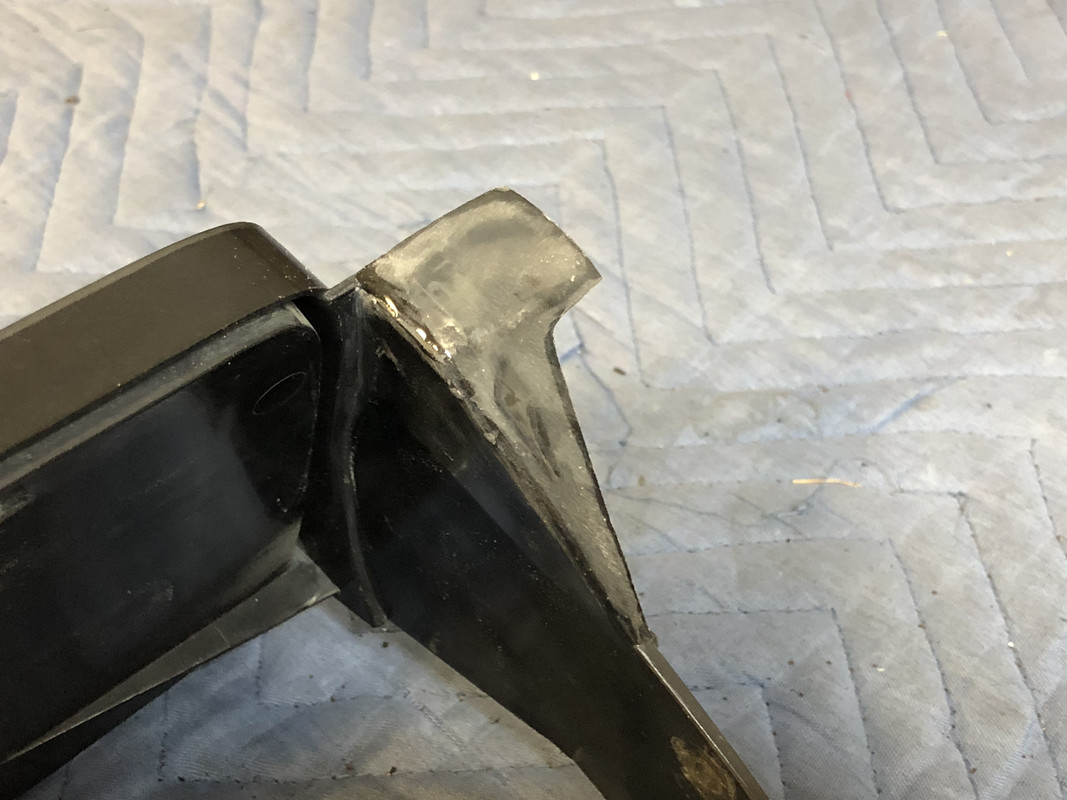
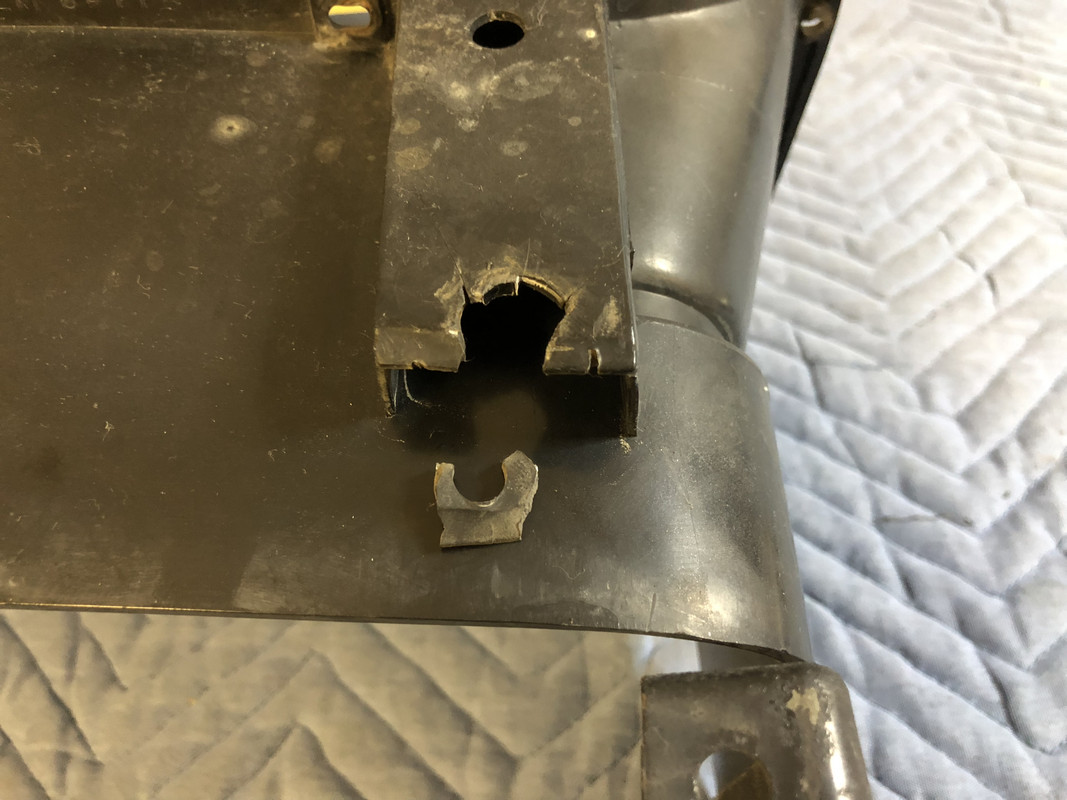
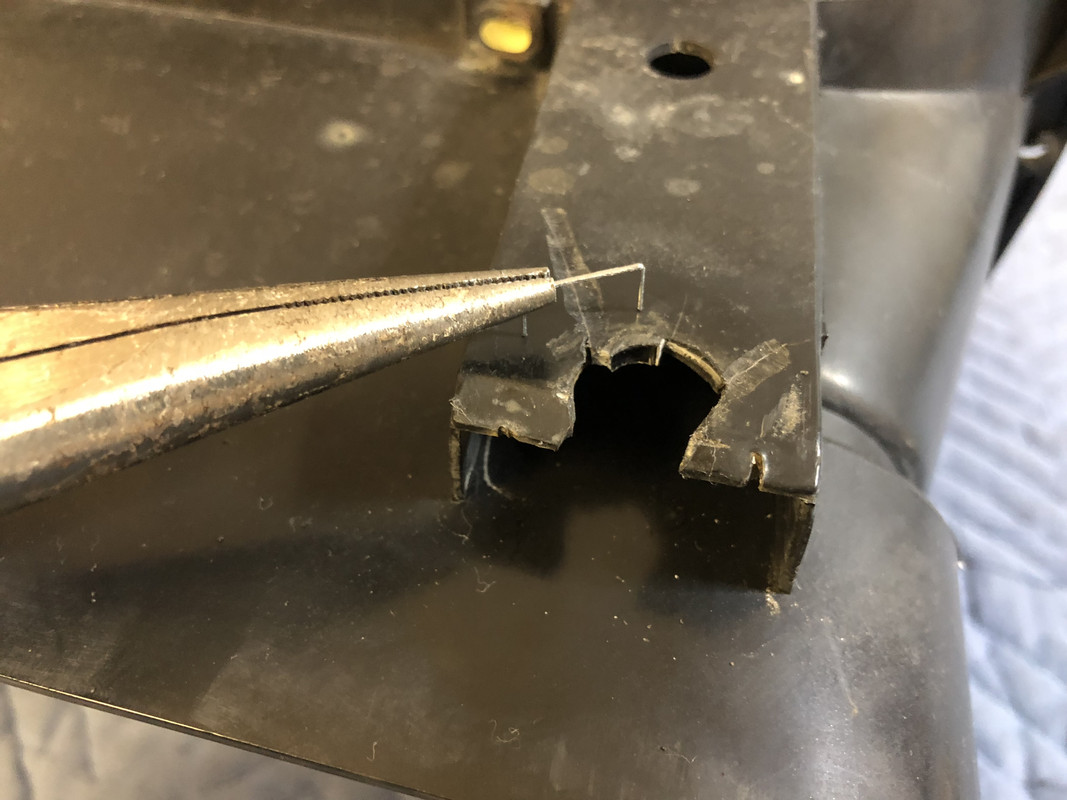
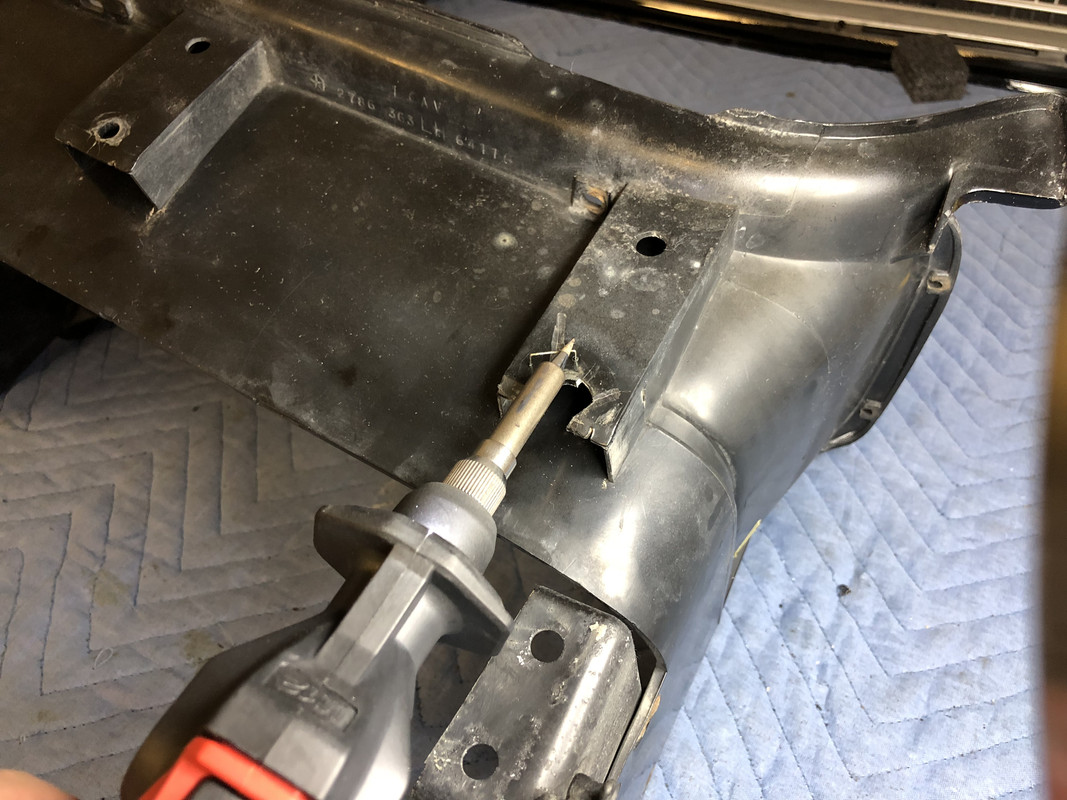
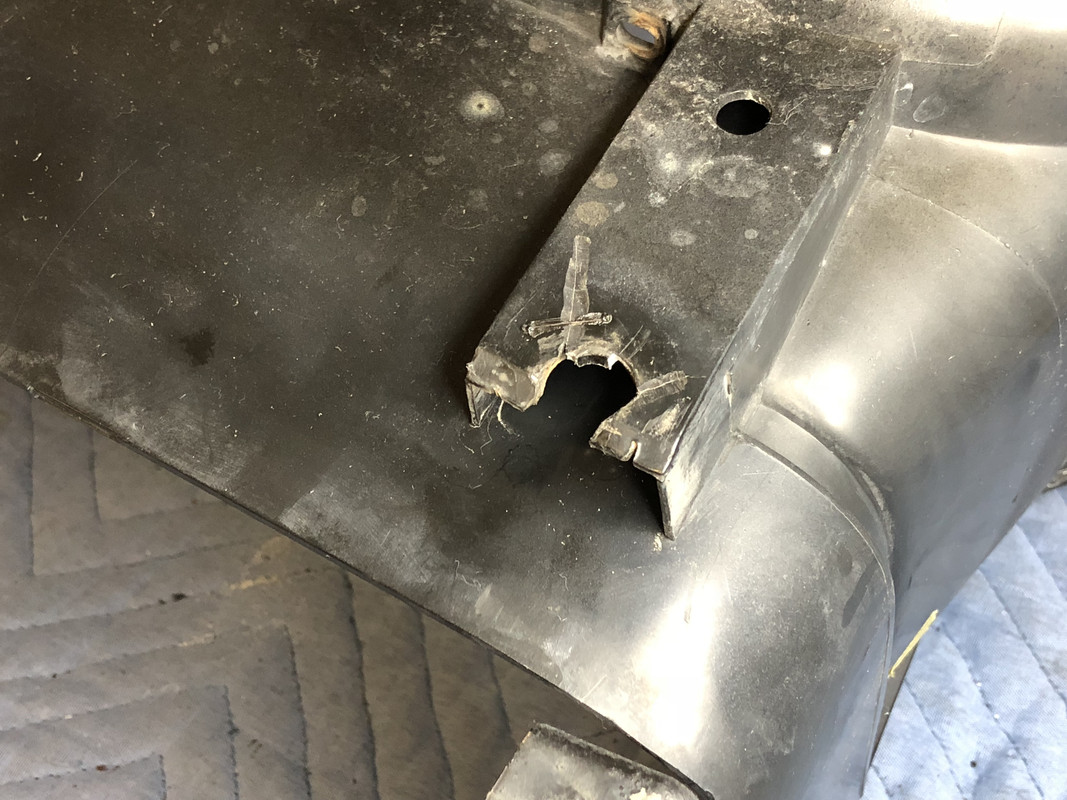
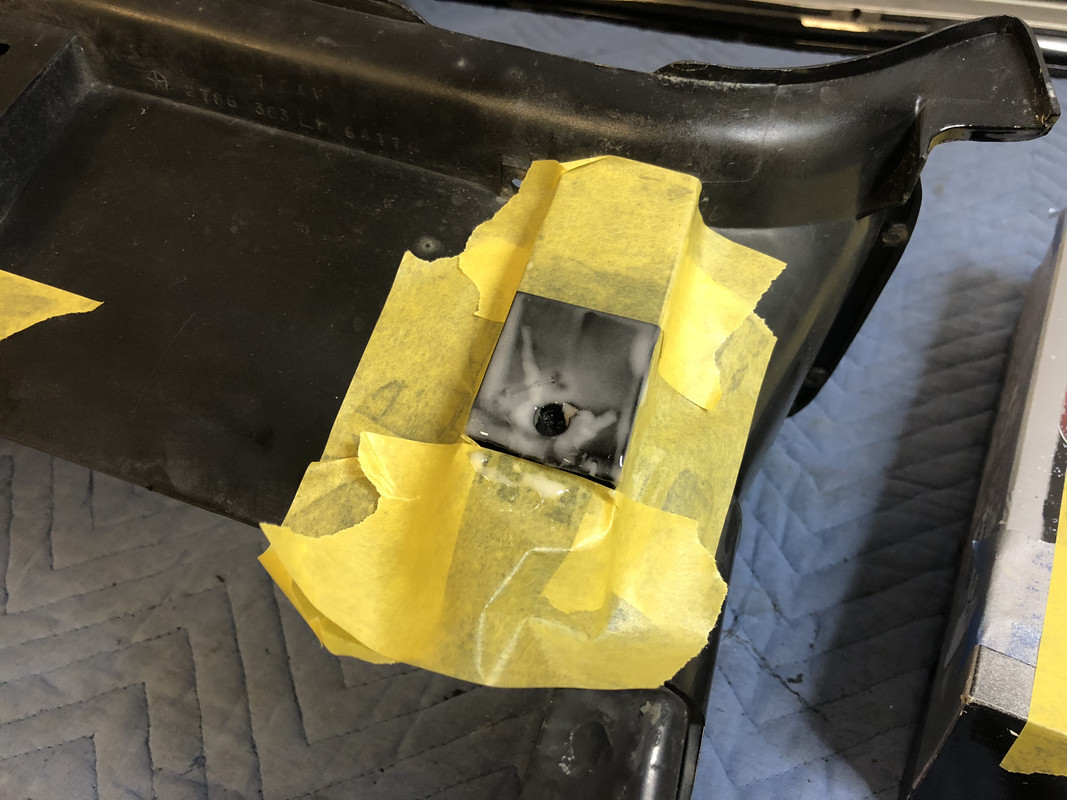
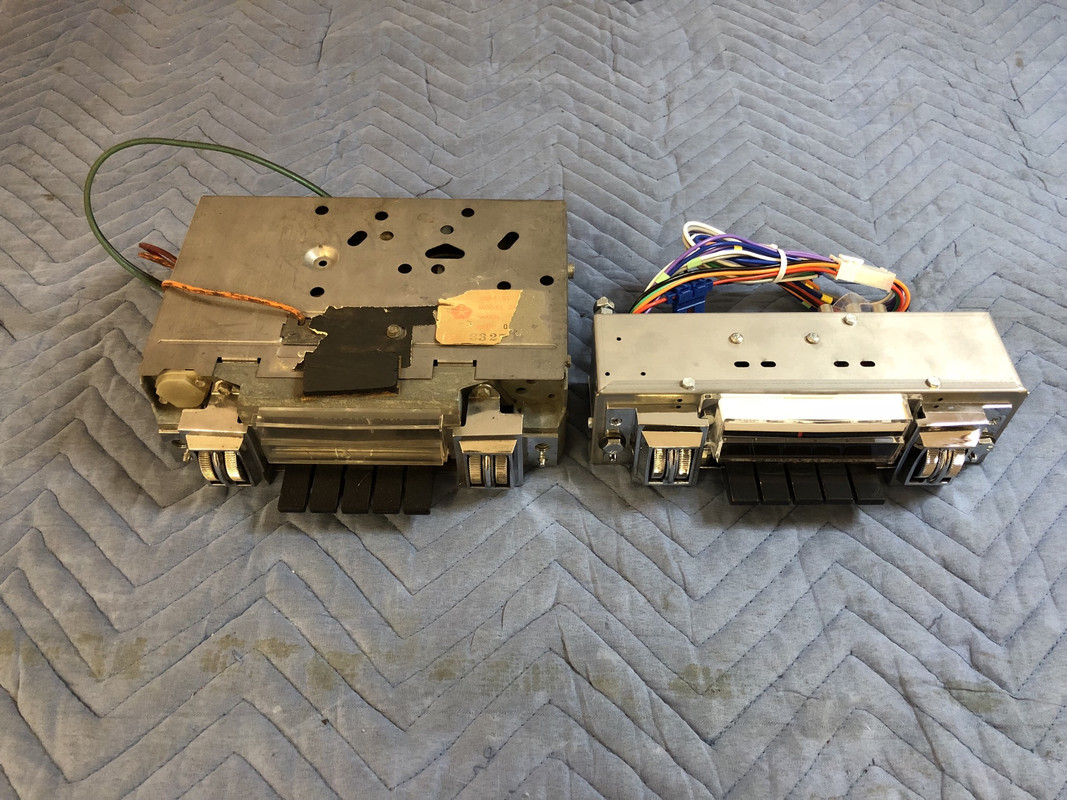


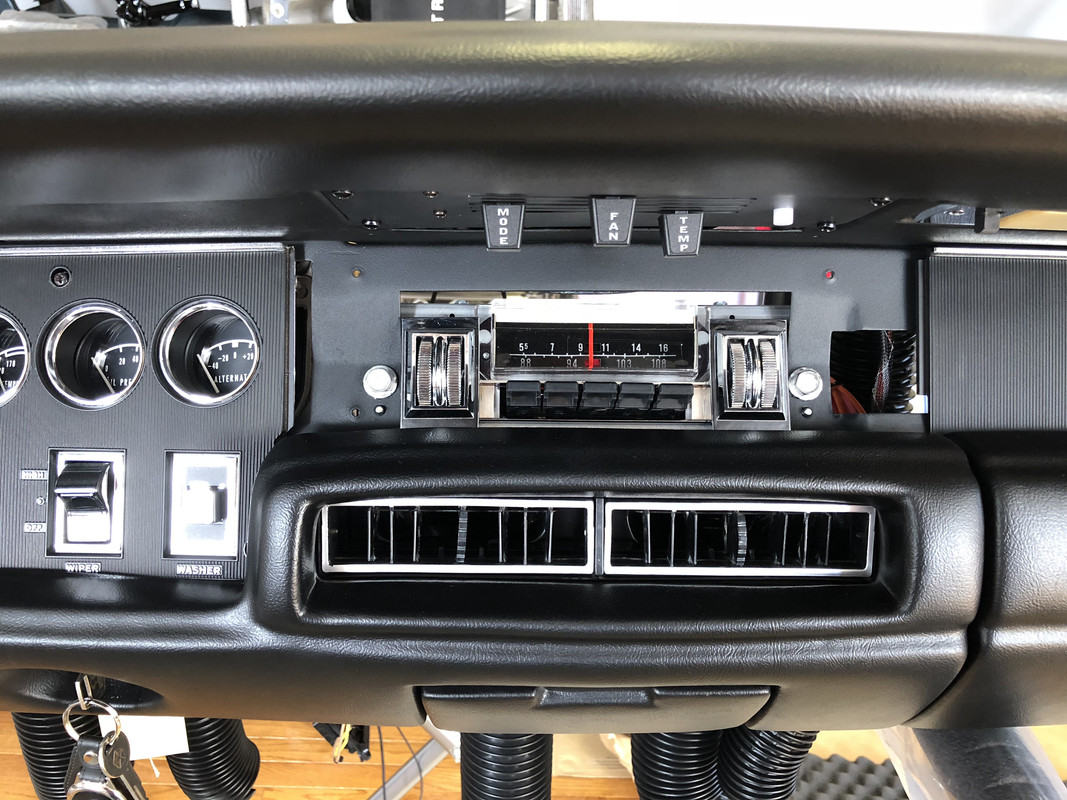
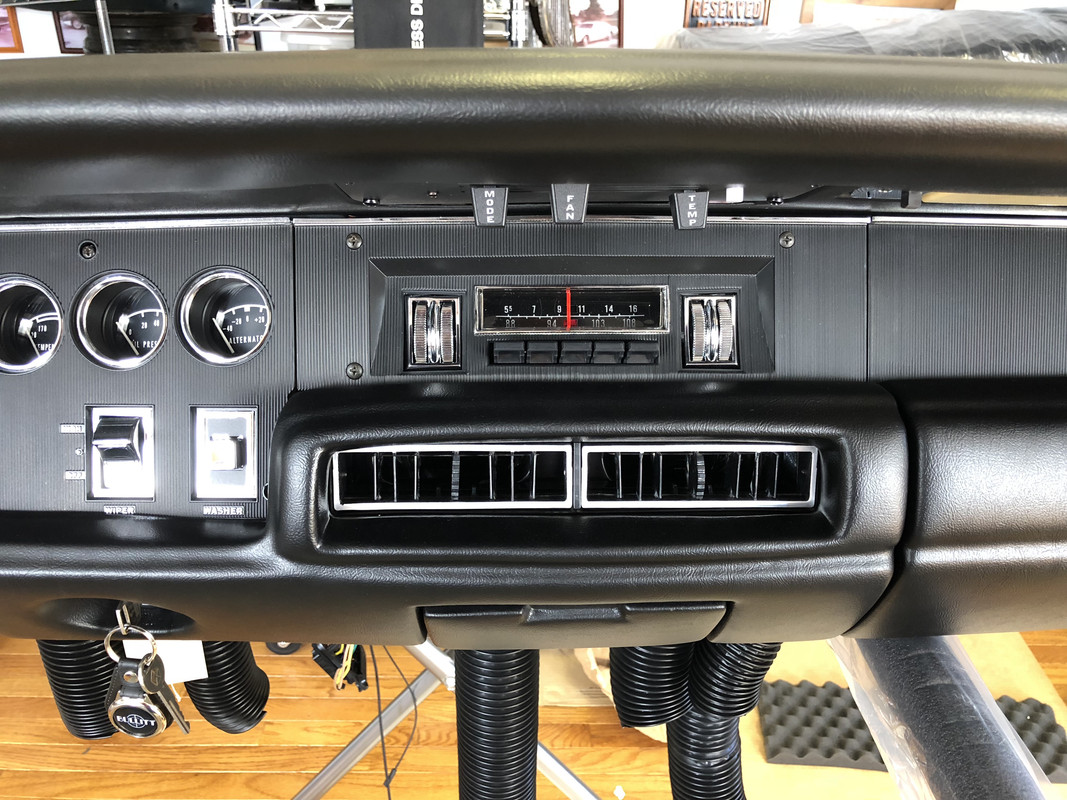
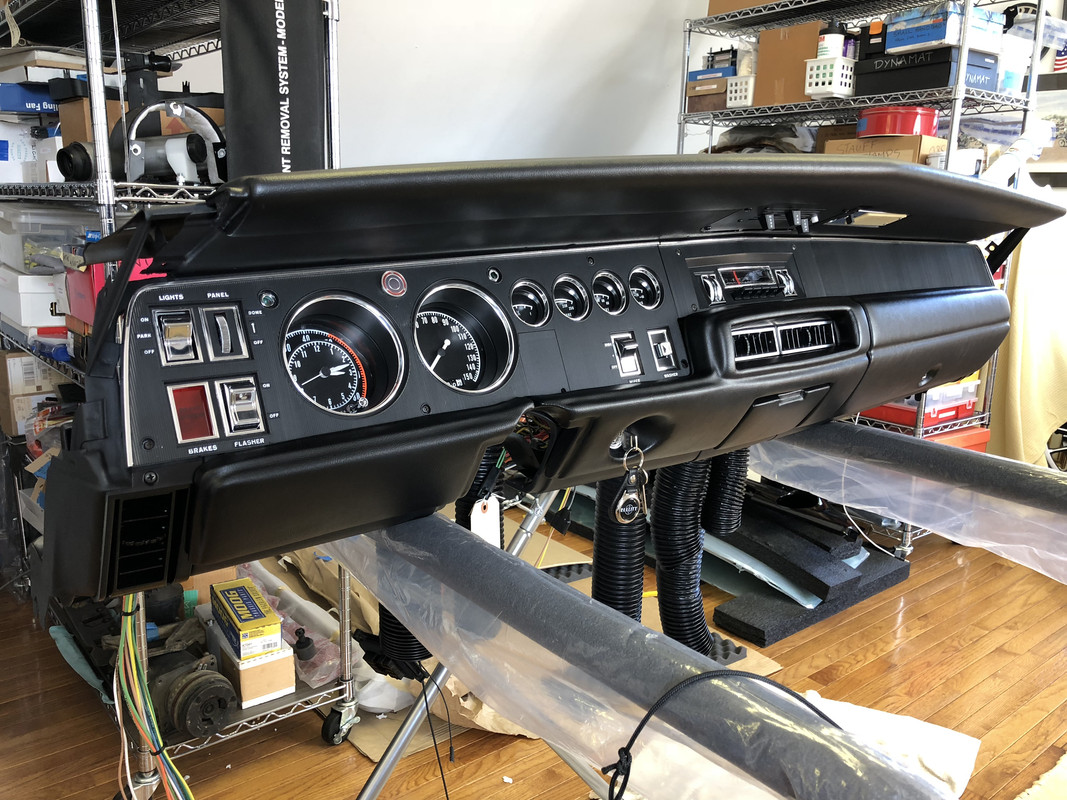
![[Linked Image]](https://i.postimg.cc/HsKVM1tM/C1-A3-C442-099-C-4-C46-8-D7-F-FA56-A1-EC4-BC6.jpg)
![[Linked Image]](https://i.postimg.cc/CxqdHrvQ/1883692-E-06-DA-4586-857-A-8-DE73-A680-D45.jpg)
![[Linked Image]](https://i.postimg.cc/2y93TsRP/27-DBDF7-C-42-B1-40-B9-A5-C9-DE36-B329-A8-FD.jpg)
![[Linked Image]](https://i.postimg.cc/tTtxdvgj/1183-C4-AA-E905-42-A5-98-EC-9052994-C66-AC.jpg)
![[Linked Image]](https://i.postimg.cc/65T8TpCw/1019-BB63-B695-469-D-B1-AB-53-D84-D30-F6-C6.jpg)
![[Linked Image]](https://i.postimg.cc/wBYMW5ZT/96-E12-AC9-3-DED-4-B4-F-9-E28-779-AC49-E70-F5.jpg)
![[Linked Image]](https://i.postimg.cc/8zfRnY8L/6-B0-C6-FDE-B963-4988-A216-57-E1-AE97-C68-E.jpg)
![[Linked Image]](https://i.postimg.cc/g21DzWyM/05-A6-DC57-0693-4-E4-F-9397-75-DA198-E37-D2.jpg)
![[Linked Image]](https://i.postimg.cc/FzPy25sV/6-E8-E0-D96-28-B6-4-EC2-AFE0-8-C3190586-D28.jpg)
![[Linked Image]](https://i.postimg.cc/d0M2M9vp/C70-E4-FA7-0931-4-FE3-9-EAD-890256-BB1430.jpg)
![[Linked Image]](https://i.postimg.cc/tRDN1Ptn/041-D9-F9-C-96-F6-45-B8-BDEE-2-E0-D9-D0-E934-A.jpg)
![[Linked Image]](https://i.postimg.cc/NfM7RMpJ/C4-E9-F948-B816-487-C-B1-E6-882-BCFF060-D2.jpg)
![[Linked Image]](https://i.postimg.cc/brFnmx36/C7-EB9-D62-0-A74-40-A4-AF77-D050-F2-B5065-F.jpg)
![[Linked Image]](https://i.postimg.cc/qBm2Br48/151-B4-BC9-87-E2-4518-92-B1-056-F02944825.jpg)
![[Linked Image]](https://i.postimg.cc/fTJmJPR1/808885-D4-B58-D-4586-8-CFD-FCBF663-DFD34.jpg)
![[Linked Image]](https://i.postimg.cc/XNsTkWSH/42-AC957-D-EEA9-44-F2-9607-862-CAD4626-EC.jpg)
![[Linked Image]](https://i.postimg.cc/DyBLzCGb/54-D0216-A-63-B5-4613-A008-9305-C0-A60581.jpg)
![[Linked Image]](https://i.postimg.cc/Lsqzwzng/609-EE396-614-E-4-C28-AF77-C429-C642-F11-B.jpg)
![[Linked Image]](https://i.postimg.cc/bwrbSQ0V/0-EA5-C04-F-C529-4-E96-8-A28-928-DC3737-BAE.jpg)
![[Linked Image]](https://i.postimg.cc/pX2KRNmH/5126-A3-DE-A1-A3-4-C16-B70-B-1-E21-CE4-B32-F4.jpg)
![[Linked Image]](https://i.postimg.cc/MHtMvTn8/69-A53-BAF-FEDF-473-F-9337-FDEF97-BF6-BB7.jpg)
![[Linked Image]](https://i.postimg.cc/T3KL3TGZ/96003-CF9-791-A-4738-9168-3-D15624-D4-C0-D.jpg)
![[Linked Image]](https://i.postimg.cc/sgbBBbg1/DCC17-F2-B-7-EA6-42-A2-82-AF-C71-AC4627-AC5.jpg)
![[Linked Image]](https://i.postimg.cc/zBrV7WWr/40-F43-EA2-56-A8-4880-A5-D0-A92651-EE0-DD6.jpg)
![[Linked Image]](https://i.postimg.cc/K8YB3q8f/D38-A6-D75-0-F53-43-E1-8646-B4-DF969-BAA1-D.jpg)
![[Linked Image]](https://i.postimg.cc/4NxmWKRN/CB222194-5-C56-4-EBF-BB6-F-A3-F32-FD8-FC49.jpg)
![[Linked Image]](https://i.postimg.cc/BZMvPqPW/74-D43-E4-D-2096-429-C-AD2-B-D106-C73-BADD2.jpg)
![[Linked Image]](https://i.postimg.cc/J067fqC7/72-DF5-D94-BB97-461-E-BABC-985-AEECB4920.jpg)
![[Linked Image]](https://i.postimg.cc/YCm2PYnk/114-A331-F-CE38-4433-8809-35-C261-EDA1-F8.jpg)
![[Linked Image]](https://i.postimg.cc/tgQRGJw6/6-CFFC877-A719-4-E03-B73-B-DA4-CAC130510.jpg)
![[Linked Image]](https://i.postimg.cc/Y9kQ6nCz/6937-D87-D-4-E44-4-B4-E-9-EC9-96-D5-DFCBDBEB.jpg)
![[Linked Image]](https://i.postimg.cc/Z5G8RKkg/7-F3-B1292-4-D1-A-4543-9-CC1-5-D55043-E78-F6.jpg)
![[Linked Image]](https://i.postimg.cc/D0xQyrFd/0203-CAEC-607-D-4339-B5-AC-25-FFD5803867.jpg)
![[Linked Image]](https://i.postimg.cc/W1FmTqyg/7539327-F-7-D29-40-C2-BF36-120-D90463-D52.jpg)
![[Linked Image]](https://i.postimg.cc/HnY4gZGk/C7-EF5-BC6-3240-4271-B659-211-D407-F2-FDB.jpg)
![[Linked Image]](https://i.postimg.cc/m263vymT/F0-B8-D26-F-B91-D-49-F6-829-F-11-B2-C8-A4-C486.jpg)
![[Linked Image]](https://i.postimg.cc/GtgY1bJX/39802389-3-EFC-4-B56-9-A21-FD6-A3140-E1-F9.jpg)
![[Linked Image]](https://i.postimg.cc/c1k8C4wm/C516-C0-B7-2870-4-B65-8-F3-F-06-F72-B35-D6-B6.jpg)
![[Linked Image]](https://i.postimg.cc/T11L0ZMg/F0-B24-DD3-37-D4-4-A4-D-A6-A4-598-EC2566-D16.jpg)
![[Linked Image]](https://i.postimg.cc/dtzkRHWZ/C5-B6-C9-A7-CB9-D-4-A9-C-9-CBB-0-ED0136-F4-CF8.jpg)
![[Linked Image]](https://i.postimg.cc/bJjwzTvm/FD8-D0875-2745-42-BB-96-AA-14-C9-E9-F8-C4-E0.jpg)
![[Linked Image]](https://i.postimg.cc/VkxYRRXz/29-CD0-A71-67-E7-4781-8-B27-49349-D27-A02-E.jpg)
![[Linked Image]](https://i.postimg.cc/7hZD6Qrn/5-E8-C3227-F569-4-E55-836-C-AEBDD3275296.jpg)
![[Linked Image]](https://i.postimg.cc/nzkpnfgL/651-AB1-C5-A9-B6-43-E2-B625-5-F392-C7-ACD11.jpg)
![[Linked Image]](https://i.postimg.cc/ZYPXKNCx/BF174536-CDE6-4977-9815-7309-D4-CC3-DAA.jpg)
![[Linked Image]](https://i.postimg.cc/gkN53Pyw/D7-DDECF0-5-ED9-4-DD4-9-DAB-C1968-FD2-E8-BF.jpg)
![[Linked Image]](https://i.postimg.cc/Z5QMDFM4/B0-D302-B4-D3-AF-4-CEE-9-E34-306174-A52-AD0.jpg)
![[Linked Image]](https://i.postimg.cc/V6QHzswh/4-CD7446-D-8024-4674-A749-93-EDD20775-CA.jpg)
![[Linked Image]](https://i.postimg.cc/LXTw8R8G/8-A418965-83-EA-4-DE7-969-E-ACC9502722-C3.jpg)
![[Linked Image]](https://i.postimg.cc/J4ggnpR7/5-F427661-1940-44-B6-9-B02-ABF82-DD70-CE0.jpg)
![[Linked Image]](https://i.postimg.cc/XvKDs3dX/4-D486345-FD85-4-F07-80-E3-07-CFC64-F6-E6-D.jpg)
![[Linked Image]](https://i.postimg.cc/4dJ2MMQP/615-C6-C5-F-3-F8-C-46-A1-B57-C-3-F34-F6-B5-F84-D.jpg)
![[Linked Image]](https://i.postimg.cc/bJ3VjT6h/290-D3-B79-95-E3-4790-91-D9-CA464-D1-D1-BA4.jpg)
![[Linked Image]](https://i.postimg.cc/L5WyJsKQ/94-DDD477-9587-4194-80-BA-42-A6-F6-C0-C6-EC.jpg)
![[Linked Image]](https://i.postimg.cc/FRV7Z3WH/C351-B31-B-1-FEE-44-C8-91-E7-4386-DFCC9920.jpg)
![[Linked Image]](https://i.postimg.cc/LsfqJrjf/784-C1-FFB-C6-DA-4435-8779-22581-BC4-BDE6.jpg)
![[Linked Image]](https://i.postimg.cc/1zLpTGr0/E458160-B-069-A-49-CE-9-A9-B-63-E1-E94-B2-FC6.jpg)
![[Linked Image]](https://i.postimg.cc/htYxzL6F/72861-CA6-C98-C-4-D36-AD4-F-1855843-DF30-F.jpg)
![[Linked Image]](https://i.postimg.cc/xjPzyDh3/6797-E4-CF-C42-B-4176-829-B-65-CDFB68972-C.jpg)
![[Linked Image]](https://i.postimg.cc/nrnQb0jm/CE0-C1145-3954-431-E-BC4-C-85-FC22-AE4272.jpg)
![[Linked Image]](https://i.postimg.cc/RVsJy1M3/7-FD40-C9-F-D55-C-4550-8-BF8-EADFCB7059-AD.jpg)
![[Linked Image]](https://i.postimg.cc/zG4bXJH8/29072562-297-E-4187-B6-EB-94-D534-CE7-AAC.jpg)
![[Linked Image]](https://i.postimg.cc/h4Q7fkgR/2-C6086-F2-D116-43-D5-8-F0-E-BB5-F1-A5-C0-A18.jpg)
![[Linked Image]](https://i.postimg.cc/6Q6vqT6M/ABB9-D515-D4-C2-4-F4-B-8-AB3-379-A20-D8-AEC5.jpg)
![[Linked Image]](https://i.postimg.cc/J0XyvkKz/DBCAE265-20-EB-4-A9-F-802-F-9-E53-B0-AA0-C4-B.jpg)
![[Linked Image]](https://i.postimg.cc/9QhT3J65/B8-A35577-F035-448-C-9-B78-D5754-C0-A13-B4.jpg)
![[Linked Image]](https://i.postimg.cc/Fsjdx07P/DF7-C4521-B7-A2-4-E6-E-9-B9-D-85721-E3-A324-C.jpg)
![[Linked Image]](https://i.postimg.cc/VshdwDbZ/B770-FFF2-E669-4200-A2-FA-4594835-E7-C47.jpg)
![[Linked Image]](https://i.postimg.cc/Cxr7M2LB/2-DC149-F2-3-A29-4-C5-D-B614-CC735-C8-F1751.jpg)
![[Linked Image]](https://i.postimg.cc/8PPLFbYh/FB7-CB683-0213-40-C3-90-C3-5-FA21-D8-F2-A6-F.jpg)
![[Linked Image]](https://i.postimg.cc/MGyn3c46/9-FC7523-A-C7-D8-4421-AB11-1-F5665-A9-DD51.jpg)
![[Linked Image]](https://i.postimg.cc/FKtfxbTC/1-B731759-875-C-46-E7-833-A-467-B89-DB2-C7-E.jpg)
![[Linked Image]](https://i.postimg.cc/NMB53sq1/EF720549-38-F3-401-B-9-B4-C-420-AC953-B67-E.jpg)
![[Linked Image]](https://i.postimg.cc/2y53505y/60-A4303-A-43-FF-461-A-A353-624-B3-D0114-B3.jpg)
![[Linked Image]](https://i.postimg.cc/pXTnVL9C/8-CF8-D025-7-C88-48-F6-B556-56-C7082-DA7-A6.jpg)
![[Linked Image]](https://i.postimg.cc/MGRBk3c8/9-DC4-AD55-9610-49-F8-AC91-3441-A4635590.jpg)
![[Linked Image]](https://i.postimg.cc/Nf55qCVP/EEFB8-B54-E51-A-4927-B8-ED-73-B1-C7812776.jpg)
![[Linked Image]](https://i.postimg.cc/Sxqkd1gV/44-C0-EF4-A-C1-B7-4-FF3-BF72-77-C861912474.jpg)
![[Linked Image]](https://i.postimg.cc/cLmZb7jW/42-FCD05-D-BB3-B-4-A95-B80-B-891-B2-E71493-D.jpg)
![[Linked Image]](https://i.postimg.cc/26qDys5j/DC53-C9-D9-0-E37-49-B4-9345-B3-ED378-D9-B48.jpg)
![[Linked Image]](https://i.postimg.cc/Bv73qS4w/163-DFDBC-7357-4-AD3-992-C-D6443-A011-C6-E.jpg)
![[Linked Image]](https://i.postimg.cc/X75YQC4N/D782-EBE2-1298-40-D9-BF88-EC7-AE3860-D42.jpg)
![[Linked Image]](https://i.postimg.cc/x1ST711v/BACBCC25-3171-45-D0-BECC-5-D12-C3-A0-F10-E.jpg)
![[Linked Image]](https://i.postimg.cc/N0ds587D/FF606-D49-1883-41-D7-9-C66-C03700-B4-A41-F.jpg)
![[Linked Image]](https://i.postimg.cc/1zmRm764/B6446-CE0-6212-4152-A56-E-0731-D308-C334.jpg)
![[Linked Image]](https://i.postimg.cc/dQkCcDwp/459-A8264-E6-CA-4918-8-DFD-198606-E49131.jpg)
![[Linked Image]](https://i.postimg.cc/F1Xm2TNr/611-D8-F17-F48-A-4-EAD-8-DC8-37-ECA612-DF6-E.jpg)
![[Linked Image]](https://i.postimg.cc/QdkxrZFR/20-F1-A4-E6-A040-460-C-A5-BA-14-F03633-A239.jpg)
![[Linked Image]](https://i.postimg.cc/76bx7CKk/C836057-D-AFF2-4300-AC78-644-B94754-DF9.jpg)
![[Linked Image]](https://i.postimg.cc/85d20Yx0/BEA10348-1-BEA-4600-9-E52-45-F1-B78-C300-B.jpg)
![[Linked Image]](https://i.postimg.cc/VvgcdhRC/8999-BB6-E-4157-4107-AA00-E38862-DBA93-E.jpg)
![[Linked Image]](https://i.postimg.cc/TPbMr10G/74-D49-B34-AAAA-4-D5-C-B6-C3-463929331-E21.jpg)
![[Linked Image]](https://i.postimg.cc/bdXy0Smq/194-EAF7-F-AFE2-4-E76-8-E7-A-BDF39-E981400.jpg)
![[Linked Image]](https://i.postimg.cc/N0GH2Zyp/057-D9171-B893-4598-BFAD-A5-AE33-F7899-B.jpg)
![[Linked Image]](https://i.postimg.cc/DzYjmLR5/77-C70-A36-DAD5-4-C94-AC97-C6-B91-A385790.jpg)
![[Linked Image]](https://i.postimg.cc/Y2LVGDrF/58930173-810-F-435-C-A8-C2-CFCCEBE9-DA63.jpg)
![[Linked Image]](https://i.postimg.cc/KYYpZJpR/CB6-A5201-7444-4-A19-9-D96-16-A1-FF79-FCE9.jpg)
![[Linked Image]](https://i.postimg.cc/G28MD9CR/94-AD1-FBC-2617-441-B-9-D34-0-B44-E539061-D.jpg)
![[Linked Image]](https://i.postimg.cc/SNWvVXzN/0-E8-FC73-E-4-DD2-4-BEF-ADC3-F819-A0-B1-FA89.jpg)
![[Linked Image]](https://i.postimg.cc/ZRGwxZbd/4-FB88300-6-FAA-454-F-AB0-D-3-EC7-C8482004.jpg)
![[Linked Image]](https://i.postimg.cc/3wrZfnMf/4-A2-EDF94-C365-4-D0-B-8-BF5-41-A20-FD0-ED45.jpg)
![[Linked Image]](https://i.postimg.cc/QxLJZXGT/8-ADCC74-B-34-AB-44-EC-AB7-E-6-E9-AB83-CCF0-D.jpg)
![[Linked Image]](https://i.postimg.cc/wvZcvz1n/4-B035-A11-AFA8-49-FE-AF2-D-EE409-BCB58-D4.jpg)
![[Linked Image]](https://i.postimg.cc/d3CRZfd3/800406-A7-4-C51-442-D-8-A45-98-B3853-F82-AA.jpg)
![[Linked Image]](https://i.postimg.cc/ZRCx4n5r/4-AA68052-08-F5-463-C-A241-E41-E115-ED31-F.jpg)
![[Linked Image]](https://i.postimg.cc/d103yH7P/C92-FA67-D-D881-4-F9-E-B0-E8-1573-DBE9-C31-A.jpg)
![[Linked Image]](https://i.postimg.cc/xCgssCTN/530-FDAA1-FC98-4-AD1-8985-50-B1-EB79850-C.jpg)
![[Linked Image]](https://i.postimg.cc/tJMBjM6X/B6177318-8-E64-4938-9883-4-B003-CB17890.jpg)
![[Linked Image]](https://i.postimg.cc/qqR1WTzb/C902-D730-08-D6-4-E62-97-B9-8-A6-E765-EA7-B9.jpg)
![[Linked Image]](https://i.postimg.cc/q7wggVvx/850373-E4-E6-C1-4-A5-F-8-C61-0-B522896-B23-A.jpg)
![[Linked Image]](https://i.postimg.cc/XqRYtns4/0-F0-BBFB0-78-DC-411-E-8-B26-8821243-A7-A72.jpg)
![[Linked Image]](https://i.postimg.cc/Ssts768X/B68-C4-D4-C-A093-4430-8331-C041252-A497-C.jpg)
![[Linked Image]](https://i.postimg.cc/sgFMN4L7/DD4-A8682-5737-4-F84-BDEA-22-DEE5670-F1-C.jpg)
![[Linked Image]](https://i.postimg.cc/wjStyFLx/B9-FDE618-2743-4-E98-BC79-16-E4-C580-E1-F2.jpg)
![[Linked Image]](https://i.postimg.cc/KvWjwQ97/E2-C9-C892-2434-4-DC7-9279-7971-B6-BDB5-AA.jpg)
![[Linked Image]](https://i.postimg.cc/pdfd9vPk/91-D38069-043-D-402-F-A1-E2-0030-A593528-A.jpg)
![[Linked Image]](https://i.postimg.cc/wx07c9LG/56-EABEB2-1-E03-4-AB4-8517-8-C624-AE9-E63-C.jpg)
![[Linked Image]](https://i.postimg.cc/5yNjdrdg/E4-B23-FE4-3-D72-46-DD-A0-C4-72-D300-D63-A8-E.jpg)
![[Linked Image]](https://i.postimg.cc/g0FJkjbn/E615-C019-5-D68-4-BBA-B9-E7-3-DC5-F86-D6-D7-F.jpg)
![[Linked Image]](https://i.postimg.cc/6q361Gn1/1-A9-B74-B5-E5-AF-47-CF-BBEF-1-ABB066-B6-A53.jpg)
![[Linked Image]](https://i.postimg.cc/c19LtXNq/4908-B8-ED-D503-4-AD9-B302-E62984-D8-F13-E.jpg)
![[Linked Image]](https://i.postimg.cc/9FsXJ0MJ/885-C4-D17-9-A00-468-D-BE38-CD20-F8-D95-B43.jpg)
![[Linked Image]](https://i.postimg.cc/Yqvq6Ypv/95-BA99-FF-52-A5-46-E5-AC78-05700-E1652-B1.jpg)
![[Linked Image]](https://i.postimg.cc/nhLKZ4CV/17-DAAAB9-ED12-49-D3-BC35-CBCB9923911-B.jpg)
![[Linked Image]](https://i.postimg.cc/BZDMwB1d/195-C7502-9-E3-A-4-D4-F-B912-02-A6549-F6-DEF.jpg)
![[Linked Image]](https://i.postimg.cc/N0SkdKGs/FA958-E8-B-B403-41-CD-941-E-A6-ED55-F70-EFA.jpg)
![[Linked Image]](https://i.postimg.cc/1znpVyGL/FF600-E7-E-DC22-43-A3-A6-E5-40-B6-BF3492-EC.jpg)
![[Linked Image]](https://i.postimg.cc/SQWfGQB4/A59-F19-B0-64-A8-4-F8-D-8-A1-E-CBEB2-CB39-B84.jpg)
![[Linked Image]](https://i.postimg.cc/bw3Z91st/46-D3-B8-FC-013-A-4996-8-E68-E6592-FFFD6-DA.jpg)
![[Linked Image]](https://i.postimg.cc/SRp7pHzH/7-E49-D457-C20-E-430-D-AFD6-DF004-F6417-B0.jpg)
![[Linked Image]](https://i.postimg.cc/wvYstLTm/A6-C7-C86-F-F633-4-F4-C-990-B-4-FBCAECB1697.jpg)
![[Linked Image]](https://i.postimg.cc/523CKZkj/36-EFD9-C4-8378-4-ED1-BCDC-7-FB4219-C0358.jpg)
![[Linked Image]](https://i.postimg.cc/ZnSYSqWm/48529957-C34-E-4794-8-FF7-4453-ACA49-C85.jpg)
![[Linked Image]](https://i.postimg.cc/J4jJZyNN/71-C678-B5-7-AC4-42-A2-9-CC1-A60341-FD6-B12.jpg)
![[Linked Image]](https://i.postimg.cc/grbzG2rd/CA68-A303-C09-F-4-DE1-AEE2-F2300-D15-FD42.jpg)
![[Linked Image]](https://i.postimg.cc/bv4Nmg8s/4844-B047-FCB2-424-A-8097-6444-A439-E203.jpg)
![[Linked Image]](https://i.postimg.cc/XYmbWvPP/10-AFF04-A-788-F-419-E-AC95-9-C44-B869-D13-A.jpg)
![[Linked Image]](https://i.postimg.cc/htfBNm2x/E0-E959-FC-6-D1-F-4-AE4-8198-AD00-CD6-A1-DC6.jpg)
![[Linked Image]](https://i.postimg.cc/N0HHfpYt/297-DC547-ACE4-4698-99-EC-FD6-B69-B47-C3-D.jpg)
![[Linked Image]](https://i.postimg.cc/T1RL0xb2/937-CA5-A5-5-A18-4-AE0-B977-8821-C4-BB4263.jpg)
![[Linked Image]](https://i.postimg.cc/3wzPyTzL/51-E1896-F-A497-456-F-89-F8-B4-BE5-F078-F6-F.jpg)
![[Linked Image]](https://i.postimg.cc/RV3VyS4F/3611576-D-05-FE-43-E4-A942-8-C06-C4332-C60.jpg)
![[Linked Image]](https://i.postimg.cc/s2MkDXHQ/2713-CFD6-FFFF-4-B63-AD01-F419-A2-A04689.jpg)
![[Linked Image]](https://i.postimg.cc/g0L7b7r3/E2-F80371-C315-4-C06-96-D7-ED41724825-D5.jpg)
![[Linked Image]](https://i.postimg.cc/zX5YSqv6/E0-A9-B528-78-DD-454-A-9059-E0623-BAC4587.jpg)
![[Linked Image]](https://i.postimg.cc/pLT7qrHG/50-AED901-55-B3-4-C4-B-9504-F1-CAFF0204-E3.jpg)
![[Linked Image]](https://i.postimg.cc/NfbS6TW2/E9-AF6-C57-2-CCB-4489-9-E06-4-AF1-C26-F642-C.jpg)
![[Linked Image]](https://i.postimg.cc/6QCKfnHR/6-DDFE5-AC-7-CFD-4-CDA-A2-ED-FEAA4-F123084.jpg)
![[Linked Image]](https://i.postimg.cc/85wqZHLF/1-C53-D350-2845-416-E-B63-A-FCB509-C78-EC8.jpg)
![[Linked Image]](https://i.postimg.cc/yYnkF4JB/43578977-A9-E4-492-D-9-A78-D7-B33674-FED2.jpg)
![[Linked Image]](https://i.postimg.cc/NfPQsg9y/7-FF6-CF0-C-7275-4-A64-BE1-C-0-C4-EDD58-B2-AC.jpg)
![[Linked Image]](https://i.postimg.cc/2y6gMZx0/12-AD5-BC2-DEDF-431-B-831-C-3-F8-A111774-D6.jpg)
![[Linked Image]](https://i.postimg.cc/XqY0Whnc/157812-F0-B0-AE-430-D-AD00-A38476-CF6298.jpg)
![[Linked Image]](https://i.postimg.cc/mkpWgwDx/766-AEDCF-D89-E-4908-B6-DC-AAD436848890.jpg)
![[Linked Image]](https://i.postimg.cc/RVqzbjsv/939-AB900-77-CD-4-CAB-8439-69-A8-FD63-B73-F.jpg)
![[Linked Image]](https://i.postimg.cc/hPQ5mgZQ/797-E4411-1-BB0-4-F65-8-C44-43-D9-C907-E89-A.jpg)
![[Linked Image]](https://i.postimg.cc/4yq20Fy3/E0-C8-E3-D3-2-B4-F-44-A1-8324-303-F50-A30761.jpg)
![[Linked Image]](https://i.postimg.cc/cC4jgj1p/F65038-FF-CF96-4-F07-B23-A-E7-EA7-C16-CB48.jpg)
![[Linked Image]](https://i.postimg.cc/pTkcHZQq/D85192-B5-5-BBB-4655-B5-C4-55-BC5-C488-D92.jpg)
![[Linked Image]](https://i.postimg.cc/XvfD23rM/6-D865622-5-A5-C-41-DC-8841-35326-A3-D3794.jpg)
![[Linked Image]](https://i.postimg.cc/dtfX34bf/D5-C46-BB1-E50-A-433-B-A755-702-A71-E57891.jpg)
![[Linked Image]](https://i.postimg.cc/6QJmLT5L/CA2-D4-C92-C9-FA-4980-AE3-F-EF96-A6087-C36.jpg)
![[Linked Image]](https://i.postimg.cc/C1wrXt8R/44373-D4-A-64-D3-4009-B1-F8-B84-E11-CD31-A5.jpg)
![[Linked Image]](https://i.postimg.cc/65rFw19h/636-AE437-151-F-41-EC-B465-DE6-C8-EA03788.jpg)
![[Linked Image]](https://i.postimg.cc/CLbp5x4k/D784-FF6-B-E163-48-D0-94-A2-58-A877441-A57.jpg)
![[Linked Image]](https://i.postimg.cc/tJPwsBFp/7-F4522-A8-EBC4-40-DA-B24-E-11-FB88-F42-BB7.jpg)
![[Linked Image]](https://i.postimg.cc/QxGv2rrt/9992939-E-13-D5-4-D3-A-B731-2-F75996892-DE.jpg)
![[Linked Image]](https://i.postimg.cc/59FZK2TT/B9-AB714-E-164-B-4-DCF-954-E-08711-F22688-F.jpg)
![[Linked Image]](https://i.postimg.cc/7ZD82rBc/2-D04-D0-DE-4422-4190-8-D26-FE6882-BCFDD7.jpg)
![[Linked Image]](https://i.postimg.cc/FRY24rRf/BE5212-BC-2-A32-4502-BFD9-82-B94-A062-B25.jpg)
![[Linked Image]](https://i.postimg.cc/pT33Vwhs/19-BFF0-D4-AAD1-41-B7-BEE6-B6-C15388-EE81.jpg)
![[Linked Image]](https://i.postimg.cc/VkRy9ZpN/D54-FDBEF-DCF3-4-D49-91-F8-B9745-BCBBB26.jpg)
![[Linked Image]](https://i.postimg.cc/d0tb5mcj/B0842830-BEA4-4-FB9-AACC-1417712-CFECF.jpg)
![[Linked Image]](https://i.postimg.cc/yYK7Kk09/5-E4485-E4-3790-430-A-8226-6-B3-EEAE2-B2-CC.jpg)
![[Linked Image]](https://i.postimg.cc/fW9bZGp4/D0-AAD4-CA-9-BDD-4779-844-D-4-A35-FF3-C26-E3.jpg)
![[Linked Image]](https://i.postimg.cc/N0FgnSmz/55285100-E6-AD-4-DC9-BE69-EB2-C479-C0-D59.jpg)
![[Linked Image]](https://i.postimg.cc/jSsqHL5K/36-DBD0-D2-60-C5-44-B7-BC0-A-67-D966436730.jpg)
![[Linked Image]](https://i.postimg.cc/hj7KDmC8/AD535-E6-C-8-F68-4-FED-8-B87-89-A73-A6605-A1.jpg)
![[Linked Image]](https://i.postimg.cc/ZYpJXrv4/B532145-F-561-D-4-DC3-B3-B2-1715-B78-DB6-CC.jpg)
![[Linked Image]](https://i.postimg.cc/x8vYH2Vc/09-C82554-1559-40-CC-B7-B7-6-D1878188484.jpg)
![[Linked Image]](https://i.postimg.cc/K8y0bmJM/29-F37-FAC-F340-4-D9-E-9-E79-6-B5-B460-F79-D1.jpg)
![[Linked Image]](https://i.postimg.cc/fTSYrYKW/7-D35-F15-F-DE8-A-4-AC6-B2-C2-1599-BF7-CDD2-E.jpg)
![[Linked Image]](https://i.postimg.cc/xd65LMYv/95-DAE088-4-F0-C-4762-B62-E-5-C7-CEAFF8-AF8.jpg)
![[Linked Image]](https://i.postimg.cc/tC6B8stb/F0-DD4478-F252-44-F5-BA59-5-A62547-EAF31.jpg)
![[Linked Image]](https://i.postimg.cc/4y9nBQTr/359-D757-A-7383-4-F9-A-84-AF-445659-BB0414.jpg)
![[Linked Image]](https://i.postimg.cc/s2jKBwFf/A1-FBBC4-F-3-F7-D-431-D-8-BB2-DB64-A53789-E9.jpg)
![[Linked Image]](https://i.postimg.cc/52yJGXMh/7469-BAD2-D797-4351-9-C1-B-4-B0-CD7-C6-B6-F2.jpg)
![[Linked Image]](https://i.postimg.cc/L5vdQpQ4/526-C940-B-BAB5-4-E8-A-B0-DB-A686260-C6735.jpg)
![[Linked Image]](https://i.postimg.cc/cHRGYYQn/9814-F2-AC-D8-F9-4-DA3-AE68-E9240-ADCD174.jpg)
![[Linked Image]](https://i.postimg.cc/c44Ggv6v/D5578-E59-7-BCE-43-BB-86-B3-38-B6-BFDE38-CB.jpg)
![[Linked Image]](https://i.postimg.cc/yx74TdPr/AD2-A9-EE4-19-B9-4390-8-FD9-6-FC109-B50-D75.jpg)
![[Linked Image]](https://i.postimg.cc/RhgC85Vd/B1-E9-C283-BF1-F-458-F-83-D7-A463-AC154-D67.jpg)
![[Linked Image]](https://i.postimg.cc/N0C5StyM/D1-E00-D77-7-D07-4717-A49-A-AD31-D4-BCFFA7.jpg)
![[Linked Image]](https://i.postimg.cc/50Zj9mSW/6962-C027-7081-4-E14-90-C2-F1-E32-E1-F90-FC.jpg)
![[Linked Image]](https://i.postimg.cc/bJGsj5bR/4-AD61-E20-ED23-486-D-84-CB-D55-ECDBF314-F.jpg)
![[Linked Image]](https://i.postimg.cc/zXG6zj2b/01-B2-CEF8-08-F1-40-C5-82-E2-76-A1-A31-C69-F4.jpg)
![[Linked Image]](https://i.postimg.cc/HkGwZWMY/A5-D82204-D731-4-EF7-95-A9-B045296-B10-D8.jpg)
![[Linked Image]](https://i.postimg.cc/rmpx0KBJ/EC5-D075-E-6-BA0-4146-A6-E2-47-A9-D9674-F4-B.jpg)
![[Linked Image]](https://i.postimg.cc/yWCDPdb2/1-E586508-4366-4-A5-B-8-E05-F37221-D1-AEE7.jpg)
![[Linked Image]](https://i.postimg.cc/rwCrf1cj/BC8-C72-FA-D3-CA-4145-BA42-641-FA38-B07-C3.jpg)
![[Linked Image]](https://i.postimg.cc/RZzt1srq/C0-F3-EEE8-8-F66-4-BEE-AA8-A-6-E0-D6-C6-CF6-CC.jpg)
![[Linked Image]](https://i.postimg.cc/zDVcbjY9/7-BECAA4-E-1356-4-A51-8-C9-A-9-F6-A8115-A84-C.jpg)
![[Linked Image]](https://i.postimg.cc/XqRCzxpH/AEDF04-B8-861-F-434-F-8163-412-C6-D9660-B3.jpg)
![[Linked Image]](https://i.postimg.cc/CLqTkBRZ/B4628744-57-DF-43-DC-B473-0-E3-FFC7-CCBE4.jpg)
![[Linked Image]](https://i.postimg.cc/rm7c2Sdk/3-AFC1-E81-F10-D-4-E62-9791-4-B4-B797-F8-CCB.jpg)
![[Linked Image]](https://i.postimg.cc/y8TV3gGm/28045-E29-F1-BD-484-A-BFF7-17-F7943-AD718.jpg)
![[Linked Image]](https://i.postimg.cc/C1RY2vx7/F0-FEF02-C-D866-4-D87-A38-C-7-DD507896455.jpg)
![[Linked Image]](https://i.postimg.cc/KjLbGRLg/94-FFAD84-95-DA-4-D93-AD5-B-F6-F1-D5873-C42.jpg)
![[Linked Image]](https://i.postimg.cc/VNLzqsy3/FA6258-AB-5-E60-4-A69-843-D-A343663-A14-FF.jpg)
![[Linked Image]](https://i.postimg.cc/nzjYFd1q/675-EB469-7194-4-F26-A4-FC-606405-D89-B67.jpg)
![[Linked Image]](https://i.postimg.cc/QCDB2SY8/4-FCEFB52-E2-D2-46-BE-8-F30-415-D0-EB44451.jpg)
![[Linked Image]](https://i.postimg.cc/0QDMXhfX/88424-F4-E-B16-A-4-A3-E-AC74-C49-C3881-FD99.jpg)
![[Linked Image]](https://i.postimg.cc/RVY6fXxR/6-D1889-D3-8-F48-4309-BF94-8-BFAA8-FD7-DAF.jpg)
![[Linked Image]](https://i.postimg.cc/W48sm1Jv/9-E79274-D-CA0-C-4-A66-B191-D767-F83-A0-ACD.jpg)
![[Linked Image]](https://i.postimg.cc/4dnRzbg6/9-D2248-DA-4022-497-E-A7-B8-94-F3-E3816300.jpg)
![[Linked Image]](https://i.postimg.cc/NF3tGyZ1/793-E1242-A11-B-4768-8314-275901501-B92.jpg)
![[Linked Image]](https://i.postimg.cc/W16Vj18k/5-CA1-ACF2-D148-4-C31-88-DD-F04274-E11663.jpg)
![[Linked Image]](https://i.postimg.cc/43WT72r4/076-DAF9-A-9101-4-F4-C-A63-B-168-F09875-AD8.jpg)
![[Linked Image]](https://i.postimg.cc/RZR0dRjy/9-B47-AA3-D-1-C84-466-C-831-D-7-FB45133-BFC2.jpg)
![[Linked Image]](https://i.postimg.cc/0yxQ73H7/8-B30-A9-C1-81-A8-4384-A3-CD-A8-DA60-F19-E3-C.jpg)
![[Linked Image]](https://i.postimg.cc/4dSG6mvv/DCBBE061-5-F20-436-C-93-FF-F40956650633.jpg)
![[Linked Image]](https://i.postimg.cc/rsD83SyY/535-CF3-BF-9-A8-D-40-B1-A0-E2-59-AC39788131.jpg)
![[Linked Image]](https://i.postimg.cc/6Qh5vW1z/F0-E82448-1-F3-A-4002-ABE1-5-F7-E4-D847859.jpg)
![[Linked Image]](https://i.postimg.cc/44Y7rc0g/F3-ECDD49-ACAD-4-D51-9212-323-B73356-A34.jpg)
![[Linked Image]](https://i.postimg.cc/gr9P7QTn/0-C59003-F-7-E4-B-408-A-A499-69-F818-A395-E0.jpg)
![[Linked Image]](https://i.postimg.cc/NjcK9zjs/FDAA5-C5-B-B808-4038-BA5-B-6-A17-E52-B1586.jpg)
![[Linked Image]](https://i.postimg.cc/5yQVnbph/D63-AE0-CF-6658-45-DF-B2-C4-BFD967-FC8-E5-A.jpg)
![[Linked Image]](https://i.postimg.cc/PqMz7q3R/0-EF620-D7-9-A3-F-47-D6-98-AE-B2265549-C869.jpg)
![[Linked Image]](https://i.postimg.cc/66PVggct/480160-E1-CB2-C-4-BE4-A5-FA-EDBCCD071826.jpg)
![[Linked Image]](https://i.postimg.cc/htL9JjBt/C02-EBEF2-EF5-F-4-A14-8593-D8-C79-D5234-E3.jpg)
![[Linked Image]](https://i.postimg.cc/1X8G4r9k/4-D291-BE7-6-BDB-4779-9-E05-02-CACDF1407-A.jpg)
![[Linked Image]](https://i.postimg.cc/FzwjSkz7/251-F323-F-604-C-42-A7-8-CCC-F46-BDDA7-AAF2.jpg)
![[Linked Image]](https://i.postimg.cc/C55NkV46/02-EDC0-CB-5-FC1-49-CA-9-E88-EA9-A3-D603-AE0.jpg)
![[Linked Image]](https://i.postimg.cc/nhb4cmNW/8-EB8-B7-E7-6-B72-4-D3-B-9-F98-D6159-BE38-E05.jpg)
![[Linked Image]](https://i.postimg.cc/kXkc6zRf/0-F3-C400-F-E9-C8-48-CC-AAB0-7630-DD7-F5018.jpg)
![[Linked Image]](https://i.postimg.cc/43RBMqJm/5-BE1-A4-B3-EBBE-42-C5-BE65-8-E9-DB6683-CC7.jpg)
![[Linked Image]](https://i.postimg.cc/6qZYxjtJ/489-B66-D9-4-E13-40-A5-A0-A7-CAB8-D4-EAA577.jpg)
![[Linked Image]](https://i.postimg.cc/3JpbsRx4/BC7823-A4-4-B6-C-4-B2-A-9-A8-F-A895-A81-AD1-E8.jpg)
![[Linked Image]](https://i.postimg.cc/sgd474y1/A9-A10-C28-20-DD-49-E1-A319-8-D2-AE868-C540.jpg)
![[Linked Image]](https://i.postimg.cc/dVjN0xdJ/20819918-30-BA-400-A-B0-FE-B8-C5395-AA09-E.jpg)
![[Linked Image]](https://i.postimg.cc/Zqff8vVg/3-D86-F39-A-BB47-4245-8-F4-C-C81253400485.jpg)
![[Linked Image]](https://i.postimg.cc/qRz1jBF7/2-DCE68-EC-FC93-44-DD-BAB2-ED97-DBC06-FE2.jpg)
![[Linked Image]](https://i.postimg.cc/15R7z3jX/1646-CB7-B-C919-40-E6-BC07-7-C895-F6570-F9.jpg)
![[Linked Image]](https://i.postimg.cc/Qd2qc80p/1956-E217-92-B0-49-B1-A62-A-2674401-A7-BDA.jpg)
![[Linked Image]](https://i.postimg.cc/nhg3TYc9/43-C7589-C-69-AD-46-C2-954-C-DF9-F871-BA00-B.jpg)
![[Linked Image]](https://i.postimg.cc/dVkB7kms/FF31-EF57-D3-D6-44-F8-8078-B62-FF147-D922.jpg)
![[Linked Image]](https://i.postimg.cc/8cZHvL05/044-C6787-FDF6-408-E-976-F-9345-F6-A19-E7-F.jpg)
![[Linked Image]](https://i.postimg.cc/8k4wxVzS/2857-AABD-9994-4-D79-9271-1617-F34-A9-FE2.jpg)
![[Linked Image]](https://i.postimg.cc/vB5n4vwW/C8-EB4-D8-A-FA1-D-4590-920-E-3328-ACDC0209.jpg)
![[Linked Image]](https://i.postimg.cc/nrF2M3Tg/D91-DFADD-0151-460-C-A126-0-D7-AE44-FC74-B.jpg)
![[Linked Image]](https://i.postimg.cc/MG1mDCFg/A61-DEC39-1299-45-F9-9-FDD-A227-ACF7-BB47.jpg)
![[Linked Image]](https://i.postimg.cc/PrdYC0Mj/F6449-EB5-5-FAC-4-E94-A677-6-DF35-D5197-B9.jpg)
![[Linked Image]](https://i.postimg.cc/5ySzPmbT/57-A17-C89-4296-4-E8-C-AFDA-A00299-E84-F62.jpg)
![[Linked Image]](https://i.postimg.cc/nzv9z1jr/30413-CC8-BC0-B-4-BC0-995-A-637-E77-BBF314.jpg)
![[Linked Image]](https://i.postimg.cc/BnX8D3Ld/2-E13-CDF6-C310-44-F4-AFDC-B678-AF2-F1-F19.jpg)
![[Linked Image]](https://i.postimg.cc/NFDy8fxw/90-C2425-A-2197-4946-857-D-1-FE0-B5921-CC1.jpg)
![[Linked Image]](https://i.postimg.cc/FzNdJJ3Z/BAC99-B8-C-1775-44-DD-B409-FF8-D777-B7543.jpg)
![[Linked Image]](https://i.postimg.cc/PqDP3MMy/DF8-EAD43-A7-CA-4275-9-E76-27-D94-E4-F9-D47.jpg)
![[Linked Image]](https://i.postimg.cc/gJPrf6SW/8-F1-EC220-87-AF-47-A7-BDAD-FB2-B26-B9-BAAB.jpg)
![[Linked Image]](https://i.postimg.cc/GtLtpnng/A0725612-314-B-4778-AF6-A-858-BBA46134-C.jpg)
![[Linked Image]](https://i.postimg.cc/6Q1vrggK/B2-D9-B1-D4-CCF5-4441-8-C6-B-84-E7629-EAE58.jpg)
![[Linked Image]](https://i.postimg.cc/x8Vqg2Pw/2-B4877-C4-0190-4-BF2-B9-D2-A0-B84330-E9-D8.jpg)
![[Linked Image]](https://i.postimg.cc/Kj7jHHqR/869-AA350-8048-4358-A1-D9-9-C14-ADFAEBF7.jpg)
![[Linked Image]](https://i.postimg.cc/fL9JxLY7/AF07533-B-610-D-42-E6-A872-54-B631-CCC5-DD.jpg)
![[Linked Image]](https://i.postimg.cc/L8DfXnVn/D4-A9-BE9-F-34-D1-469-B-A47-D-17-A81-DF929-B5.jpg)
![[Linked Image]](https://i.postimg.cc/FH6HHHhv/0778-CF54-F519-4-C6-D-9-FA2-0-B6743-BC78-A4.jpg)
![[Linked Image]](https://i.postimg.cc/XY1pBgcT/F2-E63-A28-3935-4-EC4-840-F-39-F40-E6-B76-E6.jpg)
![[Linked Image]](https://i.postimg.cc/x8QCVpnb/7-BE87323-C13-F-48-B7-ABB8-99-B76-DFFFC12.jpg)
![[Linked Image]](https://i.postimg.cc/nr1LFKhS/07009029-DF65-4-B85-8503-901-ABF376292.jpg)
![[Linked Image]](https://i.postimg.cc/Dw0zhXk5/4-AF695-B0-C2-F8-496-C-B7-D7-856-E0-C2172-B9.jpg)
![[Linked Image]](https://i.postimg.cc/bY0r9P90/9-A388-F8-E-30-AE-4-A0-D-8350-68931-B71-F665.jpg)
![[Linked Image]](https://i.postimg.cc/L6NsGV7n/F41-D2-A3-F-8-EE6-483-D-B7-D2-A2787-C52-C34-D.jpg)
![[Linked Image]](https://i.postimg.cc/Fs9RP6TM/DF384668-ADF5-49-F2-8134-BCAD18-C9-E7-BF.jpg)
![[Linked Image]](https://i.postimg.cc/yxPfBTJS/99-C2-C15-F-1-A7-A-40-D2-AEFD-BAE47-FED95-C1.jpg)
![[Linked Image]](https://i.postimg.cc/pTKGcvRC/63-F87475-F7-E5-4951-BBFF-A9789-E0635-A3.jpg)
![[Linked Image]](https://i.postimg.cc/KvGqfCV7/274429-A2-5061-4178-A71-C-4-DB422783-B37.jpg)
![[Linked Image]](https://i.postimg.cc/MHxshLGS/4502-D484-759-A-4-CCC-BCA4-75-AA339-BF714.jpg)
![[Linked Image]](https://i.postimg.cc/yYLfbv4M/5-A9-B7-FA7-705-D-4-EE9-A074-C8-D15-CB37-D80.jpg)
![[Linked Image]](https://i.postimg.cc/wjCmMdRp/B7-BD1685-6-DBB-436-D-8265-BCFB73-DF385-A.jpg)
![[Linked Image]](https://i.postimg.cc/k4dK1d7c/3-CEDDB6-C-C3-A1-4487-A935-1-B43-C091473-D.jpg)
![[Linked Image]](https://i.postimg.cc/RZyctH82/7786-A74-D-5572-4-EBC-BCB7-0-CB7-FE2-BBC94.jpg)
![[Linked Image]](https://i.postimg.cc/pdKnn1Kn/E994734-A-BF48-408-D-8686-BB22-AA1-DC4-E4.jpg)
![[Linked Image]](https://i.postimg.cc/FRZdTdWr/53-E12908-5354-48-A0-AE71-4-EA30-E96-E785.jpg)
![[Linked Image]](https://i.postimg.cc/YqjGxS17/AEEFE0-C1-35-EC-4-D0-D-993-A-07-AFF634-CB34.jpg)
![[Linked Image]](https://i.postimg.cc/65S7bN0v/5-B9-DD2-CF-1129-4-E9-A-A308-9-D300785-F223.jpg)
![[Linked Image]](https://i.postimg.cc/dVyhzSHS/3986-BE77-3-ED7-4-D7-D-A15-E-7-AB2-E8758-C4-F.jpg)
![[Linked Image]](https://i.postimg.cc/BQh0sf2N/FC66-D857-ADF7-4-B66-8-F99-E50-D5410-F6-D8.jpg)
![[Linked Image]](https://i.postimg.cc/J7PgHctz/606-E8953-2578-4950-BC7-B-5-CB9-AC28623-C.jpg)
![[Linked Image]](https://i.postimg.cc/xT8ZvJby/FBF91394-2-D4-D-4943-A380-BE76-F6-FC5-FC5.jpg)
![[Linked Image]](https://i.postimg.cc/RhdzNjyS/F5060256-F743-4332-8068-CBD767-AE79-C5.jpg)
![[Linked Image]](https://i.postimg.cc/SxJpx1r4/61262-A43-8892-4-DB5-8232-EAAFB3-E7-DE02.jpg)
![[Linked Image]](https://i.postimg.cc/BvKy9Z3x/229-D253-C-8-D00-4-F57-B729-8420-ED126240.jpg)
![[Linked Image]](https://i.postimg.cc/jS99Fwpx/5-C412-B0-F-15-CF-444-D-8-AAC-23-E782288297.jpg)
![[Linked Image]](https://i.postimg.cc/9MPn0xr0/52560-B98-EDBA-41-DC-AF80-23153110-AD97.jpg)
![[Linked Image]](https://i.postimg.cc/Y9BPpc2T/6516-D105-626-F-49-A2-A50-B-910266214994.jpg)
![[Linked Image]](https://i.postimg.cc/wj3Z2cb4/458-FC6-E8-8856-4189-99-E5-04093-DD808-DB.jpg)
![[Linked Image]](https://i.postimg.cc/2jFsS5ZG/FF3-F6-A98-1-B8-E-4577-9100-287-B93864105.jpg)
![[Linked Image]](https://i.postimg.cc/6qwFfkDC/912-C0-B3-D-887-F-4-AAD-8-CAA-DCC0-D1-B0-A026.jpg)
![[Linked Image]](https://i.postimg.cc/Jz2VCdkW/4-F762855-9133-4-E72-B253-DFD1-D6589-BE5.jpg)
![[Linked Image]](https://i.postimg.cc/hjVHxD3S/9803-DFF7-4191-4-E80-813-D-A6-B3-AB911-B8-D.jpg)
![[Linked Image]](https://i.postimg.cc/2SWmPsf5/D297273-E-2157-4-B67-87-E1-08-A0-DE561503.jpg)
![[Linked Image]](https://i.postimg.cc/gj0mQrY9/072-CF3-CE-F266-4763-9-D8-A-51-A9-F3-BC7-C22.jpg)
![[Linked Image]](https://i.postimg.cc/QCnh3stF/5-AE827-E0-2545-4-FF3-B427-B78-D116-F1100.jpg)
![[Linked Image]](https://i.postimg.cc/mrN4r7kf/56-DC072-E-5-F2-C-43-CC-B5-F7-9-BE10-F444549.jpg)
![[Linked Image]](https://i.postimg.cc/bNsqRGCk/C021-E36-B-3-D1-A-46-E2-83-AB-F750068-AADA3.jpg)
![[Linked Image]](https://i.postimg.cc/66H9RV0B/D6-CB6-DEB-C2-C3-4853-A8-E8-D03-B139-A0701.jpg)
![[Linked Image]](https://i.postimg.cc/DyHnp2HD/E563512-C-7975-44-A2-AA8-D-996-BCF4-D022-D.jpg)
![[Linked Image]](https://i.postimg.cc/mZ97G7L4/3-AE3169-E-13-ED-426-A-9013-7-B7-C6-D751966.jpg)
![[Linked Image]](https://i.postimg.cc/MGr1zDf6/468-E5745-9-A25-4-F1-B-A1-C3-8-C03-E481153-B.jpg)
![[Linked Image]](https://i.postimg.cc/RVrQ3Xsq/EA0896-AF-050-A-4331-B4-B9-1-DC764211-D4-E.jpg)
![[Linked Image]](https://i.postimg.cc/mgBYjhGs/F0289-E13-16-A2-4-EB9-8-B1-B-C809-DBAEC1-D0.jpg)
![[Linked Image]](https://i.postimg.cc/T1nbqv71/1-B08271-F-F84-A-4191-BDC0-E18-AAD94-F798.jpg)
![[Linked Image]](https://i.postimg.cc/rmBWrw97/52-AE182-E-85-BB-43-E7-9-A2-A-1256-DCCBBA76.jpg)
![[Linked Image]](https://i.postimg.cc/Lsszd7XQ/403266-C3-7635-49-EC-BFD8-2239-DA40-E180.jpg)
![[Linked Image]](https://i.postimg.cc/FsQ3F1zL/E5-D76-CCC-26-D5-4677-B9-B7-C35-CB45-DEC0-D.jpg)
![[Linked Image]](https://i.postimg.cc/nrbkDJMG/5949-A375-4-D68-46-BB-8385-4979-FF6-F0-F4-B.jpg)
![[Linked Image]](https://i.postimg.cc/qByQdzZb/EFA114-C6-9-A04-411-A-B68-E-DA7-D99-BF63-BF.jpg)
![[Linked Image]](https://i.postimg.cc/q7JWN2Wv/BAD10-CFA-82-B8-4-DB3-B689-59-B80-FBDD42-D.jpg)
![[Linked Image]](https://i.postimg.cc/j27FpcnZ/D931-D9-DC-2-CBE-42-F0-8-FD0-3093-A4597-C23.jpg)
![[Linked Image]](https://i.postimg.cc/VNZZ5pjK/3-C3-E5-C77-6-D46-4-ECF-B971-ACEB6-B461293.jpg)
![[Linked Image]](https://i.postimg.cc/MKfPH9TD/FBF814-EF-FA8-D-4083-A13-B-DDB5978-B068-F.jpg)
![[Linked Image]](https://i.postimg.cc/6QX1DCBh/B43-B2-F3-A-1-F02-46-AA-A0-EF-C9-FD41-F6-FF4-D.jpg)
![[Linked Image]](https://i.postimg.cc/LXyCY7Ly/8-C5-C9628-35-F7-465-E-B0-CE-EDD2-A8-C33-E38.jpg)
![[Linked Image]](https://i.postimg.cc/R0wxtMZg/C433-CF94-58-FD-4-CD5-8-D87-5-C2903871-DCC.jpg)
![[Linked Image]](https://i.postimg.cc/x8TwBMyZ/06945383-722-C-4-CA8-9615-B14-A9-C65-A16-F.jpg)
![[Linked Image]](https://i.postimg.cc/nLbYVQRR/96-AA9-BB8-7242-4-D78-A62-F-DBE2596-F5666.jpg)
![[Linked Image]](https://i.postimg.cc/N068KfZg/2208514-A-2-D6-C-4-E83-9562-204-BEBE603-D5.jpg)
![[Linked Image]](https://i.postimg.cc/fLMcmQhY/89-CA2-F45-AD33-4-D3-A-8-FEC-8045-D3-F11180.jpg)
![[Linked Image]](https://i.postimg.cc/RFTTDVTP/C8538-E9-E-3-F60-41-FB-8813-27-E19-BA64056.jpg)
![[Linked Image]](https://i.postimg.cc/htHMJYj0/048-A316-A-EAED-4-A6-D-A021-4-C89-AB6-DDD36.jpg)
![[Linked Image]](https://i.postimg.cc/Hnsv837W/EED2-E6-C7-DF44-4812-8-AD3-8-B25-B17-FEDEB.jpg)
![[Linked Image]](https://i.postimg.cc/HsrBGrwN/443-D5-D80-5145-4-D57-9-B34-8-EF8-DFDAEBB3.jpg)
![[Linked Image]](https://i.postimg.cc/fyp7Wvcr/5238-F898-A860-4-F91-8-B87-6-BB4669491-A0.jpg)
![[Linked Image]](https://i.postimg.cc/9Fs1cc1Q/AAE315-C1-CD5-D-4562-B9-B3-7-B41-BB7-A0260.jpg)
![[Linked Image]](https://i.postimg.cc/Y2nby6Wg/431-EE317-F2-AF-428-C-B515-A39-F32-F06-DAB.jpg)
![[Linked Image]](https://i.postimg.cc/tTD2bPvK/5-CFDA17-F-057-E-492-D-B5-B6-9-DCFD5127263.jpg)
![[Linked Image]](https://i.postimg.cc/3wTBD9sM/C586-F0-C8-B50-C-4288-8-C89-1595-A54-F2-D12.jpg)
![[Linked Image]](https://i.postimg.cc/RZfdF2bQ/E866-DECB-82-F0-4265-852-A-2-B7-F2-D5-A7283.jpg)
![[Linked Image]](https://i.postimg.cc/FK5PVhJB/874-F0929-B97-D-4045-892-B-F76577986-F04.jpg)
![[Linked Image]](https://i.postimg.cc/W3gVmxP7/FF1-EC3-CD-8-F7-D-487-B-9646-DA3-F9-ECF6-D32.jpg)
![[Linked Image]](https://i.postimg.cc/9FpKtz8r/C15-D560-D-C047-4-E74-9902-34-E651-FD97-B0.jpg)
![[Linked Image]](https://i.postimg.cc/HsBv8RnM/2-C210-FD1-D9-EF-44-D4-8-F0-A-90-C121-F5-D57-C.jpg)
![[Linked Image]](https://i.postimg.cc/vZKP3nWH/BB90865-A-9-C5-C-4-D24-A249-EA30947261-A2.jpg)
![[Linked Image]](https://i.postimg.cc/bwrCxgSB/D41-F6-B64-3672-436-A-AD0-A-AC33-AB2-F5-BA1.jpg)
![[Linked Image]](https://i.postimg.cc/8PDx6Lb2/222-D3-BAF-211-B-4-FF4-BF59-F095-D6-FDBCFB.jpg)
![[Linked Image]](https://i.postimg.cc/WzVY0P0G/D531-F10-A-3-E2-A-44-D4-8-CA4-93-C1-EF1-B8-B48.jpg)
![[Linked Image]](https://i.postimg.cc/zf9cXhBP/4-CCEDE35-A44-B-4295-95-EB-F35-C9-B554-F70.jpg)
![[Linked Image]](https://i.postimg.cc/7ZtRddy4/AB40-B8-D0-1996-41-F6-9-F4-A-1-D54-DF322-B9-B.jpg)
![[Linked Image]](https://i.postimg.cc/3NZSBbZP/45-CBF68-C-E299-46-C9-A61-F-8-A759-AE91641.jpg)
![[Linked Image]](https://i.postimg.cc/FHHqPm8G/41-E22-B0-B-0-FC1-405-B-A612-029282-EADB80.jpg)
![[Linked Image]](https://i.postimg.cc/KjPPhvqd/13-F97827-CF19-4446-B50-A-453-C4-A5-B7-A67.jpg)
![[Linked Image]](https://i.postimg.cc/ncn7Qxwh/AA8199-CB-98-D3-45-F3-B046-6-F59-CFE39407.jpg)
![[Linked Image]](https://i.postimg.cc/4Nwc60rb/4-A4-A3-B3-A-5-B5-E-4796-A0-F2-E54-F9-E215043.jpg)
![[Linked Image]](https://i.postimg.cc/7hkz9rHX/CA205-FAA-07-A6-49-D7-B464-D4-CC077296-CA.jpg)
![[Linked Image]](https://i.postimg.cc/3NFvbfWh/A5-C917-FE-820-F-4-E36-BC75-D88630-DBED96.jpg)
![[Linked Image]](https://i.postimg.cc/K8zMJNbX/D203-BD4-A-487-A-41-C9-AD04-B91399-D7-ABFC.jpg)
![[Linked Image]](https://i.postimg.cc/L6DPyD6C/8-D67-F501-DA8-E-4-F4-E-B787-3580-E00-C4-FDD.jpg)
![[Linked Image]](https://i.postimg.cc/gkmRqQdL/EC998-BBE-CDD6-4-C8-D-95-D1-FE74596-EACE5.jpg)
![[Linked Image]](https://i.postimg.cc/tgZV4Hdw/170-C6065-527-F-48-B2-AD3-F-2-D2-EC59-D4398.jpg)
![[Linked Image]](https://i.postimg.cc/8khMvN8V/199-DB258-0-ECE-489-D-BACB-EAE776872905.jpg)
![[Linked Image]](https://i.postimg.cc/4dHvq9FK/8-D13-C54-C-237-A-48-A9-A204-104-FCDDF75-F0.png)
![[Linked Image]](https://i.postimg.cc/wMcNYc5B/CADDFF3-E-2-F96-4835-A039-6-A2-CCD022-E63.jpg)
![[Linked Image]](https://i.postimg.cc/VNm7DpyW/AC7-AC801-89-D4-424-C-875-A-1588-EB17735-C.jpg)
![[Linked Image]](https://i.postimg.cc/250PvrqZ/54-AD4-EC4-8-C3-E-4-FC5-B764-9-BB4-B5-F6-CA8-D.jpg)
![[Linked Image]](https://i.postimg.cc/N0DdVDBq/4-AD19236-E41-B-4838-8-B32-FC67384167-A1.jpg)
![[Linked Image]](https://i.postimg.cc/VL7LfQgd/6-E46-DDBB-58-A0-4295-AAD5-7-E679-F52-B40-E.jpg)
![[Linked Image]](https://i.postimg.cc/CLMxpLj3/DC2-C89-FB-E2-A3-4885-BD1-B-04561-E02-C9-DE.jpg)
![[Linked Image]](https://i.postimg.cc/43cJQKg9/76027-BEB-A34-E-4-C78-83-D6-39-EE8-A41539-D.jpg)
![[Linked Image]](https://i.postimg.cc/fy9F6d8c/3-B7-AF966-33-EE-4154-9483-86-EAEED913-C1.jpg)
![[Linked Image]](https://i.postimg.cc/C5BJRVDS/D4230-FFF-B1-DE-4-DB5-8-B8-F-497-C16573203.jpg)
![[Linked Image]](https://i.postimg.cc/8kmzYrrd/B4-EEBAFF-FA30-4-FD9-AD19-DB31-AD2-D50-EF.jpg)
![[Linked Image]](https://i.postimg.cc/tg3VP7L0/4-F1-F5-B4-B-B23-E-4-F71-B82-F-838701-D751-A5.jpg)
![[Linked Image]](https://i.postimg.cc/xT8H7fbH/078-C794-D-EC12-40-B6-A0-EC-8457788140-D5.jpg)
![[Linked Image]](https://i.postimg.cc/Mpc7c66x/9325-F25-C-4-F6-C-4092-9-D15-D6-FA6-BCB5-AD5.jpg)
![[Linked Image]](https://i.postimg.cc/QN0109Vh/540-C9437-17-C3-4985-B5-E2-BE4220776233.jpg)
![[Linked Image]](https://i.postimg.cc/zvXWq5ts/B0-F4-FE90-19-FD-4537-9-B40-F9-BBE59-F909-D.jpg)
![[Linked Image]](https://i.postimg.cc/26YhXn48/DFF45-BED-FBCB-410-A-9-A6-D-72-BB4-CEB866-C.jpg)
![[Linked Image]](https://i.postimg.cc/nhQmF32h/D18-E2-BDC-C182-4-AF0-9331-54-DC399636-CD.jpg)
![[Linked Image]](https://i.postimg.cc/tT9nzpjs/FAF0-C3-E8-6-BD6-4-E32-B818-599-E7-A8-D6-F79.jpg)
![[Linked Image]](https://i.postimg.cc/L6ykhqdx/6-E5-A6815-803-A-4-E89-9-C6-E-587-AE6-D8-CC77.jpg)
![[Linked Image]](https://i.postimg.cc/qMBXksFt/094-AE41-D-CDA5-4-A8-F-9-D46-7-F9-E3-EFE925-A.jpg)
![[Linked Image]](https://i.postimg.cc/ht69bHtx/D8-E75-A98-AA6-B-4-C4-E-938-F-462-DC0725-D96.jpg)
![[Linked Image]](https://i.postimg.cc/T3pVbRff/C9-F7-B5-B6-93-DB-4-F90-A932-78-BEE3-D3-C6-D9.jpg)
![[Linked Image]](https://i.postimg.cc/vTb7xfHN/D3201-F43-2-BA4-489-A-A2-E6-EE68-D91-D23-D8.jpg)
![[Linked Image]](https://i.postimg.cc/c4p4Bxrn/6-C12-B4-F8-40-FE-409-B-858-E-0-A3-AB5-B51696.jpg)
![[Linked Image]](https://i.postimg.cc/HLCndYmg/617-F67-B9-DF86-4-E12-8904-062457838649.jpg)
![[Linked Image]](https://i.postimg.cc/nrMc0M4v/E9-F2-A833-03-E6-442-C-BB5-D-A526-A3831216.jpg)
![[Linked Image]](https://i.postimg.cc/25mkg0dj/3-E127-FB3-0801-4-AD7-A58-C-F35-FBD3-E0773.jpg)
![[Linked Image]](https://i.postimg.cc/sDQgWQDz/E813-DD1-D-8-AE8-42-EA-A9-EE-6-D355071-A5-D1.jpg)