Moparts
My On-Going 727 Rebuild Questions Post
Posted By: Big Bad Bee
My On-Going 727 Rebuild Questions Post - 09/18/14 07:42 AM
As I was working on the rebuild of my 727 tonight, I realized that I will end up hounding you guys with multiple posts. Rather than doing that I will ask a simple favor of you trans gurus out there. Could you stick with me this week while I get this thing together and just keep checking this post for questions? That way I can confine things to one thread. I would be very thankful and I believe that it will be helpful to other guys down the road.
Here's what I started with. Starting with a B engine 1975 727 TF, Munroe's transmission manual, dial gauge, dial caliper, snap ring pliers, medium and large C clamps, dead blow hammer air wrench, picks, and typical shop tools. Lots of clean shop rags.
I gutted the trans system by system using Munroe as a guide. Rather than use slide hammers to remove the front pump, I whacked at it from behind using a long socket extension. Worked great. Thank you moparts... I used the large C clamp to compress the springs on the accumulators to get the C clips out and pull them out of the body. Worked great.

Now on to the inspection and cleaning phase.
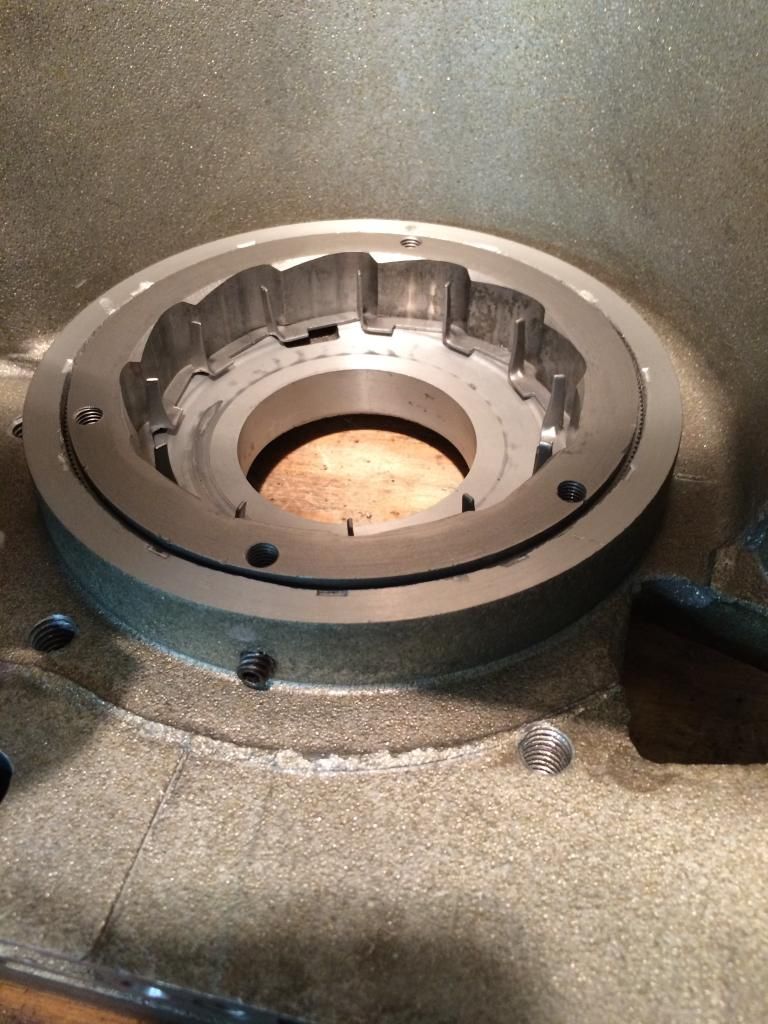
The accumulator bores look good. The rear clutch sprag was very tight in the race. Yes, I unloosened the set screw. Monroe said to loosen the set screw and then use a small drift to tap the sprag out from behind. It took some coaxing but it came out, however, the backing plate/retainer got tweaked by my drift.
HERE COME THE QUESTIONS!
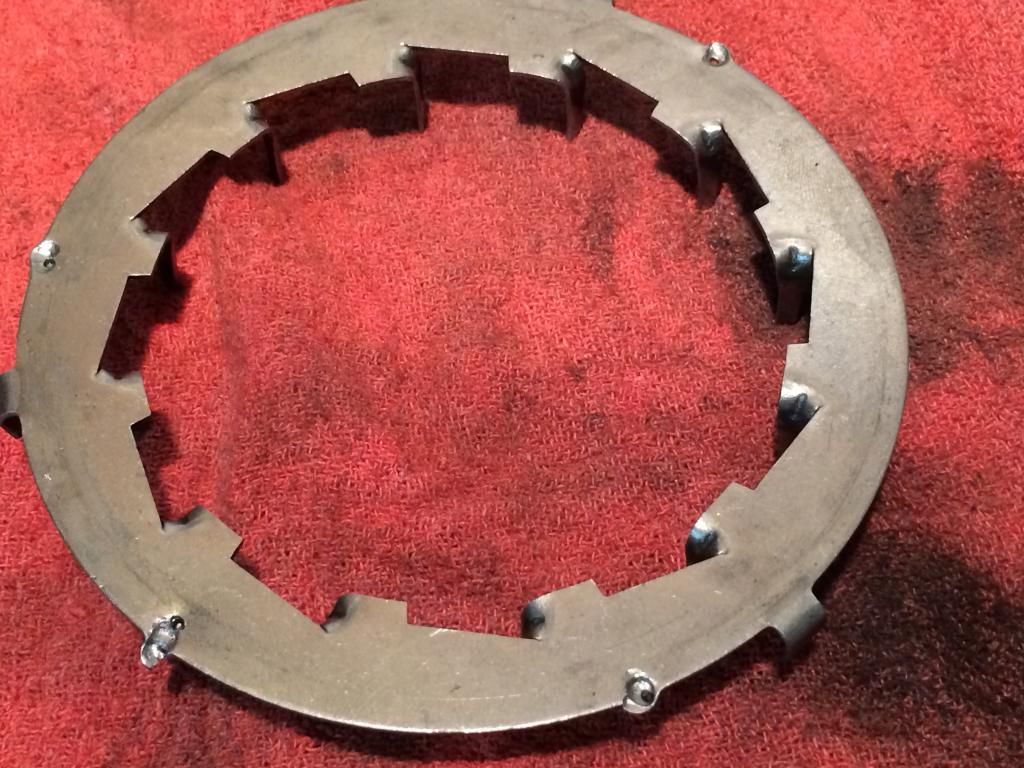
Was Monroe drunk when he wrote that or did I use to small of a drift? So what shall I do here, guys? the plate still sits against the sprag pretty flush. do I flatten out the dimples made by my drift? Grind them out? Buy a new backing plate/retainer? Look at the face of the backing plate. See the bearing wear? should I replace this?
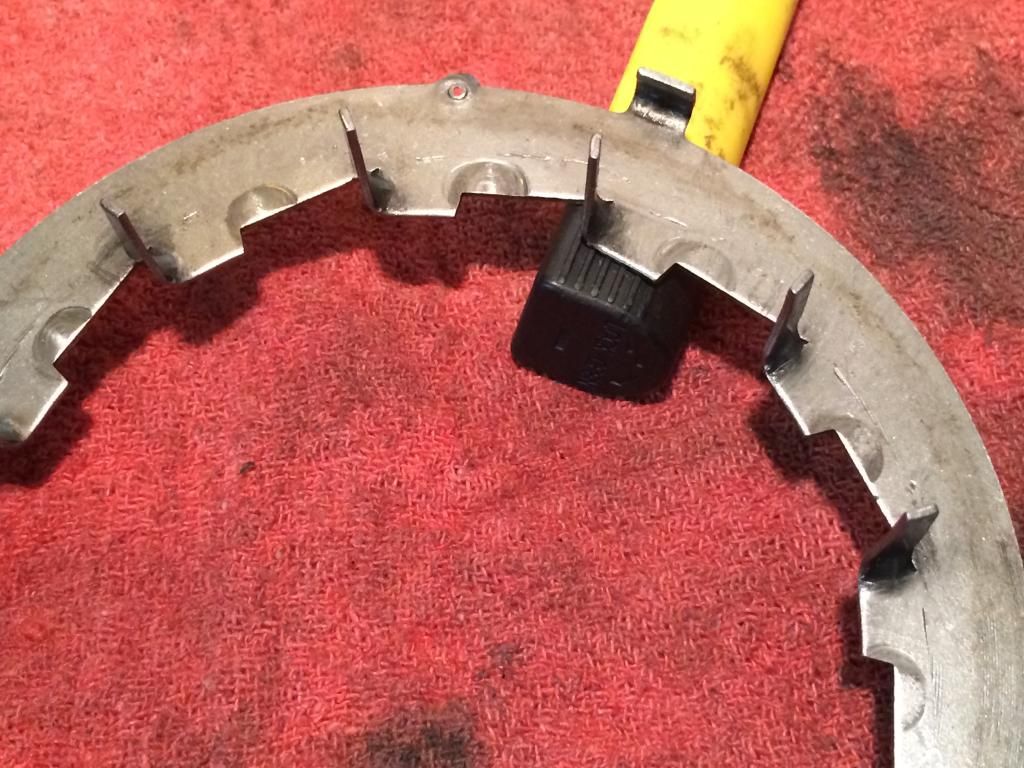
Take a look at the sprag. The little dowel bearings are in perfect shape as are the springs. Is this sprag okay? It's got some shiny wear spots but I can see all the groves in the cam.
I am now ready to clean the case and tail shaft and continue inspecting and cleaning. What do I use for solvent? is mineral spirits okay? Lacquer thinner?
Monroe suggests bead blasting the case but to rinse it out THOROUGHLY. I won't blast the interior but the exterior would be nice. What's your take? I was a bit surprised he suggested it.
What do you use for assembly lube?
I bought my rebuild kit from PTC. It came with 8 different bushings. So far my bushings are looking very clean and smooth. Do I forgo replacing the smooth ones or do I replace them all while I have it apart? Is there a good way to get them out without a bushing removal tool?
I know that's a lot of questions. Answer all you can and help me get this thing back together by Sunday!
This time of year most guys up here bag an elk and pose with it. I gutted a Torqueflight!
Posted By: Swedcharger67
Re: My On-Going 727 Rebuild Questions Post - 09/18/14 11:52 AM
I would just flatten out the dimples made by the drift. Looks pretty good IMHO.
I had to modify my backing plate/retainer significantly more due to the installation of a thrust bearing.

Posted By: 80fbody
Re: My On-Going 727 Rebuild Questions Post - 09/18/14 03:02 PM
I'd just replace the sprag since you removed it. Those are only like $15 I believe. I wouldn't waste the $100 on a bolt-in.
Posted By: JohnRR
Re: My On-Going 727 Rebuild Questions Post - 09/18/14 03:24 PM
Quote:
I'd just replace the sprag since you removed it. Those are only like $15 I believe. I wouldn't waste the $100 on a bolt-in.
Almost correct here .
First off you should have NOT removed the sparg unless it was loose in the case or the outer race was damaged. It's junk now throw it in the scrap pile.
Buying the standard bolt in is a waste of money as it does nothing to prevent the rollers from laying over, and now that you have driven out a perfectly good sprag putting in a stock press in isn't going to be as strong as the factory unit. Call Cope, or Coan, and buy the SUPER/Ultimate Sprag.... yes it's $200ish ..., it has more rollers and can't roll over and it's a bolt in. I suggest this one because I'm sure you aren't going to put a Billet front drum ... over $500 ... in it which is more expensive than the Super Sprag .

Posted By: Twostick
Re: My On-Going 727 Rebuild Questions Post - 09/18/14 05:52 PM

Add the billet drum if you can. Trans will now be as close to bulletproof as is possible. Don't fall into the "my engine doesn't make enough power" trap. A stone stock 318 is capable of exploding a stock drum.
Kevin
Posted By: Big Bad Bee
Re: My On-Going 727 Rebuild Questions Post - 09/18/14 06:01 PM
Quote:
Quote:
I'd just replace the sprag since you removed it. Those are only like $15 I believe. I wouldn't waste the $100 on a bolt-in.
Almost correct here .
First off you should have NOT removed the sparg unless it was loose in the case or the outer race was damaged. It's junk now throw it in the scrap pile.
Buying the standard bolt in is a waste of money as it does nothing to prevent the rollers from laying over, and now that you have driven out a perfectly good sprag putting in a stock press in isn't going to be as strong as the factory unit. Call Cope, or Coan, and buy the SUPER/Ultimate Sprag.... yes it's $200ish ..., it has more rollers and can't roll over and it's a bolt in. I suggest this one because I'm sure you aren't going to put a Billet front drum ... over $500 ... in it which is more expensive than the Super Sprag .
What?
Everyone here said to buy Munroe's manual and follow it to the letter. He says to knock the sprag out and inspect it. This is a $200 mistake??? 
What solvent? What lube? Glass bead blasting?
Posted By: hemi-itis
Re: My On-Going 727 Rebuild Questions Post - 09/18/14 06:07 PM
Since you will be beating on this,I want you to meet your new friend
http://www.tcsproducts.com/Supersprag,steel planets,billit drum and a shield should be in your future!
.JPG "8273876-8.27.11(5).JPG")
Posted By: JohnRR
Re: My On-Going 727 Rebuild Questions Post - 09/18/14 07:06 PM
Quote:
Quote:
Quote:
I'd just replace the sprag since you removed it. Those are only like $15 I believe. I wouldn't waste the $100 on a bolt-in.
Almost correct here .
First off you should have NOT removed the sparg unless it was loose in the case or the outer race was damaged. It's junk now throw it in the scrap pile.
Buying the standard bolt in is a waste of money as it does nothing to prevent the rollers from laying over, and now that you have driven out a perfectly good sprag putting in a stock press in isn't going to be as strong as the factory unit. Call Cope, or Coan, and buy the SUPER/Ultimate Sprag.... yes it's $200ish ..., it has more rollers and can't roll over and it's a bolt in. I suggest this one because I'm sure you aren't going to put a Billet front drum ... over $500 ... in it which is more expensive than the Super Sprag .
What?
Everyone here said to buy Monroe's manual and follow it to the letter. He says to knock the sprag out and inspect it. This is a $200 mistake???
What solvent? What lube? Glass bead blasting?
I have Monroe's manual , but I get bored reading so I just look at the pictures  . One doesn't need to remove it to inspect it.
As far as the $200 mistake , how much is your feet or the car really worth? The $200 is the cheapest way to make the trans safer. In a street car I would put in the super/ultimate sprag , you won't make it fail so the drum will never overspeed , if your were building an 800HP tire shredding monster then the sprag and the drum.
As far as the lube , transtar has nice lube that isn't too expensive.
I clean everything with brake wash , lay out a large white cloth and completely disassemble the valve body , lay each valve and spring out as they come out of the bores, clean each one individually and clean both valve body halves , there will be sludge in it .
Posted By: Big Bad Bee
Re: My On-Going 727 Rebuild Questions Post - 09/18/14 07:28 PM
Man, that's pretty. I know this is the race forum and I didn't state my goal. This is a moderate street build. 440, 475 hp, 3.91 SG.
That said, I need basic help in inspection, replacement and assembly.
What about the bushings? Do I knock em all out and replace em or leave em if they are clean? I sure don't want to make another $200 mistake...
Posted By: Guitar Jones
Re: My On-Going 727 Rebuild Questions Post - 09/18/14 07:49 PM
I agree with JohnRR, once you've taken the sprag out it will never be the same, get the good bolt in.
As for the bushings most times it's not necessary. You need to check them for wear, look at where the sealing rings ride, especially in the front drum to reaction shaft and input to reaction shaft. If there are any wear grooves on those surfaces the bushings that support them are toast and the hard parts will need to be replaced anyway.
Posted By: 80fbody
Re: My On-Going 727 Rebuild Questions Post - 09/18/14 08:53 PM
Not sure I'd change the bushings if they're good either, at least without a press. A couple , like the reaction shaft I believe, were somewhat of a pain to get correct on my 727.
Posted By: Big Bad Bee
Re: My On-Going 727 Rebuild Questions Post - 09/18/14 08:59 PM
Quote:
I have munroes manual , but I get bored reading so I just look at the pictures . One doesn't need to remove it to inspect it.
As far as the $200 mistake , how much is your feet or the car really worth. The $200 is the cheapest way to make the trans safer. In a street car I would put in the super sprag , you won't make it fail so the drum will never over speed , if your were building an 800HP tire shredding monster then the sprag and the drum.
As far as the lube , transtar has nice lube that isn't too expensive.
I clean everything with brake wash , lay out a large white cloth and completely disassemble the valve body , lay ech valve and sping out as they come out of the bores , clean each one individally and clean the entire valve body halves , there will be sludge in it .
Good info, John. It's not a matter of what my feet or car are worth. I'm not quick to replace factory engineered hardware that generally lasts 250k miles with no service especially when the "Bible" on that part says otherwise. Monroe does state something regarding improper assembly and risk of an explosion capable of injury or fatality if the thing binds up. Gotta love it. First everyone says, "it's easy, you can do it" so I dive in and now it's, "oh yeah, and don't create a grenade that will blow your nuts off..." 

Posted By: Big Bad Bee
Re: My On-Going 727 Rebuild Questions Post - 09/18/14 09:05 PM
Thanks for the other comments on the bushings etc. guys. I've been replying when I can and don't mean to miss comments. I don't have a press but I can have them done if need be.
Posted By: WILD BILL
Re: My On-Going 727 Rebuild Questions Post - 09/18/14 11:35 PM
One thing you haven't stated (and no one has asked) is what kind of VB will you be using? THis will have a great effect on weather you stand a chance of over spinning the front drum.
If you plan on using a VB that does not have a LBA in first gear then I hihgly recomend a billet front drum. Most, manual VB's do not have LBA in first gear. All stock VB's (even those with a shift kit) reatain the LBA in first gear.
I have never knocked out a good working sprag so I can't tell you weather pressing in another factory one will last or not. Cheap insurance to not have to open it up after 5 passes would be a bolt in sprag.
If the bushings look good, I don't bother replacing them. Is it right? Probably not, But I've gotten away with every time so take that with a grain of salt and use your best judgement.
Cleaning the inside? I'm assuming you don't have accsess to a Hot Tank? Works great just be sure the "soap" is aluminum safe. If no tank, accetone or laquer thinner will work fine as will brake clean but that could get expensive. Tranny fluid is a fairly high detergent oil so things should clean up easily.
As for assy lube, beleive it or not, all I've ever used is good ol' petrolium jelly. Heard that trick form my auto trans instructor back in colledge. Never let me down yet.
One other thing I have yet to hear mentioned is, Do you have a lip seal tool? They aren't expensive and kinda a must have. It's really the only "transimission tool" I have ever bought. I can;t imagine how you will gett the seals and drums in correctly with out one.
Posted By: dusturbd340W5
Re: My On-Going 727 Rebuild Questions Post - 09/19/14 12:18 AM
you only need a lip seal tool for the rear drum/fwd clutch and all you need to get by is a feeler gauge just be careful not to nick the seal.
Posted By: Leigh
Re: My On-Going 727 Rebuild Questions Post - 09/19/14 12:25 AM
Take a piece of 1/8" tubing, and peen a piece of stainless wire into it. Hardware stores will have both items.
Posted By: JohnRR
Re: My On-Going 727 Rebuild Questions Post - 09/19/14 01:59 AM
I've got the Lisle cam bearing install tool , I use it for replacing most of the bushings , I'd at least change the one in the front pump and in the front drum.
Yes the stock sprag will last hundreds of thousands of miles , in a daily driver , but once you start beating on them all bets are off.
My mom had a 72 Fury with a 360, what I drove when I couldn't sneak out in my dad's duster I transplanted the 340 and 4 speed into, I was out screwing around in it one day and was shifting up thru the gears and slammed it into reverse as I overshot drive at about 40mph
, the car came to a screeching halt and wouldn't start right up afterwards
. anyway we probably put another 5k on it after that before the trans took a dump and I swapped in one I got from the junkyard. When I finally parted the car out I saved the 727. A decade later I decided it was time to see what's going on inside and learn how to rebuild one. I stripped the trans apart and flipped the case over to pump side down and the outer race of the sprag and a hunk of the case fell out onto the bench ...

Posted By: dvw
Re: My On-Going 727 Rebuild Questions Post - 09/19/14 02:44 AM
OK I'll though my 2 cents in. I've probably built over 75 727s. First I agree, I wouldn't have and personally don't remove the outer low roller cam. I have put the old one back in by lining up the splines and tapping it back in w/o issue. Do replace the pump bushing. It can be done w/o a bushing driver if you are very careful by using a piece of flat material, lay it flat across and tap it in straight. Used to do it all the time before I made a bushing driver. Look carefully at the new bushing. You will see that it a rolled piece that is joined with a seam. Make sure the seam is not inline with the area where it will be staked. Round an old punch or hinge pin and stake it. Remove the slight burr with knife, check it now on the converter to make sure it slides on freely. You 2 springs in the front servo. make sure the front clutch drum takes 4 frictions. If it;s set up for 3 replace it, they're cheap Clean the governor. Other than that the most difficult task is installing the front drum piston. You can't rotate it or see the outer seal. take a large zip tie , go around the seal and put the piston/seal/zip tie in the freezer for about 15 minutes. Take it out remove the zip tie , lube the seal and set the piston down as far as you can get it w/o forcing the seal to roll outward. You can fell when this happens. Then take the drum in your hands and tap it hard against a 4x4 wood block. the piston should fall down into the drum. If it does't work. try try again. Do not force it. When done drop both the input and drums into the 'front pump and air check it. Now's the time, don't wait until it's already assembled. I taught myself over 25 years ago. Pay attention, go slow. It will work fine. For what it's worth I run the original 1965 low roller in my 64 Belvedere. 200 passes it looks like new. The car ran
9.18@146 last weekend.
Doug
Posted By: dusturbd340W5
Re: My On-Going 727 Rebuild Questions Post - 09/19/14 03:32 AM
I have built hundreds of these over the years all you need to do is lube up the front drum and seals real good and just wiggle the piston while applying pressure and it will slip right in no need for zip ties or a freezer.
Posted By: dizuster
Re: My On-Going 727 Rebuild Questions Post - 09/19/14 05:07 AM
zip tie and freezer aren't required for a guy that's built 100 of them... but sure as hell helps the new guys out who have no idea what a rolled lip seal feels like...
Posted By: Bigbeep
Re: My On-Going 727 Rebuild Questions Post - 09/19/14 05:20 AM
Quote:
I have built hundreds of these over the years all you need to do is lube up the front drum and seals real good and just wiggle the piston while applying pressure and it will slip right in no need for zip ties or a freezer.
Same way I do it. Works fine just don't force it. Beep

Posted By: 451Mopar
Re: My On-Going 727 Rebuild Questions Post - 09/19/14 09:19 AM
You should have not removed the stock sprag if it was tight and you plan to reuse it. The stock one was peened in place (the flat marks around the sprag in the aluminum case.) For a stock powered driver, reusing the old sprag would be OK if it is still tight when replaced, but for a performance car I would at least get the lower priced bolt-in sprag. If your making really good power, get the more expensive bolt-in super sprag. Consider the cost of the bolt-in sprag as step one to preventing a possible front drum explosion. Step two is the billet drum (pricy $$$.)
For bushings, replace front pump bushing, and front drum bushing (if it is sloppy the sealing rings won't seal and you will loose pressure to the front clutch pack.) The tail shaft bushing also (check fit to driveshaft yoke.) When installing the front pump (converter) bushing, use the round side of a phillips screwdriver to peen it in place, then fit to the converter to make sure it fits before installing the seal and re-assemblin the pump. The front pump thrust bushing (large thin fiber/plastic washer) comes in various thickness. It should be OK if you are re-using the stock gears and drums, but if you start replacing them with the billet parts, then you may need a different thickness bushing to get the correct clearance.
Posted By: Big Bad Bee
Re: My On-Going 727 Rebuild Questions Post - 09/19/14 07:21 PM
Wild Bill, The valve body is the stock unit. I'm installing a TransGo Shift kit. What is an LBA? I don't have a lip seal tool. I'll definitely consider it.
Leigh, do you have photos? I have no idea what you are suggesting.
I'll get back to all the lip seal comments when I get to that point of the rebuild. Right now I don't even know what the lip seal looks like. Thank you all for the information so far.
Here's a new development. Inspecting the housing I found this.
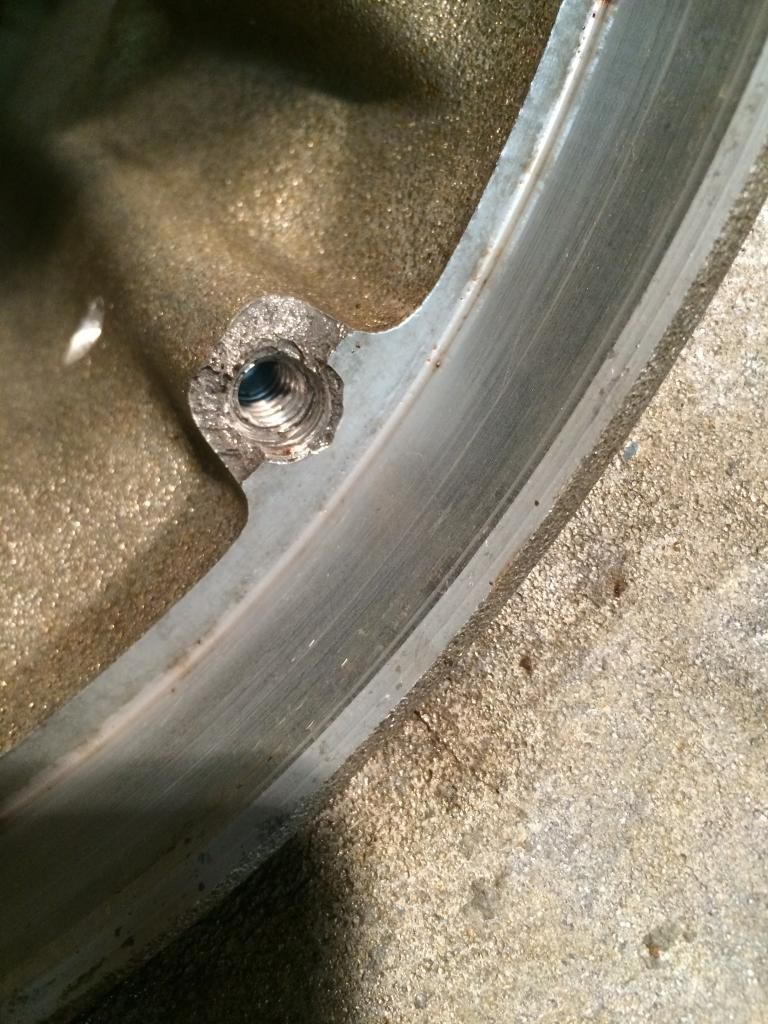
This is a pump bolt hole is at the 9 o'clock position. The bolt was threaded in tight and it looks like it's got a helicoil in it??? I've lost a quarter inch of thread. So obviously somebody else has been under lucy's skirt...
Like I said, there are enough threads for the bolt to get a good grip. Is the case still okay? I don't see any fractures beyond this little break.
Posted By: WILD BILL
Re: My On-Going 727 Rebuild Questions Post - 09/19/14 07:49 PM
LBA is shorthand for Low Band Apply. As I said, many after market VB's don't apply the Low Band in first gear which is what gives the chance of spinning the front drum beyond its limits causing it to explode. Using a Stock (albeit modified VB) you wont have that risk.
The lip seals are the ones on the pistons inside the drums. They are one way seals that hold the pressure when the fluid is directed to the piston to engage the clutch packs.
Providing there is enough thread in the broken hole boss to get it torqued to spec I don't think you'll have an issue as there appears to be enough sealing surface for the gasket to seal to.
Posted By: John_Kunkel
Re: My On-Going 727 Rebuild Questions Post - 09/19/14 09:23 PM
The broken boss already has a Heli-Coil installed so it should be OK as is.
The clutch piston lip seals being discussed aren't that much of a problem, the rear seal is fully visible during the piston install and the lip can be "nursed" into place with any rounded object; the front seal isn't visible and is a little more tricky but, since yours is a '75, it will have the seal with the short lip (left in the pic below) and will usually install with a firm straight push (well lubed, of course).

Posted By: Big Bad Bee
Re: My On-Going 727 Rebuild Questions Post - 09/20/14 02:28 AM
John K, excellent picture. Thank you.
Bill, thanks for the clarification. A follow up question. If I drag race with a stock VB and shift kit, do I risk over-spinning the trans in the water box in first gear?
I got the bolt in sprag ordered and on the way. I'll be busting my hump getting the assemblies cleaned, inspected and reassembled with new parts so that they are ready to assemble monday when the sprag gets here. More to follow. Thanks guys.
Posted By: WILD BILL
Re: My On-Going 727 Rebuild Questions Post - 09/20/14 05:55 AM
Quote:
A follow up question. If I drag race with a stock VB and shift kit, do I risk over-spinning the trans in the water box in first gear?
No, Not with the low band also holding in first gear.
The "problem" is when you have a VB without a LBA in first gear. The sprag is then the only thing holding in first gear. If that lets go, then the drum will spin roughly twice engine RPM and the stock drum just can't handle that and can come apart.
Posted By: JohnRR
Re: My On-Going 727 Rebuild Questions Post - 09/20/14 02:58 PM
Quote:
John K, excellent picture. Thank you.
Bill, thanks for the clarification. A follow up question. If I drag race with a stock VB and shift kit, do I risk over-spinning the trans in the water box in first gear?
I got the bolt in sprag ordered and on the way. I'll be busting my hump getting the assemblies cleaned, inspected and reassembled with new parts so that they are ready to assemble monday when the sprag gets here. More to follow. Thanks guys.
With a stock Valvebody when you pull the trans down into Low it applies the rear band. The only time you risk overspinning is if the trans in in 1st and the sprag has failed , band not applied , that is when things will spin backwards thru the geartrain in the trans and potentially overspeed the drum.
Buy the super sprag , problem solved, the stock replacement bolt in is a complete waste of money , and you are half way to the good one.
Posted By: MR_P_BODY
Re: My On-Going 727 Rebuild Questions Post - 09/20/14 03:08 PM
Quote:
Quote:
John K, excellent picture. Thank you.
Bill, thanks for the clarification. A follow up question. If I drag race with a stock VB and shift kit, do I risk over-spinning the trans in the water box in first gear?
I got the bolt in sprag ordered and on the way. I'll be busting my hump getting the assemblies cleaned, inspected and reassembled with new parts so that they are ready to assemble monday when the sprag gets here. More to follow. Thanks guys.
With a stock Valvebody when you pull the trans down into Low it applies the rear band. The only time you risk overspinning is if the trans in in 1st and the sprag has failed , band not applied , that is when things will spin backwards thru the geartrain in the trans and potentially overspeed the drum.
Buy the super sprag , problem solved, the stock replacemtn bolt in is a complete waste of money , and you are half way to the good one.
Yep.. the production VB is a LBA valve body but like
John said.. its only applied in manual low.. if left
in drive it is not applied... and the super sprag
is worth the cost over the bolt in stock style

Posted By: cudadon
Re: My On-Going 727 Rebuild Questions Post - 09/20/14 05:34 PM
Mike how should one do a burnout @ the track with a stock (shift kit) VB so as not to overspeed the drum?
Start out in manually shifted 1, is it then ok to shift to 2nd?
Don

Posted By: Big Bad Bee
Re: My On-Going 727 Rebuild Questions Post - 09/20/14 06:41 PM
Quote:
Mike how should one do a burnout @ the track with a stock (shift kit) VB so as not to overspeed the drum?
Start out in manually shifted 1, is it then ok to shift to 2nd?
Don
From what Wild Bill was saying, it sounds like you would be right but if you had a manual valve body you would run your burnout starting in second gear? Fascinating. I've never drag raced. Not even on the street. All this is news to me.
DVW, 451, Mr P, Big Beep, john, Bill, everyone, the collective knowledge here is fantastic and I appreciate the detail you've put in your posts. I'm learning so much. I'm sure I'll have more questions later today.
Posted By: WILD BILL
Re: My On-Going 727 Rebuild Questions Post - 09/21/14 02:42 AM
Yes, W/ a manual VB W/O LBA I start my burnouts in second gear and then click third and roll out under power. I also use a line lock on the front brakes to hold the car in place during the burnout
Posted By: MR_P_BODY
Re: My On-Going 727 Rebuild Questions Post - 09/21/14 03:12 AM
Quote:
Mike how should one do a burnout @ the track with a stock (shift kit) VB so as not to overspeed the drum?
Start out in manually shifted 1, is it then ok to shift to 2nd?
Don
With the stock VB.. its gonna start out in 1st/low
so shift the shifter into 1st/low to apply the band
(that way all the load isnt on the sprag) and get
it spinning... AS SOON AS POSSIBLE shift into 2nd
and get the tire speed up and shift into high...
just remember that you dont want to ever pedal the
car in low gear... if your in D and you pedal you
unload then slam the rollers back in and thats when
things break.. if the sprag breaks it then spins the
drum 2.2 times the engine rpm... the drum(production)
will let go at about 13,000 rpm... 6000 engine rpm
X 2.2 is 13,200 rpm.. so the engine doesnt have to
be spinning BIG rpm... but the sprag is only used
in 1st/low gear.. thats why you want to get out of
1st/low gear as soon as you can
EDIT
with a MANUAL VB I start out in high gear and wack
the throttle and get it spinning pretty quick but
my car is light so I dont have all the friction on
the tires from weight...on most cars with the manual
VB they start out in 2nd then shift to high... remember
your trying to get the tire speed up for heat
Posted By: Big Bad Bee
Re: My On-Going 727 Rebuild Questions Post - 09/21/14 06:23 PM
Okay back to business. I'm ready to start removing and replacing bushings as I clean and reassemble my transmission sub-assemblies. I've got a few different opinions here on which ones to replace but since I have an entire bushing kit why not replace them all?
Obviously I don't want to bung something up here, and I'd rather not buy an expensive tool, so give me your methods. I've seen people use everything from 2 x 4's to sockets to drive bushings. The only specialized tool I have right now is a bushing and bearing race driver kit that I checked out from the local O'Reilly's auto-parts store. It has the tapered disks to accommodate wheel bearing races.
Removal: how? Is it okay to remove them with the drift? A socket? The bushing driver? How do I know which direction the bushing drives out?
Insertion: is that tool from O'Reillys going to be okay? There are small bushings I don't have the right size disc for. can I tap them in using the backside of a socket or something similar? Do you lubricate The outside sleeve of the bushing and the mating surface on the part it is inserted into?
All of the surfaces inside the rear drum are looking excellent, however the outside of the drum has a few little brown spots where it looks like band material is stuck to it. how do I clean this up? Emery cloth? 0000 steel wool?
Posted By: StealthWedge67
Re: My On-Going 727 Rebuild Questions Post - 09/21/14 07:28 PM

GREAT POST so far. This is the way its supposed to work.
Posted By: MR_P_BODY
Re: My On-Going 727 Rebuild Questions Post - 09/21/14 08:02 PM
Quote:
Okay back to business. I'm ready to start removing and replacing bushings as I clean and reassemble my transmission sub-assemblies. I've got a few different opinions here on which ones to replace but since I have an entire bushing kit why not replace them all?
Obviously I don't want to bung something up here, and I'd rather not buy an expensive tool, so give me your methods. I've seen people use everything from 2 x 4's to sockets to drive bushings. The only specialized tool I have right now is a bushing and bearing race driver kit that I checked out from the local O'Reilly's auto-parts store. It has the tapered disks to accommodate wheel bearing races.
Removal: how? Is it okay to remove them with the drift? A socket? The bushing driver? How do I know which direction the bushing drives out?
Insertion: is that tool from O'Reillys going to be okay? There are small bushings I don't have the right size disc for. can I tap them in using the backside of a socket or something similar? Do you lubricate The outside sleeve of the bushing and the mating surface on the part it is inserted into?
All of the surfaces inside the rear drum are looking excellent, however the outside of the drum has a few little brown spots where it looks like band material is stuck to it. how do I clean this up? Emery cloth? 0000 steel wool?
Sorry I cant help with the bushing aspect... its been
a while since I last installed them... back then I
made up a installer tool for the larger ones and
installed them first and kept cutting the tool down
for each smaller bushing... at the time I didnt have
enough stock at home to make a tool for each bushing
so I could keep the tools.. I dont recall any of
them going in or out in any one direction... scotch
brite pad should clean the drum
Posted By: Big Bad Bee
Re: My On-Going 727 Rebuild Questions Post - 09/21/14 08:21 PM
Quote:
Sorry I cant help with the bushing aspect... its been
a while since I last installed them... back then I
made up a installer tool for the larger ones and
installed them first and kept cutting the tool down
for each smaller bushing... at the time I didnt have
enough stock at home to make a tool for each bushing
so I could keep the tools.. I dont recall any of
them going in or out in any one direction... scotch
brite pad should clean the drum
That's ok Mike. Better to be humble than to lead me astray. I'm assuming you drive em out from whence the came. Some races have a shoulder so I guess that's obvious. I've also learned to measure how deep the old bushing sits and where the oil holes are before knocking em out. I've read how some guys knock a bushing out with a Cove chisel. Like I said. Don't wanna FUBAR the thing.
Posted By: MR_P_BODY
Re: My On-Going 727 Rebuild Questions Post - 09/21/14 08:45 PM
Quote:
Quote:
Sorry I cant help with the bushing aspect... its been
a while since I last installed them... back then I
made up a installer tool for the larger ones and
installed them first and kept cutting the tool down
for each smaller bushing... at the time I didnt have
enough stock at home to make a tool for each bushing
so I could keep the tools.. I dont recall any of
them going in or out in any one direction... scotch
brite pad should clean the drum
That's ok Mike. Better to be humble than to lead me astray. I'm assuming you drive em out from whence the came. Some races have a shoulder so I guess that's obvious. I've also learned to measure how deep the old bushing sits and where the oil holes are before knocking em out. I've read how some guys knock a bushing out with a Cove chisel. Like I said. Don't wanna FUBAR the thing.
I have cut some bushings with a course hack saw blade
then they come out easy.. if you do it that way just
be CAREFUL not to cut the housing area that the bushing
sets in
Posted By: Big Bad Bee
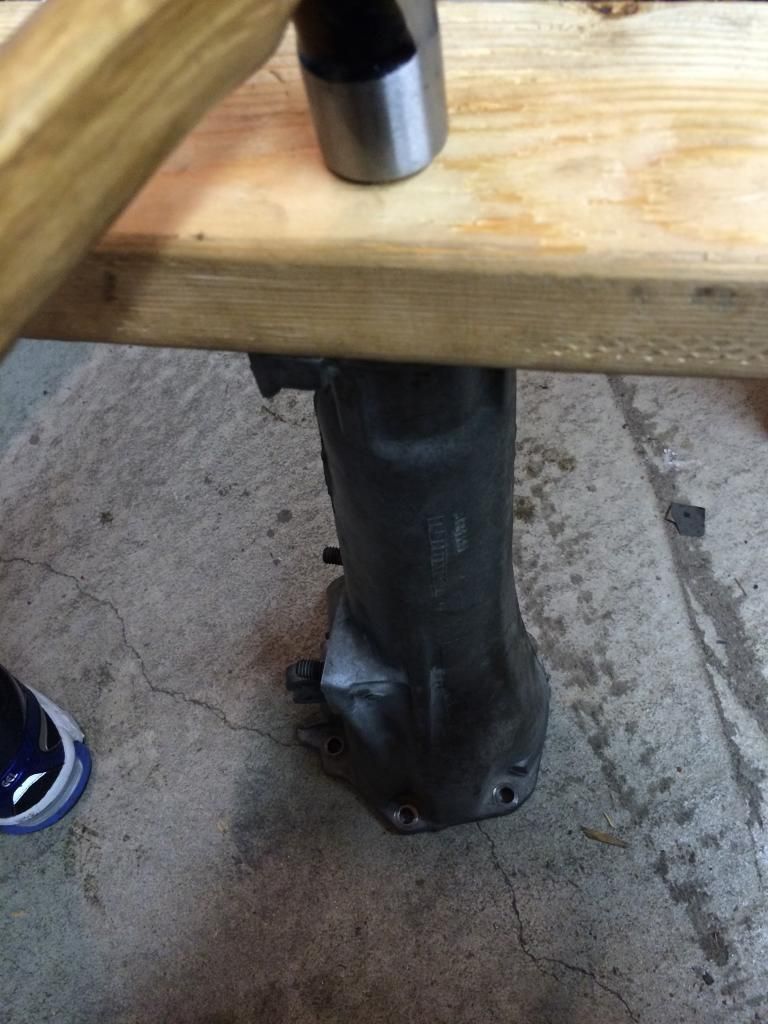
Re: My On-Going 727 Rebuild Questions Post - 09/22/14 04:49 AM
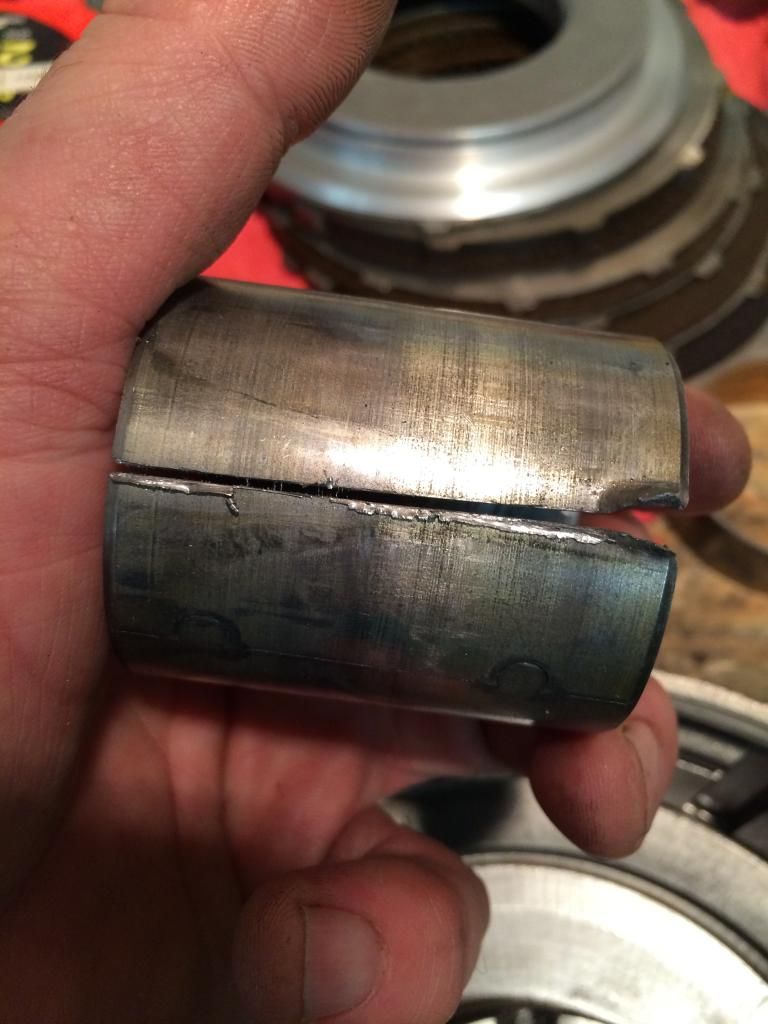
Well, in the absence of enough wisdom and the right tools I've learned another lesson tonight.
After unsuccessfully trying with a cold chisel, I used this bearing and race tool to remove the bushing from the rear retainer.
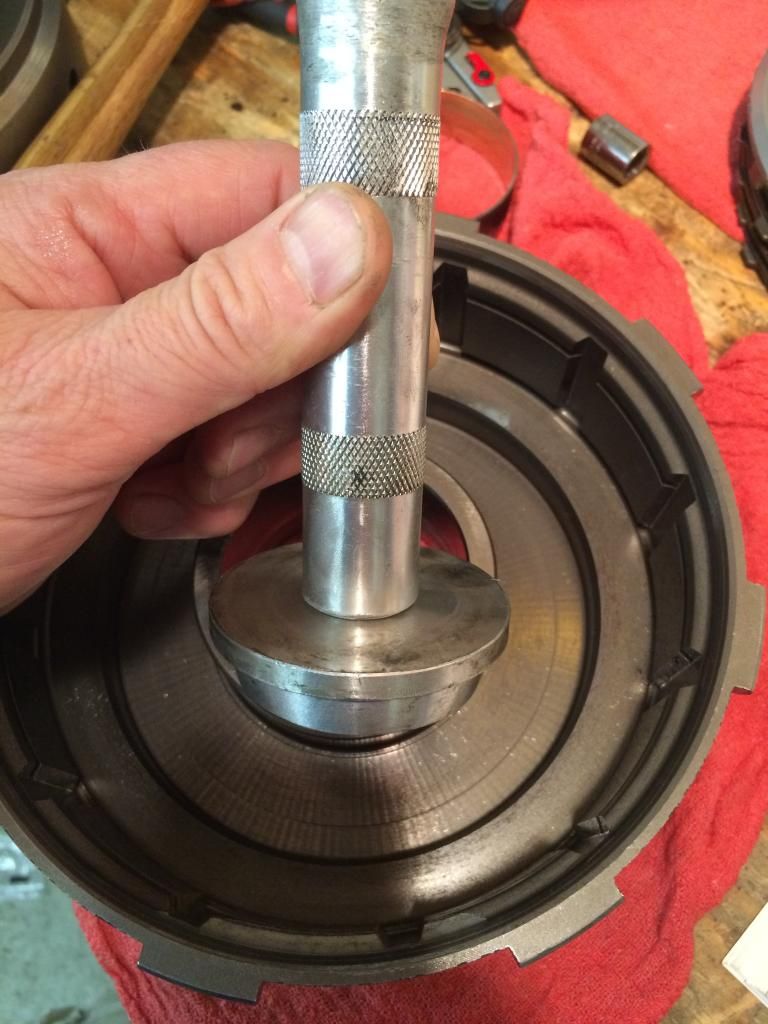
It was the right size and even with the tapered inside lip, worked sufficient.
I cleaned and inspected the bore, hit the new bushing and the bore with petroleum jelly and tried to knock it in with the same tool. When I was removing the bushing the tool had the bore to keep it aligned and it worked great. Inserting it with nothing to guide it was not so successful. It started a little cocked.
MISTAKE: Rapping on one edge of the driver to even the bushing out caused the joint in the bushing to split. I got the unit in the rest of the way with a 2x4, which I should have used in the first place. You can see a nice new oiling groove I've created. The crack is puzzling.


I attempted to remove the bushing in the tail piece but the tool kit didn't have a proper sized tool. It was almost right but because the disks are aluminum, the lip of the bushing just beat the heck out of the disk and I was done for the evening.
Thanks for listening. More to come. I got this.

Posted By: 80fbody
Re: My On-Going 727 Rebuild Questions Post - 09/22/14 01:36 PM
Unfortunately, this is the learning curve with trans building and why some mentioned to leave most of the bushings alone if they looked good. I'd get another full set of bushings so you can redo any that don't go in right.
Posted By: Big Bad Bee
Re: My On-Going 727 Rebuild Questions Post - 09/22/14 03:03 PM
Quote:
Unfortunately, this is the learning curve with trans building and why some mentioned to leave most of the bushings alone if they looked good. I'd get another full set of bushings so you can redo any that don't go in right.
Agreed. I can also see that having the right tool for that particular operation is key. You really need that shoulder to slip down into the bearing to get it in there smoothly.
Posted By: 80fbody
Re: My On-Going 727 Rebuild Questions Post - 09/22/14 03:23 PM
I purchased a quality bearing driver set which was around $70-$80 I believe. Also picked up a 20 ton Harbor Freight press. So I have a couple hundred spent for tools but they've helped out on many projects since that 1st trans.
Posted By: JohnRR
Re: My On-Going 727 Rebuild Questions Post - 09/22/14 04:38 PM
Quote:
Mike how should one do a burnout @ the track with a stock (shift kit) VB so as not to overspeed the drum?
You are only going to over speed the drum if the sprag has failed and you bring it up over 6k in the burnout box.
Posted By: Big Bad Bee
Re: My On-Going 727 Rebuild Questions Post - 09/23/14 05:27 AM
After the cracked bushing yesterday, I contacted a local mopar race transmission builder who gave me a tip on how to split and remove bushings. I also purchased a bolt in sprag. Pix to follow. Tomorrow.
Posted By: Big Bad Bee
Re: My On-Going 727 Rebuild Questions Post - 09/25/14 07:59 AM
Ok I'm back. I bought another complete bushing set for $15 from Transtar and elicited the advice of new friend Randy Ray of Randy's Racing Transmissions in Spokane Valley, WA. Randy is a Mopar guy and has hundreds of transmission rebuilds and quarter mile runs under his belt. Please note that while Randy is helping me with advice I welcome your ideas and thoughts.
Once Randy explained how to remove a bushing it was pretty simple. You look for the seam in the bushing and then get a very small screw driver and tap at the edge right behind it on either side of the seam, splitting it and then pushing it inward. then you get a cold chisel and just start whacking the bearing inward and splitting the seam all the way down. Sorry no picture, but it looks a bit like unzipping your pants.
This go round I lubricated both the drum and bearing with plenty of lube...

(Okay, I didn't use that, but I if it were good for lubing a trans, it would be the ONLY thing that crap is good for)
...And started it with a small 3/8" thick piece of plywood.
I set the correct depth just below the bevel in the steel race by tapping it in the rest of the way with the edge of a fir 2x4. VICTORY!!!

Next I tried to do the same the tail housing bushing.
Um No.
It's too thick. There is an oil channel that runs the length or the bushing in the tail housing. Taking a suggestion from Mike (mr P Body) I got a fresh hacksaw blade and went about sawing through the bushing. It took about a half hour but when I got through it, it literally fell out.
I lubed up the bushing, Made sure to orient it so the hole in it lined up with the correct oil duct and rammed it home with the side of a 2x4.
I tapped it the rest of the way in with a fender washer.
Note. Without the shoulder that a bushing driver has, the bushing tends to pucker inward when you hit it. I test fit the driveshaft and the bushing had swelled on the end too much. I took a knife and ran it around the lip of the bushing a few times, beveling the lip and removing a little material. Now the driveshaft fits great.
I think I have the bushing issue conquered so I moved to my next pitfall, the sprag. After talking to you guys here and Randy and consulting Munroe's manual, I went with a new TCI bolt-in sprag. Yes, the Super Sprag is cool and adds an extra measure of safety but the majority say it's overkill for my application. JohnRR, I really respect you. You've taught me a lot about the best way to go about building my car. I hope you keep giving your opinion here even though this time around I didn't take your advice.
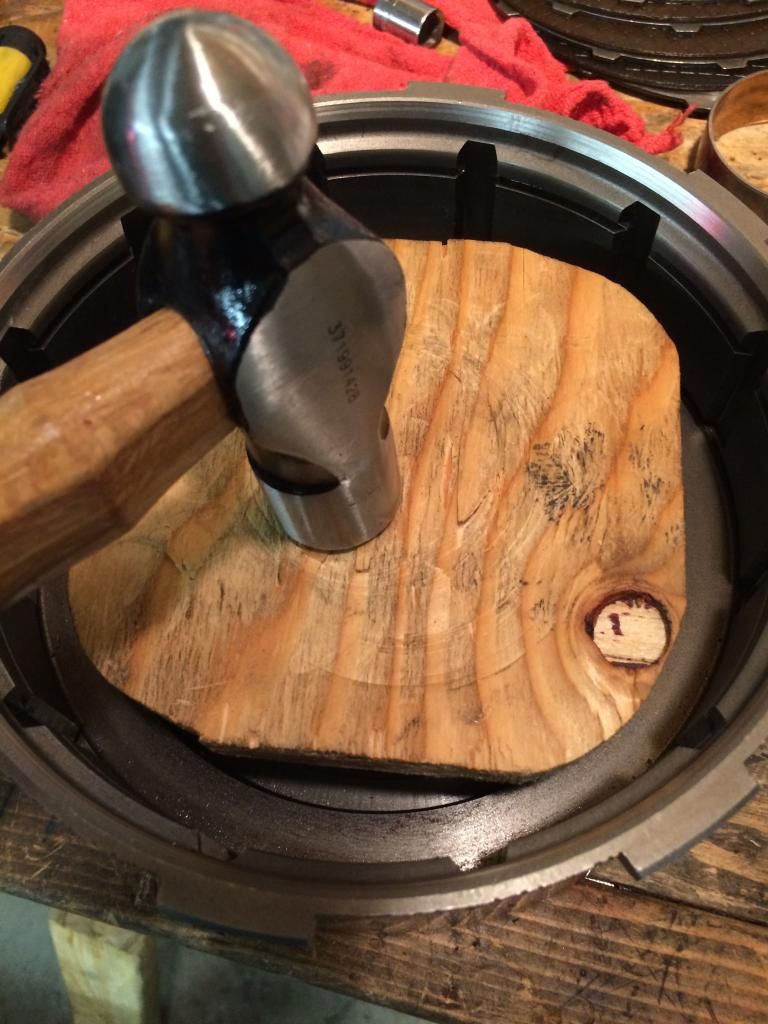
I prepped the case by taking a die grinder and beveling the teeth that the sprag meshes with. The original sprag is peened in around the edge with a small chisel. If you don't grind each of those spots where the peen is, the new sprag can possibly stick and you could crack the case.
I drilled out the threads in the case ever so slightly to give the sprag bolts a wee bit more tolerance.
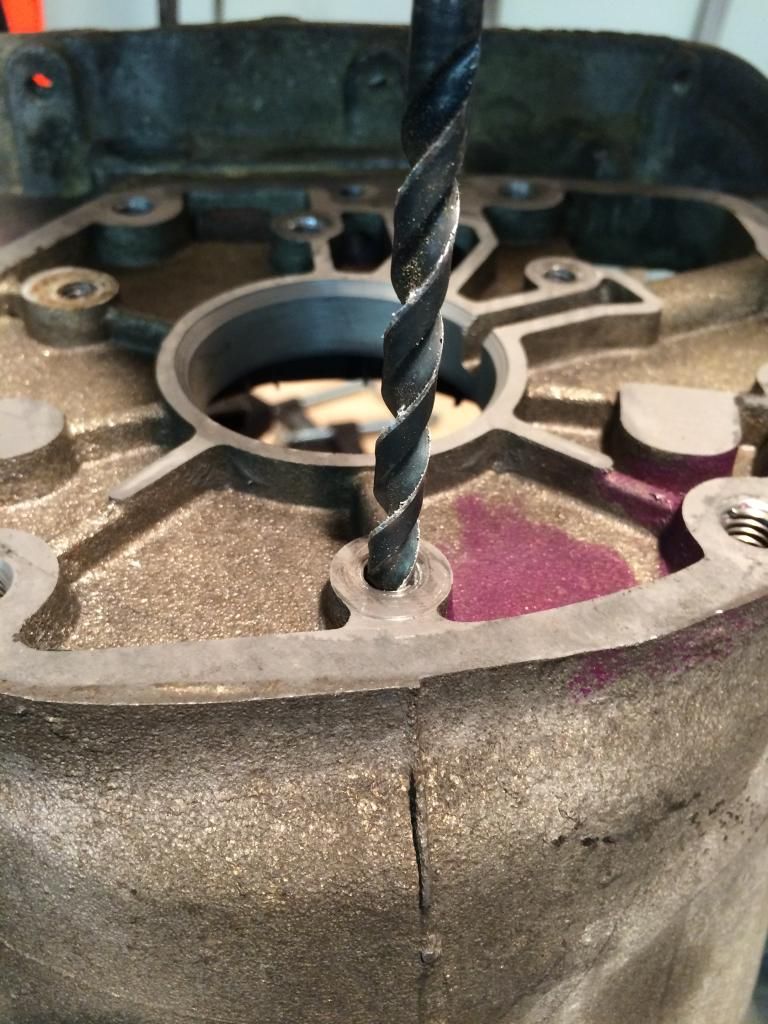
Then I bent in the retaining prongs of the backing plate slightly so that they would grip the sprag during installation.

Then I put washers on the supplied allen head bolts and sucked it up to the housing turning each bolt one full revolution at a time working in a criss-cross pattern like changing a tire.

here it's sucked about 2/3 of the way in.

Done
Now that I know I can do this without destroying the case, I'll go back to disassembling each subassembly, inspecting and cleaning, and then follow Munroe's step by step reassembly and calibration.
Posted By: PC-CHARGER
Re: My On-Going 727 Rebuild Questions Post - 09/25/14 03:19 PM
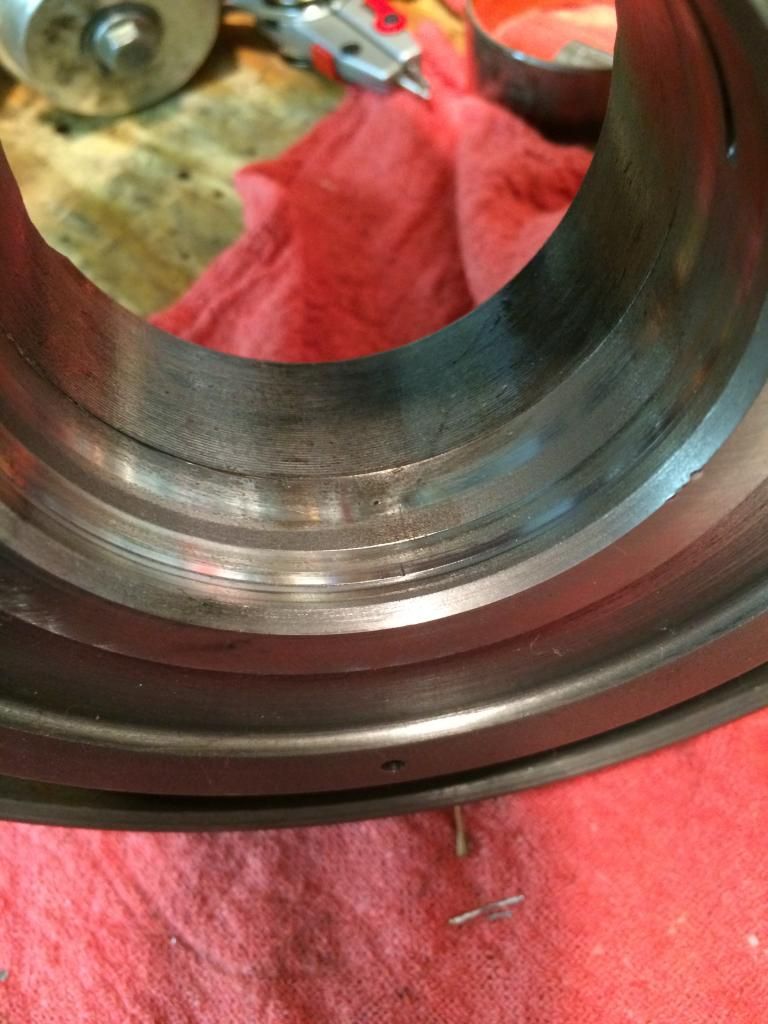
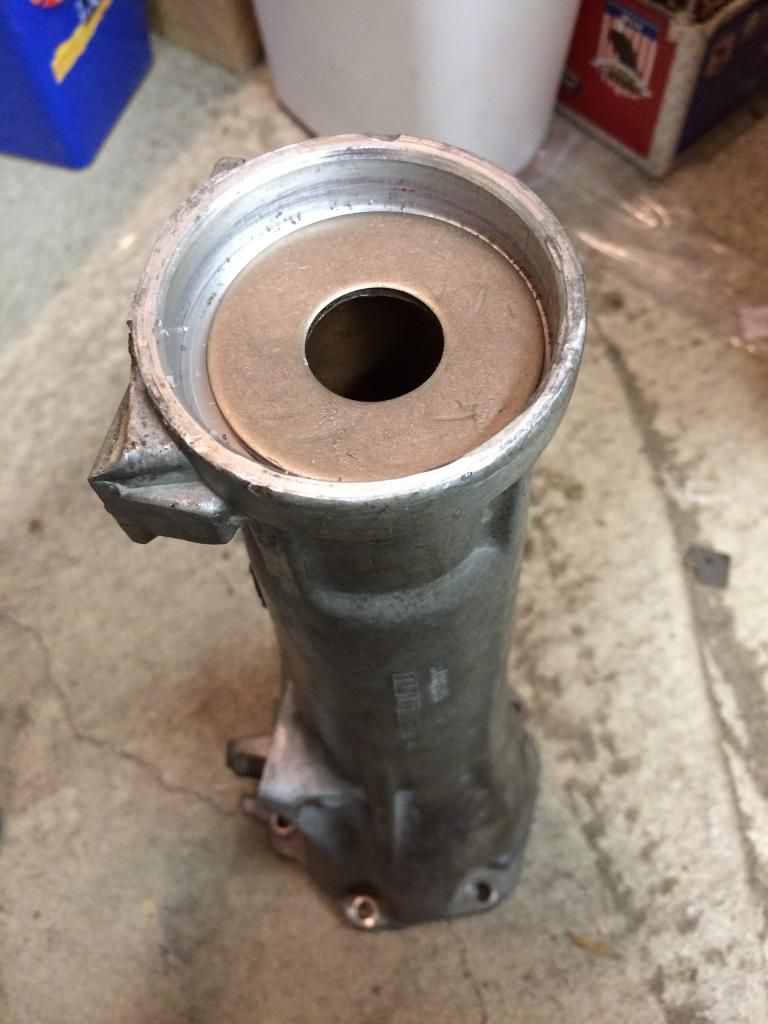
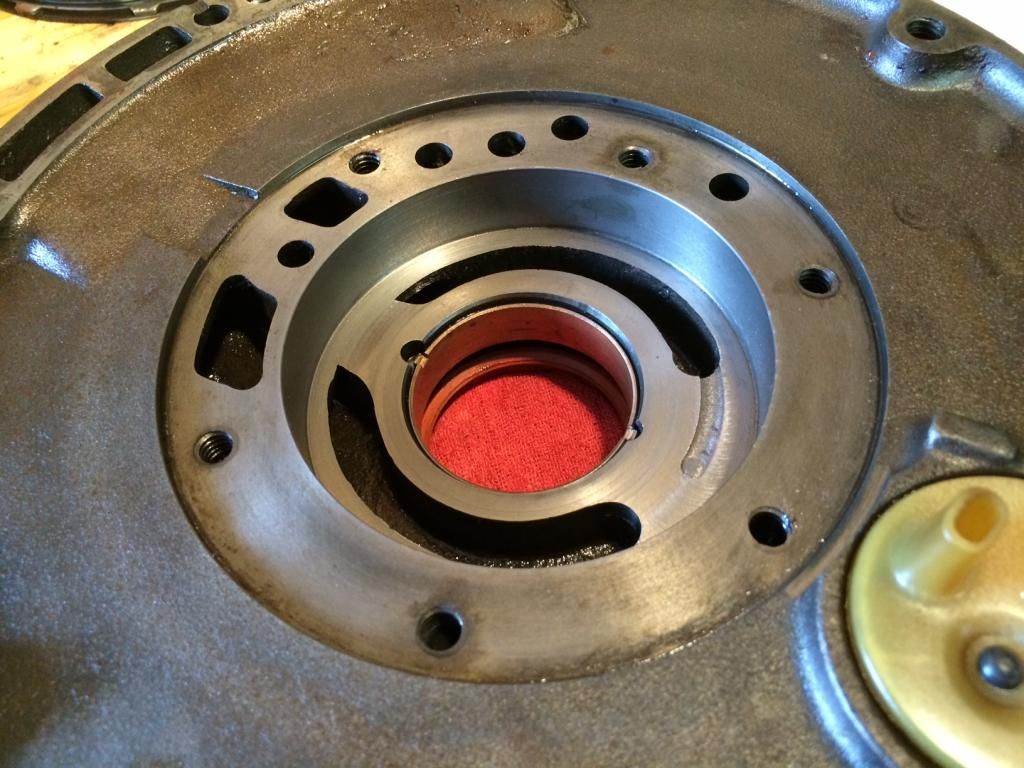
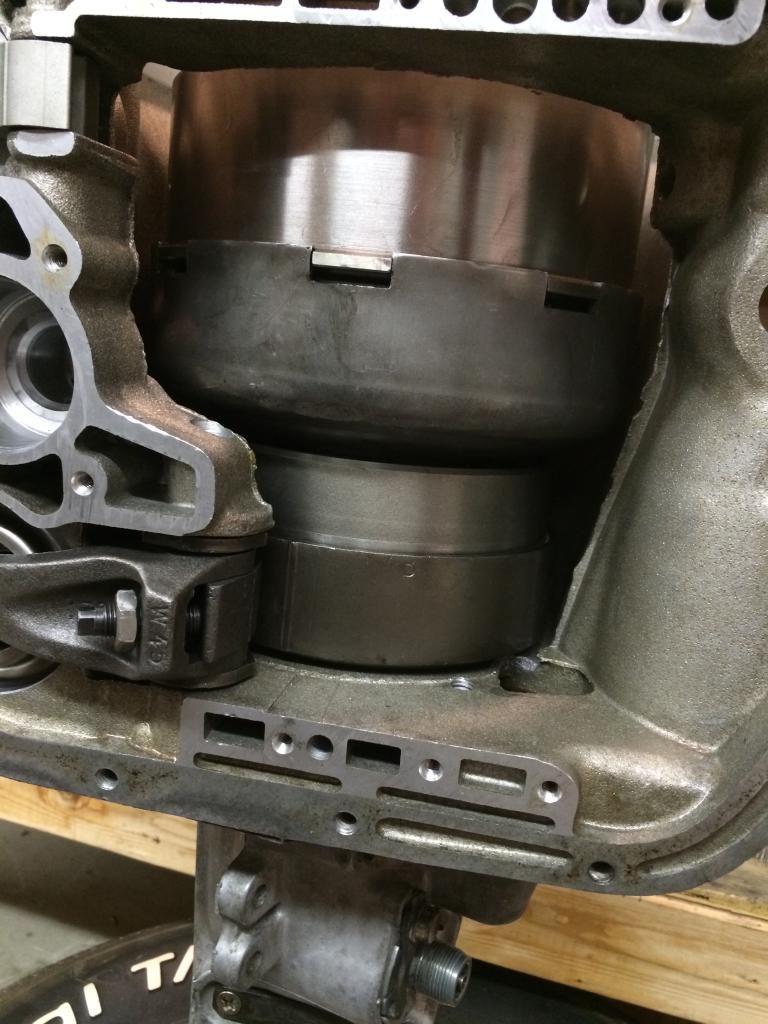
It's difficult to see and be sure but in the picture you took of the front drum with the bushing removed, it appears you have some wear in the seal ring area. I've attached your picture with the area in question circled in red. If there is as much wear in that area as it appears, then the drum should be replaced. You should also check the sealing ring grooves on the back of the pump for damage.

Posted By: Big Bad Bee
Re: My On-Going 727 Rebuild Questions Post - 09/25/14 06:26 PM
Quote:
It's difficult to see and be sure but in the picture you took of the front drum with the bushing removed, it appears you have some wear in the seal ring area. I've attached your picture with the area in question circled in red. If there is as much wear in that area as it appears, then the drum should be replaced. You should also check the sealing ring grooves on the back of the pump for damage.
I'll go back tonight and check it. What am I looking for? It's shiny where the seal rubs but there aren't any grooves or galling. Looking forward to installing yet another high drum bushing...
Posted By: PC-CHARGER
Re: My On-Going 727 Rebuild Questions Post - 09/25/14 07:55 PM
If it is just shiny where the seal rings ride, you're fine but in the picture it almost looks grooved and that's no good. If you can catch a fingernail on the shiny area, then it's worn beyond what can be reused.
Posted By: dusturbd340W5
Re: My On-Going 727 Rebuild Questions Post - 09/26/14 01:31 AM
yeah that sure looks like a groove
Posted By: Big Bad Bee
Re: My On-Going 727 Rebuild Questions Post - 09/26/14 10:30 PM
That bore is definitely grooved. I will be rolling out to Transtar to plop down more money for another drum this afternoon. The fun never stops...
Posted By: aspenrt360
Re: My On-Going 727 Rebuild Questions Post - 09/26/14 10:40 PM
hey at least you are doing it right and not just slapping it together
Posted By: PC-CHARGER
Re: My On-Going 727 Rebuild Questions Post - 09/27/14 12:01 AM
Don't forget to check the corresponding seal ring grooves on the back of the pump. Often when they groove the drum like this it will also rub on the ring grooves and damage them as well. Also check any other bores where there are seal rings for any kind of wear. You should also check the ring grooves themselves for step wear that would increase side clearance. By design, the seal rings rotate in unison with the rotating part. If everything is working properly the rotation should be between the ring and the stationary pump seal ring grooves so you will see step wear in the ring grooves but obviously that doesn't always happen.
Posted By: 80fbody
Re: My On-Going 727 Rebuild Questions Post - 09/27/14 12:33 AM
Rebuilt pump is an option and generally not too expensive. Think mine was around $50-$60. Comes with new gears and bushing already installed. I also found very quickly that you typically can't just slap the $200 rebuild kit in and go unless it's going behind a completely stock motor.
Posted By: Big Bad Bee
Re: My On-Going 727 Rebuild Questions Post - 09/27/14 02:36 AM
Thank you, guys. I get this for sure. Almost my entire build has been based on moderation. I've tried not to sacrifice safety and quality but I've also not gone over the top. I picked up a new drum tonight. Looks good. I'll keep moving through the build and hopefully find all the issues. I will say that this first chapter has taught me a few things.
Posted By: Big Bad Bee
Re: My On-Going 727 Rebuild Questions Post - 09/28/14 05:30 AM
Today was a short one but a productive one with the tranny. I worked on the front clutch retainer/input shaft assembly and carefully inspected all the splines, sealing surfaces, guide channels, lip seal groves and and the bushing for wear, resurfaced the pressure plates with 120 grit and cleaned everything up real good in the mineral spirit bathtub. Happy to say, that the whole thing looked great and I don't foresee any replacement other than the seals. I realized after it was pointed out by a moparts member that my high drum was scored, that as I tear down each assembly, I need to see how all the bearing, bushing, guide and ring surfaces work together and look at them all with care. It's fun!
Next I tore down the pump pulling all the seals. This too made me smile. the pump gear and ring look to be in good shape and I measured them with a feeler gauge. Gear gap is okay. So is the space between the ring and the race it sits in, and the height of the ring and center gears.

The pump looks really nice in the bore.
Try as I might, I couldn't figure out where the seam in the pump bushing was. Gave it several whacks with the corner of a sharp little cold chisel. I was tapping around the edge trying to be patient and I couldn't get it to budge. Then I got an idea. The old tail piece bushing is almost the same size. I lined the edge of the tail bushing with the edge on one side of the pump bushing and gave it a whack. BINGO! Easy peazy. I just moved around the lip of the pump bushing whacking the tail bushing and it was out in a flash. I'll load the new bushing tomorrow, clean it all up and move on to the reverse drum. My pile of clean parts is growing.

 after making about 10 grooves in this bearing and not budging it, I smacked it with the tail bushing. Happy day...
I was wondering what one of the guys posting here was talking about on peening this bearing over. Here you can see that there are two C shaped notches where the bearing should be peened outword. I am assuming that this helps it from failing and spinning with the torque converter
Posted By: PC-CHARGER
Re: My On-Going 727 Rebuild Questions Post - 09/28/14 05:42 AM
Pump looks good. If your measurements are all within spec, then it's good to go. I replied to another post about replacing a front pump bushing that explained about the two notches in the bushing and how to use a blunt 1/4" punch to peen the new bushing in place.
Posted By: Big Bad Bee
Re: My On-Going 727 Rebuild Questions Post - 09/28/14 06:38 AM
Quote:
Pump looks good. If your measurements are all within spec, then it's good to go. I replied to another post about replacing a front pump bushing that explained about the two notches in the bushing and how to use a blunt 1/4" punch to peen the new bushing in place.
Thank you, Rick! I finally see what you're saying. and yup. All the measurements were well within tolerances. I'll be pulling the PTC torque converter out of the box tomorrow to test the fit with the new bushing once I get her in place.
Posted By: Big Bad Bee
Re: My On-Going 727 Rebuild Questions Post - 10/15/14 02:02 AM
I'm back with a few more updates. My one week project has turned into a fall project...
I've got a question. What is this thing? Munroe says zip about it.

I noticed what looked like foam or something on the inside. After I cleaned the pump plate with solvent, I was drying it with compressed air. In an attempt to blow this unit out, whatever was blocking the side that faces the engine blew apart and fell inside it. You can see a little remaining. I am assuming that the part pops out and you snap in a new unit. Help me out here.

With the case and all it's components checked and bushings replaced, every part cleaned with mineral spirits and blown dry with compressed air, I moved to the valve body. I split the halves and placed all the parts in labelled bags. as I did this, I videotaped each section to show how the valves came out and how their springs were arranged.
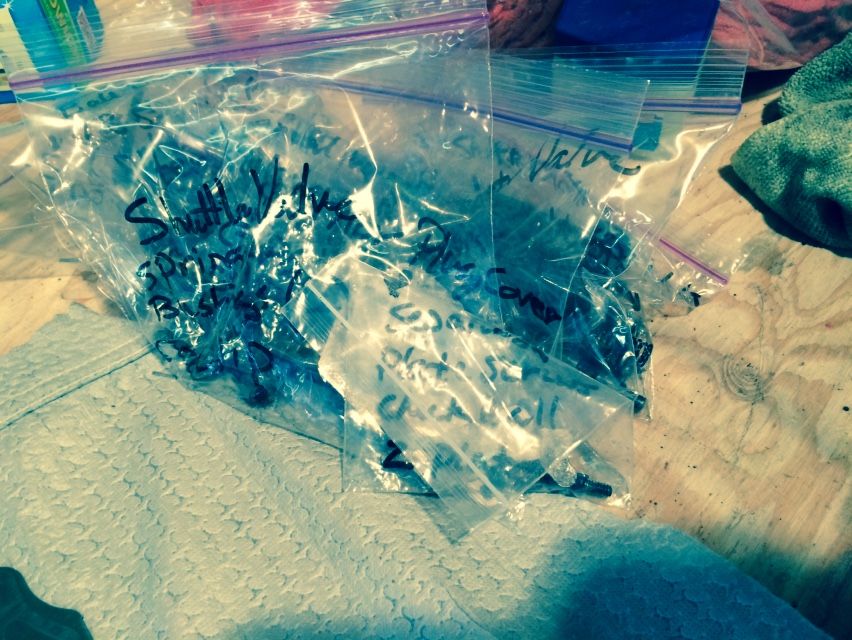
after cleaning all the parts and drying, I laid them all out on a clean surface under their baggies as assemblies and cleaned up the large pieces, really working at all the passageways. Here they are all ready to reassemble.

Previous to cleaning the separator plate and halves, I drilled passages in the plate and worked the valve body as per the instructions in my TransGo shift kit. The guy that sells this kit has a sense of humor.
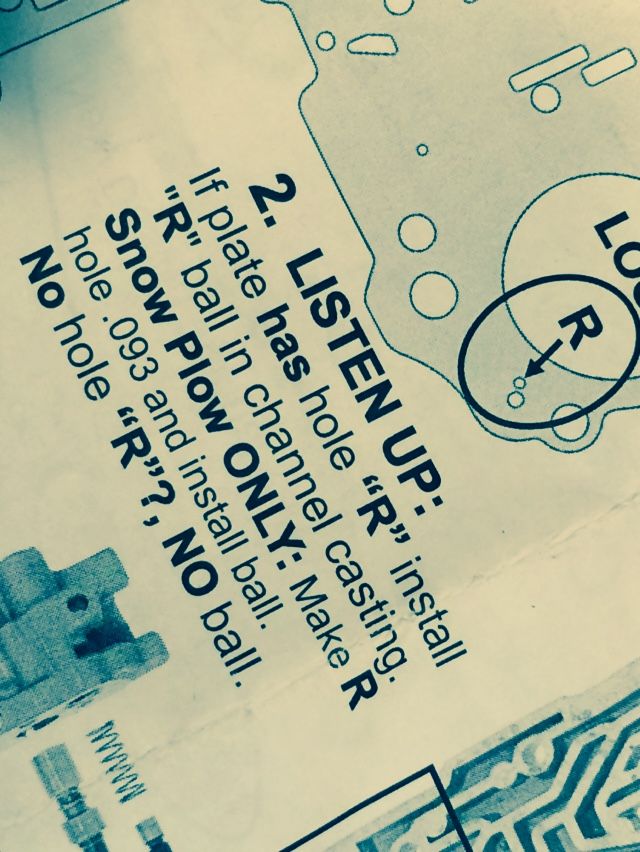
I tried to listen up but heard nothing...
I got out my TransGo shift kit and went over the instructions, figuring out where in the reassembly process the parts would go.

Watching the videos in reverse order, I reassembled the valve body. great news. No left over parts. it was fun and pretty simple.

Just a couple minor details and she's going back together.
Don't forget to tell me what that plastic thingy-mo-bob is and if I have to replace it.
Posted By: WILD BILL
Re: My On-Going 727 Rebuild Questions Post - 10/15/14 02:11 AM
That little plastic thingy you refer to is the trans breather vent. What you saw come out was probably some sort of filter material to separate the trans fluid from the air.
I'm pretty sure that shouldn't have happened and that it does need to be in there. IMHO, you have 2 options. First, drill and tap the hole on the outside for an NPT pipe plug and relocate the vent or, Call John Cope and see what he recommends you do about a replacement breather.
Posted By: PC-CHARGER
Re: My On-Going 727 Rebuild Questions Post - 10/15/14 03:14 AM
As Bill says, that plastic part is a baffle for your vent.I've never seen anything inside them so I'm not sure what would have blown out when you blew air in it. Possible some dirt build up?
I've attached a picture of your valve body. Looks good but the adjuster for the pressure regulator looks crooked. Is it just the angle of the picture? I've highlighted the area in red.

Posted By: dusturbd340W5
Re: My On-Going 727 Rebuild Questions Post - 10/15/14 04:43 AM
Quote:
As Bill says, that plastic part is a baffle for your vent.I've never seen anything inside them so I'm not sure what would have blown out when you blew air in it. Possible some dirt build up?
I've attached a picture of your valve body. Looks good but the adjuster for the pressure regulator looks crooked. Is it just the angle of the picture? I've highlighted the area in red.
I have had many of the vents off there is nothing on the inside, had to have been dirt or something
Posted By: WILD BILL
Re: My On-Going 727 Rebuild Questions Post - 10/15/14 04:55 AM
I admit I never had one off or apart so I was making an assumption based on his description.
I will try and remember this for future reference.
Posted By: Big Bad Bee
Re: My On-Going 727 Rebuild Questions Post - 10/15/14 07:35 AM
Quote:
As Bill says, that plastic part is a baffle for your vent.I've never seen anything inside them so I'm not sure what would have blown out when you blew air in it. Possible some dirt build up?
I've attached a picture of your valve body. Looks good but the adjuster for the pressure regulator looks crooked. Is it just the angle of the picture? I've highlighted the area in red.
I'll check that tomorrow. It goes on with three screws and all are in. Hmmmm. It looks cockeyed in the picture, I agree. Getting those screws compressed and the whole thing back on is a B.
Posted By: Big Bad Bee
Re: My On-Going 727 Rebuild Questions Post - 10/15/14 07:39 AM
Quote:
Quote:
As Bill says, that plastic part is a baffle for your vent.I've never seen anything inside them so I'm not sure what would have blown out when you blew air in it. Possible some dirt build up?
I've attached a picture of your valve body. Looks good but the adjuster for the pressure regulator looks crooked. Is it just the angle of the picture? I've highlighted the area in red.
I have had many of the vents off there is nothing on the inside, had to have been dirt or something
You know, I was kind of wondering if it was maybe a spider nest. it's cream colored. could just be that somebody took up residence in the breather. I'll blow it the rest of the way out. You can see that some of it is still there in the photo.
Wild Bill, thanks again for your help. You guys are great!
Posted By: John_Kunkel
Re: My On-Going 727 Rebuild Questions Post - 10/15/14 08:00 PM
Yep, some critter took up residence in the breather baffle...dig as much of the junk out as you can and blow it out thoroughly.
The PR spring retainer is OKs is, just the later style.
Posted By: PC-CHARGER
Re: My On-Going 727 Rebuild Questions Post - 10/15/14 11:36 PM
Hey John, you are right the retainer looks OK but what about the PR adjusting screw itself? It looks to be leaning a bit to the left. I'm just thinking that the "nut" for the adjuster screw may not be installed the right way. It is rectangular and if it were installed wrong, it could push it sideways slightly.
Posted By: Big Bad Bee
Re: My On-Going 727 Rebuild Questions Post - 10/16/14 06:58 AM
Quote:
Hey John, you are right the retainer looks OK but what about the PR adjusting screw itself? It looks to be leaning a bit to the left. I'm just thinking that the "nut" for the adjuster screw may not be installed the right way. It is rectangular and if it were installed wrong, it could push it sideways slightly.
John, you were right. I hit the breather with air and all that crusty stuff blew away. RIP transmission dwelling critter.
The PR adjusting screw IS cocked a little. I don't know what to do here. The TransGo kit instructions say to adjust the bolt until the plate just touches the bracket. The bracket has an indentation like a triangular kink pressed into it on the left side that keeps the plate from laying flat against it. How do I set the plate if it won't lay flat?
Posted By: PC-CHARGER
Re: My On-Going 727 Rebuild Questions Post - 10/16/14 02:21 PM
If you have the adjustment backed out to where it contacts the plate as the Transgo instructions state, then you are good to go.
Posted By: Big Bad Bee
Re: My On-Going 727 Rebuild Questions Post - 10/16/14 11:59 PM
Quote:
If you have the adjustment backed out to where it contacts the plate as the Transgo instructions state, then you are good to go.
That is how it is. I worked it back and forth trying to decide because the raised area makes it a bit of a challenge to determine when the entire plate would be touching, but it's all within about a quarter turn.
Thank you. Next? ASSEMBLY!!!!!
Posted By: Big Bad Bee
Re: My On-Going 727 Rebuild Questions Post - 10/27/14 10:45 PM
Back to business. The sprag, front and rear regulators and rear band are in and the front and rear clutch retainers are assembled. I reassembled the pump and it's looking good. I'm trying to pressure test the front and rear clutch retainers. I'm using 25-30 lbs of compressed air as Munroe suggests. The rear drum functions perfectly. The front drum leaks around the center. I had put new sealing rings around the pump extension. They are the type that clasp. The drum slides on fine, but it bleeds air past the rings and I get zero pressure in the drum. I messed with it and measured to make sure the drum is seated. The drum looks as though it is seated. I pulled it off and set it back on several times with no success and then decided to swap in the old sealing rings. The clutch pack has pressure although if I rotate it, it loses pressure. What am I doing wrong with the rings? Oh, and the rear drum seals up completely. No hissing. The front drum, even though it is firm, still leaks a little. Should it completely seal? I am positive all the air is coming from around the center shaft, not from behind the piston.
Posted By: John_Kunkel
Re: My On-Going 727 Rebuild Questions Post - 10/27/14 10:57 PM
Squirt some ATF into the case hole for the front clutch and see if that minimizes the air leakage.
Posted By: Big Bad Bee
Re: My On-Going 727 Rebuild Questions Post - 10/27/14 11:05 PM
are you talking about the hole in the pump disk?
Posted By: Big Bad Bee
Re: My On-Going 727 Rebuild Questions Post - 10/28/14 03:39 AM
I tried adding some trans fluid to the galley that feeds the front drum. The piston actuates firmly but I can still hear the air hissing from above and below the two ring seals out the top and bottom of the drum. This is with the new ring seals in place. So should I just put my old seals back in? Or do the new seals require time to break in? Help!!!
Posted By: WILD BILL
Re: My On-Going 727 Rebuild Questions Post - 10/28/14 04:14 AM
IIRC I've always heard some air leaking during an air check. I have never air checked individual components though. Always did my air checks after assy but before the VB install. Remember, trans fluid is thicker than air and constantly flowing under pressure to hold the components applied.
Posted By: John_Kunkel
Re: My On-Going 727 Rebuild Questions Post - 10/28/14 08:00 PM
Some air leakage is normal during the air check, the sound normally resembles frying bacon. Metal rings leak more air than plastics do.
Posted By: Big Bad Bee
Re: My On-Going 727 Rebuild Questions Post - 10/29/14 05:16 PM
Thank you Bill and John. That confirms what I'm seeing. The old rings seal much better I can only get the new rings to seal solidly when the oil passage has plenty of oil. Should I just leave the old rings?
Two more big questions. First, there is a three-eared bushing and race that go between the forwars tip of the tail shaft and the rear of the front shaft where they mate. Is it common to discard the race? My trans didn't have a race. The front drum is definitely a 78 - up unit.
Second, I've got the guts back in and I tried to re measure end play in the nose gear. Original end play was .047. I put the thinnest thrust washer in the kit between the pump and front drum and with the pump and gasket in and torqued down (175 in lb) I get .004 end play. I can turn the assembly with the nose gear by hand. And turn it in reverse and get the sprag to lock. It does not spin freely when I let go. I used the thinnest select thrust washer in the rebuild kit between the pump and front drum.
As for components that might change front to rear spacing, I've replaced front drum and bushing, pump bushing, all races in planetary gears, thrust washers between the drums and between the front drum and pump, and the bushing and race between the shafts. Clutches and steels too obviously.

Posted By: Big Bad Bee
Re: My On-Going 727 Rebuild Questions Post - 10/30/14 06:54 AM
Posted By: Big Bad Bee
Re: My On-Going 727 Rebuild Questions Post - 10/30/14 07:24 AM
A thought about input shaft end play. Could my drums be hanging up (sagging together) because of gravity? I was thinking I might tip the trans up vertically to see if the binding will stop and things will free up.
Posted By: 80fbody
Re: My On-Going 727 Rebuild Questions Post - 10/30/14 01:33 PM
You probably have an extra thrust washer in the back half of the trans. Been awhile but I think you can pull the front half back out and check the rear to make sure you have some clearance. If you do then make sure all your thrust washers are in the right place in the front half of unit.
Posted By: PC-CHARGER
Re: My On-Going 727 Rebuild Questions Post - 10/30/14 03:59 PM
Sounds like you may not have all the clutch plates aligned and the drums are not fully seated. It's easier if the transmission is stood on it's tail. I usually put the front and rear clutches together on the bench and then install as an assembly. It's tricky as you have to align the clutch plates as well as the large drive lugs on the front clutch with the slots on the sun gear shell. When it is installed correctly the front clutch lugs will be flush or slightly below the edge of the sun gear shell slots.

Posted By: booger
Re: My On-Going 727 Rebuild Questions Post - 10/30/14 04:02 PM
FWIW here's a way to stand it up so you can work on it without spending money on a dedicated jig/stand. Can't imagine how you got it together without it being vertical (if you did), I couldn't.

Posted By: JohnRR
Re: My On-Going 727 Rebuild Questions Post - 10/30/14 04:58 PM
Quote:
Sounds like you may not have all the clutch plates aligned and the drums are not fully seated. It's easier if the transmission is stood on it's tail. I usually put the front and rear clutches together on the bench and then install as an assembly. It's tricky as you have to align the clutch plates as well as the large drive lugs on the front clutch with the slots on the sun gear shell. When it is installed correctly the front clutch lugs will be flush or slightly below the edge of the sun gear shell slots.
This ...
Posted By: John_Kunkel
Re: My On-Going 727 Rebuild Questions Post - 10/30/14 08:40 PM
If you can turn the input shaft by hand it's unlikely the clutches aren't seated, a single disc hanging up will usually seized the input shaft.
Posted By: Big Bad Bee
Re: My On-Going 727 Rebuild Questions Post - 10/31/14 12:48 AM
GLORY HALLELUJAH!
Thank you for these replies. I'll answer them separately.
Jay, The extra thrust washer thing would just apply to the rear, right? There were three. Two brass with three anchors and one silver with 4 anchors that went between the planetaries and their mating surfaces. There was also the thin race that goes against the inside of the shell. The only other two are the fiber washers that go between the clutch retainers and between the front retainer and the pump. I could pull the C Clip and go through the planetaries again I guess. I'll try putting this thing on its end first.
PC, thanks for the photo. that's exactly what the spacing between the shell and the front drum look like. I placed both drums together and got them to seat. Pulled them out to see that all the teeth on the rear clutch pack align as do the front.
Booger, I literally laughed outloud at that wheel borrow shot. That's yankee enginuity right there. My tailpiece is already installed but I'll see what I can do about setting that case upright. I did indeed get it all assembled while it was on its side.
JohnRR and John K, I definitely can turn the assembly by hand. I'll get this thing upright tonight and reassemble things and let you know the results.
KEEP CHECKING IN, GUYS! I REALLY APPRECIATE THE GREAT ADVICE!!!!
Posted By: PC-CHARGER
Re: My On-Going 727 Rebuild Questions Post - 10/31/14 02:09 AM
Here's the stand I use. Started with a $39 engine stand a a few dollars worth of 1" x 1" square tubing and some 7/16" threaded rod. Only downside is that some of the transmissions shields require cutting off the front tabs so nowhere to mount the front with those transmissions. I usually rig up something when one of those comes through. It also works with 904 transmissions but can only use 3 out of the four threaded legs.

Posted By: Big Bad Bee
Re: My On-Going 727 Rebuild Questions Post - 10/31/14 06:57 AM
PC, that's a great looking stand!
..necessity is the mother of invention...

It got the job done, but I am no further in solving my endplay issue than yesterday night. Just to clarify, I did pull the entire assembly apart to check for stupidity. All is correct. Note: I did check the endplay in the output shaft between the front C clip and the stop behind the back planetary retainer before I installed the output shaft and it was dead nuts on. I checked and rechecked the drums till I was blue in the face. solid "Clunk" against their mating surfaces. Even wiped the thrust washer and mating surface to see if they were making contact. All spins freely. Sprag works great.

I put the gasket and pump back on and didn't bolt it in. just used gravity. zero endplay. Then I got wise and took a couple O rings that are 1/8" thick, gooped them with lube and stuck them on the case to pump mating surface and slid the pump back on so that the reaction shaft mated with the front drum bushing and slipped into it's groove in the case. Result? No end play. couldn't get a grip on the sucker enough to pull the drums forward.
What I think is happening is that the front drum and reaction shaft mating surfaces are so tight I can't pull and push on the sucker. I did check to see if the drum will spin freely on the reaction shaft and it does. I am just wondering if all that vaseline and tight tolerance is causing enough suction that it's not gonna budge till break in.
I am definitely beyond my ability on this one. It's kicked my butt. What do you think about my theory? I'm wondering how I can rig up a way to grip the input shaft strong enough to check endplay but not damage the teeth.
Posted By: WILD BILL
Re: My On-Going 727 Rebuild Questions Post - 10/31/14 07:22 AM
Looking at your last pic, I'm wondering if the new sprag isn't sitting flush or is too thick or something causing everything to get pushed forward.
The wear pattern on the drum is much higher than the band is sitting.
Posted By: Big Bad Bee
Re: My On-Going 727 Rebuild Questions Post - 10/31/14 07:48 AM
That band is super loose. I set up the sprags side-by-side. They are identical except for the fact one is drilled and tapped of course. Maybe I'm missing something. All I know is that even with 1/8" gap between the pump and case there was no end play and I greased the surface of the end of the reaction shaft and I know it's not bottoming out in the drum. The pump bottoms out in the case effortlessly.
Posted By: PC-CHARGER
Re: My On-Going 727 Rebuild Questions Post - 10/31/14 04:22 PM
It's real strange that when it is all assembled you can turn the input shaft freely but there is zero end play. is it possible you are not getting a firm grip on the input shaft and are not pulling it up enough to see the end play that is there? Wrap a thin strip of aluminum sheet around the splines on the input shaft and then grip it with some vise grips and use that to lift up the shaft to see if there is any end play. Remember that if you don't have the pump gasket in place when checking the end play, it will increase when you do install the gasket.
Posted By: 80fbody
Re: My On-Going 727 Rebuild Questions Post - 10/31/14 04:25 PM
Do you have the trans resting on the output shaft? That would probably bind everything up.
Posted By: JohnRR
Re: My On-Going 727 Rebuild Questions Post - 10/31/14 05:04 PM
Quote:
Do you have the trans resting on the output shaft? That would probably bind everything up.
this first , the shaft must be free , having that rag wadded up underneath it is an issue probably.
Second looking at your picture of the front drum in the sunshell it doesn't look like it's seated far enough to me ?
What do you have for thrust washer, etc between the mainshaft and the input shaft ? , input shaft and the front drum ?
Posted By: VernMotor
Re: My On-Going 727 Rebuild Questions Post - 10/31/14 05:04 PM
That front drum is not all the way down in there.
Posted By: John_Kunkel
Re: My On-Going 727 Rebuild Questions Post - 10/31/14 07:20 PM
Look on the driving shell (behind the front drum) and there will be witness marks where the drum tangs have worn on the shell...this will tell you if the drum in installed deep enough.
The output shaft ball bearing snap ring will usually have some movement in the tailhousing, resting the weight of the trans on the output shaft will shove the output shaft as far forward as possible and can thus skew the end play reading. Some builders advocate doing this on purpose to load the output shaft full forward, I prefer to take the end play reading with the trans horizontal.
Keep in mind that there are two selective thickness fiber thrust washers, even with the thinnest one behind the pump the other one might be thick enough to tighten the end play too much.
Posted By: Big Bad Bee
Re: My On-Going 727 Rebuild Questions Post - 11/01/14 05:52 PM
Quote:
It's real strange that when it is all assembled you can turn the input shaft freely but there is zero end play. is it possible you are not getting a firm grip on the input shaft and are not pulling it up enough to see the end play that is there? Wrap a thin strip of aluminum sheet around the splines on the input shaft and then grip it with some vise grips and use that to lift up the shaft to see if there is any end play. Remember that if you don't have the pump gasket in place when checking the end play, it will increase when you do install the gasket.

 WINNER!!! WINNER!!! WINNER!!!

Got .050 out of it the main shaft is still supported. I'll cut it loose and try again. NOW WE'RE getting SOMEWHERE!!!
Many thanks!!!!
Posted By: Big Bad Bee
Re: My On-Going 727 Rebuild Questions Post - 11/03/14 08:32 AM
I froze my pump and lip seal and got them installed. End play is dead nuts on. Pressure tested everything and we're good. Question. Munroe says that a spring goes on top of this unit between it and the valve body but when I disassembled it, there was a spring INSIDE it resting between it and the bore. Is this okay?

Another question. How do I torque down the band tensioner adjusting bolts? they have a square head on them. Is there some kind of socket made for them?

I'm almost ready to button it up. Picked up a nice MP deep pan off Ebag. As soon as I set the tension on the bands, I'll add the filter and extension, button it up, shoot some paint on her and get ready to bolt her to the engine and in she goes!!!

Posted By: PC-CHARGER
Re: My On-Going 727 Rebuild Questions Post - 11/03/14 04:04 PM
Depending on the application, the accumulator came with a spring underneath, on top or none at all so assemble the way that it came apart. Some shift kits remove the spring and replace with a blocker rod.
Yes there are four and eight point sockets that fit those square adjusting bolts.
Although not a big deal, you will be removing three screws from your valve body in order to install the filter and extension. Here's a shot with the screws marked.

Posted By: John_Kunkel
Re: My On-Going 727 Rebuild Questions Post - 11/03/14 09:16 PM
I would omit the spring inside the accumulator piston but would install the outer spring if available.
For the band adjuster a 4" Crescent wrench works good, just tighten it snug (no gorilla) and loosen the desired number of turns; it's not that critical. Since you have the pan off you can use a 5/16" or 3/8" Allen wrench as a feeler gauge between the lever and the piston plunger...place the flat sides of the Allen wrench between the lever and plunger and tighten the adjuster until the wrench can be passed between them easily.
Posted By: Big Bad Bee
Re: My On-Going 727 Rebuild Questions Post - 11/04/14 03:08 AM
Quote:
Depending on the application, the accumulator came with a spring underneath, on top or none at all so assemble the way that it came apart. Some shift kits remove the spring and replace with a blocker rod.
Yes there are four and eight point sockets that fit those square adjusting bolts.
Although not a big deal, you will be removing three screws from your valve body in order to install the filter and extension. Here's a shot with the screws marked.
Thanks to you both for sticking with me on this. I'll be headed to South Carolina for the rest of the week so I'll have to finish up the project friday. I'll check in then. Thanks again.
Posted By: Big Bad Bee
Re: My On-Going 727 Rebuild Questions Post - 11/09/14 05:06 PM
Posted By: WILD BILL
Re: My On-Going 727 Rebuild Questions Post - 11/09/14 05:25 PM
See, that wasn't so bad was it?
Now get er in and let er rip!!!!!!!!! 
Posted By: 80fbody
Re: My On-Going 727 Rebuild Questions Post - 11/09/14 08:28 PM
Great job and a good post for others to read thru before their 1st build.
Posted By: Big Bad Bee
Re: My On-Going 727 Rebuild Questions Post - 11/10/14 02:57 AM
Thanks guys. First smoky burnout is for you!


