Moparts

Building a custom Fan Shroud: Pic by pic

Posted By: autoxcuda

Building a custom Fan Shroud: Pic by pic - 07/23/12 06:06 AM

I have a Champion 4 core 22” radiator that has performed well in my new 416 stroker small block. I’ve put 3458 miles the motor in 1 ½ years and driven a few times 80 miles @3700rpm to/from Willow Springs Raceway racing 60 laps/150 miles going about 130 mph @ 5800 rpm on straights. Radiator looks great inside, no rust, and no measured electrolysis. I run distilled water and Justice Brothers Radiator Cooler (RC/22P) and Justice Brothers Cooling System Protector ( CSP/1P). No major cooling problems, but I don’t run a fan shroud.

Once in 88 degree heat I got stuck in road construction barely moving for 20 minutes. Motor got up to 215 degrees. The fan by itself just could not pull enough air without the car moving. Time for a shroud.

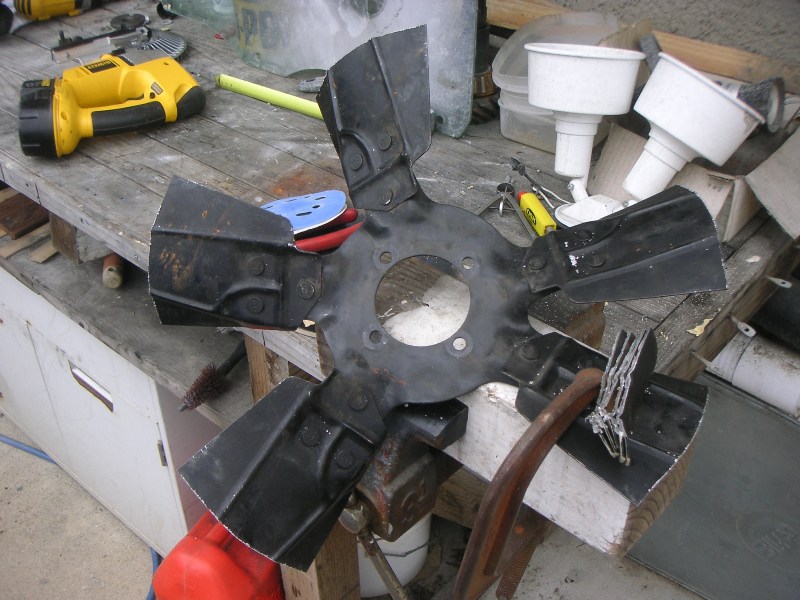
When we first built the motor, the Champion upper radiator hose mounted way too close to the center and hit my 18” 5 blade MP fan kit. So I cut 1” off each blade of a 5 blade and made a 16” fan. The car still performed pretty darn good with a skimpy looking 16” fan and no shroud. I run the short Jaguar fan clutch (Hayden #2765) because of the thick radiator and 70-up taller aluminum water pump.

The upper hose inlet tube had to be moved outward to fit any fan shroud. Radiator Works in Northridge, Ca did that and added a aluminum tab on top to help attach a shroud.

The factory 68-69 and 70-72 V-8 shrouds needed cutting to end up with a marginal shroud. So I traded some parts with Troy and he said he’d make me a shroud if I helped.

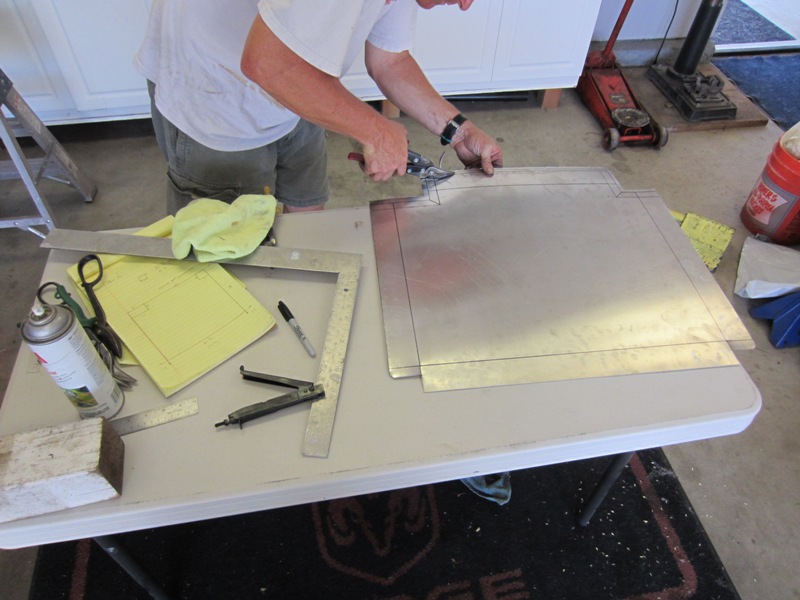
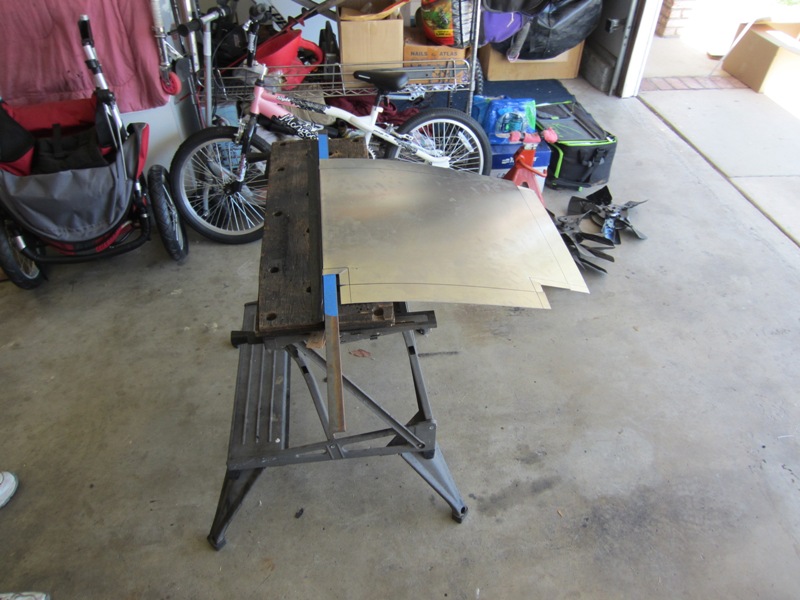
Here’s the pictures that tell the story….


That aluminum angle is 1/16" thick and 3/4" by 1/2". 48" long piece. The 20 gauge aluminum sheet was $21.75 for a 24" x 48" piece.


Attached picture 7303922-FanShoudSm04.JPG
Posted By: astjp2

Re: Building a custom Fan Shroud: Pic by pic - 07/23/12 07:37 AM

Good fab!

Attached picture 7303968-avt9.gif
Posted By: autoxcuda

Re: Building a custom Fan Shroud: Pic by pic - 07/23/12 07:42 AM

We put these on the existing Champion holes. But the aluminum was too thick for them even after I bent them out some. So we thinned the alumnum out some and also made the shroud end rails fit more flush.


When the radiator was still in the car I marked the centerline of the water pump translated to the radiator itself. This way we would know where to start the center of the fan shroud opening later. I also had the upper shroud tab welded onto the radiator along this centerline.

We added foam to make a tight seal and to protect the shroud from rubbing into the radiator tubes/fins.


Foam detail


Attached picture 7303971-FanShoudSm11.JPG
Posted By: bonefish

Re: Building a custom Fan Shroud: Pic by pic - 07/23/12 01:38 PM

you did a great job on that!id, like to see what you could do with some decent tools.
Posted By: jcc

Re: Building a custom Fan Shroud: Pic by pic - 07/23/12 03:06 PM

Nice job and nice thread presentation.

And a little OT, I have always pondered the original concept of a fan shroud. Is it to move air by the engines fan thru the largest area of of the radiator by the fan, or is it to make the fan move the most amount of air thru improved efficiency by good shroud design (ie a simple tight fitting ring), albeit thru a smaller area of the radiator?

Seems to me the first goal would be best for low vehicle speed use, and the second more ideal for high speed use, since it would present less blockage of the radiator since most shrouds reduce airflow area at some point. However simply over sizing the radiator would, imo mask whatever results one observed to the above solutions
Posted By: autoxcuda

Re: Building a custom Fan Shroud: Pic by pic - 07/23/12 04:57 PM

Quote:

Nice job and nice thread presentation.

And a little OT, I have always pondered the original concept of a fan shroud. Is it to move air by the engines fan thru the largest area of of the radiator by the fan, or is it to make the fan move the most amount of air thru improved efficiency by good shroud design (ie a simple tight fitting ring), albeit thru a smaller area of the radiator?

Seems to me the first goal would be best for low vehicle speed use, and the second more ideal for high speed use, since it would present less blockage of the radiator since most shrouds reduce airflow area at some point. However simply over sizing the radiator would, imo mask whatever results one observed to the above solutions


A shroud around the fan is mostly a low speed deal. It just optimizes the fan. At higher speeds with enough air hitting the front of the radiator the fan isn't so important. But that's where good shrouding in front of the radiator becomes inportant.

A guy that worked large automobile and industrial radiator manufacture explained to me the design of a fan shroud...

To get the optimum hole diameter for shroud take the fan diameter and add 10% of the fan diameter. So for my 16" fan I added 1.6" to 16" and cut my hole at 17.6".

The optimum depth of the shroud is when the pitch of the fan blades are showing 1/2 in and 1/2 out of the shroud.
Posted By: autoxcuda

Re: Building a custom Fan Shroud: Pic by pic - 07/23/12 07:34 PM

To find optimum hole diameter for a shroud take the fan diameter and add 10% of the fan diameter. So for my 16" fan I added 1.6" to 16" and cut my hole at 17.6".

The optimum depth of the shroud is when the pitch of the fan blades are showing 1/2 in and 1/2 out of the shroud.

That info came from a past employee of a large automobile and industrial radiator manufacture explained to me the design of a fan shroud.

Attached picture 7304453-FanShoudSm16.JPG
Posted By: autoxcuda

Re: Building a custom Fan Shroud: Pic by pic - 07/24/12 02:17 AM

Troy cut the hole with a handheld jigsaw. The tape is so the aluminum doesn't get all scratched up from the jigsaw bouncing on it. I have a little hand held notcher. Neat, but would have took me forever to cut something this large.

Attached picture 7305041-FanShoudSm19.JPG
Posted By: challengermike

Re: Building a custom Fan Shroud: Pic by pic - 07/24/12 03:01 AM

Quote:

To find optimum hole diameter for a shroud take the fan diameter and add 10% of the fan diameter. So for my 16" fan I added 1.6" to 16" and cut my hole at 17.6".

The optimum depth of the shroud is when the pitch of the fan blades are showing 1/2 in and 1/2 out of the shroud.

That info came from a past employee of a large automobile and industrial radiator manufacture explained to me the design of a fan shroud.


Is a 17.6 hole big enough to not allow the fan to hit it when the engine mounts flex?
Posted By: autoxcuda

Re: Building a custom Fan Shroud: Pic by pic - 07/24/12 06:13 AM

Quote:

Quote:

To find optimum hole diameter for a shroud take the fan diameter and add 10% of the fan diameter. So for my 16" fan I added 1.6" to 16" and cut my hole at 17.6".

The optimum depth of the shroud is when the pitch of the fan blades are showing 1/2 in and 1/2 out of the shroud.

That info came from a past employee of a large automobile and industrial radiator manufacture explained to me the design of a fan shroud.


Is a 17.6 hole big enough to not allow the fan to hit it when the engine mounts flex?


That's a little over 3/4" all the way around. I've driven it about a bunch. No problems shift hard at 5500 rpm from 1st to 2nd.
Posted By: autoxcuda

Re: Building a custom Fan Shroud: Pic by pic - 07/24/12 06:22 AM

Here's a detail of the foam seal at the bottom of the shroud. At this point I also added foam all around the top of the shroud (not shown in previous pics).


I wanted a durable finish on the shroud that didn't need the maintainance of bare aluminum. So I painted it VHT wrinkle paint baked in an oven. I can run my fingernail against this paint enough to file it and it will not scratch.


Attached picture 7305408-FanShoudSm29.JPG
Posted By: autoxcuda

Re: Building a custom Fan Shroud: Pic by pic - 07/24/12 06:42 AM

The fan for my system is very small. Like I said before it's a MP 5 blade fan cut down 1" so it would clear the inlet tube and be lower than the top of the radiator (don't cut my fingers off).

The 1" cut really takes a lot of meat off the fan. Five 1" cuts stacked on the right next to the C-clamp pictured below. I'm really shocked it cooled so well without the fan shroud. I guess I could say it's low drag for increased horsepower.


Here's the anorexic looking fan mocked up with freshly painted shroud.


Attached picture 7305422-FanShoudSm36.JPG
Posted By: Commando1

Re: Building a custom Fan Shroud: Pic by pic - 07/24/12 01:35 PM

I'm absolutely lovin this thread...
Posted By: autoxcuda

Re: Building a custom Fan Shroud: Pic by pic - 07/24/12 06:32 PM

This shows the idea of the fan blade being 1/2 in and 1/2 out of the shroud

Attached picture 7305878-FanShoudSm59.JPG
Posted By: 1962Savoy

Re: Building a custom Fan Shroud: Pic by pic - 07/24/12 08:35 PM

Thanks For the info I did it as well and it turned out perfect. I engine turned the shroud and then clear coated it.My fan is only 1/2 inch away from the edge of the opening and I haven't had any clearance problems.

Attached picture 7306035-IMGP2532.JPG
Posted By: bobs66440

Re: Building a custom Fan Shroud: Pic by pic - 07/24/12 09:06 PM

Nice work. I had similar cooling issues with my 22" radiator so I made one for it to see if it made any difference in the engine temp. It didn't. I have an 18" fan, so I couldn't keep the hole inside the core size. I've since installed a new Champion 26" and plan to build another one from bare stock this time. The finger brake I used kind of mangled the .040 aluminum I used, so the next one will be .063".


Posted By: autoxcuda

Re: Building a custom Fan Shroud: Pic by pic - 07/24/12 09:06 PM

Quote:

Thanks For the info I did it as well and it turned out perfect. I engine turned the shroud and then clear coated it.My fan is only 1/2 inch away from the edge of the opening and I haven't had any clearance problems.


Looks like someone has access to a TIG welder.

I like the engine turned finish. Works well with your engine compartment. It ran through my mind, but I went wrinkle to complement my other wrinkle stuff.

Attached picture 7306072-4_3_11Sm13.JPG
Posted By: autoxcuda

Re: Building a custom Fan Shroud: Pic by pic - 07/24/12 09:11 PM

Quote:

Nice work. I made one for the 22" rad I had installed also but it was temporary to see if it made any difference in the engine temp. It didn't. I have an 18" fan, so I couldn't keep the hole inside the core size. I've since installed a new Champion 26" and plan to build another one from bare stock this time.


Was your engine temp issue only at idle without the car moving? Or was it with the car moving?
Posted By: bobs66440

Re: Building a custom Fan Shroud: Pic by pic - 07/24/12 09:16 PM

Quote:

Quote:

Nice work. I made one for the 22" rad I had installed also but it was temporary to see if it made any difference in the engine temp. It didn't. I have an 18" fan, so I couldn't keep the hole inside the core size. I've since installed a new Champion 26" and plan to build another one from bare stock this time.


Was your engine temp issue only at idle without the car moving? Or was it with the car moving?


It was only at idle. On the highway or any speed over 20mph or so it was fine.
Posted By: autoxcuda

Re: Building a custom Fan Shroud: Pic by pic - 07/24/12 10:00 PM

Here's a picture of the fan shroud installed.

The JAZ over flow bottle on the right has a valve so you can drain it when and where you want. Not that its ever had anything overflow into it of significance.

Attached picture 7306140-FanShoudSm47.JPG
Posted By: dogdays

Re: Building a custom Fan Shroud: Pic by pic - 07/24/12 10:09 PM

The fan shroud improves the effectiveness of the fan. I was going to say efficiency but I'm not 100% sure about that. But the shroud helps the fan apply negative pressure to the entire surface of the radiator.
Air goes through all of the radiator with or without a shroud, think about it. The air would have to be solid to not turn the corner after it went through the radiator and hit the shroud.

R.
Posted By: autoxcuda

Re: Building a custom Fan Shroud: Pic by pic - 07/25/12 05:59 AM

I refilled the radiator with distilled water and Justice Brothers Radiator Cooler (RC/22P) and Justice Brothers Cooling System Protector ( CSP/1P) to give me the best cooling and resistance to electrolysis.

Attached picture 7306829-FanShoudSm55.JPG
Posted By: bobs66440

Re: Building a custom Fan Shroud: Pic by pic - 07/25/12 10:37 AM

I always thought distilled water was best also, but after some research I ended up using drinking water (purified by reverse osmosis) and No-Rosion which is probably similar to what you are using to protect the aluminum radiator. He said it would also bring the temp down 10 degrees, but it didn't.

Here's an excerpt from their site. I'm not an expert by any stretch, and I'm not saying it's gospel but it sounded plausible...


Q. Should I use distilled water as coolant?
A. Yes. But only in a 50/50 mix. Distilled water should not be used as straight water coolant, because it can cause damage to system metals. The reason has to do with how distilled water is created. During the distillation process, water is vaporized into its gaseous phase, so all impurities are left behind. These impurities include a number of minerals, including calcium and magnesium, the two components of hardness. The water is then condensed back into its liquid phase, so the resulting liquid is pure water. In fact, some of the purest water on earth. The problem is that distillation strips impurities from water, resulting in water molecules that are electrochemically imbalanced. So distilled water will actually strip electrons from the metals in a cooling system as it attempts to rebalance itself electrochemically. This can result in damage to metals in a cooling system. Using distilled water in combination with 50% antifreeze effectively cuts the amount of distilled water in half. By compounding with glycol, it will not cause damage to metals in a cooling system. For this reason, it is safe to use distilled water in a 50/50 mix.

Q. What type of water is best to use as straight water coolant?
A. Reverse osmosis (RO) water. Rather than stripping impurities from water, RO filters them through a membrane. The resulting water is electrochemically stable, and not harmful to metals in a cooling system. RO water is every bit as pure as distilled water, but without the risk of electrochemical stripping of electrons from system metals.

Q. Where can I find reverse osmosis (RO) water?
A. At the local supermarket. Look for DRINKING WATER, which is available in gallon bottles. But do not confuse it with SPRING WATER, which is often high in mineral content. We have performed extensive testing of major brands and generic brands of bottled drinking water, and found that it is almost always composed of RO water.

Q. What are the benefits of using purified water, such as distilled or RO? A. It lacks the impurities of tap water. Without impurities, its ability to function as an electrolyte is greatly diminished, thereby minimizing damage from electrolysis. It contains no hardness, meaning it will not form scales and deposits that can cause overheating. It does not contain other damaging contaminants, such as chloride or sulfate. And importantly, it enhances the overall performance of No-Rosion, allowing it to more effectively function and provide the full range of benefits that it has been engineered to provide.


http://www.no-rosion.com/
Posted By: autoxcuda

Re: Building a custom Fan Shroud: Pic by pic - 07/25/12 06:26 PM

I agree to get water that is mineral free. The calcicum is what is really bad.

I have heard that about distilled water. But I couldn't find anything else that was labeled mineral free.

I saw RO water at the store. But it didn't see on the label that is was mineral free. Maybe it was my mistake. My first priority was to stay away from the minerals. Maybe I'll go back and look at the labels and look around.
Posted By: autoxcuda

Re: Building a custom Fan Shroud: Pic by pic - 07/25/12 06:34 PM

Quote:

I always thought distilled water was best also, but after some research I ended up using drinking water (purified by reverse osmosis) and No-Rosion which is probably similar to what you are using to protect the aluminum radiator. He said it would also bring the temp down 10 degrees, but it didn't....


You've done that and adding a shroud with no temperature change, correct? I think there's some cause more inherent. Engine tune, radiator size, flow restriction. Have you ran this very engine block before without cooling issues?

These are the results from a comprehensive cooling additive test done by Turbo Magazine: TEST They used heat gun in various places (cyl temp, etc) and factored any difference in outside temps. Justice Brothers Super Radiator Cool (RC/22P) brought the coolest temperatures:


Attached picture 7307330-TurboMagazineCoolingResults.jpg
Posted By: jcc

Re: Building a custom Fan Shroud: Pic by pic - 07/25/12 07:02 PM

I never really understood this type of test, seems to me that a liquid that was really bad at absorbing heat would read a LOWER temp, and the heat would just dissipate another way. Can't believe there is a way at these temps to absorb heat at one rate, and dissipate it at another rate.
Posted By: autoxcuda

Re: Building a custom Fan Shroud: Pic by pic - 07/26/12 03:48 AM

So I got it all together and tested it. It was 92 degrees in my garage when I started it up.

I figure if I went this far, I was really going to test it. I've been a S-O-B to this car for 19 years, why should I stop now ....


I let it idle for 25 minutes not moving it an inch in the garage!


The front of the car was 1 1/2 ft from my washer and dryer. So no wind to help it. Even though the garage door was open, after 25 minutes my eyes would tear up if I stayed in there too long. After 25 minutes, the car raised the temp in the whole garage to 98 degrees.

RESULTS


1) After 10 minutes idling, temp measured on heat gun was 160 deg. at the temp sender.


2) After 25 minutes idling, temp measured on heat gun was only 203 deg. at the temp sender. Turned it off and no boilover whatsoever. I didn't think that was bad given the extreme abuse. It was a fricken nauseous sauna in there.


I think it did really well for such an extreme test ??

Here's a picture showing the suction of a paper towel on my grille at idle and the ambient temperature there.

Attached picture 7308010-FanShoudSm58.JPG
Posted By: autoxcuda

Re: Building a custom Fan Shroud: Pic by pic - 07/26/12 04:37 PM

Quote:

I never really understood this type of test, seems to me that a liquid that was really bad at absorbing heat would read a LOWER temp, and the heat would just dissipate another way. Can't believe there is a way at these temps to absorb heat at one rate, and dissipate it at another rate.


I think it more about the transfer of heat/energy. The liquid mix in your cooling system transfers removes heat from your engine to the liquid mix. Then when it passes through the radiator it transfers the heat to the air through the surface area of the radiator fins.

It's from my old Thermodynamics 360 class that I C=can't remember all the detail. Steam table, Q-in Q-out, yadda yadda yadda....
Posted By: feets

Re: Building a custom Fan Shroud: Pic by pic - 07/26/12 11:21 PM

it would cool better if you got that paper towel off the grille.


Do you have a lower air dam on the car?
Posted By: autoxcuda

Re: Building a custom Fan Shroud: Pic by pic - 07/27/12 06:25 AM

Quote:

it would cool better if you got that paper towel off the grille.


Do you have a lower air dam on the car?


No I don't have a lower air dam. 67-69 Barracuda have a lower valence with a large opening. I was going to put a spoiler on the lower valance, and I thought it would divert more air into radiator.

But I don't currently have any cooling issues whatsoever if the car is moving, forcing more air into the radiator.
© 2024 Moparts Forums