|
 Update:DONE -GearVendor in my 1969 Charger Daytona..
#892386
Update:DONE -GearVendor in my 1969 Charger Daytona..
#892386
12/31/10 01:33 PM
12/31/10 01:33 PM
|
Joined: Aug 2003
Posts: 8,827
Houston, Tx
hemi68charger
 OP
OP
master
|
OP
master
Joined: Aug 2003
Posts: 8,827
Houston, Tx
|
Hey gang.. As most of you know, I chose the GearVendor option for an overdrive system for my Daytona. Well, I began the installation process and would like to document my experiences. Vehicle: 1969 Charger Daytona Tranny: 727 Torqueflite Differential: 9.75 Dana (4.10) GV unit: Model 3D0727 1. Here's the basic/components I received with the kit  1. Raise/secure vehicle and remove driveshaft   2. Position jack/support under transmission. I used the tranny pan with a scissor jack with a block of wood  3. Remove tranny rubber insulator and crossmember ( I didn't remove insulator from crossmember)  4. Place drain pan under tranny and remove inspection plate that covers tranny housing snap-ring  5. Disconnect/remove trannyspeedo gear assembly from tailshaft housing  6. Remove six bolts securing tailhousing to transmission  7. Use snap-ring pliers to spread snap-ring while pulling tailshaft housing off.  8. Clean gasket surface on tranny  9. Remove original lock pawl assembly out of original tailshaft housing and install into new GV tailshaft housing. Also remove the snap-ring and install it into the new GV unit.    10. Install GV tailshaft housing onto tranny tailshaft. I utilized two exhaust manifold studs to hold the new gasket in place to help with the GV tailshaft housing installation. Worked out great. Once a couple of the original bolts are installed, you can remove the studs.   11. On my Daytona, there was a TTI exhaust system. The center h-pipe clamp was positioned with the nuts towards the back. This created a forward movement obstruction for the tailshaft housing. Simple solution was to reverse the clamp.    12. Install snap-ring cover gasket, cover and crossmember. Also, in my case with a center console, install the shifter rod bracket.   13. Verify the coupler is seated fully forward touching the tailshaft. Lightly grease the outside of the coupler, bushing, seal then slip the coupler back into the tailshaft housing. There shouldn't be any binding. The coupler is positioned in the housing for shipping purposes. Adjust the end play. I accomplished this by utilizing a straight edge, slipped two of the numerous supplied shims between the coupler and straight edge and then taking a measurement. I ended up with .013 clearance. The tech at GearVendor told me this was a proper technique and have a tolerance between 0 - 0.15. Do not place grease in the coupler to hold shims when reinstalling. This will compromise the end play reading. The shims are to be installed into the coupler on the tailshaft side, not the overdrive unit side.  14. Unfortunately, the clearance issue that "supposedly" was fixed, isn't. The speedo assembly typically was the culprit, but this, for me, was an issue of the overdrive housing. So, yes, I "made" room. I took my pickle fork since it has a solid round handle and use it with a sledgehammer to curve the floor pan inwards. It worked out great I do have to say. It made a nice smooth modification. The white grease pencil markings are the areas that were touched by the overdrive unit. I also ground down the two areas of the overdrive unit that touched the floorpan. I basically rounded down the peaks of the unit.     15. Install overdrive gasket with lettering facing tailshaft housing.  16. Slide yoke onto shaft of overdrive unit and then position unit onto housing.      17. Secure overdrive unit with the eight 1/4 20-inch locknuts/washers 18. Install supplied speedometer cable adaptor.  19. Install signal generator to cable adaptor then vehicle's original speedometer cable to signal generator.  20. I used a cable loop to secure the speedo-adpator and solenoid harness. Had to do this to keep wires away from h-pipe.  21. Driveshaft modification. Based on the dimensions, I had to shorten my driveshaft 14". I used on of my spare driveshafts, but unfortunately, the inner diameter (ID) of the driveshaft won't facilitate the installation/welding of the foreard yoke. This yoke was to be a match for the GV supplied driveshaft tranny yoke. So, I had to have the driveshaft service company make one from scratch. This will probably be the case for most Mopar driveshaft modifications. I got new u-joints and the assembly high-speed balanced. Brought it home, but unfortunately, the dang thing was about an 1" too long !!!! So, I'll have to take it back Monday.. Bummer, I was hoping to have it installed this weekend. 21a. original driveshaft measurement. I used a spare 727 I had for the measurements with my original driveshaft. Length to centerline of u-joint (21.5")   21b. GV complete unit (35.5")   21c. At the shop   21d. About an inch too long.. :'(  22. I mounted the electronics behind the kick panel. It fit rather nicely to be honest.  23. I decided I didn't want to permanently mount the selector switch and status light. I made a plate and attached it to the vent box under the dash. That way, the velco adhesive wouldn't be on the vent box. From what I gather, most driving will be in the "auto" mode, so there will not be a need to change the selection switch numerous times.  24. Here's the kickpanel back on. Would never know the electronic autodrive control box is back there. Also, the wire you see is the foot switch. Instead of mounting it on the floor, I'm going to place a toggle switch inconspicuously under the dash.  What I have to do now is fill up the overdrive unit with Dexron II ATF. Never use synthetic or additives. After that, replace the exhaust flange-to-manifold gaskets and get the driveshaft fixed.. After which, test drive time.......... Update: Jan.07, 2011 25. OK, got the driveshaft back from the shop. The dimension they needed was 40" from GV overdrive unit output seal to forward most portion of the yoke going into the differential.  26. Next is filling up the GV unit with Gear Lube. Here is the access/fill hole.  27. Here I'm finishing up with the fluid. Edit: GV's update on fluid is either GM# 12346190, or Mopar #0487-4459, I will update the picture........ I used the Mopar brand. It is Gear Lube, clear  28. Pump works pretty good - The ATF was installed, then removed when I discovered through and GV update I needed to use the previously mentioned Mopar Gear Lube  I'll continue this later on this weekend, I have Guard Duty this weekend, so won't be able to mess around with it much... Hope this helps anyone in the future with a GV install. Update: Jan.07, 2011
Last edited by hemi68charger; 01/20/11 12:24 AM.
|
|
|
Re: GearVendor installation in my 1969 Charger Daytona..
[Re: Quikshft]
#892389
12/31/10 02:56 PM
12/31/10 02:56 PM
|
Joined: Aug 2003
Posts: 8,827
Houston, Tx
hemi68charger
OP
master
|
OP
master
Joined: Aug 2003
Posts: 8,827
Houston, Tx
|
Quote:
Step 25....Pack up and save all original parts. 
Nice pictorial, thanks for posting.
Good step that I didn't "document". All original parts have been tagged and stowed for future "whatever"...
TroyHouston Mopar Connection Club'69 Charger Daytona 440 - auto - 4.10 Dana (now with 426 hemi) '69 Charger 500 440 - 4speed - 3.54 Dana '70 Road Runner 383 - 4speed - a/c (now with 440)
|
|
|
Re: GearVendor installation in my 1969 Charger Daytona..
[Re: gtx6970]
#892391
12/31/10 03:12 PM
12/31/10 03:12 PM
|
Joined: Aug 2003
Posts: 8,827
Houston, Tx
hemi68charger
OP
master
|
OP
master
Joined: Aug 2003
Posts: 8,827
Houston, Tx
|
Quote:
What is the purpose of the 'foot / toggle' switch ?
is this system fully automatatic operation with no input for the operator ?
does the original speedo drive gear get transfered to this new unit ?
Bill, the "foot switch" enables the driver to manually turn the system on or off. Like, if I was cruising around town when rpm's aren't an issue or when I go to pass someone on the highway.
A new speedometer pinion and assembly come with the overdrive unit. When you order one, you are asked what rear gear ratio your car has and what the diameter of the tires are. The appropriate speedo pinion gear and speedo assembly are included in the kit.
The system can be operated in an auto-mode. In this mode, the car will shift by itself at around 45-47mph. 1st thru 3rd is just like original. Most of my driving will be like this.
Last edited by hemi68charger; 12/31/10 03:13 PM.
TroyHouston Mopar Connection Club'69 Charger Daytona 440 - auto - 4.10 Dana (now with 426 hemi) '69 Charger 500 440 - 4speed - 3.54 Dana '70 Road Runner 383 - 4speed - a/c (now with 440)
|
|
|
Re: GearVendor installation in my 1969 Charger Daytona..
[Re: gtx6970]
#892394
01/01/11 11:47 AM
01/01/11 11:47 AM
|
Joined: Aug 2003
Posts: 8,827
Houston, Tx
hemi68charger
OP
master
|
OP
master
Joined: Aug 2003
Posts: 8,827
Houston, Tx
|
Quote:
So, the system doesn't kick down, aka out of overdrive on accel ?
I assume the regular trans still does, so technially the trans is in 2nd , yet the OD is still engaged.
Is this unit capable of that kind of torque?
Hey Bill,,
As Screamin eluded to, the GV can handle anything I give it.. I never thought about the OEM kickdown taking affect... I'll have to experiment on that one.....
TroyHouston Mopar Connection Club'69 Charger Daytona 440 - auto - 4.10 Dana (now with 426 hemi) '69 Charger 500 440 - 4speed - 3.54 Dana '70 Road Runner 383 - 4speed - a/c (now with 440)
|
|
|
Re: GearVendor installation in my 1969 Charger Daytona..
[Re: hemi68charger]
#892395
01/01/11 12:40 PM
01/01/11 12:40 PM
|
Joined: Mar 2007
Posts: 3,277
West Coast, USA
jbc426
master
|
master
Joined: Mar 2007
Posts: 3,277
West Coast, USA
|
Quote:
Quote:
So, the system doesn't kick down, aka out of overdrive on accel ?
I assume the regular trans still does, so technially the trans is in 2nd , yet the OD is still engaged.
Is this unit capable of that kind of torque?
Hey Bill,,
As Screamin eluded to, the GV can handle anything I give it.. I never thought about the OEM kickdown taking affect... I'll have to experiment on that one.....
I read an article online in one of the magazines that led me to believe that the foot switch was used to contol the overdrive's selection of being in standard or overdrive(or underdrive as the case may be, as Gearvendors sells both). That way you can quickly split the gears of the transmission when you are accelerating. For instance first low, hit the button for first high, hit it again and upshift the trans for second low, then second high etc, etc,. Once you practice at it, it's supposed to be pretty seamless and really quick to do essencially giving you a six speed or eight speed with an overdrive trans.
1970 Plymouth 'Cuda #'s 440-6(block in storage)currently 493" 6 pack, Shaker, 5 speed Passon, 4.10's
1968 Plymouth Barracuda Convertible 408 Magnum EFI with 4 speed automatic overdrive, 3800 stall lock-up converter and 4.30's (closest thing to an automatic 5 speed going)
|
|
|
Re: GearVendor installation in my 1969 Charger Daytona..
[Re: jbc426]
#892396
01/01/11 01:44 PM
01/01/11 01:44 PM
|
Joined: Jan 2003
Posts: 2,530
Nunya CA
CR8CRSHR
master
|
master
Joined: Jan 2003
Posts: 2,530
Nunya CA
|
|
|
|
Re: GearVendor installation in my 1969 Charger Daytona..
[Re: ross]
#892398
01/01/11 03:49 PM
01/01/11 03:49 PM
|
Joined: Aug 2003
Posts: 8,827
Houston, Tx
hemi68charger
OP
master
|
OP
master
Joined: Aug 2003
Posts: 8,827
Houston, Tx
|
Quote:
Nice documentation and pictures. I paid close attention as I have a unit that I have not installed yet but plan to before winter is out. One thing you did not discuss and I am concerned about is the angle the universal joints end up at when the driveshaft is shortened.Did you do any before measuring of the angles so you would have reference material for when you get the drive shaft in.
Happy New Year
Ross
Hey Ross..
I didn't have an inclinometer at the time of my OEM driveshaft removal, so I did some grude measurements. I measured the distance from the garage floor to the front lowest point of the driveshaft by the yoke-to-tube joint (point A) and did the same for the rear lowest point (point B). At the points on the garage floor, I measured the distance from point A and point B. After that, it's simple geometry. But, the driveshaft shop stated that the max angle relative to the floor of the driveshaft to be between 3-11 degrees. I've get more accurate measurements after I get the driveshaft fixed and installed.
Troy
TroyHouston Mopar Connection Club'69 Charger Daytona 440 - auto - 4.10 Dana (now with 426 hemi) '69 Charger 500 440 - 4speed - 3.54 Dana '70 Road Runner 383 - 4speed - a/c (now with 440)
|
|
|
Re: GearVendor installation in my 1969 Charger Daytona..
[Re: ross]
#892400
01/01/11 06:11 PM
01/01/11 06:11 PM
|
Joined: Oct 2007
Posts: 288
Birmingham, England
Mick70RR
enthusiast
|
enthusiast
Joined: Oct 2007
Posts: 288
Birmingham, England
|
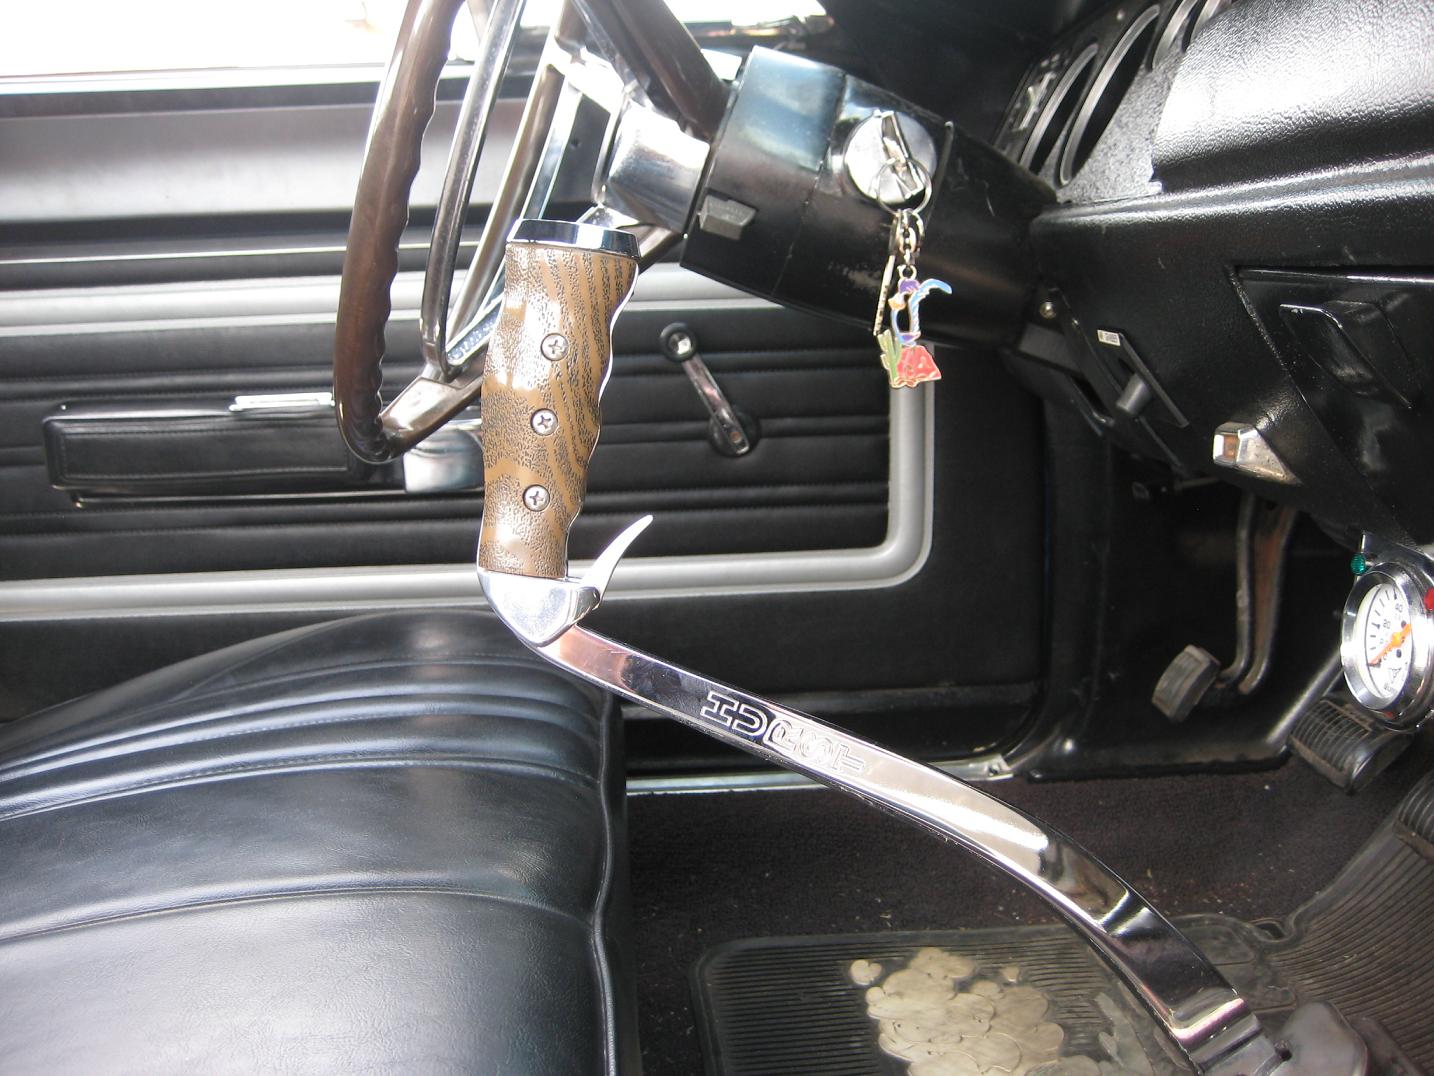
I am the only person in the UK to blow one of these GV overdrives up. The overdrive was 18 months old and fitted behind the 4 speed in my Road Runner. I emailed GV and Rick Johnson phoned me up almost immediately. He arranged a warranty repair using Overdrive Repair Services in Sheffield and sent them a new clutch and clutch band overnight to fix mine. I had it back in the car within a week. Customer service is second to none. Heres the switch I made for the pistol grip to operate the overdrive.
1970 Road Runner
505 cid
MCH CNC ported Stealth heads
MP 528 camshaft
4 speed
GV overdrive
11.98 @ 117 on street treads
|
|
|
Re: GearVendor installation in my 1969 Charger Daytona..
[Re: rapom]
#892403
01/03/11 10:14 PM
01/03/11 10:14 PM
|
Joined: Aug 2003
Posts: 8,827
Houston, Tx
hemi68charger
OP
master
|
OP
master
Joined: Aug 2003
Posts: 8,827
Houston, Tx
|
Took the driveshaft back today to get it shortened. They asked for the measurements from the opening of the output shaft area/seal of the GV overdrive unit to the front face of the input yoke to the Dana. It measures 40". So, I'm taking that this will be the over all length with the extra needed coming from the distance of the u-joint as it slides into the rear Dana yoke, which will be about an inch. That would leave plenty of meat of the forward yoke in the output shaft hole of the GV unit and enough to slide back and forth as needed under driving conditions.....
TroyHouston Mopar Connection Club'69 Charger Daytona 440 - auto - 4.10 Dana (now with 426 hemi) '69 Charger 500 440 - 4speed - 3.54 Dana '70 Road Runner 383 - 4speed - a/c (now with 440)
|
|
|
Re: GearVendor installation in my 1969 Charger Daytona..
[Re: 602heavy]
#892405
01/03/11 11:29 PM
01/03/11 11:29 PM
|
Joined: Nov 2010
Posts: 3,696
jersey
Spaceman Spiff
master
|
master
Joined: Nov 2010
Posts: 3,696
jersey
|
Maybe I missed it but what supports the unit other than the crossmember?
526 cubes of angry wedge, pushbutton shifted, 9 passenger killer!
|
|
|
Re: GearVendor installation in my 1969 Charger Daytona..
[Re: Spaceman Spiff]
#892407
01/03/11 11:48 PM
01/03/11 11:48 PM
|
Joined: Aug 2003
Posts: 8,827
Houston, Tx
hemi68charger
OP
master
|
OP
master
Joined: Aug 2003
Posts: 8,827
Houston, Tx
|
Quote:
Maybe I missed it but what supports the unit other than the crossmember?
The GV unit is bolted straight to the GV tailshaft housing. That's it. Apparently it's strong enough. I haven't heard of anyone breaking one yet.
Quote:
When I put mine in my Challenger, I slid the new yoke in till it bottomed out. Then slid it back out 5/8 of an inch, and measured from center to center on the u joint holes of both yokes. Took that measurement to the driveshaft shop to get the new driveshaft made. The electronic box seems to be the weak link of the system. Check with the GV tech dude to see if yours will live behind that kick panel. Might build too much heat. 
I think that's one of the suggested places. I'll double check. I guess I should drive it a while and check the control box for heat dissipation. The measurement scheme I used would have worked, it was the shop that messed it up by cutting off 13" versus the 14" I asked them to do.... They were cool about it this afternoon when I dropped it off..
TroyHouston Mopar Connection Club'69 Charger Daytona 440 - auto - 4.10 Dana (now with 426 hemi) '69 Charger 500 440 - 4speed - 3.54 Dana '70 Road Runner 383 - 4speed - a/c (now with 440)
|
|
|
Re: GearVendor installation in my 1969 Charger Daytona..
[Re: hemi68charger]
#892408
01/04/11 12:23 AM
01/04/11 12:23 AM
|
Joined: Jan 2003
Posts: 8,480
Candler,NC / Myrtle Beach, SC
JDMopar
master
|
master
Joined: Jan 2003
Posts: 8,480
Candler,NC / Myrtle Beach, SC
|
After I had a control box fail, I ran a spare wire from the foot switch down to the solenoid on the unit. I crimped an end on it, and then just taped it up and left it loose. Did the same at the foot switch end, and also ran a spare to the fuse block to supply 12V to the foot switch. All the solenoid needs is 12V to operate, so I can still get the OD to engage if the box ever takes a dump again. The split shifting was fun for the first 5 minutes, but I just use mine for OD now!  Good luck, and you did a super nice job on the install. 
|
|
|
Re: GearVendor installation in my 1969 Charger Daytona..
[Re: 602heavy]
#892409
01/04/11 12:24 AM
01/04/11 12:24 AM
|
Joined: Jan 2003
Posts: 74,970
U.S.S.A.
JohnRR
I Win
|
I Win
Joined: Jan 2003
Posts: 74,970
U.S.S.A.
|
Quote:
Those GVs are bullet proof , had one on the 68 charger , stripped the planetries out before the box got hurt , 4400lb charger constantly put through it's paces @ the track , only issues i had was a control module go bad , GVs sent me one out within a couple days , great aftersales service.................nice work there MickRR.

I wouldn't call them bulletproof , I know a guy that blew up at least one behind a 12v Cummins diesel that was putting over 400 HP to the ground through a 5 speed manual trans towing 29k lb. horse trailers, but most gas engines aren't making the kind of torque a Cummins makes.
|
|
|
Re: GearVendor installation in my 1969 Charger Daytona..
[Re: JohnRR]
#892410
01/04/11 05:58 AM
01/04/11 05:58 AM
|
Joined: Jan 2003
Posts: 5,890
Athens, Greece
Pyper70
master
|
master
Joined: Jan 2003
Posts: 5,890
Athens, Greece
|
Memories of installing mine...I had the same problem in the tunnel with the fitment of the OD unit. Still though, I hate working on transmissions and rear axles. The instructions were simple, easy to read. Took me 6 hours to install on a Saturday plus the waiting of a business day following for the driveshaft work.
Only problem I have is that my H-Pipe sits right on the GV unit where the finned part of the housing is. My exhaust melted the gasket. I still haven't gotten around to relocating the crossover. I have bought 2 spare gaskets just in case.
Only think I can't figure out is the split shifting. 1st (Gear 1), switch (Gear 1.5).....switch/2nd (Gear 2), switch (Gear 3).....switch/3rd (Gear 3.5 / OD)....switch
I can't get the sync right...but I don't drag race it enough to utilize that option, I just hit the button and go to OD....Final driving speed is 80mph @2100 rpm with 3.55s and 28" rear overall tire.
Great job on the documentation. I had documented mine but upon carrying my SD card from my camera to the computer....fell in a tub of tranny fluid at the shop I did it in....toasted
Family owned 1969 Charger R/T DualQuad 440/727/GVO/3.55s
|
|
|
Re: GearVendor installation in my 1969 Charger Daytona..
[Re: JohnRR]
#892411
01/04/11 08:06 AM
01/04/11 08:06 AM
|
Joined: Dec 2008
Posts: 1,200
UK
602heavy
pro stock
|
pro stock
Joined: Dec 2008
Posts: 1,200
UK
|
Quote:
Quote:
Those GVs are bullet proof , had one on the 68 charger , stripped the planetries out before the box got hurt , 4400lb charger constantly put through it's paces @ the track , only issues i had was a control module go bad , GVs sent me one out within a couple days , great aftersales service.................nice work there MickRR.
I wouldn't call them bulletproof , I know a guy that blew up at least one behind a 12v Cummins diesel that was putting over 400 HP to the ground through a 5 speed manual trans towing 29k lb. horse trailers, but most gas engines aren't making the kind of torque a Cummins makes.
Well , i'm talking about a 4400lb B body , 605" running nitrous , circa 950hp , maybe not a cummins.
|
|
|
Re: GearVendor installation in my 1969 Charger Daytona..
[Re: 602heavy]
#892412
01/04/11 05:56 PM
01/04/11 05:56 PM
|
Joined: Oct 2007
Posts: 288
Birmingham, England
Mick70RR
enthusiast
|
enthusiast
Joined: Oct 2007
Posts: 288
Birmingham, England
|
Since blowing my overdrive up I've done a fair bit of reading about this style of overdrive and there's a few things you should bear in mind. First of all a 4 speed is going to be a lot harder on the overdrive because there's no torque converter to soften the blow when the cone clutch engages. When driving around town I tend to dip the clutch just after I hit the switch because at low speed/part throttle it bangs in even harder.
With the overdrive switched out, the drive is taken up by a one way roller clutch when accelerating or cruising so it's not going to slip. In reverse or on the overrun, the one way roller clutch does nothing and drive is through the cone clutch which is held against the annulus with low fluid pressure. The cone can slip under heavy acceleration in reverse or on the overrun so engine braking should be avoided if the overdrive is switched out. When the overdrive is engaged, the cone clutch is held against the clutch band using very high fluid pressure (about 700psi) so it's not going to slip on the overrun. With that in mind I always slow the car down with the overdrive engaged and let it drop out automatically at about 15mph.
The other thing I do now is regularly change the fluid. There's a drain plug fitted as standard to my overdrive so I don't even have to drop the pan and it only takes about half an hour.
1970 Road Runner
505 cid
MCH CNC ported Stealth heads
MP 528 camshaft
4 speed
GV overdrive
11.98 @ 117 on street treads
|
|
|
Re: GearVendor installation in my 1969 Charger Daytona..
[Re: gtx6970]
#892413
01/04/11 11:24 PM
01/04/11 11:24 PM
|
Joined: Mar 2004
Posts: 2,025
Bucks County, PA
500Stroker
|
Joined: Mar 2004
Posts: 2,025
Bucks County, PA
|
Quote:
So, the system doesn't kick down, aka out of overdrive on accel ?
I assume the regular trans still does, so technially the trans is in 2nd , yet the OD is still engaged.
Correct. With my 3:55's on the highway in 3rd OD the regular trans still kicks down at 70 mph and does not go into 3rd until 105 mph if I keep the petal to the floor.
|
|
|
Re: GearVendor installation in my 1969 Charger Daytona..
[Re: JDMopar]
#892414
01/04/11 11:33 PM
01/04/11 11:33 PM
|
Joined: Mar 2004
Posts: 2,025
Bucks County, PA
500Stroker
|
Joined: Mar 2004
Posts: 2,025
Bucks County, PA
|
Quote:
The electronic box seems to be the weak link of the system. Check with the GV tech dude to see if yours will live behind that kick panel. Might build too much heat.
I mounted mine up under the steering column behind the gauges
|
|
|
Re: GearVendor installation in my 1969 Charger Daytona..
[Re: hemi68charger]
#892416
01/08/11 12:40 AM
01/08/11 12:40 AM
|
Joined: Aug 2003
Posts: 8,827
Houston, Tx
hemi68charger
OP
master
|
OP
master
Joined: Aug 2003
Posts: 8,827
Houston, Tx
|
I've updated steps 25 - 28 in up top......... Getting closer......
TroyHouston Mopar Connection Club'69 Charger Daytona 440 - auto - 4.10 Dana (now with 426 hemi) '69 Charger 500 440 - 4speed - 3.54 Dana '70 Road Runner 383 - 4speed - a/c (now with 440)
|
|
|
Re: GearVendor installation in my 1969 Charger Daytona..
[Re: hemi68charger]
#892418
01/08/11 12:44 PM
01/08/11 12:44 PM
|
Joined: Jan 2003
Posts: 397
Ozona, Texas
Paladin
enthusiast
|
enthusiast
Joined: Jan 2003
Posts: 397
Ozona, Texas
|
Troy,
I want to thank you so much for taking the time and effort to document this. I scored a nice Gear Vendors unit for $400 a while back with a T-19 adapter. I plan on installing it in my '71 R/T this summer while Levi and Ethan are home on leave from Annapolis. I am going with a simple on/off switch, as I plan on using it as a simple overdrive so I can replace my 2.76s with 3.23s.
Again, I personally appreciate what you did here. As the old saying goes, a picture is worth a thousand words.
May God bless America,
"Paladin"
Ben H. English
Ozona, Texas
1971 Dodge Charger R/T
1977 Chrysler Cordoba A35
1979 Dodge Lil� Red Express
1981 Chevrolet Corvette
1985 Chevrolet Corvette
1986 Chevrolet Corvette Roadster
1994 Lincoln Mark VIII
1998 Dodge Ram 2500 Sport V10
|
|
|
Re: GearVendor installation in my 1969 Charger Daytona..
[Re: 500Stroker]
#892420
01/09/11 07:46 AM
01/09/11 07:46 AM
|
Joined: Aug 2003
Posts: 8,827
Houston, Tx
hemi68charger
OP
master
|
OP
master
Joined: Aug 2003
Posts: 8,827
Houston, Tx
|
Quote:
...
GV's website says - Fluid type - GM#1052271 petroleum based or GM#12346190 synthetic.
Ken, thanks for the head's up. The Dexron II ATF is right out of their installation manual. But, maybe it hasn't been updated. It's worth a call to them to verify since I haven't gotten it out on the road yet. I'll try to check out their website this afternoon.
TroyHouston Mopar Connection Club'69 Charger Daytona 440 - auto - 4.10 Dana (now with 426 hemi) '69 Charger 500 440 - 4speed - 3.54 Dana '70 Road Runner 383 - 4speed - a/c (now with 440)
|
|
|
Re: GearVendor installation in my 1969 Charger Daytona..
[Re: hemi68charger]
#892423
01/09/11 12:55 PM
01/09/11 12:55 PM
|
Joined: Jan 2003
Posts: 8,480
Candler,NC / Myrtle Beach, SC
JDMopar
master
|
master
Joined: Jan 2003
Posts: 8,480
Candler,NC / Myrtle Beach, SC
|
Troy...I read right over the part about you using the Dexron. I originally purchased my GV for a D350 pickup, and installed it in that truck. My installation manual also had the sticker saying to use the GM petro or synthetic. I used the petro oil while it was in the truck. When I bought my 04 Dodge 2500, I pulled the GV out of my old truck and sold the truck. A few years later, I put the GV in my 71 GY3 Challenger. This time I used the synthetic GM fluid, and I'm much happier with the way it shifts. The Dexron probably wouldn't hurt yours,but I'd check with the GV techs to see.
|
|
|
Re: GearVendor installation in my 1969 Charger Daytona..
[Re: JDMopar]
#892424
01/18/11 11:55 PM
01/18/11 11:55 PM
|
Joined: Aug 2003
Posts: 8,827
Houston, Tx
hemi68charger
OP
master
|
OP
master
Joined: Aug 2003
Posts: 8,827
Houston, Tx
|
Wow... What a difference....... I drove the Daytona this afternoon making sure all the "t's were crossed and "i's" dotted. Here are two videos of the cruise. Sorry about the quality and only being inside, but can't take outside videos when one's driving..... The unit has done everything as advertised. Engaged and disengaged right on queue. Seemed to drive smooth without any differential adjustment to any driveline angles. So far, quite pleased. I'll put a few more miles on her then check the gearlube and all wires and speedo-cable for any clearance issues... Down the street by the house.... http://www.youtube.com/watch?v=W2OStFjZazcDown the feeder road...... http://www.youtube.com/watch?v=9yPGInia5Lw
Last edited by hemi68charger; 01/19/11 12:38 AM.
TroyHouston Mopar Connection Club'69 Charger Daytona 440 - auto - 4.10 Dana (now with 426 hemi) '69 Charger 500 440 - 4speed - 3.54 Dana '70 Road Runner 383 - 4speed - a/c (now with 440)
|
|
|
Re: Update:Finished-GearVendor in my 1969 Charger Daytona..
[Re: hemi68charger]
#892429
01/19/11 12:28 PM
01/19/11 12:28 PM
|
Joined: Jul 2008
Posts: 53
Jensen Beach, Florida
pressureangle
member
|
member
Joined: Jul 2008
Posts: 53
Jensen Beach, Florida
|
The GV can be made to kick down simply by inserting a break switch in the solenoid circuit. On my own (which isn't in yet) I'll have a WOT switch on the gas pedal completing ground to a relay in the solenoid circuit.
Why do I torture myself so?
|
|
|
Re: Update:Finished-GearVendor in my 1969 Charger Daytona..
[Re: pressureangle]
#892430
01/19/11 12:54 PM
01/19/11 12:54 PM
|
Joined: Aug 2003
Posts: 8,827
Houston, Tx
hemi68charger
OP
master
|
OP
master
Joined: Aug 2003
Posts: 8,827
Houston, Tx
|
Quote:
The GV can be made to kick down simply by inserting a break switch in the solenoid circuit. On my own (which isn't in yet) I'll have a WOT switch on the gas pedal completing ground to a relay in the solenoid circuit.
I put a toggle switch (inlew of the foot switch supplied by GV) under the dash over by the brake release. It's small enough where I can't see it, yet positioned so flipping it is real easy. I didn't want the foot switch mounted to the floor. 9 times out of 10, the toggle switch will be on for highway driving.
Last edited by hemi68charger; 01/19/11 01:02 PM.
TroyHouston Mopar Connection Club'69 Charger Daytona 440 - auto - 4.10 Dana (now with 426 hemi) '69 Charger 500 440 - 4speed - 3.54 Dana '70 Road Runner 383 - 4speed - a/c (now with 440)
|
|
|
Re: Update:DONE -GearVendor in my 1969 Charger Daytona..
[Re: hemi68charger]
#892431
01/19/11 05:28 PM
01/19/11 05:28 PM
|
Joined: Aug 2003
Posts: 8,827
Houston, Tx
hemi68charger
OP
master
|
OP
master
Joined: Aug 2003
Posts: 8,827
Houston, Tx
|
I also noted that my driveshaft is nearly horizontal with everything from the OD output shaft, driveshaft to the Dana's input yoke perfectly aligned in a horizontal orientation relative to the floor....
TroyHouston Mopar Connection Club'69 Charger Daytona 440 - auto - 4.10 Dana (now with 426 hemi) '69 Charger 500 440 - 4speed - 3.54 Dana '70 Road Runner 383 - 4speed - a/c (now with 440)
|
|
|
Re: Update:DONE -GearVendor in my 1969 Charger Daytona..
[Re: ross]
#892434
01/20/11 12:00 AM
01/20/11 12:00 AM
|
Joined: Aug 2003
Posts: 8,827
Houston, Tx
hemi68charger
OP
master
|
OP
master
Joined: Aug 2003
Posts: 8,827
Houston, Tx
|
Quote:
Looks and sounds good Troy and thanks for taking the time to do this. Glad everything worked out for you. Makes me want to get at mine. Give us an update when you have a few hundred miles on her.
Ross
It's very easy.... Now that I've done it once.. I'll be helping a friend with his '70 Superbee soon. He already has the kit. Now it's about time. His is a 3.23, so he'll be really cruising..........
Quote:
Awesome post, thank you for sharing!! Hey, where did you get that neato plastic pump thingy in photos 27 & 28?
I got it my local auto parts store.. It's pretty handy. The plastic hose is a little stiff, but does the job... Would be great for differentials as well.
TroyHouston Mopar Connection Club'69 Charger Daytona 440 - auto - 4.10 Dana (now with 426 hemi) '69 Charger 500 440 - 4speed - 3.54 Dana '70 Road Runner 383 - 4speed - a/c (now with 440)
|
|
|
Re: Update:DONE -GearVendor in my 1969 Charger Daytona..
[Re: hemi68charger]
#892435
01/20/11 01:48 AM
01/20/11 01:48 AM
|
Joined: Nov 2003
Posts: 123
Gold Coast, Australia.
6pacdave
member
|
member
Joined: Nov 2003
Posts: 123
Gold Coast, Australia.
|
Hemi68, I have an A518 in my GTX that was previosly fitted when purchased. Any reasons as to not using the A518? I dont know too much about their strengths but it was bought through MP back in 96 and documented in Hotrod.I hope the A518 can handle some 1/4 mile launches see here http://www.hotrod.com/howto/43323_mopar_overdrive_transmission_swap/index.html Im fitting a 3.91 gear next,I just hope the A518 is strong enough? Mine also utilises a toggle switch, no biggie , just flick at speed to engage, and flick off to re-engage 3rd gear at a reasonable low speed. cheers Dave
70 GTX
70 Chevelle SS396
69 Mustang F'back
|
|
|
Re: Update:DONE -GearVendor in my 1969 Charger Daytona..
[Re: hemi68charger]
#892437
01/20/11 02:48 AM
01/20/11 02:48 AM
|
Joined: Jul 2008
Posts: 205
Martinsville, VA
440child
enthusiast
|
enthusiast
Joined: Jul 2008
Posts: 205
Martinsville, VA
|
Quote:
Awesome post, thank you for sharing!! Hey, where did you get that neato plastic pump thingy in photos 27 & 28?
I got it my local auto parts store.. It's pretty handy. The plastic hose is a little stiff, but does the job... Would be great for differentials as well.
That's exactly what I was thinking. Thanks alot!
|
|
|
|
|


 ...IIRC The manual wants the final angles no more than 1.5-2 degrees{nose down} which is way different than the guidelines everyone is using in performance applications...I ended up setting mine up at 2.5 and have'nt had any cruizing or acceleration vibrations....

 You better get some gas!


.jpg)