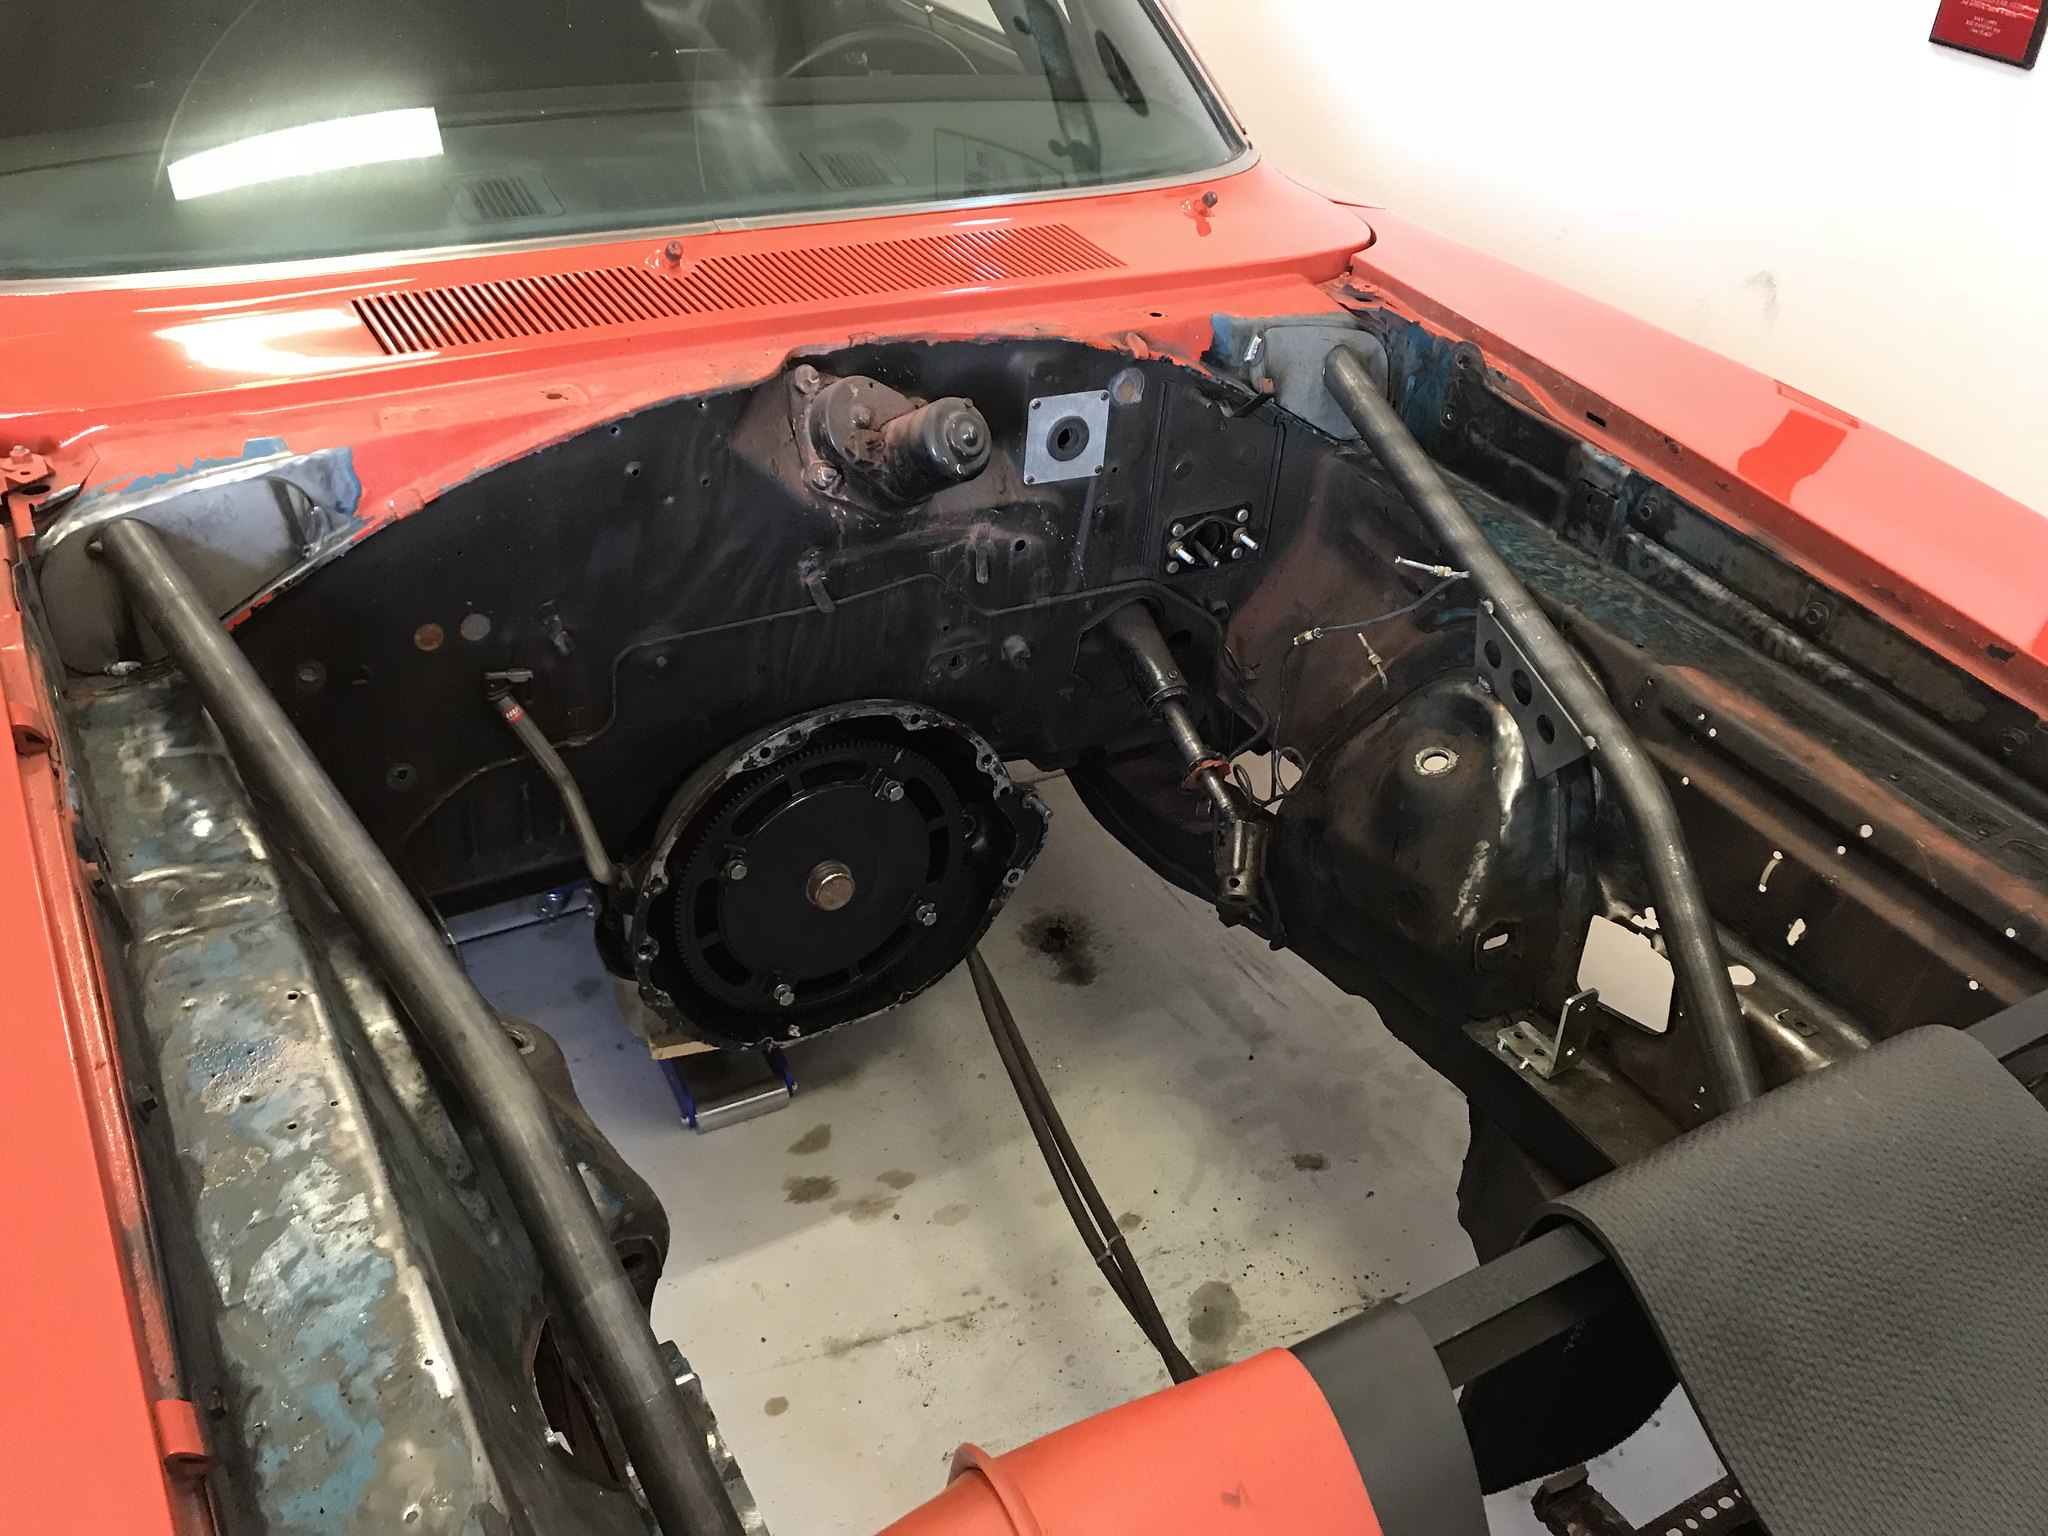
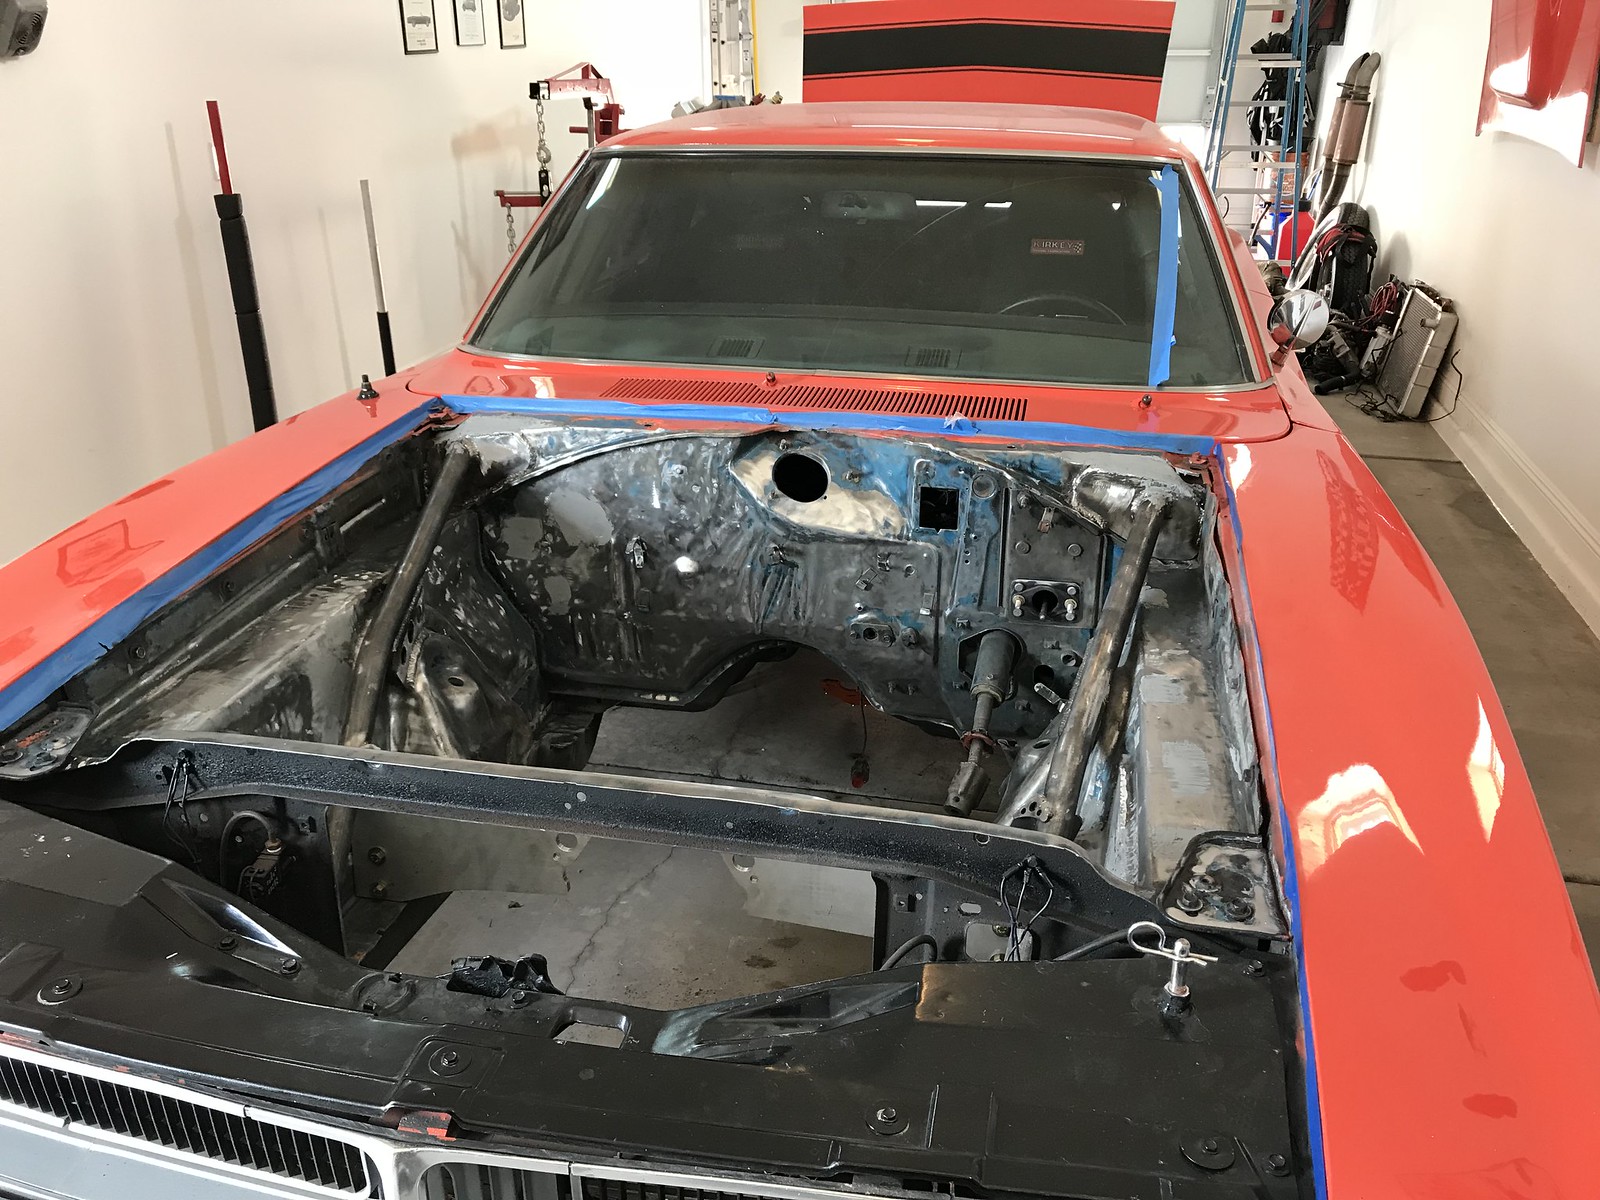
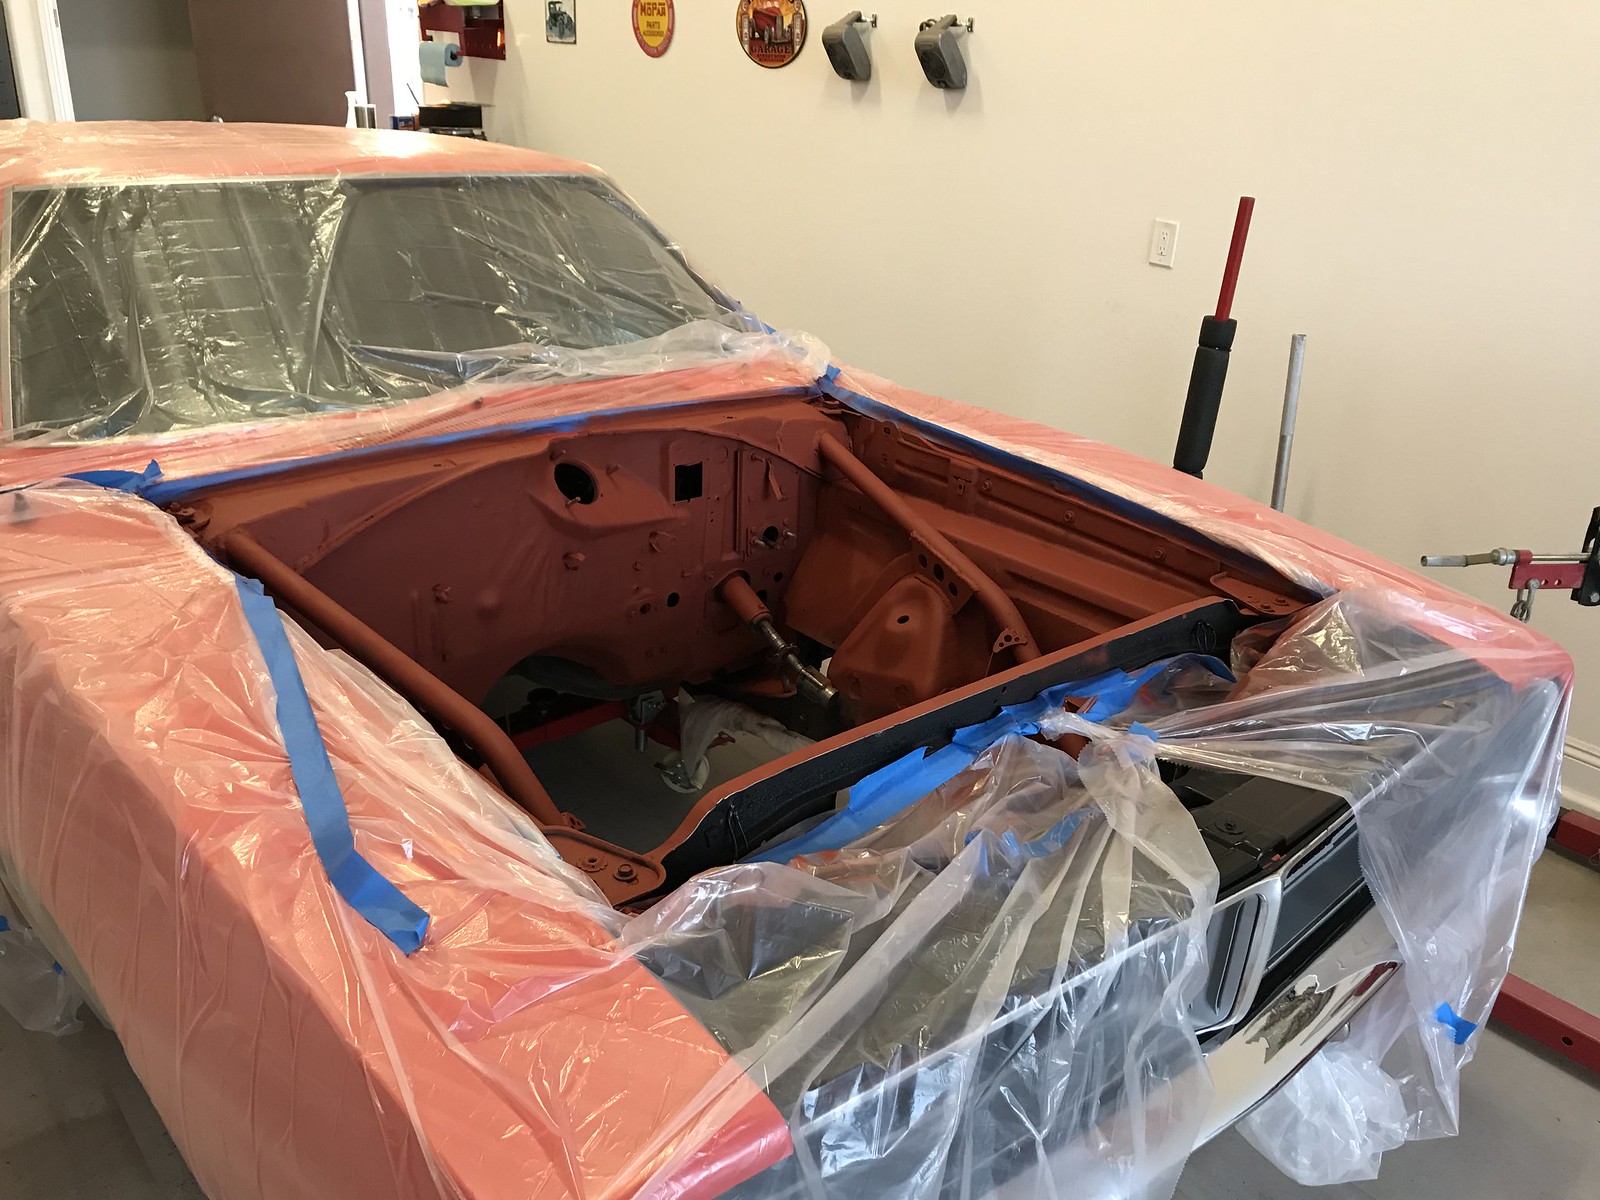
Removed the wire harness, master cylinder, throttle linkeage, shifter cable, etc... Some A-hole painted the engine compartment with that rubberized rattle can black paint... Oh, wait a minute! That was 16yr old me back in the 90's!
Made it through the first few layers of crap on the inner finders, but have yet to touch the firewall. At this point I think a full tube chassis would be easier!
So far the wire wheels work better for the sludge and rattle can rubberized paint. The stipper wheel does good with the paint. Not sure what the happy medium is between a smoothed show quality engine bay and something that I won't mind too much if I chip/scuff when working on the car late at night at the track.
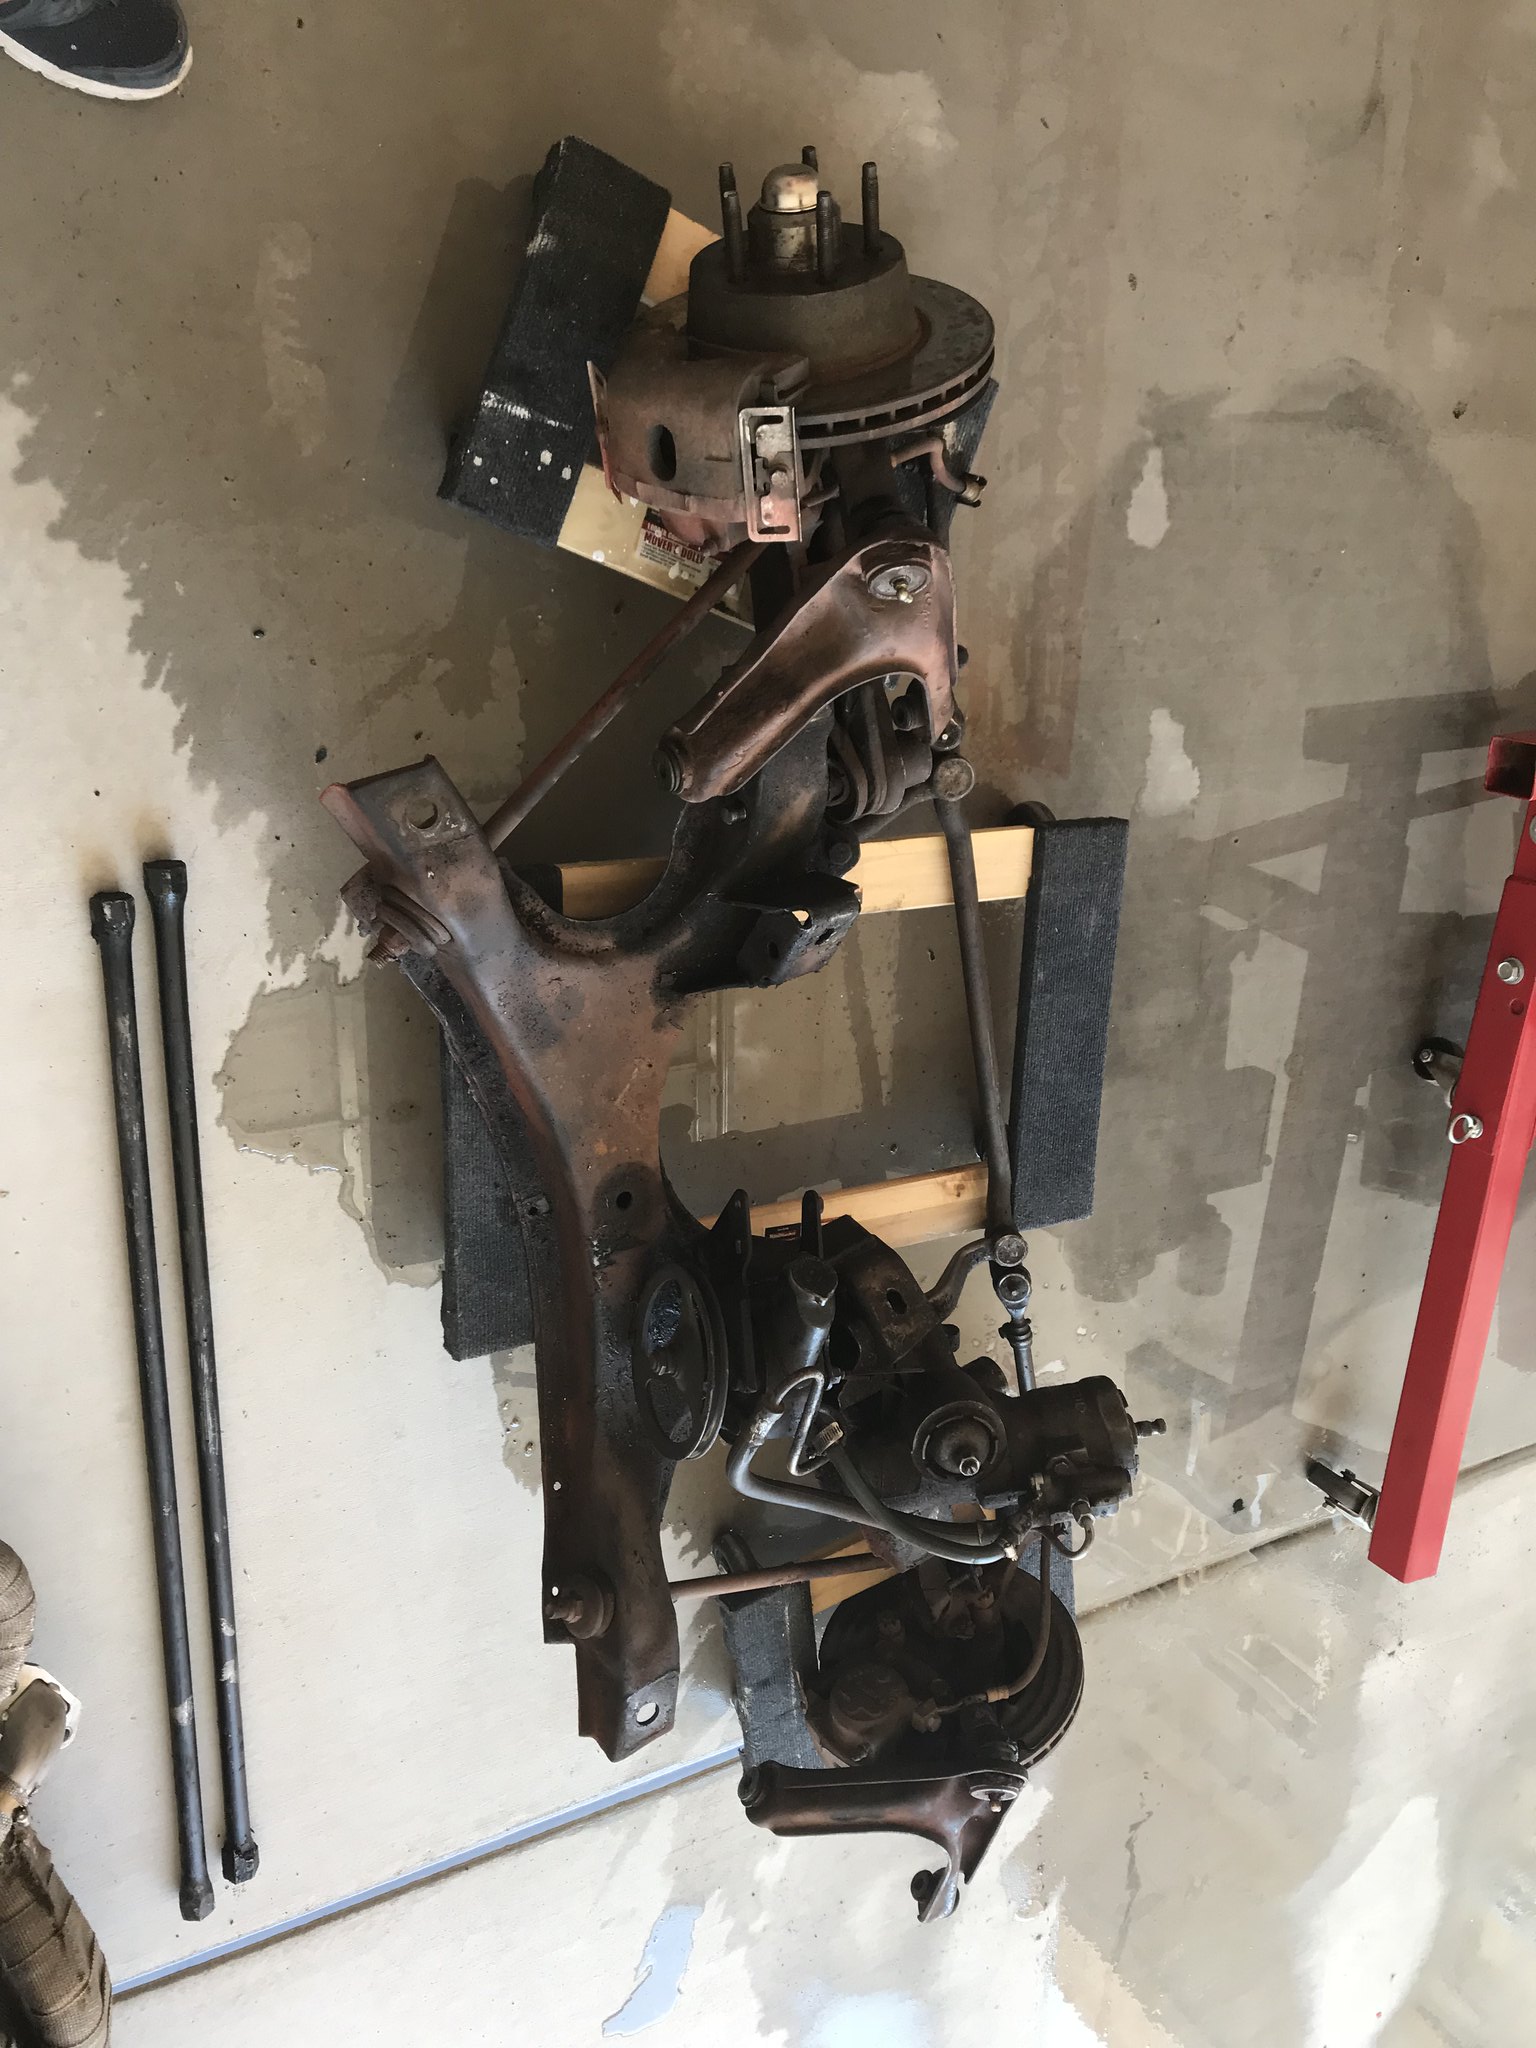
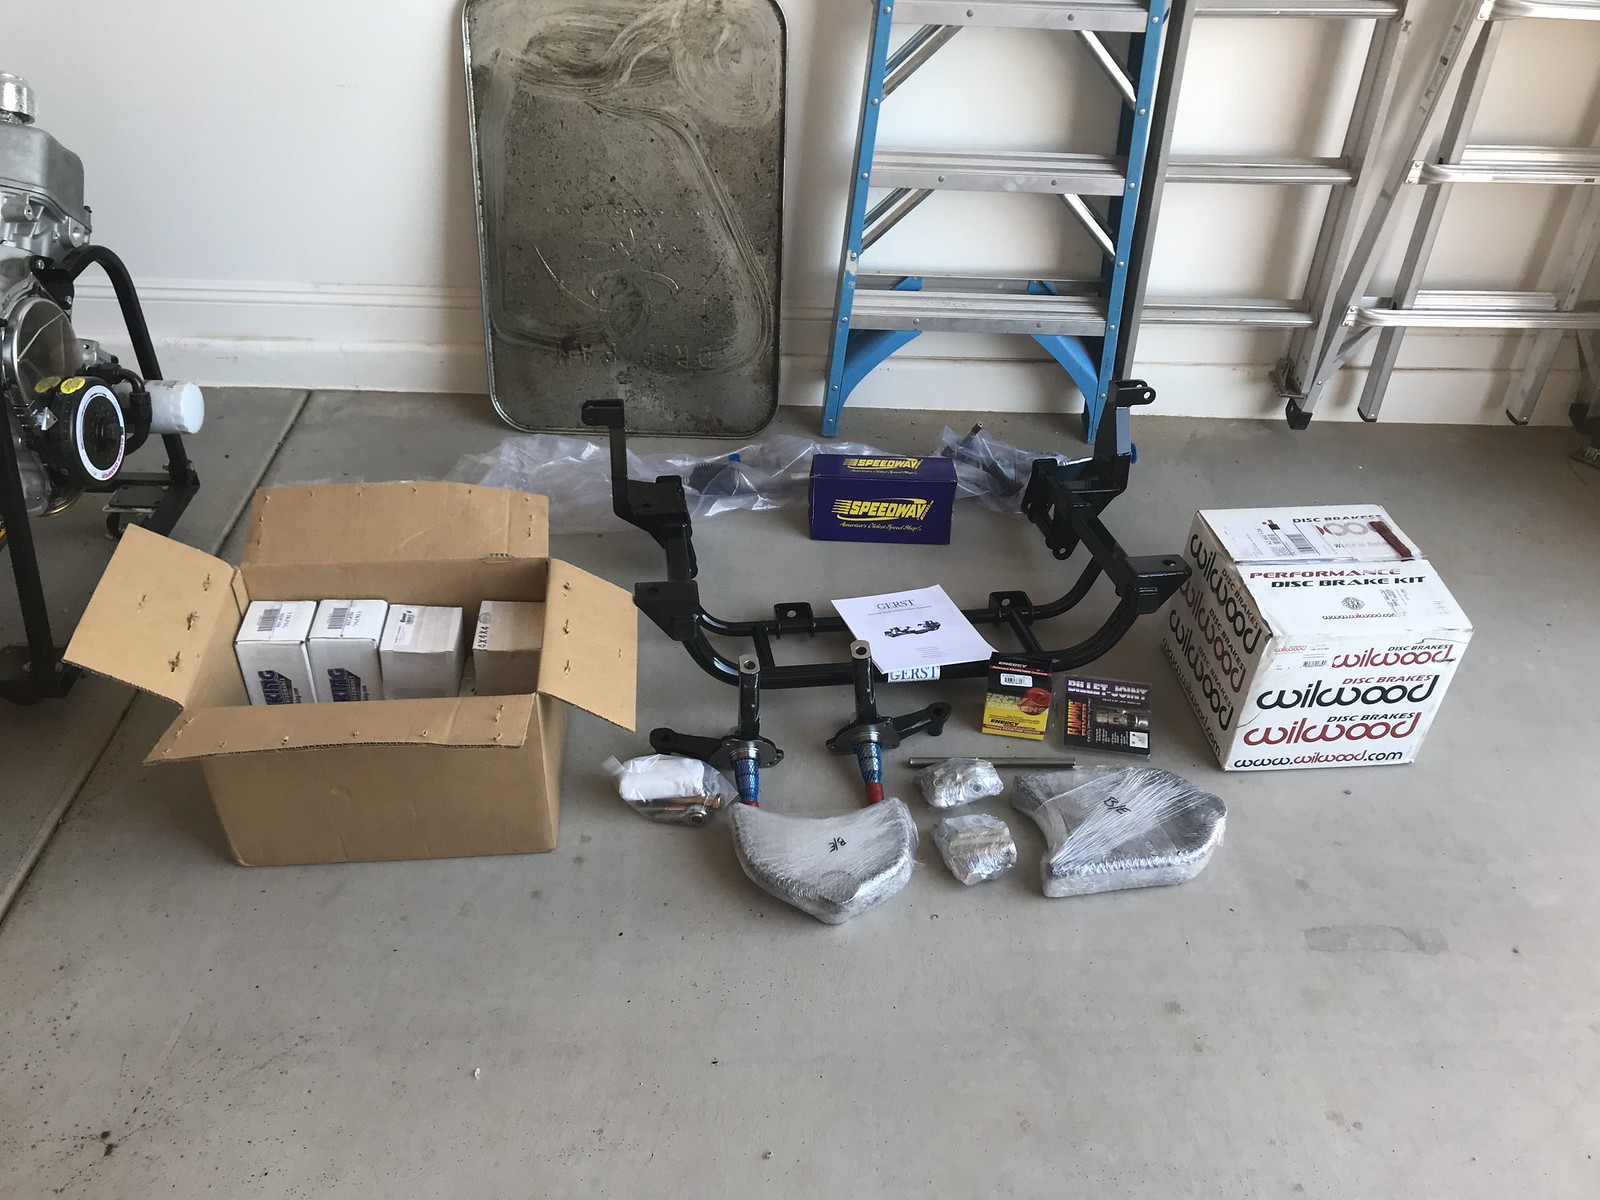
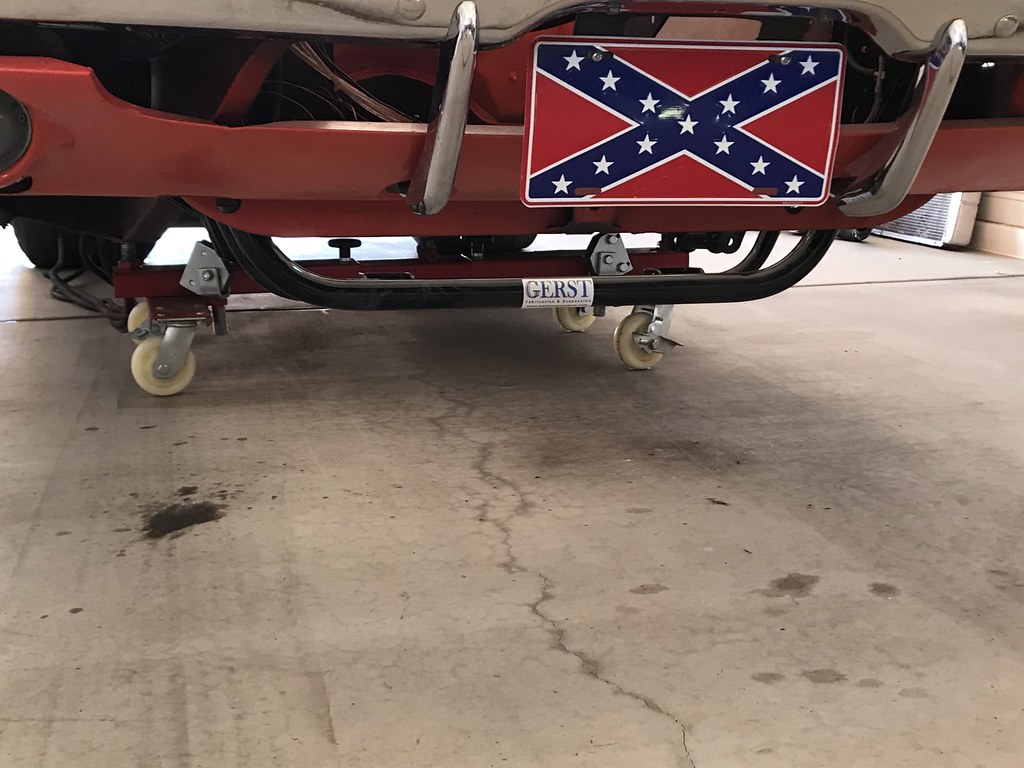
I don't know what's with this GERST guy? I ordered my front end and he said it was about ~6 weeks before it would be delivered. 6-weeks later, the damn thing showed up on my door step! Doesn't he know that if he's going to survive in the mopar world, he needs to push the ETA at least twice and add in a couple recalls....
I ran out of wire on my MIG and unfortunately it cause my spool to bind and release... bird $hit welds on the plates connecting the front kickers to the firewall. Thanks to GERST my project is waiting on me and not parts! What the heck is wrong with this guy?
Don't you love the way the factory crunched the metal into shape.Fire wall looks just like my super bee.As far as primer after the blasting just clean and apply,will stick like crazy.Looks like it turned out rather Nice!
I have instagram for my online portfolio at work- I should start a garage profile if it does image hosting like photobucket used to.
I go back and forth on how to do engine bays. Sometimes I want to hide and smooth stuff but usually I end up going for simple and easy to work on. It’s crazy how much work it is to make it look super clean and sanitary. I’m sure yours will be top notch judging by the work so far. https://instagram.com/p/ie7fbOAW6z/
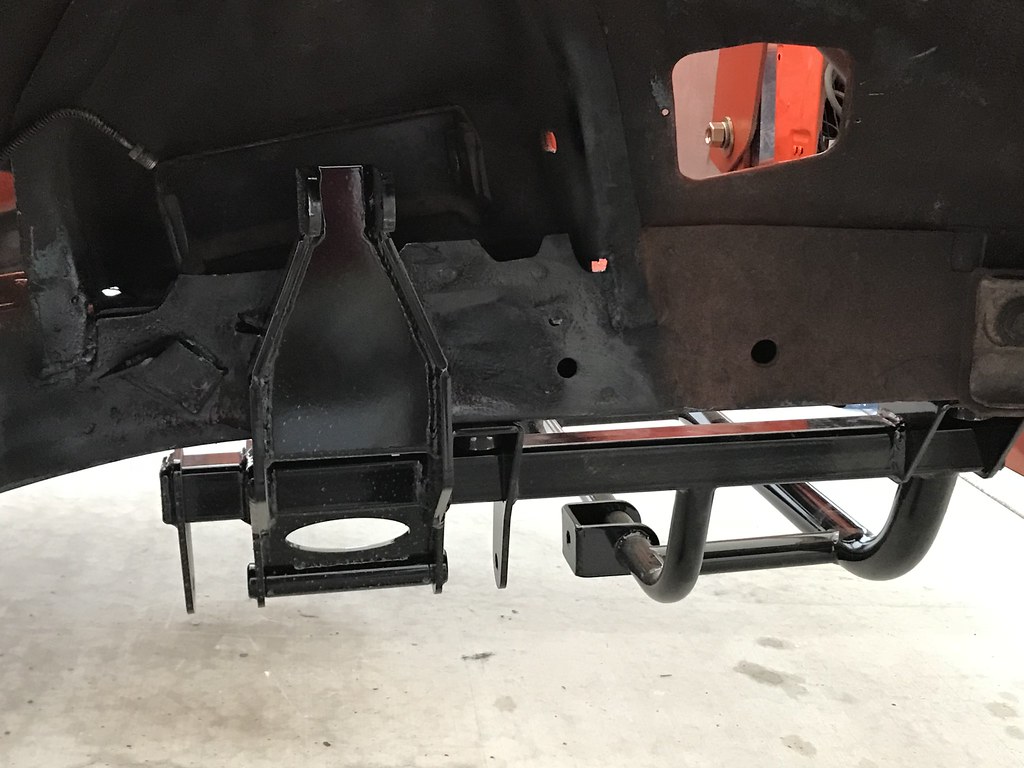
How much weight does the Gerst setup save you in weight off the front end?
1969 Dart GTS 340 1969 Super Bee X9 N-96 1969 Coronet R/T X9 N-96 2015 Dodge Dart GT 2019 Ram 2500 Big Horn. Looking for the original block for my Bee. The last 4 are 7449
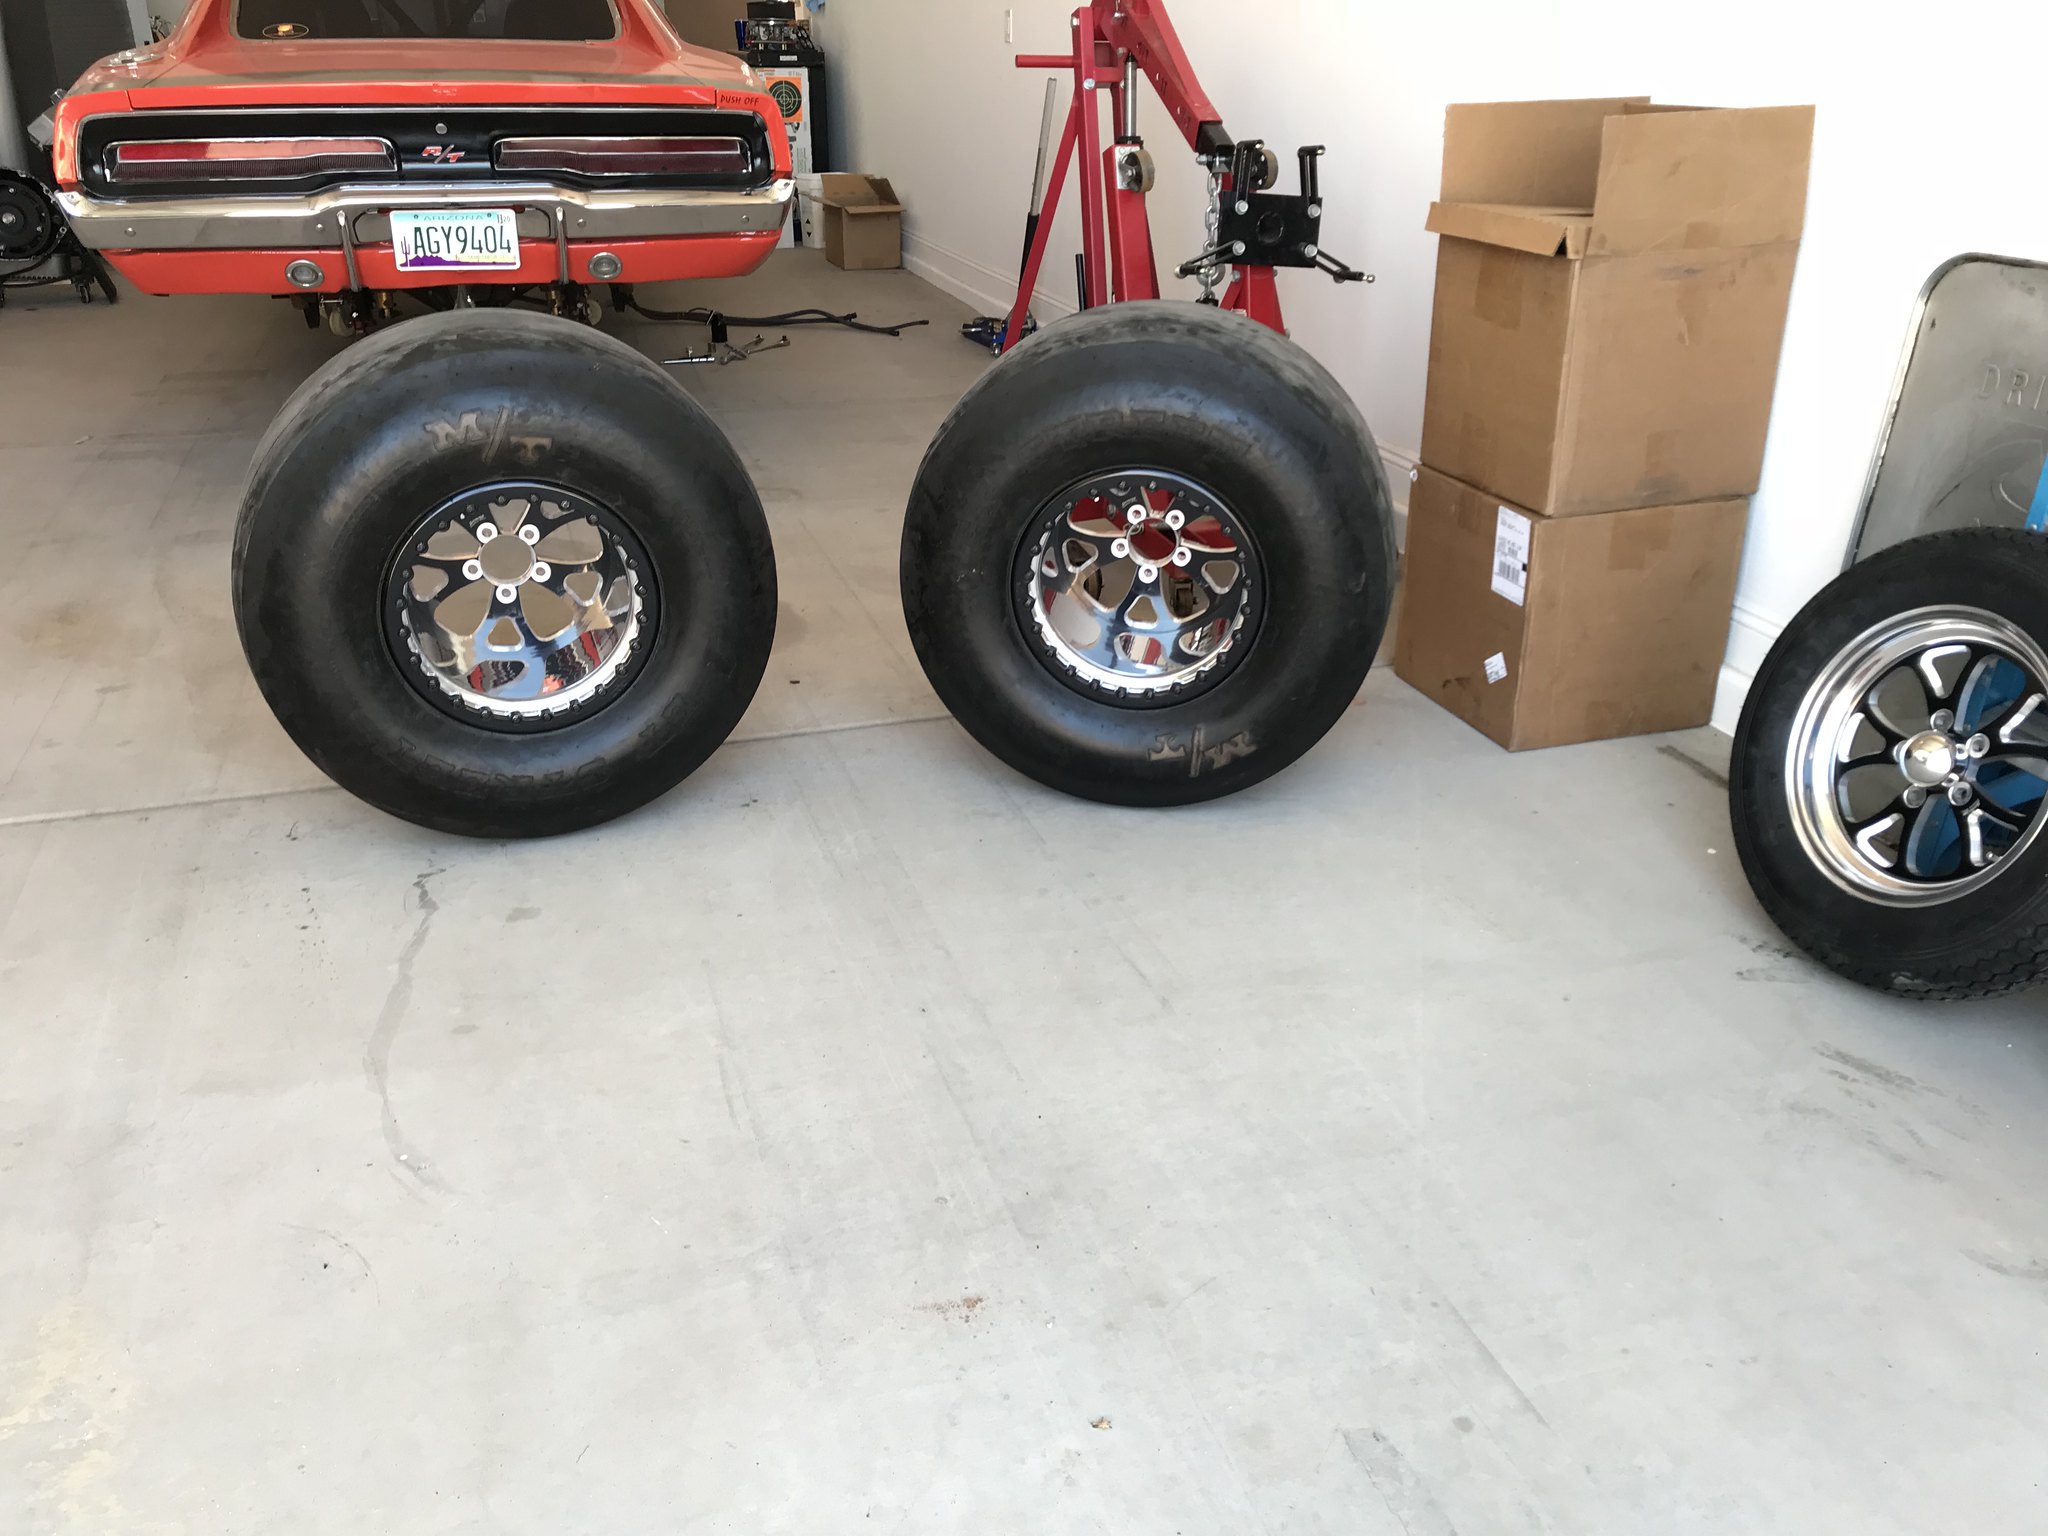
I cracked a front wheel and unfortunately American Racing no longer makes the Pro series. I don't remember who posted the link, but so far I like these Champion Wheels a lot more than anything I've owned in the past!
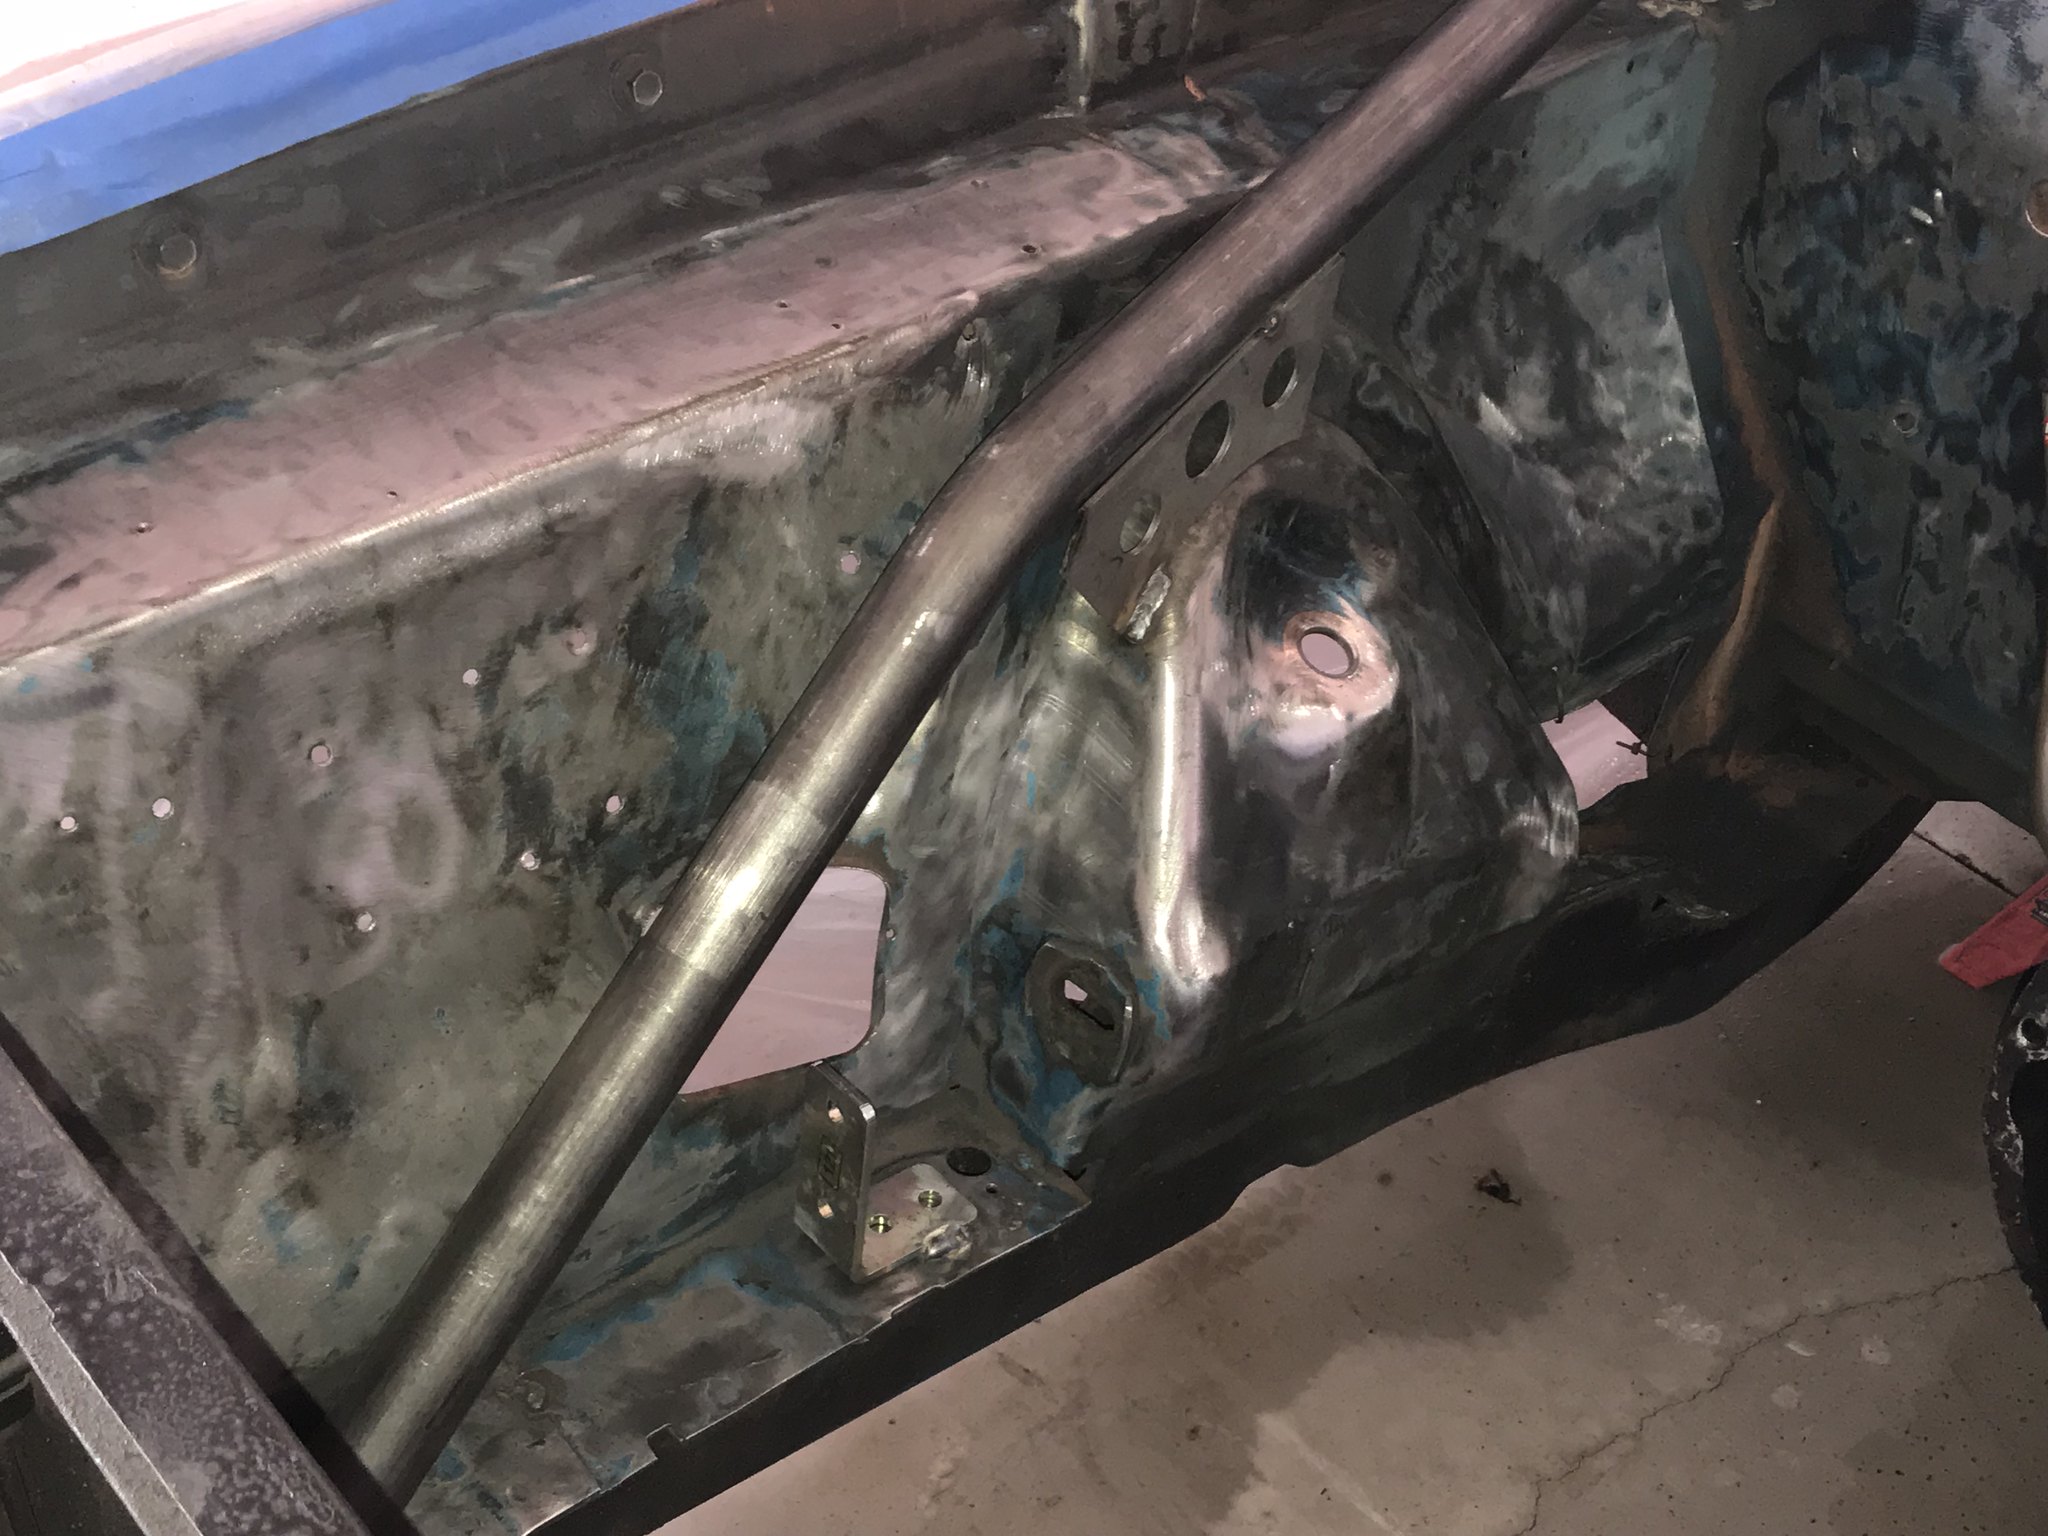
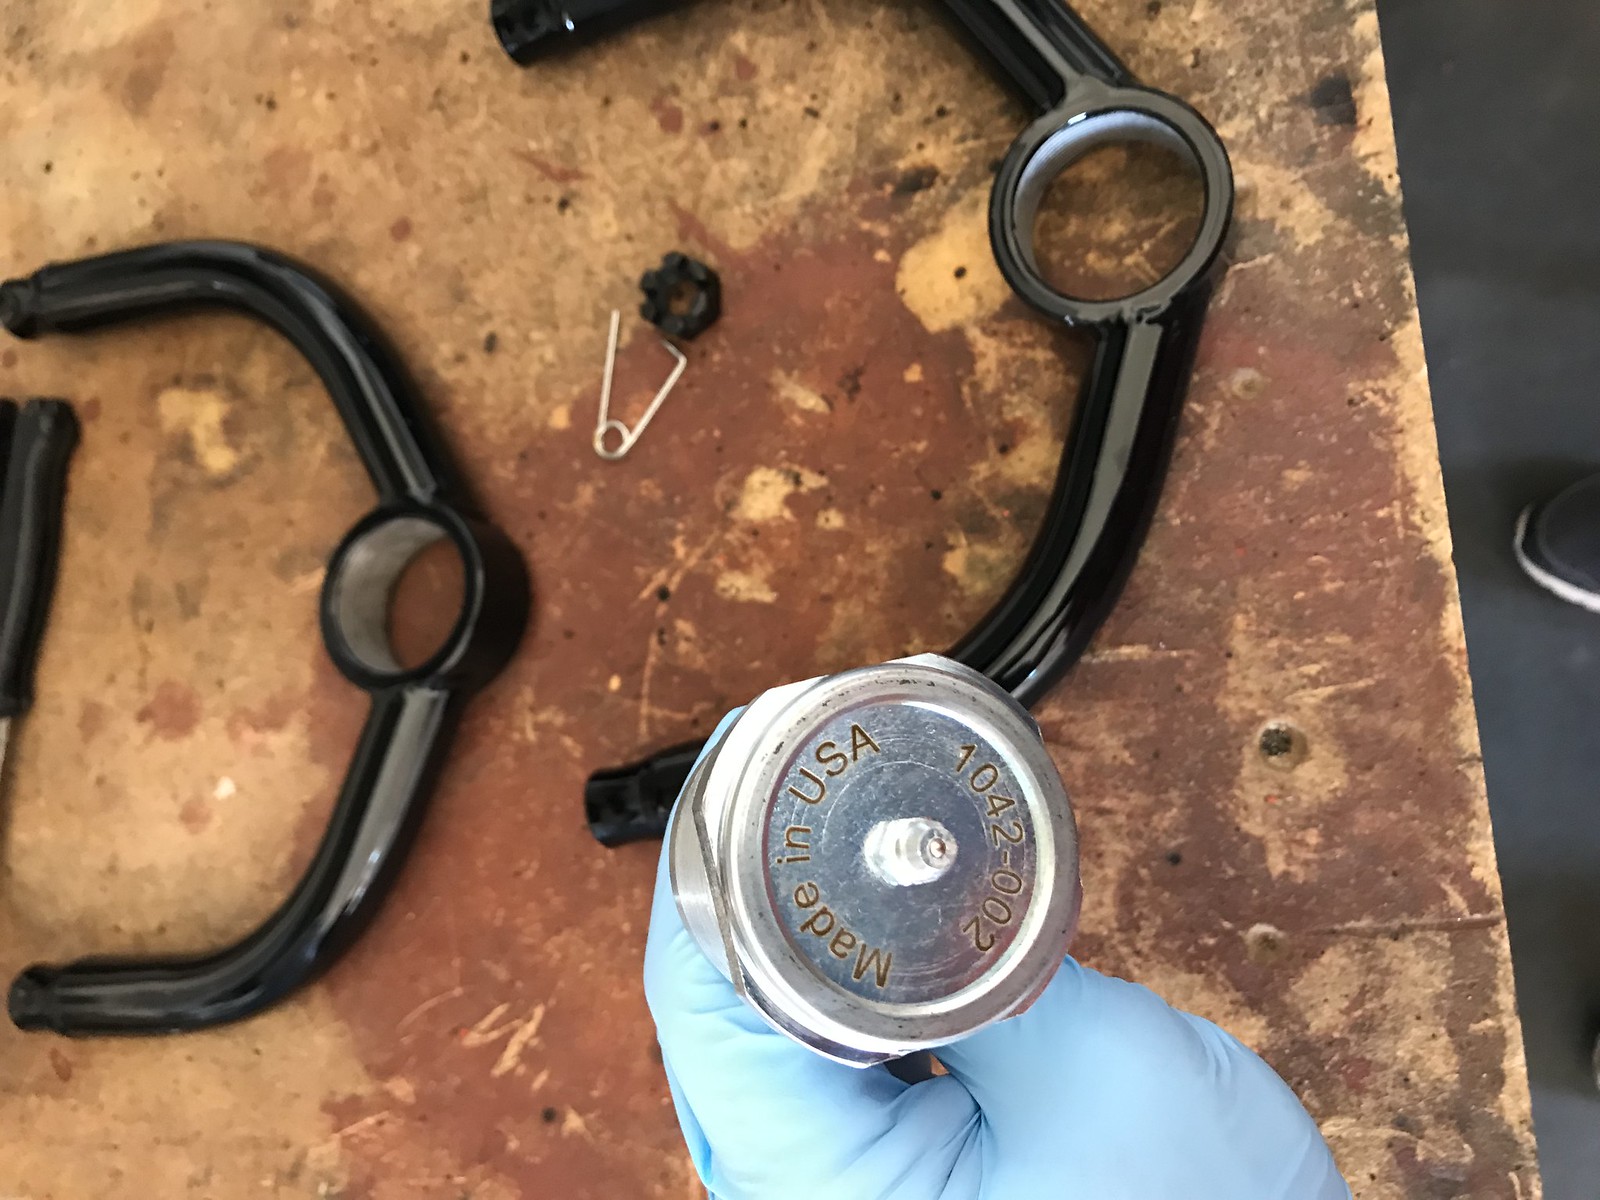
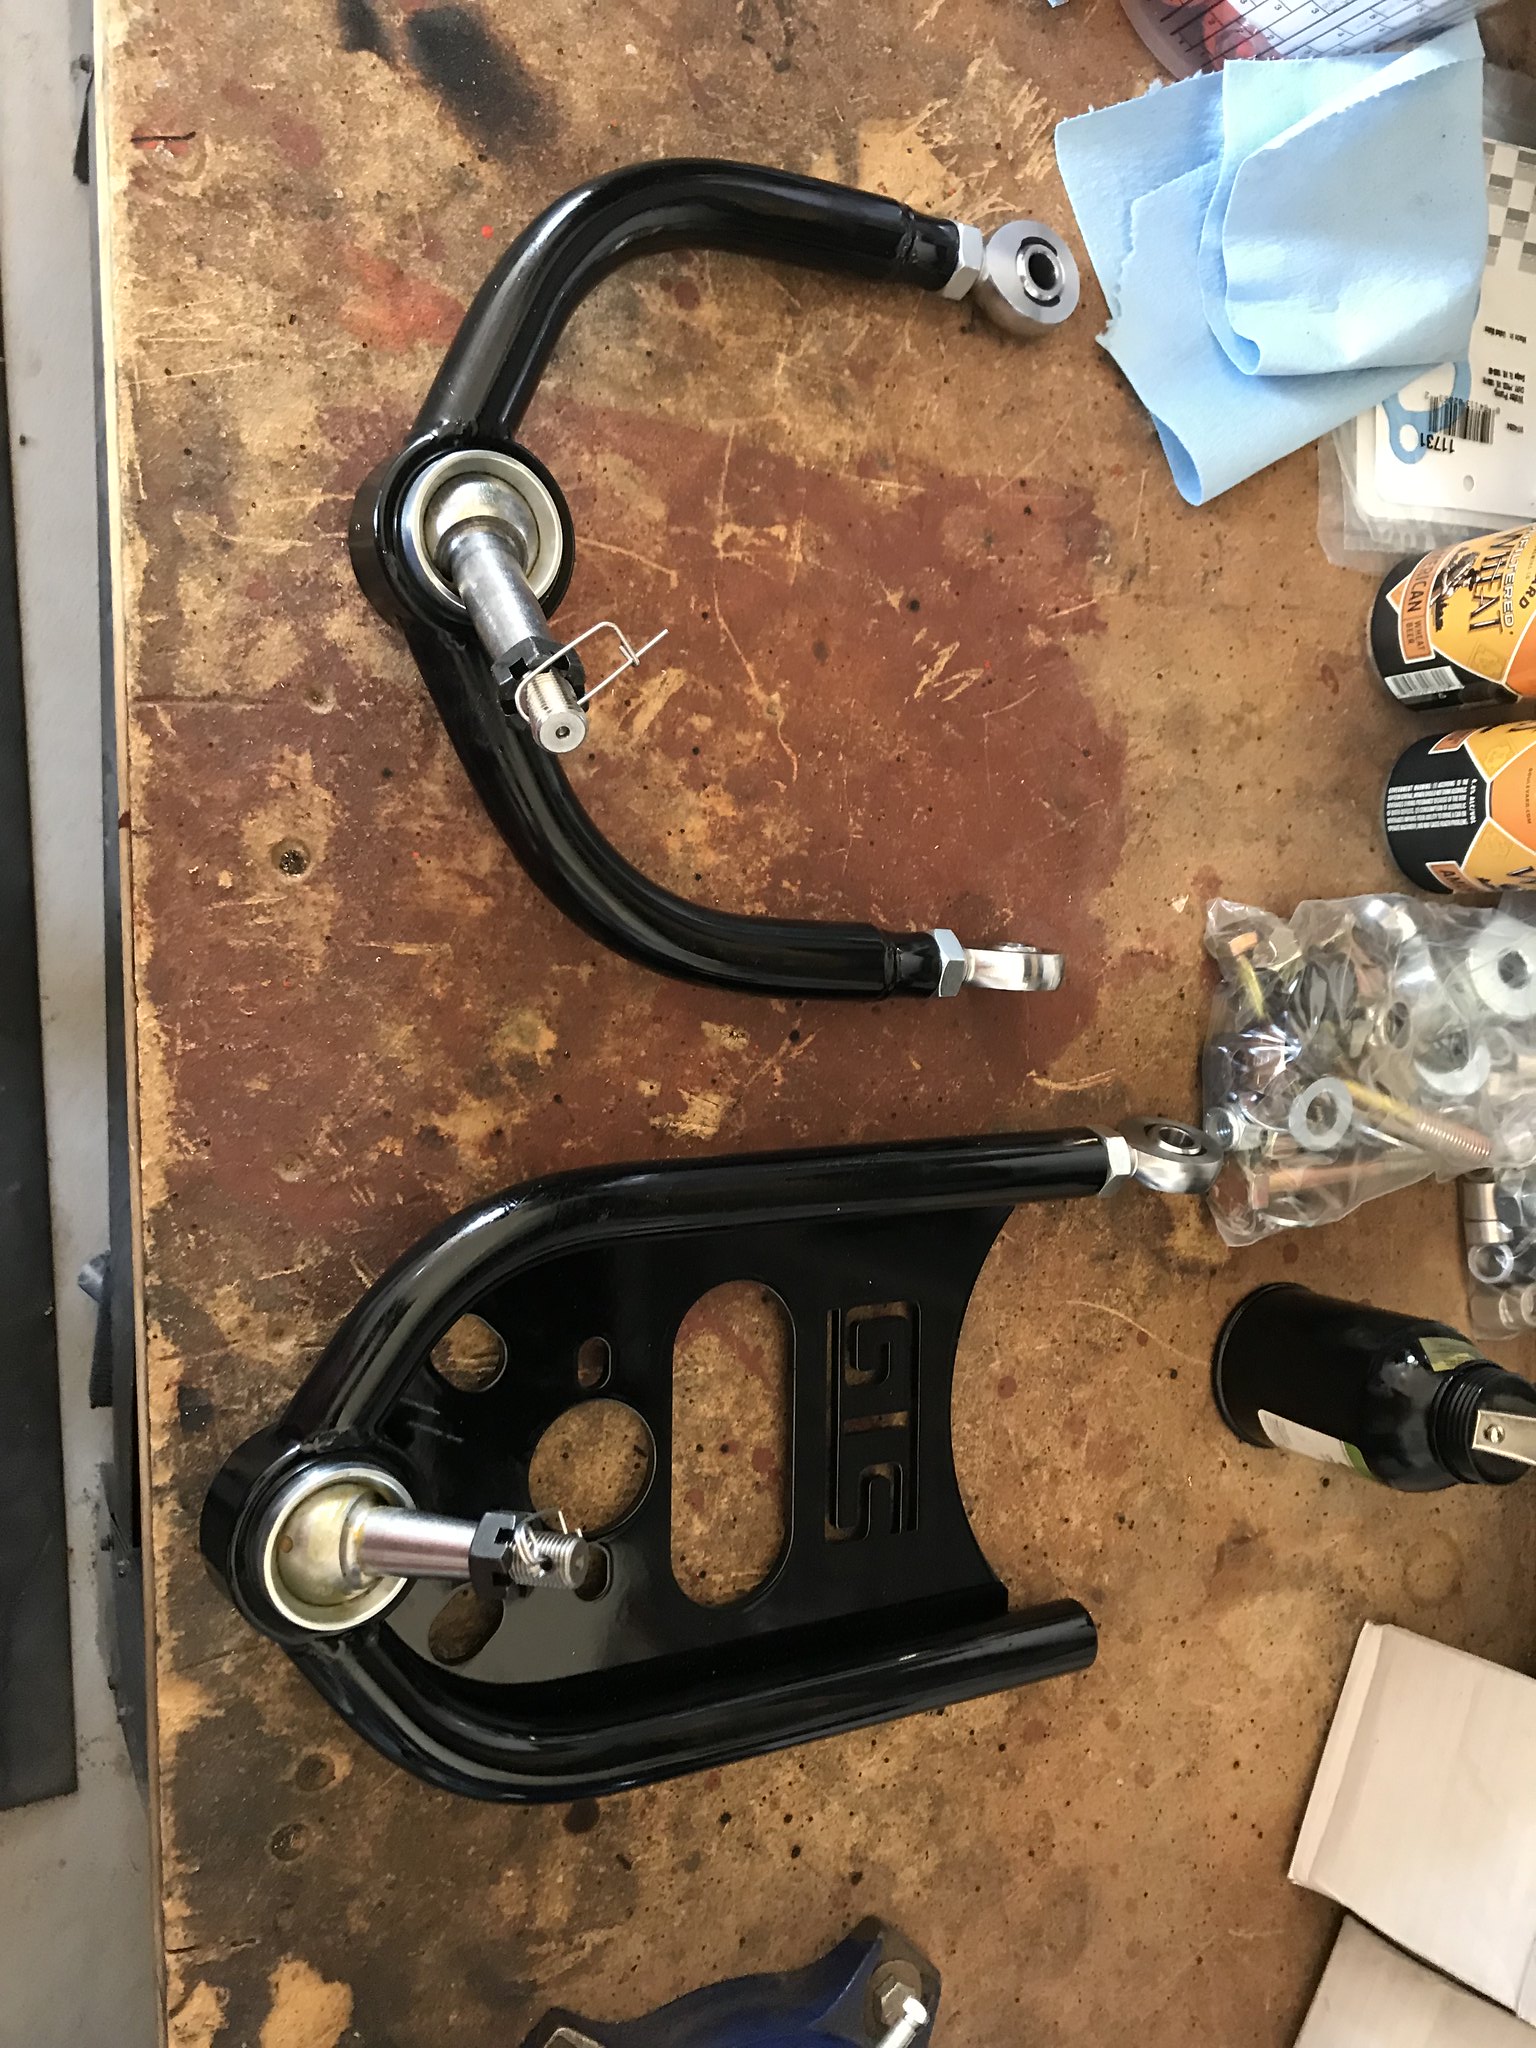
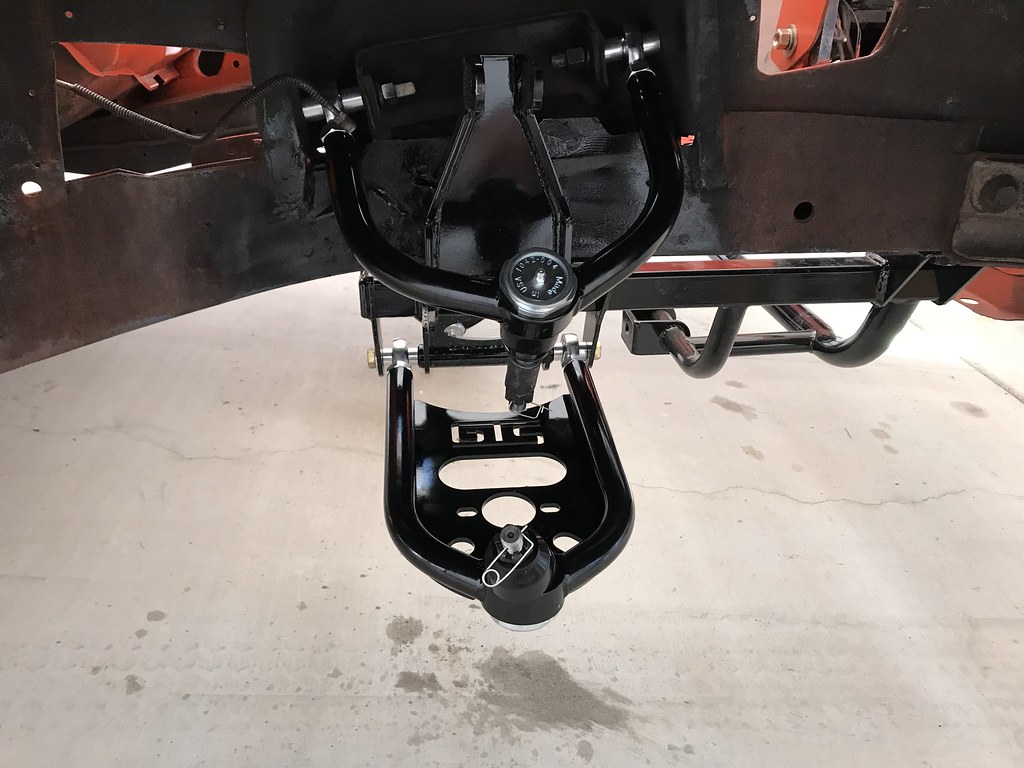
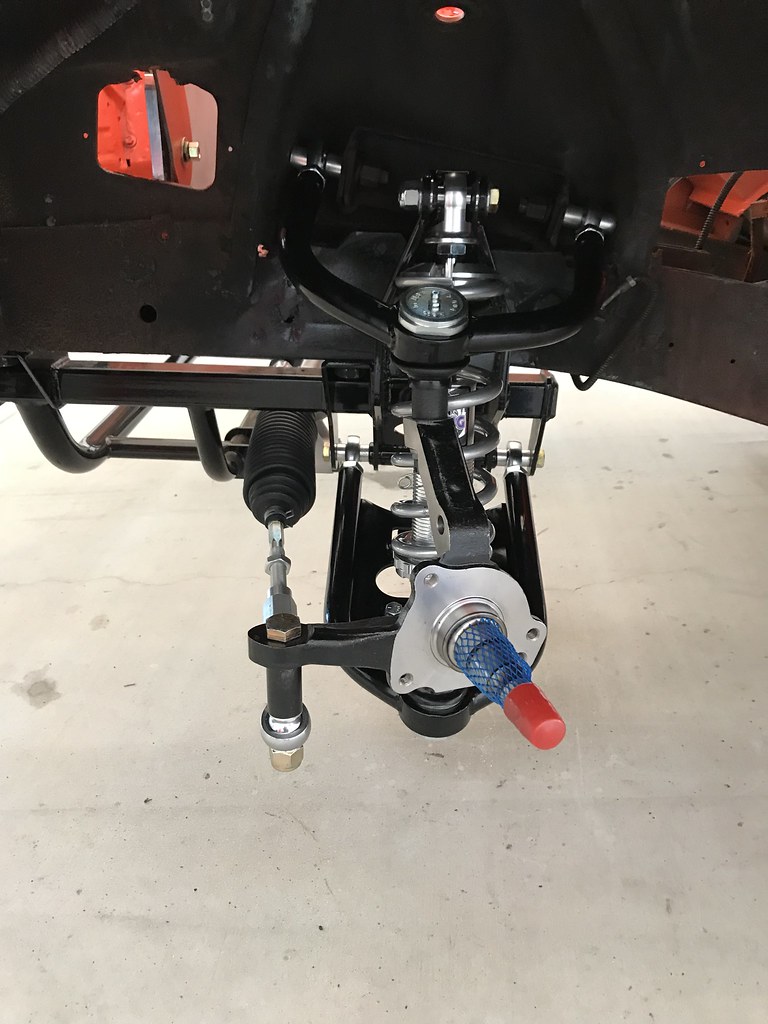
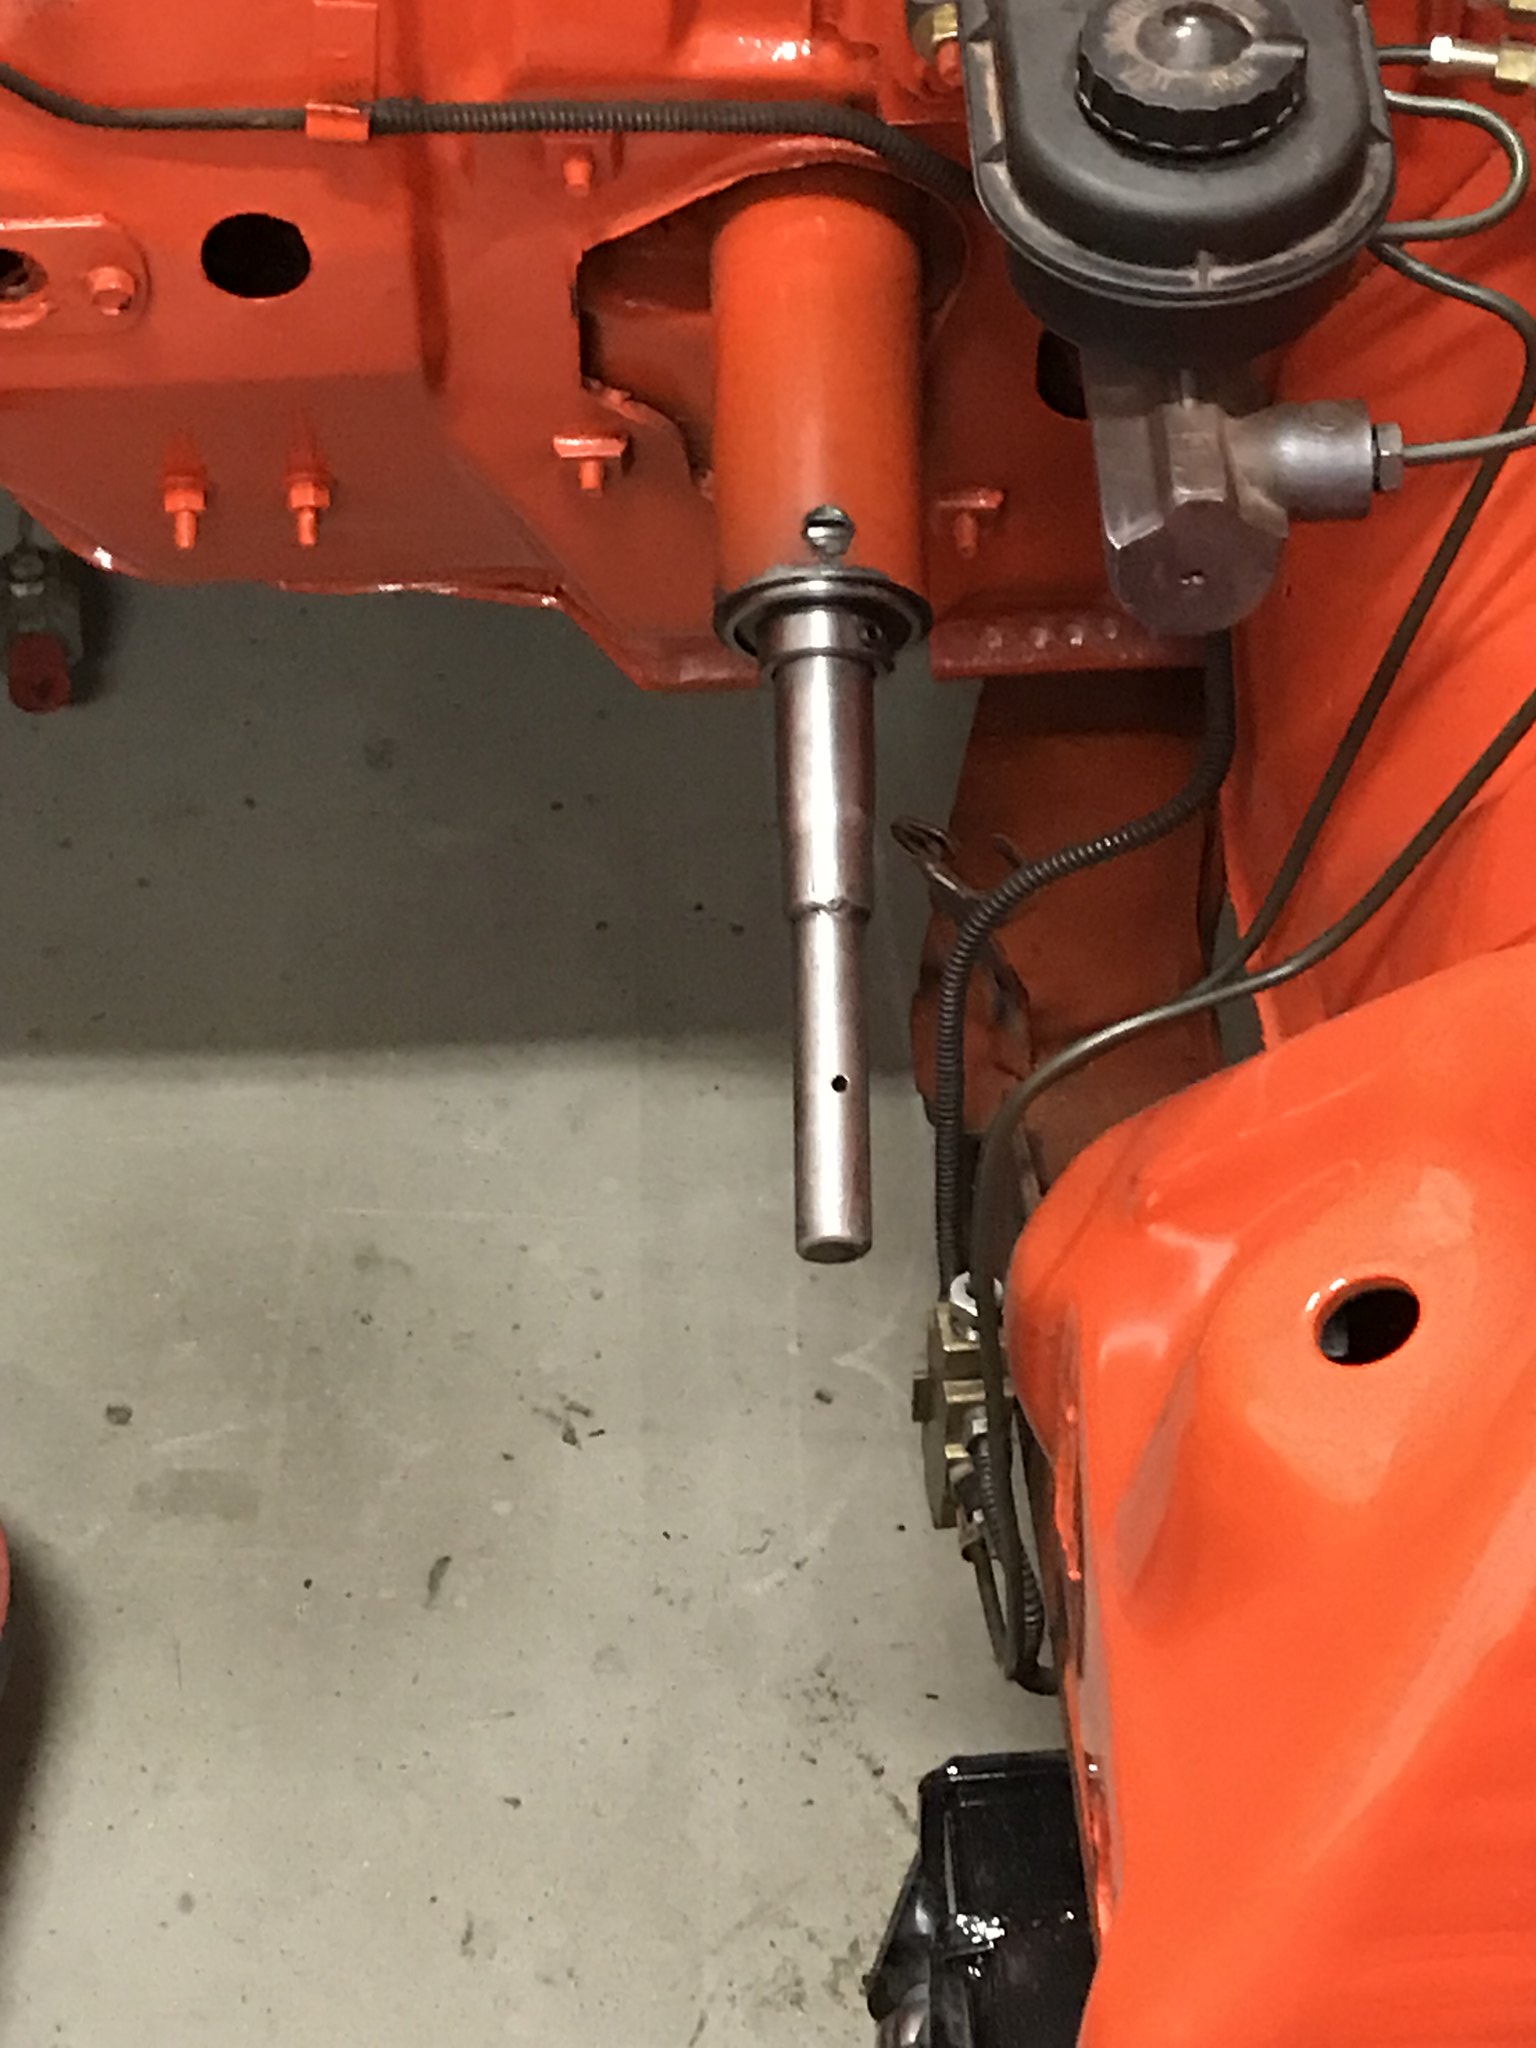
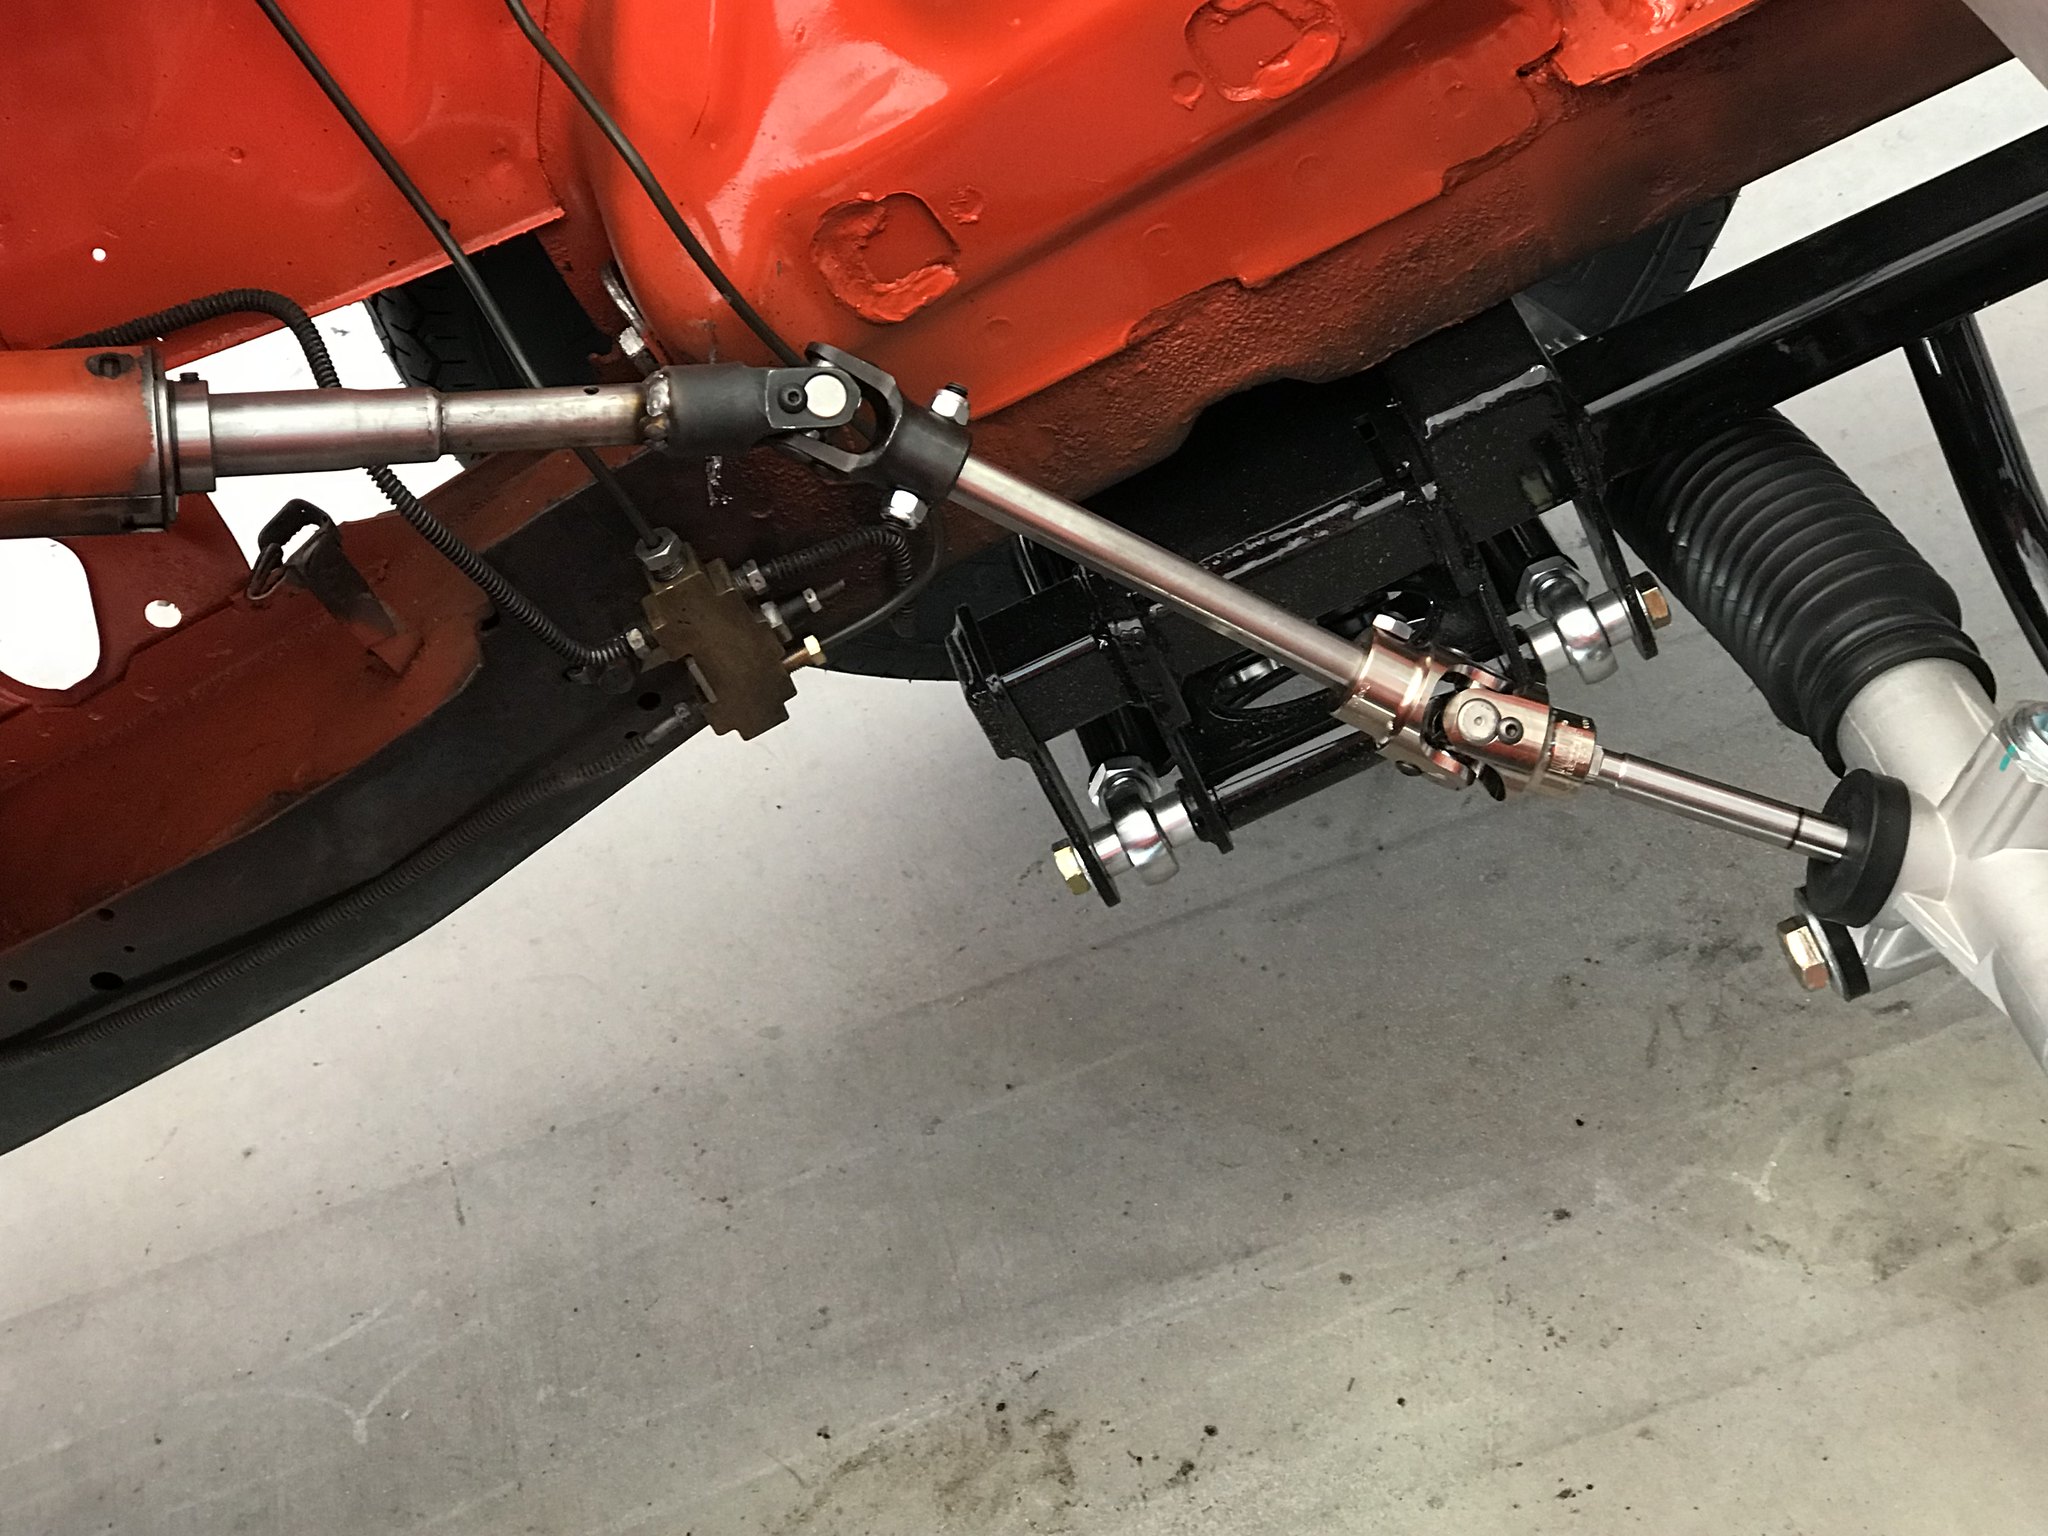
GERST Review: If you can work an aftermarket modern front suspension into your budget I strongly recommend it. My experience is limited to first hand GERST and second had via friends with RMS and Magnum Force. All appear to be superior to the factory system. I will eat crow if down the road experience proves me wrong, but so far my impressions are that GERST is lighter, stronger, safer, more adjustable, and increases header clearance. Not to mention the trials and tribulations I went through as a young man with local alignment shops and Chrysler threaded ball joints. I may have actually found religion after removing my battle worn factory suspension and comparing it to this nice modern system!
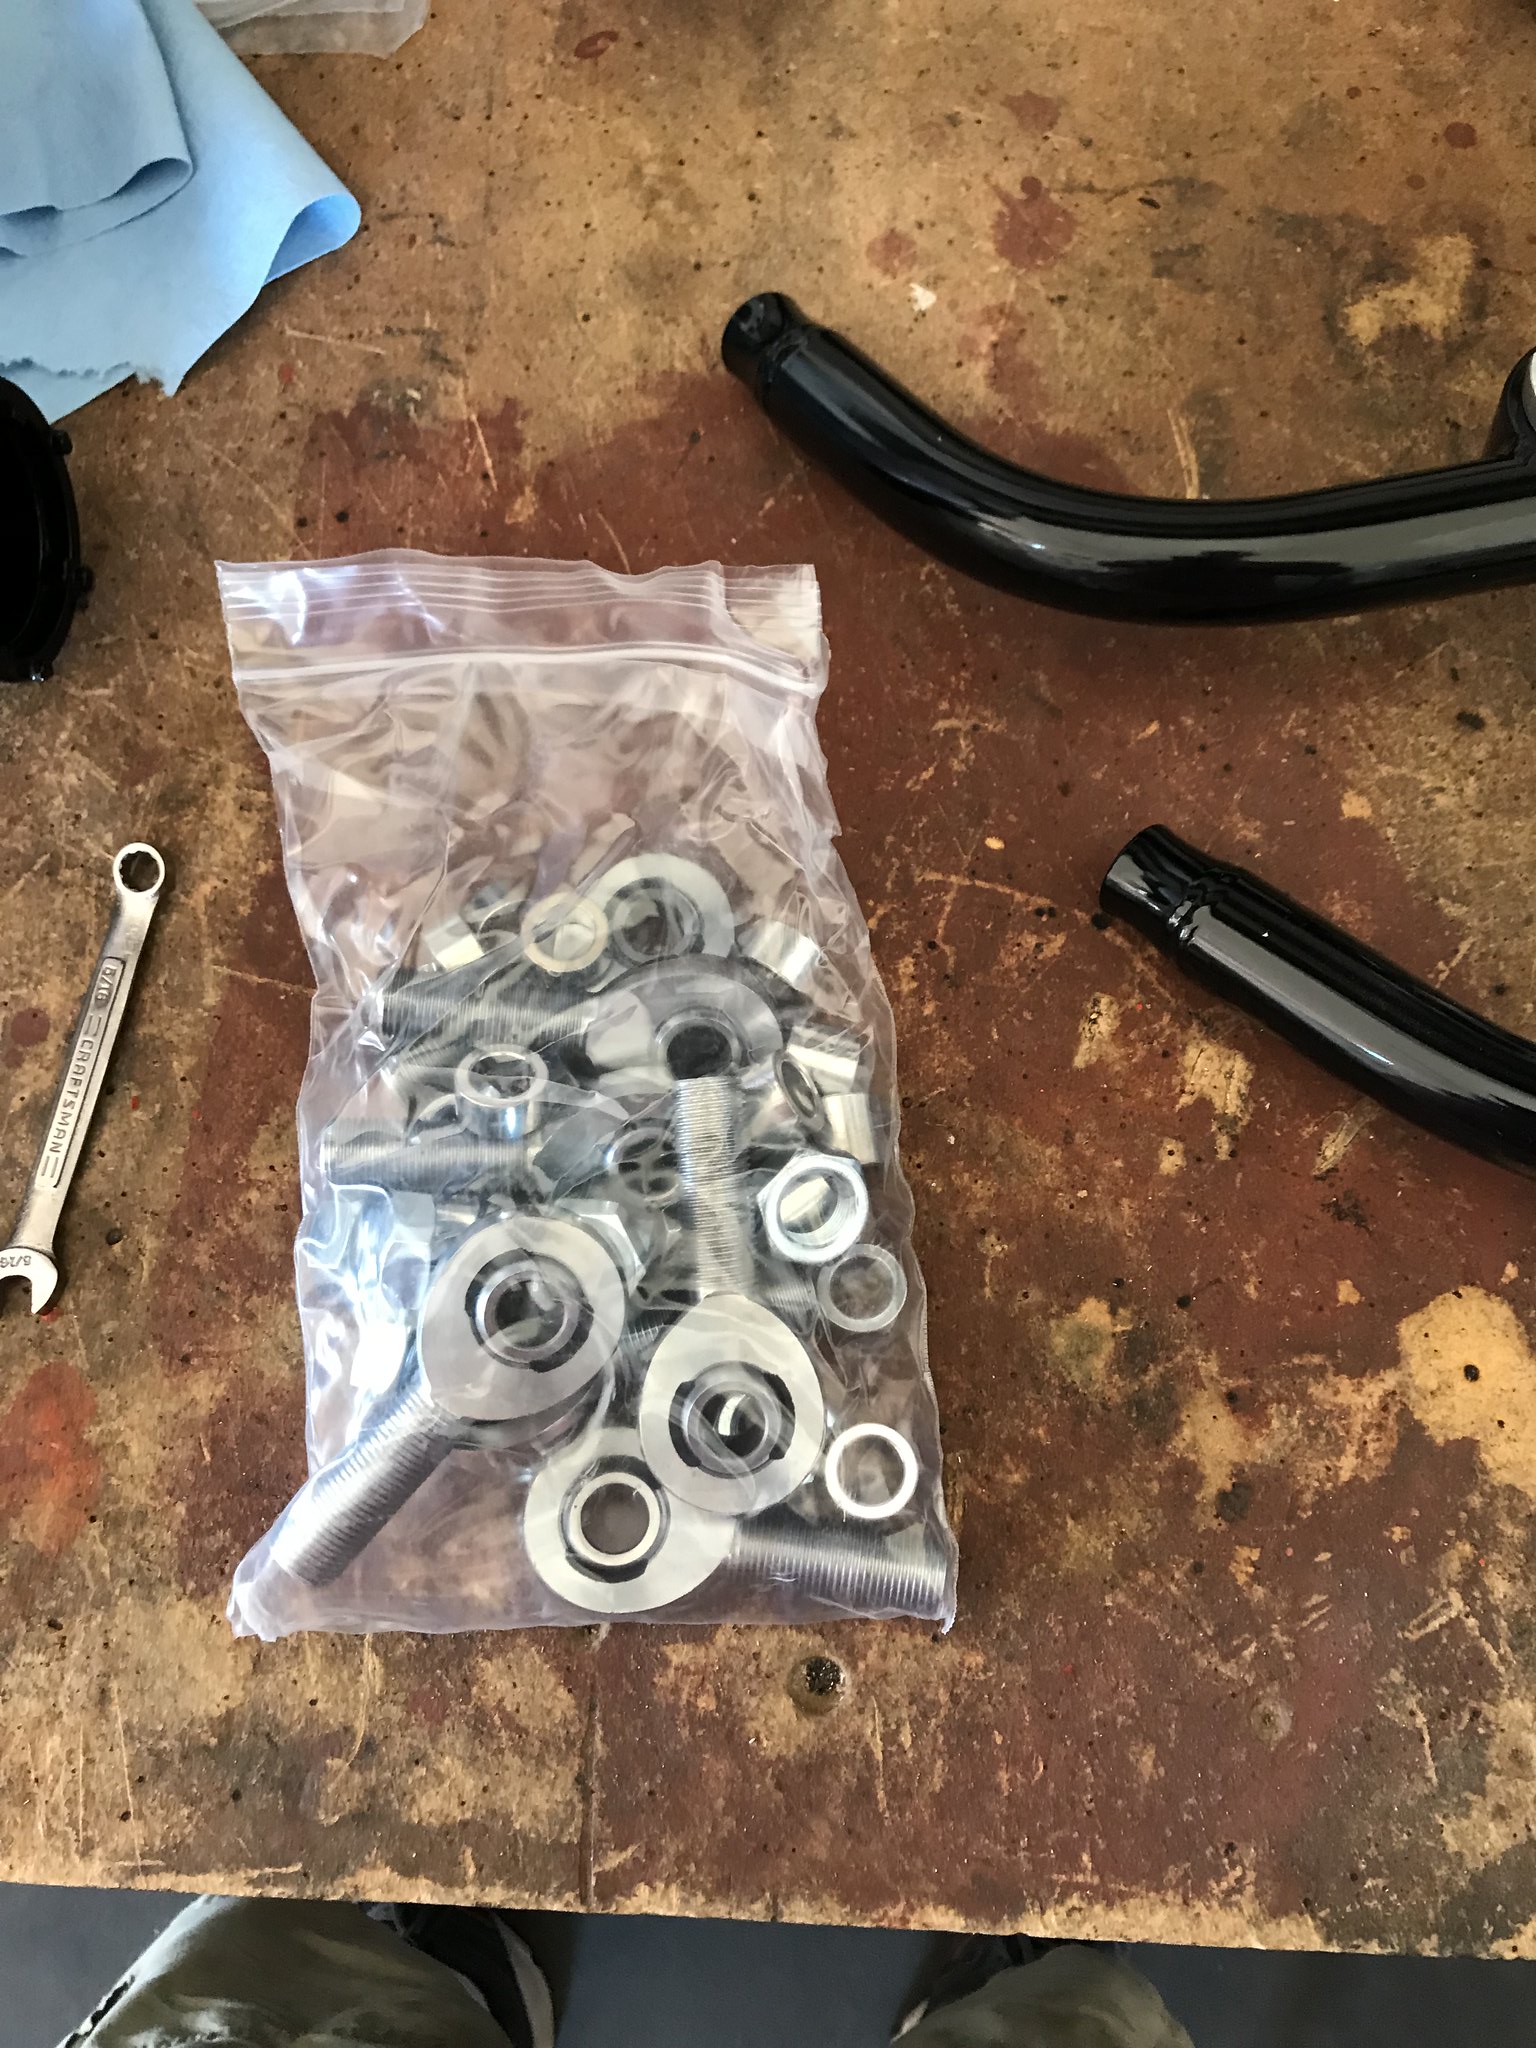
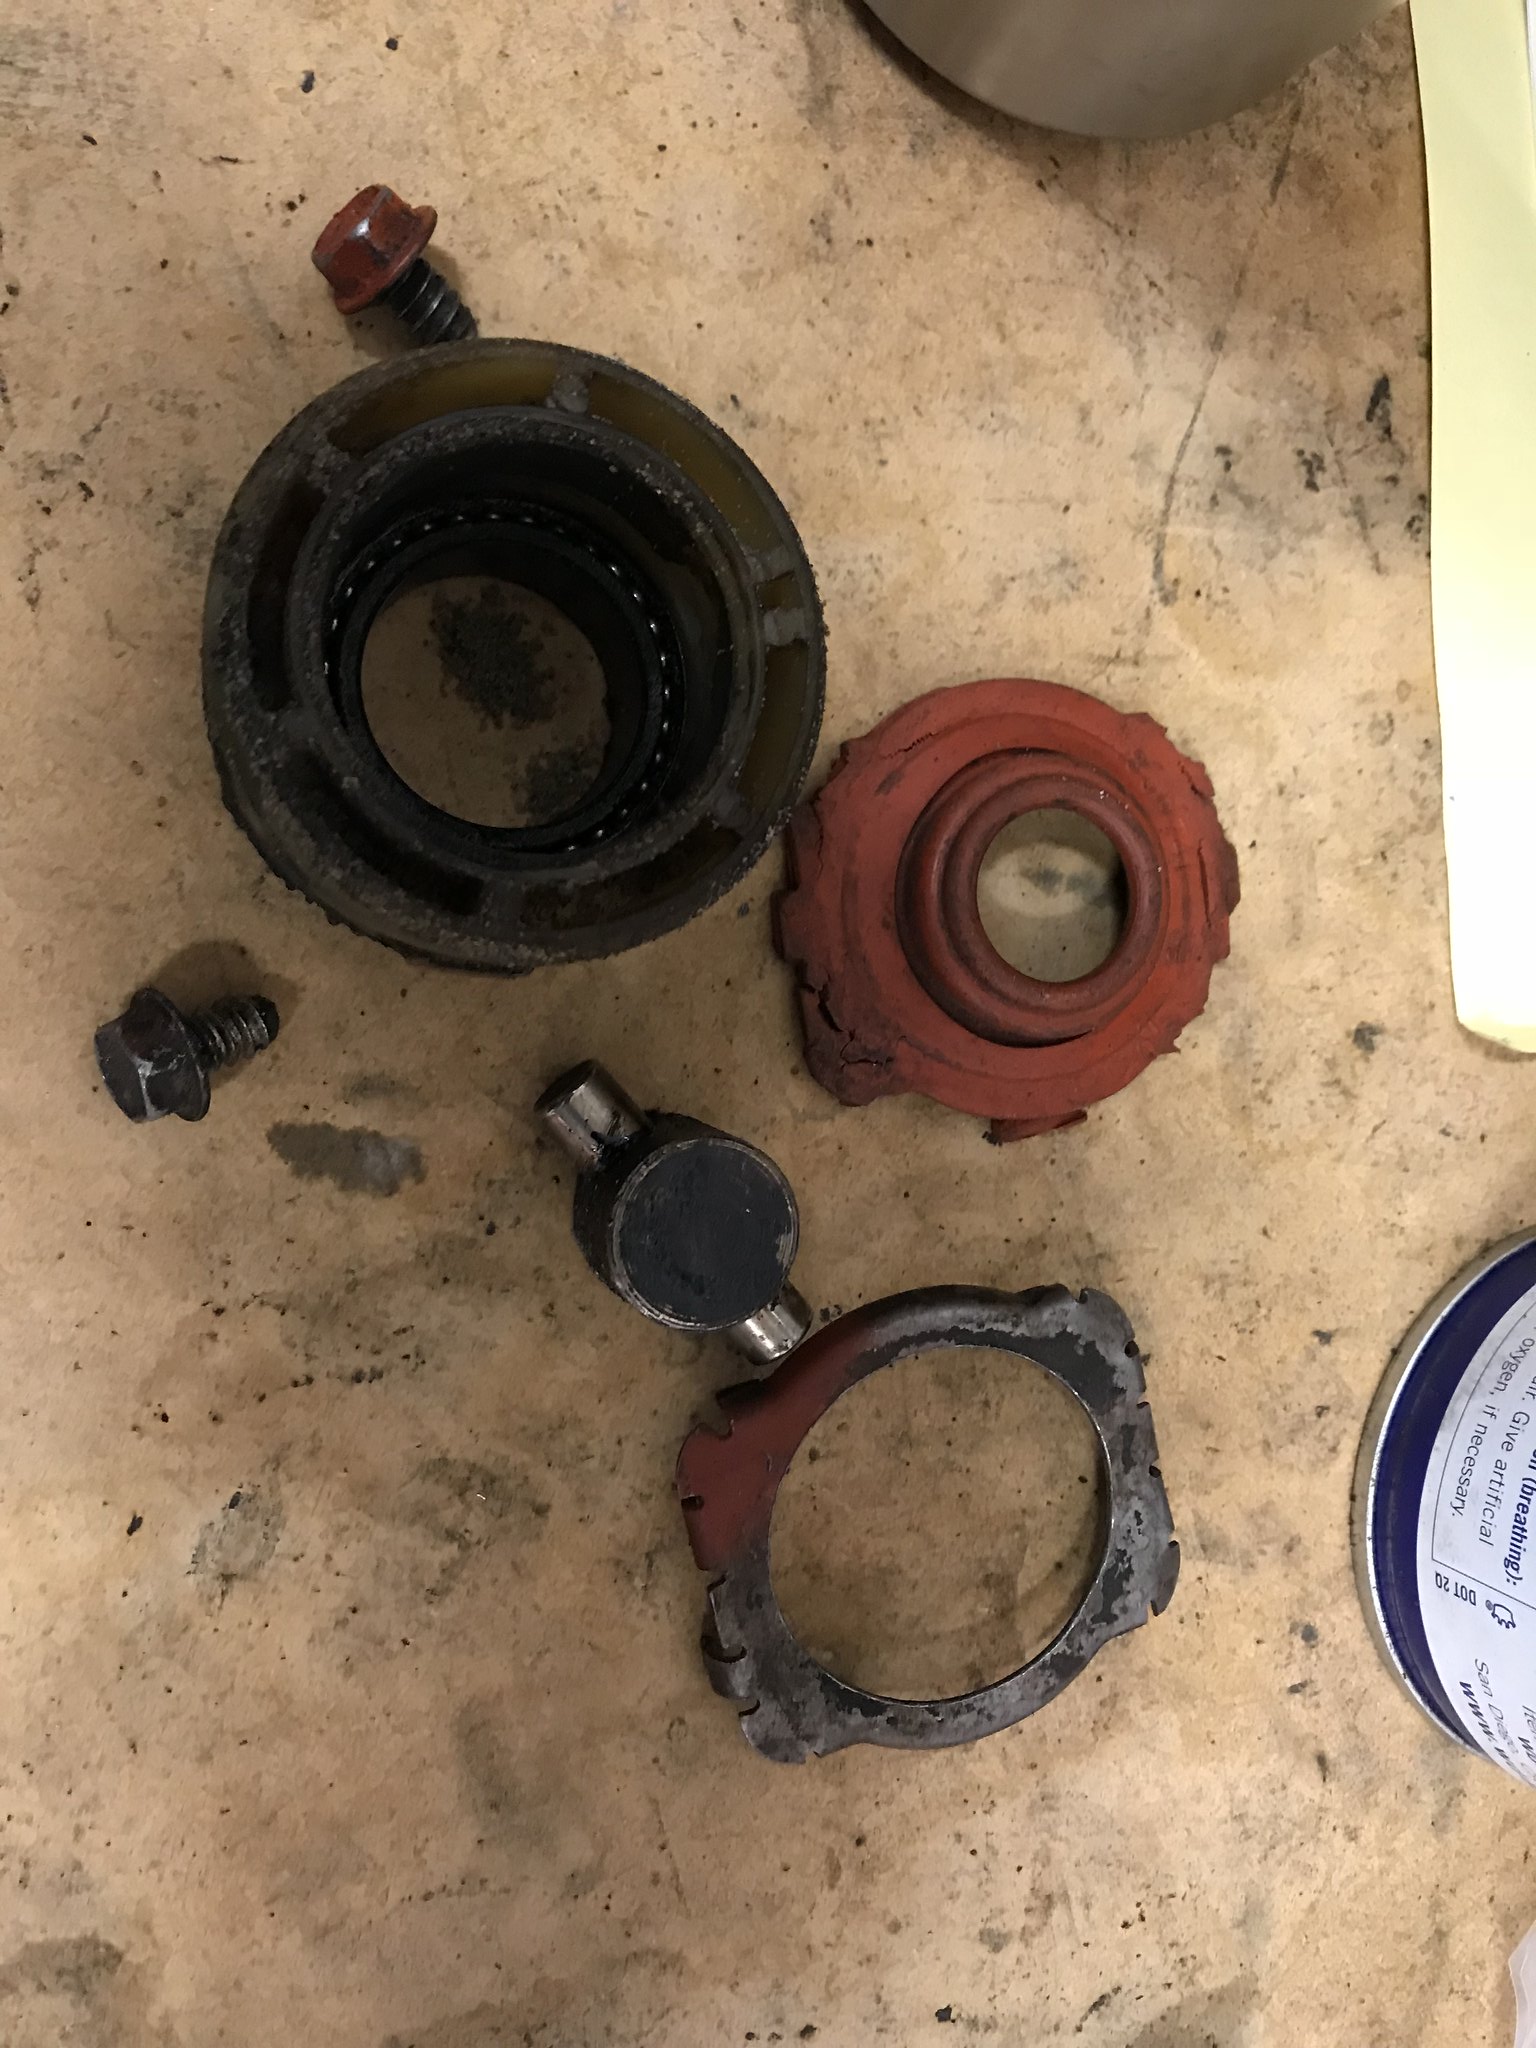
My roadblocks: • Lower control arm clearance was tight. So much so that the kit did not include enough smaller spacers to install the lower control arms. The instructions mention powder coating thickness variations are the issue. To resolve I first attempted to remove the powder coating from the inside of the k-frame brackets. Eventually I had to reduce (sand) the size of a couple of the “larger” spacers included in the kit. • Upper control arm, passenger side clearance was also tight. The instructions state to use the cone spacers on either side of the heim joint. The passenger side on my k-member was ~1/8in too tight. My options were to sand the spacer, replace the spacer with a smaller cone spacer (not included), remove the powder coating (didn’t work), or spread the bracket. After removing the powder coating and still needing more clearance; I installed a smaller cone spacer I had from another project. I may revisit this later, but the shock doesn’t rub through the entire range of motion.
Experience with GERST: • He answers the phone day and night. Don’t hesitate to call with your questions. • GERST comes with the Steering column bushing while other kits don’t include or charge extra. • GERST is tubular and provides more header room than other kits. • Track width is adjustable. My kit came with extenders for the Rack and Pinion. My friends with Magnum and RMS did not. I suspect this is to allow the track width to be adjusted without being limited by adjustment on the Rack.
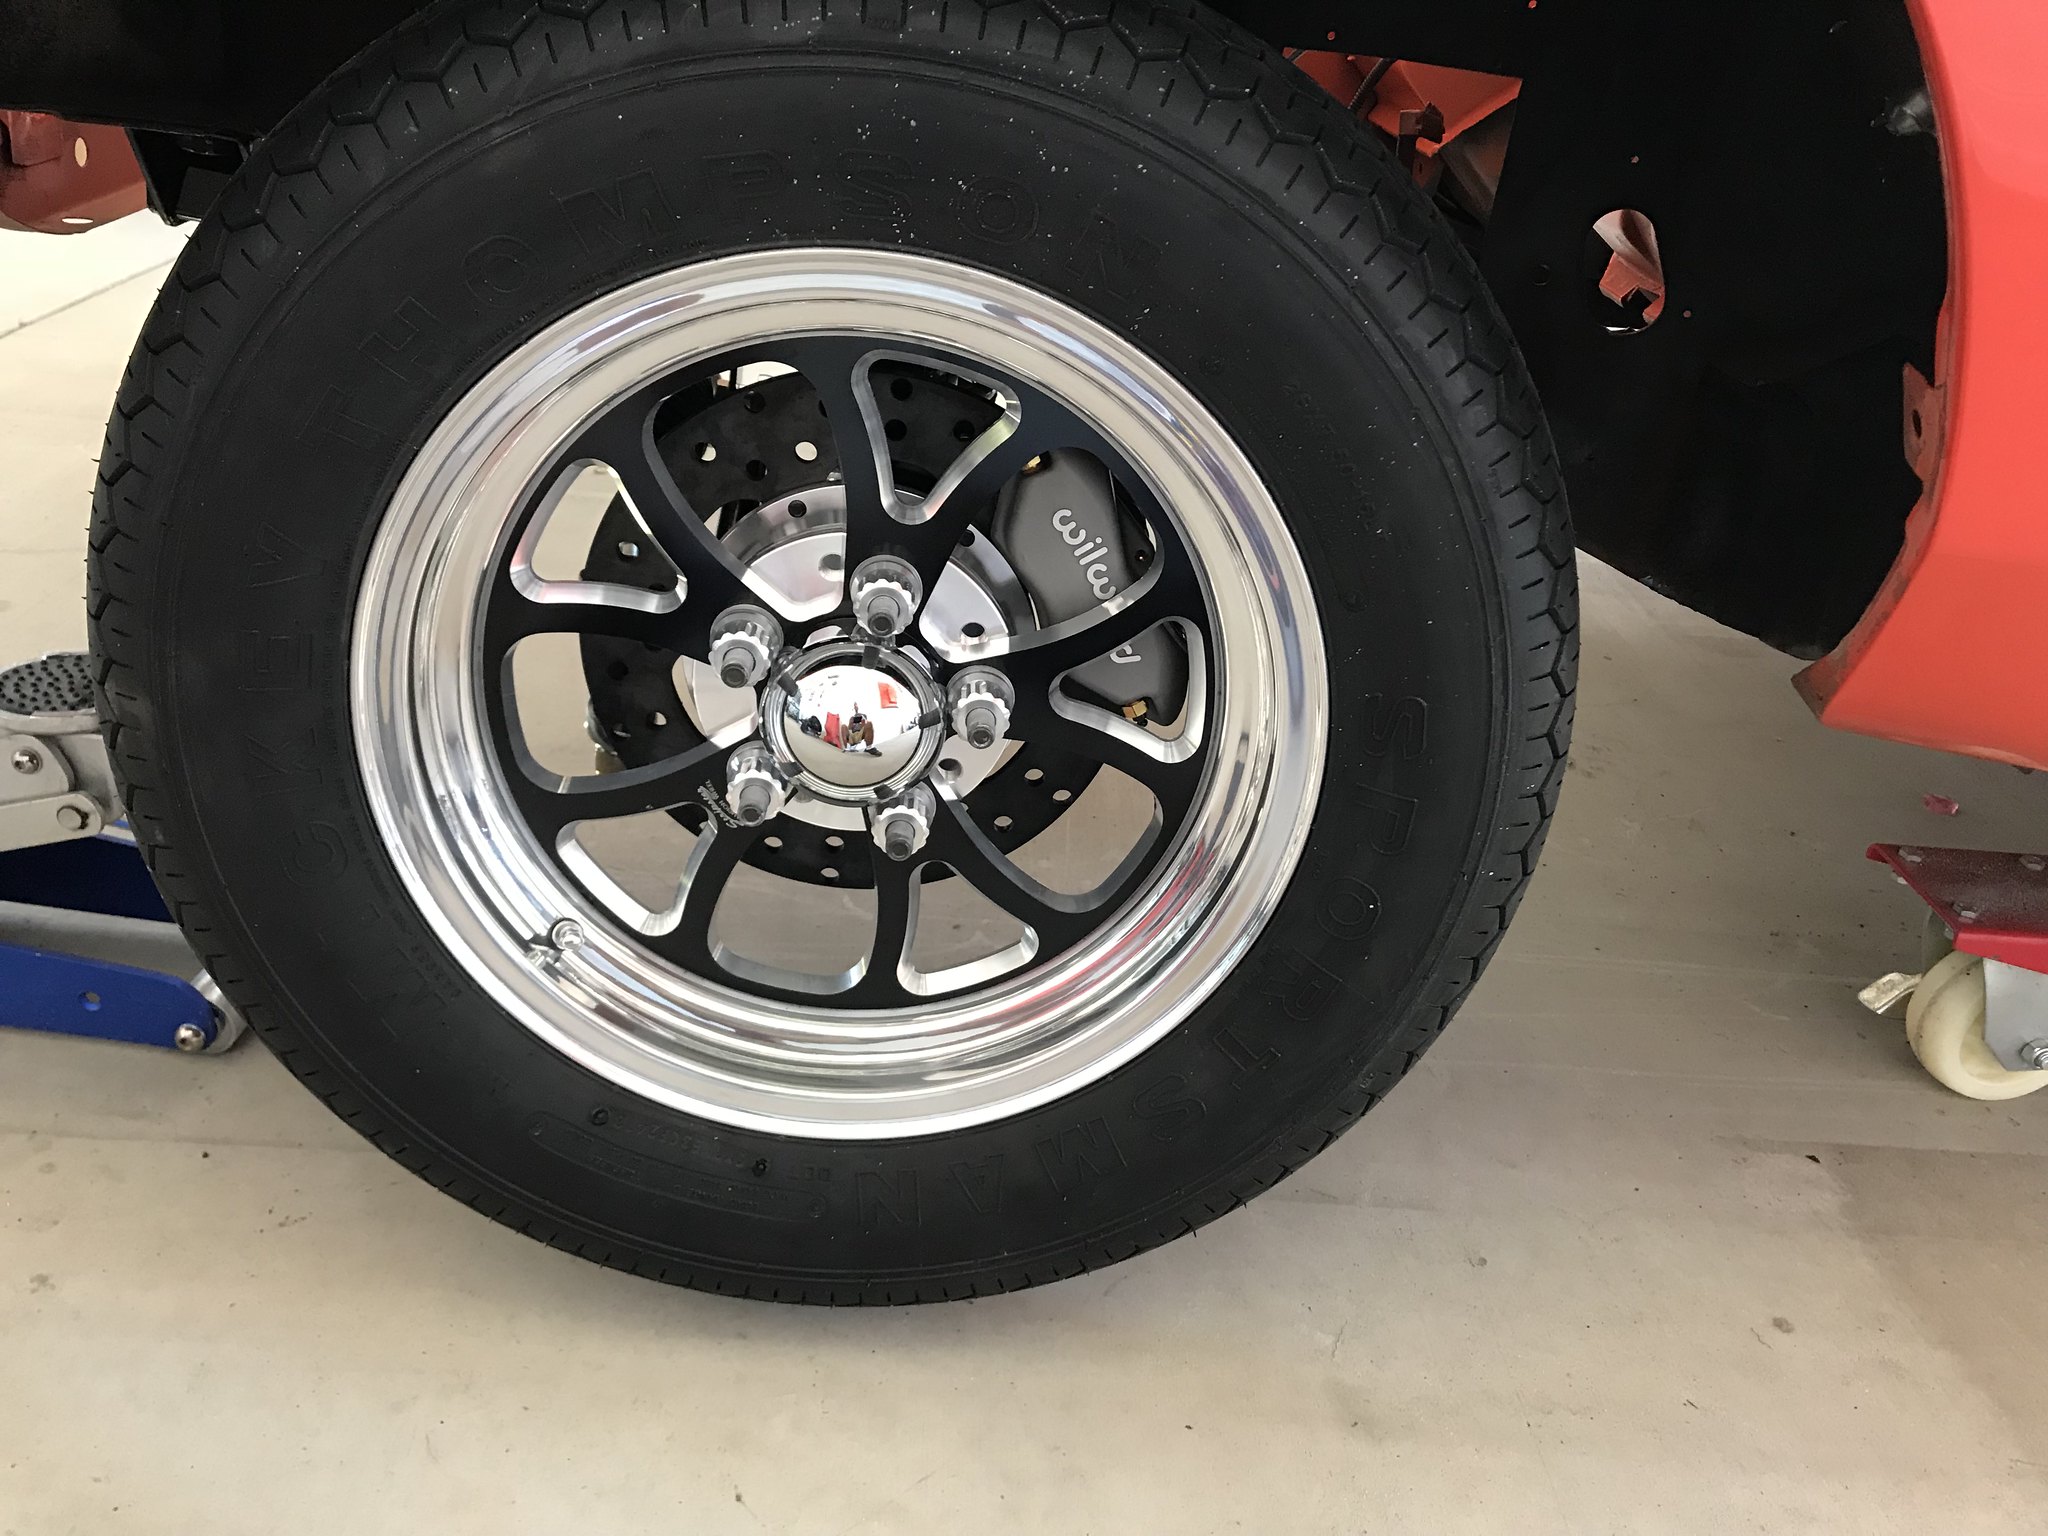
For the average Joe: • I’ve spent 30+ years using reconditioned/used factory parts; be it a factory block or early 80’s Magnum Disc brake spindles in this case. This was my first experience with entirely NEW stuff. I had to use emery cloth on the spindles to allow the outer bearings to slide in place. Polish, clean, grease, test fit, repeat… • New brakes are awesome!!!!! You’ll just have to compare for yourself, but factory stuff is HEAVY and hard to work with compared to the stuff that came in this kit.
You've pushed the "easy" button Greg! Love tube K/rack/coil over setup!
I went 127mph on the old factory stuff (145mph once when I was a dumb kid) and consider myself lucky to still have both the car and me in one piece. I should have done this sooner!
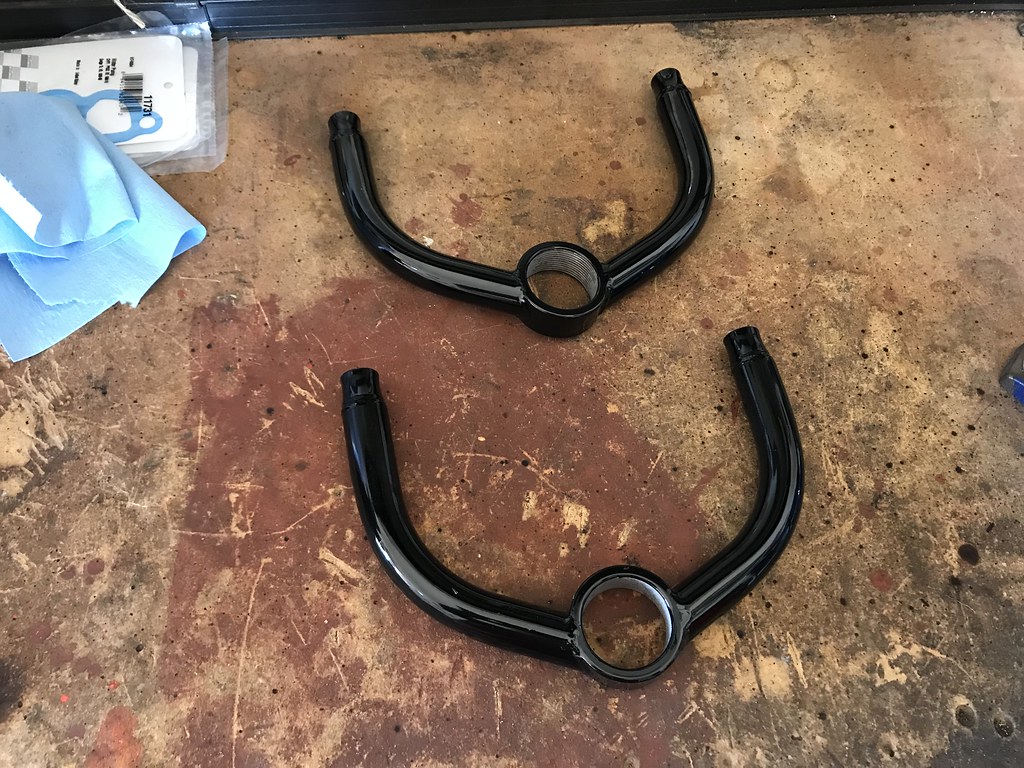
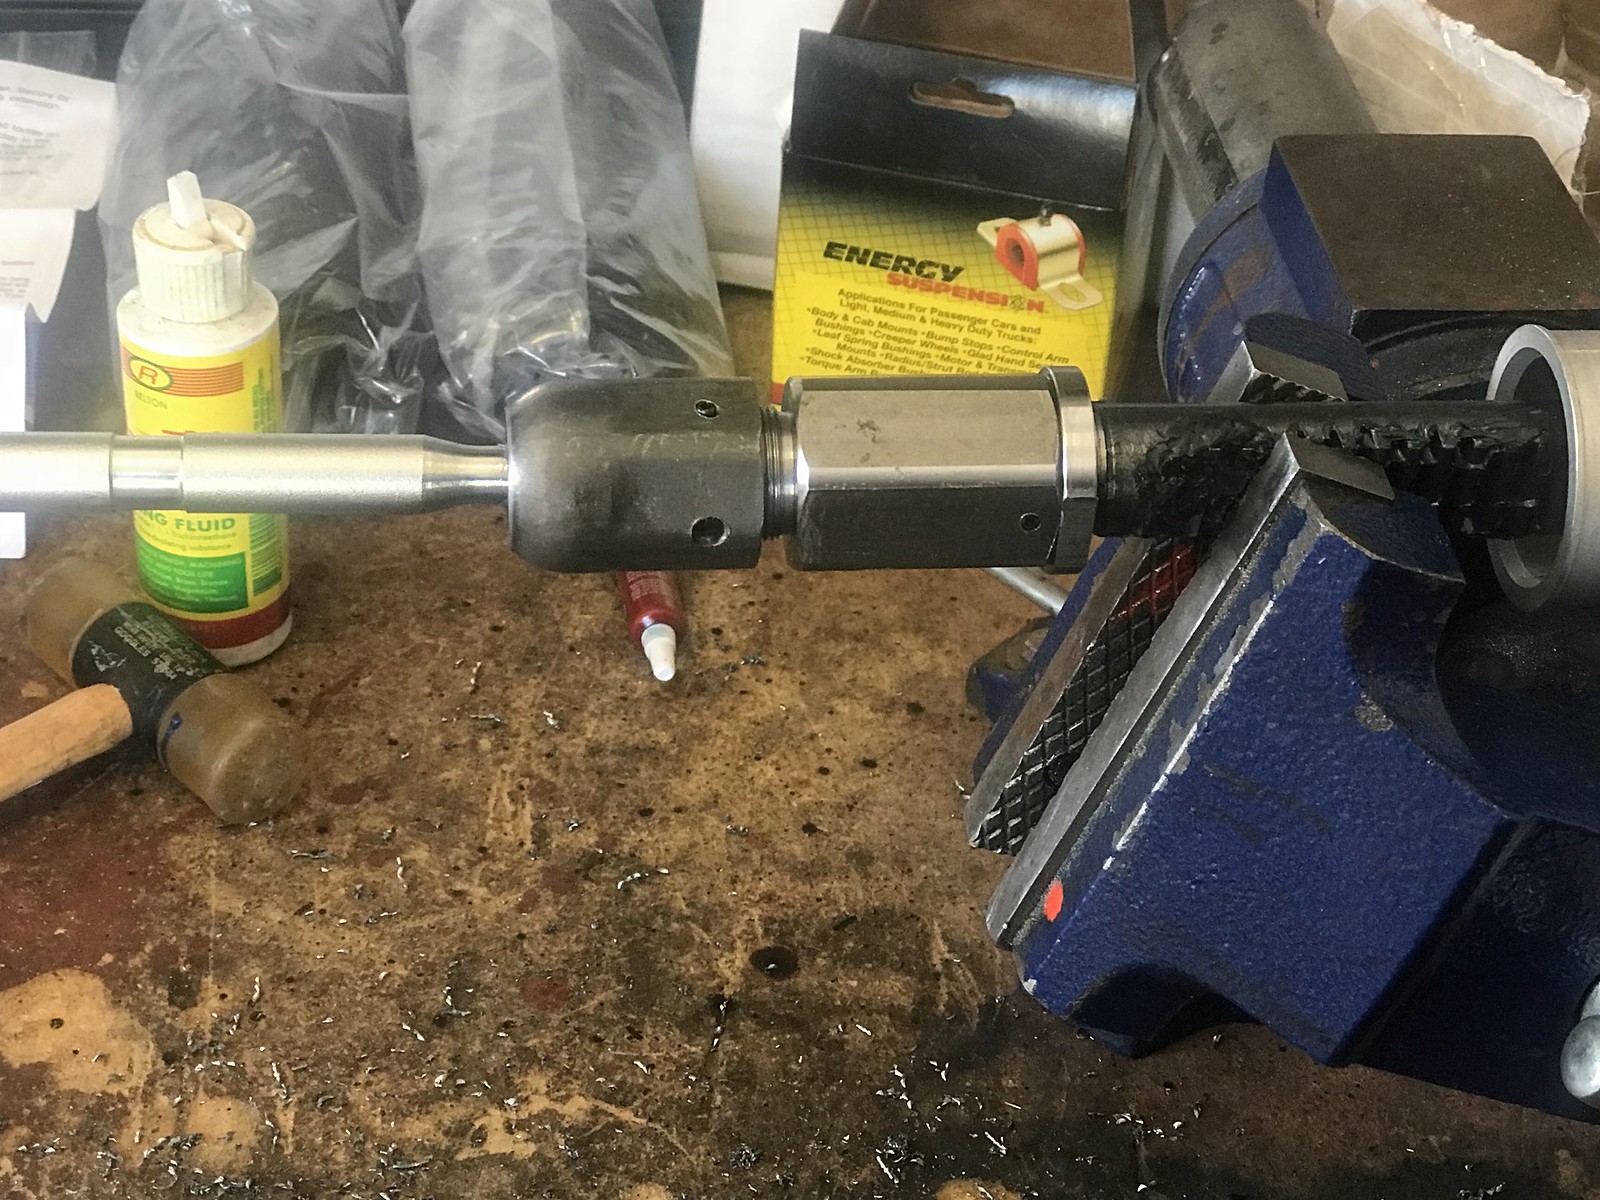
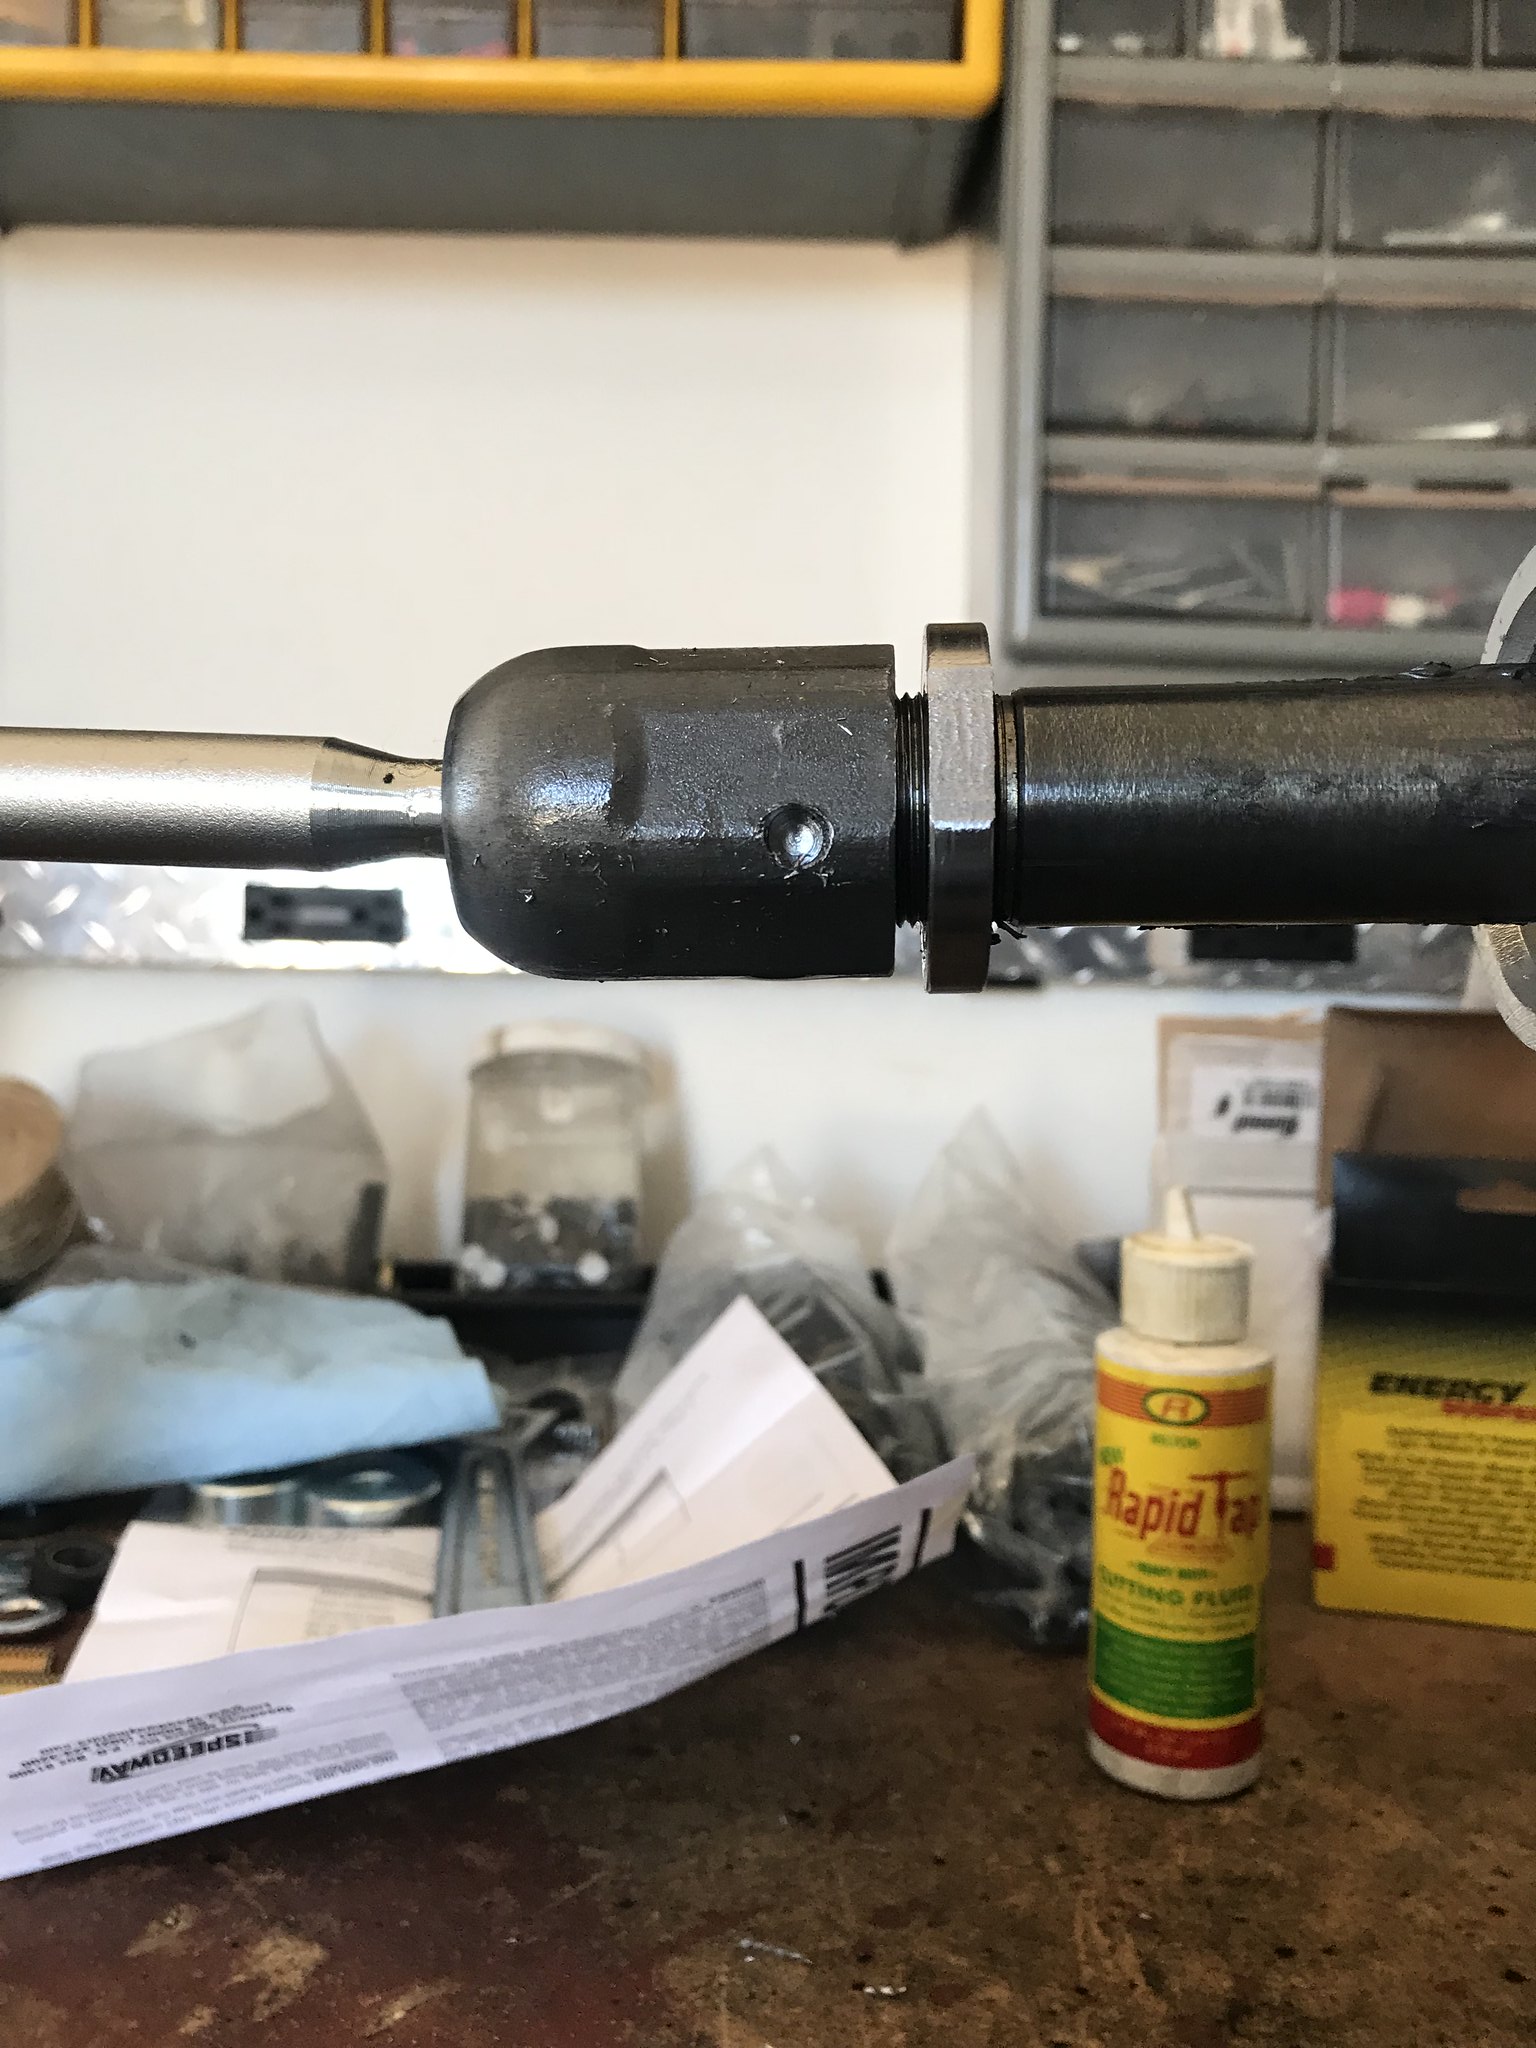
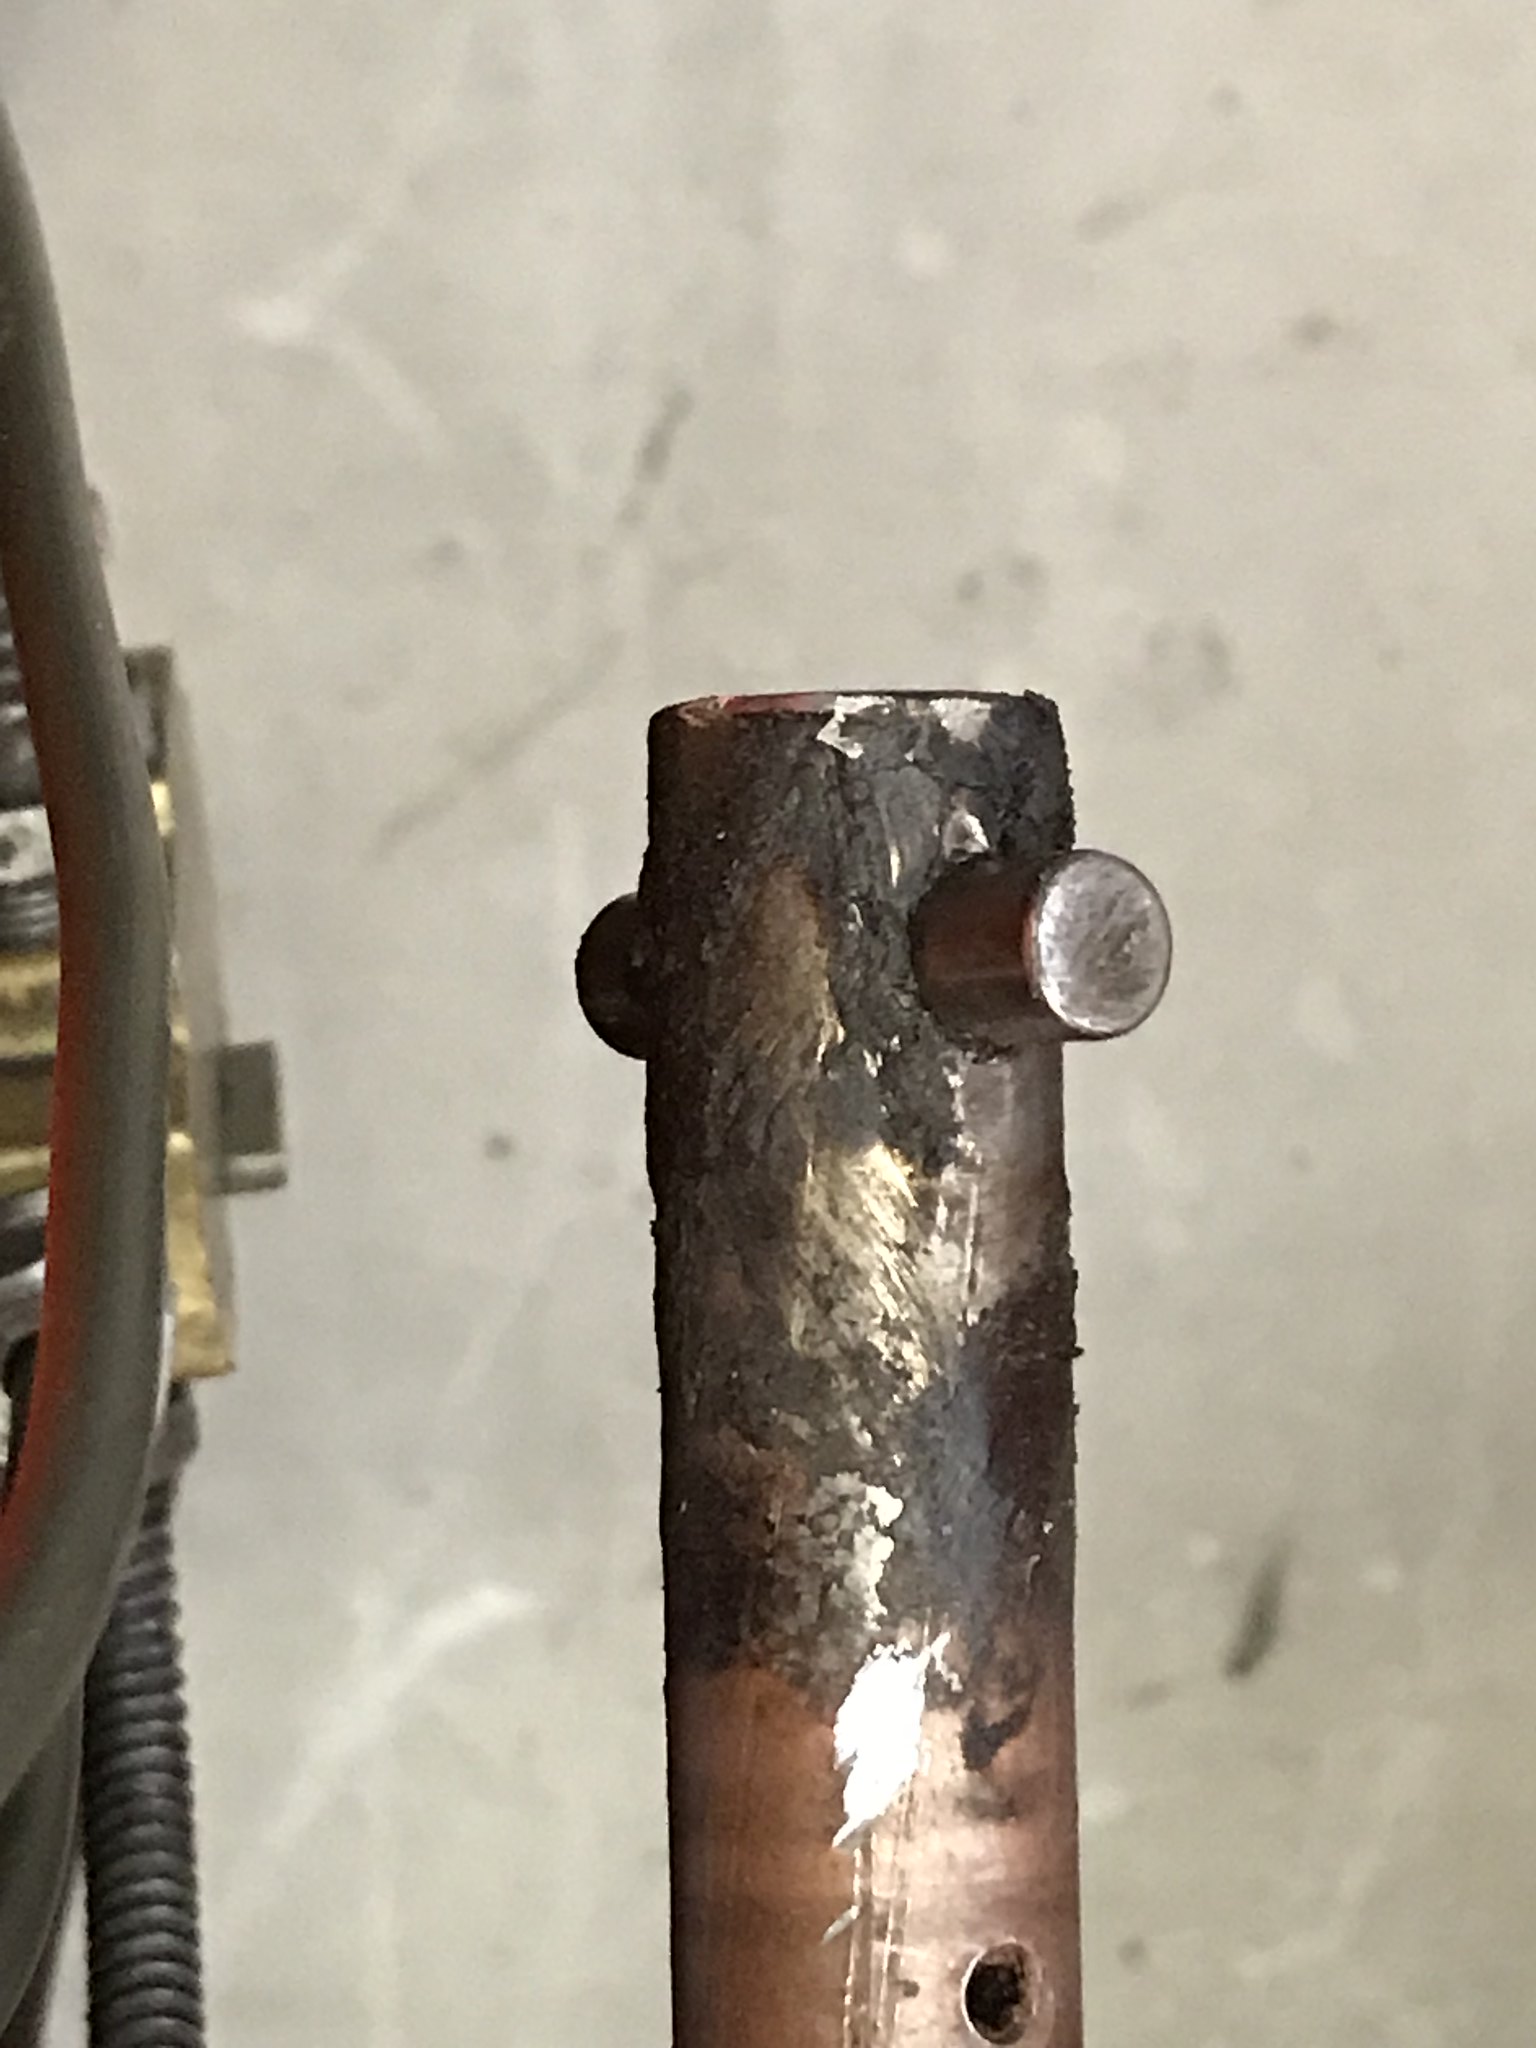
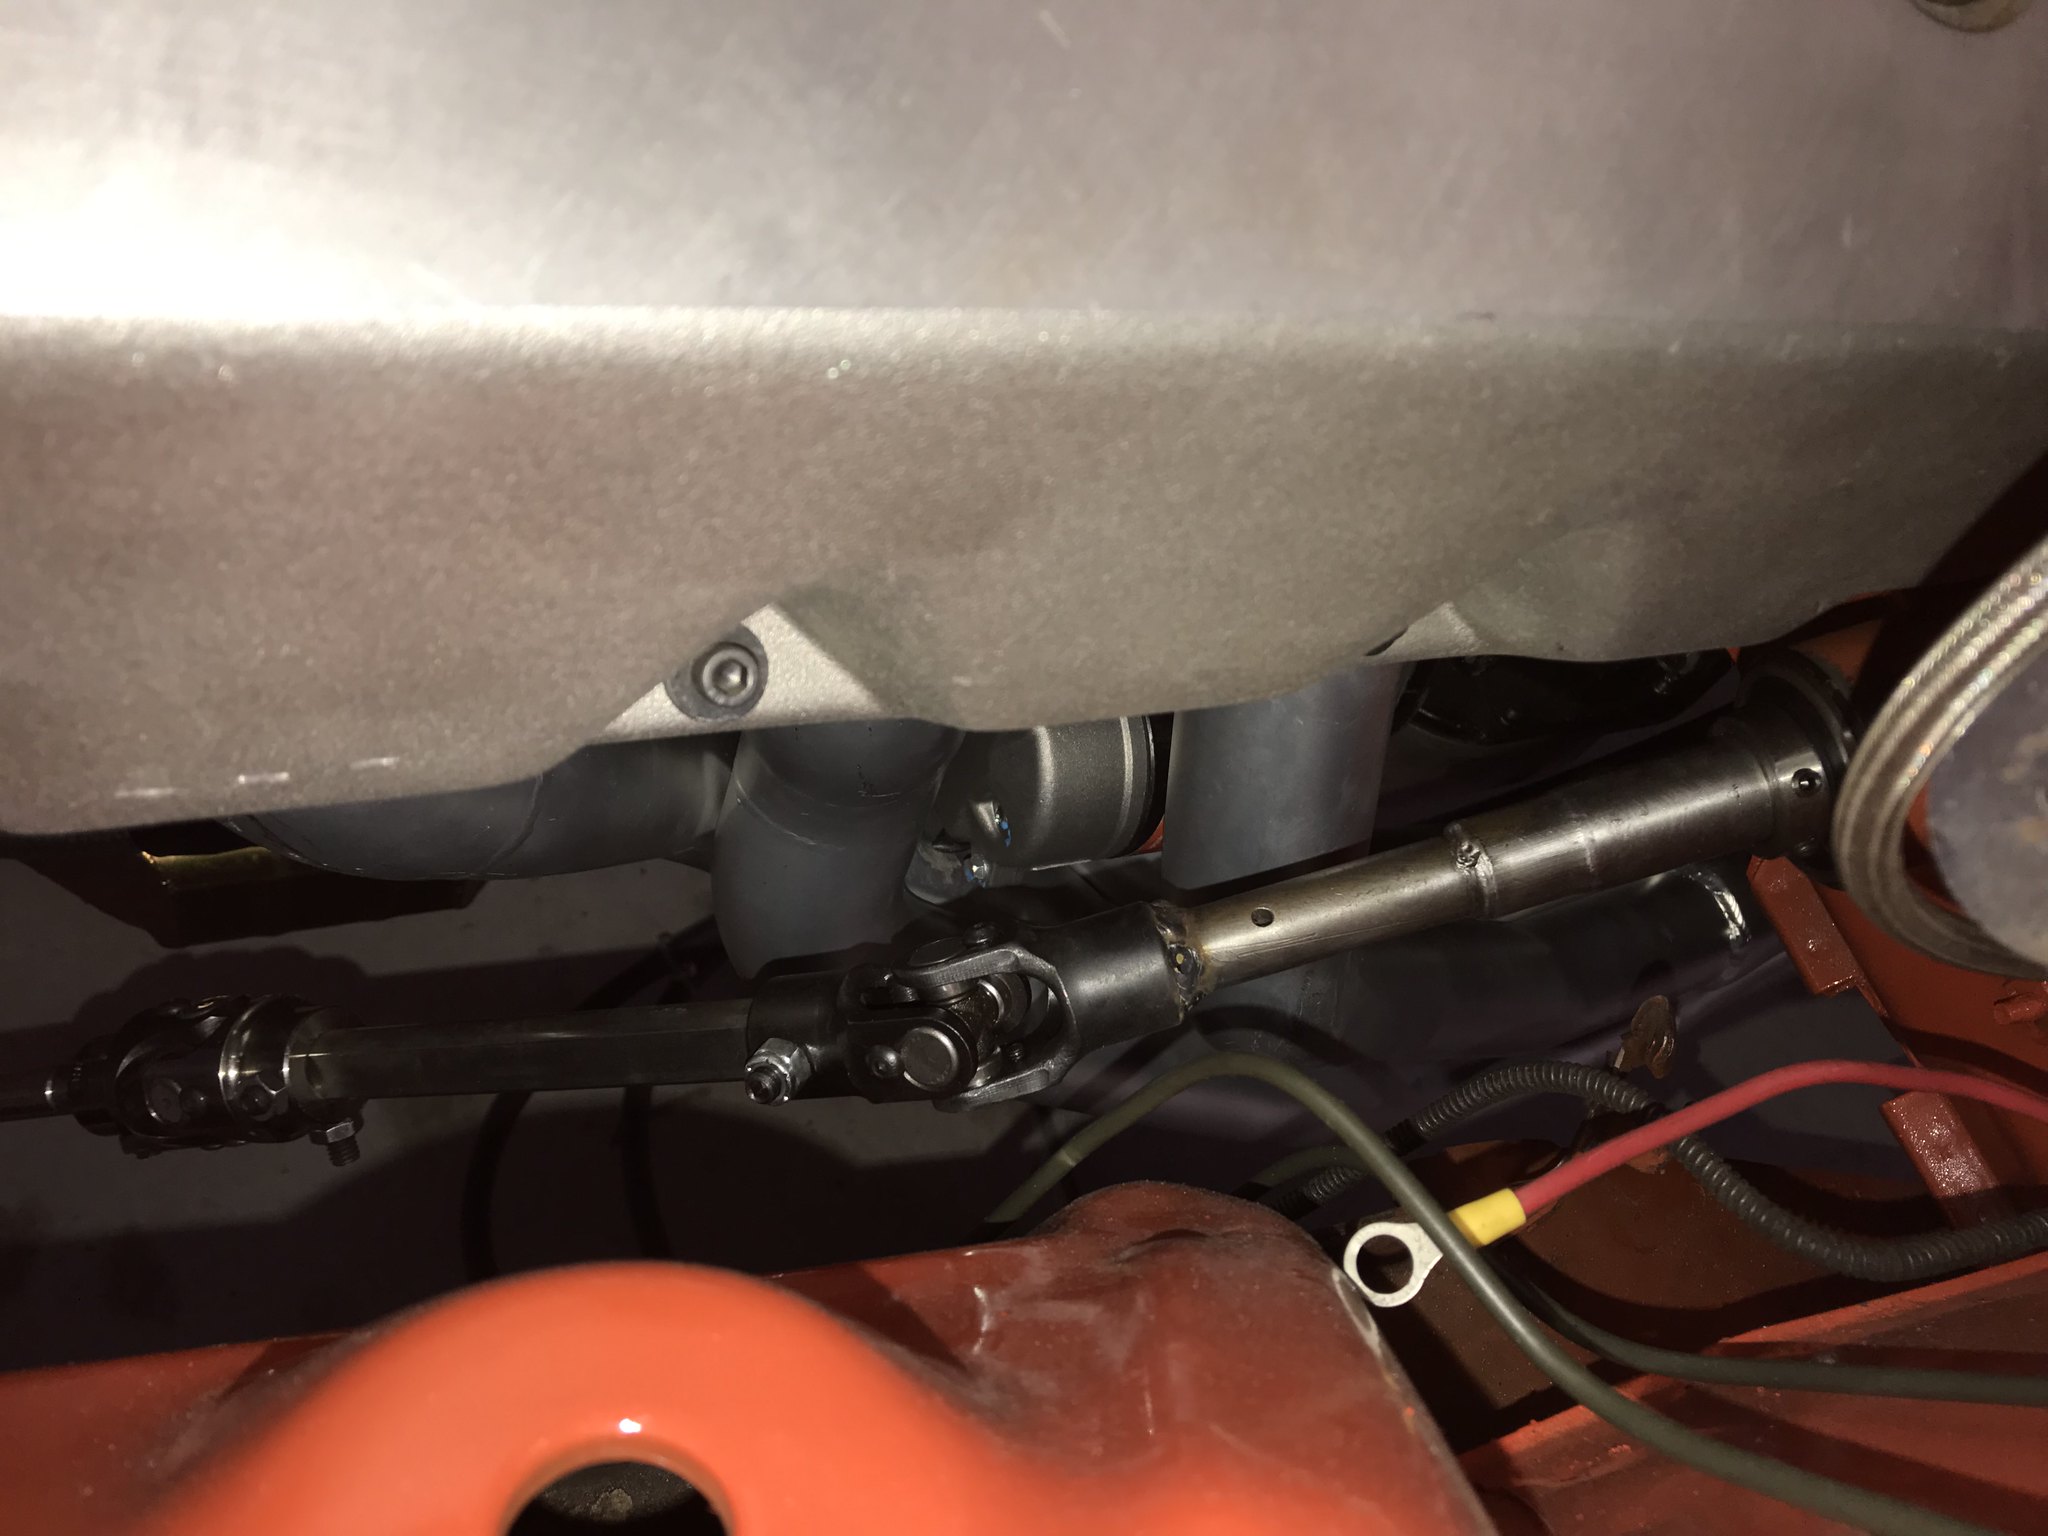
usually, a support bearing is used when having three joints in a steering shaft, but due to you having a sort of long shaft sticking out of your column, and the standard "long" rack shaft, i think a support would be insurance against any possible deflection. here is a shot of the support on my humpback project. it's a 3/4", .007 oversize, heim joint, available in a bunch of places especially made for steering shaft support. the oversize allows for a painted shaft installation. my shaft runs from the firewall, through the header tubes to the support, then to the rack. the steering is very smooth in operation. just a suggestion i would do if possible on your setup because of the extended column shaft.
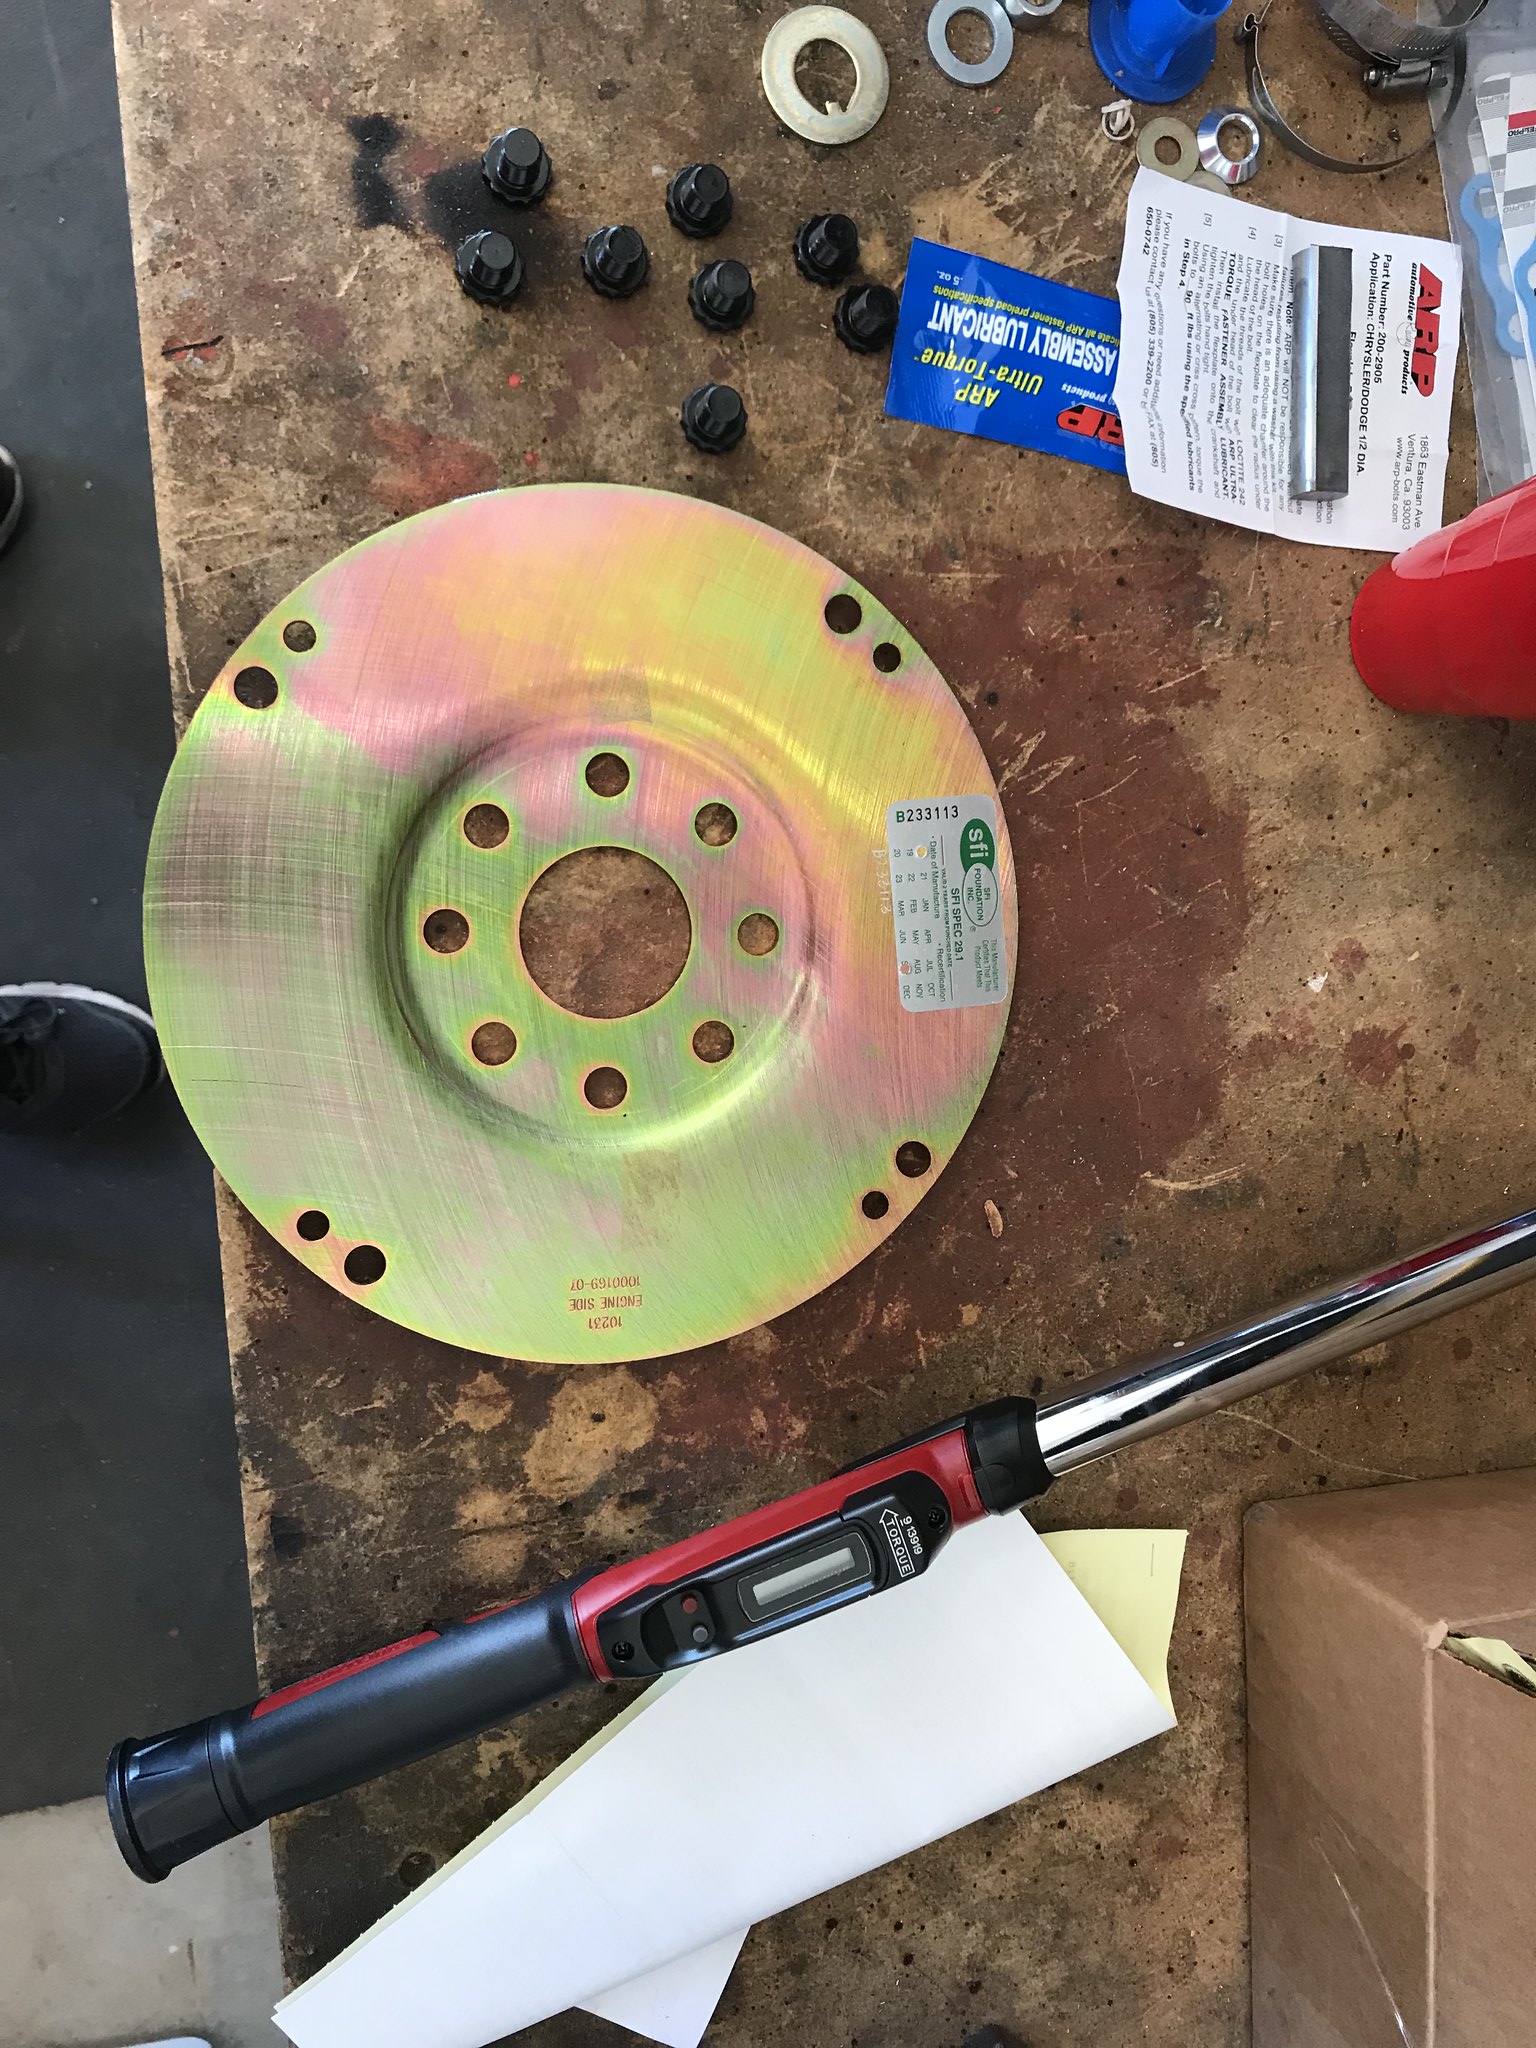
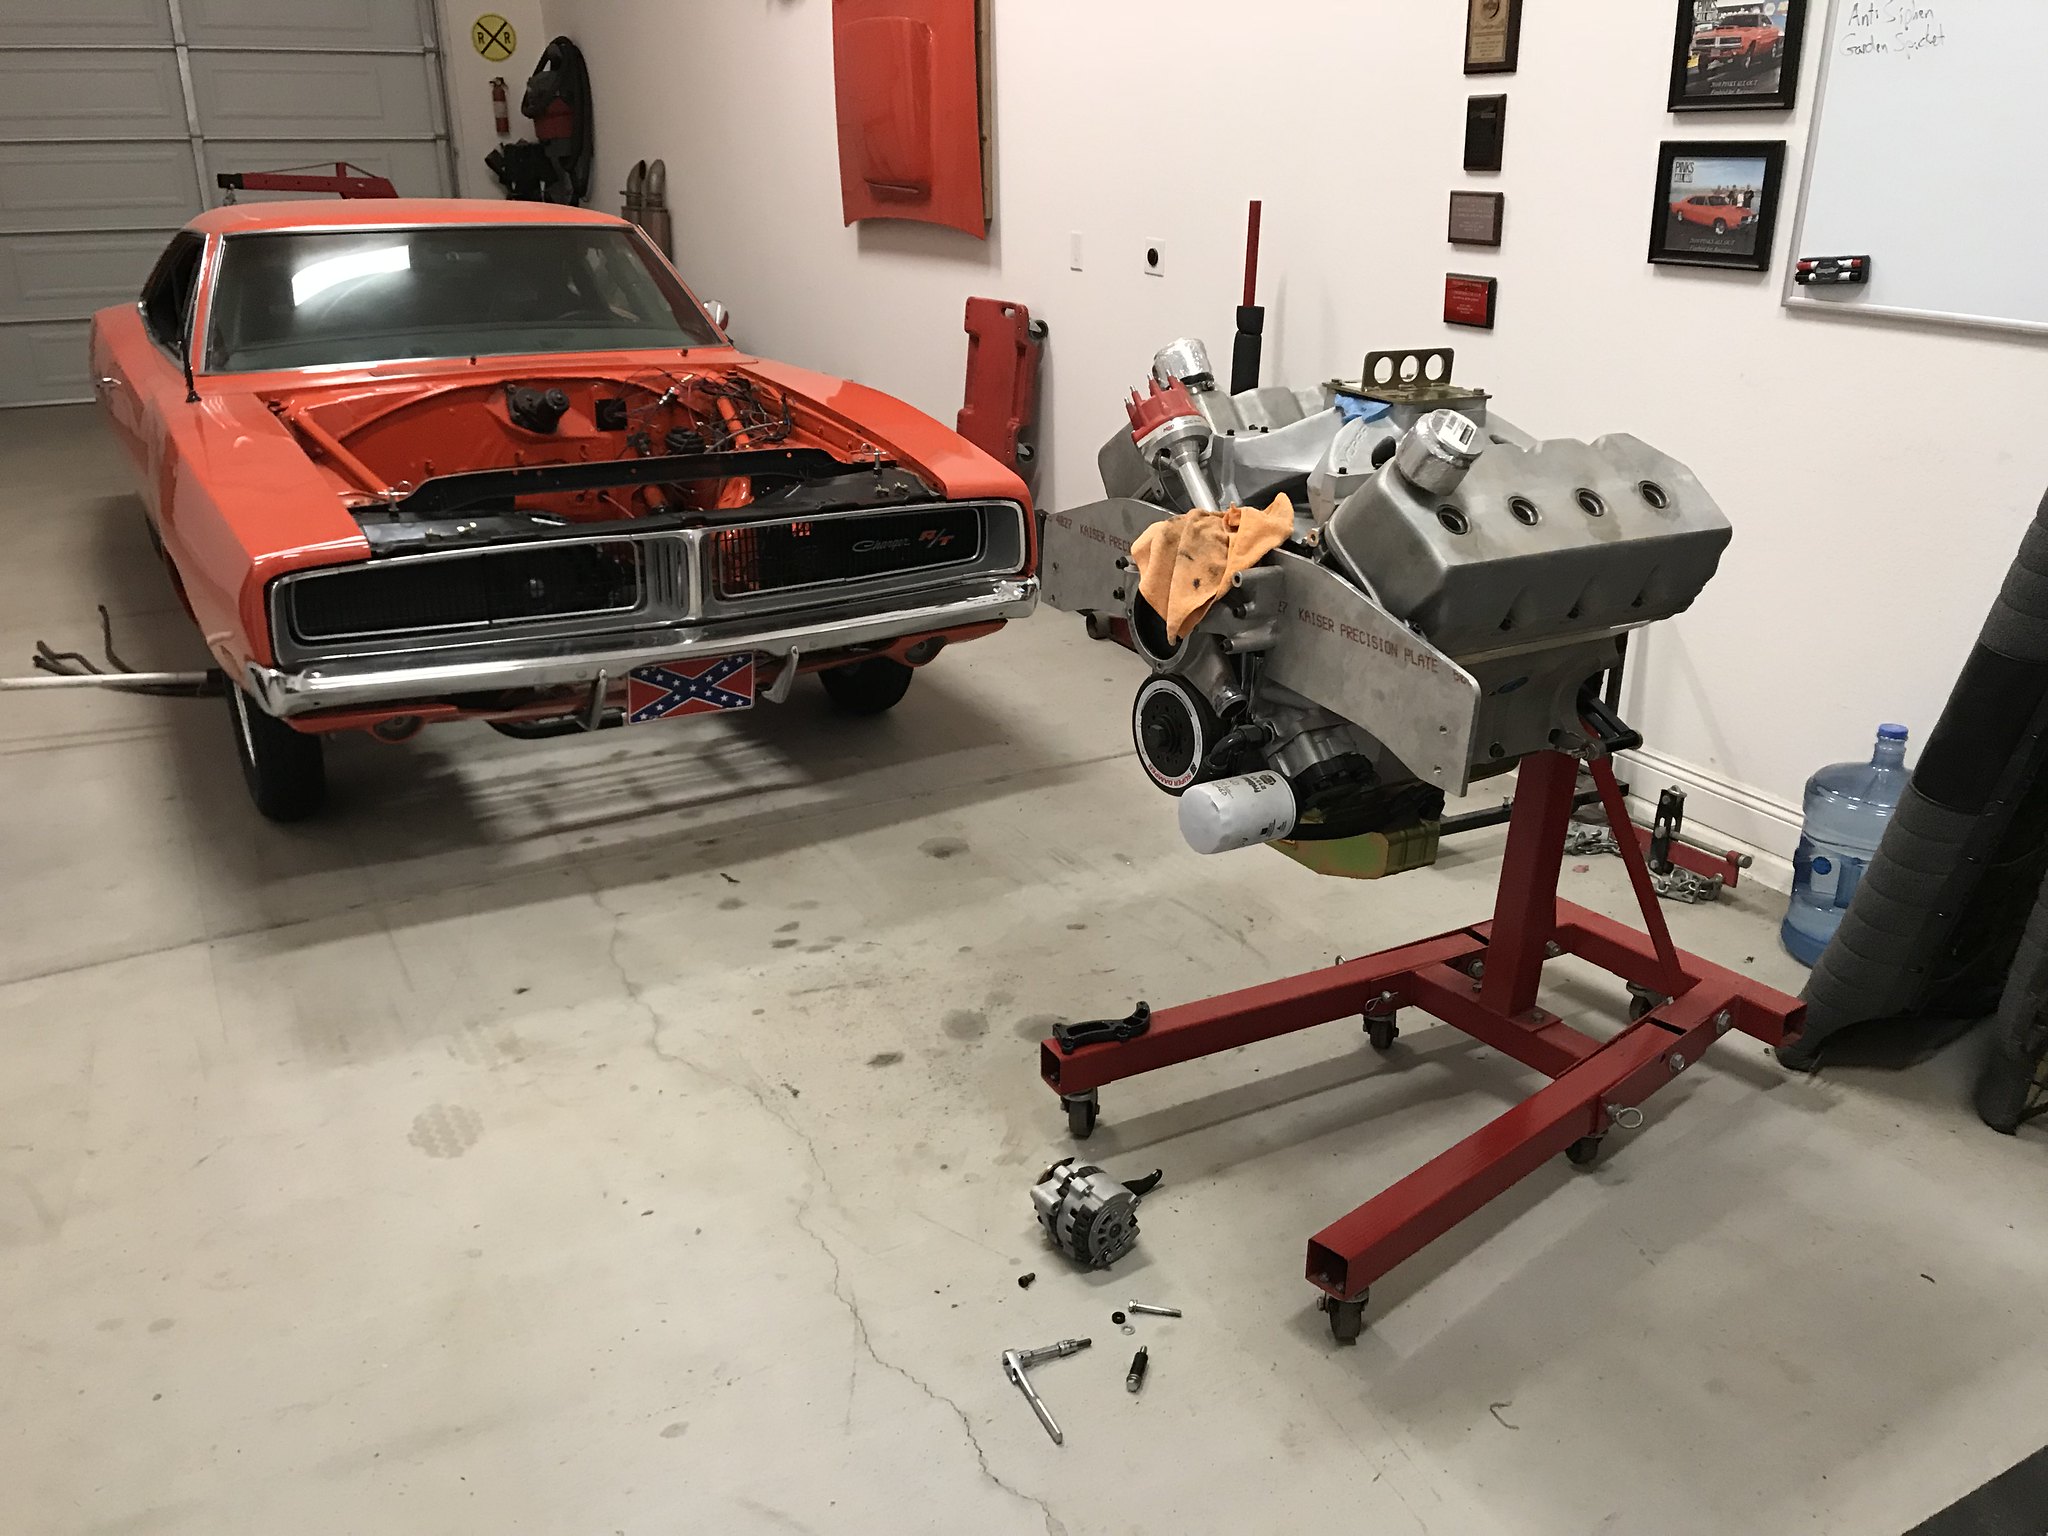
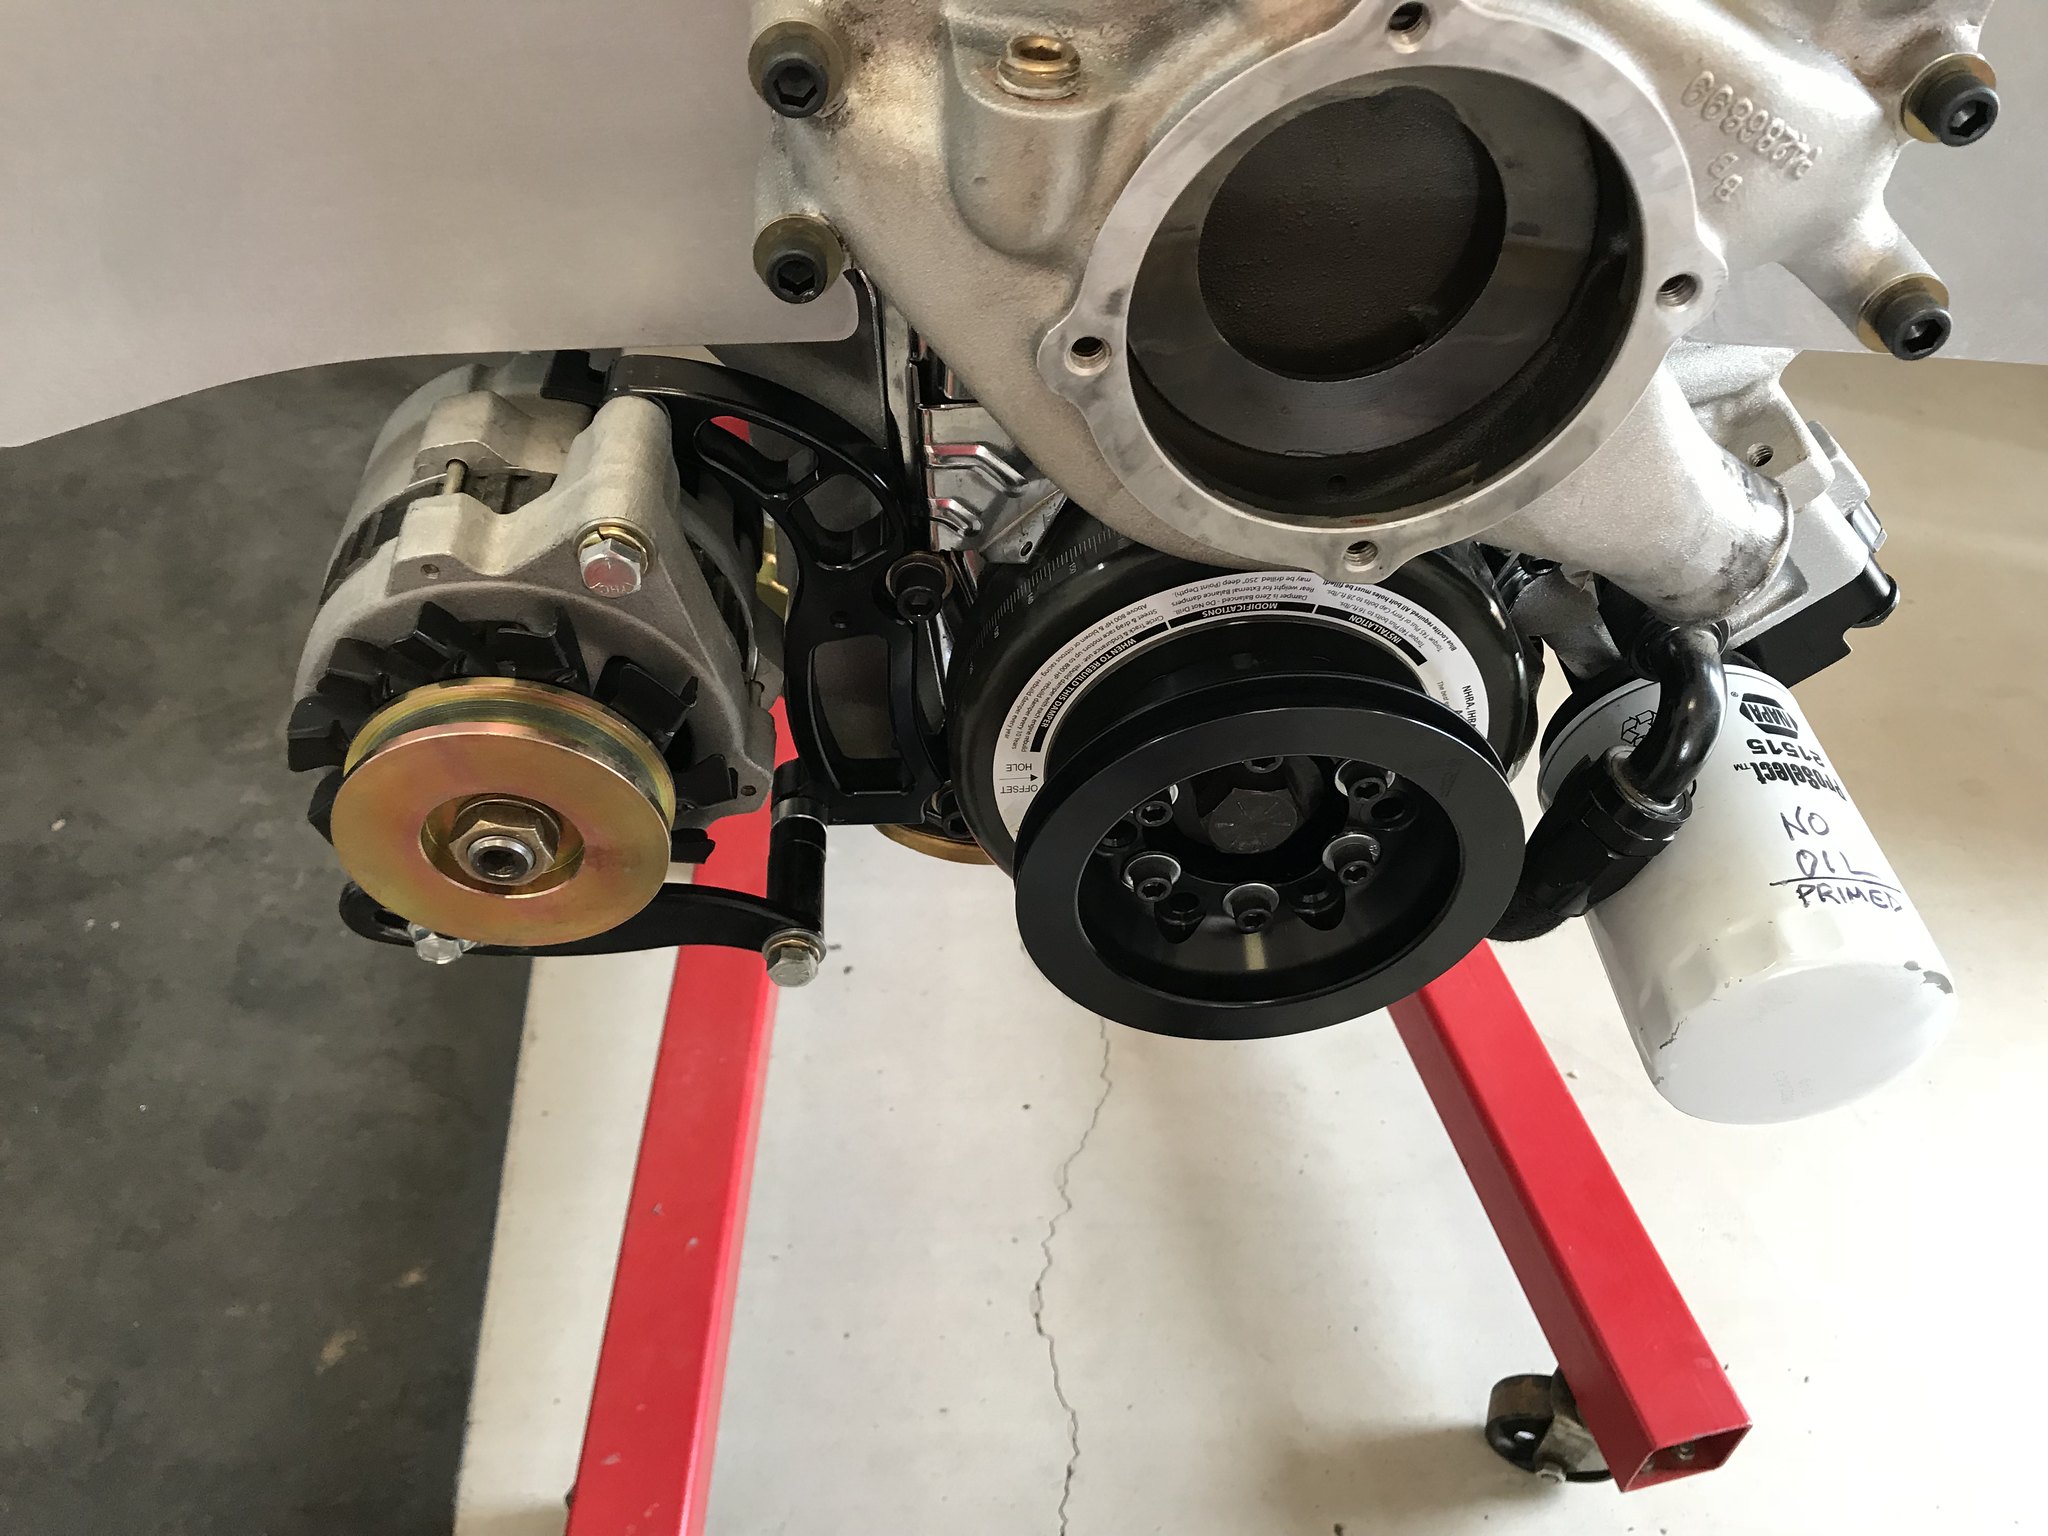
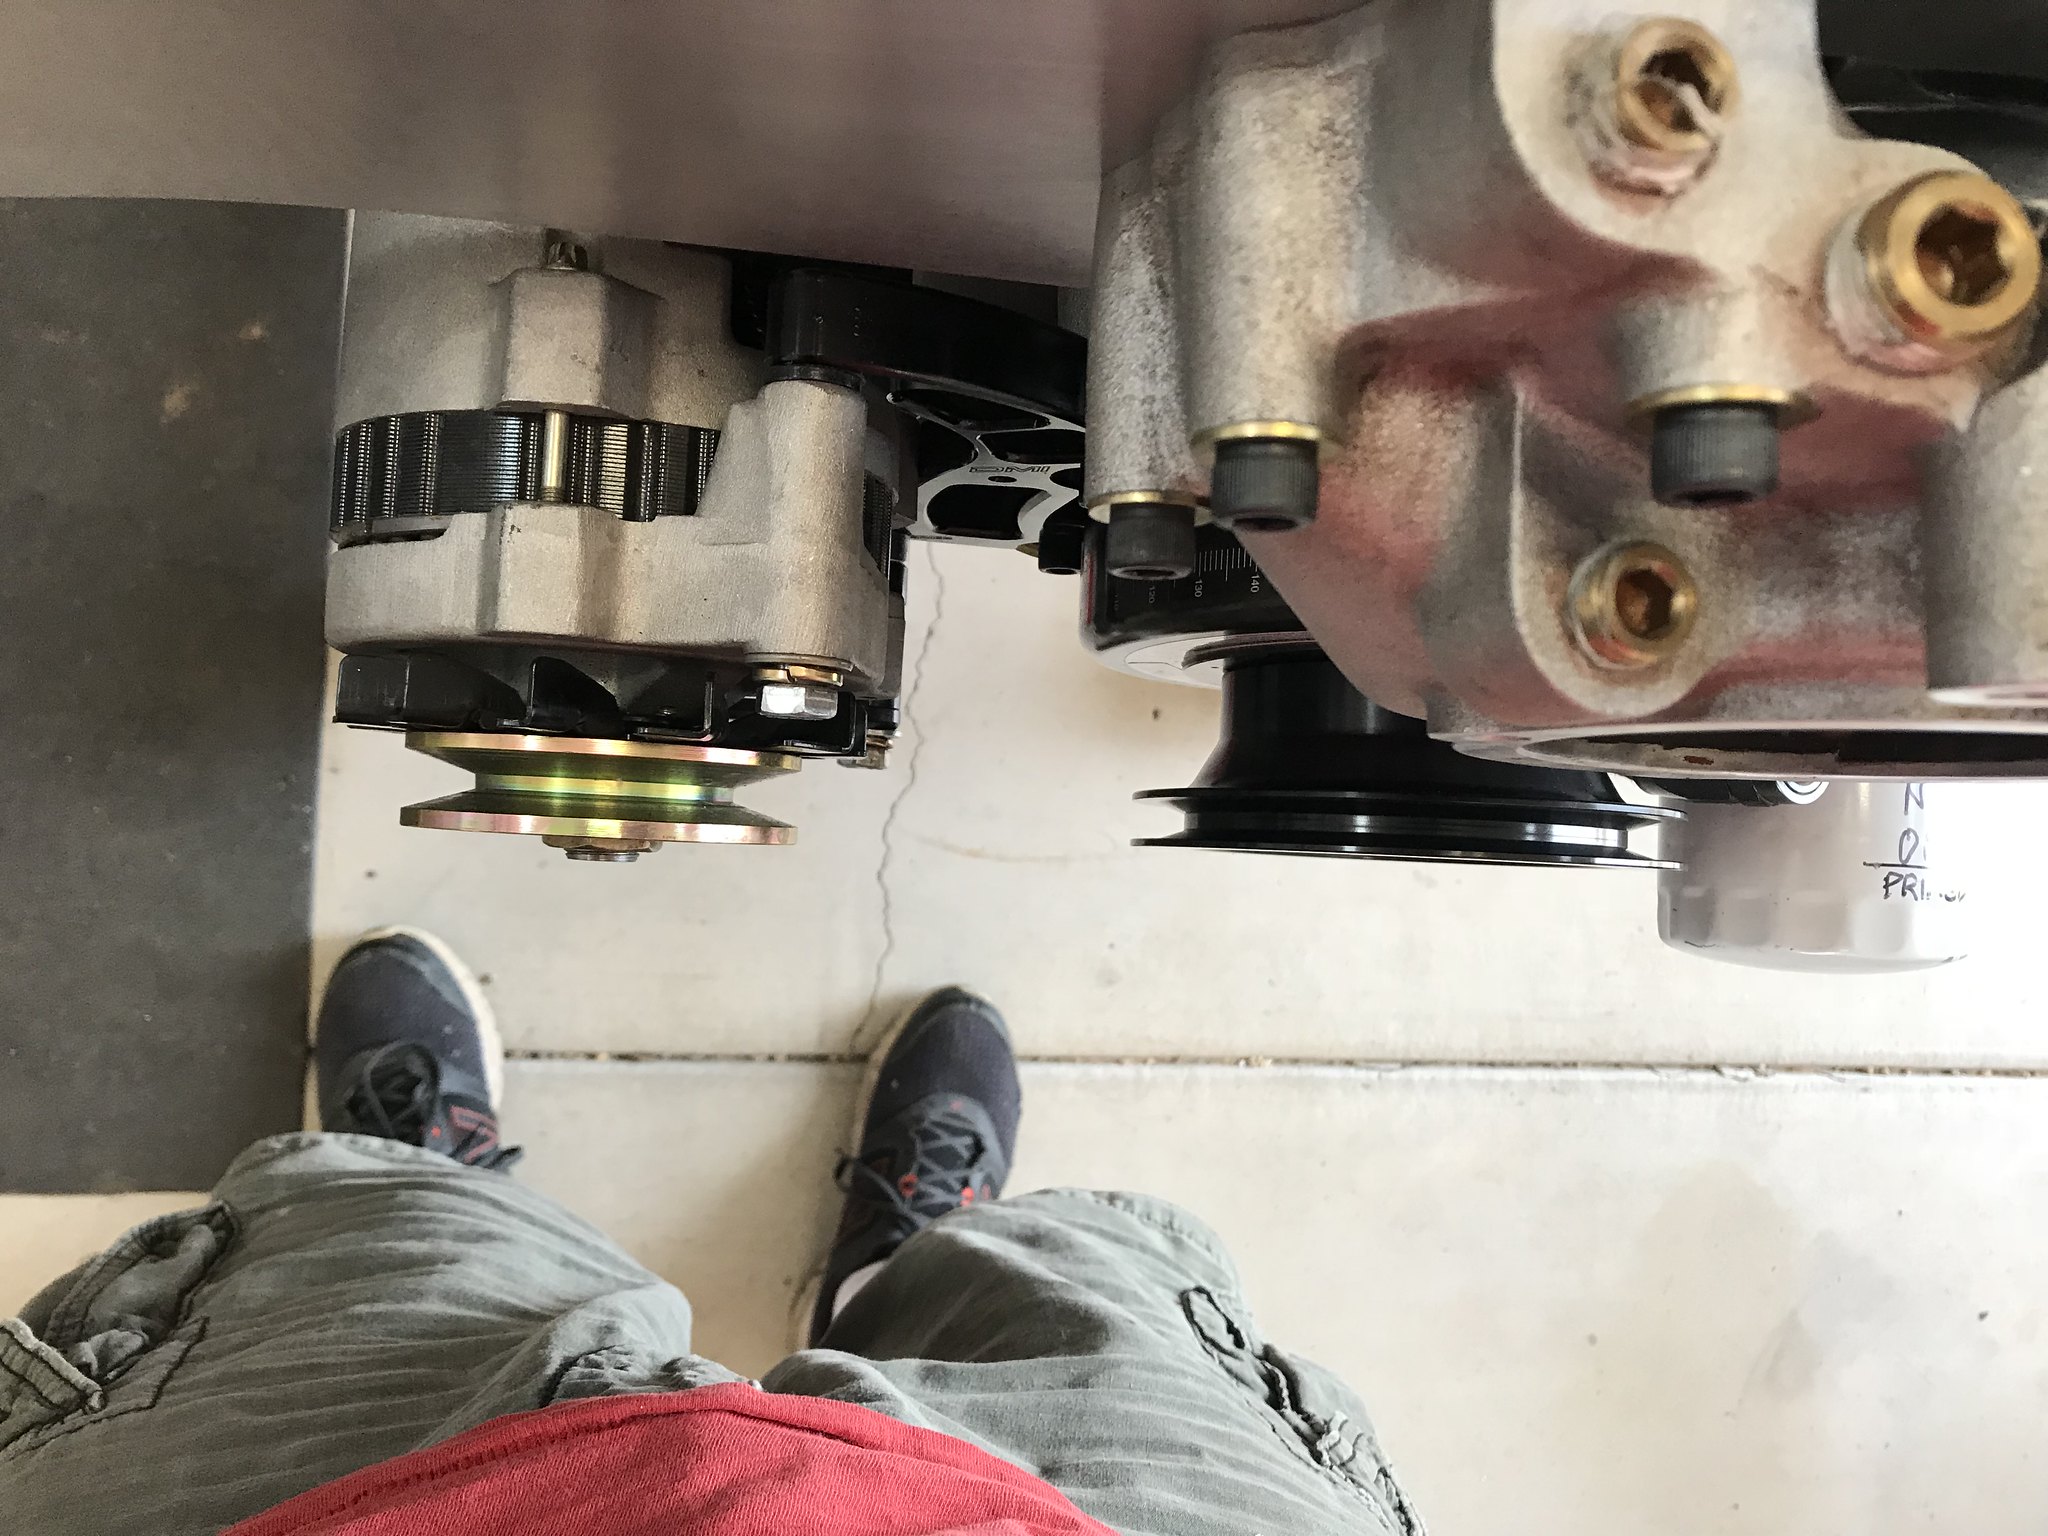
Progress was a little slow tonight. I picked up extended bolts for the water pump now that I'm running an Engine Plate, but forgot to get bolts for my low mount alternator bracket (left the old ones on the 440 when I sold it).
List for this week:
Find that thread about the water pump hole and restrict mine before final install.
Install the alternator and bracket and align with the crank pulley. I bought the spacer for the pulley, but don't think I'll need it if I run an electric water pump.
Possible trim the upper ears on the Engine Plate to increase the clearance between the front supports. It's currently pretty tight and I could save some busted knuckles by taking little off both sides.
DMI Mopar/Chevy pulley (BMCT-060) workes with 1/4in spacer on the bracket to block and 1/8 between the alternator and bracket. The 1/4 on the block are just enough to clear the Timing Chain cover (with a slight amount of trimming.
Do you have studs or bolts on your valve covers? If you have studs you MAY have trouble getting the passenger's side valve cover off.
My car flexes enough that if I jack it up and take the weight off the front suspension, the valve cover can be removed. I do have valve cover studs. If it's sitting w/ the weight on the tires, the cover contacts the shock tower when I try to lift it off. Hopefully yours doesn't do this since you have snout bars on your cage...wish I'd done that.
Not to ME OP, you know it will hit the fender well when revved up in neutral, let alone when at WOT I like to see a 1/4 inch + clearances on that, those cast aluminum valve covers will grow out and up when heated up more than you think Now get to work fixing it before it marks up the fenderwell and valve cover
Mr.Cab Racing and winning with Mopars since 1964. (Old F--t, Huh)
Bolts on the valve cover and yes I plan to clearance the shock tower. Really glad that I converted to GERST suspension so I don't need the shock tower. Now the real question is if I'll be able to get 1/4 without scratching the paint!
Not to ME OP, you know it will hit the fender well when revved up in neutral, let alone when at WOT I like to see a 1/4 inch + clearances on that, those cast aluminum valve covers will grow out and up when heated up more than you think Now get to work fixing it before it marks up the fenderwell and valve cover
Cab....I was speaking on the build it self, the valve cover is a little to tight for my likings. but i'm sure the op will address that consider this a don't what this thread to get lost.
Cab....I was speaking on the build it self, the valve cover is a little to tight for my likings. but i'm sure the op will address that consider this a don't what this thread to get lost.
The thread won't get lost! I'm a pic/post [censored]!
I shortened the Engine Plate and sealed it to the water pump. I also added the bypass mod with a threaded insert to adjust the orifice size. Currently at 1/8 per the other thread on this board.
I can't be the only one who has to remove the shock to get the valve cover off am I? LOL
Even with studs removal sucks.
Nope, I forgot to mention that I have to take the shock loose and push the shock stud down out the way.
I have family in town this weekend and won't get any garage time. I'm going to try to pull the valve covers when I get a chance. I'll be sure to snap pics and update the thread.
I might start a new thread for the induction. I "think" that I want the new Sniper 4500 fuel injection. However, I haven't read many success stories, and Thumper Carbs appear to be pretty bullet proof. I'll probably to the exhaust or cooling system next and think on this one a little.
From what I've heard so far, I'd wait a while on the EFI. Put a good carb on it and enjoy it...later on when more of the bugs are worked out of these EFI systems, maybe.
I can't be the only one who has to remove the shock to get the valve cover off am I? LOL
Even with studs removal sucks.
Welcome to the real world of owning and having to work on a 426 Hemiroid motor in a stock B body, same thing on E bodies on shoving the passenger side shock stud down to remove that valve cover even with the stock stamp steel OEM valve covers
Mr.Cab Racing and winning with Mopars since 1964. (Old F--t, Huh)
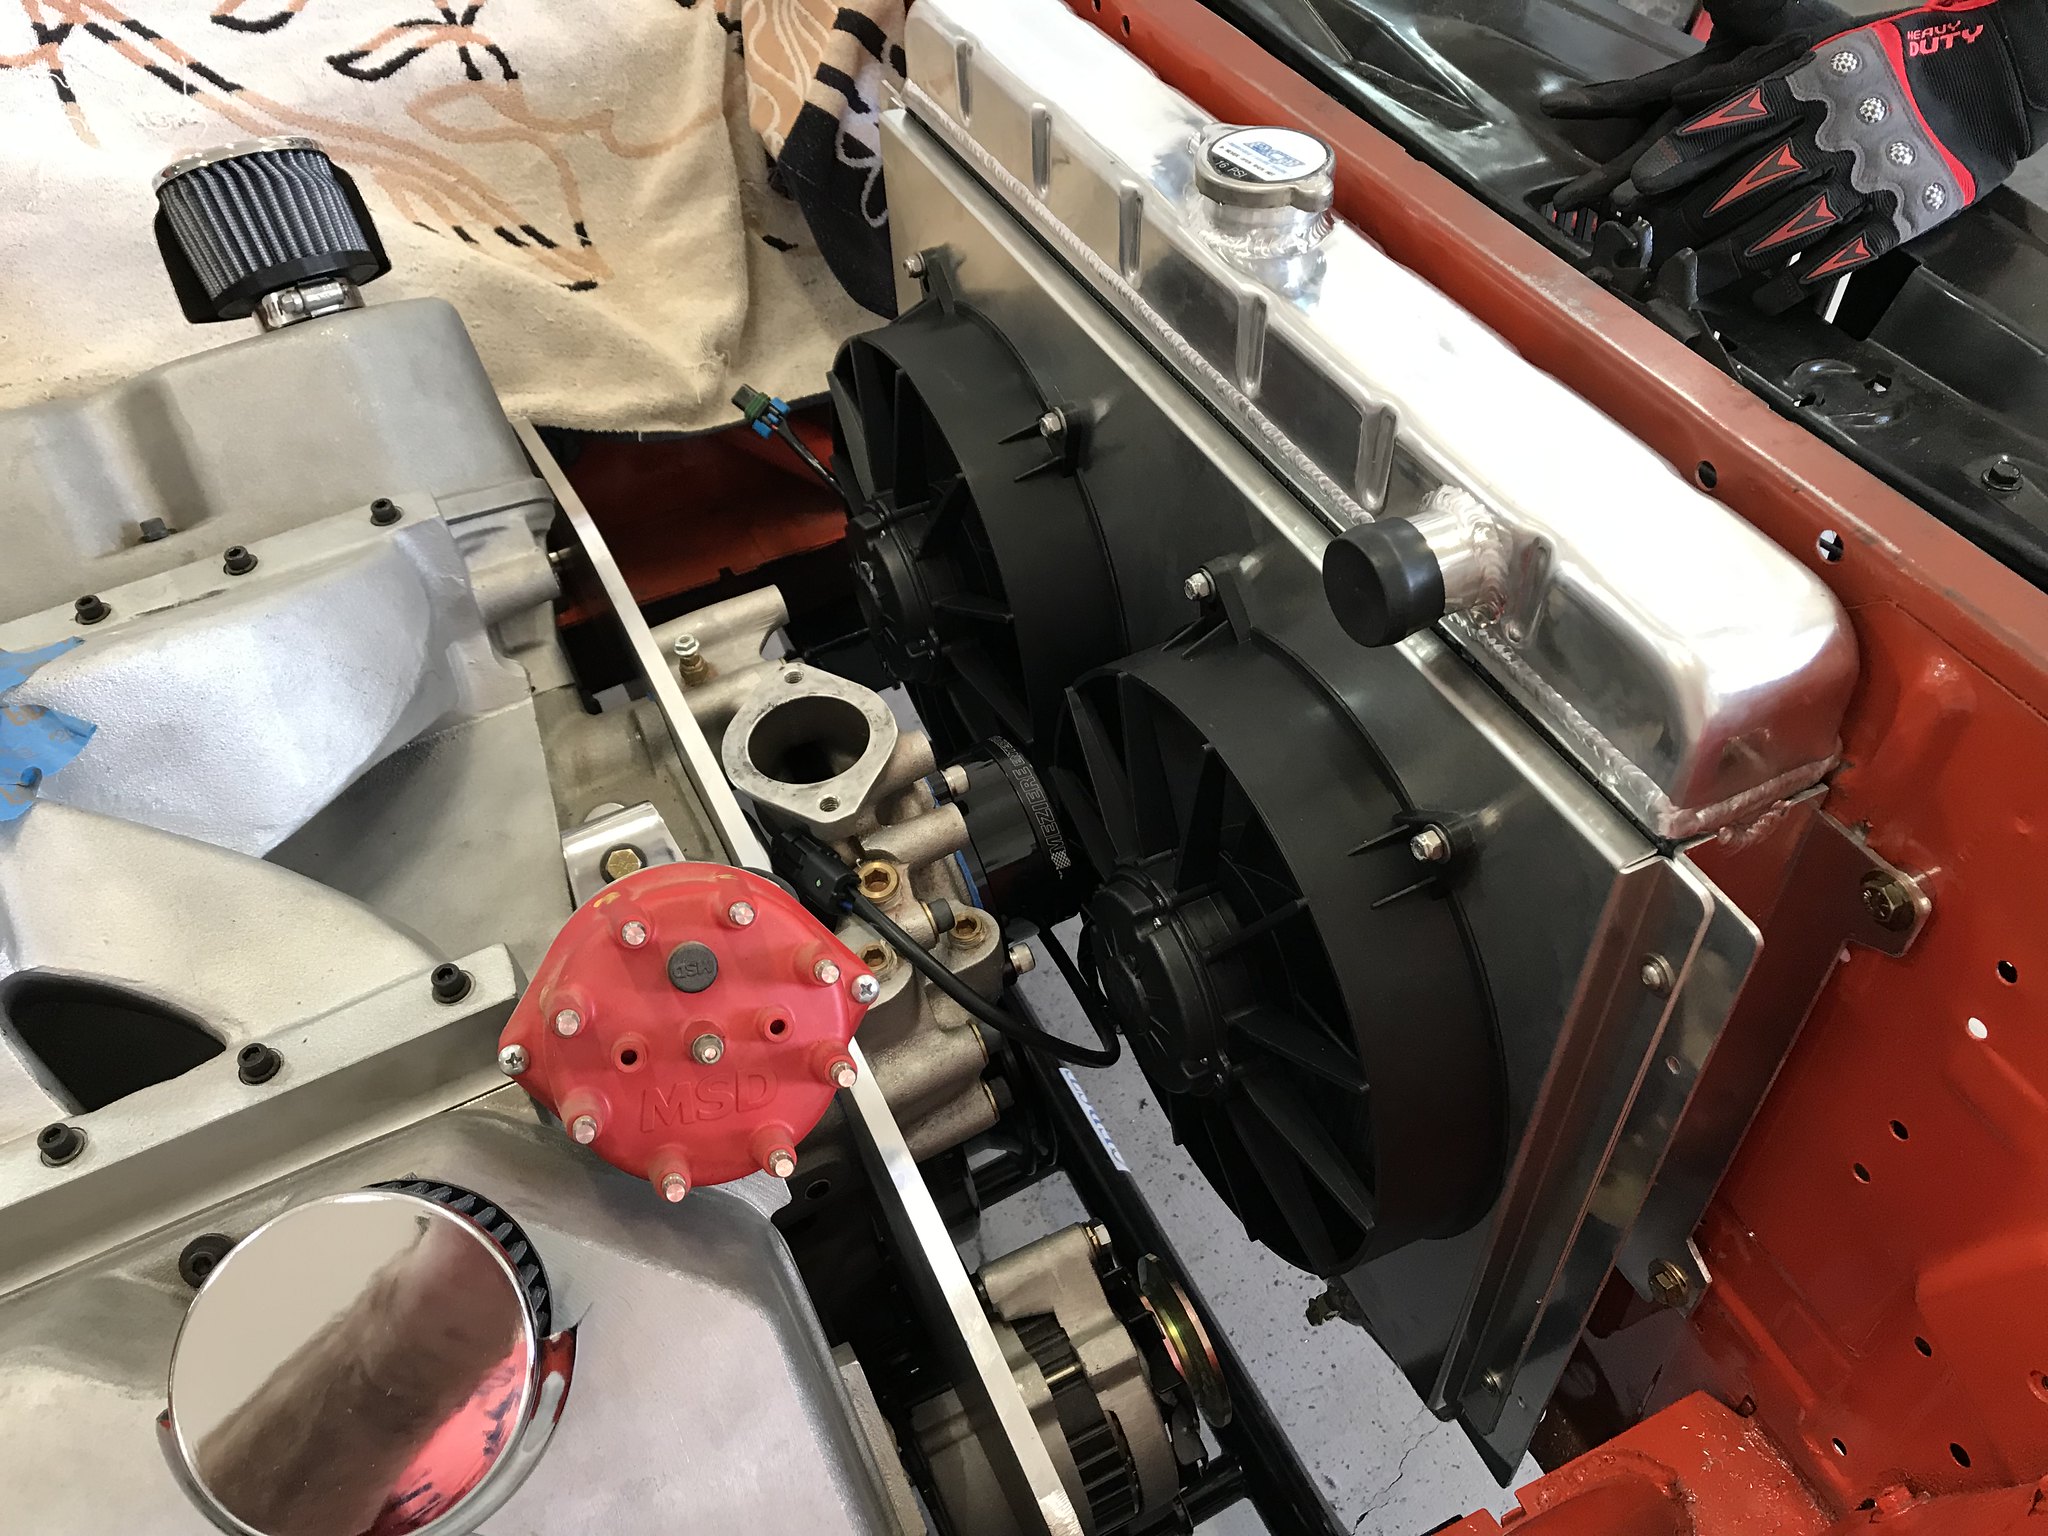
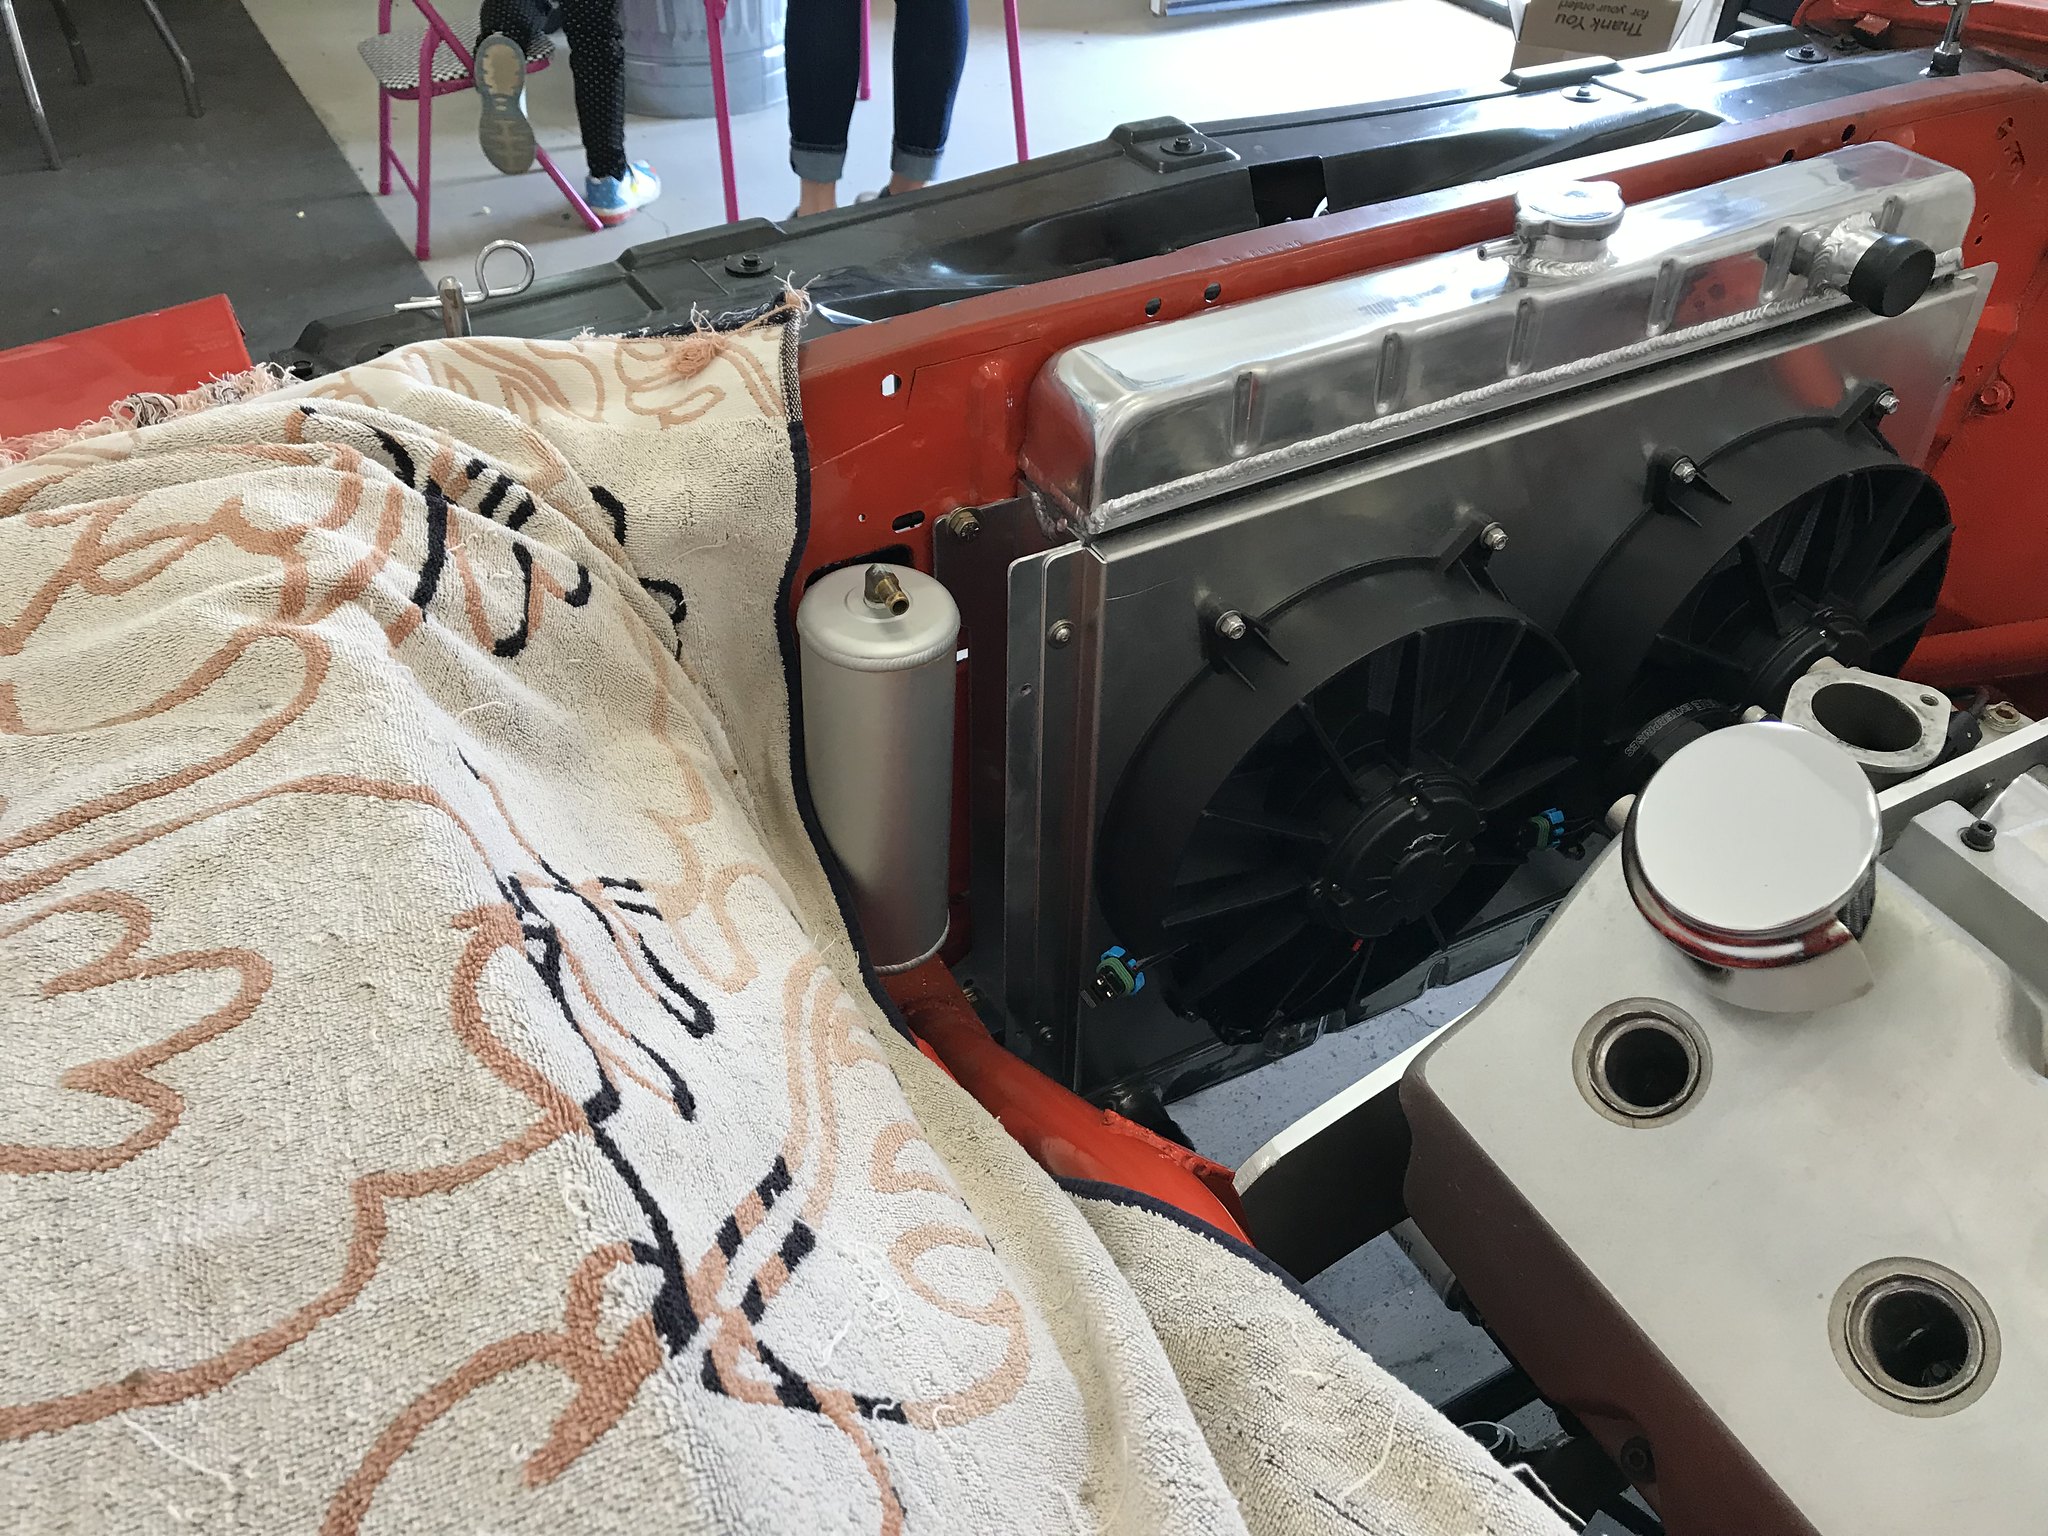
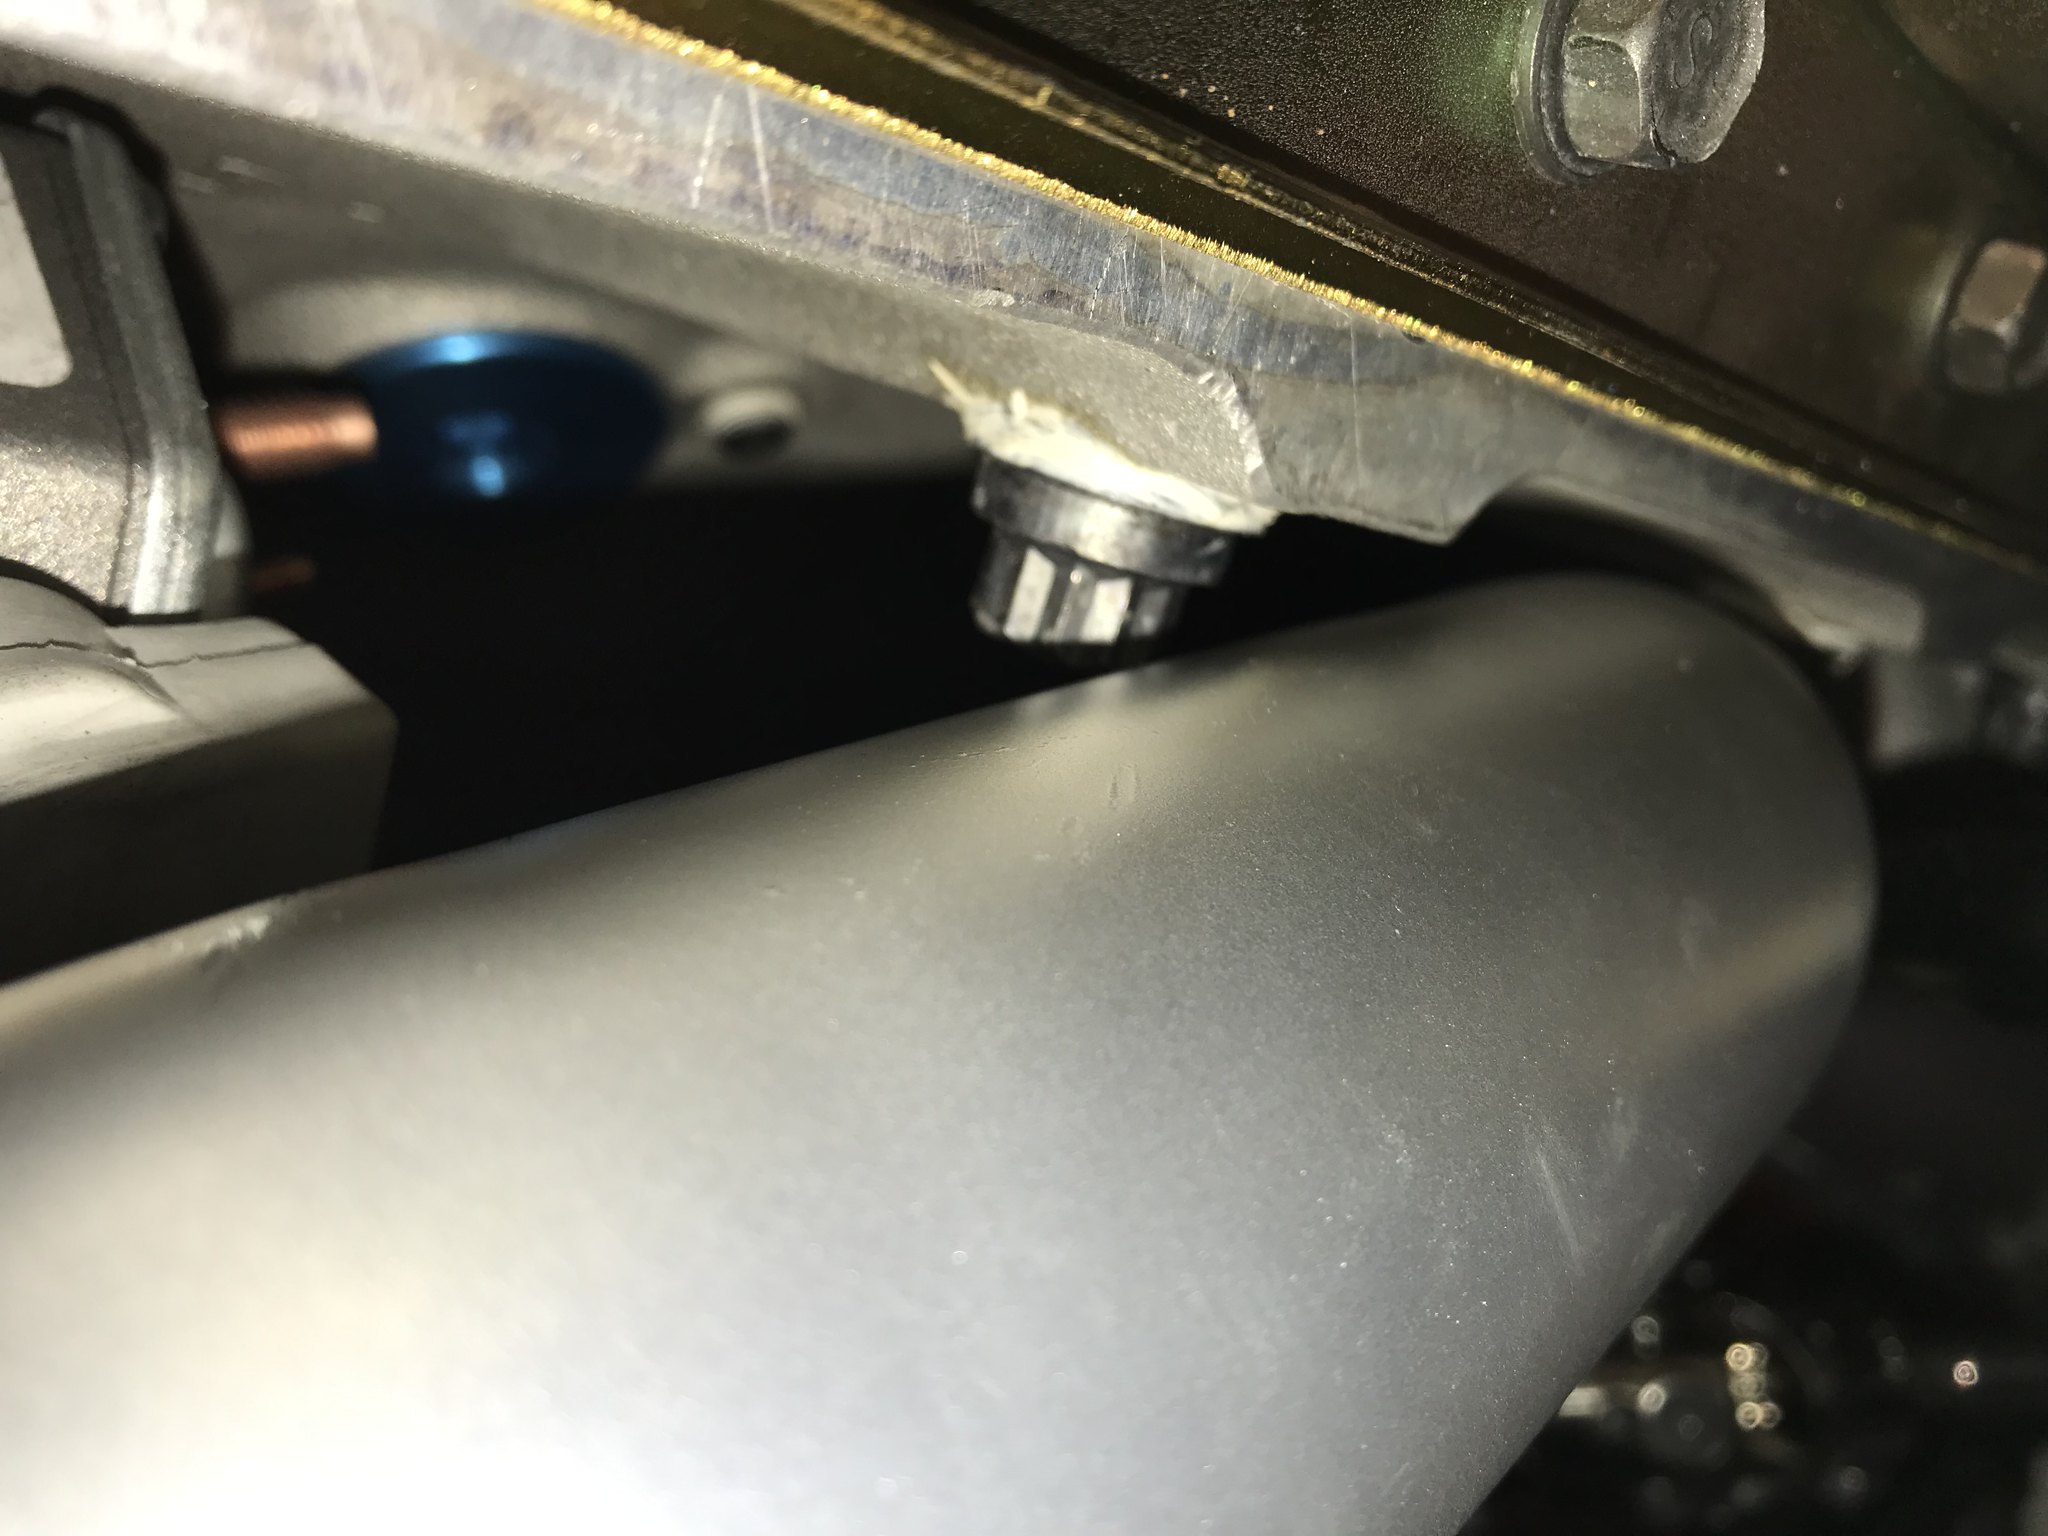
Can you measure the depth of that setup from the core support to the nose of the fans? It looks great and the price is nice too.
~7.5 inches from the support to the back of the fan motors. I was able to center the water pump between the fans to gain clearance. My car must have had the smaller radiator as I had to drill holes and use 1/4in spacers between the support and radiator mount:
Yes! You can see the pics! What a pain in the rear, but I'm sure a few of you guys feel the same after FB bought Photobucket and screwed up everything.
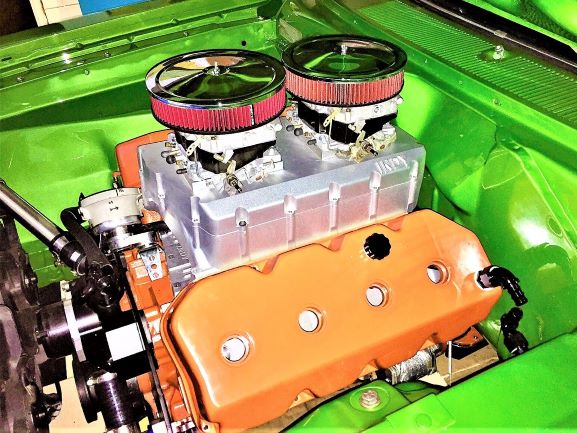
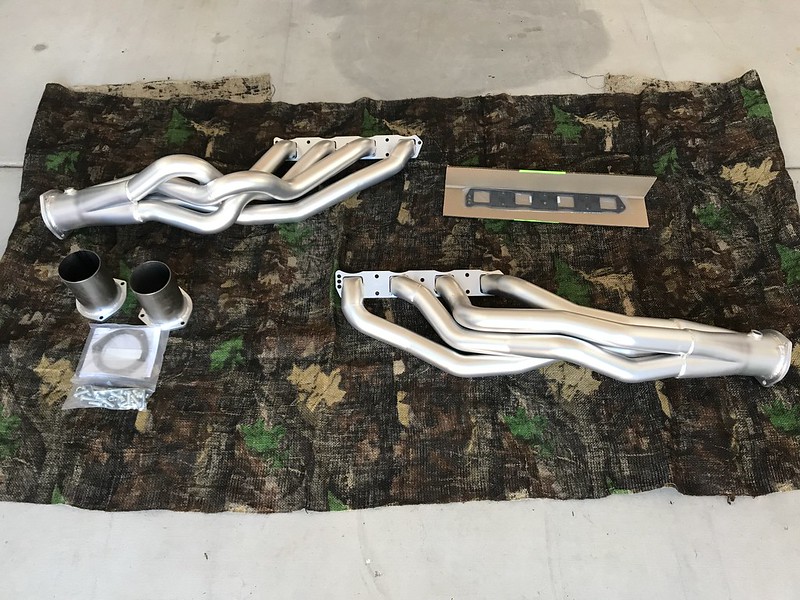
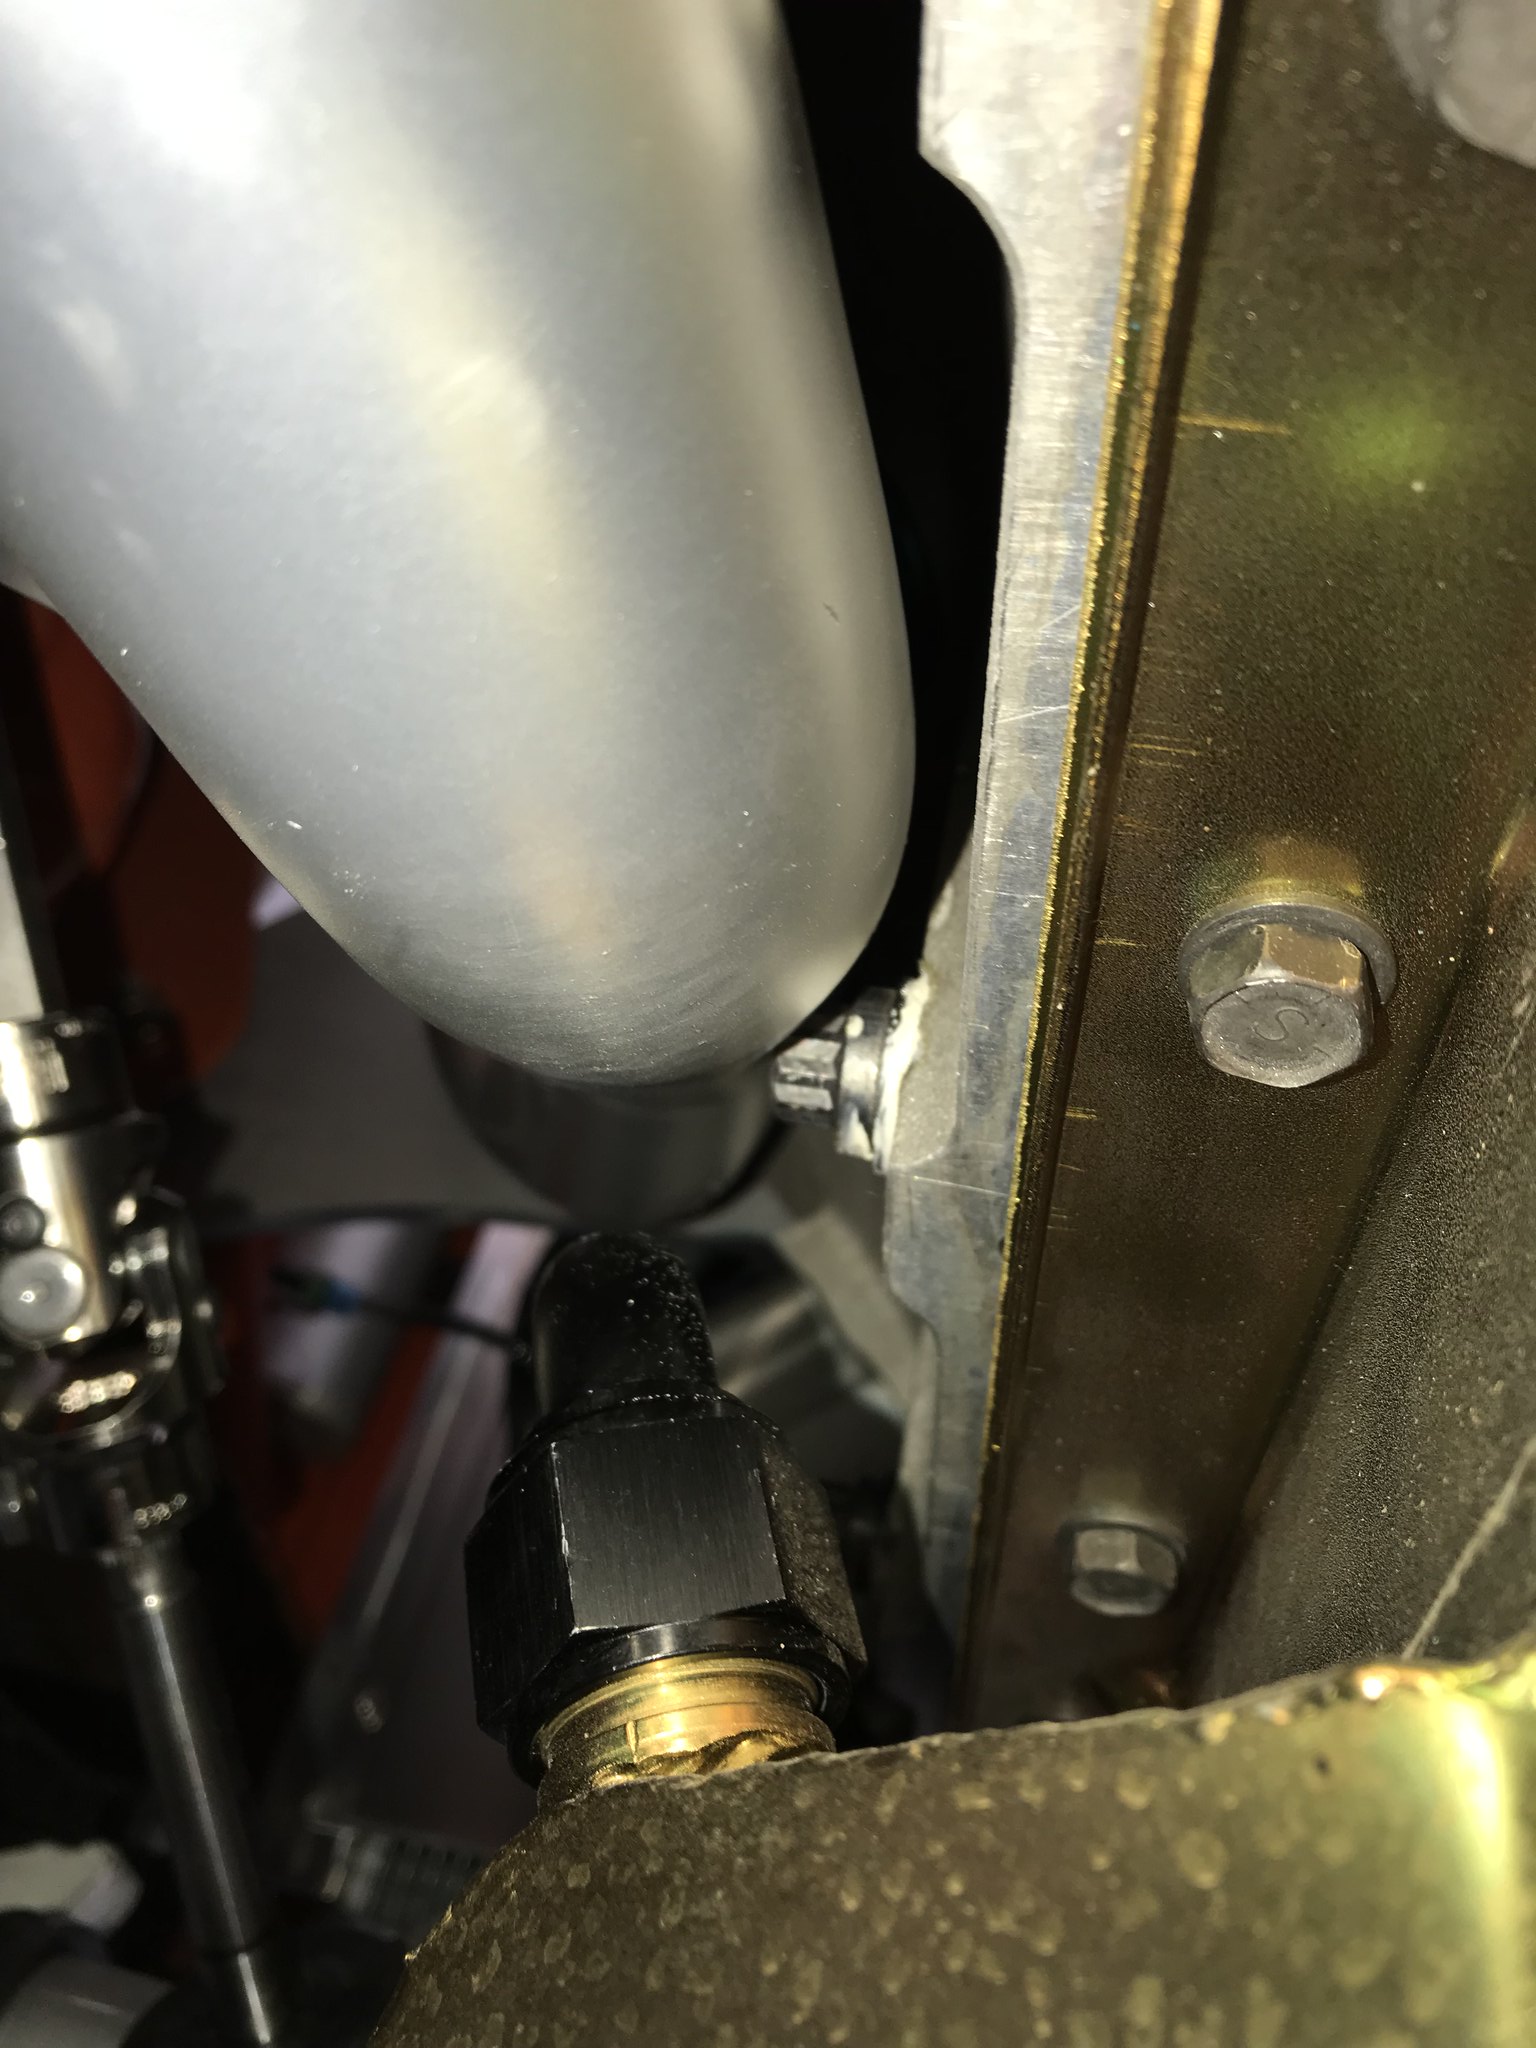
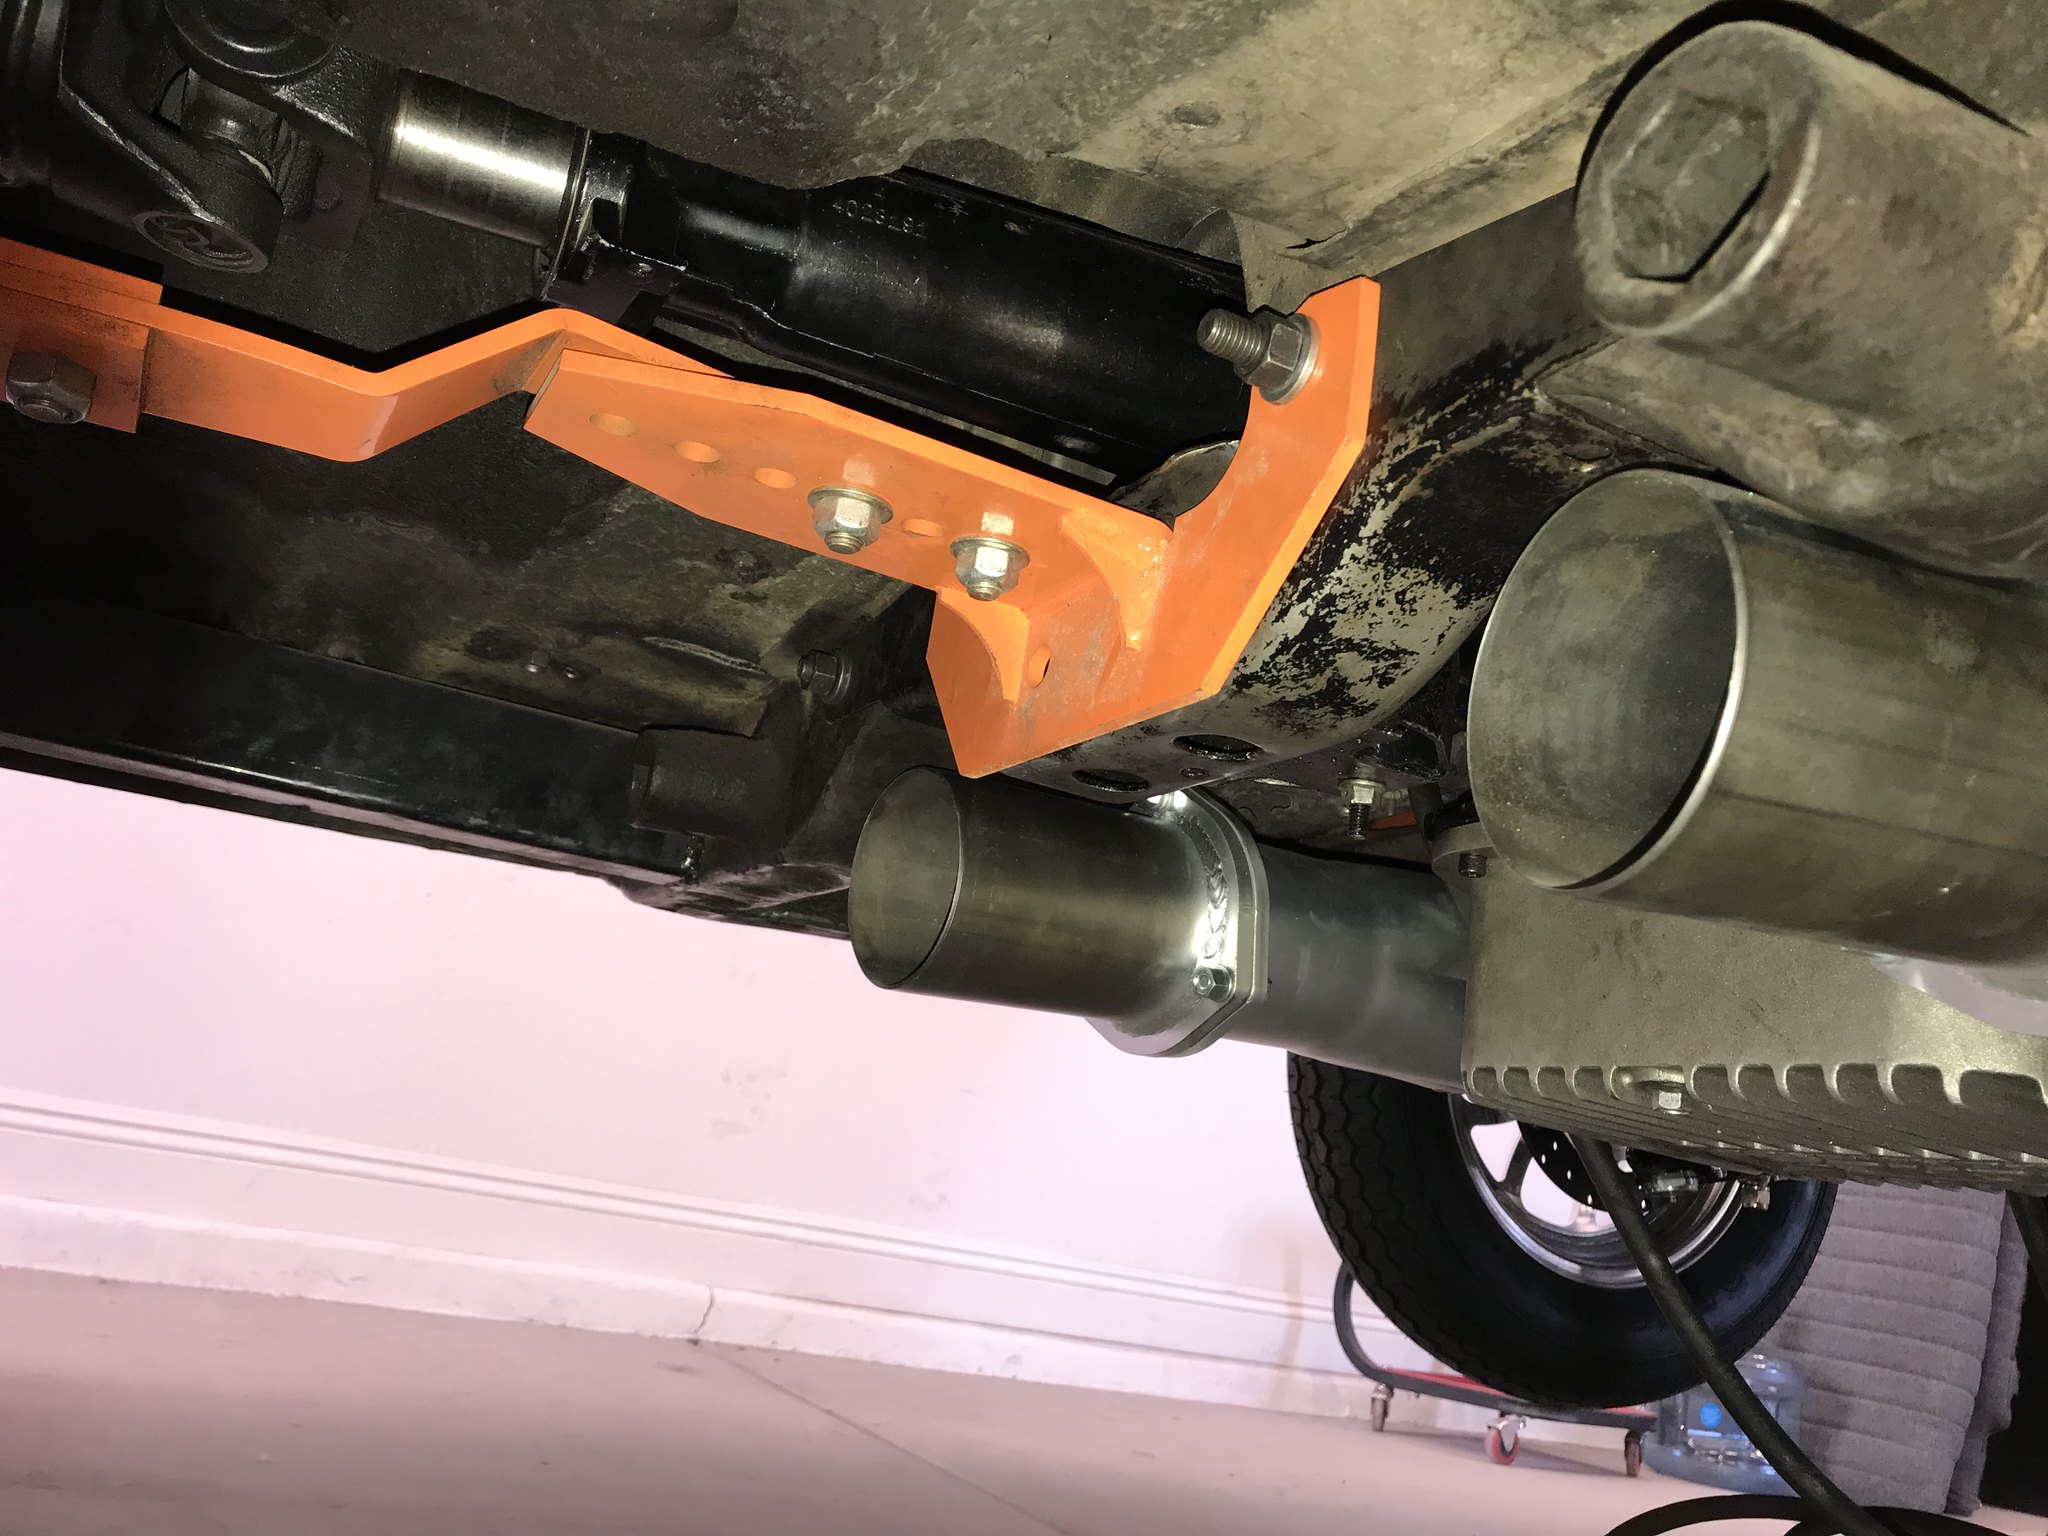
2-1/4 primary, 4in collector, O2 bungs. I'm running CNC ported Indy SR heads so I had to special order the 4in collector option on the HEMI625-214 for Coil Over Suspension. O2 bungs are to keep my induction options open. I'm considering the Sniper 4500.
It took a little while to figure out how to use it, but I'm pretty happy with it.
[img]http://i.imgur.com/boeexFms.jpg[/img] 31 Plymouth Coupe, 392 Hemi, T56 magnum RS23J71 RS27J77 RP23J71 RO23J71 WM21J8A I don't regret the things I've done. I only regret the things I didn't do. "Wise men talk because they have something to say; fools because they have to say something. ~ Plato"
Can you measure the depth of that setup from the core support to the nose of the fans? It looks great and the price is nice too.
~7.5 inches from the support to the back of the fan motors. I was able to center the water pump between the fans to gain clearance. My car must have had the smaller radiator as I had to drill holes and use 1/4in spacers between the support and radiator mount:
Looks familiar... LOL. Looking good. Mine was tight & I mounted my over flow bottle the same way.
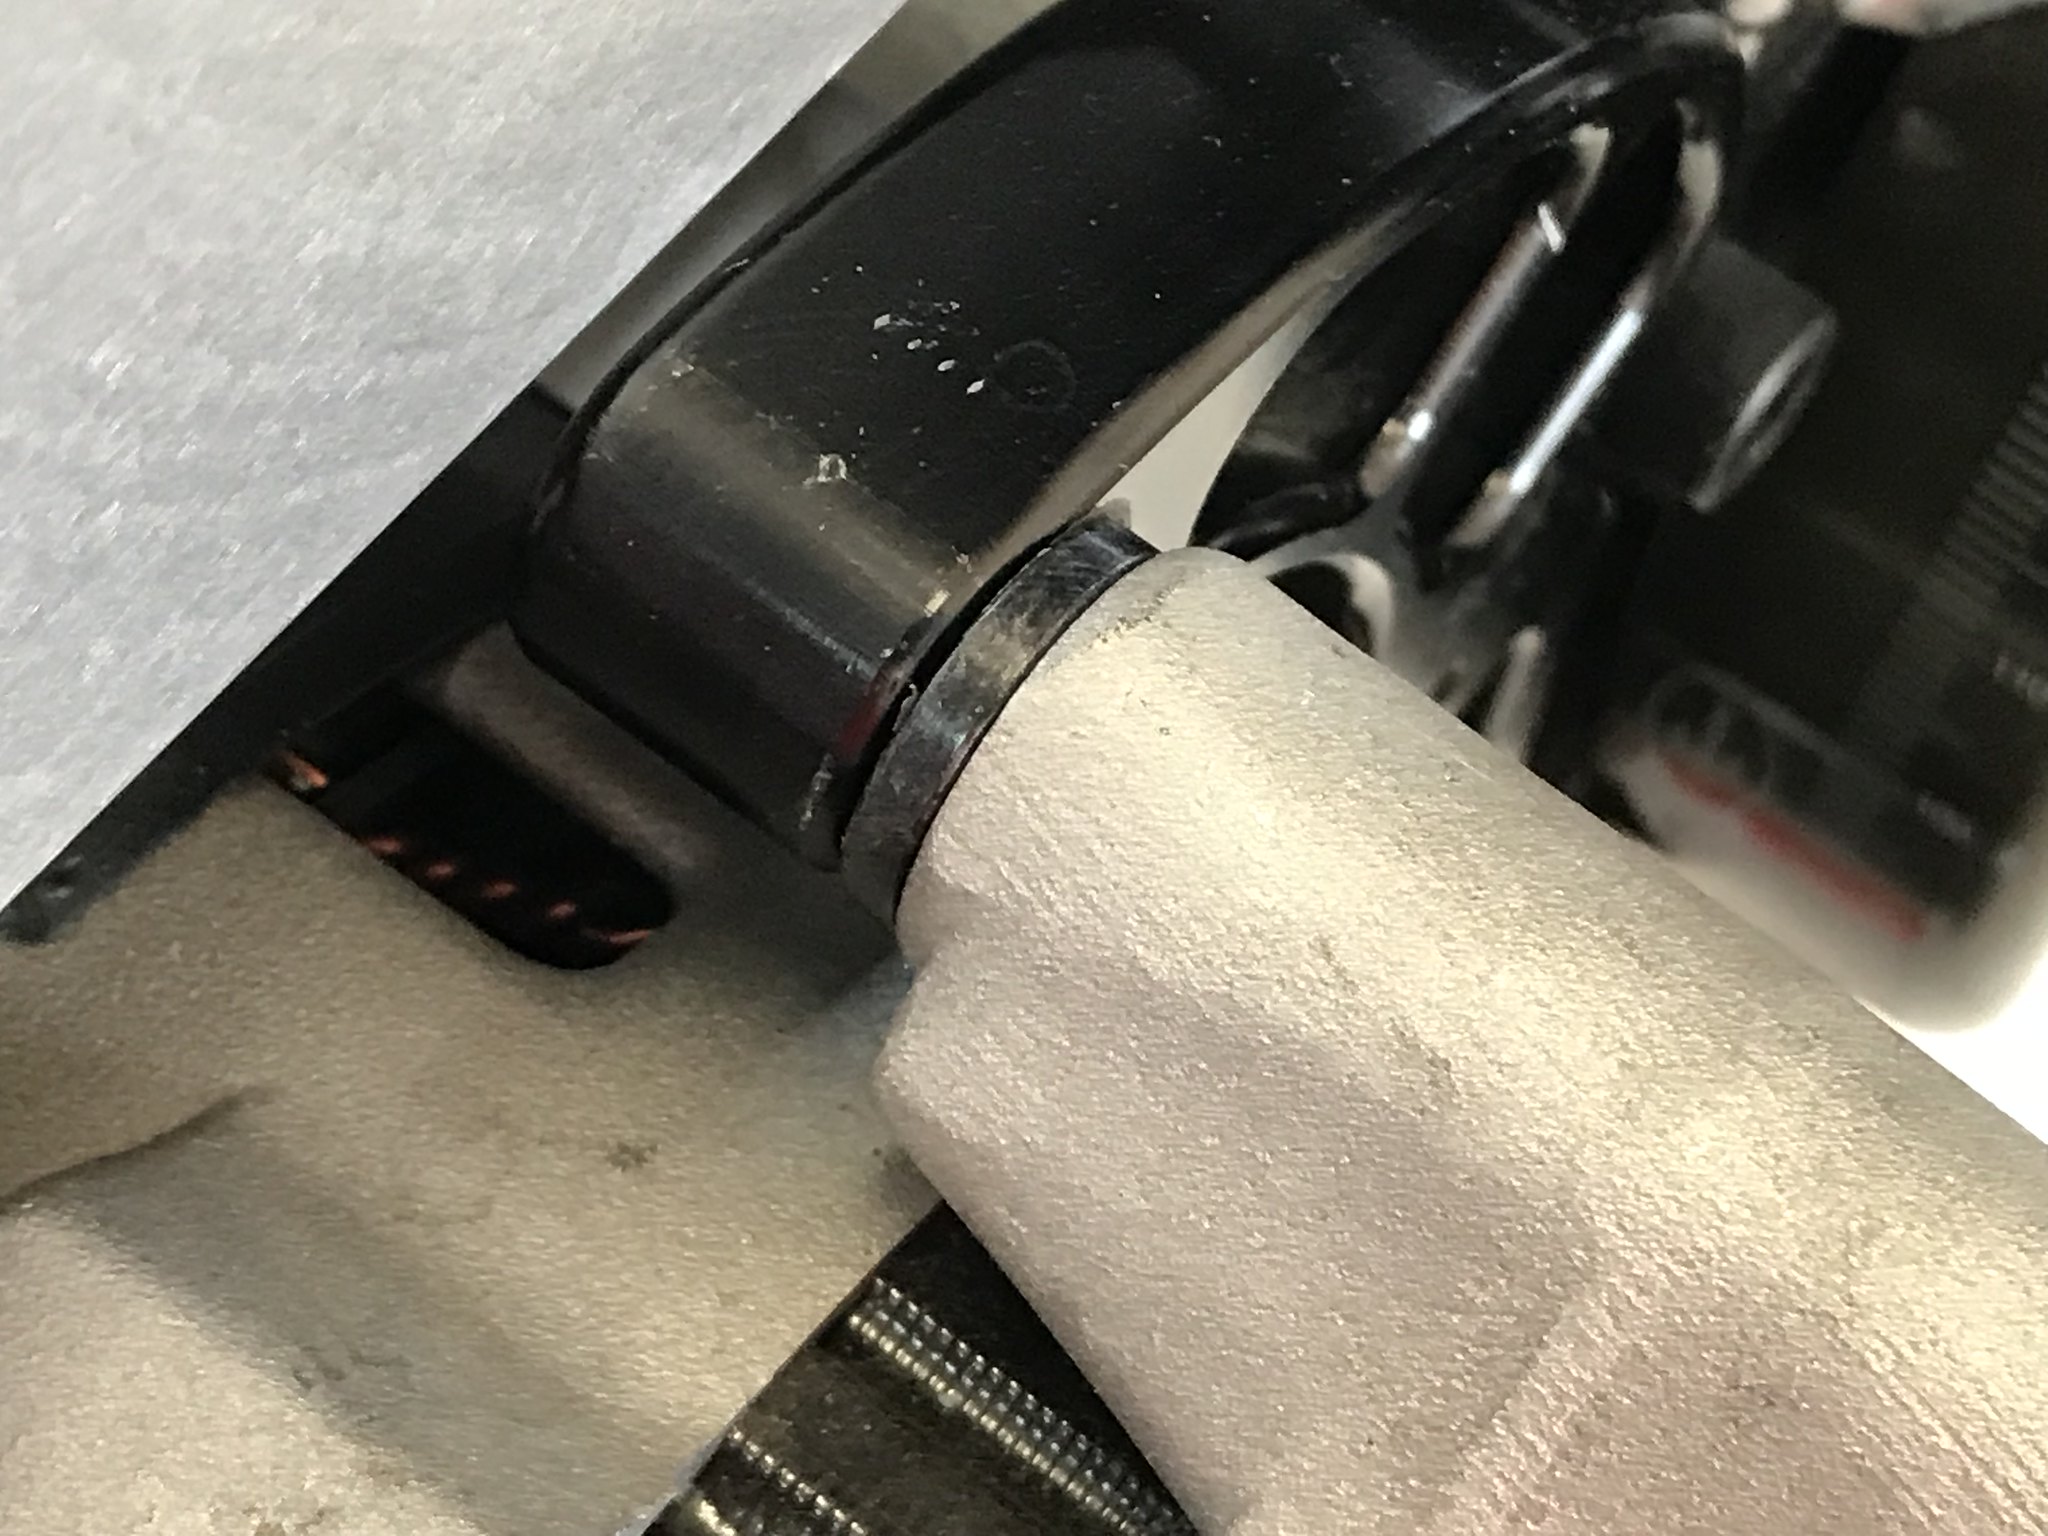
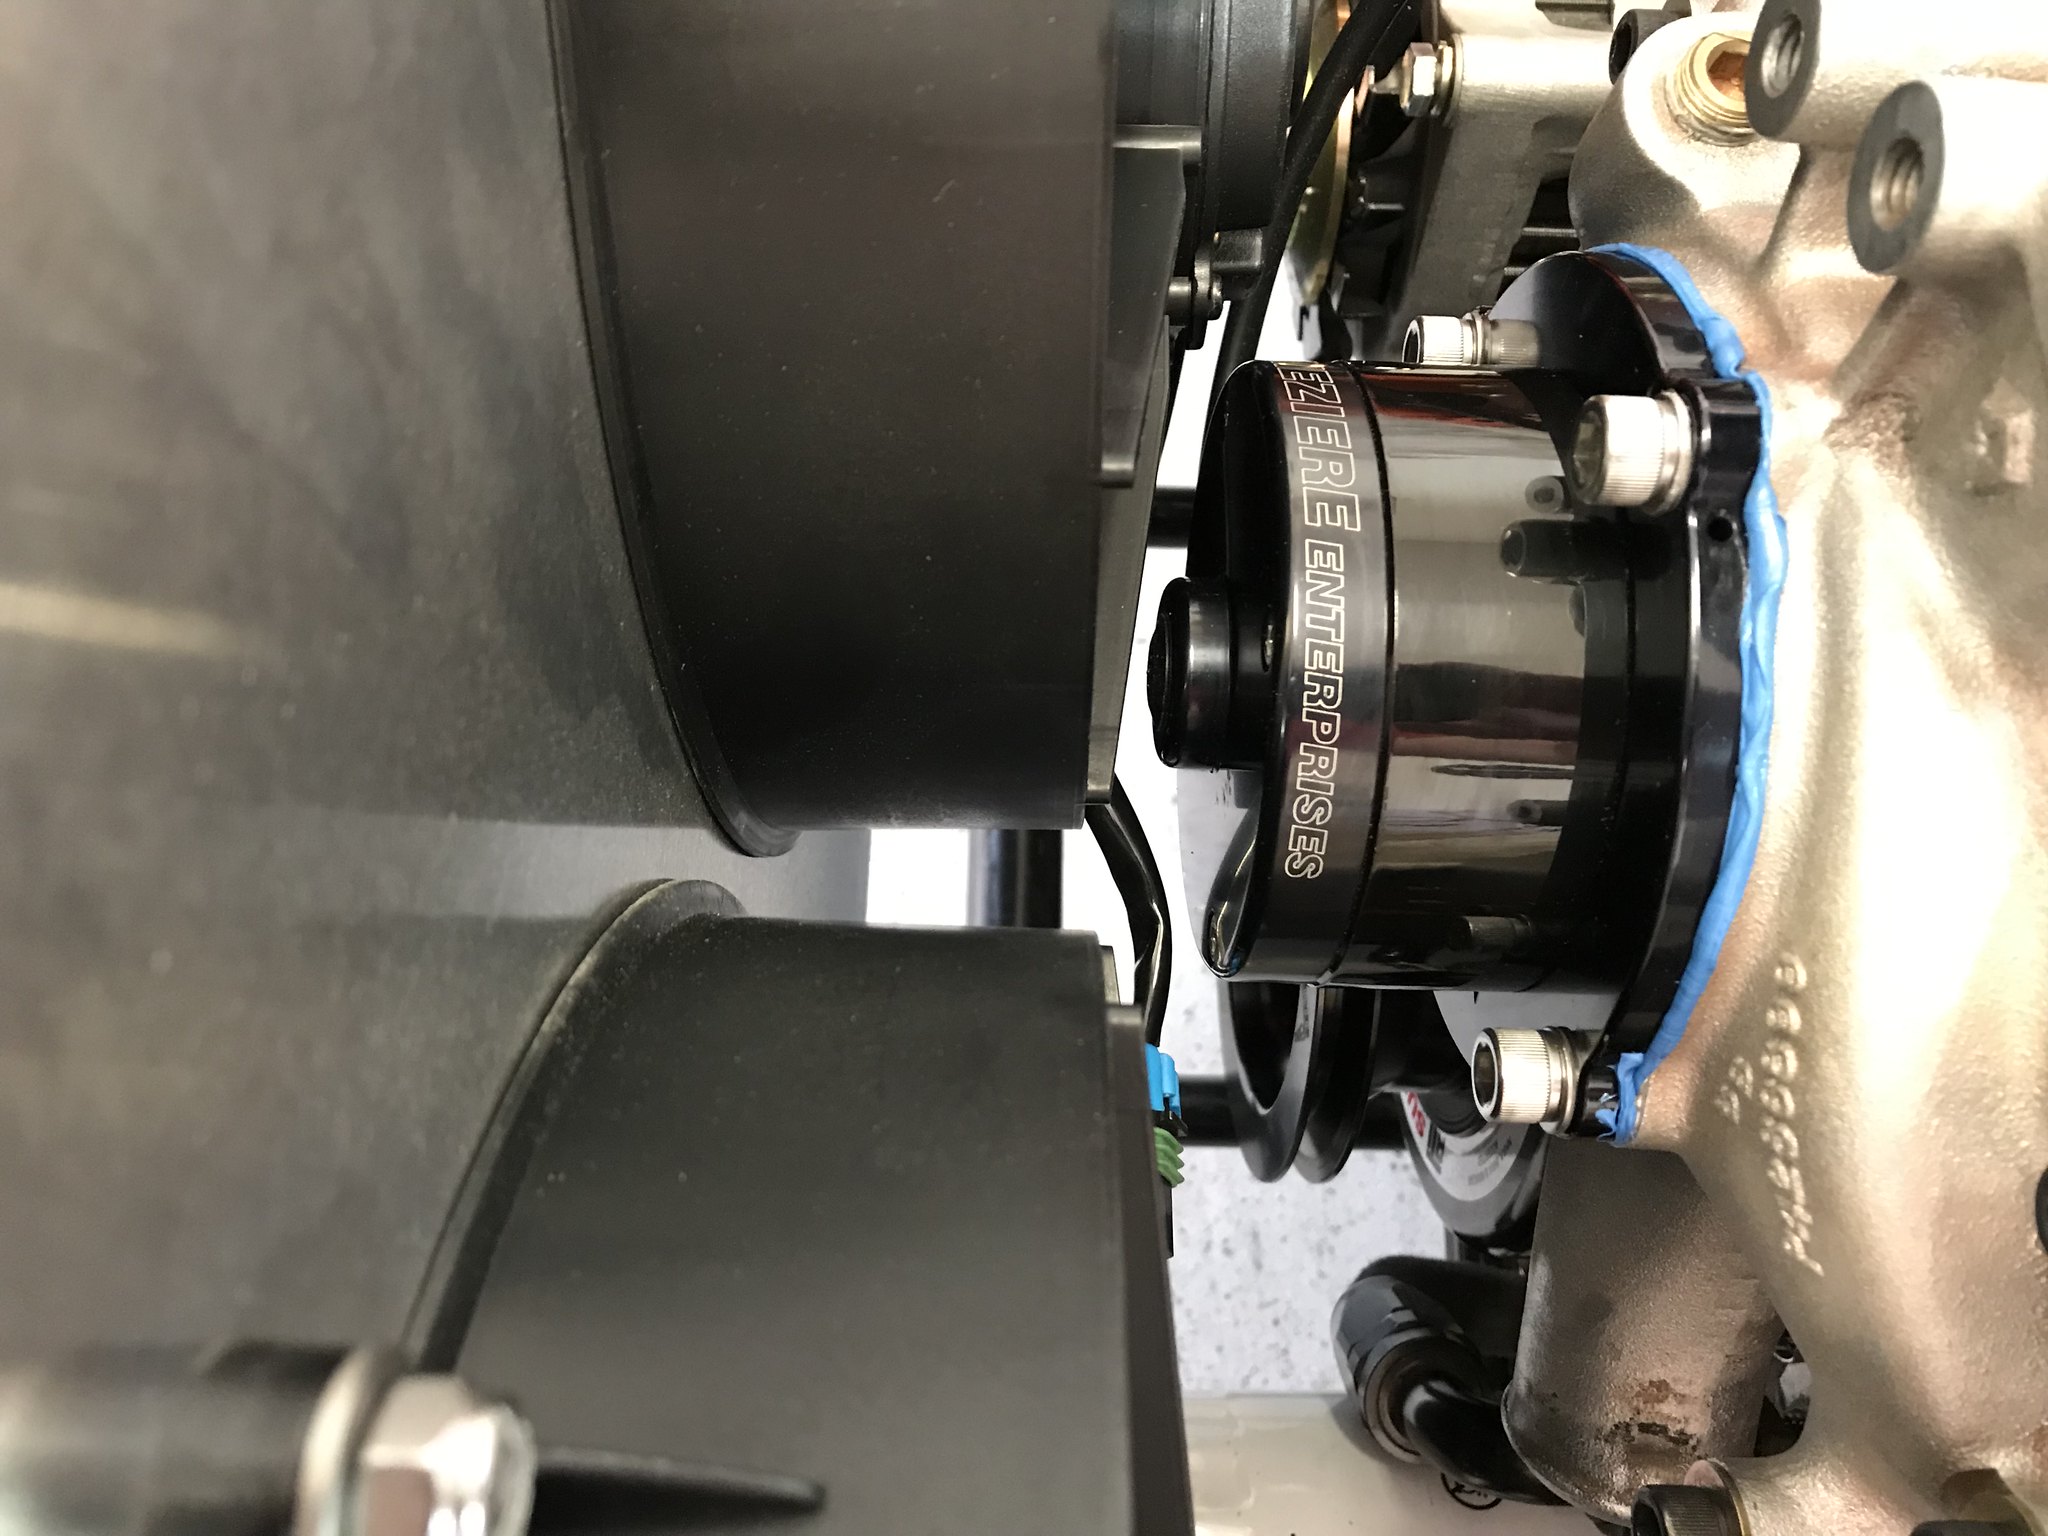
very nice piece ! however, i would recommend a support bearing on the steering shaft. that would keep some flex out of the column and rack shafts.
Really? I haven't seen a mopar with one yet and GERST, RMS, and MF are pretty common. Do you have any pics so I can see what you're talking about?
I added one om my steering shaft also.I made mine with a nylon bushing. This is about the best picture I have of it. It now has a grease fitting also that I added.
Bolts on the valve cover and yes I plan to clearance the shock tower. Really glad that I converted to GERST suspension so I don't need the shock tower. Now the real question is if I'll be able to get 1/4 without scratching the paint!
Indy has rocker covers that are cast with a relief for more shock tower clearance. Mine are & it helps with a little more room. I don't have any better close up pictures. Hard to tell in this view.
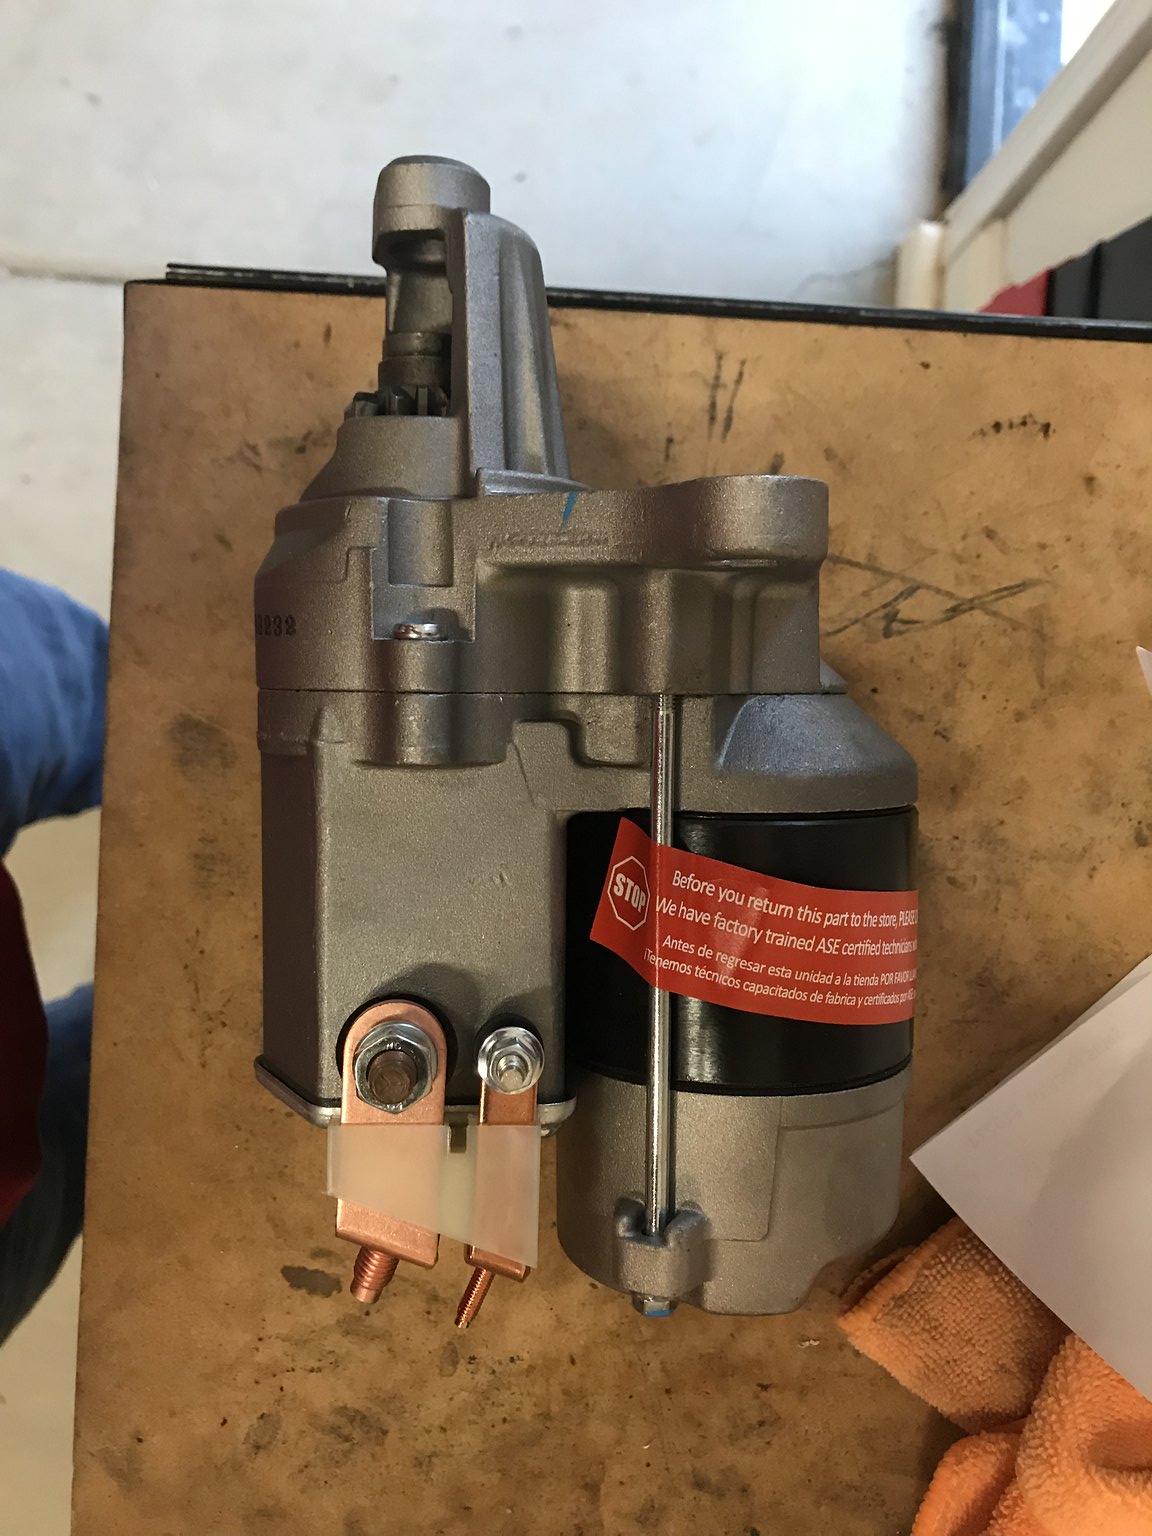
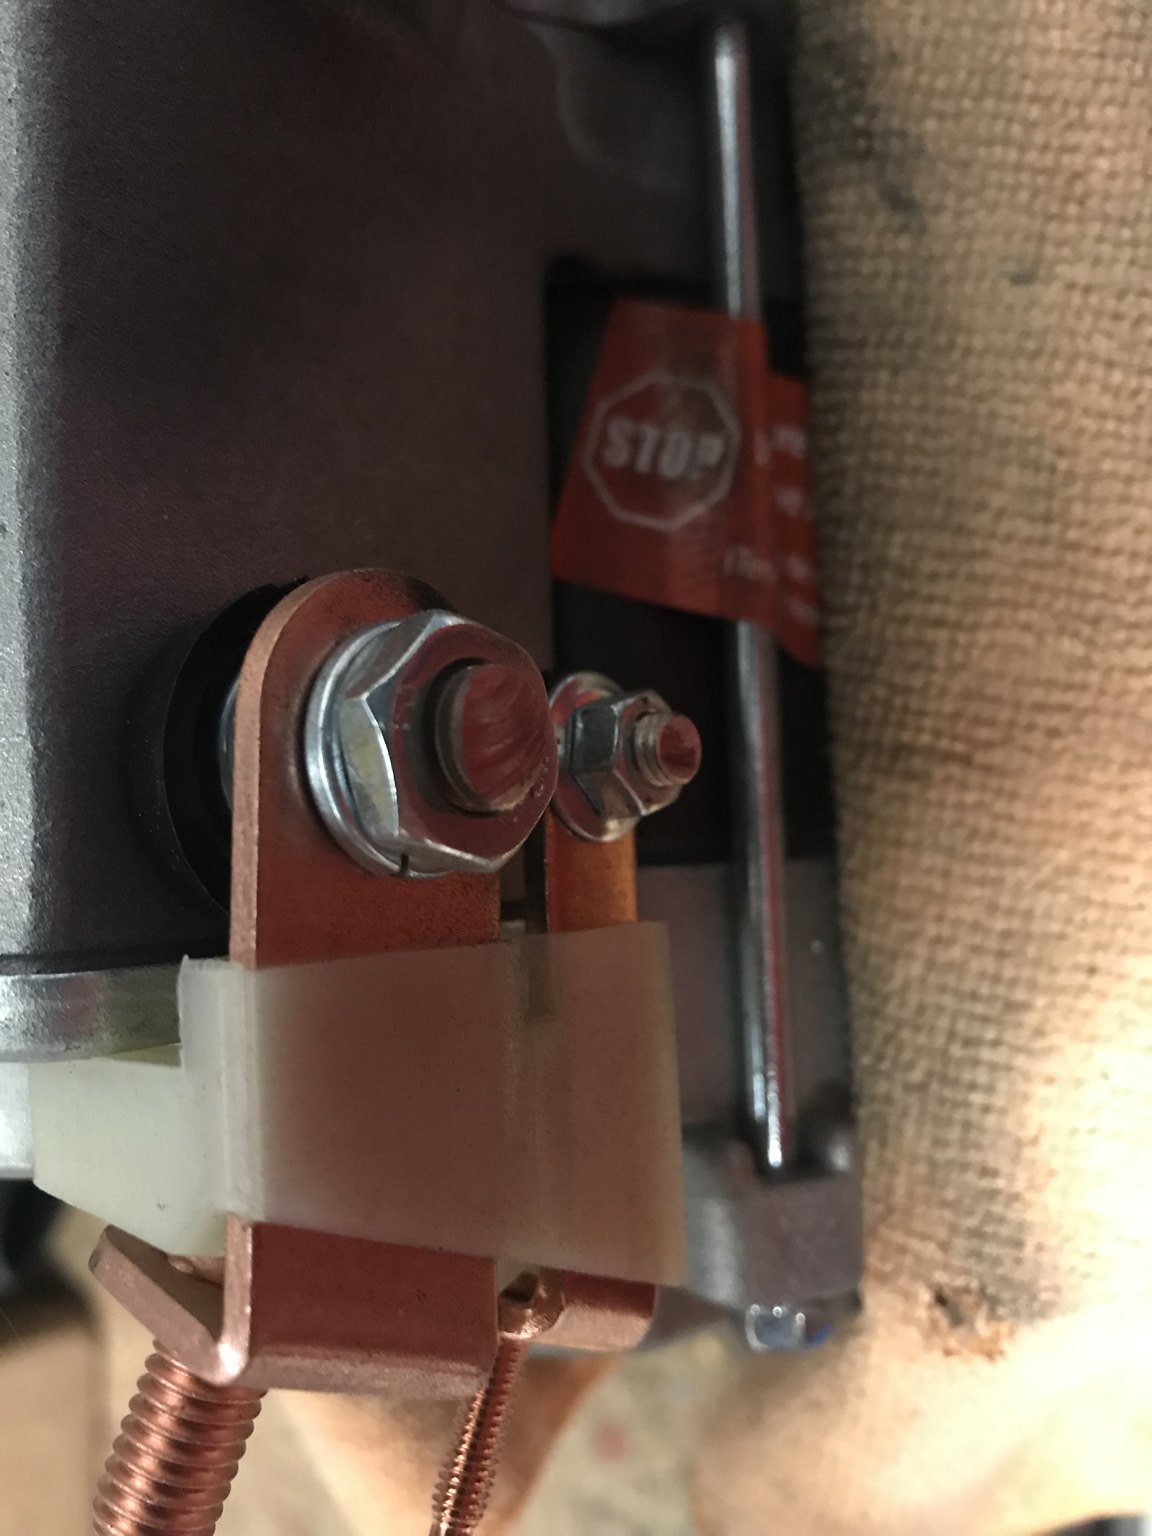
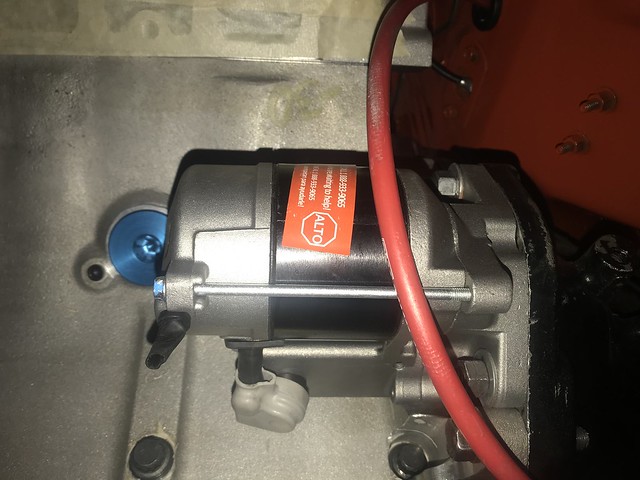
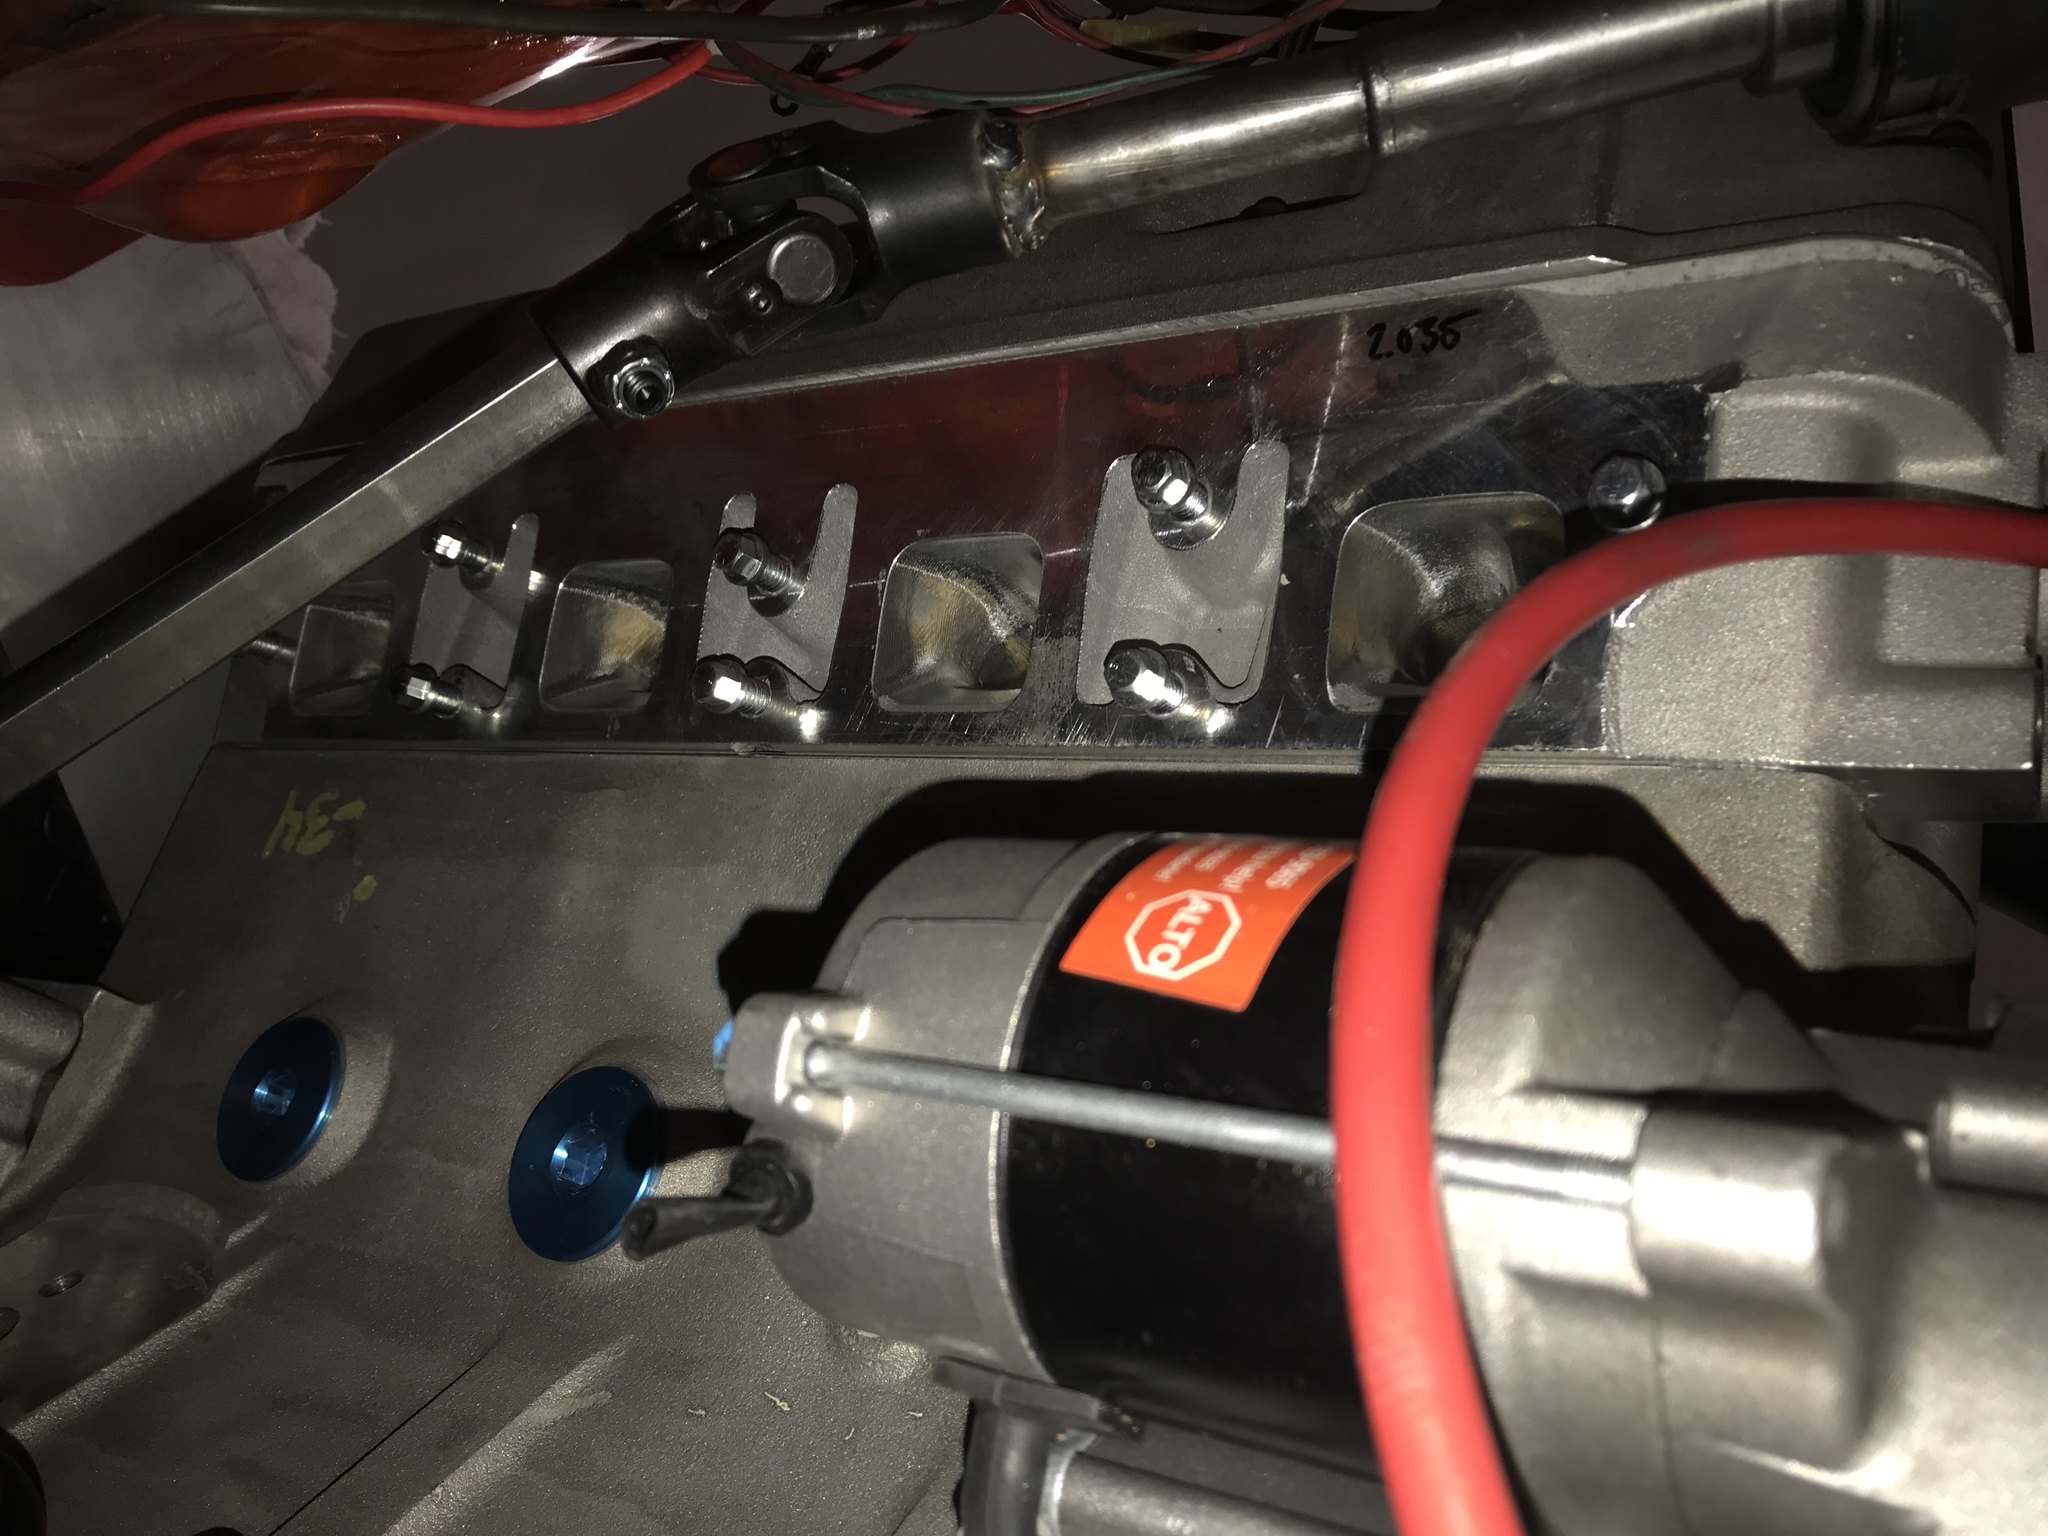
I picked up a mini starter and terminal relocation stuff (via moparts search function). I can't believe I ran the old factory tank for so many years. These little things are tiny!
A little grinding on the posts for clearance. Look similar to your setups?
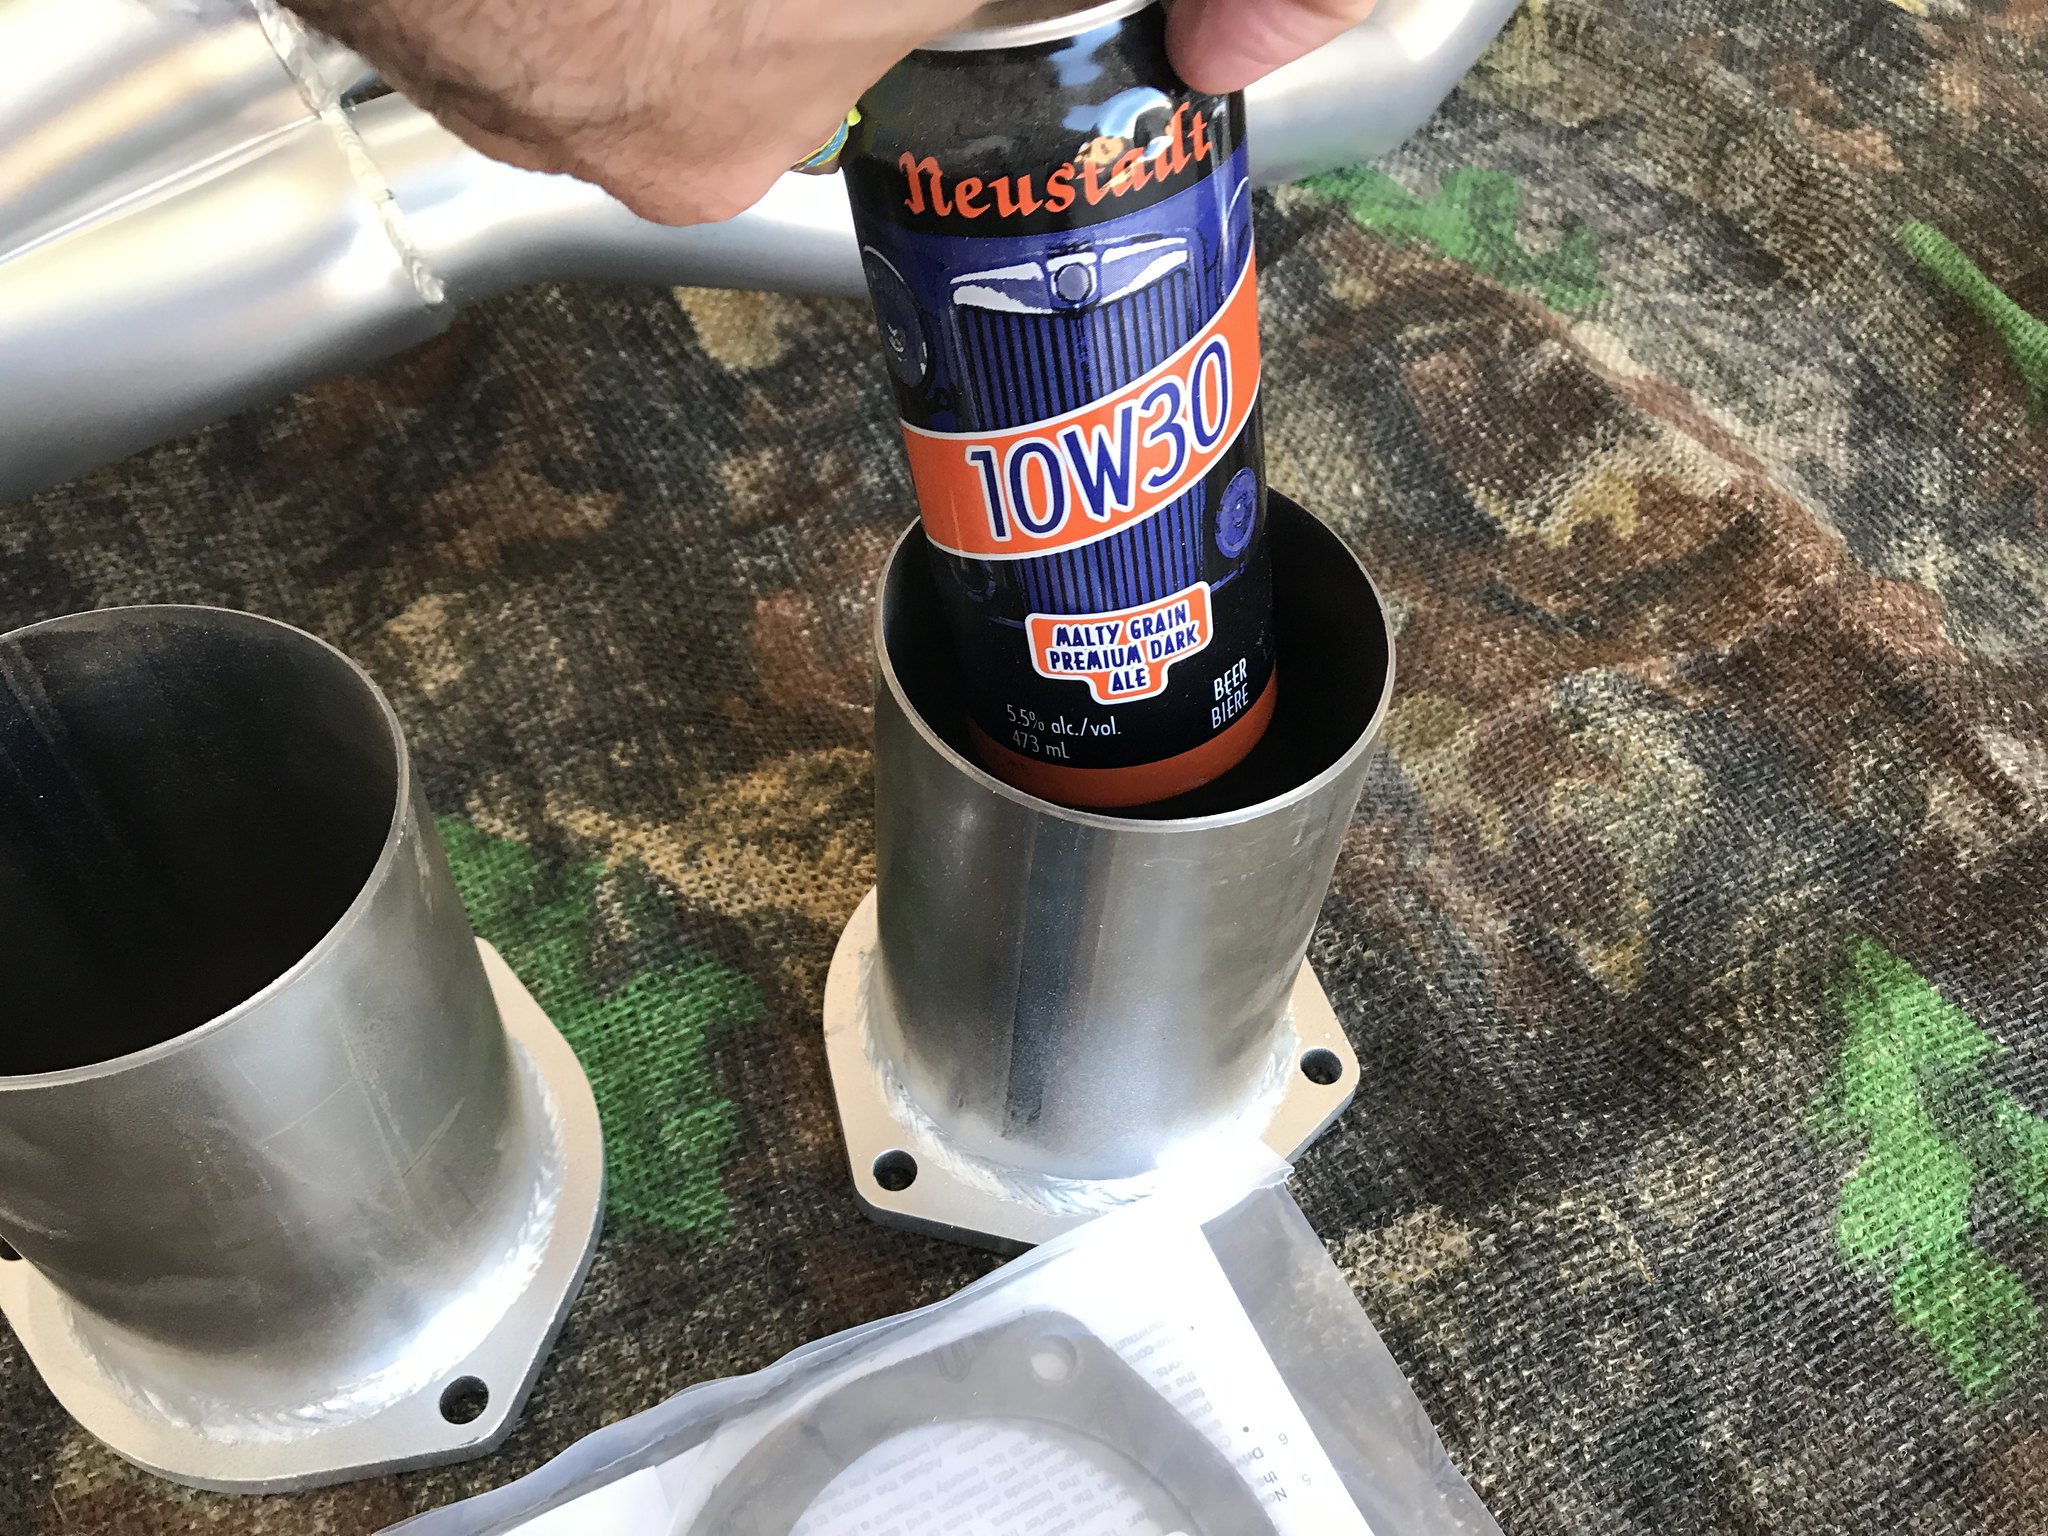
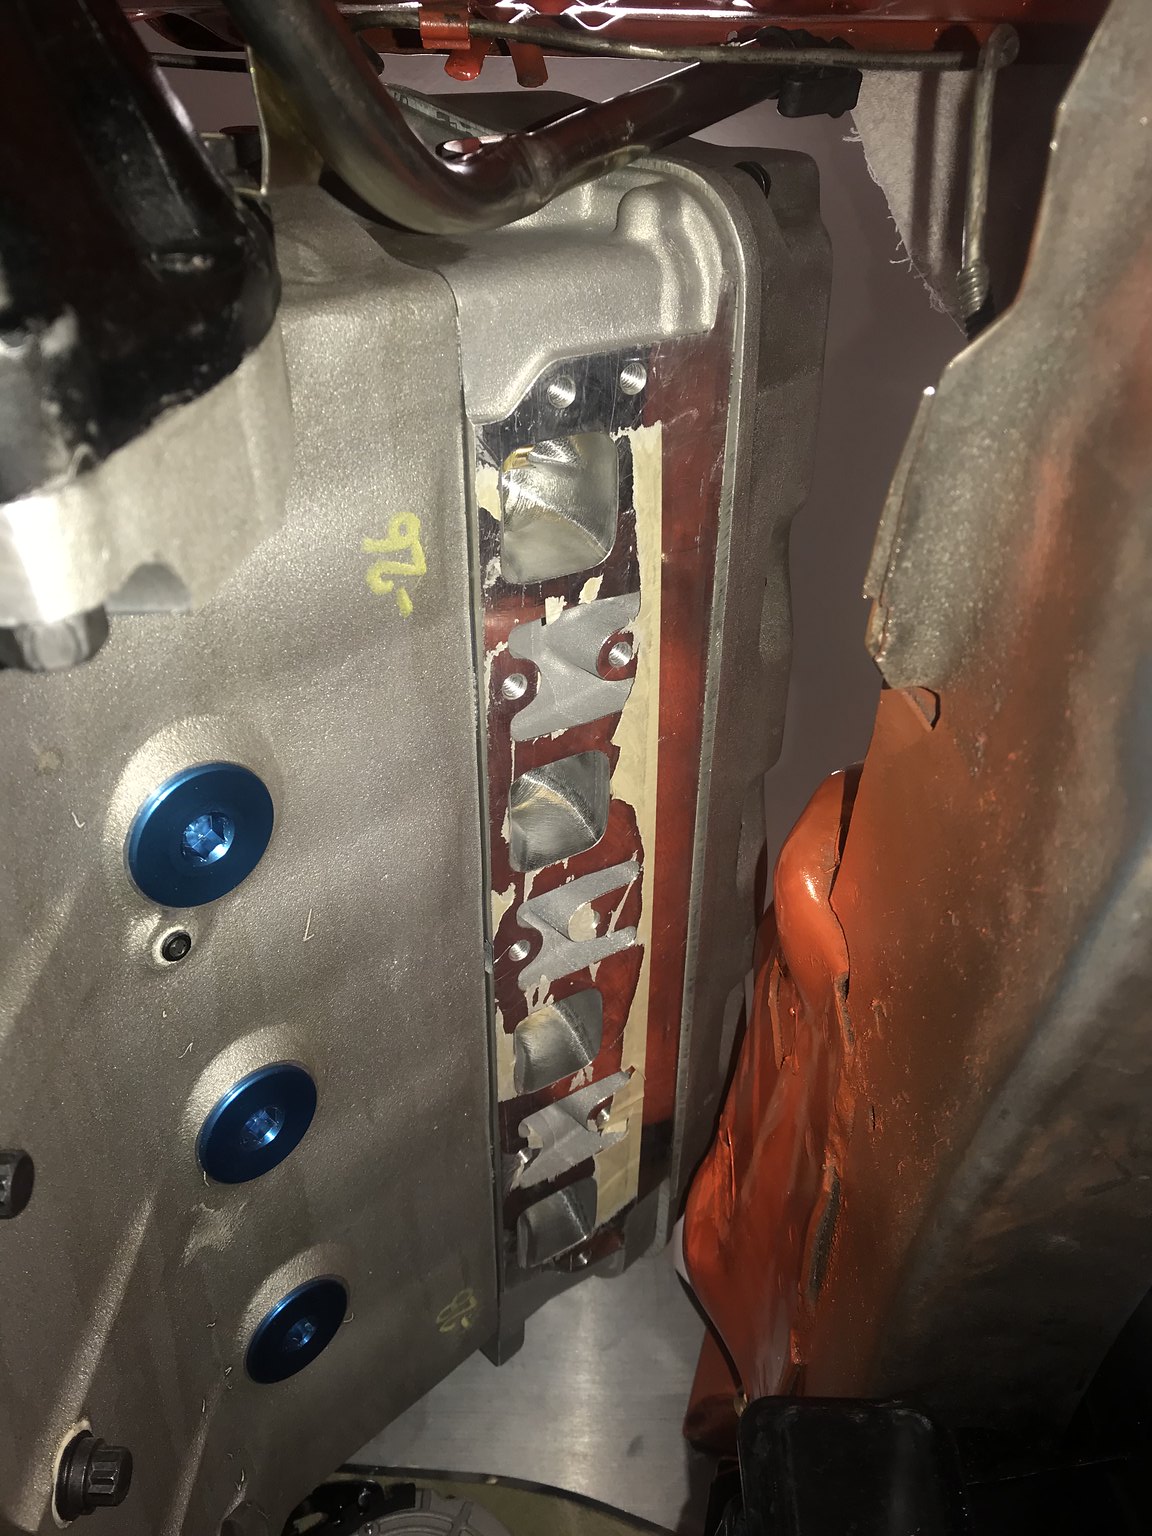
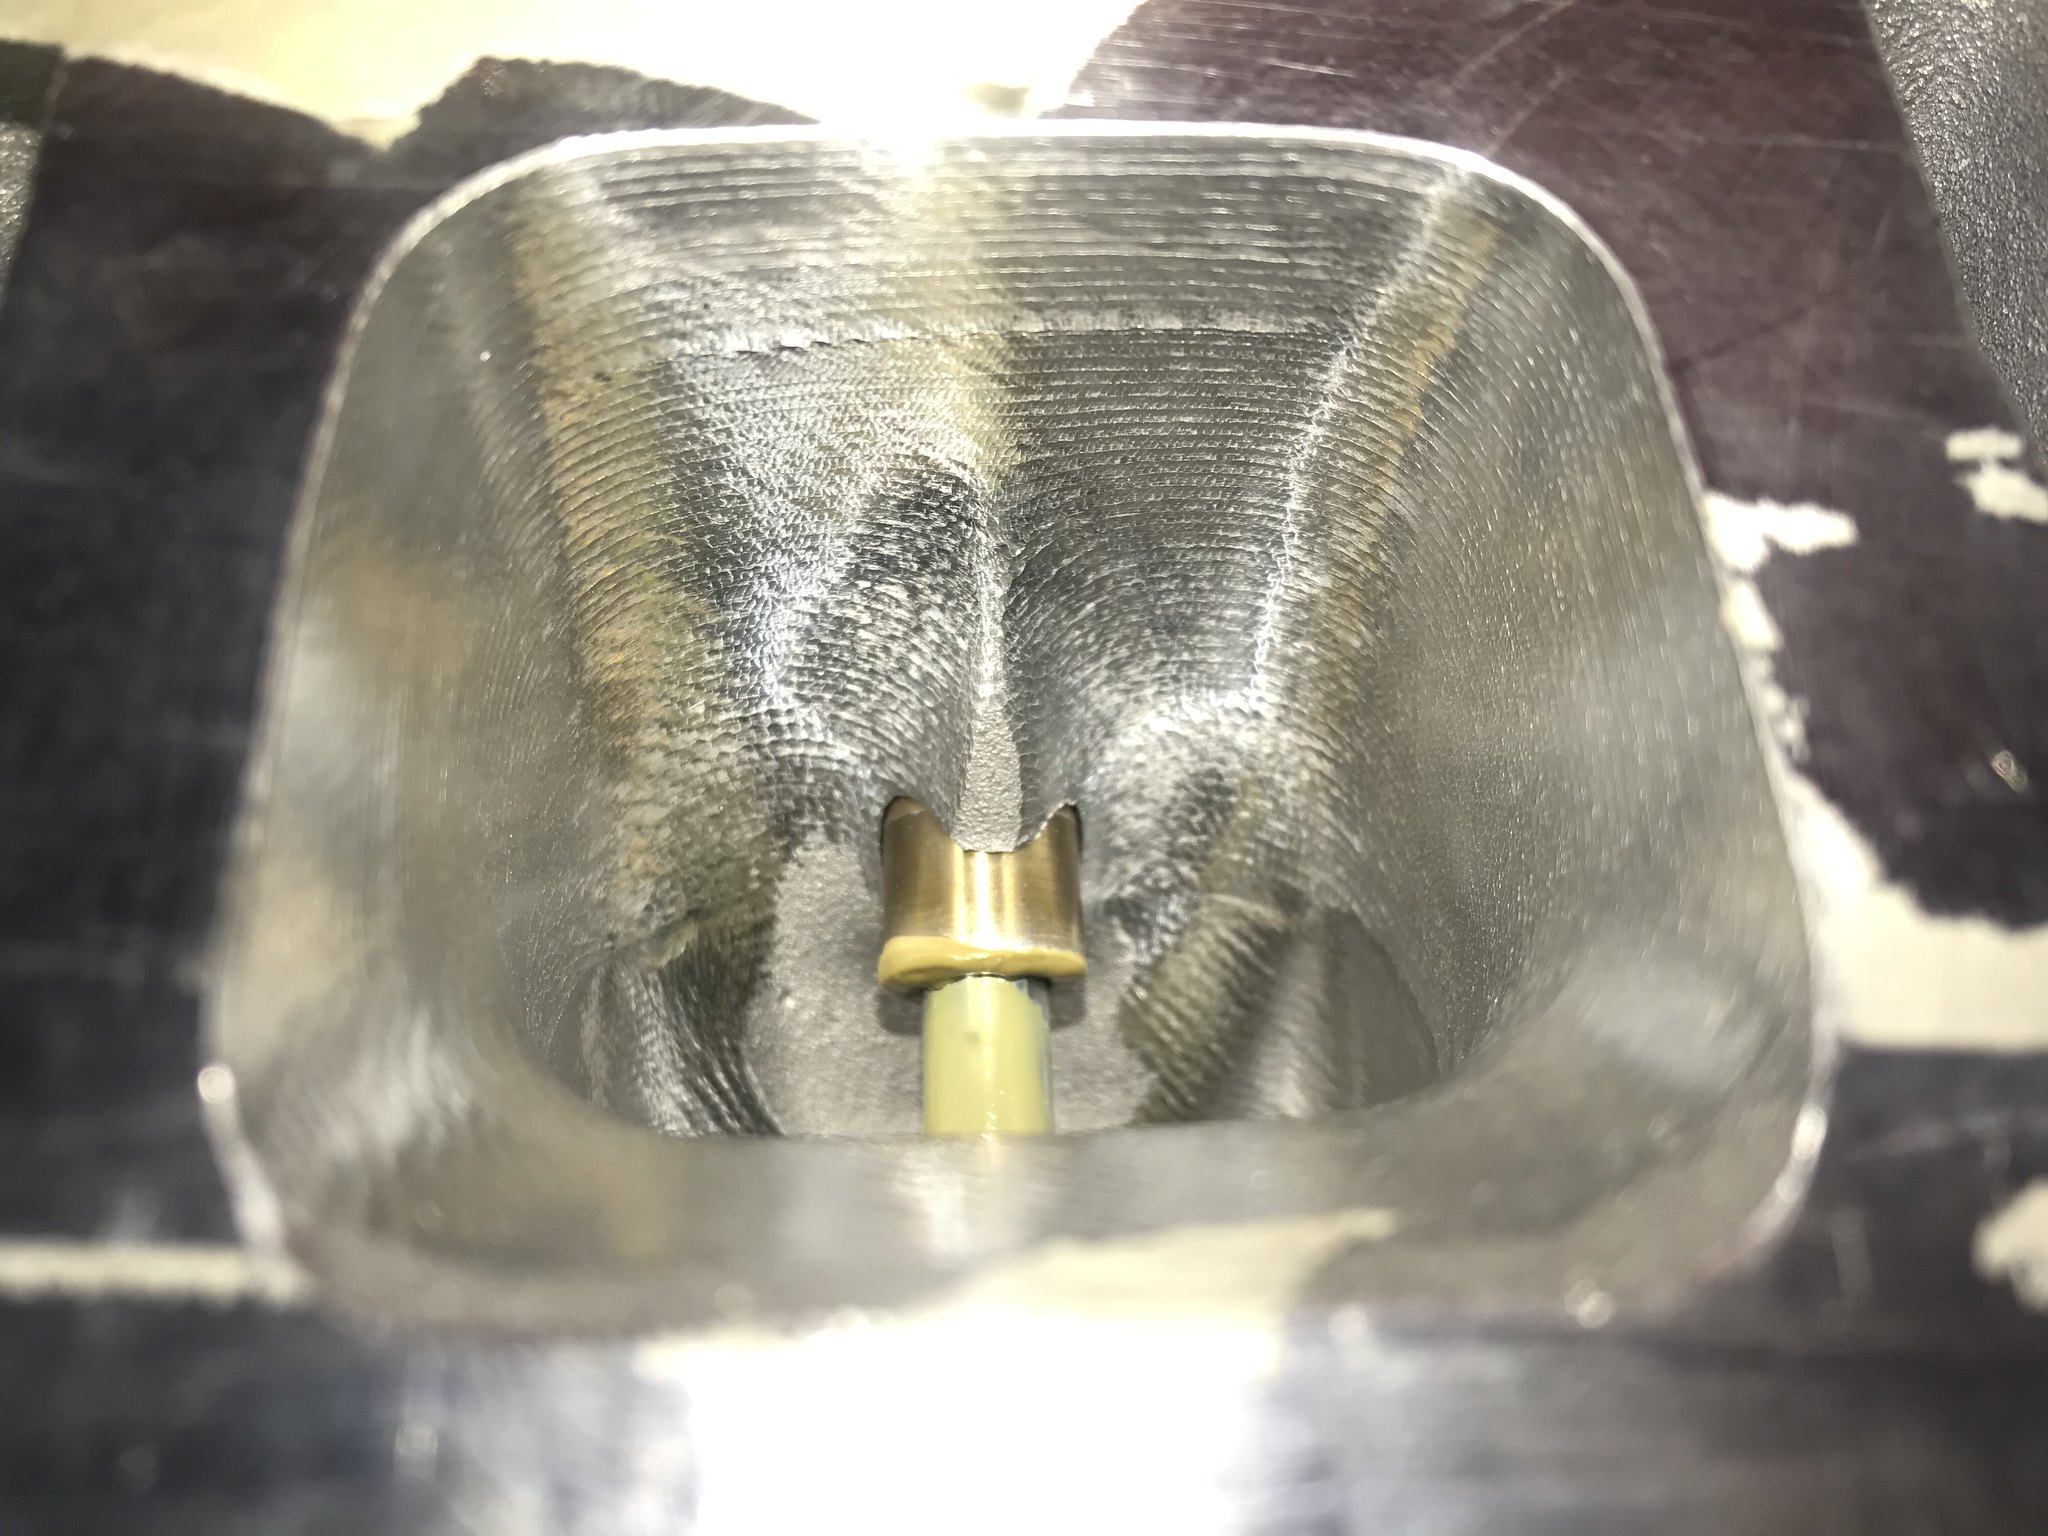
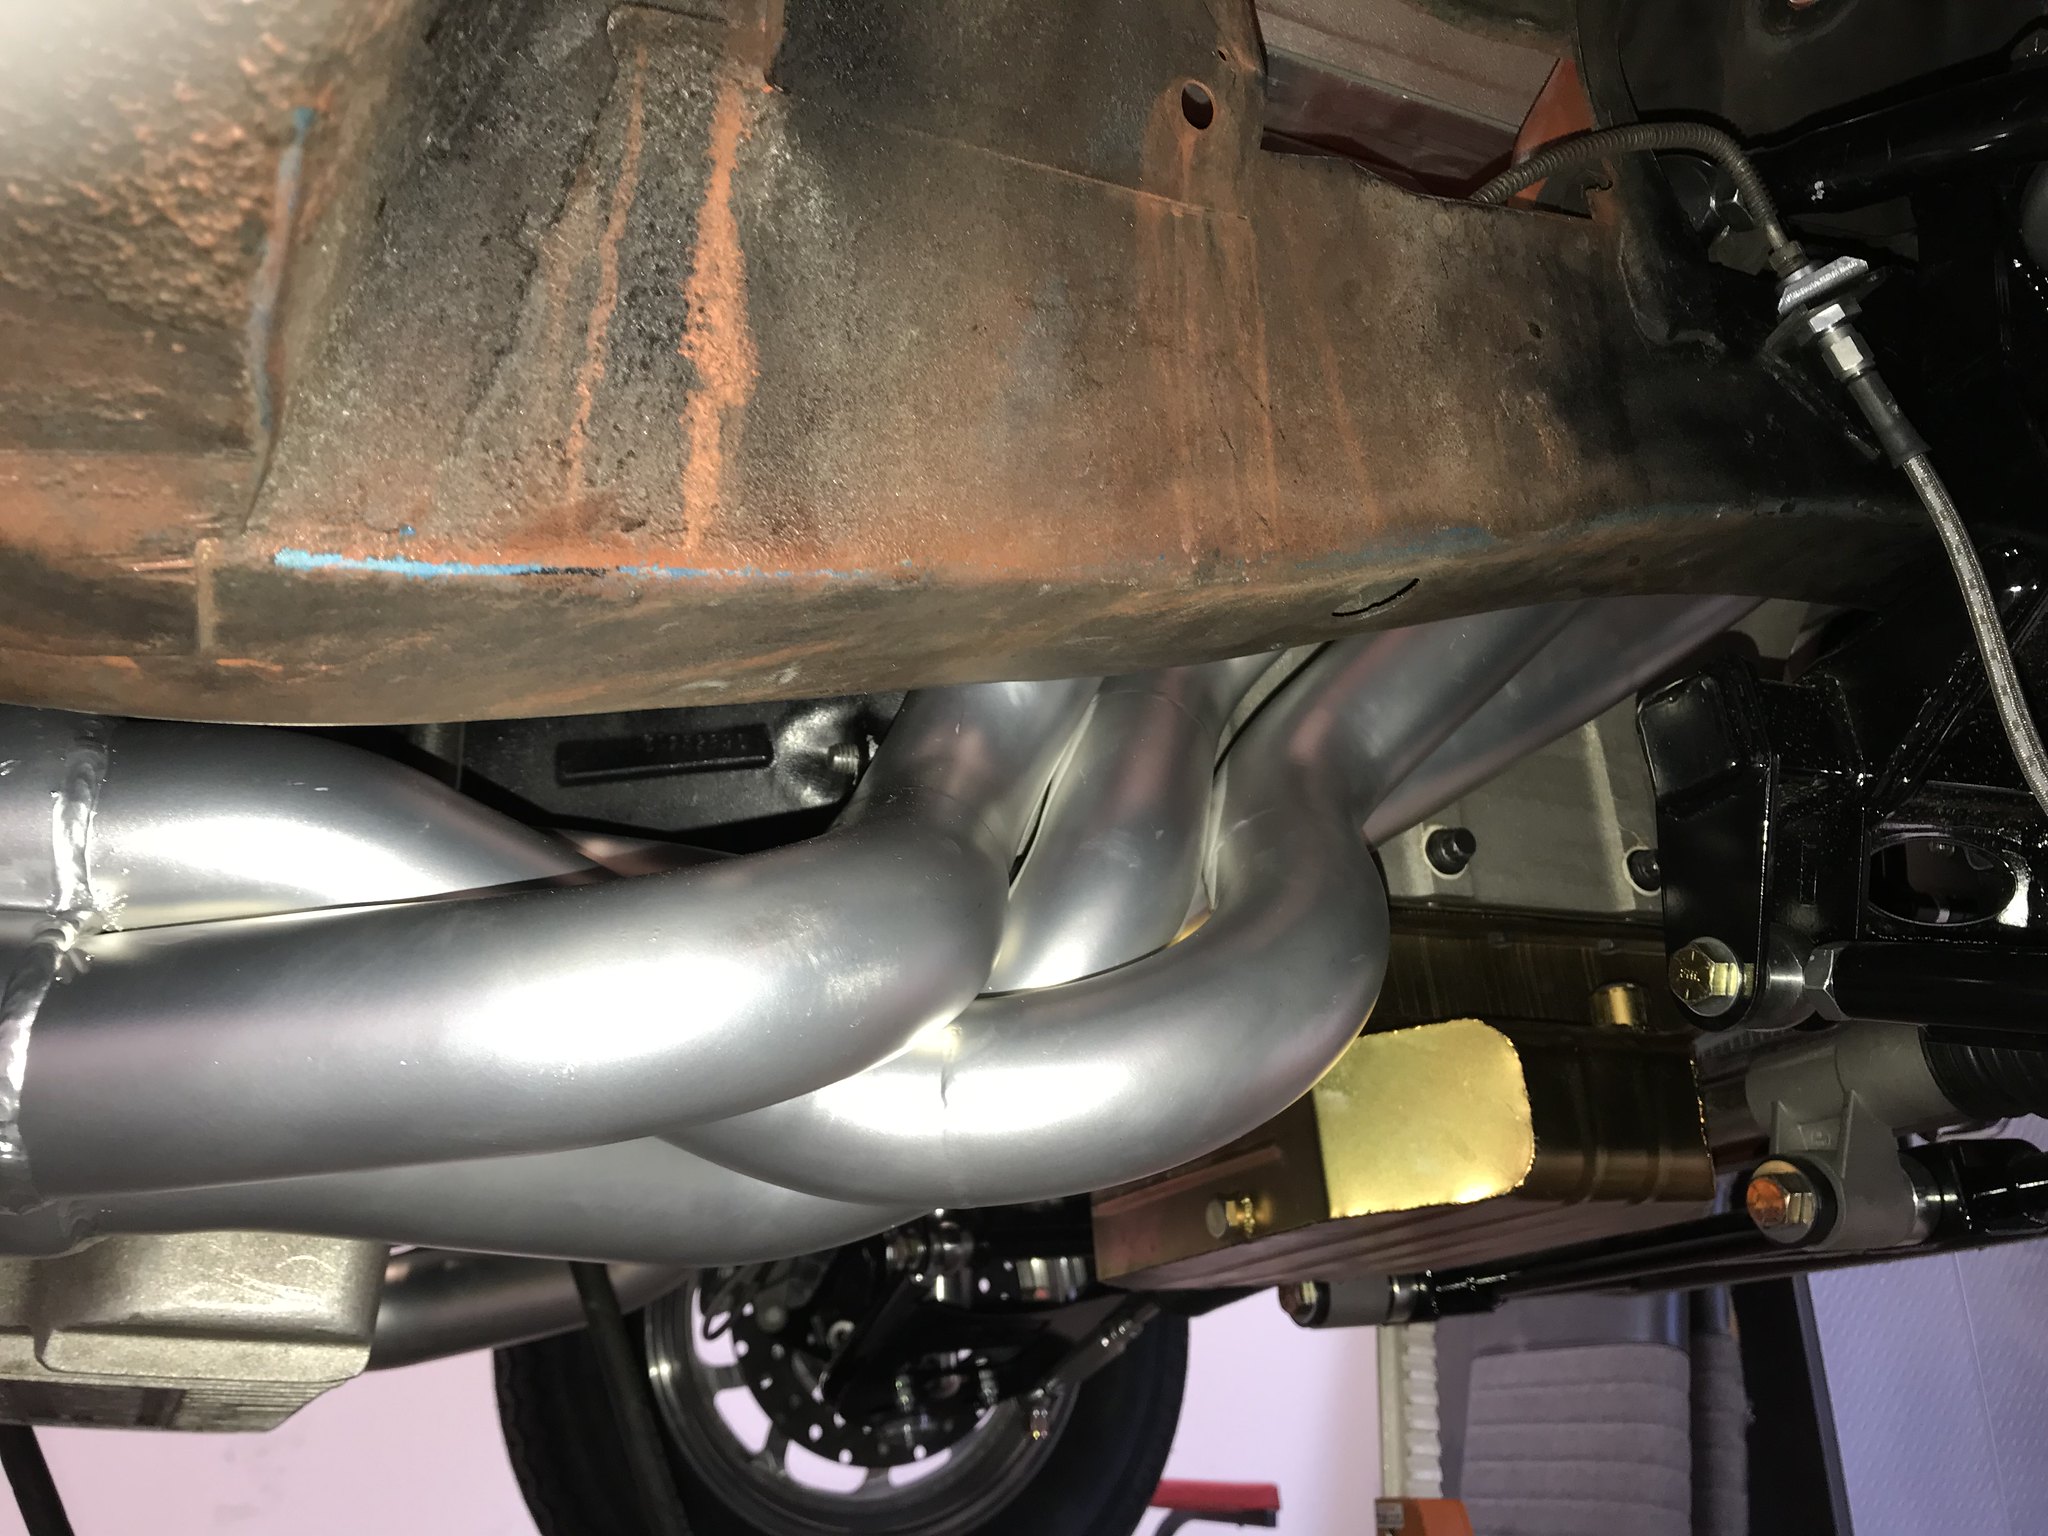
Headers are going to be tight! I don't know what kind of tape the machine shop used to cover the exhaust ports, but that stuff is sticky. I really wish I took it off and cleaned things up before installing the engine. A few pics of the CNC'ed exhaust ports:
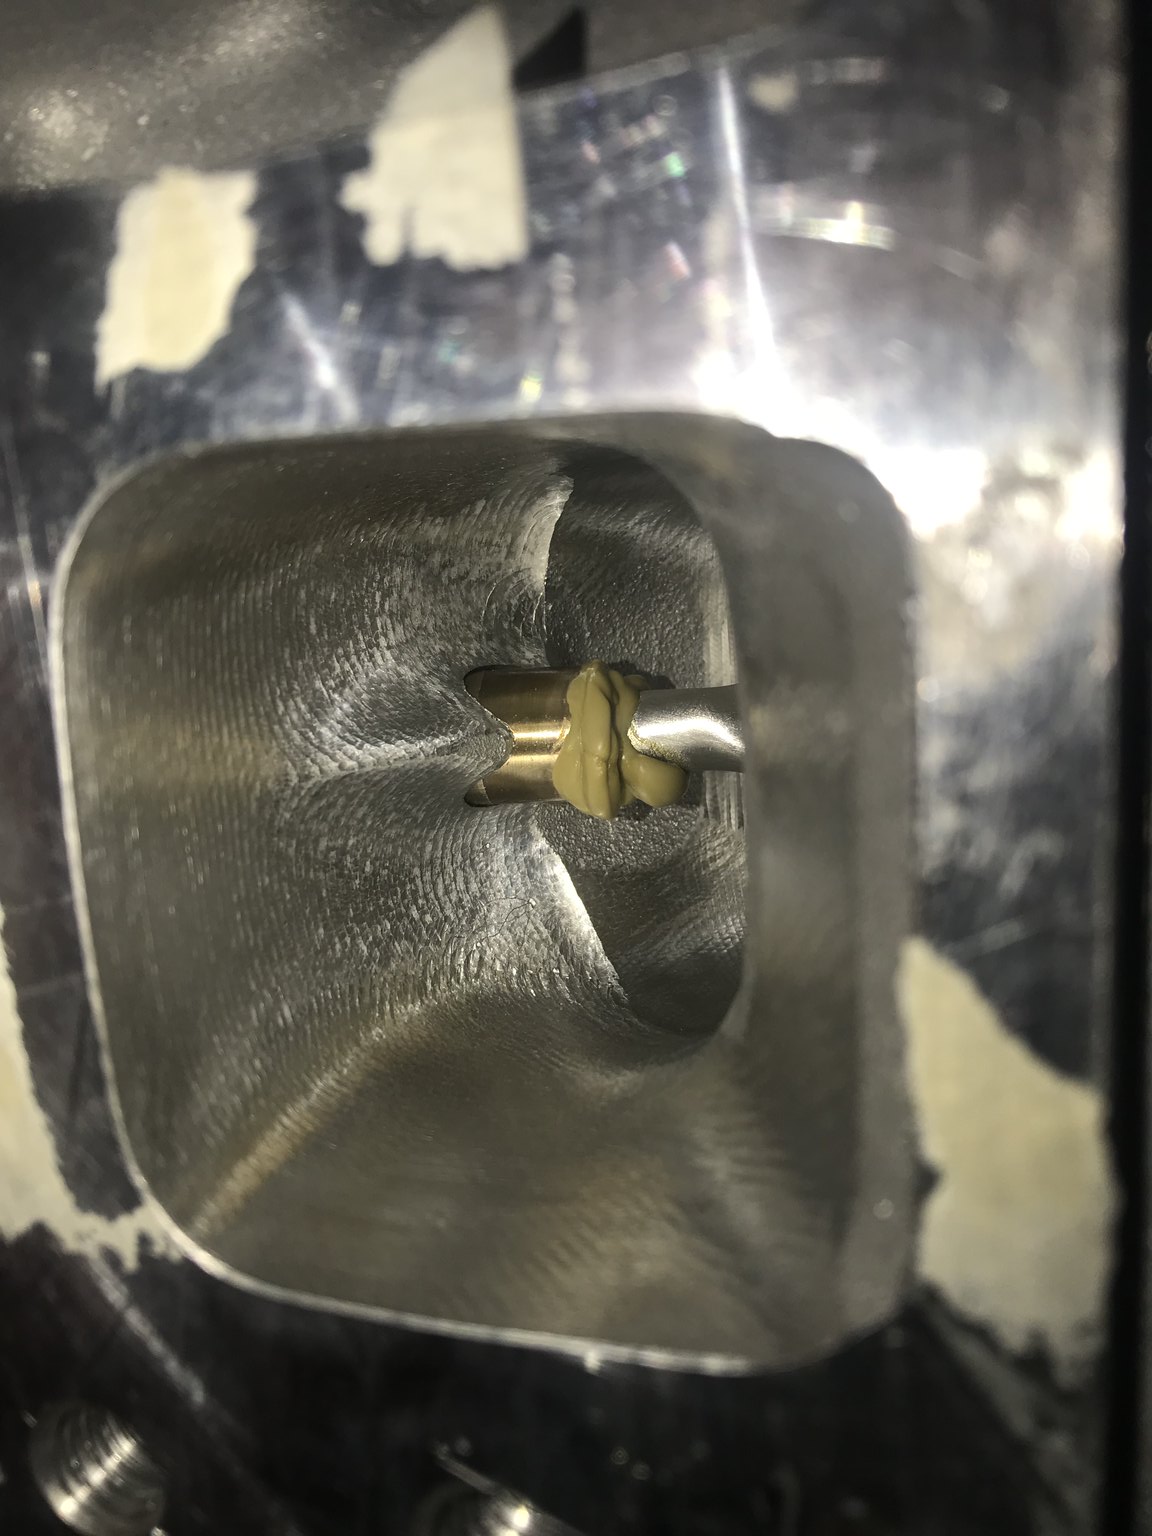
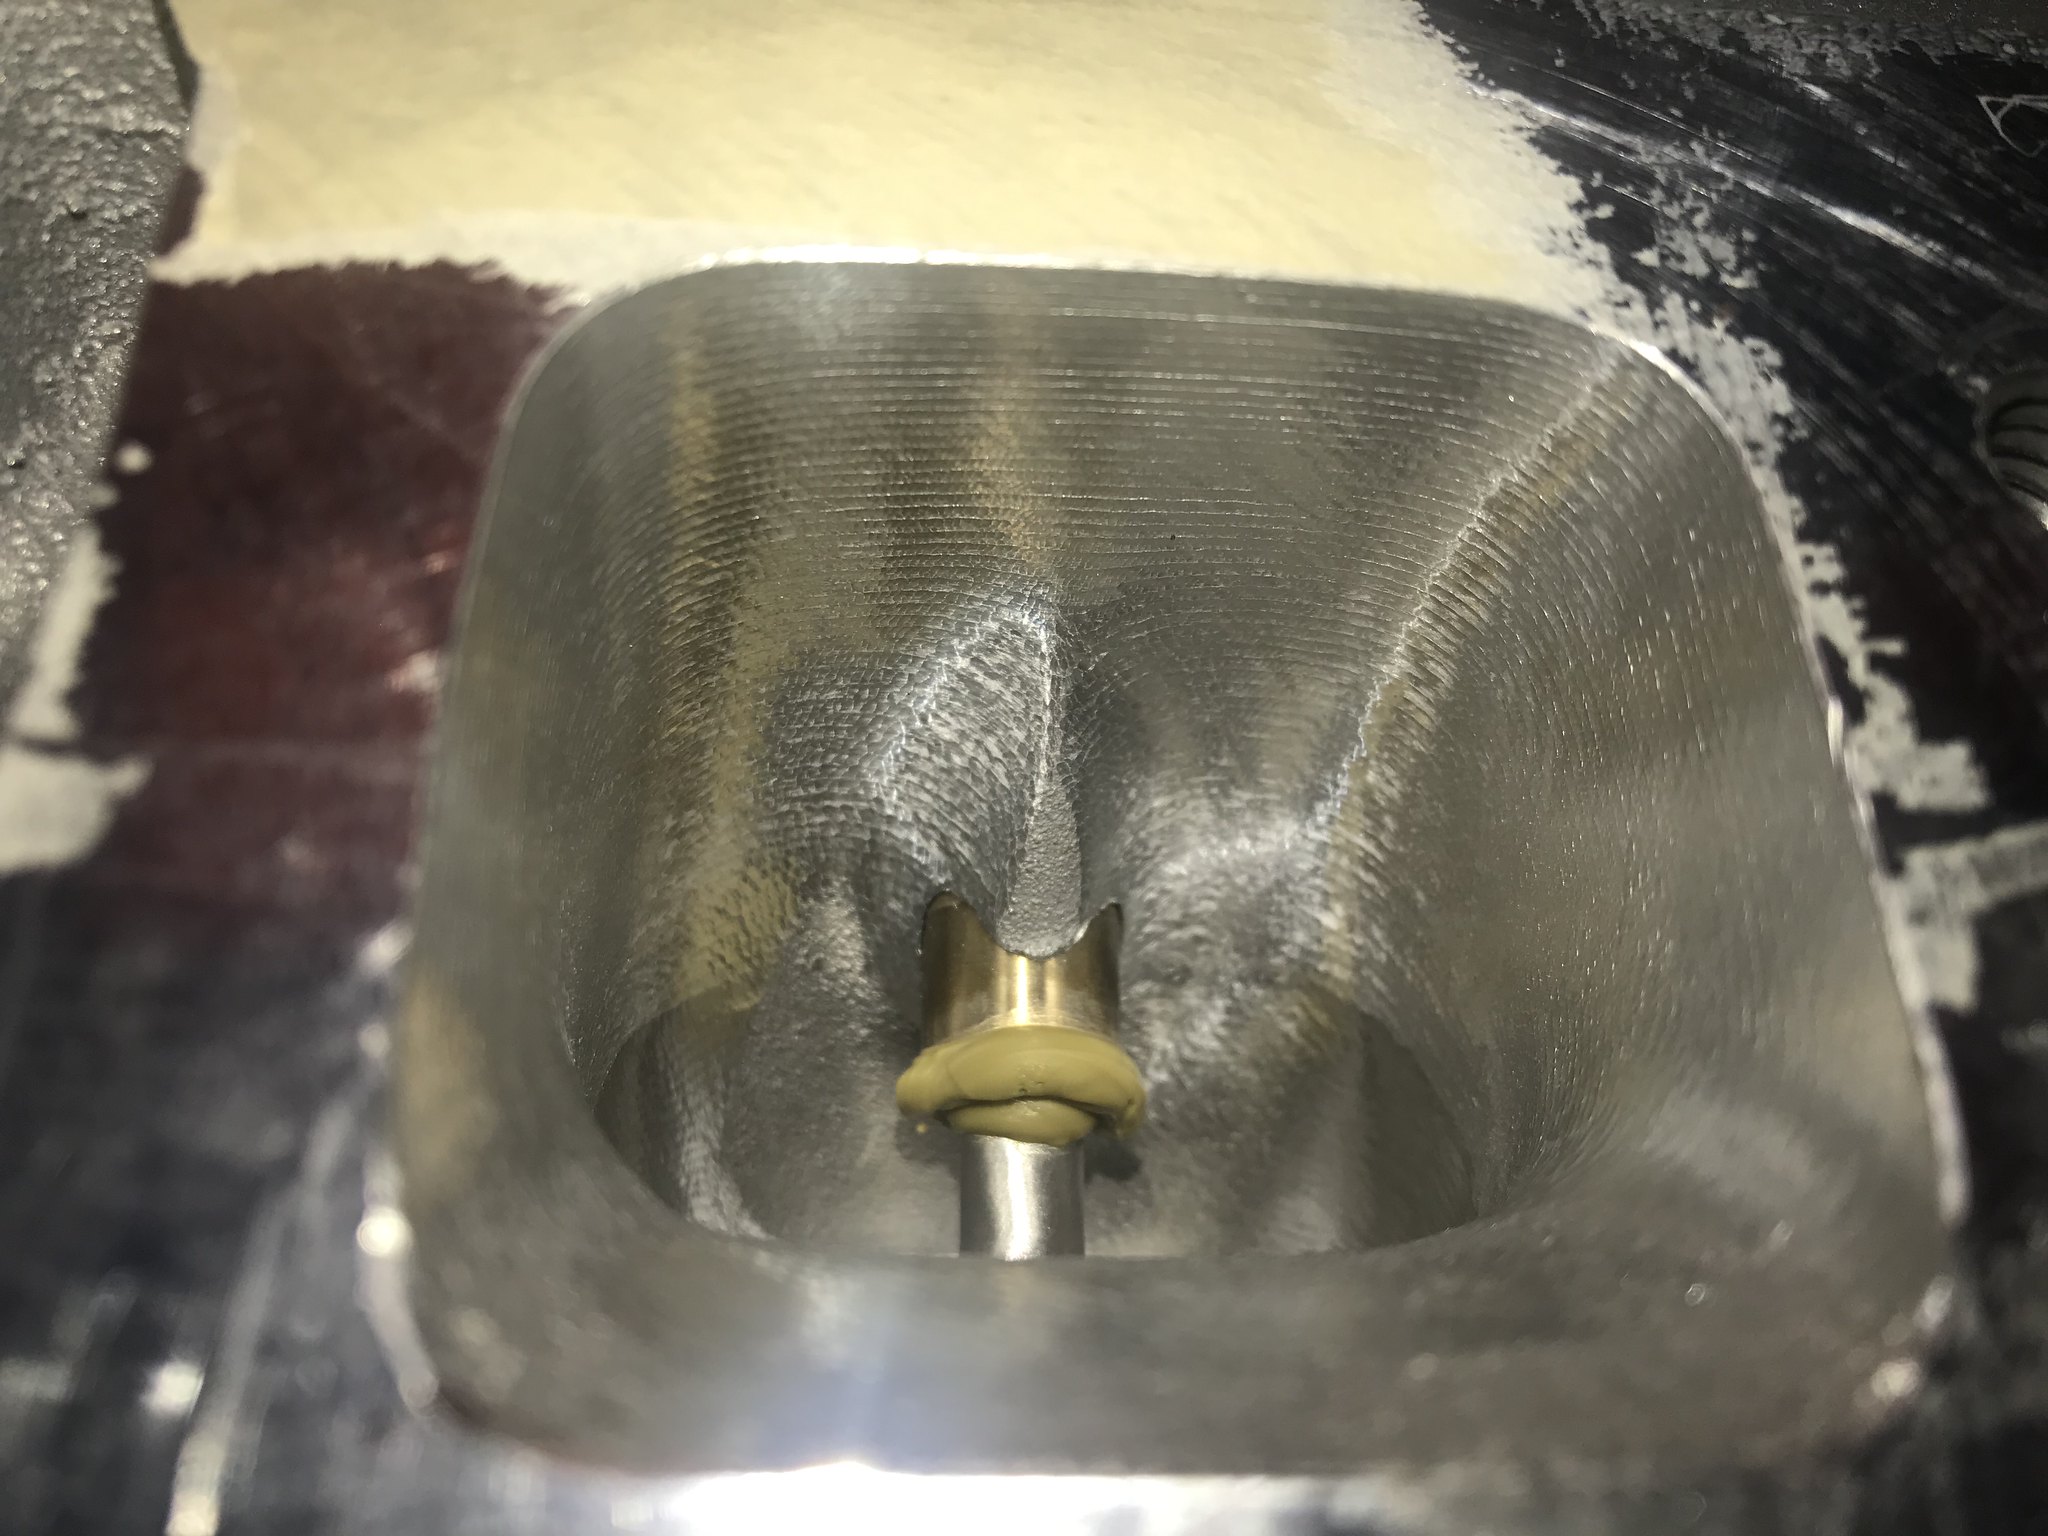
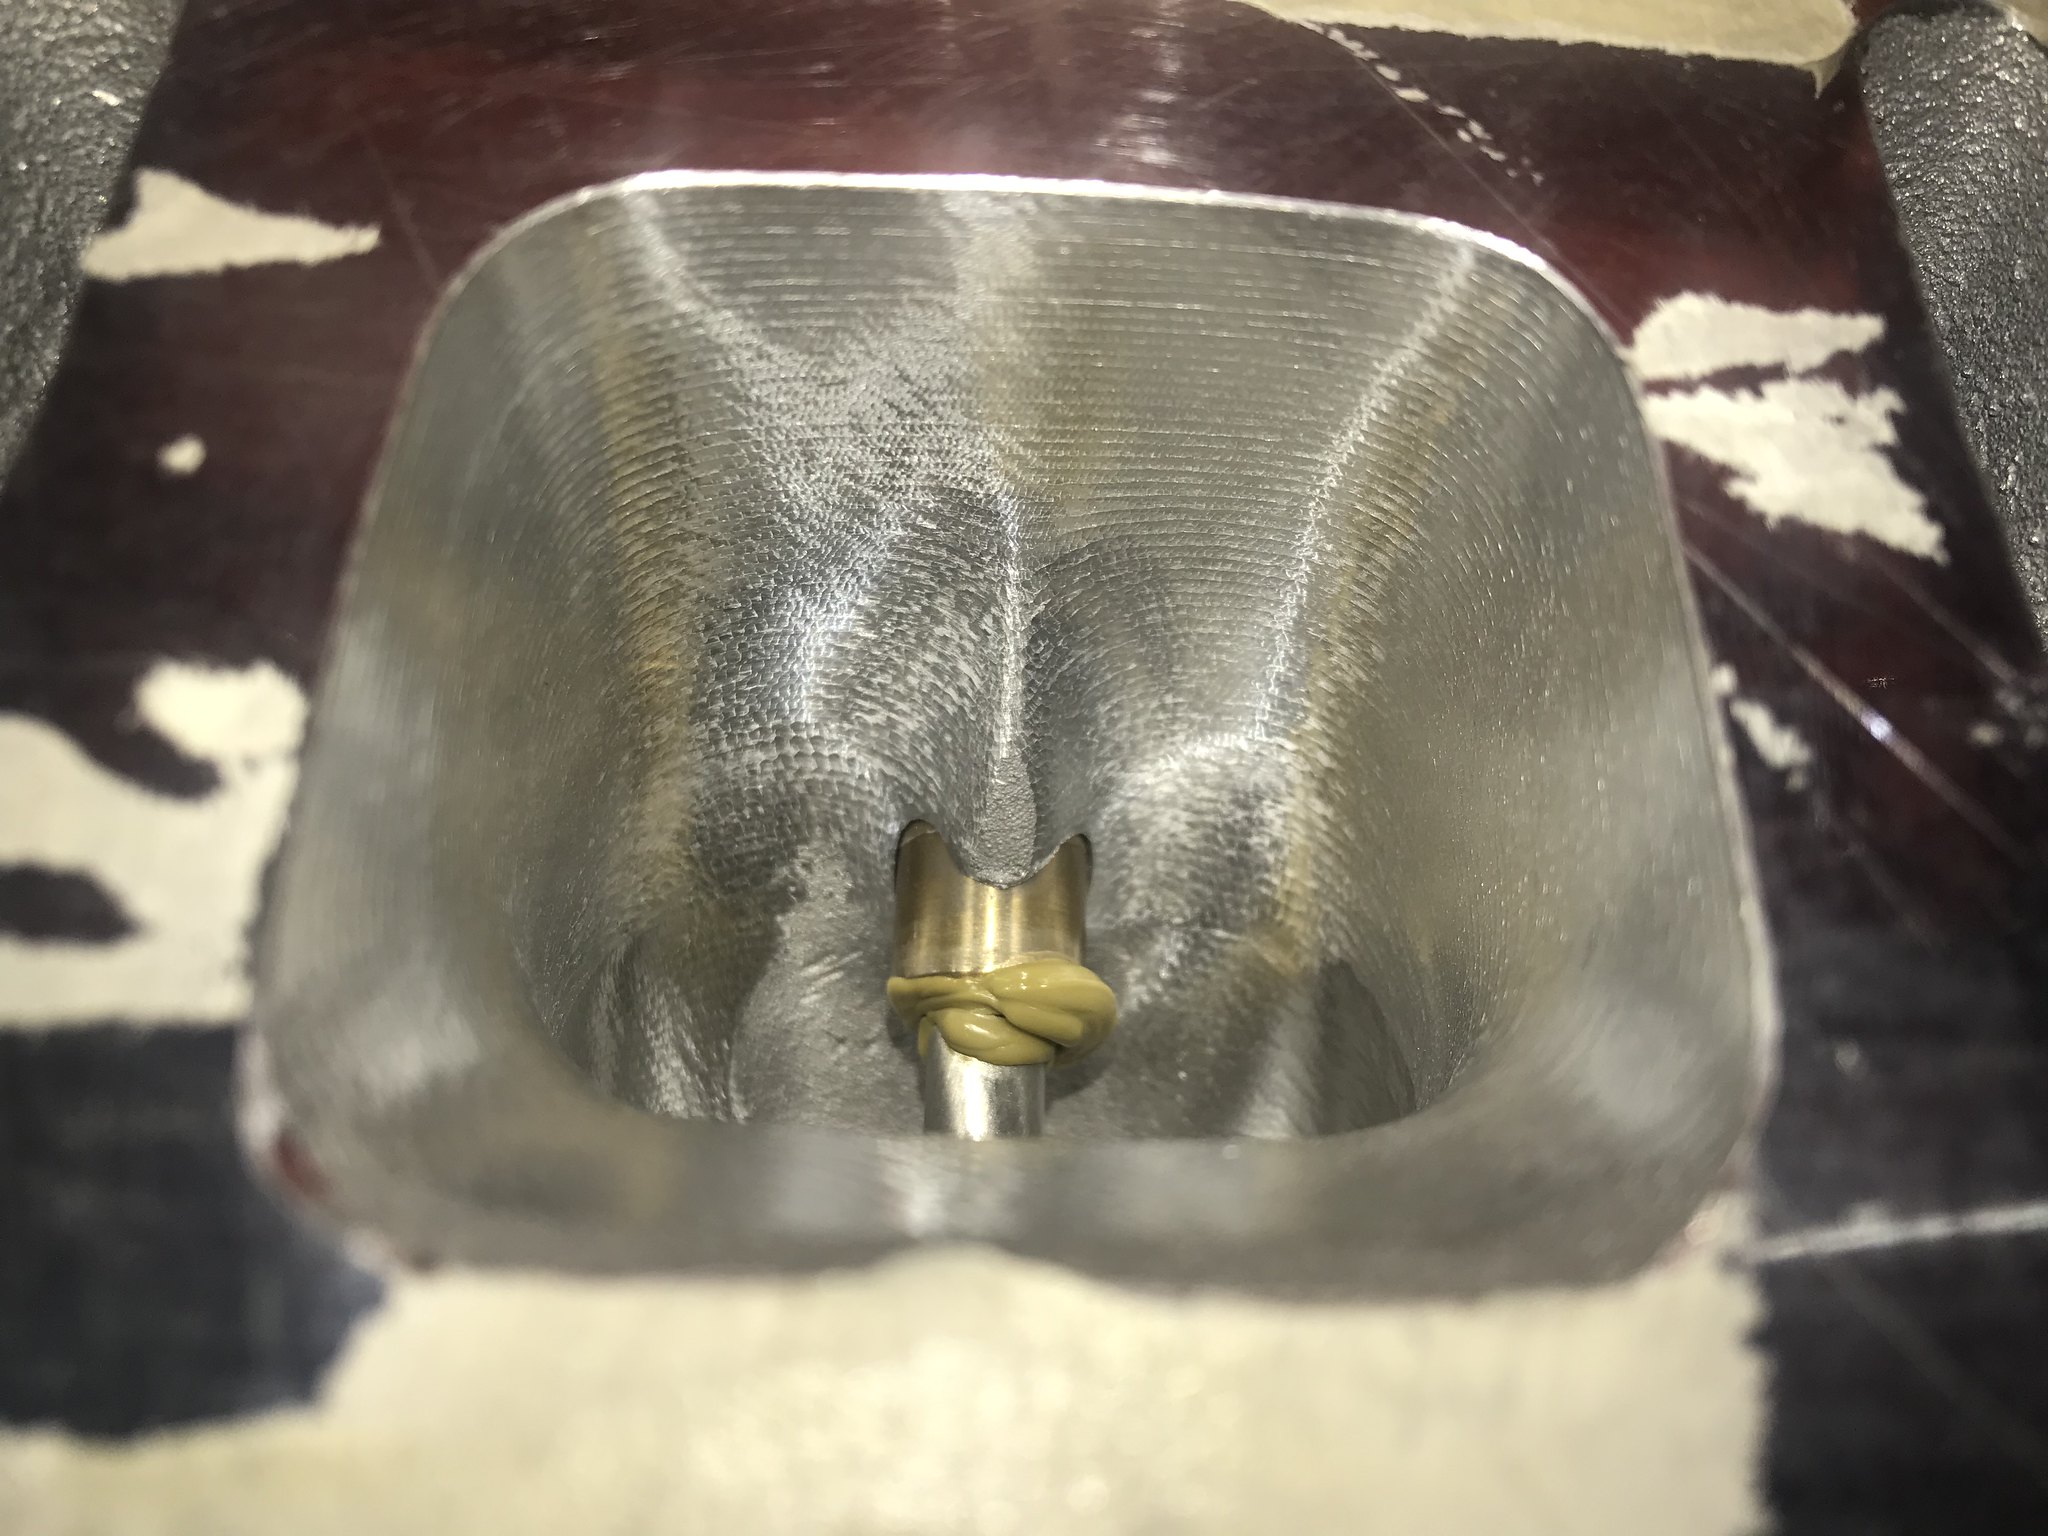
the yellow stuff on the valve guides/valves is assembly grease, correct ? or something special due to the heat there ? in other words, when burnt upon fire up, it won't stick to the valve stem and cause guide issues.
the yellow stuff on the valve guides/valves is assembly grease, correct ? or something special due to the heat there ? in other words, when burnt upon fire up, it won't stick to the valve stem and cause guide issues.
Originally Posted By an8sec70cuda
Probably white lithium grease. Most use that when the engine will sit for a while before startup.
I'll stick my finger in it later and let you guys know, but ya! Probably assembly lube of some sort.
laquer thinner on a rag, hold it on there, will take that tape residue right off....
Otherwise..NICE build !
Thanks! I'll try that first!
I won't use laquer thinner on any of my cars or motors painted surface Denatured alcohol works very well for removing tape residue without hurting the paint That tip was given to me by commercial house painter a long time ago, go buy a gallon and use it for that as well as cleaning new overspray on engines and other things that you want to clean stuff off of
Mr.Cab Racing and winning with Mopars since 1964. (Old F--t, Huh)
I searched for the starter terminal stuff here but did not find it, could you provide a link? Thanks, it looks awesome.
Plug these PNs into the Search by Part Number box. There is a $10 minimum so you'll end up with enough to do 2 or 3 starters. The starter I purchased is from O'reilley for a '98 RAM 1500 5.9, but I'm sure others will work. I found a lot of information on this board about starters with links to additional web forums. Sound like all brands are made in the same place.
laquer thinner on a rag, hold it on there, will take that tape residue right off....
Otherwise..NICE build !
Thanks! I'll try that first!
I won't use laquer thinner on any of my cars or motors painted surface Denatured alcohol works very well for removing tape residue without hurting the paint That tip was given to me by commercial house painter a long time ago, go buy a gallon and use it for that as well as cleaning new overspray on engines and other things that you want to clean stuff off of
I searched for the starter terminal stuff here but did not find it, could you provide a link? Thanks, it looks awesome.
Plug these PNs into the Search by Part Number box. There is a $10 minimum so you'll end up with enough to do 2 or 3 starters. The starter I purchased is from O'reilley for a '98 RAM 1500 5.9, but I'm sure others will work. I found a lot of information on this board about starters with links to additional web forums. Sound like all brands are made in the same place.
That tape was NASTY! It literally pulled the fingers off of my latex gloves. I had to go commando with a razor blade. After I got the big chunks off; I re-donned the latex gloves and hit it with scotch bright and denatured alcohol.
Cleaned out the threads in the heads, anti-seized the new header bolts, and am ready for the hard part (hopefully this weekend). Do I start with the easy side or hard side?
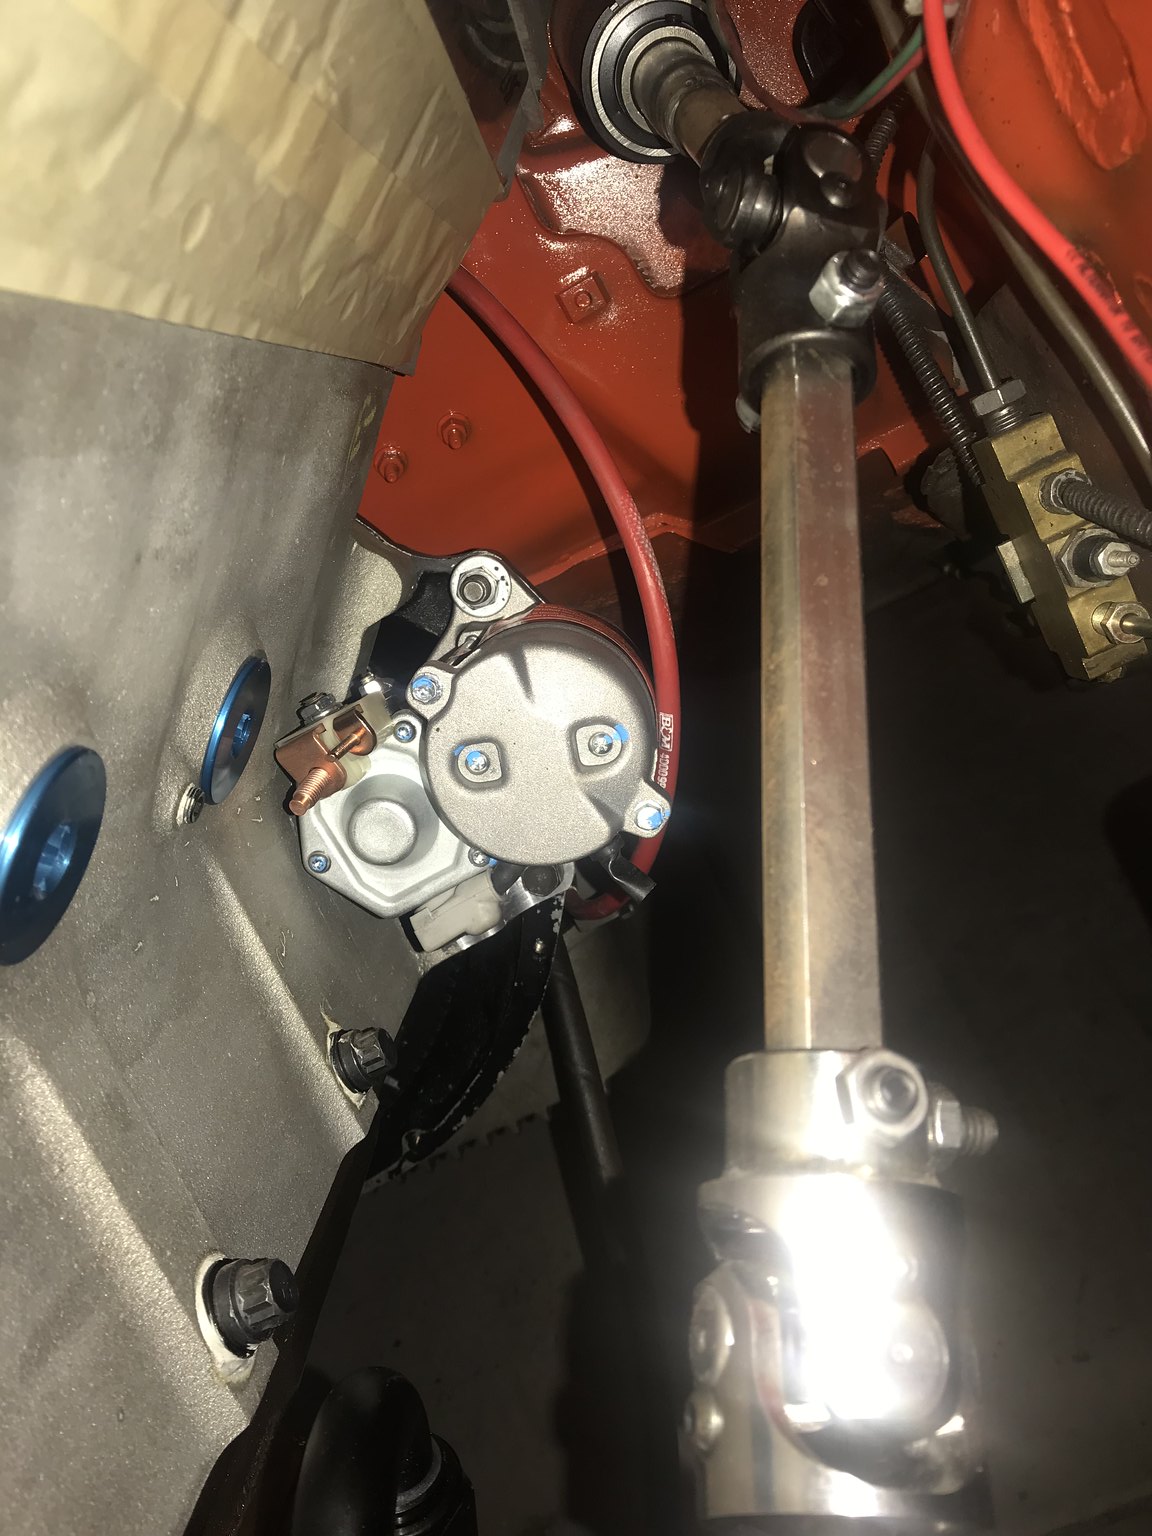
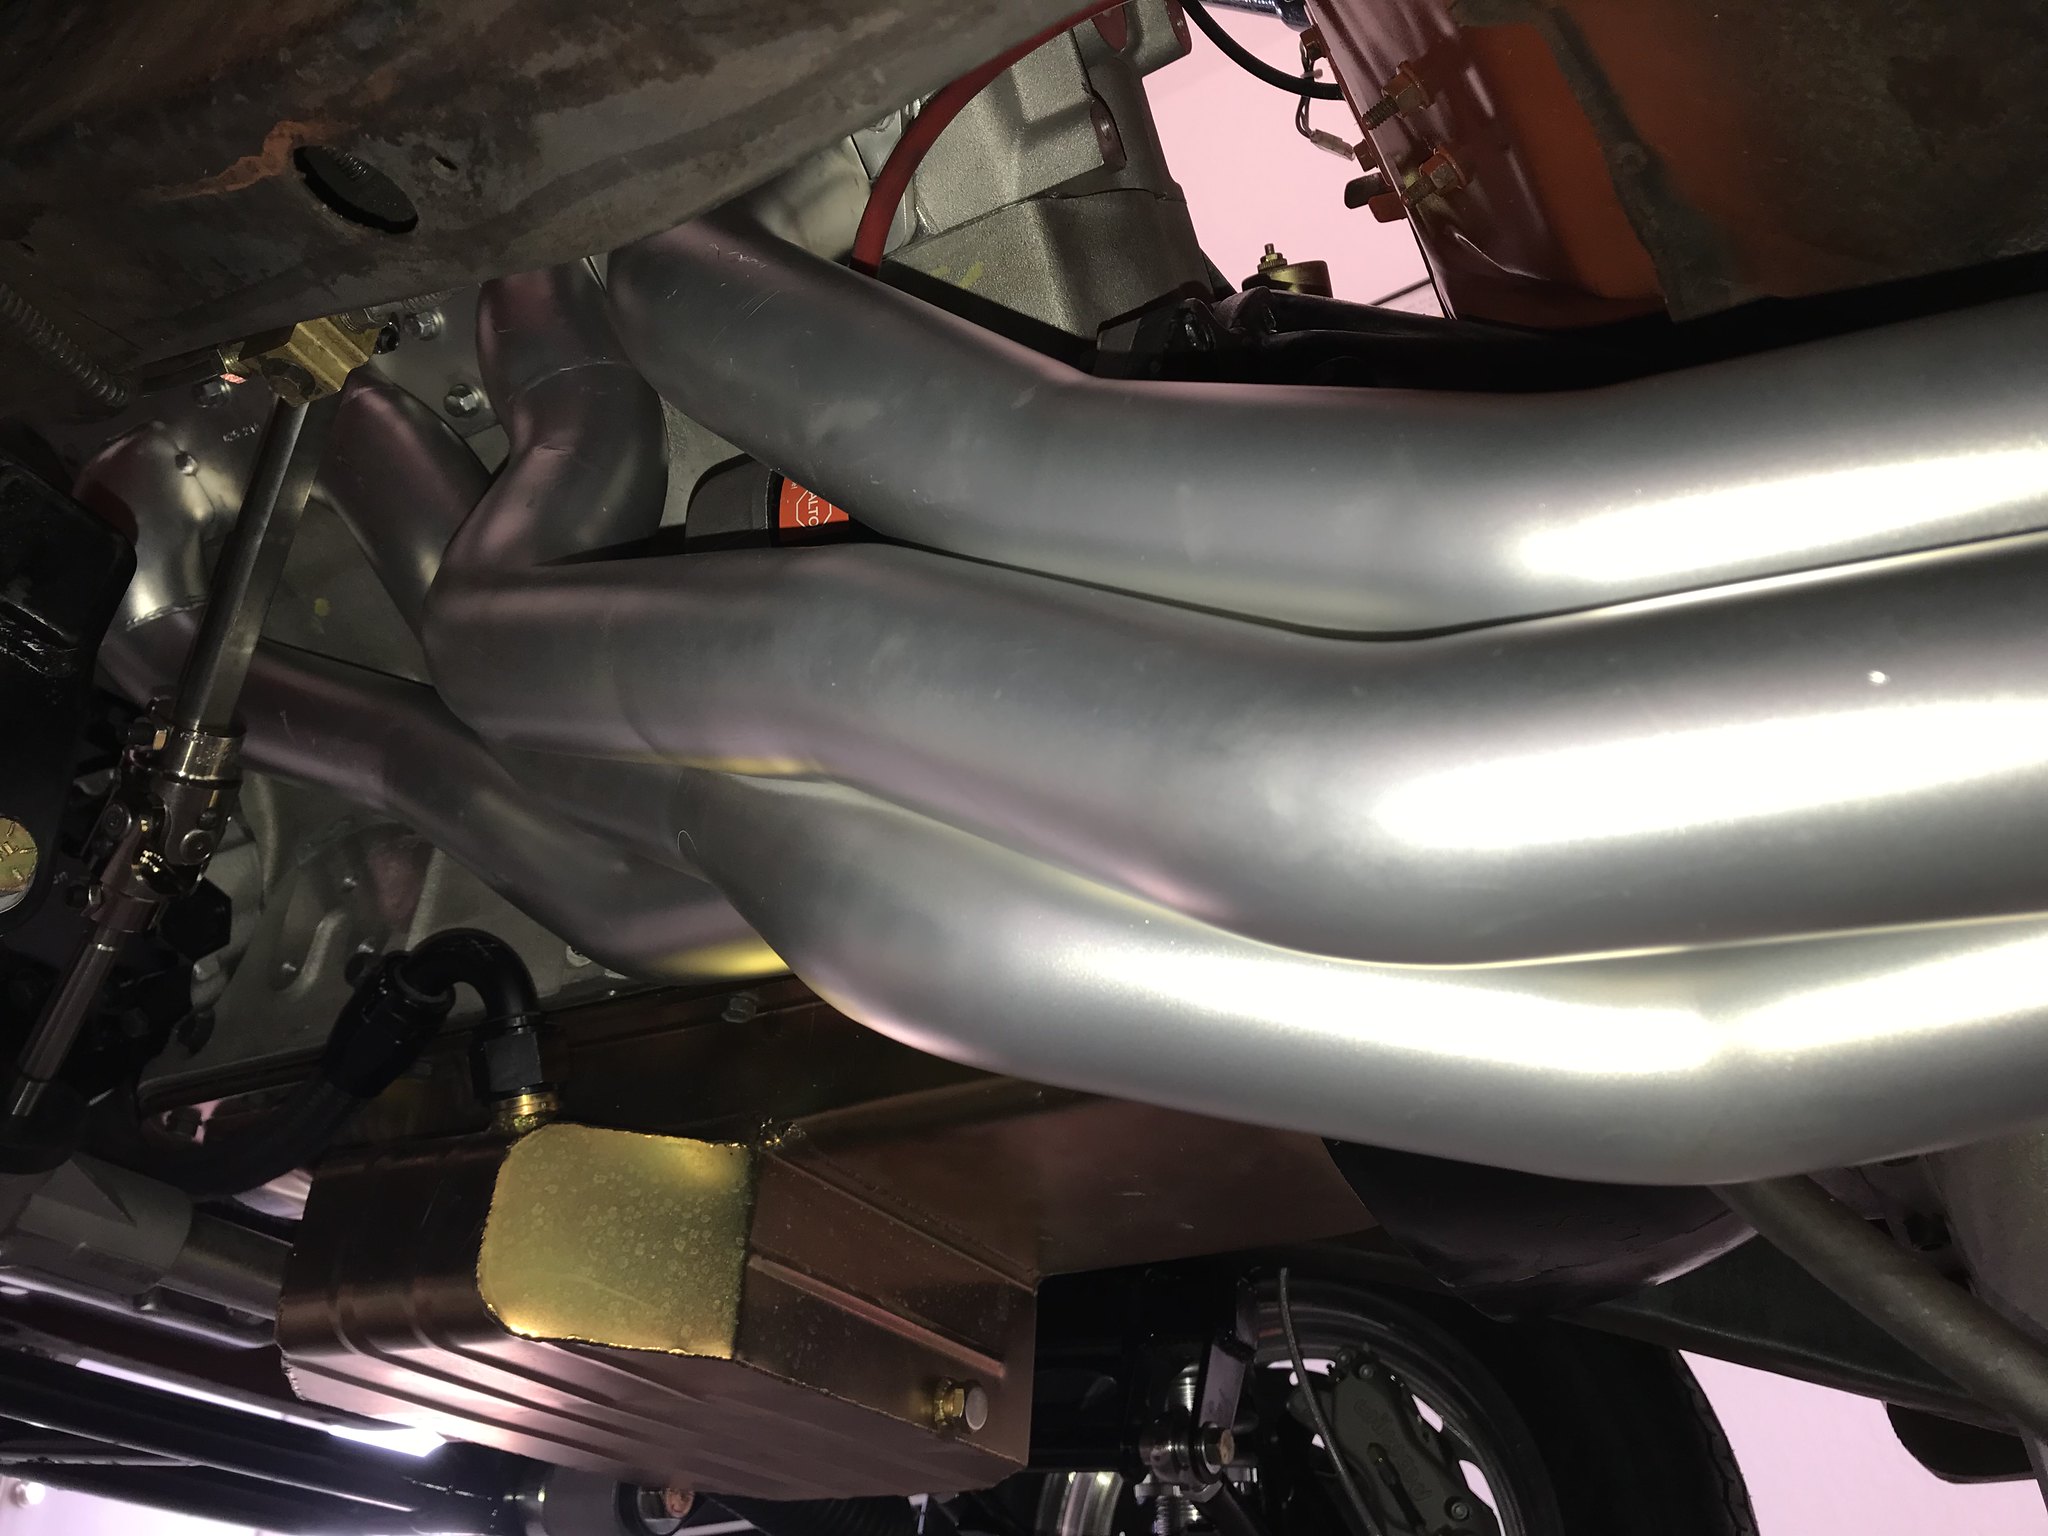
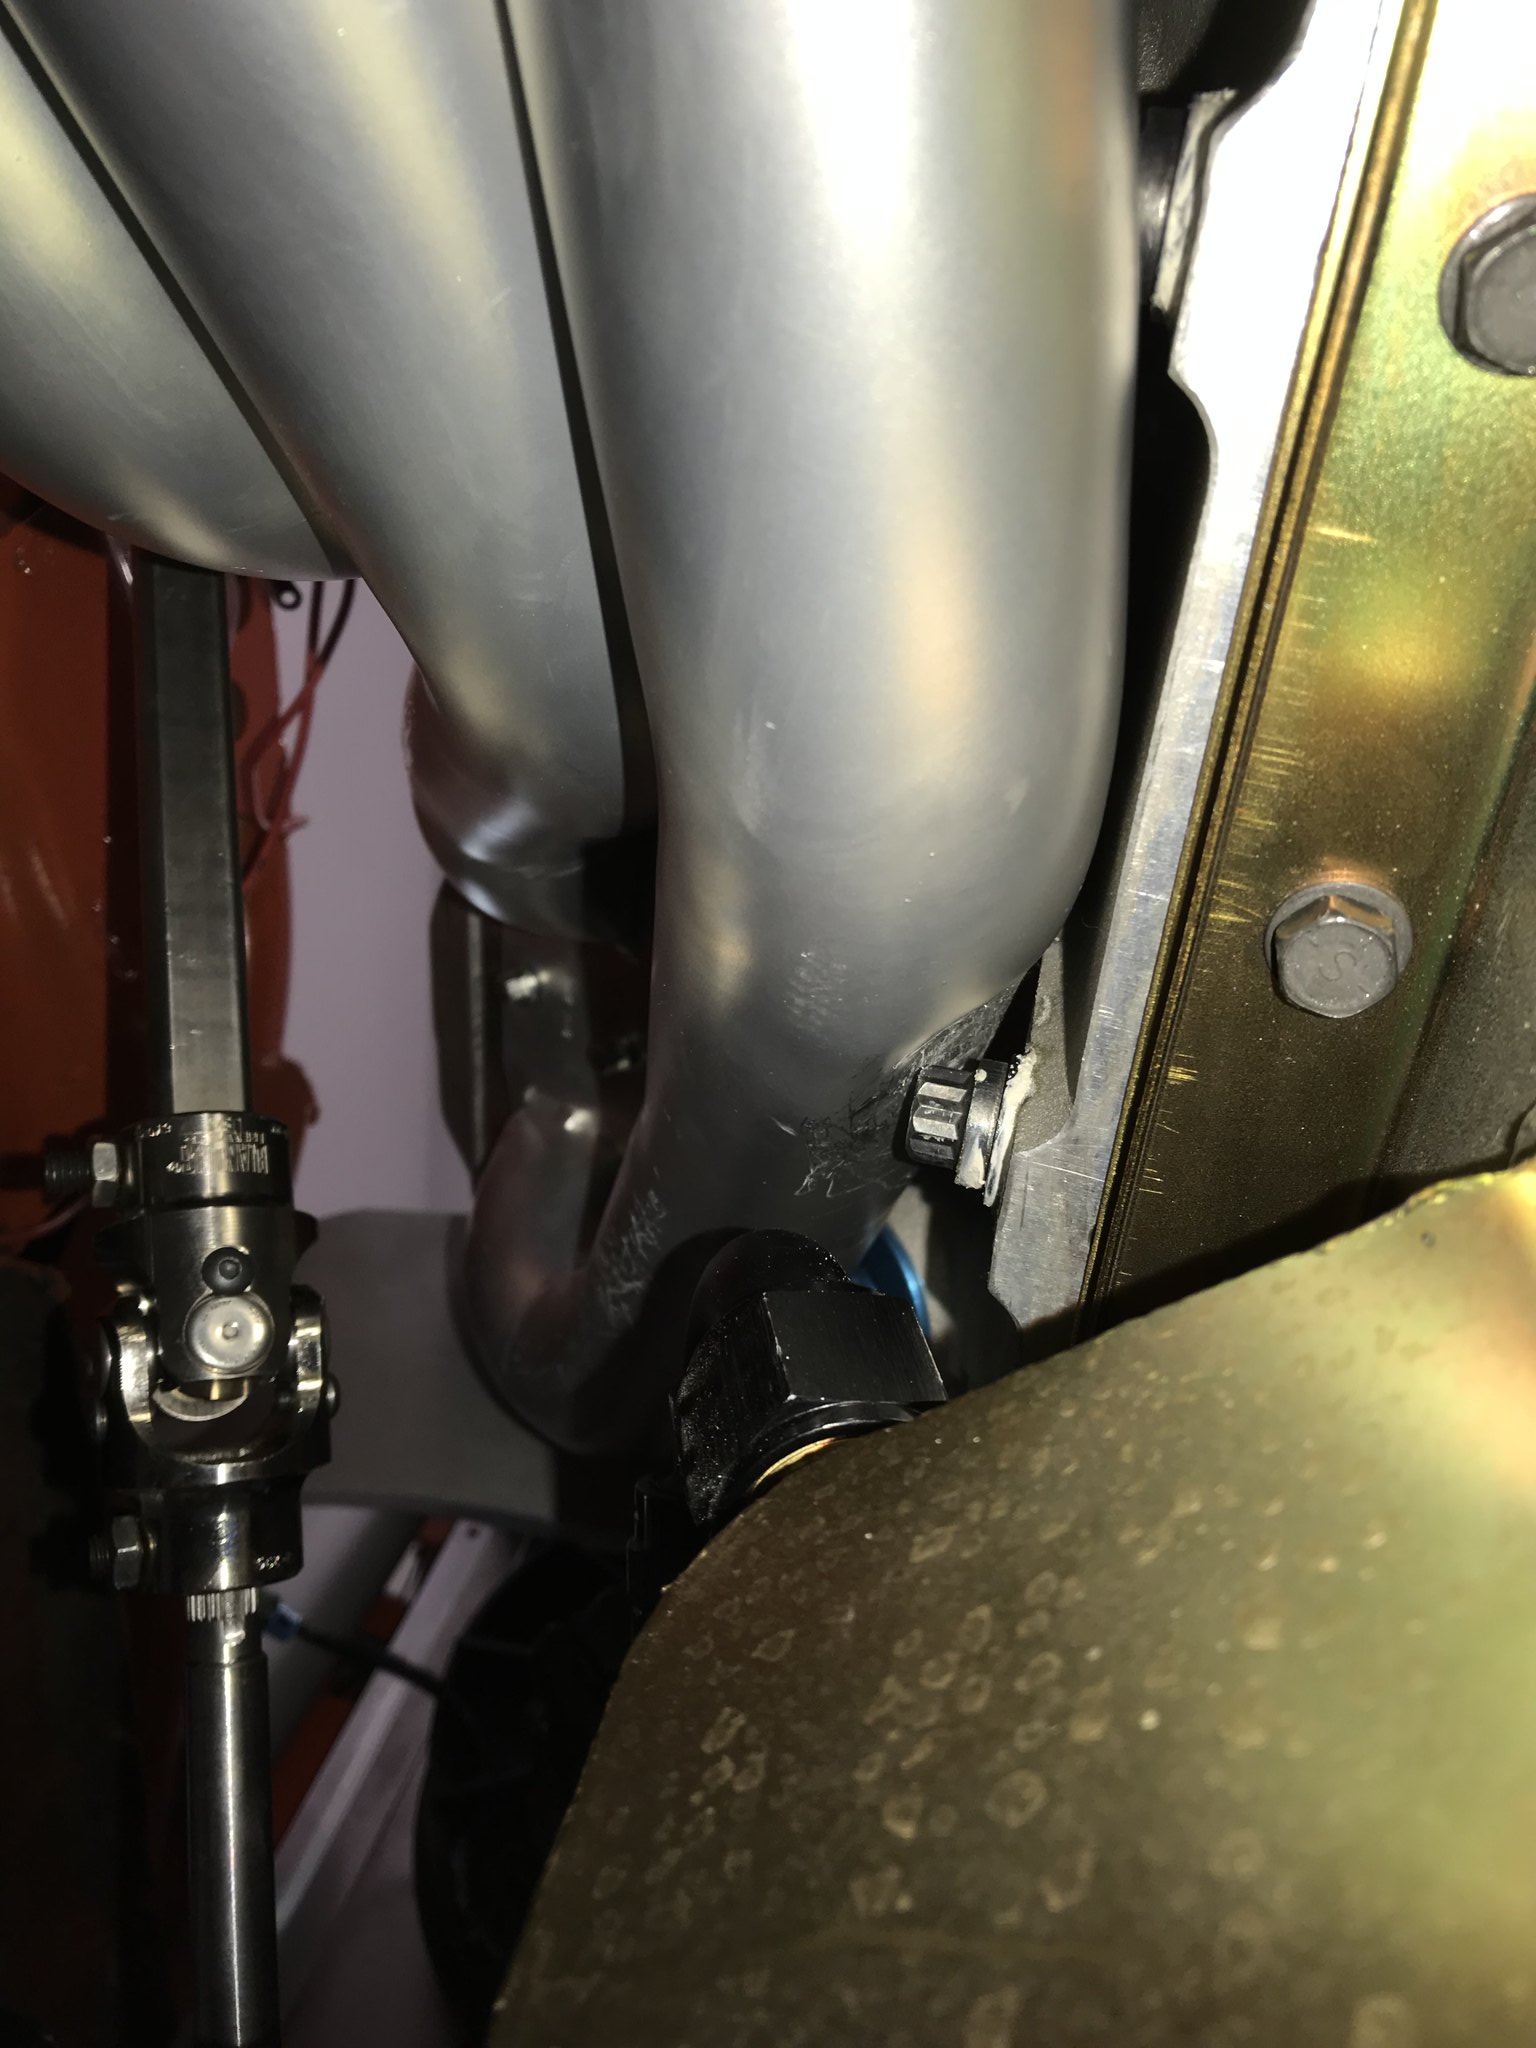
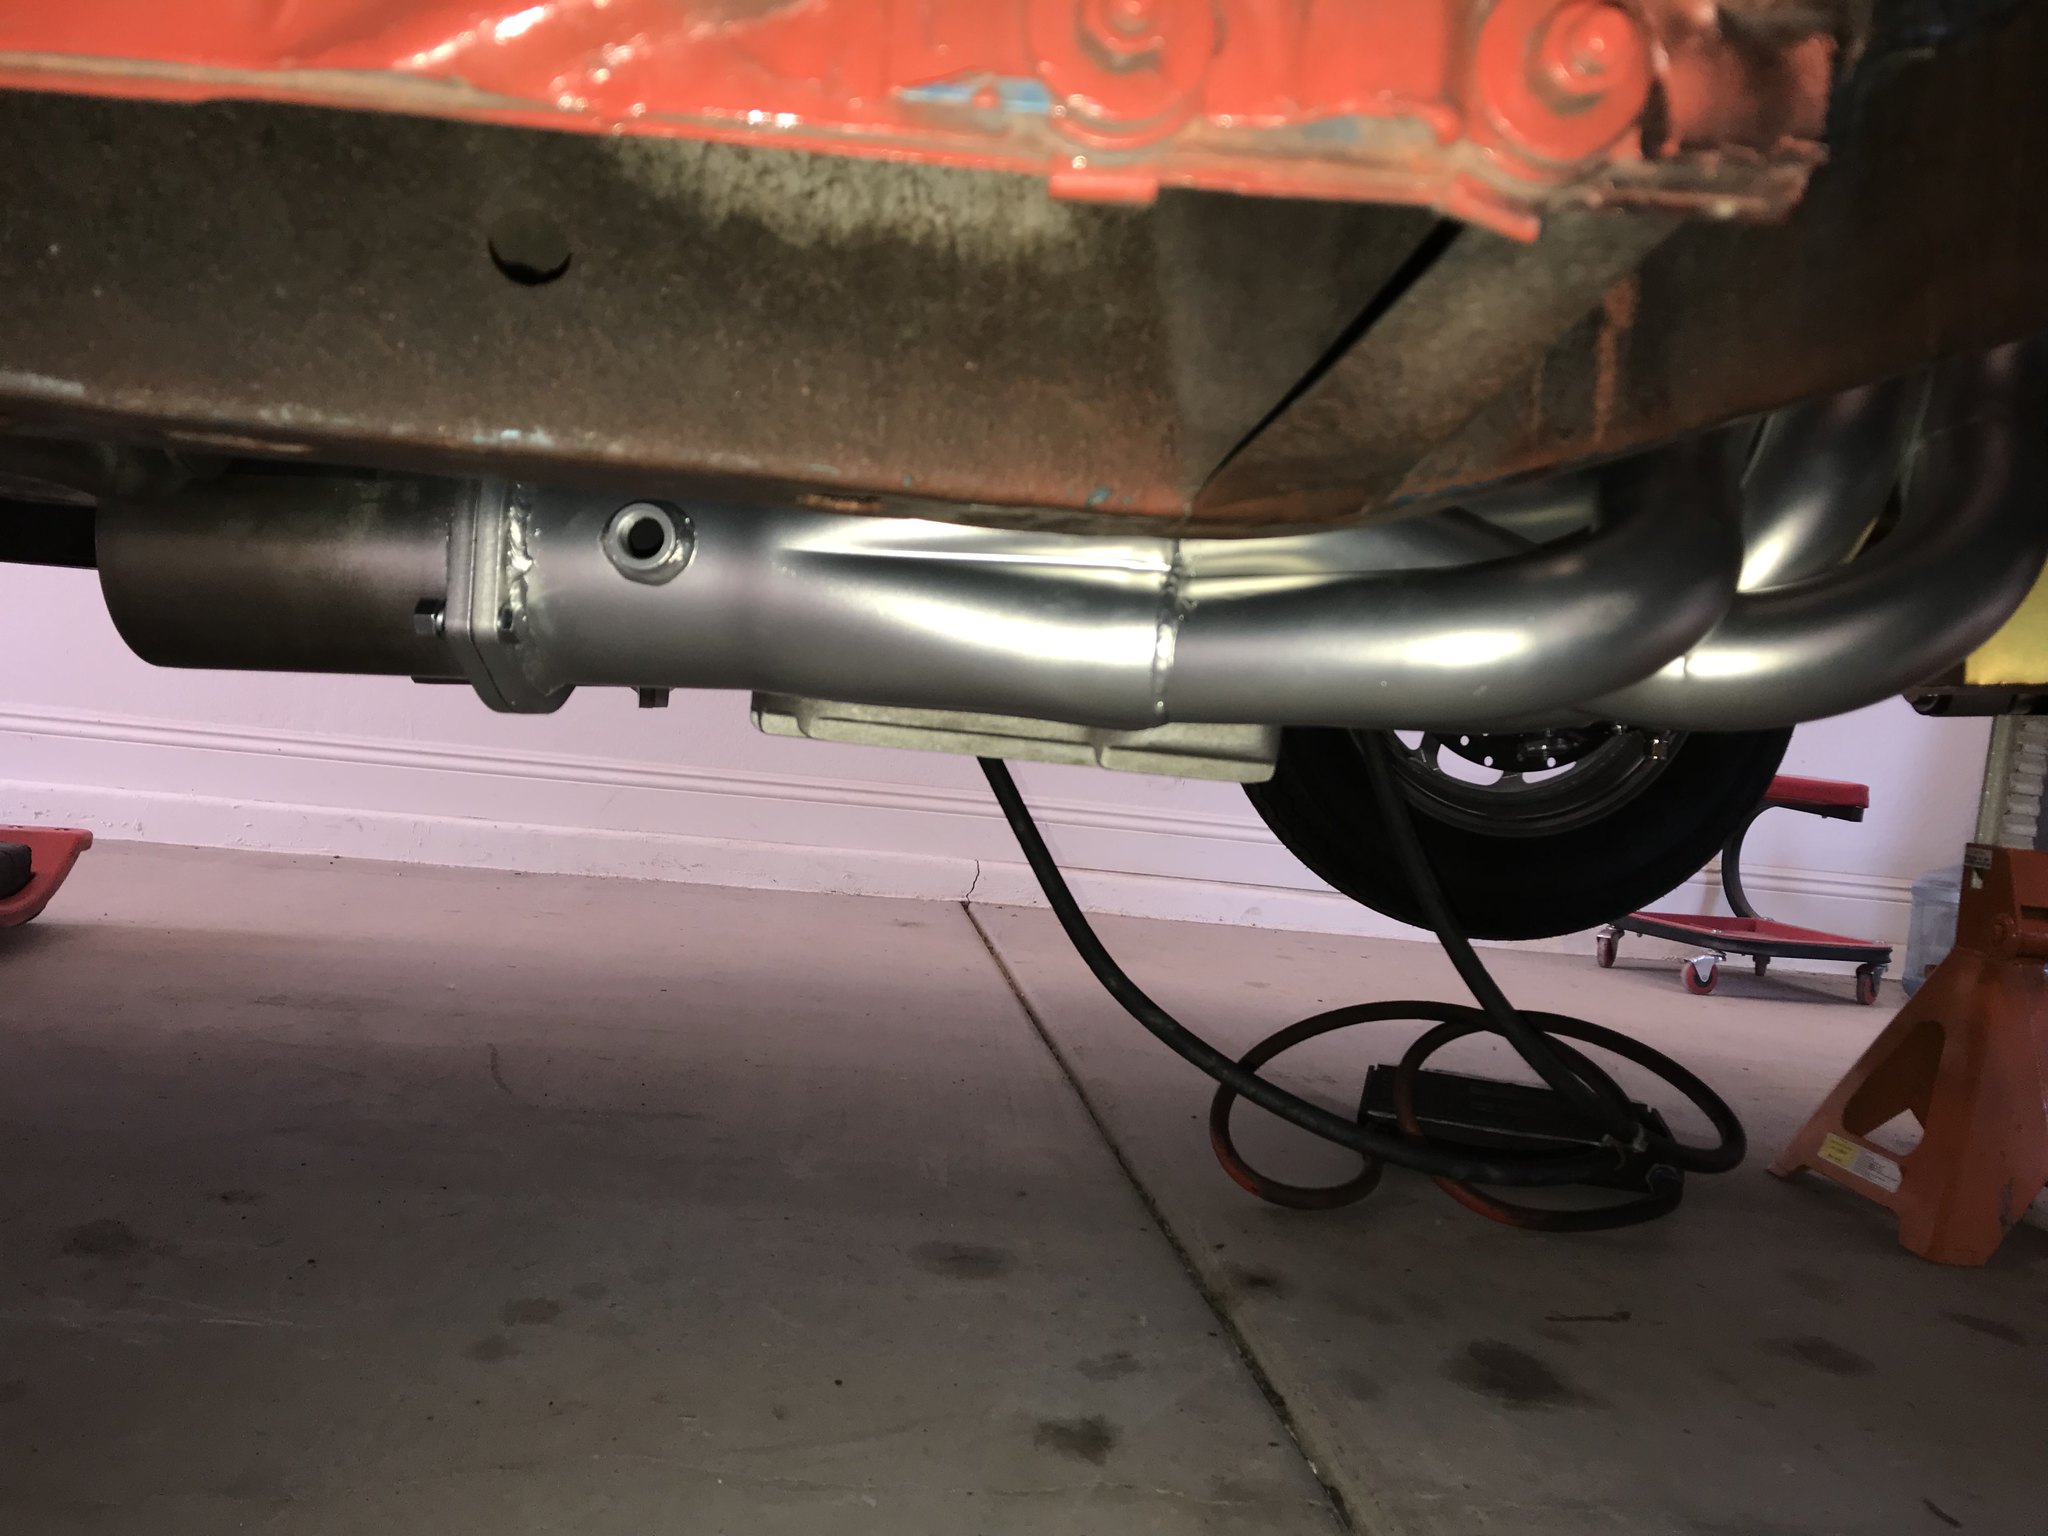
The "hard side" is in, and it was relatively uneventful with only minor scratches on the new pipes. I'm going to have to switch to a rear cable exit shifter as there is NO room for the cable. Luckily I ordered the 4 inch collectors as I wouldn't want to make things easy on myself once I start fabbing up the exhaust. Very tight clearances on 2 of the main cap cross bolts and tightening the starter bolts was a pain (about the same with the wedge).
I'm a little disappointed in the TTi Headers. I ran them on my wedge and that set was a bolt in and forget it. These HEMI headers...not so much!
After the initial install of the driver side, I noticed the cross bolts for the main caps hitting one of the primary tubes. Clearancing that tube allowed the header to shift causing the starter to hit. Once the starter tubes were dented up I gained clearance on the collector/cross member and everything seated nicely.
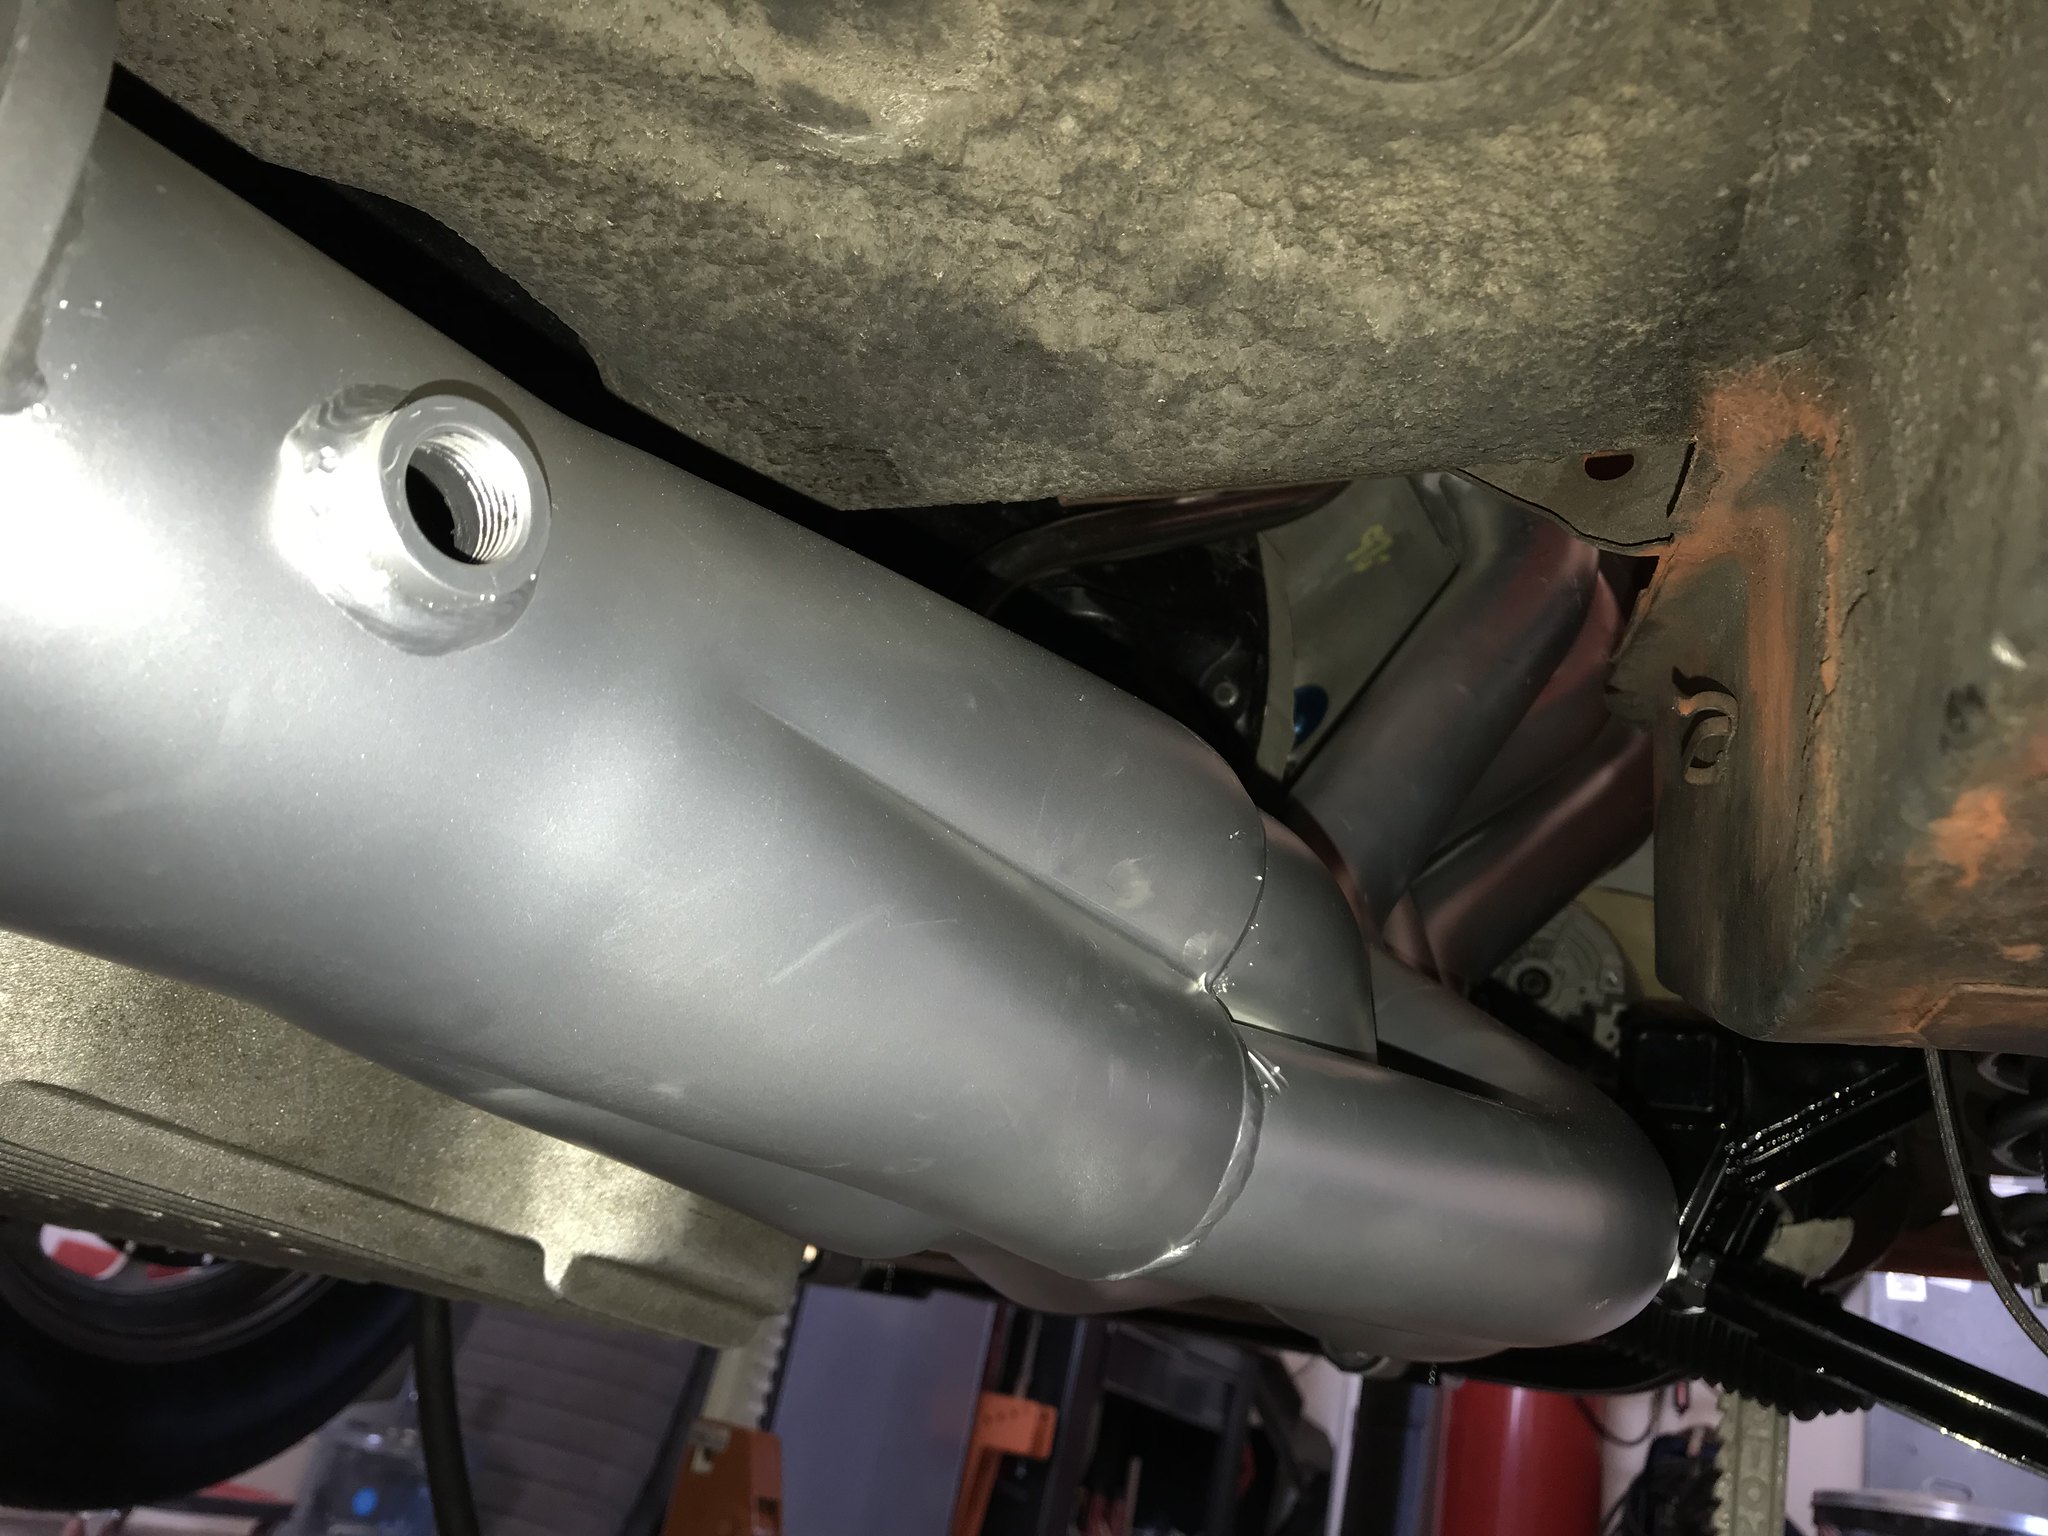
The passenger side was pretty much the same story. One tube hitting the main cap cross bolt, when clearanced the transmission hit one of the other tubes. Nothing like taking a rubber mallet to a brand new set of coated headers...
Finished product looks nice. The transmission pan actually sit lower than the headers.
On a side note; I went back through this thread and tried to fix all the dead instagram pics (what a pain in the rear!).
I have the 2.25" primary 4" collector TTI headers on mine. I had to dent one tube on the driver's side IIRC to clear one of the side main cap bolts. Had to clearance the passenger's side b/c it laid against the torsion bar. Not a big deal, but they fit great now, lol.
I can't be the only one who has to remove the shock to get the valve cover off am I? LOL
Even with studs removal sucks.
Nope, I forgot to mention that I have to take the shock loose and push the shock stud down out the way.
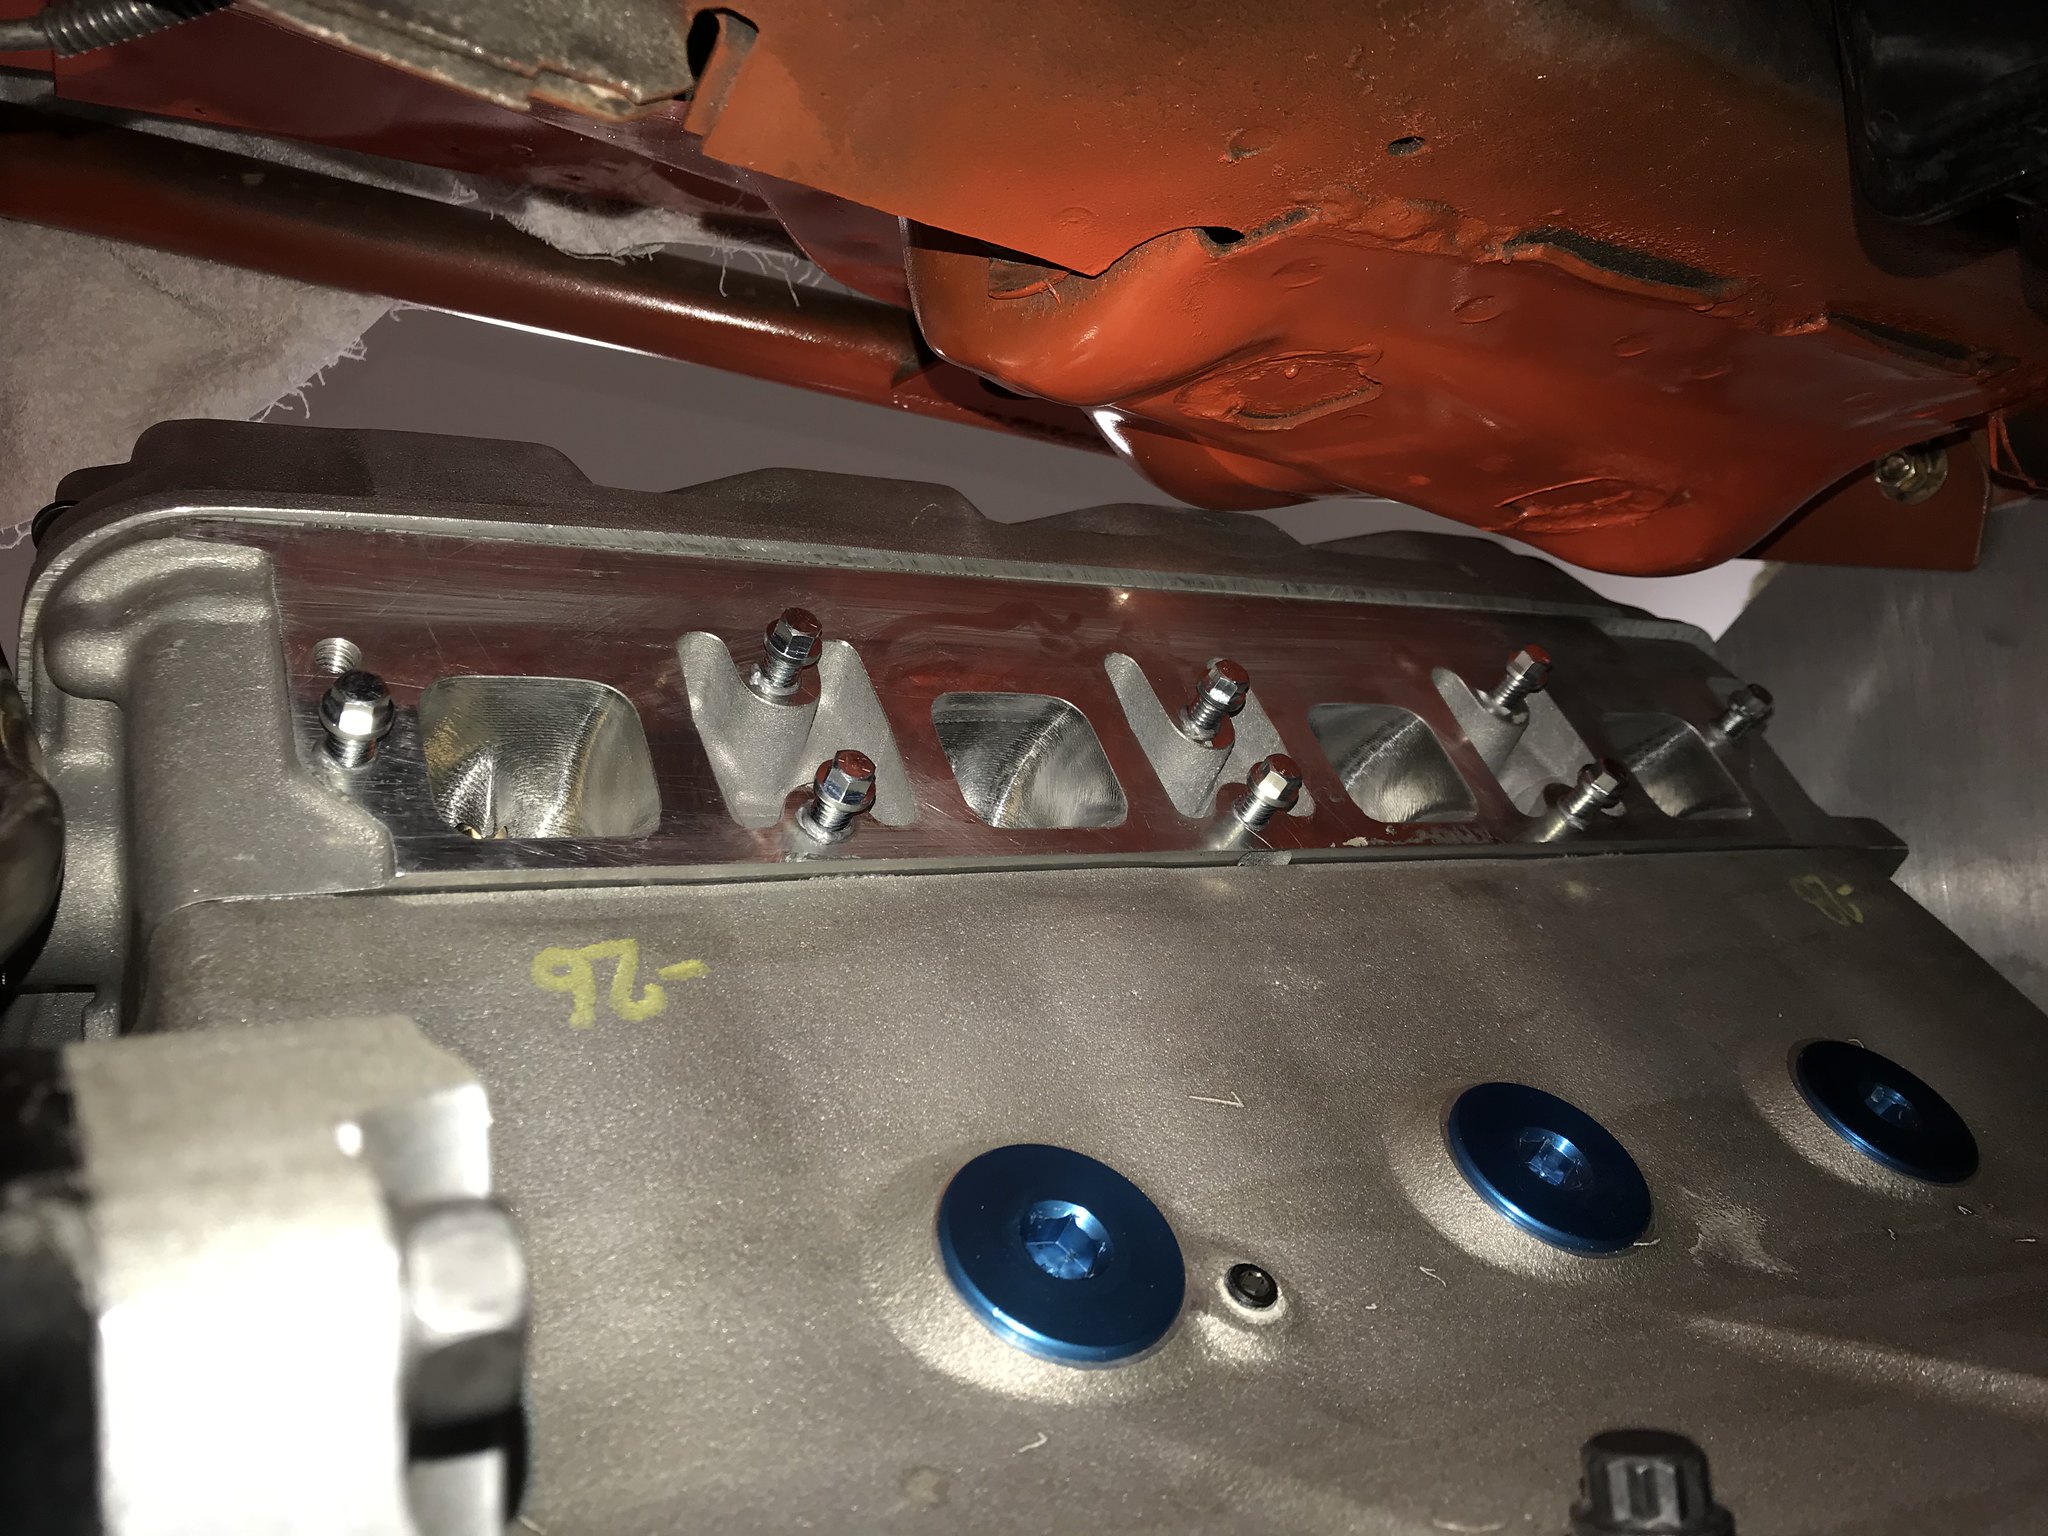
I'm waiting on parts and decided to revisit this today. Good news! The valve covers come off relatively easy. Bad news, I have a few questions:
I didn't like the breathers that came on my valve covers. I removed the tube that was welded to the cover and plan to replace it with a puch in style breather/gromet. However, the hole is a little large. Is there an oversized grommet or will I have to fab something?
What is the "trick" for spark plugs? I've had these in/out a few times and it's painful! I have to carefully spin by hand with lube and/or anti seeze trying to thread in straight. They always feel like they are cross-threading! The heads are Indy SR. I currently have 7 of the 8 in good, but left one loose as I got tired of trying to make it happy; knowing that it would have to come out later when I revisit the valve cover.
Last I knew, most Hooker products were from Mexico, but most of my info is outdated as I stopped paying much attention. Maybe the company purchase (doesn't Holley own them now?) put pressure on them to cheapen things up, like almost everything else these days.
This might sound stupid but my favorite breather grommet is OEM Mopar number 2946079. It's a little bit larger than the usual aftermarket stuff, and fits the 1970+ style breathers with the tube.
I had no luck keeping a pair of breathers on the valve covers from putting oil everywhere on my 572. Tried different styles of breathers, baffled fittings, even wire mesh in the tubes, extending the tubes, etc. I put a vacuum pump on it and it works good, but in hindsight I'd just run a pair of -10 lines, one on each cover, to a breather tank and call it good.
Sounds like the threads on that one cylinder are a little rough or sharp at the top causing the plug to be a pain to start. I just use a long extension and they thread in pretty easily.
That's what I'm doing! I found an oversized grommet online to fill the hole. Minimum purchase of 10, so I have a few spares for down the road.
I'm going to try the last sticky plug with the valve cover off to make sure it's going in straight. Just don't want to mess up my engine before I get a chance to start it! Thanks everyone!
Gotcha...for some reason I thought you were going to run breathers on the covers. A better option than the grommets is to weld some -10 male fittings onto the covers.
The new grommets came in and work great! I ordered a nice filler cap for the other side from Hughes and am tossing around the idea of doing wrinkle black on the valve covers with an Air Grabber air cleaner and HEMI sticker.
What hood are you planning on using? And who makes that air cleaner? Thanks
I don't know on the hood. Air Cleaner is from PG Classics. I modified a stock one for the 4500. It's a metal base, not fiberglass like others I've seen.
I managed to get one side of the exhaust buzzed up. Waiting on a couple bends for the other side. I went under the axle as I mentioned in a separate thread. This is the first time the car has had exhaust past the rear axle in ~20 years... May have to install a stereo if it works out!
What are you doing to allow the motor to breathe? I see one outlet with no inlet for breathing I would and do use a PCV on all my non vacuum pump motors to help suck moisture out of them as well as allow the motor to breath when revved up above 3000 RPM
Mr.Cab Racing and winning with Mopars since 1964. (Old F--t, Huh)
What are you doing to allow the motor to breathe? I see one outlet with no inlet for breathing I would and do use a PCV on all my non vacuum pump motors to help suck moisture out of them as well as allow the motor to breath when revved up above 3000 RPM
PVC valve connected to a Jegs Breather tank on one valve cover.
That hood looks great, as you know I have a cowl hood, 2nd gen Chargers are the most difficult car to find a scoop that looks good, the car is so AWESOME looking stock, I did the cowl for cool air & hood clearance, it works very well, but as far as LOOKS go the hood you posted is the best LOOKING hood I have seen on a 2nd gen, it has that 3rd gen bulge hood look.
1968 Charger COLD A/C Hilborn EFI 512ci 9.7 compression, Stealth heads, 4.10 gear A518 ODtrans 4100lb,10.93 full street car trim 2020 T/A 392 Stock 11.79 @ 114.5
Out with the old...! I needed a rear exit shifter with the new elephant pretty much eliminating any possibility of running a shifter cable through the engine compartment.
I've been fighting with the PPP bracket that connects the cable to the transmission. I ordered the one for use with a blanket and it flat out won't fit. It hits the floor and required so much trimming that it compromised the structure. Even after my hack job the bolt holes won't align up due to the cast transmission pan. Absolute junk in my opinion. I wrestled with the idea if Sh%&-canning the entire shifter set up, but JBODY replied to my "help" post with a really cool idea for a bracket (apparently I'm not the only one with this problem). Here's my "junk" solution; I hope it helps others. I went off the top of the rear "ear" of the transmission (JBODY went under). I don't think it matters as long as the cable doesn't bind. "All-in-all" I hit all gears and PARK smoothly with no binding. If you order PPP, buy the cheapest bracket possible as it is just used as a template for your fab work (still kind of pi$$ed about that one).
Prepping for my new "Thumper Carb!" Fuel lines are supposed to be good for ~10 years. Mine are12+, stiff, and cracking! Made a front mount for my regulators.
Does this combination benefit from the adapter setup from a power standpoint, or is it more a case of making it all work together?
MuscleMotors said it makes more power. I did some research for both NA and Nitrous and there is a lot of support for the combination. I'm going to give it hell and see what it runs before I second guess MM. I modified the Air Grabber Air Cleaner to work with the new Thumper Carb today. I'll post some pics tomorrow or Saturday when the new Glasstek hood arrives!
Thank you, good info. I have the same manifold, maybe mine would benefit from similar induction.
Indy offers a similar setup in their catalog. I posted the question on here before, but didn’t get any replies from people that tried it.
That looks like a hand grenade with the pin out waiting to be thrown I have a bunch of NOS parts I've never used and may not ever use I'll probably go with a blower or turbo set up instead
Mr.Cab Racing and winning with Mopars since 1964. (Old F--t, Huh)
I've run up to a 200 shot on a factory crank and rods. Both MoparBilly and Monte gave me some pointers via PM(s) on this board and the old MoparChat, but I'm no expert. This new Hemi stands a chance of pushing my car to the limits of the chassis without nitrous. No-Prep 8th mile racing is getting popular out here in AZ. I'm keeping the old nitrous set up on the car until I see how it runs.
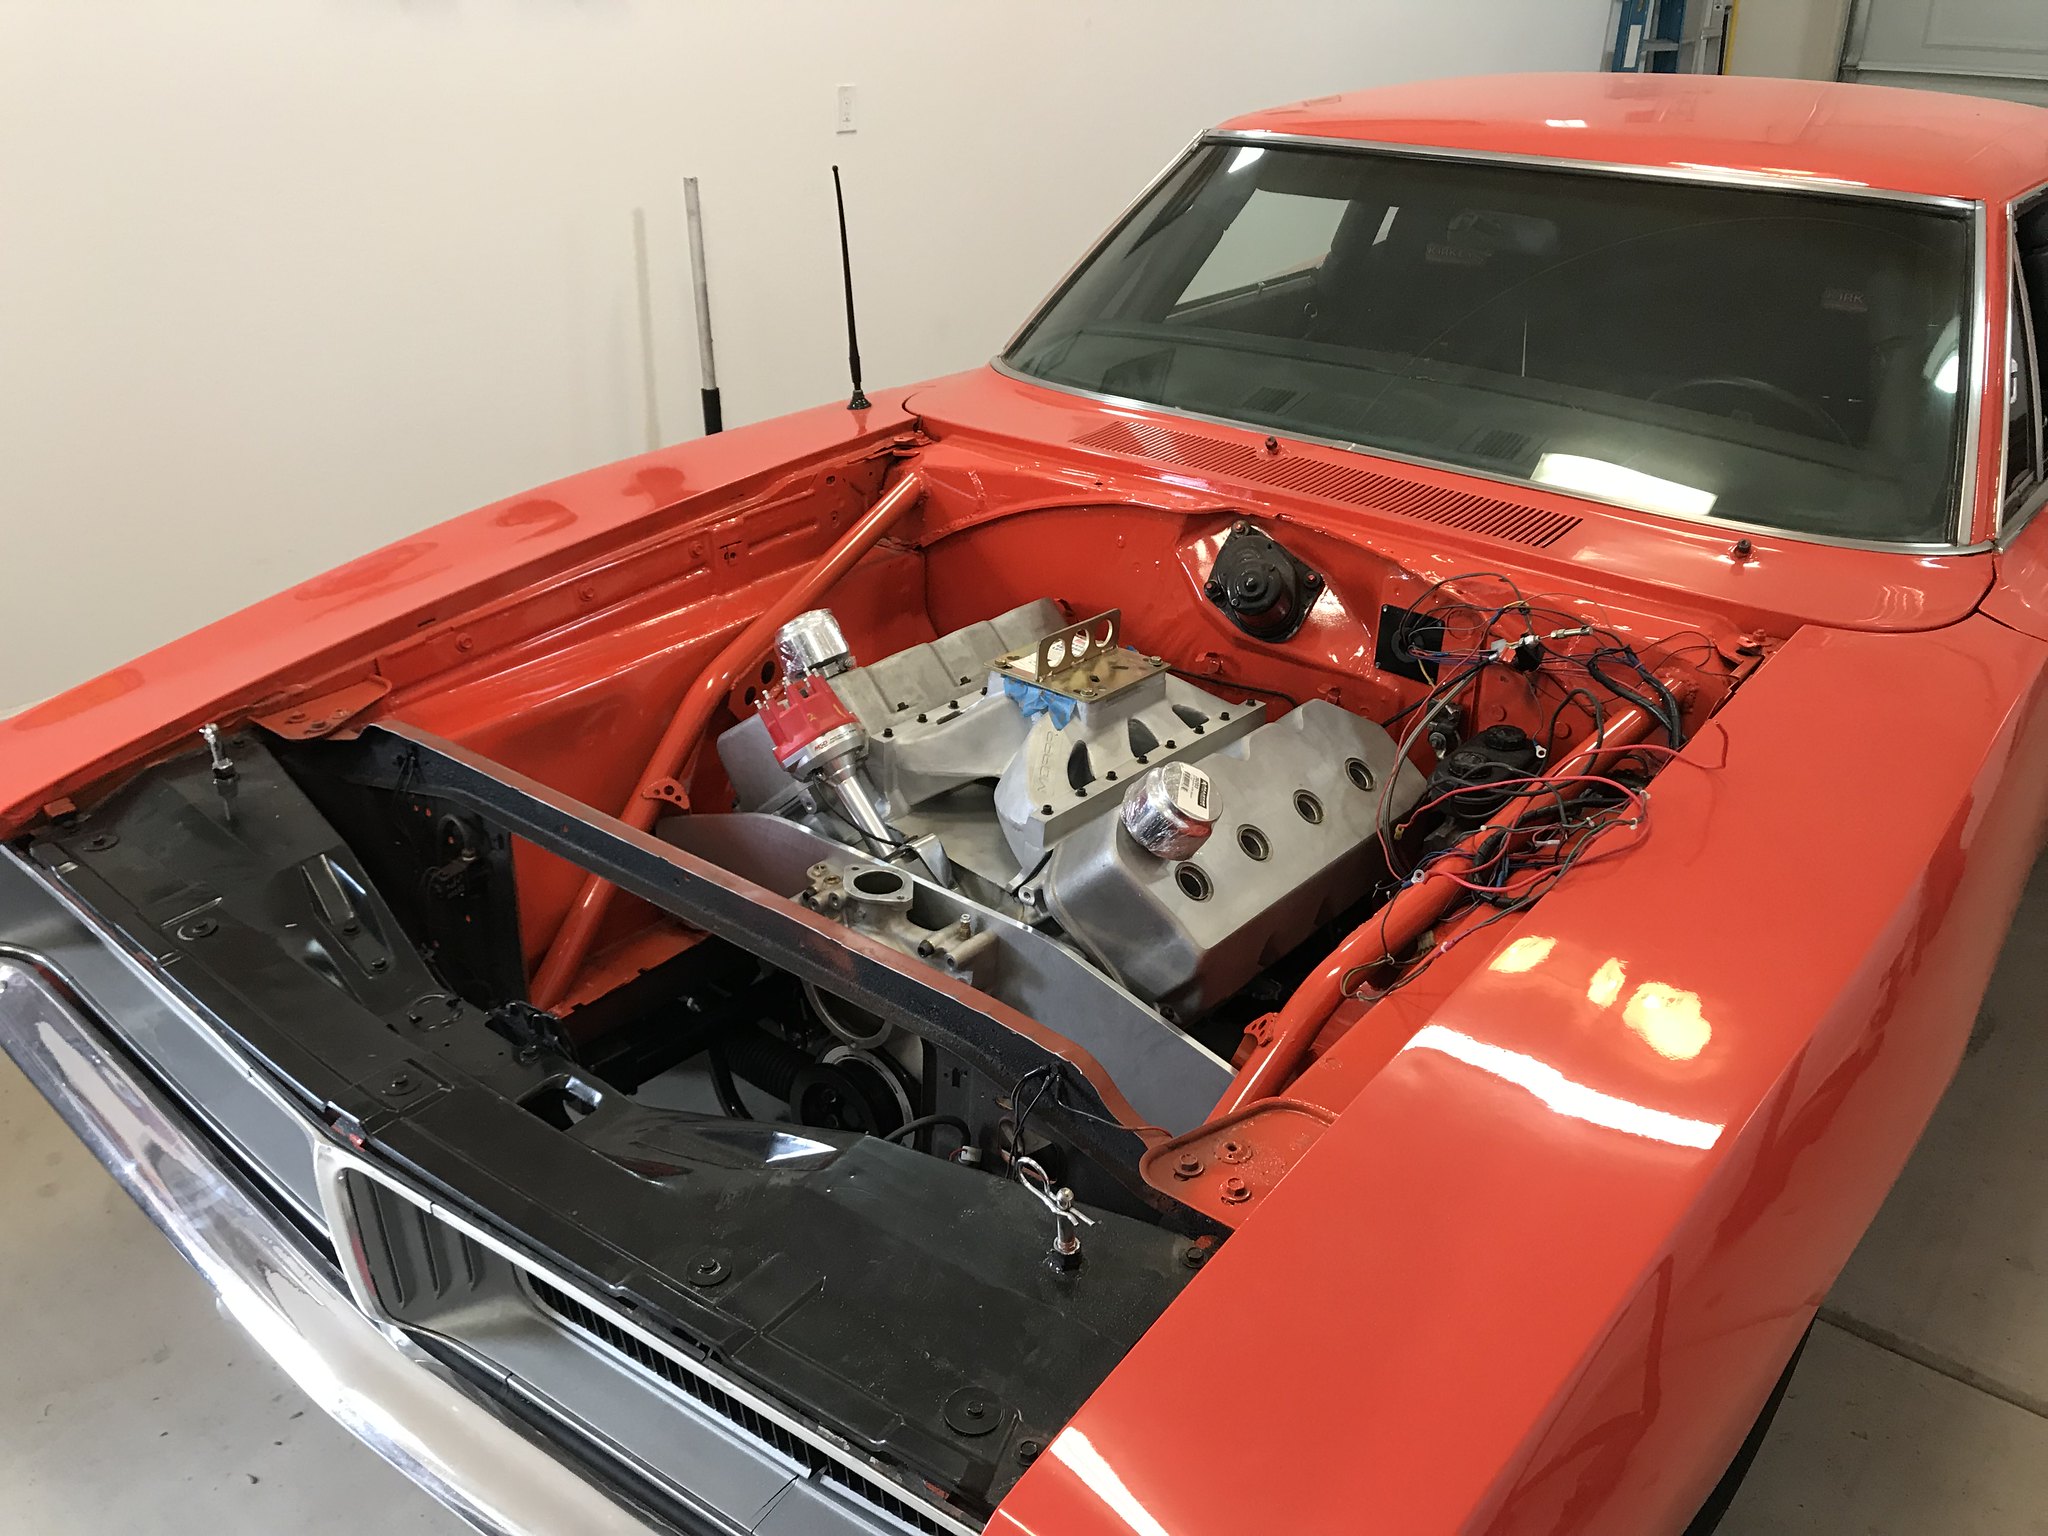
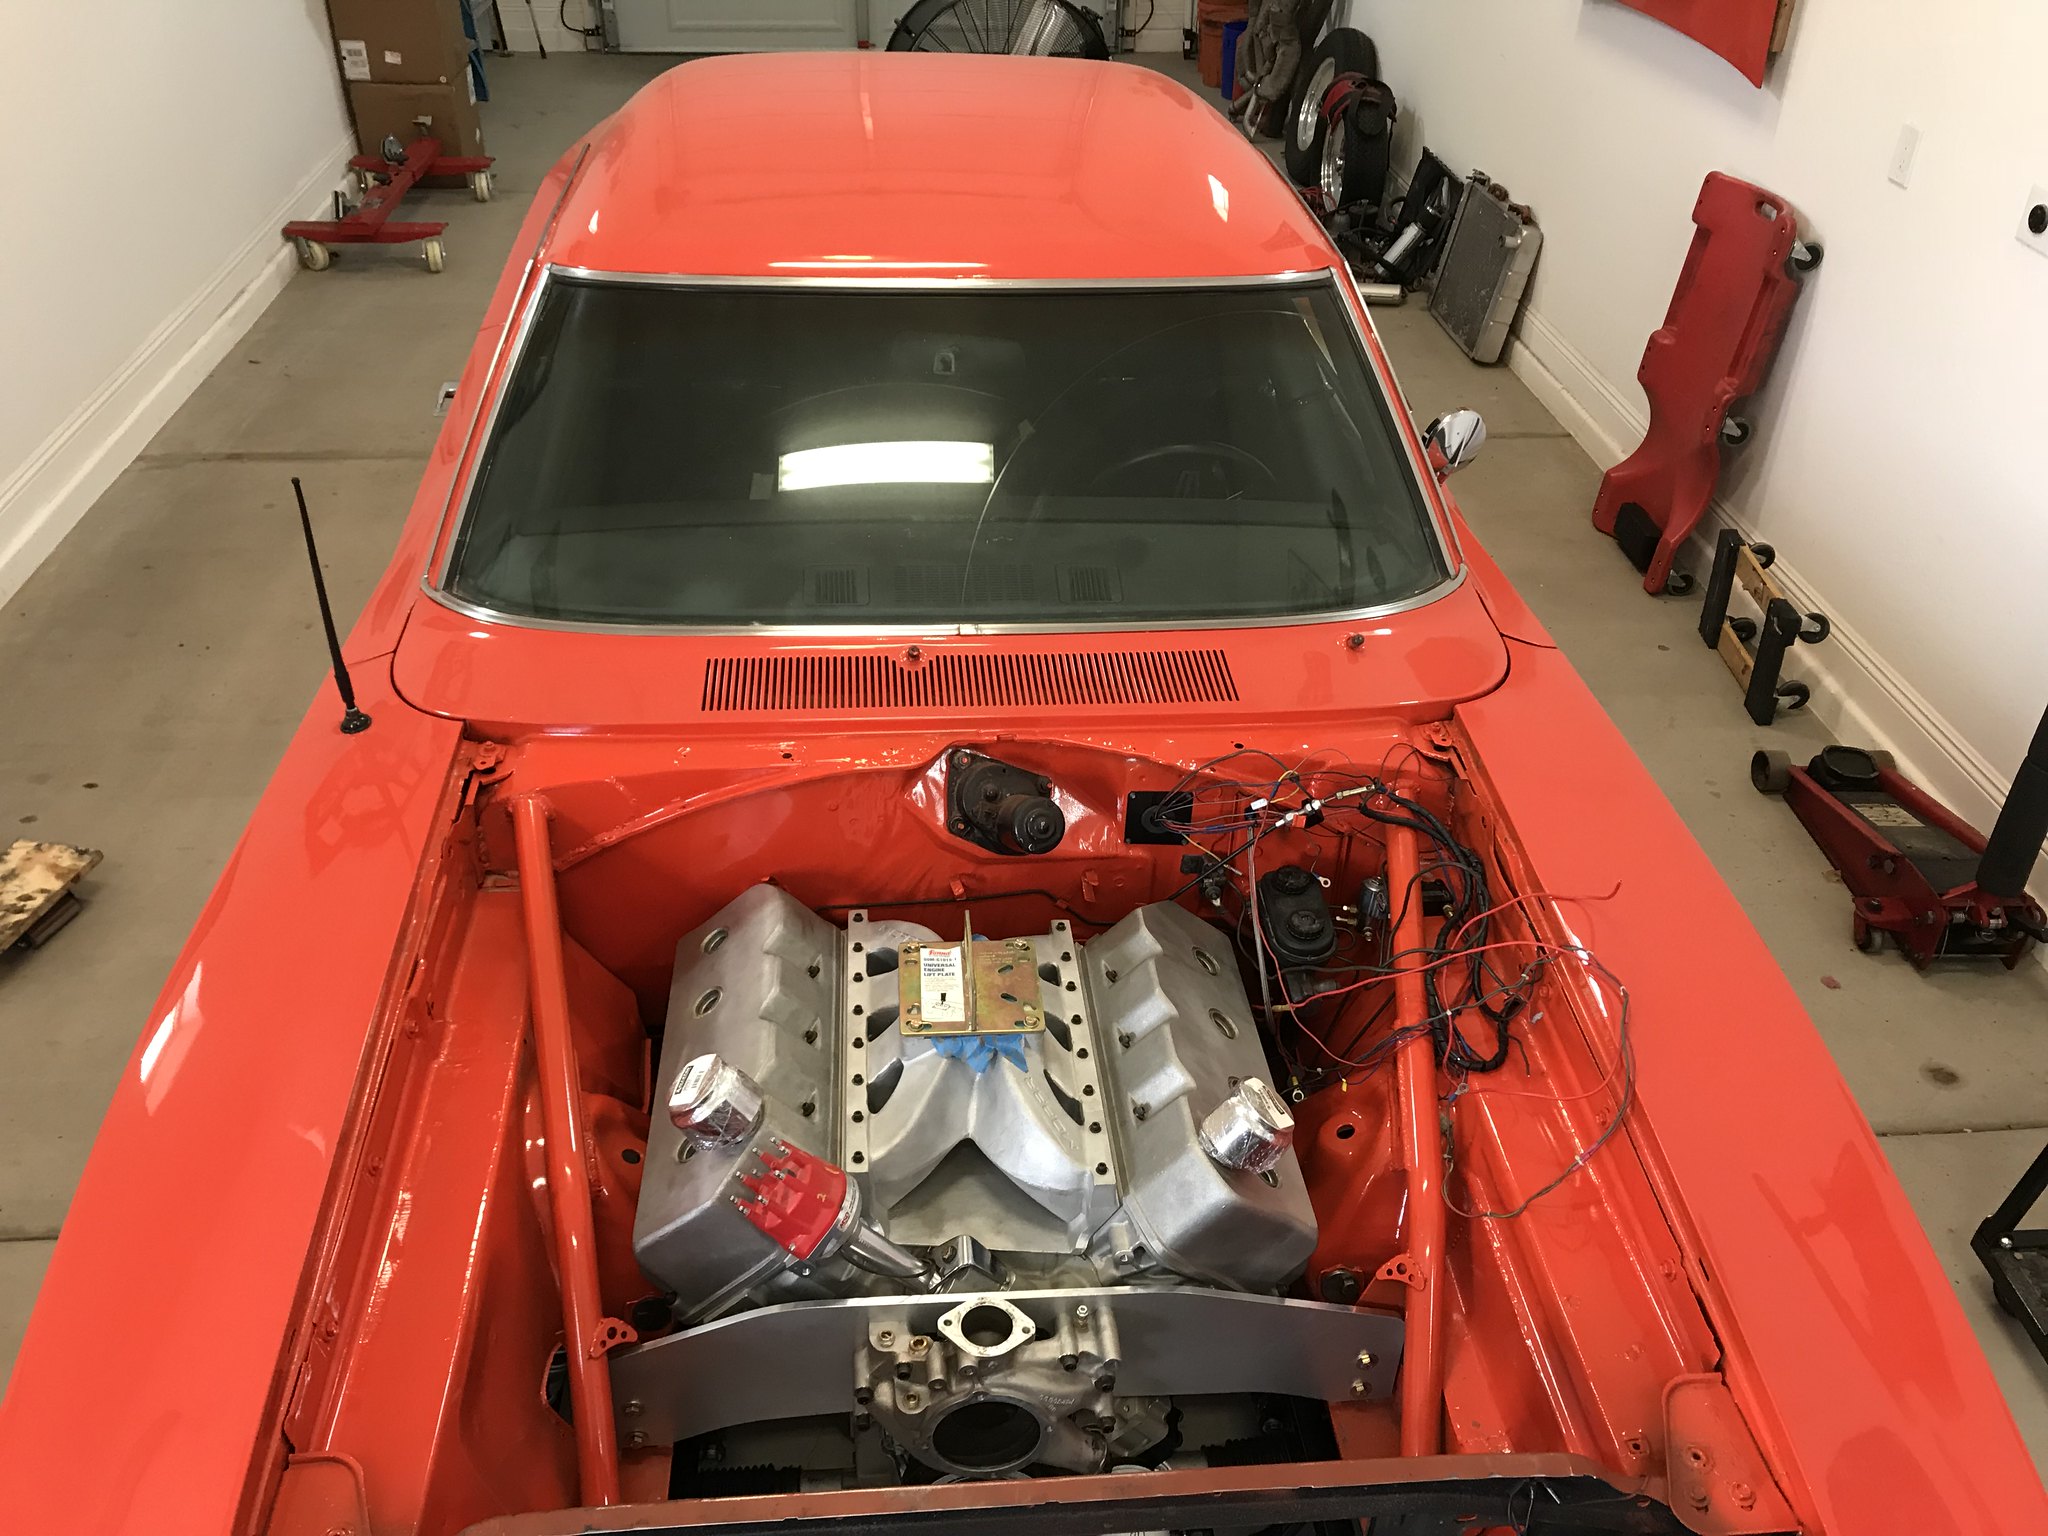
"Plumbing" is finished. The hood shows up tomorrow. Just need to finish the wiring and fix an alternator issue that I caused by removing the mechanical water pump.
I took a break from the car to spend time with family and assemble my early Father's Day / Birthday present. Back to the car tomorrow! I'm about 1/2 way through my sabbatical (8 weeks paid vacation every 7 years, this is my third).
1/2 inch off the back of the cowl and a little trimming off the inner support for the Air Grabber aircleaner and the hood sits flush. I need to decide on pins or 1/4-turn fasteners.
**edit** Several buddies are suggesting Satin Black over Body Color. Opinions?
GlassTek kicks butt! Way better than my old POS UP22 hood!
looks good, but maybe it's just me, but maybe the black hood would make the hood stand out a little too much, making it look too big ? maybe not the whole hood, but a couple of big stripes black, then the rest body color ?
Are you using a mechanical fuel pump? If so check the lower pump housing to the oil galley plug under the fuel pump boss to see the pump is touching it or not If it is touching it you may have found your oil leak if your not using a mechanical fuel pump check the block off plate for the same thing, Murphy loves messing with us hot rodders and drag racers
Mr.Cab Racing and winning with Mopars since 1964. (Old F--t, Huh)
I found the leak! Apparently the top passenger side motor mount bolt hole is semi wet (oil). I’ Using an engine plate so the hole was empty. I put a temporary bolt with a little RTV and it stopped the leak. Looks like I’ll use that side for the engine limiter.
Some thing is not correct There should be no oil any where near that bolt hole Maybe it is leaking some where else and finding it's way to that hole Sheet, I forgot that this is a Hemiroid motor All the motor mount holes on the stock 426 type hemi motors are threaded into the crankcase so they really need to be seal well
Mr.Cab Racing and winning with Mopars since 1964. (Old F--t, Huh)
Some thing is not correct There should be no oil any where near that bolt hole Maybe it is leaking some where else and finding it's way to that hole Sheet, I forgot that this is a Hemiroid motor All the motor mount holes on the stock 426 type hemi motors are threaded into the crankcase so they really need to be seal well
Thanks Cab! Indy block. I'll make Engine limiters that come off of the engine mount locations and be sure to seal all bolts. Little bit of a learning curve going from a wedge to my first hemi. I pulled the distributor and inspected everything above that bolt hole location before trying the bolt with sealer. Couldn't find any oil above the hole. I let the engine come up to temp and idle for a while. No leaks now!
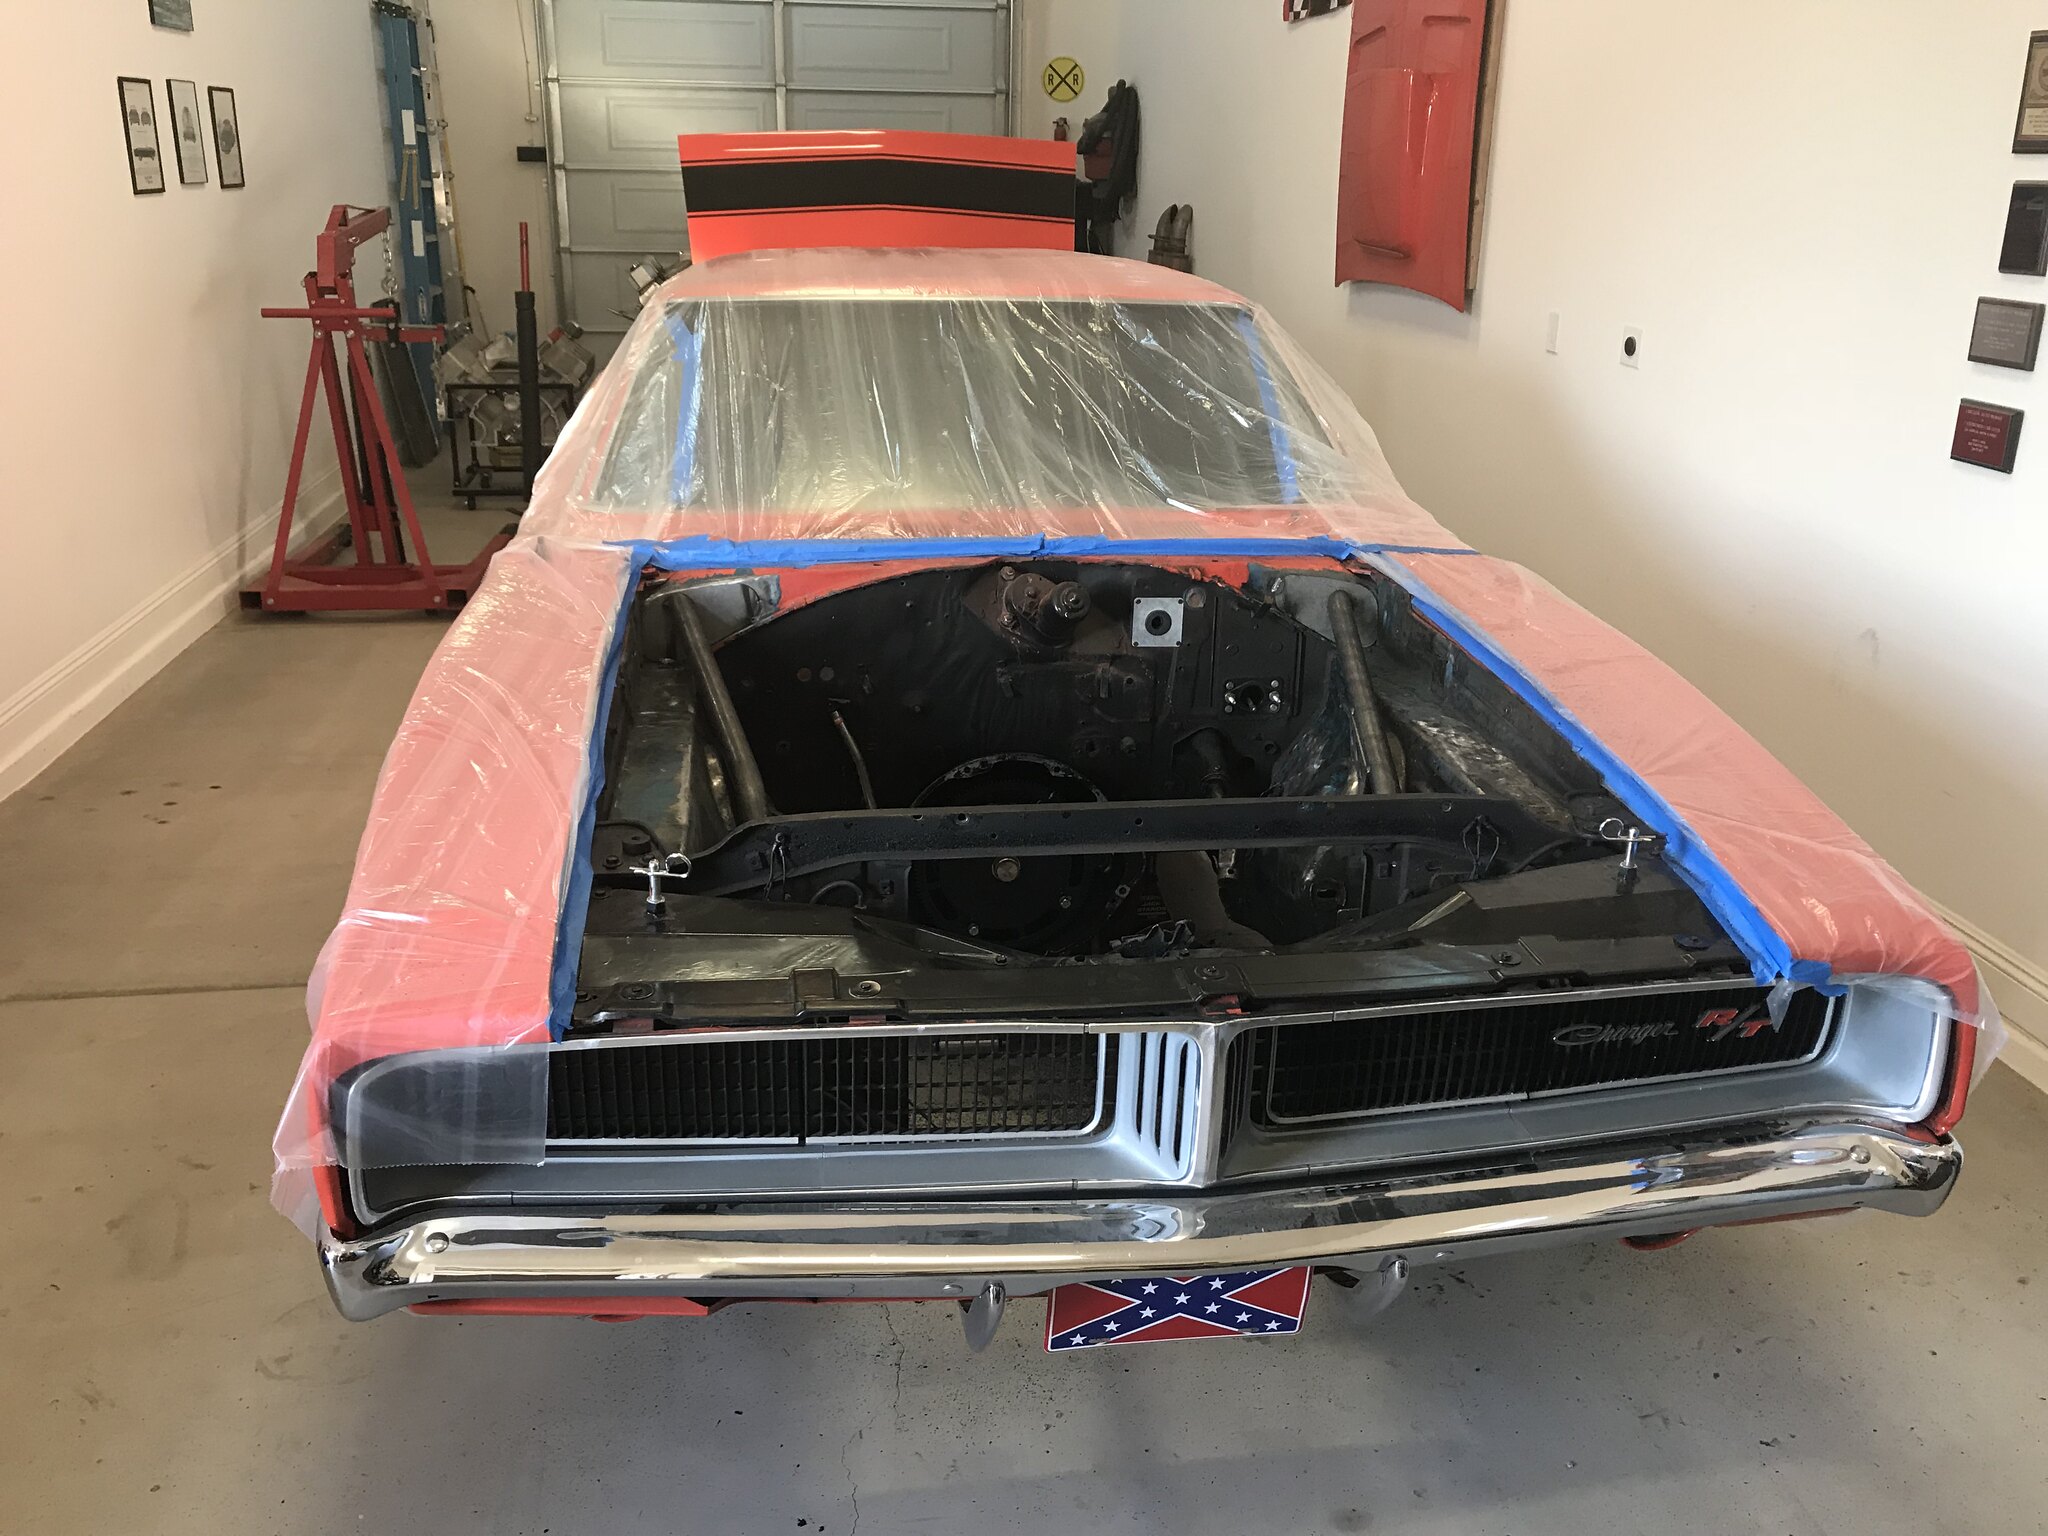
I'm going to bleed the brakes, mount the hood and send it off to paint, fab some engine limiters, align the front end, and........... take it for a f'in test drive!
I’ll start this off on a positive note with a video! It has an oil leak and I need to adjust the throttle linkeage, but it runs!
Life happened and I wasn’t able to mess with the car for a couple months. Don’t care to elaborate.
Prior to the pause in progress; I had recently started the new engine. After a couple warm up runs, it kept throwing the alternator belt. I noticed a loose mounting bolt and suspected that was the culprit. Quick repair and an attempt to restart resulted in an engine that wouldn’t crank. I immediately suspected the 10 year old battery (batteries don’t live more than 2 years in Arizona). Attempts to charge were unsuccessful so I went to the local parts store. To my dismay the new battery was unable to turn over the engine either. I attempted to jump it with my Cumins (dual batteries). Click…hummmmm….. no crank. Crap! I ordered one of the bad ass Power Master starters, and pulled all of the plugs to see if the engine would crank. With no plugs it spun freely! Big relief!!!!! The new starter arrived and I swapped it out. This isn’t quick because it’s not like the local parts store stocks Hemi exhaust header gaskets. Fast forward a couple weeks and I’m ready to try the new starter. Everything connected, new battery charged, sitting in the driver seat and I hit the button……..click HUmmmmmmm. Damnit! At this point I knew it was something stupid that I did. I ran jumper cables from the starter mounting bolt to the frame. Hit the button…..click….HUmmmmmmmm. Grrrrr! I pinged a couple buddies, one is a member here, and they talked me off the cliff. Tony noticed a puff of smoke between my nitrous purge line and my fuel regulator (woaaaah!)…, amp meter, second set of eyes, etc… later and the engine cranked with a couple plugs in one head. Long story long: I ran a #2 gauge wire from the negative terminal to the mounting bolt of the starter and everything is happy.
What did I learn from this? Check the simplest things first. Just because you suspect the uber expensive piece between the frame rails doesn’t mean that it’s bad. Also, there doesn’t appear to be much of a difference between the NAPA brand starter for a 98 ram and the PowerMaster… except for the billet adjustable mounting bracket. If you have header clearance problems, buy the PowerMaster. I have 2.25 in primary and 4in collector TTi headers that didn’t need the PowerMaster. Guess What! I now have a spare starter.
Trust me and do yourself a favor and change that alternator belt to a Dayco TopCog belt, My hemi would throw that belt everytime I hit it. I changed the belt and I haven't had 1 problem in 9 years.
I must have lost the belt on the last test drive. Throttle linkeage fixed. I'm pretty sure that I fixed the oil leak (engine mount bolt on the side of the block. All I had was blue RTV, will see if it holds).
Old car cleans up okay. The hood is at The painters and should be done next week. My butt dyno says the hemi is faster than the wedge (wedge on nitrous). The car has no problem doing a rolling burn out with a small blip of the throttle. I drove as much as I felt comfortable with running off the battery. Will order a Dayco TopCog belt tonight. The engine revs up QUICK. Definitely not something that I'm used to.
[quote=gsmopar] The car has no problem doing a rolling burn out with a small blip of the throttle. I drove as much as I felt comfortable with running off the battery. Will order a Dayco TopCog belt tonight. The engine revs up QUICK. Definitely not something that I'm used to. Sounds like it is time to work on the traction so it will set you way back in the seat at WOT and put a big old grin on your face
Mr.Cab Racing and winning with Mopars since 1964. (Old F--t, Huh)
I must have lost the belt on the last test drive. Throttle linkeage fixed. I'm pretty sure that I fixed the oil leak (engine mount bolt on the side of the block. All I had was blue RTV, will see if it holds).
Old car cleans up okay. The hood is at The painters and should be done next week. My butt dyno says the hemi is faster than the wedge (wedge on nitrous). The car has no problem doing a rolling burn out with a small blip of the throttle. I drove as much as I felt comfortable with running off the battery. Will order a Dayco TopCog belt tonight. The engine revs up QUICK. Definitely not something that I'm used to.
( The engine revs up QUICK. Definitely not something that I'm used to.)
I know the feeling it's shocking how fast they rev. I have a mechanical roller and 4-speed. A good tach is nice but a rev limiter is a must.
I know some will get their feelings hurt but I learned about the TopCog belt from the Chevy Z28 302 guys. Another engine that revs so fast it loved throwing belts.
The new alternator belt is staying put so far. I did a quick run through 2.5 gears on a open country road. I need to add a second line from the driver side valve cover to my breather tank and re-bleed the front brakes (little squishy). The hood came back today! I'll do some final alignment and hopefully take some nice pics this weekend!
usually, a support bearing is used when having three joints in a steering shaft, but due to you having a sort of long shaft sticking out of your column, and the standard "long" rack shaft, i think a support would be insurance against any possible deflection. here is a shot of the support on my humpback project. it's a 3/4", .007 oversize, heim joint, available in a bunch of places especially made for steering shaft support. the oversize allows for a painted shaft installation. my shaft runs from the firewall, through the header tubes to the support, then to the rack. the steering is very smooth in operation. just a suggestion i would do if possible on your setup because of the extended column shaft.
Looking at the op's steering column solution and yours, I thought the pictured solution induced cyclical velocity changes as the the column rotated when phased as pictured. I think many try to replicate a DS where the input and output angles are attempted to be same and because of relatively high RPMS , large torque inputs, and out of balance bending issues are dealt with, but none of which applies to a steering u joints. Here constant predictable steering angle inputs vs outputs are the goal,, ie constant velocity. Welded steering shafts also make me nervous.
I do like the project.
"A configuration known as a double Cardan joint drive shaft partially overcomes the problem of jerky rotation. This configuration uses two U-joints joined by an intermediate shaft, with the second U-joint phased in relation to the first U-joint to cancel the changing angular velocity. In this configuration, the angular velocity of the driven shaft will match that of the driving shaft, provided that both the driving shaft and the driven shaft are at equal angles with respect to the intermediate shaft (but not necessarily in the same plane) and that the two universal joints are 90 degrees out of phase. This assembly is commonly employed in rear wheel drive vehicles, where it is known as a drive shaft or propeller (prop) shaft." From Wiki
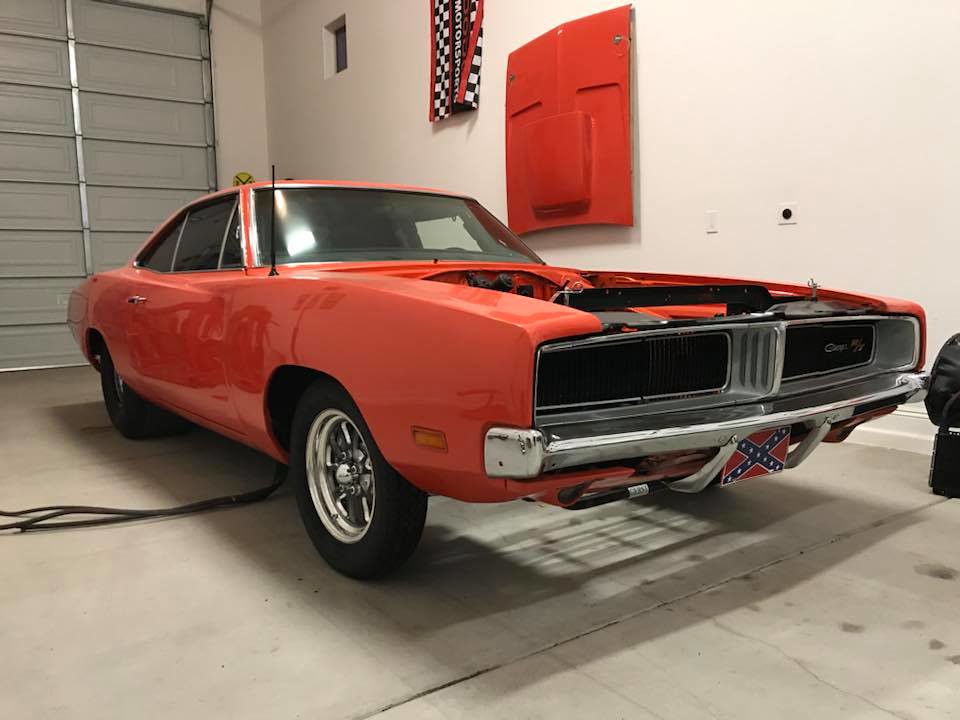
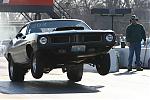
I'm on my second tank of gas and have leaned on it a little on the open road. So far so good! Can't wait to get this thing to the track and see what it does. Butt dyno says it's significantly faster than my old wedge. I did the local Cars and Coffee this morning:
I'm on my second tank of gas and have leaned on it a little on the open road. So far so good! Can't wait to get this thing to the track and see what it does. Butt dyno says it's significantly faster than my old wedge. I did the local Cars and Coffee this morning:
I'm on my second tank of gas and have leaned on it a little on the open road. So far so good! Can't wait to get this thing to the track and see what it does. Butt dyno says it's significantly faster than my old wedge. I did the local Cars and Coffee this morning:
Tire smoke on demand Now comes the hard part, making that powerful Hemiriod motor NOT spin the tires so bad in your car Can you imagine a wheelie H--- yeah
Mr.Cab Racing and winning with Mopars since 1964. (Old F--t, Huh)


![[Linked Image]](https://farm8.staticflickr.com/7894/33476844518_b3ff02e257_k.jpg)
![[Linked Image]](https://farm8.staticflickr.com/7847/47352942521_5fdc3f3abd_k.jpg)
![[Linked Image]](https://farm8.staticflickr.com/7904/32410981987_1cfbfdb5cc_k.jpg)
![[Linked Image]](https://farm8.staticflickr.com/7839/46483448475_e331c95933_k.jpg)
![[Linked Image]](https://farm5.staticflickr.com/4874/46483369845_42c96aaded_k.jpg)
![[Linked Image]](https://farm8.staticflickr.com/7809/33522547228_70d9d0aa85_k.jpg)
![[Linked Image]](https://farm5.staticflickr.com/4901/46483366325_2db3ea8e9a_k.jpg)
![[Linked Image]](https://farm5.staticflickr.com/4895/40432856103_975109105f_k.jpg)
![[Linked Image]](https://farm8.staticflickr.com/7801/46691318434_08d8f19732_k.jpg)
![[Linked Image]](https://farm8.staticflickr.com/7852/47392091022_feb6df749d_k.jpg)
![[Linked Image]](https://farm8.staticflickr.com/7895/32503261037_77badb7601_k.jpg)
![[Linked Image]](https://farm8.staticflickr.com/7857/40545699713_62143b1b41_k.jpg)
![[Linked Image]](https://farm8.staticflickr.com/7808/32569494027_e763007ad3_k.jpg)
![[Linked Image]](https://live.staticflickr.com/7816/46826349994_87c9da9eee_k.jpg)
![[Linked Image]](https://live.staticflickr.com/7829/40593779993_266efa547c_k.jpg)
![[Linked Image]](https://live.staticflickr.com/7825/40593780013_c3b5366b27_k.jpg)


![[Linked Image]](https://live.staticflickr.com/65535/33777342628_7ea4a08c5a_z.jpg)
![[Linked Image]](https://live.staticflickr.com/65535/46930841954_2b14302162_z.jpg)
![[Linked Image]](https://live.staticflickr.com/7801/46691318434_1dc6874af0_z.jpg)


![[Linked Image]](https://live.staticflickr.com/65535/46860205985_5a7a97cbb0_z.jpg)
![[Linked Image]](https://live.staticflickr.com/65535/32833052497_d82e26a19f_z.jpg)
![[Linked Image]](https://live.staticflickr.com/65535/47776659531_eebef5c89b_z.jpg)
![[Linked Image]](https://live.staticflickr.com/65535/32833054457_0a8857144f_z.jpg)
![[Linked Image]](https://live.staticflickr.com/65535/32833054687_6719af5796_z.jpg)
![[Linked Image]](https://live.staticflickr.com/65535/33951573658_271ed731ca_z.jpg)
![[Linked Image]](https://live.staticflickr.com/65535/33951571568_9a8de20918_z.jpg)
![[Linked Image]](https://live.staticflickr.com/65535/32885036517_6938afe193_z.jpg)
![[Linked Image]](https://live.staticflickr.com/65535/47039314274_04a84fde4a_z.jpg)
![[Linked Image]](https://live.staticflickr.com/65535/47106520254_bdfac22bbd_z.jpg)
![[Linked Image]](https://live.staticflickr.com/65535/47106602884_3ac180ec98_z.jpg)
![[Linked Image]](https://live.staticflickr.com/65535/47849453592_2804fd93c6_z.jpg)
![[Linked Image]](https://live.staticflickr.com/65535/40935036633_ca0693d2aa_z.jpg)
![[Linked Image]](https://live.staticflickr.com/65535/40935038763_1998fa1cc5_z.jpg)
![[Linked Image]](https://live.staticflickr.com/65535/47923597197_a6095ac709_z.jpg)
![[Linked Image]](https://live.staticflickr.com/65535/47923596528_555dc513fa_z.jpg)
![[Linked Image]](https://live.staticflickr.com/65535/47923596886_a83a0d0e78_z.jpg)
![[Linked Image]](https://live.staticflickr.com/65535/47989884026_2e24ae3cf3_z.jpg)
![[Linked Image]](https://live.staticflickr.com/65535/47989825682_a546f78ceb_z.jpg)
![[Linked Image]](https://live.staticflickr.com/65535/48011197096_23be499b85_z.jpg)
![[Linked Image]](https://live.staticflickr.com/65535/48011193391_bed8c4752d_z.jpg)
![[Linked Image]](https://live.staticflickr.com/65535/48022260938_ecb049686a.jpg)
![[Linked Image]](https://store.racerdirect.net/pub/media/catalog/product/cache/c687aa7517cf01e65c009f6943c2b1e9/3/0/309726.jpg)
![[Linked Image]](https://live.staticflickr.com/65535/48046291173_b1b3282561_z.jpg)
![[Linked Image]](https://live.staticflickr.com/65535/48046253931_0dbbe18228_z.jpg)
![[Linked Image]](https://live.staticflickr.com/65535/48046255001_bb8e884db8_z.jpg)
![[Linked Image]](https://live.staticflickr.com/65535/48046343917_1d49851d2a_z.jpg)
![[Linked Image]](https://live.staticflickr.com/65535/48046256846_6659b8a9e1_z.jpg)
![[Linked Image]](https://live.staticflickr.com/65535/48064752018_2c19e0bbe0_z.jpg)
![[Linked Image]](https://live.staticflickr.com/65535/48069720942_aed1688199_z.jpg)
![[Linked Image]](https://live.staticflickr.com/65535/48182476512_c7a838e76b_z.jpg)
![[Linked Image]](https://live.staticflickr.com/65535/48185351307_08bb736aa2_z.jpg)
![[Linked Image]](https://live.staticflickr.com/65535/48185292211_d9bc482dae_z.jpg)
![[Linked Image]](https://live.staticflickr.com/65535/48192290896_916da63f2e_z.jpg)
![[Linked Image]](https://live.staticflickr.com/65535/48863146211_e9e62b3305.jpg)
![[Linked Image]](https://live.staticflickr.com/65535/48863146191_9ec89d4e25.jpg)
![[Linked Image]](https://live.staticflickr.com/65535/48863146146_f231d5266e.jpg)
![[Linked Image]](https://live.staticflickr.com/65535/48872482918_418308e870.jpg)
![[Linked Image]](https://live.staticflickr.com/65535/48872481913_8397449e41.jpg)
![[Linked Image]](https://live.staticflickr.com/65535/48939085667_aa63873b85.jpg)
![[Linked Image]](https://live.staticflickr.com/65535/48971784622_e8b0ec53ed.jpg)
![[Linked Image]](https://live.staticflickr.com/65535/48971616401_bd84dffc89.jpg)
![[Linked Image]](https://live.staticflickr.com/65535/48971617021_b643bf6d55.jpg)
![[Linked Image]](https://live.staticflickr.com/65535/48971786057_b786f94605.jpg)
![[Linked Image]](https://live.staticflickr.com/65535/48971617826_97d6baebc6.jpg)
![[Linked Image]](https://live.staticflickr.com/65535/49076913281_b590abc78b.jpg)
![[Linked Image]](https://live.staticflickr.com/65535/49077119042_67dce0423a.jpg)