Previous Thread
Next Thread
Print Thread
Page 1 of 2 1 2
73 Challenger Brake Upgrade #2255598
02/18/17 07:15 PM
02/18/17 07:15 PM
Joined: Jan 2017
Posts: 35
San Antonio.TX
J
JohnGlenn Offline OP
member
JohnGlenn  Offline OP
member
J

Joined: Jan 2017
Posts: 35
San Antonio.TX
Some of you that halped me out during my issue, Brake Help thread, this is what I did. Figured I would put it all in one place for easy viewing.

I upgraded my front discs to 03 Cobra disks, basically the 13" setup sold by Doctor Diff, who by the way is awesome! He tried to help me sort my world, even though I didn't buy from him. Honestly because I'm cheap, and I wanted the challenge.

After the above issues, which I'm almost positive were caused by crap vaccuum, I decided to upgrade everything. Enter oddball rear brakes and 03 Cobra hydroboost.

If you have questions, just fire away, the project is done now and I'm posting so others laugh and nit pick.

Re: 73 Challenger Brake Upgrade [Re: JohnGlenn] #2255604
02/18/17 07:35 PM
02/18/17 07:35 PM
Joined: Jan 2017
Posts: 35
San Antonio.TX
J
JohnGlenn Offline OP
member
JohnGlenn  Offline OP
member
J

Joined: Jan 2017
Posts: 35
San Antonio.TX
So, heres the basic numbers. I was going to provide coords from my DRO, but it started skipping, and I wasn't going to stop to clean it. You can duplicate the way i did, layout dye, punch a spindle center, and create arcs useing calipers. Find what looks good with known bolt hole spacing and center punch, drill on center punch marks.

I used the old bearings when i set it up on my lathe, worked, but i was planning to replace them anyway. Your going to need carbide tooling to cut on the hub, that thing is HARD. Also, at the bottom is a comparison of the SN95 hub vs the cut down E body. I was concerned about strength, until I saw how thick the e body hub really was.

IMAG0177.jpg
Basic Drawing and Dimensions

IMAG0106.jpg
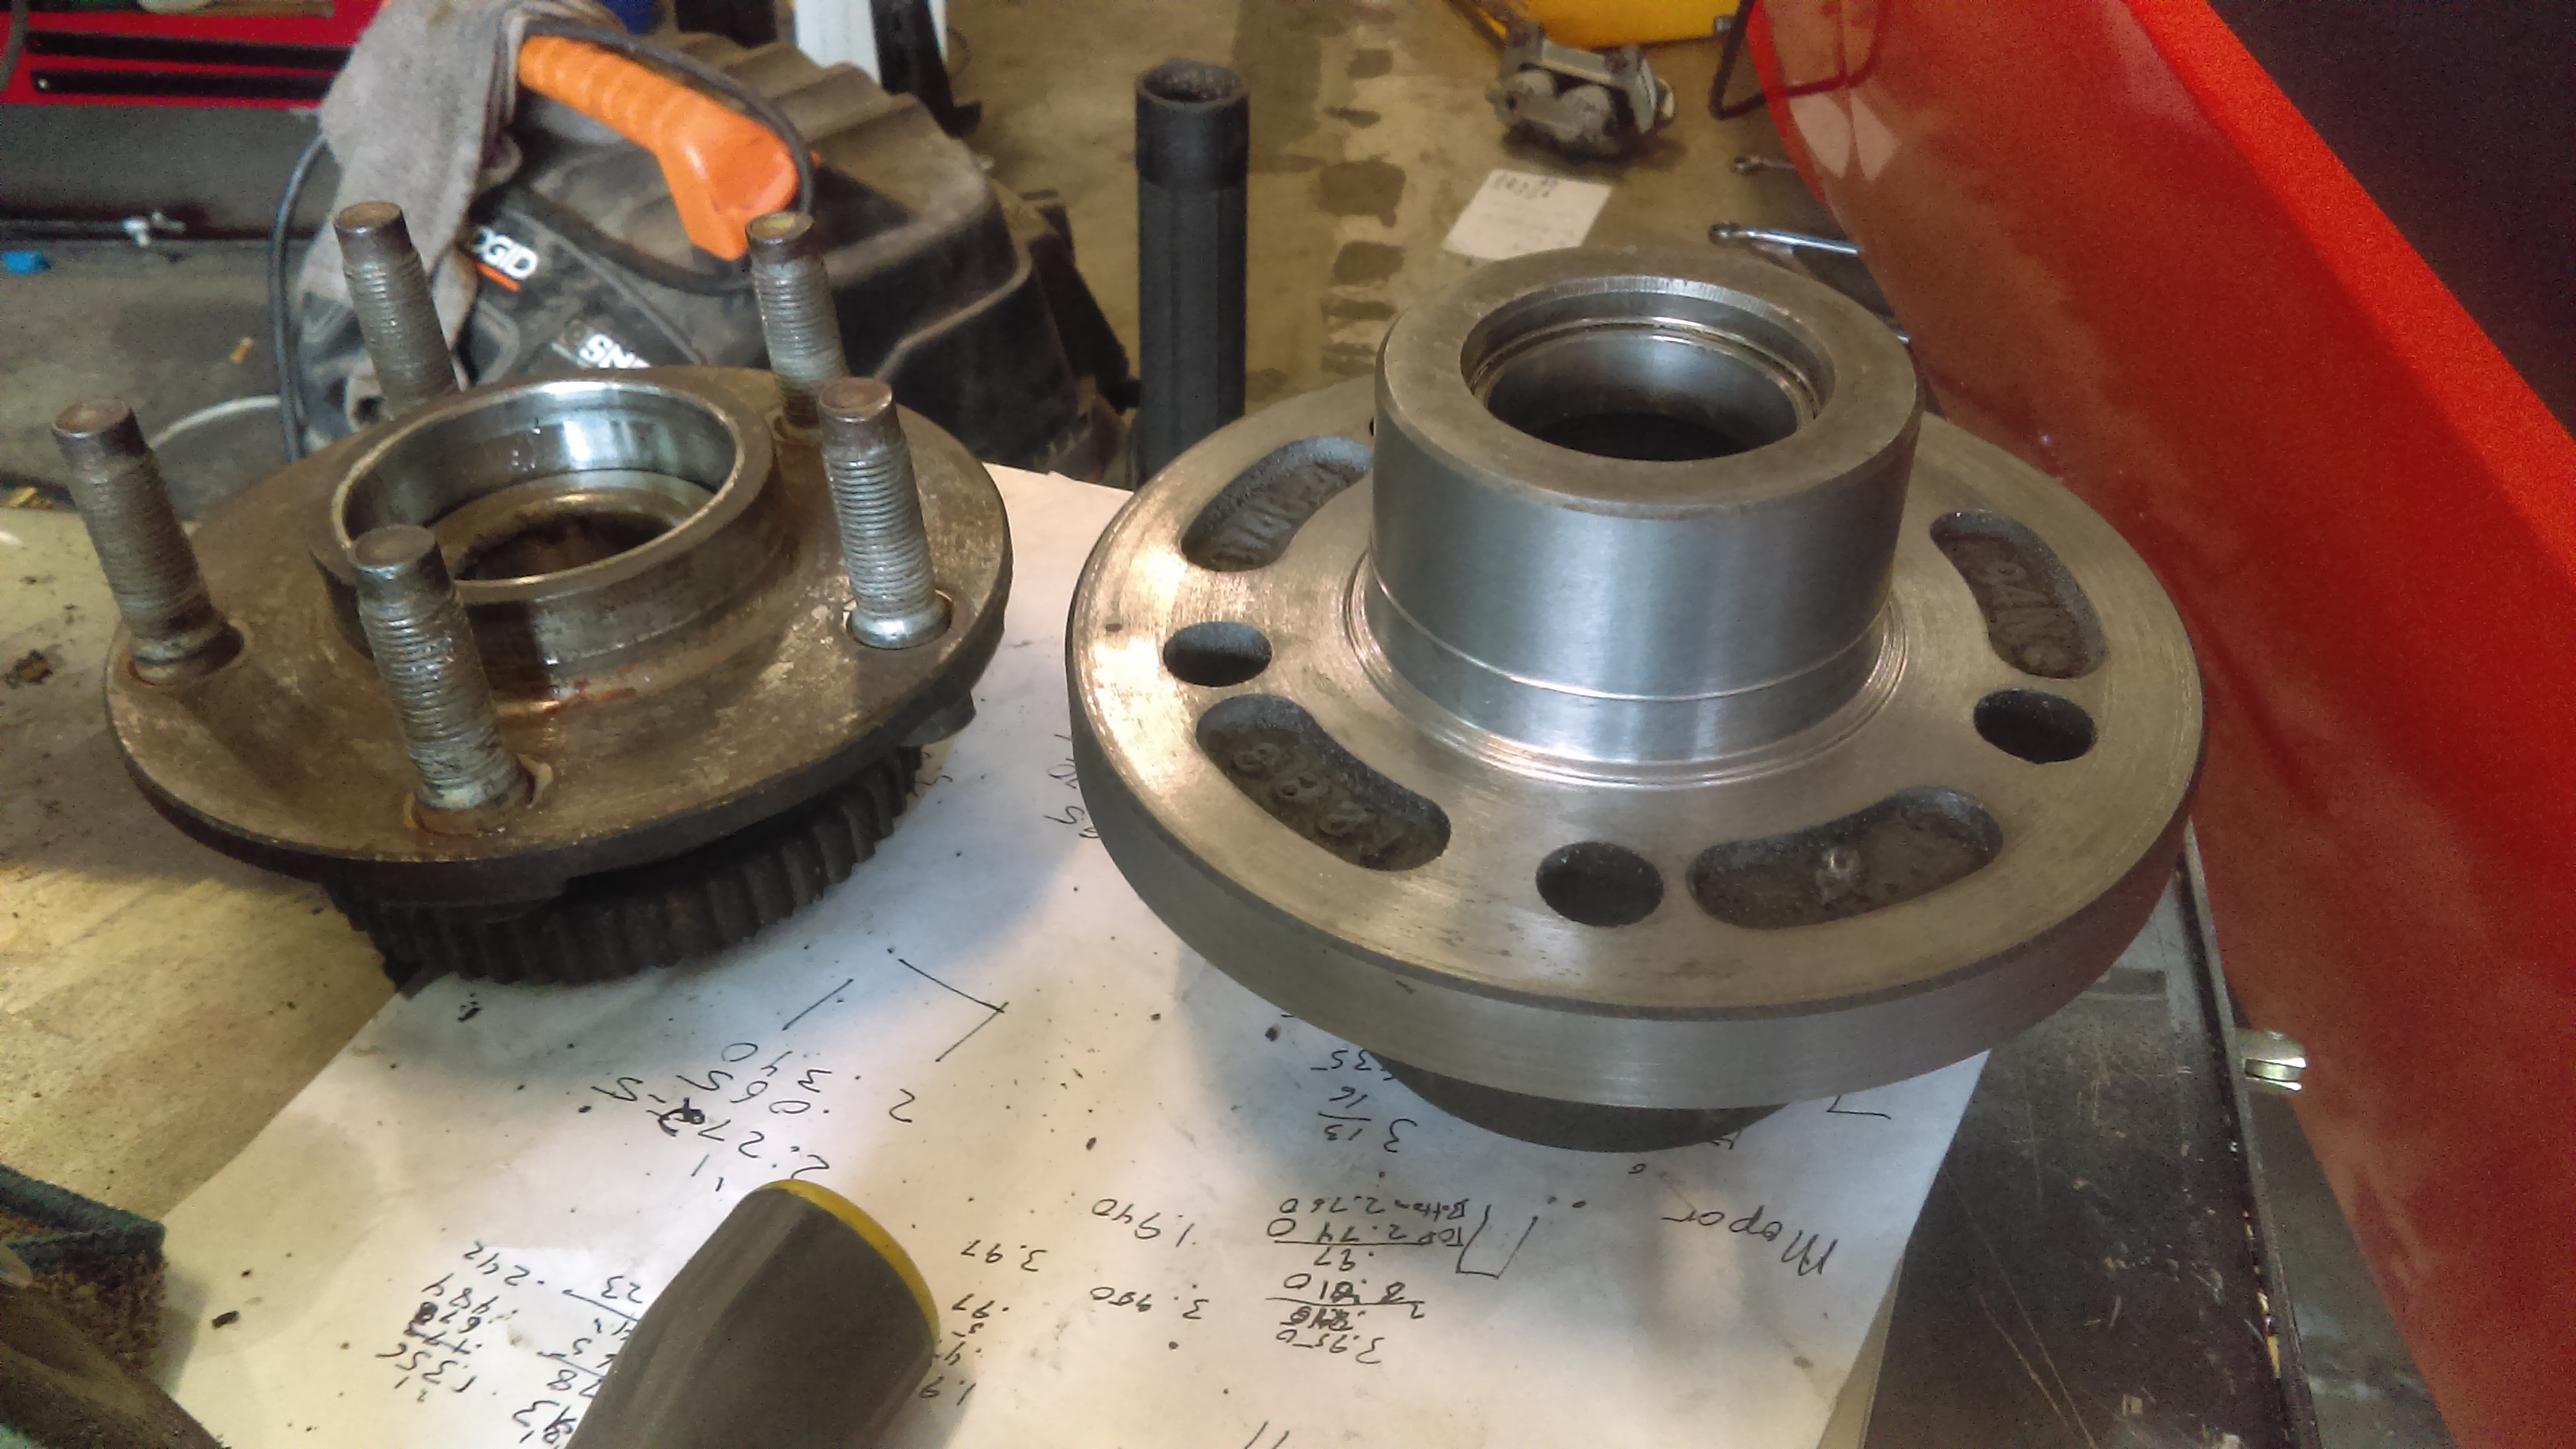
Remove factory brakes, cut disk from "hub" with plasma cutter.
IMAG0108.jpg
Place "hub" in lathe on centers, clean up plasma cut, turn hub snout OD to accept mustang disk, I also faced off the mounting surface.

Re: 73 Challenger Brake Upgrade [Re: JohnGlenn] #2255608
02/18/17 07:48 PM
02/18/17 07:48 PM
Joined: Jan 2017
Posts: 35
San Antonio.TX
J
JohnGlenn Offline OP
member
JohnGlenn  Offline OP
member
J

Joined: Jan 2017
Posts: 35
San Antonio.TX
Next layout the brackets, and cut. I used some thin aluminum to layout everything based on spindle center, then once i had a good grasp I used it for a template to center punch what would become my brackets.
IMAG0109.jpg
Previous post I forgot to reinstall. So here ya go. Interestingly enough, I checked runout prior to lathe work and after. Out of round was within .010, surface was within .007 after cleaning with wire brush. After lathe work both tolerances were under

IMAG0112.jpg
both brackets were cut from 6061 T6 aluminum I had laying around, it was 1x4 bar stock.

IMAG0115.jpg
milled down to .757 thick, as perscribed in the drawing, also rounded edges a little by pivoting on center of holes in my vice, sorry, don't have a rotary table. Also, test fit.

Re: 73 Challenger Brake Upgrade [Re: JohnGlenn] #2255610
02/18/17 07:58 PM
02/18/17 07:58 PM
Joined: Jan 2017
Posts: 35
San Antonio.TX
J
JohnGlenn Offline OP
member
JohnGlenn  Offline OP
member
J

Joined: Jan 2017
Posts: 35
San Antonio.TX
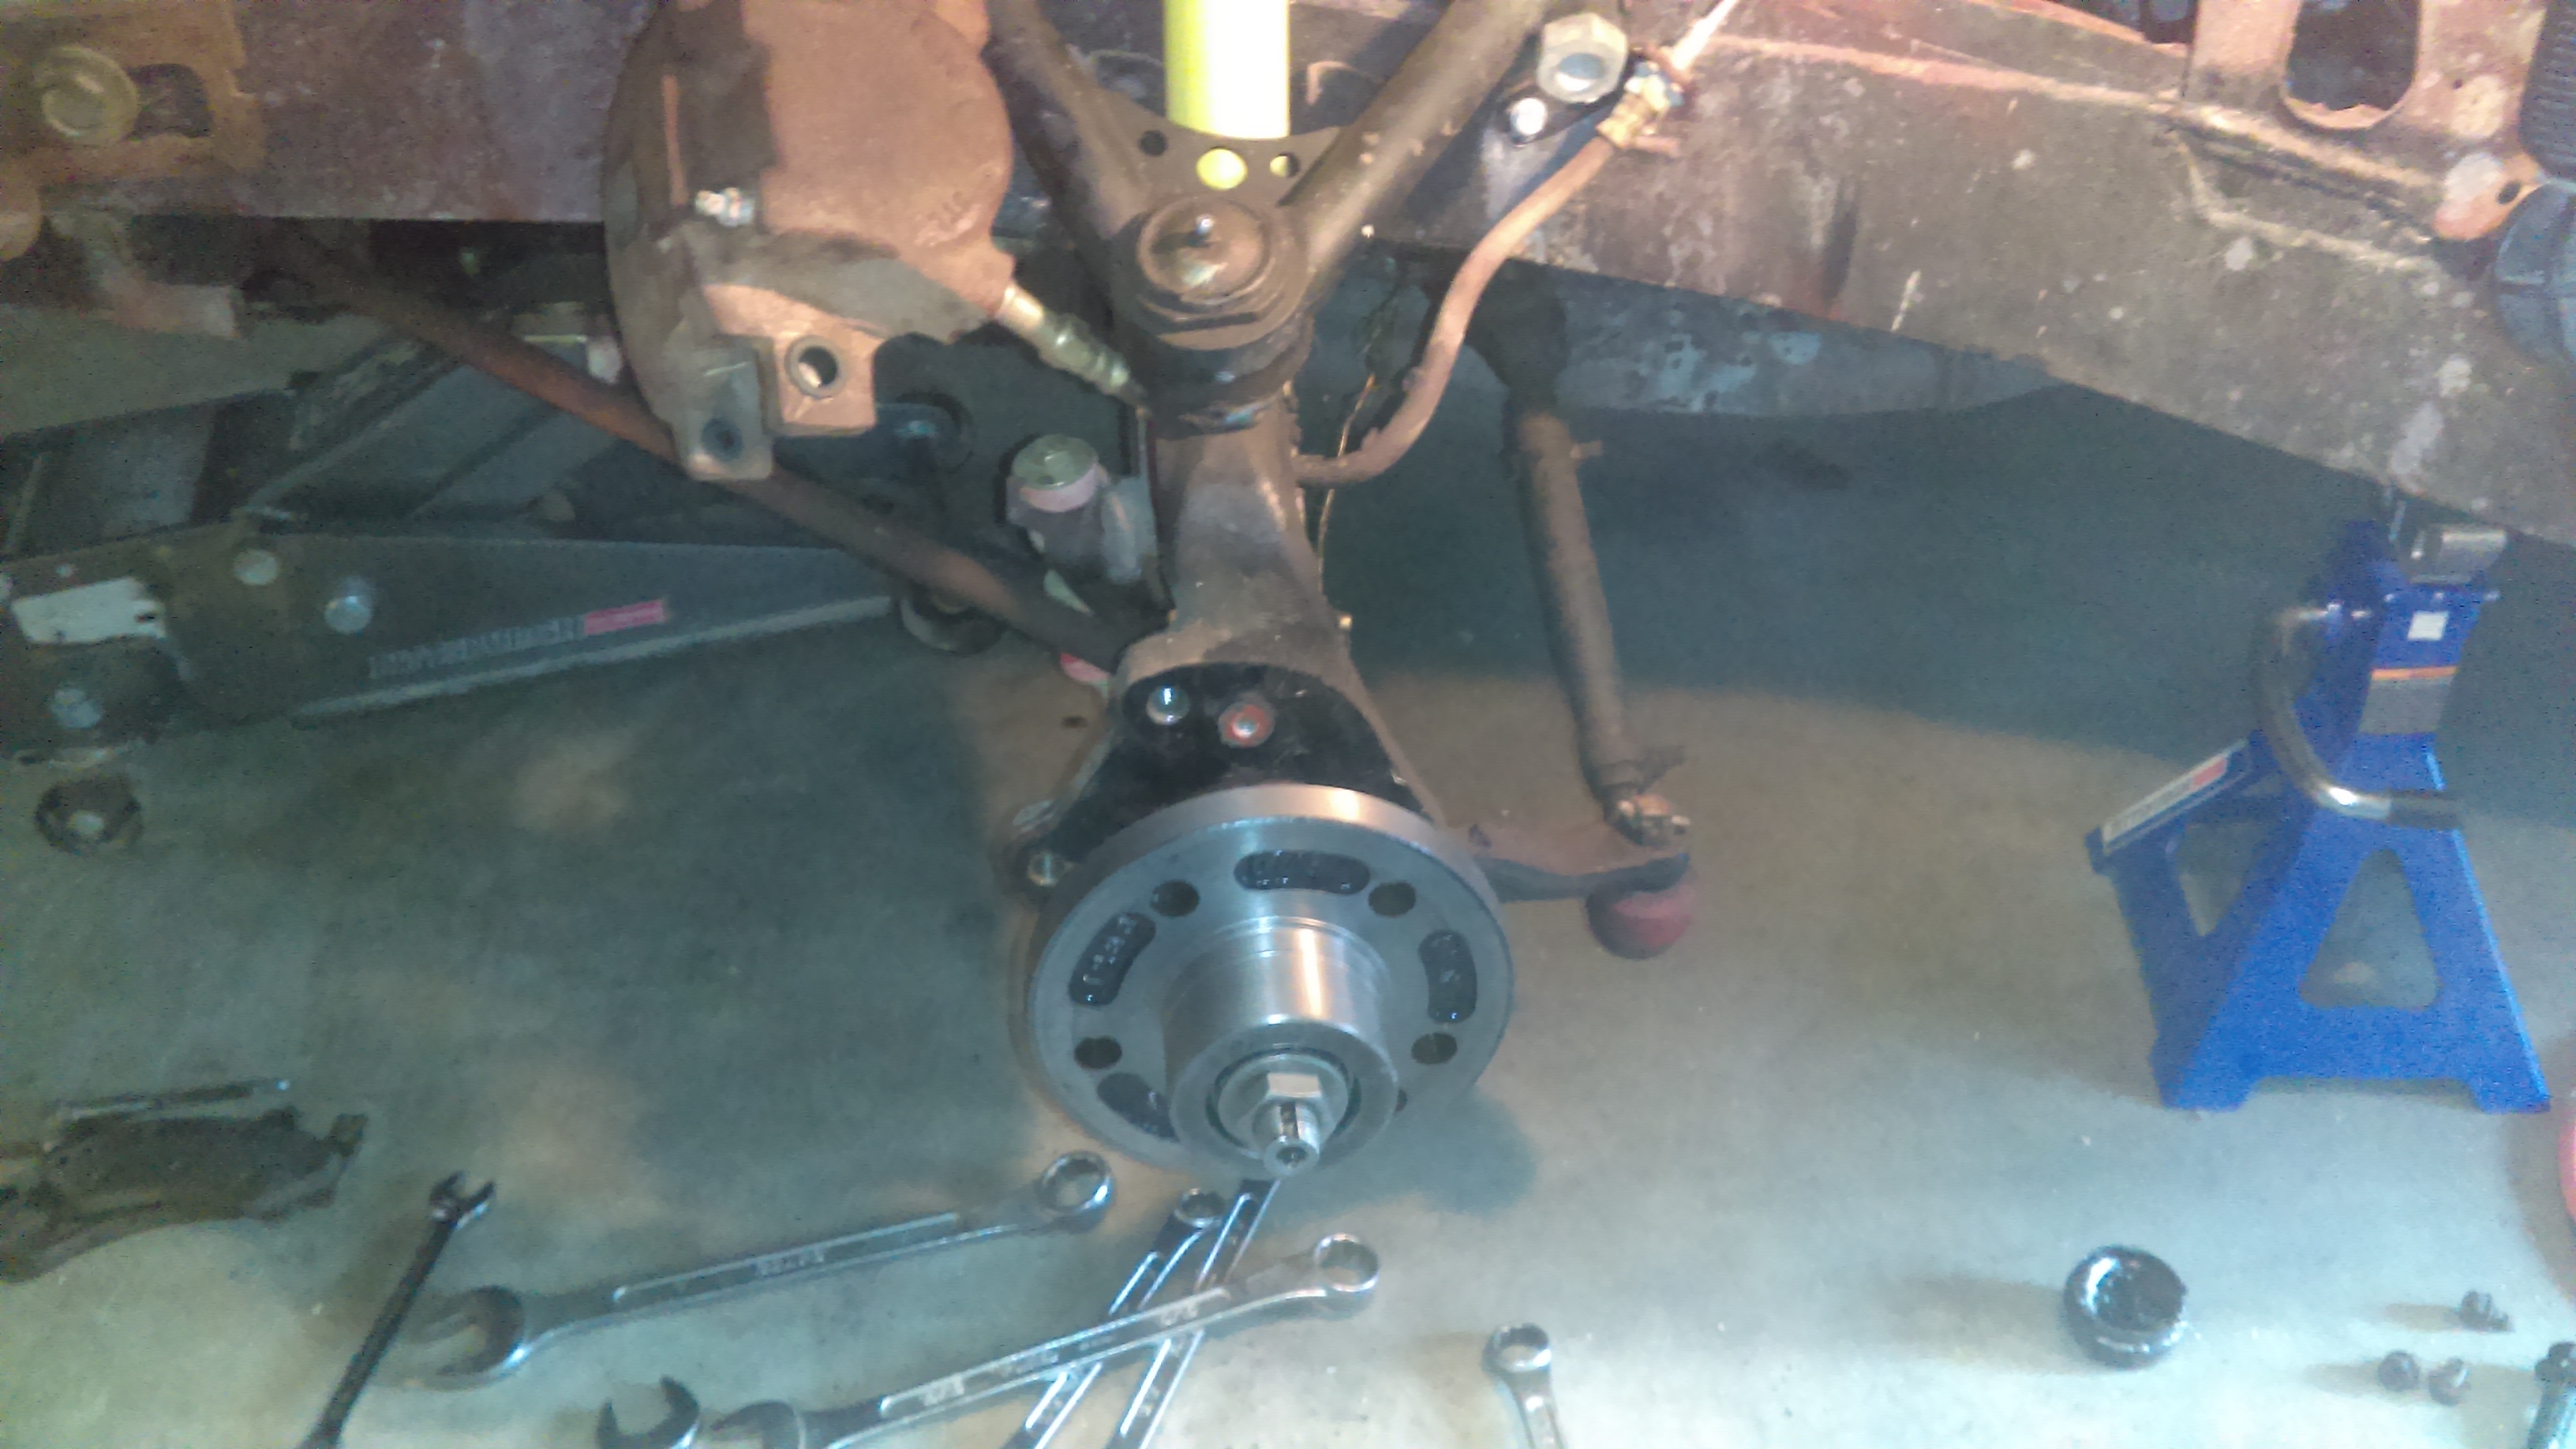
So here's to test fitting. My measurements were spot on, and everything lined up nicly. For the record, I bought loaded spindles, $200 for the pair, and things had been painted red... not on an orange car we don't.

IMAG0116.jpg
And test fit.

IMAG0120.jpg
Oh how pretty.

IMAG0124.jpg
And compare to original disk

IMAG0125.jpg
and test fit.

Re: 73 Challenger Brake Upgrade [Re: JohnGlenn] #2255613
02/18/17 08:01 PM
02/18/17 08:01 PM
Joined: Jan 2017
Posts: 35
San Antonio.TX
J
JohnGlenn Offline OP
member
JohnGlenn  Offline OP
member
J

Joined: Jan 2017
Posts: 35
San Antonio.TX
Lastly, to complete the front required lines, and extra bolts. Lines were sourced through Dr Diff, stainless braid for about when I would have paid at the parts store. Also, bolts from Fastenall, as prescribed in the first drawing picture.

Re: 73 Challenger Brake Upgrade [Re: JohnGlenn] #2255623
02/18/17 08:12 PM
02/18/17 08:12 PM
Joined: Jan 2017
Posts: 35
San Antonio.TX
J
JohnGlenn Offline OP
member
JohnGlenn  Offline OP
member
J

Joined: Jan 2017
Posts: 35
San Antonio.TX
Rears are next, didn't have much to start with, so lots of part #'s. Here's what I used:

Rotors - 03 Cobra Mustang, Duralast 54036 x2 $80, bolt holes are too small, so you'll have to open them up for it to sit flat.

Calipers - 01 Jag S-Type, similar to mustang, but more available. Pick and pull $20.

Hoses - 01 Camero outer's, Duralast 78537 x2 $24 (Metric Bubble flare ends)

Brake line -M10-1, 4 ft $7. To replace from center hose to disk hoses, no luck making bubble flares here, easier and cheaper to buy the dang line and redo center hose flares.

Re: 73 Challenger Brake Upgrade [Re: JohnGlenn] #2255625
02/18/17 08:21 PM
02/18/17 08:21 PM
Joined: Jan 2017
Posts: 35
San Antonio.TX
J
JohnGlenn Offline OP
member
JohnGlenn  Offline OP
member
J

Joined: Jan 2017
Posts: 35
San Antonio.TX
This step almost requires a lathe, and as always, start with a scrap piece to check fit.

IMAG0128.jpg
Basic layout

IMAG0126.jpg
I'm still useing the 8.75 adjuster.

IMAG0129.jpg
in the lathe

IMAG0134.jpg
milled 6061 t6 .500 plate, hole pattern in next post. Also, some .100 spacers to replace the drum backing plate.

Re: 73 Challenger Brake Upgrade [Re: JohnGlenn] #2255632
02/18/17 08:39 PM
02/18/17 08:39 PM
Joined: Jan 2017
Posts: 35
San Antonio.TX
J
JohnGlenn Offline OP
member
JohnGlenn  Offline OP
member
J

Joined: Jan 2017
Posts: 35
San Antonio.TX
Like I said, my DRO was acting fickle, so test piece first, but these are the coords i drilled on.

Center bore of axle ID should be what will fit OVER your axle housing, from the BACK, mine varied as axle housing OD isn't precision machined.
X: 0.00
Y: 0.00

Axle flange bolt holes (3/8 bolts, i cut mine under to form a tight press fit) I cut away the bottom bolt hole to allow it to fit over the axle tube, but will provide all 5 for the spacers.
1: X -.684 Y -1.660
2: X -1.843 Y -.382
3: X -.484 Y 1.816
4: X .699 Y .811
5: X 1.182 Y 1.355 Center Bottom hole

Caliper Bolt holes
1: X -4.395 Y -1.856
2: X -4.719 Y 1.961

Re: 73 Challenger Brake Upgrade [Re: JohnGlenn] #2255634
02/18/17 08:46 PM
02/18/17 08:46 PM
Joined: Jan 2017
Posts: 35
San Antonio.TX
J
JohnGlenn Offline OP
member
JohnGlenn  Offline OP
member
J

Joined: Jan 2017
Posts: 35
San Antonio.TX
I used a grinder to get the u shape in the bolt heads, when you see it in person you'll get it. Also, ground some snug fitting washers, 5/16 fender washers, as you don't want all that pressure compressing right on the aluminum.

IMAG0141.jpg
From here you can see the idea, and the stack. Bracket, axle flange, spacer, bearing cap. I used 3/8 x 2 grade 8 bolts.

Re: 73 Challenger Brake Upgrade [Re: JohnGlenn] #2255639
02/18/17 08:51 PM
02/18/17 08:51 PM
Joined: Jan 2017
Posts: 35
San Antonio.TX
J
JohnGlenn Offline OP
member
JohnGlenn  Offline OP
member
J

Joined: Jan 2017
Posts: 35
San Antonio.TX
I'm not giving specific deminsions, as with the single adjuster any movement effects both sides. I wound up useing my .100 spacers, but no gaskets, only gear oil rtv. Worked perfect on drivers side, perfect disk spacing on bracket, but not the pass side. If you look at the bracket above, it has a taper milled into it as the drivers side seemed crooked and disk spacing wasn't great on the back side. I think this might be some tow in the axle housing, as everything seats nicely, and with a litle taper milled in has great disk/bracket spacing.

Re: 73 Challenger Brake Upgrade [Re: JohnGlenn] #2255642
02/18/17 08:57 PM
02/18/17 08:57 PM
Joined: Jan 2017
Posts: 35
San Antonio.TX
J
JohnGlenn Offline OP
member
JohnGlenn  Offline OP
member
J

Joined: Jan 2017
Posts: 35
San Antonio.TX
Some extra pics to see the assembly. Of note, the hose fittings are metric, bubble flares... So, plan for this, it blind sided me, I thought everything was double flares.

IMAG0139.jpgIMAG0146.jpg
Re: 73 Challenger Brake Upgrade [Re: JohnGlenn] #2255643
02/18/17 08:59 PM
02/18/17 08:59 PM
Joined: Jan 2017
Posts: 35
San Antonio.TX
J
JohnGlenn Offline OP
member
JohnGlenn  Offline OP
member
J

Joined: Jan 2017
Posts: 35
San Antonio.TX
Also, note the barrel fitting for the ebrake. This is how I used factory cables. They are about 2.5 inches long, and have a c clip holding them to the bracket.

Re: 73 Challenger Brake Upgrade [Re: JohnGlenn] #2255645
02/18/17 09:06 PM
02/18/17 09:06 PM
Joined: Jan 2017
Posts: 35
San Antonio.TX
J
JohnGlenn Offline OP
member
JohnGlenn  Offline OP
member
J

Joined: Jan 2017
Posts: 35
San Antonio.TX
Rear brakes done, for around $125.

IMAG0140.jpg
Last edited by JohnGlenn; 02/18/17 09:07 PM.
Re: 73 Challenger Brake Upgrade [Re: JohnGlenn] #2255646
02/18/17 09:10 PM
02/18/17 09:10 PM
Joined: Jan 2017
Posts: 35
San Antonio.TX
J
JohnGlenn Offline OP
member
JohnGlenn  Offline OP
member
J

Joined: Jan 2017
Posts: 35
San Antonio.TX
Got a car meet to go to, hopefully I'll get the hydroboost conversion posted tonight.

Re: 73 Challenger Brake Upgrade [Re: JohnGlenn] #2255844
02/19/17 02:31 AM
02/19/17 02:31 AM
Joined: Jan 2017
Posts: 35
San Antonio.TX
J
JohnGlenn Offline OP
member
JohnGlenn  Offline OP
member
J

Joined: Jan 2017
Posts: 35
San Antonio.TX
Now for Hydroboost.

01-03 Cobra Mustang, got the booster, master and prop valve off ebay: $114 shipped

Brake Lines: Don't have the reciept, but less than $20
Dorman 071340BP (3/16 double flare to m10x1 bubble flare adaptor, for front line)
Dorman 785-434 (7/16 female double flare to 3/16 male double flare, rear line to wilwwod prop valve)
Dorman 785-462 (1/4 tube nut, front line into above adapter)
3/16 double flare line and fittings, dependant on how your brakes are currently setup.

Hydraulic Lines: From Summit $154.73
RUS-620421 $15.97 X4 (90 hose end)
RUS-648080 $11.97 (-6 to M18x1.5 o-ring adapter)
RUS-670530 $4.97 (-6 to M16mmx1.5 adapter, also requires Dorman 82540 nylon sealing ring $5)
RUS-632620 $50.97 (PowrFlex Hose)
AER-FBM2964 $8.97 (flare adapter for PS pump)
RUS-648010 $13.97 (o-ring 1/2-20 adapter for steering box)
I tried some cheap junk yard alternatives, a main hose from a 97 sunfire would get close, just needing some bending and a double flare for PS pump. But, the hydro to steering box hung me up, it's 3/8 down to 5/16 with an o-ring seal. It would have been cheaper just to go with the above summit order, way less headache.

Mounting:
4x5x1.5 material of your choosing, I used a sandwich of aluminum, one inch thick, plus another .5 plate.
4 x 5/16x2.5 inch bolts.

General Idea:
The Ford booster from mount face to eyelet is 1.5 inch longer than the factory booster. Also, if mounted right side up, that would expose the lines, and generally ugly it up, so I flipped the master and mounted it upside down.

Re: 73 Challenger Brake Upgrade [Re: JohnGlenn] #2255848
02/19/17 02:38 AM
02/19/17 02:38 AM
Joined: Jan 2017
Posts: 35
San Antonio.TX
J
JohnGlenn Offline OP
member
JohnGlenn  Offline OP
member
J

Joined: Jan 2017
Posts: 35
San Antonio.TX
I don't remember specifics for diminsions, but the Ford eyelet is larger and skinnier. This is a great time to make it from bearing bronze, and also replace the other pedal bushings with bronze while your at it. Pedal is oh so smooth now.

IMAG0154.jpg
total width was .400, dont remember the rest

IMAG0155.jpg
press fit bushing, then ream to .500. YOU NEED A REAMER, bushing shrinks when pressed in.

Re: 73 Challenger Brake Upgrade [Re: JohnGlenn] #2255856
02/19/17 02:45 AM
02/19/17 02:45 AM
Joined: Jan 2017
Posts: 35
San Antonio.TX
J
JohnGlenn Offline OP
member
JohnGlenn  Offline OP
member
J

Joined: Jan 2017
Posts: 35
San Antonio.TX
mounting holes are sketchy, I measured off the booster, but still not perfect. Center hole for booster is just centered on bolt patters, then recessed to leave .300 face thickness. This allows you to tighten the nut via chiesel, and then reinstall the snap ring. On the inside is an alignment pin, i drilled it twice once i decided to flip the booster, simply cut down some .25 steel stock as a dowel.

IMAG0160.jpgIMAG0162.jpg
Re: 73 Challenger Brake Upgrade [Re: JohnGlenn] #2255857
02/19/17 02:48 AM
02/19/17 02:48 AM
Joined: Jan 2017
Posts: 35
San Antonio.TX
J
JohnGlenn Offline OP
member
JohnGlenn  Offline OP
member
J

Joined: Jan 2017
Posts: 35
San Antonio.TX
Also, the .500 plate was recessed where the two plates meet, this allowed me to trim the rubber boot and have the two plates clamp it.

Re: 73 Challenger Brake Upgrade [Re: JohnGlenn] #2255859
02/19/17 02:53 AM
02/19/17 02:53 AM
Joined: Jan 2017
Posts: 35
San Antonio.TX
J
JohnGlenn Offline OP
member
JohnGlenn  Offline OP
member
J

Joined: Jan 2017
Posts: 35
San Antonio.TX
next is to bolt it all in, first pic is lines up, ugly, second is lines down with booster flipped.

IMAG0165.jpg
lines up

IMAG0168.jpg
lines down

Re: 73 Challenger Brake Upgrade [Re: JohnGlenn] #2255864
02/19/17 03:01 AM
02/19/17 03:01 AM
Joined: Jan 2017
Posts: 35
San Antonio.TX
J
JohnGlenn Offline OP
member
JohnGlenn  Offline OP
member
J

Joined: Jan 2017
Posts: 35
San Antonio.TX
Next is lines. Order is: PS pump to Hydroboost in, hydroboost out to PS box, return from both tied together and then back to pump. I threw in a cooler on the low pressure side, junk yard piece off an excursion, $10.

IMAG0170.jpgIMAG0174.jpgIMAG0173.jpg
Page 1 of 2 1 2


Powered by UBB.threads™ PHP Forum Software 7.7.1