|
 Re: Color Scheme
[Re: SeanD]
#1602014
Re: Color Scheme
[Re: SeanD]
#1602014
04/05/14 10:24 PM
04/05/14 10:24 PM
|
Joined: Jan 2005
Posts: 3,344
Central TX
roe
 OP
OP
master
|
OP
master
Joined: Jan 2005
Posts: 3,344
Central TX
|
I've heard about that stuff but dont know anyone who's used it. The RR was rolled with Rustoleum and then he spraybomed the gloss black. Im going back and re-reading all 3 of those endless thread to brush up and gather all the tips and info I can before I start on the truck. But its either going to be his color combo which will require jambs and all. Or I will go with the Rustoleum Charcoal gray color in a gloss finish which will allow me to keep the factory grey in the jambs, etc...
1971 Plymouth Satellite
408/904 8 3/4 3.23 SG
|
|
|
Re: Update: making progress on color change
[Re: roe]
#1602018
04/21/14 10:39 PM
04/21/14 10:39 PM
|
Joined: May 2003
Posts: 15,487
Florida
scratchnfotraction
I Live Here
|
I Live Here
Joined: May 2003
Posts: 15,487
Florida
|
looks like you got the dodge truck bug for sure now Roe. hardest thing to do is decide what you want to do..I changed my mind 3x before I got to put the yellow base coat on mine..went yellow at the last min at paint shop.  then in the middle kept thinking I should have went another way on color...yellow/black is gonna be hard to pull off on a dodge truck.. but it came out looking great in my book...and I have the only yellow/black superbee 440 truck in my town.  boy..those gator flags sure look a long way from home. 
|
|
|
Re: Update: making progress on color change
[Re: scratchnfotraction]
#1602019
04/22/14 07:14 PM
04/22/14 07:14 PM
|
Joined: Jan 2005
Posts: 3,344
Central TX
roe
OP
master
|
OP
master
Joined: Jan 2005
Posts: 3,344
Central TX
|
Oh yeah, I dove right into this thing. I think I said the wrong color earlier, I meant charcoal gray, for the body, and the accent color will be black. I'm anxious to get this paint done so I can start driving this thing. I'm gonna stick with the gray for now, but if I don't like it, I can just paint it over again, the supplies are cheap enough. Once paint is done, I'll do the bed and rails in black bedliner, and then drive the wheels off of it. One thing I found out is that texans love their football. So I fly these flags to give them something to aspire to. Everyone needs a role model.  roe
1971 Plymouth Satellite
408/904 8 3/4 3.23 SG
|
|
|
Re: Update: making progress on color change
[Re: roe]
#1602020
04/27/14 10:38 PM
04/27/14 10:38 PM
|
Joined: Jan 2005
Posts: 3,344
Central TX
roe
OP
master
|
OP
master
Joined: Jan 2005
Posts: 3,344
Central TX
|
Update. After putting on 2 thick coats of unthinned primer to the fenders and hood, then sanding most of it back of, I decided to do 1 thinned coat to the whole truck. Full strength it builds quickly which is great for filling small surface imperfections. But too thick it takes longer to fully dry. Also, doing the primer help me get comfortable with the rolling technique. As I went along I got much better at laying down smooth coats and reducing roller lines. There are lines where my coats overlapped areas that had dried already. And I also think that I will see less roller marks on the color coats when the paint is thinned much thinner than I did the primer, and the paint doesn't dry as fast which will give me more time to work it. Pics: Question about this first pic. This guide that goes around the window is old and brittle, and needs to be replaced. Is this the part listed on page 11 of the LMC catalog under "front door glass and components"? ( http://www.lmctruck.com/icatalog/dc/t.aspx?Page=10 ) 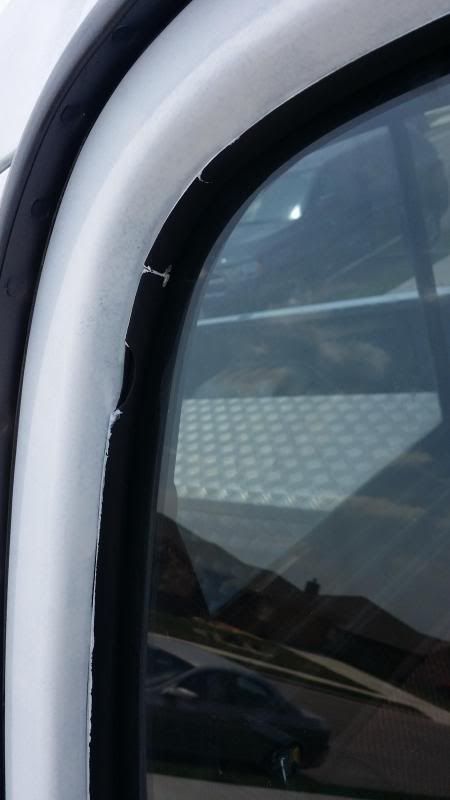 You can see the dent I need to fix just in front of the rear wheelwell.  Darker white areas like at the top of the fender are where there was primer left after sanding it back smooth 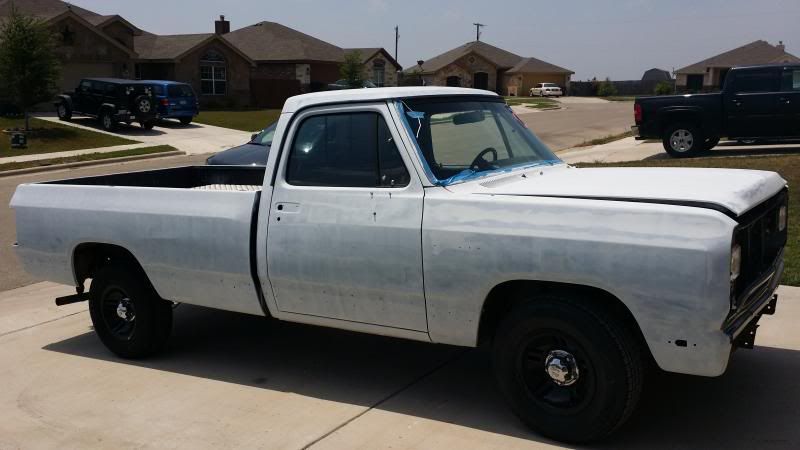 The lighter spots are where there is the thin coat of primer over areas that went lower than factory paint (metal/factory primer) 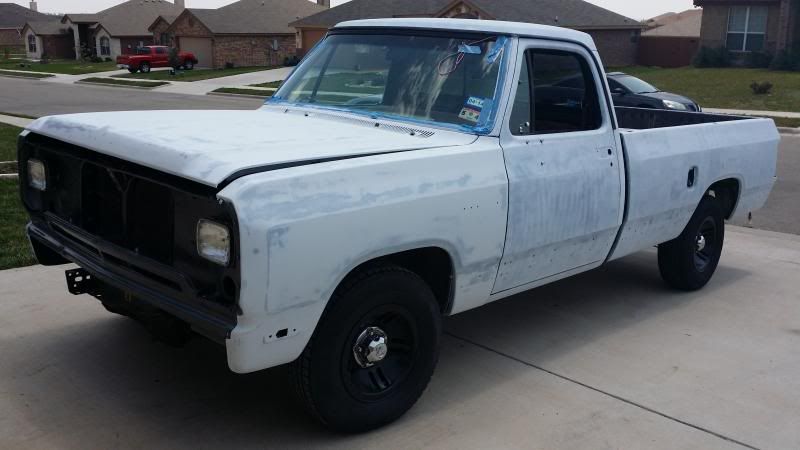 After getting the whole thing in primer, I'm still thinking it might look really good in gloss white. But Im going to stick with the charcoal grey for now. 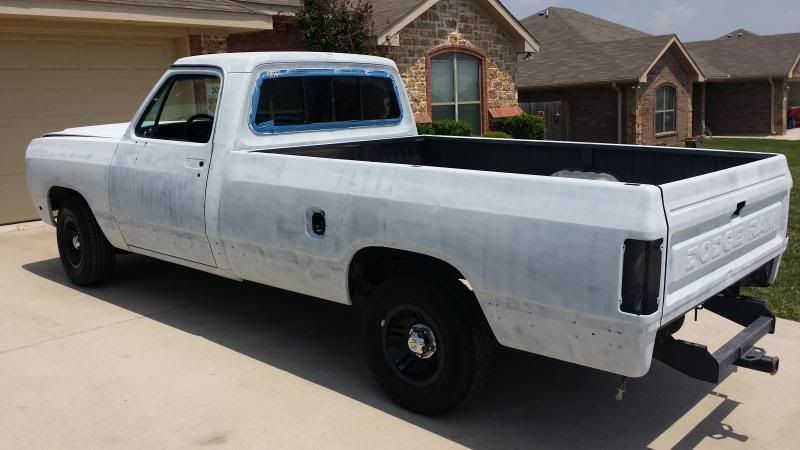 I've been debating blacking this out with gloss black, but for now Im going to leave the factory gray. Its in great shape. Only two small spots where the paint was scratched off and there is surface rust. You can see them at the bottom. Im just going to sand those two areas and hit them with some of the charcoal gray. 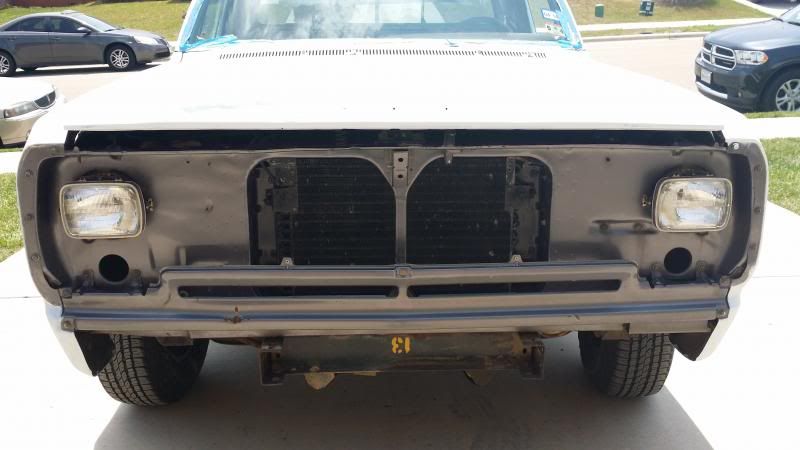 There is a small dent at the first D in Dodge, and another in the center/bottom of the tailgate. Im also deciding whether to paint the hitch black or body color. 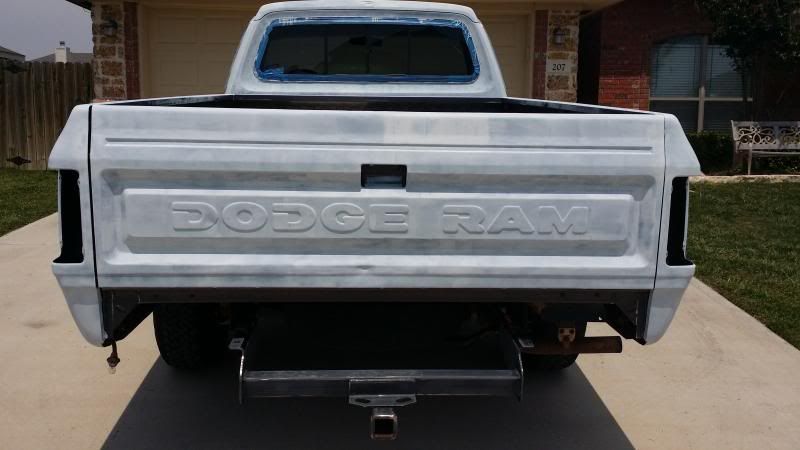 These are the two holes that I will bondo/feather, then primer back over on the drivers bed rail. 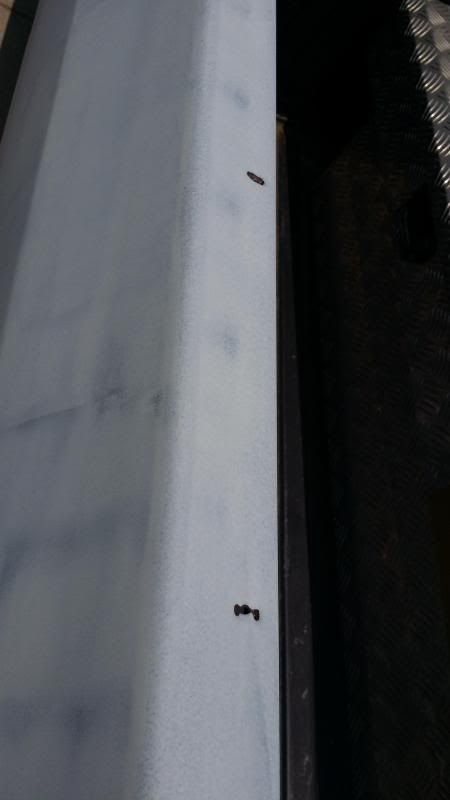
1971 Plymouth Satellite
408/904 8 3/4 3.23 SG
|
|
|
Re: Update: making progress on color change
[Re: roe]
#1602021
06/01/14 07:42 PM
06/01/14 07:42 PM
|
Joined: Jan 2005
Posts: 3,344
Central TX
roe
OP
master
|
OP
master
Joined: Jan 2005
Posts: 3,344
Central TX
|
Here is the next update. My first attempt at bondo/body filler. I watched a bunch of youtube videos, read some stuff online and gave it a shot. You can tell which ones I did first, and which ones I did after I had a little practice. All in all, I feel pretty well about it. Those first ones that were kind of globbed on because I was rushing, put in too much hardner, and mixed too much at once, I will sand down to see how they look, then apply another coat if I need to. Also, next time I'll definitely wear gloves. Can you guess which one I did first,  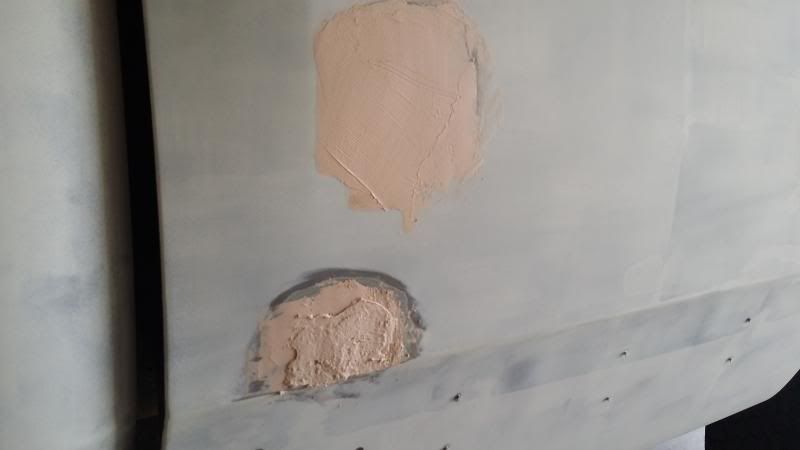 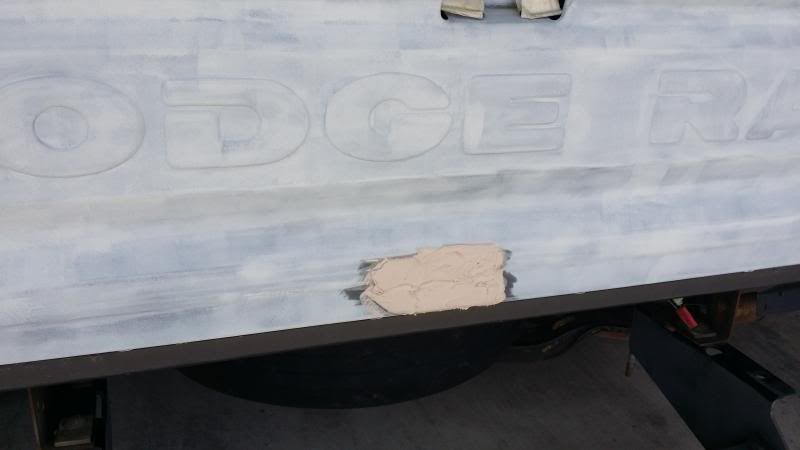 getting better 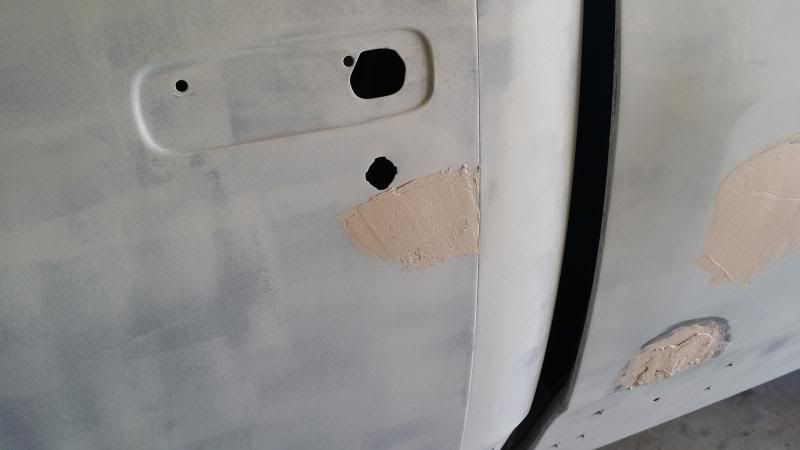 At the right side of this pic where the bondo starts, I actually found a little rust through that looked like a pin hole. Cleaned it up did what you see here. I understand its better to weld in new metal, but... 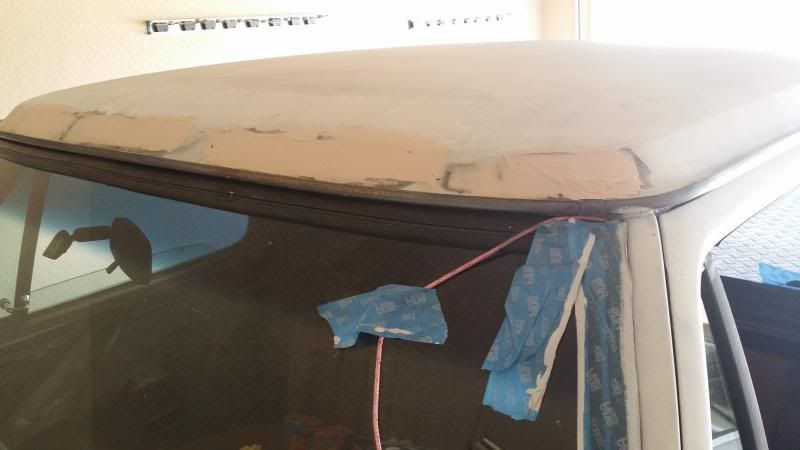 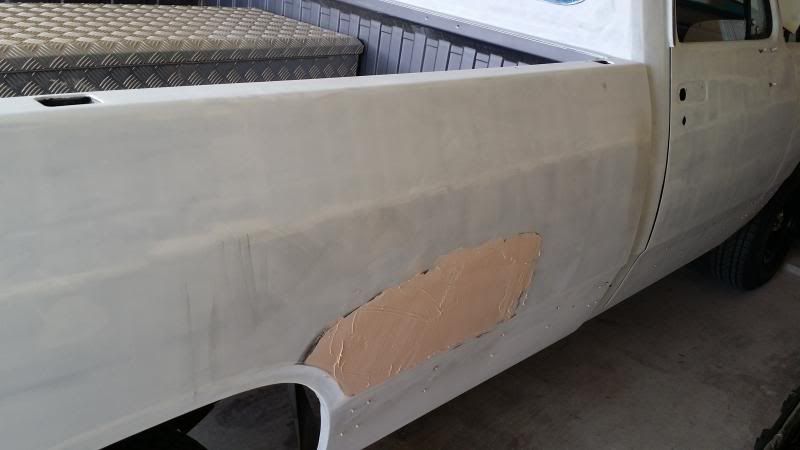 now I've got it 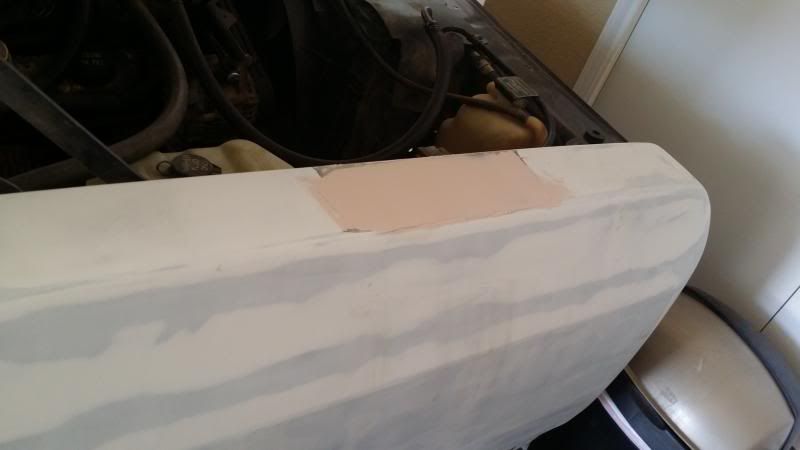 I'll post some pics after sanding, then primer/sealer, then on to color. I think I have a chance at driving it next Monday. 
1971 Plymouth Satellite
408/904 8 3/4 3.23 SG
|
|
|
Re: Update: making progress on color change
[Re: roe]
#1602022
06/01/14 08:14 PM
06/01/14 08:14 PM
|
Joined: Jan 2003
Posts: 5,783
Corpus Christi, TX
shanker
master
|
master
Joined: Jan 2003
Posts: 5,783
Corpus Christi, TX
|
Props to you for getting your hands dirty and doing the job yourself...it feels good doesn't it..
just a tip from another hobbyist; there are MUCH easier to work with plastic fillers that can be bought (and most of the time for cheaper) from your nearest Automotive Paint Supply store..
Bondo (the name brand stuff); isn't that easy to work with compared to say Rage II Extreme. at least to me anyway.
The Federal Government has not yet learned that you cannot legislate morality
1970 Coronet R/T FF4/FF8/V85/V1G 440/Auto/3.23
1970 Coronet R/T FK5/FK5/V8W/V1W 440/Auto/3.55
1970 Super Bee TX9/TX9/V8W/N96 383/Auto/3.91
1975 Duster 360 VS29L5 Daily Driver
|
|
|
Re: Update: making progress on color change
[Re: shanker]
#1602023
06/02/14 10:36 AM
06/02/14 10:36 AM
|
Joined: May 2003
Posts: 15,487
Florida
scratchnfotraction
I Live Here
|
I Live Here
Joined: May 2003
Posts: 15,487
Florida
|
LOOKIN GOOD!!! thats how I did my first one. jump right in and try it. best thing about filler is you can sand it back off and do it over if it does not turn out right. only way to learn is to do it for yourself. I would have done the same on the roof pin hole. that area is always in need of inspection. same for under the drip rail above rubber gasket on the pinch weld. thanks for the update on it Roe. 
Last edited by scratchnfotraction; 06/02/14 06:45 PM.
|
|
|
Re: Update: making progress on color change
[Re: roe]
#1602024
06/02/14 12:30 PM
06/02/14 12:30 PM
|
Joined: Nov 2005
Posts: 15,118
85086
moparpollack
Lil Herman
|
Lil Herman
Joined: Nov 2005
Posts: 15,118
85086
|
Sand three to four inches away from the dent you are trying to fill. If you bondo up to primer it will shrink and show a spot.
56 Plaza 63 D100 step side 67 Coronet, 68 Roadrunner, 69 Super Bees, 69 Coronet 500 convertible, 70 Roadrunner Post, 79 D150 360, and a severe case of Mopar a,d,d
|
|
|
Re: Update: making progress on color change
[Re: shanker]
#1602026
06/02/14 09:29 PM
06/02/14 09:29 PM
|
Joined: Jan 2005
Posts: 3,344
Central TX
roe
OP
master
|
OP
master
Joined: Jan 2005
Posts: 3,344
Central TX
|
Shanker: it does feel good, I've always liked to try and as much as possible so I can learn more. This is definitely a learning experience. This bondo is definitely tough to sand. I'll look into trying another brand once this can is gone. Something easier to sand would be welcomed with open arms.
Scratchin: no problem on the update. You asking about it actually made me want to work on it some more.
Moparpollack: thanks for the tip, I'll remember that as I move forward to try and make this look as good as possible.
Golden Arm: after my first round of filler I know what you mean about the sanding. I'm actually in TX now so you were spot on about the houses. I just can't seem to change my profile to say TX instead of FL.
1971 Plymouth Satellite
408/904 8 3/4 3.23 SG
|
|
|
Re: Update: making progress on color change
[Re: roe]
#1602027
06/18/14 10:37 PM
06/18/14 10:37 PM
|
Joined: Jan 2005
Posts: 3,344
Central TX
roe
OP
master
|
OP
master
Joined: Jan 2005
Posts: 3,344
Central TX
|
Well, here is the next update. Its a little behind schedule, but that's whats great about this method. If time constraints pop up, then you can just wait and continue when you are able. This is after 1 coat to the entire body. In spots where coats overlapped, I think Im going to really like the color, its a nice deep, dark gray. I don't think the roller lines will be a problem for 2 reasons. 1. Everyone elses progress pics that I saw pretty much had the same look on the first 2-3 coats. 2. Im getting better at avoiding them all together. I can see bigger and bigger areas without the roller marks as I get better. Finally, I see that I am no bodyman, . I was able to make a lot of dents less noticeable, but definitely not perfect. And I missed a couple of dents as well. But I don't need it to be perfect either, and Im NOT backtracking now to try and fix them. Anywho, heres the pics... There was a really noticeable dent right in front of the rear wheelwell. 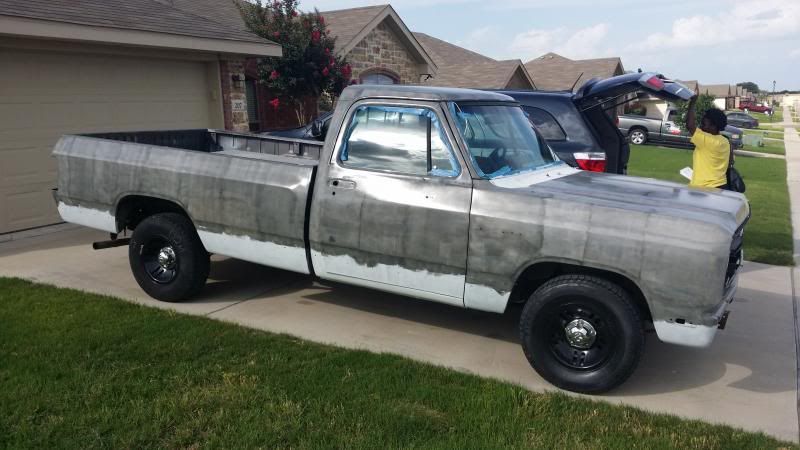 I will either pull and paint the cowl vent panel, or pull another at the junk yard, prep and paint, then swap them out. 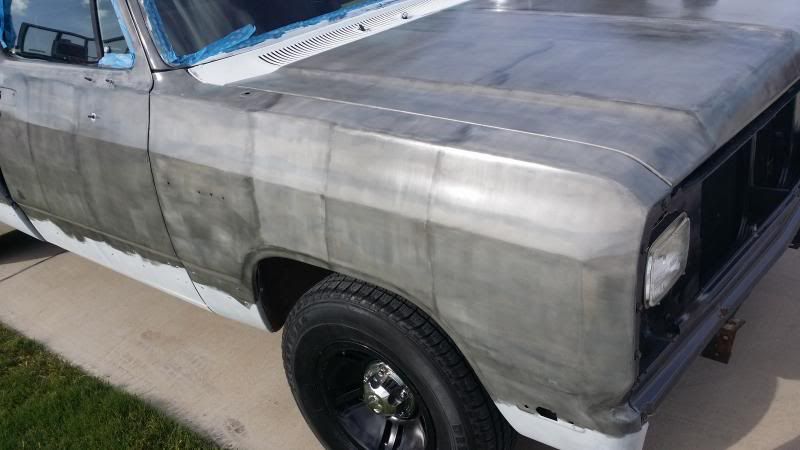 When I get full coverage I can see this having a nice gloss in it. 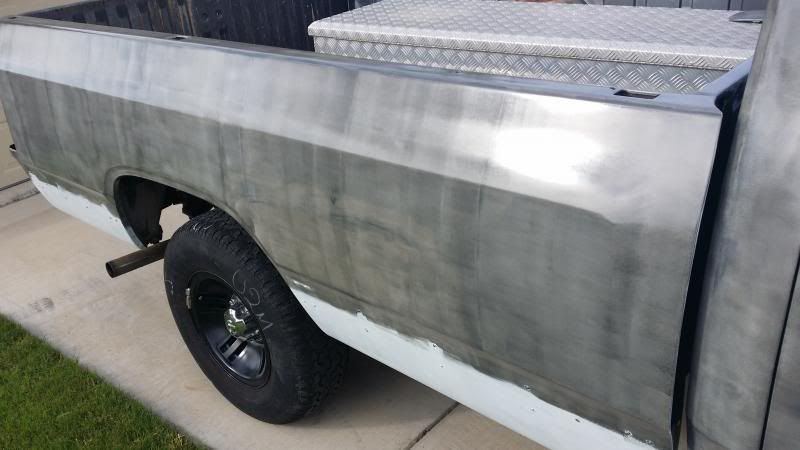 Dent in the bottom/middle of the tailgate made much less visible. Forgot about the one in the first D in Dodge. And with all the nooks and contours, this tailgate is a pain in the butt to paint. 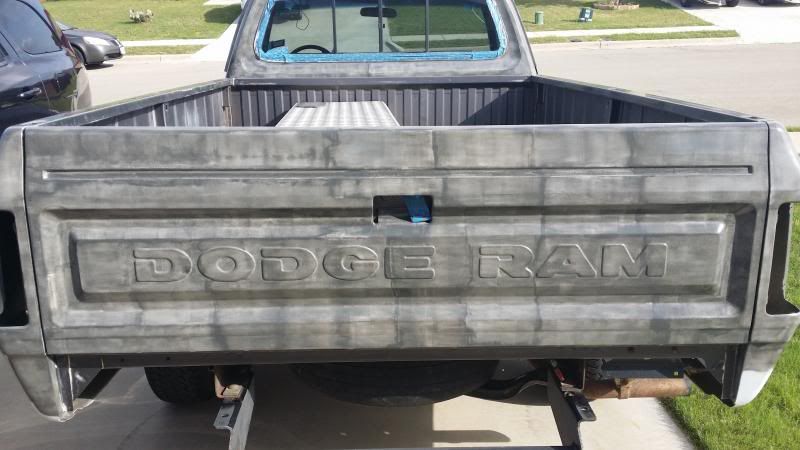 As of right now the strip at the bottom of the truck will be painted gloss black. May even do black bedliner when I do the bed.  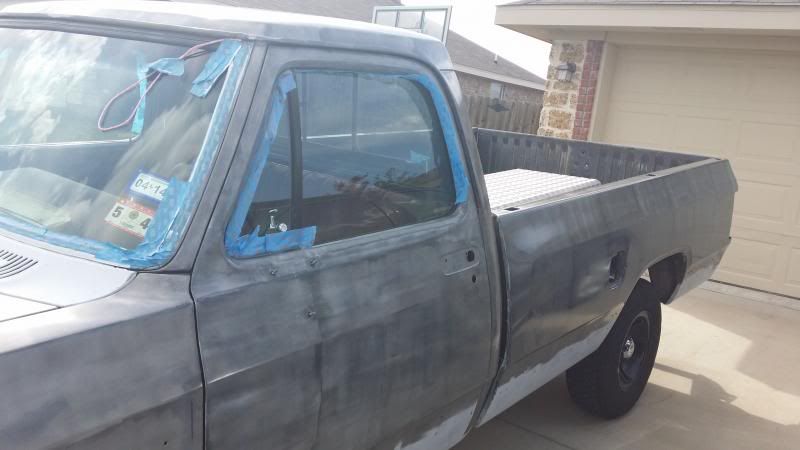 This is the bedrail that I patched a couple of holes up with Bondo. Turned out pretty well. 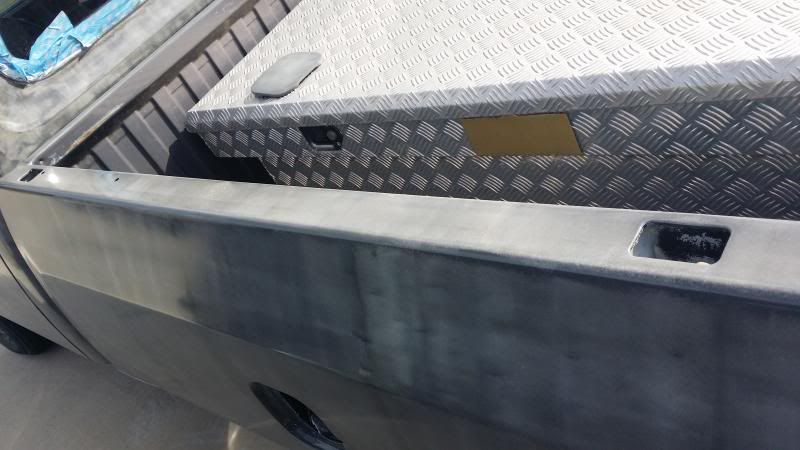 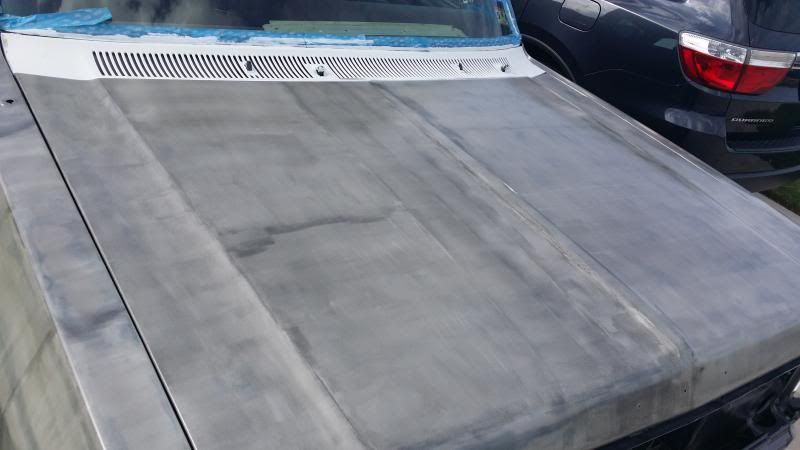 Im also think Im going to try painting the coats in alternating directions. So this coat was vertical, Im going to do the next one horizontal.
1971 Plymouth Satellite
408/904 8 3/4 3.23 SG
|
|
|
Re: Update: making progress on color change
[Re: roe]
#1602028
06/21/14 11:44 PM
06/21/14 11:44 PM
|
Joined: Jan 2005
Posts: 3,344
Central TX
roe
OP
master
|
OP
master
Joined: Jan 2005
Posts: 3,344
Central TX
|
Coat #2. Im really liking this color. Starting to get full coverage now, and the depth and gloss is pretty impressive with just a natural finish. The coats dry very hard very quickly because of the thinness of each layer, and after 2 coats the orange peel is about the same as my 2013 Durango. Well, heres pics... 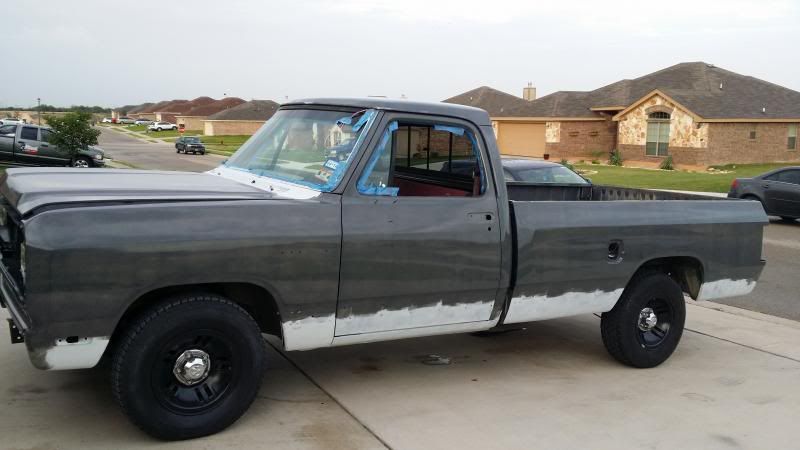 check out the gloss and reflection with just the natural finish 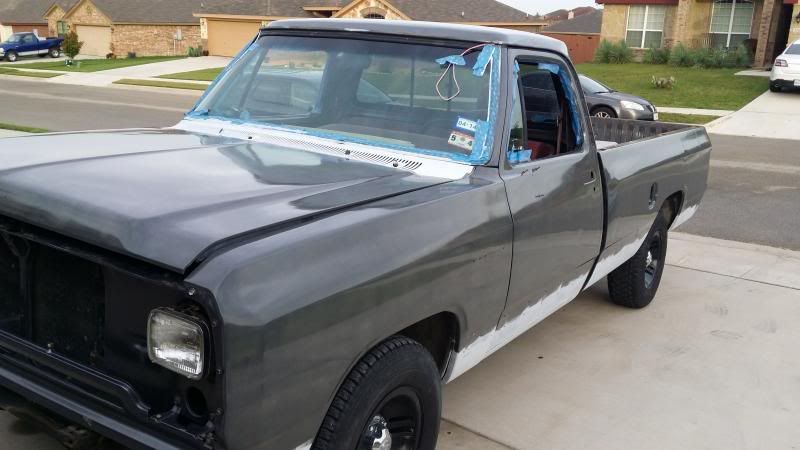 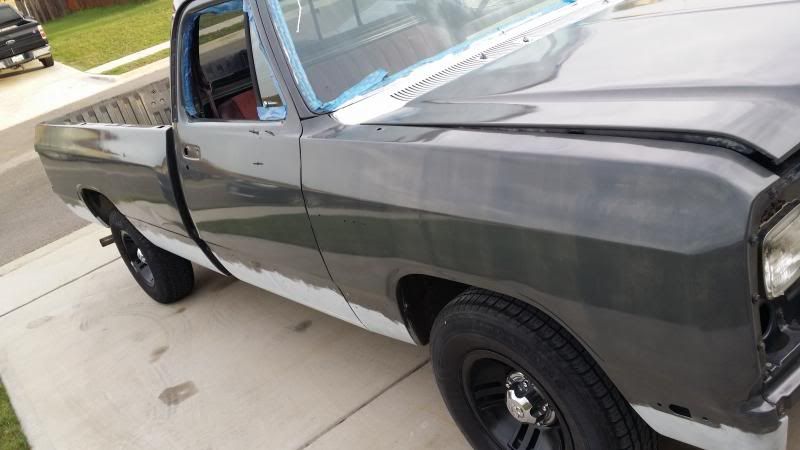 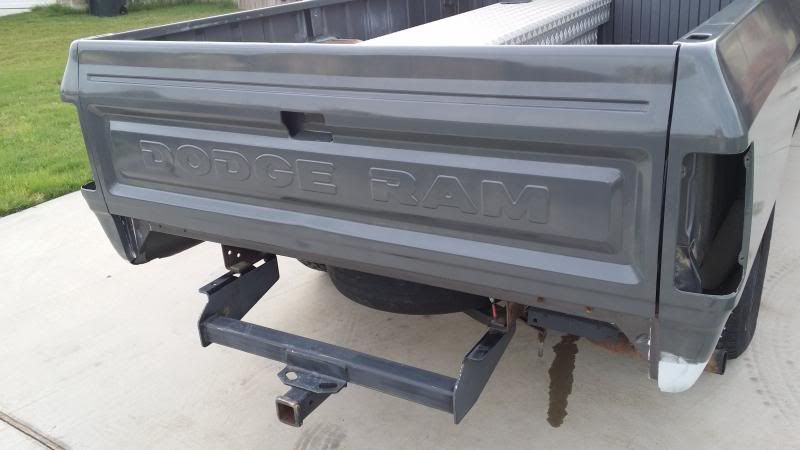 See my shotty attempt at repairing some dents in the front of the roofline. 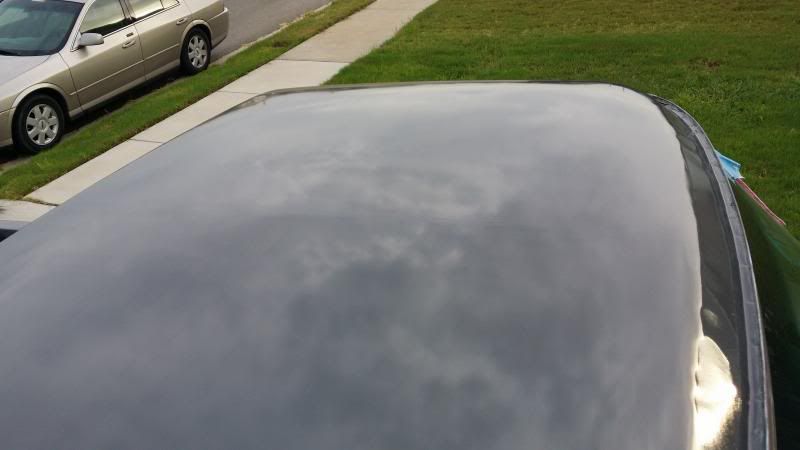 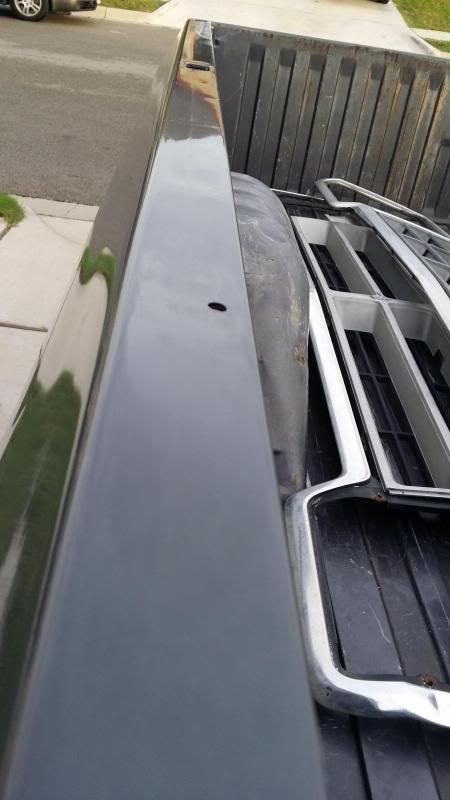 straight on pic 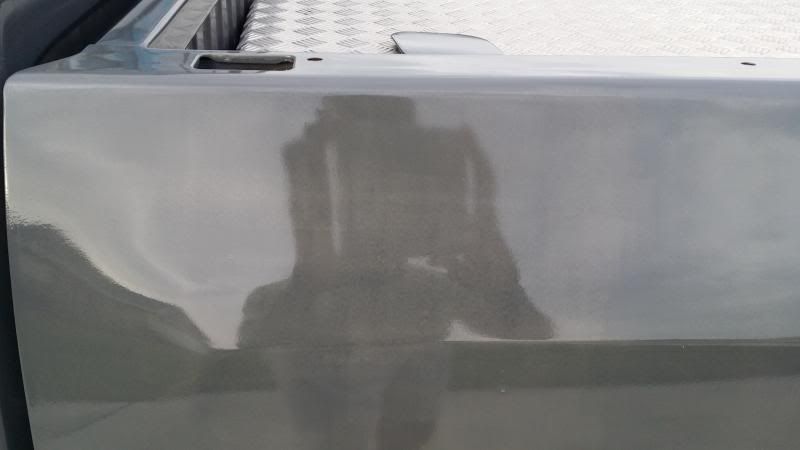 a little closer 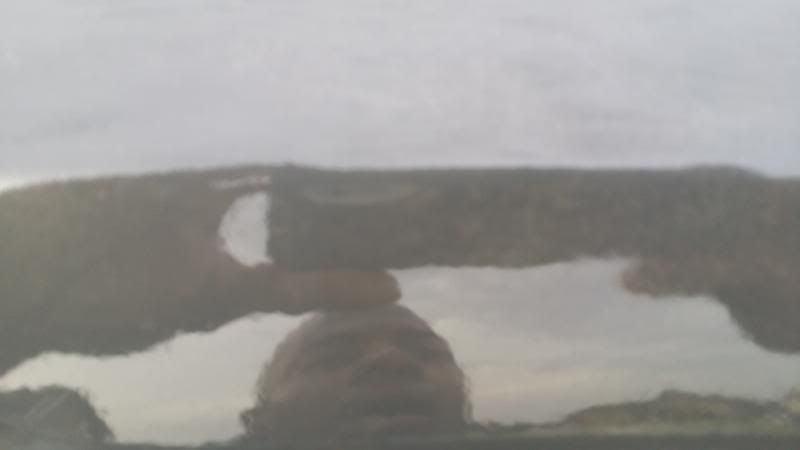 Inside the jamb is factory color with metallic in it, where you see the vehicle reflection is the Rustoleum color. They're close enough to where I don't plan on painting the jams. The run you see at the top of the pic is the only one I've noticed on the car so far. It came from paint that built up and ran down the drip rail. Ironic huh? 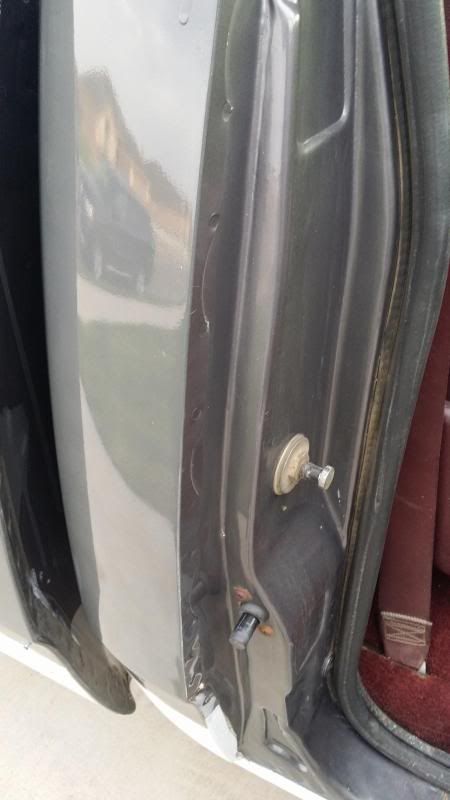 closeup  another closeup. You can see the texture in the far right of the pic. Compare the orange peel to that of the next pic of my Durango's paint.  Durango 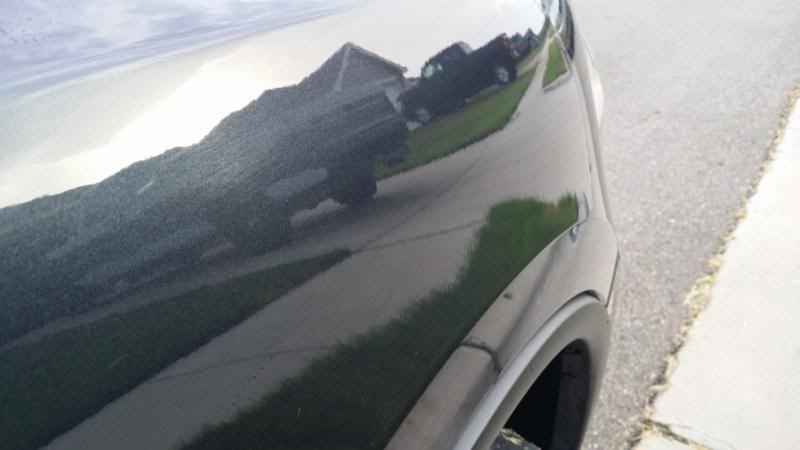
Last edited by roe; 06/22/14 12:11 AM.
1971 Plymouth Satellite
408/904 8 3/4 3.23 SG
|
|
|
Re: Update: making progress on color change
[Re: roe]
#1602029
06/21/14 11:58 PM
06/21/14 11:58 PM
|
Joined: Jan 2005
Posts: 3,344
Central TX
roe
OP
master
|
OP
master
Joined: Jan 2005
Posts: 3,344
Central TX
|
I was supposed to put another coat on today, but I want to let the paint bake in the sun. I tried today but it has been overcast all day long.
Also, Im at the point where Im supposed to wetsand and then apply two more coats. But Im really worried about burning through the paint with all of these edges and curves, especially on the tail gate. We'll see how it turns out. I think without wetsanding the peel would be too much for my liking, so Im going to try it. I figure that with the wetsanding I will have to do 4 more coats and call it a day. Then I can do the gloss black around the bottom edge of the truck, and Im going to do the roll on bedliner for the bed and bed rails. Last step for the exterior is to try again to track down 4 of the 20" steelies that come as full size spares on the new Rams.
1971 Plymouth Satellite
408/904 8 3/4 3.23 SG
|
|
|
|
|