|
 Dr D Stage 2 Front Disc Brake Kit
#1583192
Dr D Stage 2 Front Disc Brake Kit
#1583192
02/24/14 11:01 AM
02/24/14 11:01 AM
|
Joined: Jan 2003
Posts: 5,443
Indiana
YO7_A66
 OP
OP
master
|
OP
master
Joined: Jan 2003
Posts: 5,443
Indiana
|
I am in the process of installing Dr D's Stage 2 front disc setup for my 70 Challenger (manual disc). I just wanted to let those know who may be in the market for a "kit", that the parts that are supplied by Dr D are very good quality and they bolt right in!
I have currently installed the new spindles, my own lower ball joints, caliper mounting brackets, dust shields, the new combination valve, and the aluminum master cylinder (15/16" bore)/mounting kit. (Note: I am currently waiting on the rotors [RH threads] which should be here today).
The spindles and the mounting brackets bolted right in with no problems. I was assuming that this kit was going to come with an adjustable valve for the rear line, but to my surprise it came with a direct replacement valve that bolted in and all of the lines fit just like the valve that I removed. This is the first time that I have dealt with the new style aluminum MC that has the firewall mounting kit. This is the last time that I will be dealing with the four firewall bolts!!
The only "issue" that I had were with the dust shields which were minimal and it appears that who ever is making these parts, people all over are having the same fitment issues. I read about the issues before I received the kit so I knew that ahead of time. A couple of tweaks to gain access around the knuckle mounting bolts, and they are on. So far with this kit, the shields are the only issue and it took a minute each to fix. The valve was the biggest surprise to me because I did not want to cut into my existing SS brake lines for an adjustable valve. The valve in the kit fit perfectly. The calipers are coated black and look great. I painted the spindles and the caliper mounting brackets just because they came bare and to keep the rust down in the future.
I just wanted to let the members know that Cass has put together a very nice disc brake kit. All of the small parts are separated into bags. All of the bolts, clips, hoses, bearings, brake shoes, calipers (slider type) and spindles are all new and included!
Once I get my rotors, I will able to start on the caliper assembly and I hope to have the kit wrapped up by the end of the week. It is still cold here so I am taking my time when the temps allow.
Thanks Cass!
1970 YO7 A66 [Canadian Export] F8 Challenger
340 (Currently in shop for stroker assy.)
|
|
|
Re: Dr D Stage 2 Front Disc Brake Kit
[Re: YO7_A66]
#1583193
02/27/14 09:51 AM
02/27/14 09:51 AM
|
Joined: Jan 2003
Posts: 5,443
Indiana
YO7_A66
OP
master
|
OP
master
Joined: Jan 2003
Posts: 5,443
Indiana
|
What is the torque spec for the "lock nut" on the end of the spindle that retains the bearing nut?
Thanks
1970 YO7 A66 [Canadian Export] F8 Challenger
340 (Currently in shop for stroker assy.)
|
|
|
Re: Dr D Stage 2 Front Disc Brake Kit
[Re: DoctorDiff]
#1583195
02/27/14 03:36 PM
02/27/14 03:36 PM
|
Joined: Jan 2003
Posts: 5,443
Indiana
YO7_A66
OP
master
|
OP
master
Joined: Jan 2003
Posts: 5,443
Indiana
|
Got it, thanks.
(edit: I answered my own question when I got home and looked through my parts. No second locking nut)
Thanks Cass.
1970 YO7 A66 [Canadian Export] F8 Challenger
340 (Currently in shop for stroker assy.)
|
|
|
Re: Dr D Stage 2 Front Disc Brake Kit
[Re: YO7_A66]
#1583196
02/28/14 02:54 PM
02/28/14 02:54 PM
|
Joined: Jan 2003
Posts: 5,443
Indiana
YO7_A66
OP
master
|
OP
master
Joined: Jan 2003
Posts: 5,443
Indiana
|
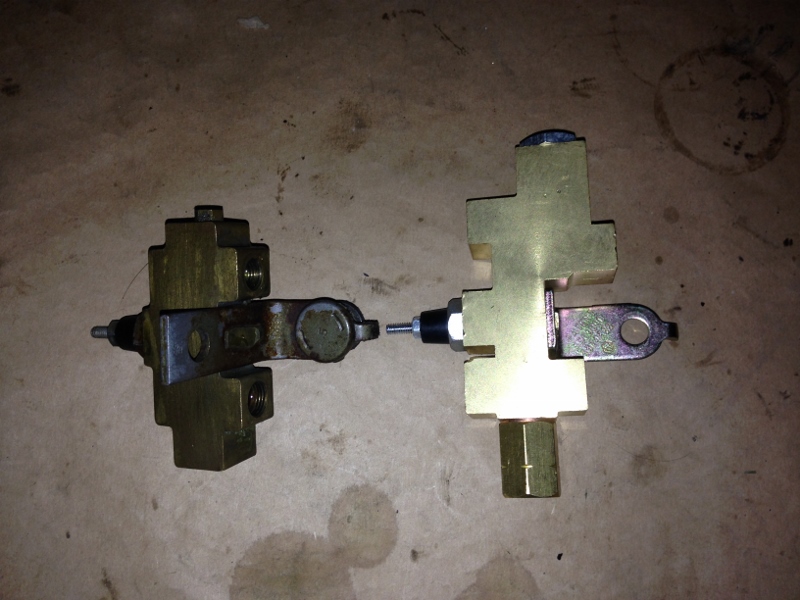
I have been asked my some members to post some reference pictures from the kit. I am not done with the installation yet, but until then, I will post some pictures of the progress.
The first picture is from another thread. I needed help with the orientation of these mounting tabs for the calipers.
1970 YO7 A66 [Canadian Export] F8 Challenger
340 (Currently in shop for stroker assy.)
|
|
|
Re: Dr D Stage 2 Front Disc Brake Kit
[Re: YO7_A66]
#1583197
02/28/14 02:57 PM
02/28/14 02:57 PM
|
Joined: Jan 2003
Posts: 5,443
Indiana
YO7_A66
OP
master
|
OP
master
Joined: Jan 2003
Posts: 5,443
Indiana
|
This is one of the minor mods that I had to do to get the splash shields on around the knuckle mounting nuts. Once again, this is due to the manufacturer not the vendor.(dimples around the large slot at bottom of picture. This gave the access around the knuckle arm mounting nut)
1970 YO7 A66 [Canadian Export] F8 Challenger
340 (Currently in shop for stroker assy.)
|
|
|
Re: Dr D Stage 2 Front Disc Brake Kit
[Re: YO7_A66]
#1583199
02/28/14 03:05 PM
02/28/14 03:05 PM
|
Joined: Jan 2003
Posts: 5,443
Indiana
YO7_A66
OP
master
|
OP
master
Joined: Jan 2003
Posts: 5,443
Indiana
|
This shows the new aluminum M/C with firewall adapter kit. Any future M/C changes will be made with only two mounting nuts. This one is the 15/16" unit for the manual disc setup. This was one of the M/C options by Dr D for a softer brake pedal.
My existing pictures of the spindle assemblies are fairly dark. I will take better pictures this weekend.
1970 YO7 A66 [Canadian Export] F8 Challenger
340 (Currently in shop for stroker assy.)
|
|
|
Re: Dr D Stage 2 Front Disc Brake Kit
[Re: YO7_A66]
#1583200
03/01/14 04:05 PM
03/01/14 04:05 PM
|
Joined: Jan 2003
Posts: 5,443
Indiana
YO7_A66
OP
master
|
OP
master
Joined: Jan 2003
Posts: 5,443
Indiana
|
Hello everyone, I need a pointer on how to install the new brake lines to the calipers. I have four small washers and four larger washers. Were do they go?
Thanks
1970 YO7 A66 [Canadian Export] F8 Challenger
340 (Currently in shop for stroker assy.)
|
|
|
Re: Dr D Stage 2 Front Disc Brake Kit
[Re: DoctorDiff]
#1583202
03/01/14 04:18 PM
03/01/14 04:18 PM
|
Joined: Jan 2003
Posts: 5,443
Indiana
YO7_A66
OP
master
|
OP
master
Joined: Jan 2003
Posts: 5,443
Indiana
|
I didn't think that you would be on the board today but I am glad you checked in! Thanks Cass!
1970 YO7 A66 [Canadian Export] F8 Challenger
340 (Currently in shop for stroker assy.)
|
|
|
Re: Dr D Stage 2 Front Disc Brake Kit
[Re: YO7_A66]
#1583203
03/01/14 06:12 PM
03/01/14 06:12 PM
|
Joined: Jan 2003
Posts: 5,443
Indiana
YO7_A66
OP
master
|
OP
master
Joined: Jan 2003
Posts: 5,443
Indiana
|
Is this the correct position?
1970 YO7 A66 [Canadian Export] F8 Challenger
340 (Currently in shop for stroker assy.)
|
|
|
Re: Dr D Stage 2 Front Disc Brake Kit
[Re: YO7_A66]
#1583204
03/01/14 07:33 PM
03/01/14 07:33 PM
|
Joined: Jan 2003
Posts: 5,443
Indiana
YO7_A66
OP
master
|
OP
master
Joined: Jan 2003
Posts: 5,443
Indiana
|
Dr D suggested that I test fit the bearings on the spindles before install in the case that there were any burrs on the bearing id's. I did find this issue, so I did as suggested and took some sandpaper and just cleaned the id of the bearings and they slid right on. One of the spindles had a burr on the keyway but some sand paper took care of that too.
Thanks again Cass for the suggestion.
Note: Dust shield orientation incorrect.
Last edited by YO7_A66; 03/02/14 05:15 PM.
1970 YO7 A66 [Canadian Export] F8 Challenger
340 (Currently in shop for stroker assy.)
|
|
|
Re: Dr D Stage 2 Front Disc Brake Kit
[Re: DoctorDiff]
#1583207
03/01/14 07:45 PM
03/01/14 07:45 PM
|
Joined: Jan 2003
Posts: 5,443
Indiana
YO7_A66
OP
master
|
OP
master
Joined: Jan 2003
Posts: 5,443
Indiana
|
That picture is hard to tell but that is the drivers side and the opening in the shield is under the caliper mounting bracket.
Thanks
1970 YO7 A66 [Canadian Export] F8 Challenger
340 (Currently in shop for stroker assy.)
|
|
|
Re: Dr D Stage 2 Front Disc Brake Kit
[Re: YO7_A66]
#1583210
03/02/14 05:17 PM
03/02/14 05:17 PM
|
Joined: Jan 2003
Posts: 5,443
Indiana
YO7_A66
OP
master
|
OP
master
Joined: Jan 2003
Posts: 5,443
Indiana
|
I got the dust shields swapped.
Thanks Cass.
1970 YO7 A66 [Canadian Export] F8 Challenger
340 (Currently in shop for stroker assy.)
|
|
|
Re: Dr D Stage 2 Front Disc Brake Kit
[Re: YO7_A66]
#1583211
03/02/14 11:58 PM
03/02/14 11:58 PM
|
Joined: Jan 2003
Posts: 5,443
Indiana
YO7_A66
OP
master
|
OP
master
Joined: Jan 2003
Posts: 5,443
Indiana
|
Cass,
Do the new rotors come with bearing races installed?
If so, do I use them or knock them out and use the races that came with the bearings that were provided in the kit?
Thanks again.
1970 YO7 A66 [Canadian Export] F8 Challenger
340 (Currently in shop for stroker assy.)
|
|
|
 Re: Dr D Stage 2 Front Disc Brake Kit
[Re: YO7_A66]
#1583214
Re: Dr D Stage 2 Front Disc Brake Kit
[Re: YO7_A66]
#1583214
03/05/14 10:35 AM
03/05/14 10:35 AM
|
Joined: Jan 2003
Posts: 5,443
Indiana
YO7_A66
OP
master
|
OP
master
Joined: Jan 2003
Posts: 5,443
Indiana
|
I received the zinc plated slotted/drilled rotors from Dr D. Very nice parts!
He directed me to remove the existing bearing races that are provided. The existing races get zinc plated too since they are already installed before plating.
I removed both of the races and then installed the Timken races provided in the kit. I packed the rear bearing (high temp disc brake grease) and added the seal (dust cover installs away from the bearing). Then installed the rotor and the outer bearing. I rotated the disc while over tightening the bearing nut. Then I backed off the nut until the bearing was loose, then I tightened the nut to 145 in/lbs (12 ft/lbs) while rotating the rotor. I checked for any play from top to bottom of the rotor and it was tight. The rotor spins smoothly but does not free wheel spin (without a tire and wheel installed).
Note: I know that some of you experienced members do this by feel, but I like throwing a "number" at it, so I went to 145 in/lbs.
Note 2: I also know that allot of the members know the details of the above. But for guys like me who are doing this for the first time, or are thinking of doing this for the first time, the extra detail helps out.
Sorry for the dark picture.
1970 YO7 A66 [Canadian Export] F8 Challenger
340 (Currently in shop for stroker assy.)
|
|
|
 Re: Dr D Stage 2 Front Disc Brake Kit
[Re: YO7_A66]
#1583215
Re: Dr D Stage 2 Front Disc Brake Kit
[Re: YO7_A66]
#1583215
03/05/14 10:39 AM
03/05/14 10:39 AM
|
Joined: Jan 2003
Posts: 5,443
Indiana
YO7_A66
OP
master
|
OP
master
Joined: Jan 2003
Posts: 5,443
Indiana
|
Next is to install the caliper/pads/anti rattle o-ring.
I found this picture on Moparts showing where the o-ring is placed. Since I have a 1970 manual, I did not have a good reference for this o-ring placement. Thanks to the member/s who have posted this picture in earlier threads.
- Install o-ring around caliper mounting bracket.
- Slide the rear pad into the caliper mounting bracket.
- install the outer pad into the caliper (off of the car) and bend the tabs so they are snug around the caliper casting. Install the brake hose at this time too. See above response for placement of the copper washers.
- install the caliper and outer pad onto the caliper mounting bracket.
- install the caliper mounting clips as shown in the picture at the beginning of this thread.
- route the brake line and tighten other end.
After this, I should be able to start the bleeding process of the system this weekend.
Note: I bled the MC after mounting it to the firewall and before screwing on the brake line fittings. (You can purchase a MC brake bleeding kit from your local parts store.)
1970 YO7 A66 [Canadian Export] F8 Challenger
340 (Currently in shop for stroker assy.)
|
|
|
Re: Dr D Stage 2 Front Disc Brake Kit
[Re: YO7_A66]
#1583216
03/07/14 11:35 AM
03/07/14 11:35 AM
|
Joined: Jan 2003
Posts: 5,443
Indiana
YO7_A66
OP
master
|
OP
master
Joined: Jan 2003
Posts: 5,443
Indiana
|
I forgot to include this picture earlier in the thread:
After I replaced the existing bearing seats with the new Timken seats, I finished packing the bearings and installed the seal. I found a good reference picture on Moparts that showed me the correct orientation of the seal.
1970 YO7 A66 [Canadian Export] F8 Challenger
340 (Currently in shop for stroker assy.)
|
|
|
Re: Dr D Stage 2 Front Disc Brake Kit
[Re: YO7_A66]
#1583217
03/07/14 11:36 AM
03/07/14 11:36 AM
|
Joined: Jan 2003
Posts: 5,443
Indiana
YO7_A66
OP
master
|
OP
master
Joined: Jan 2003
Posts: 5,443
Indiana
|
I finished the assembly on the drivers side. All of the parts bolted on quick and easy and the new SS brake line fell right into place. I should have the passenger side done in 20 minutes and then I will be ready to bleed the system.
Dr D has put together a complete kit with high quality parts. I know that there are several companies selling these types of kits, but what I like about this one is that the valve for the rear line is a direct bolt in piece. The rotors are drilled/slotted/and zinc plated to keep the rust down for when these cars are sitting. Dr D has a few M/C's to choose from depending on your setup. His customer service is excellent. I emailed him several times while deciding on what parts to buy and he answered my questions immediately either on this board or thru my emails. Nice brake kit Dr D!!
Before I started this install, I found several online "How To" articles about the drum to disc swap. I kept referencing Disc-O-Tech (Mopar Action), Moparforums, Moparts, Dr Diff., Master Power Brakes, and Wilwood for reference material. I know that this is not rocket science, but some of these articles were missing some of the small details for those of us first timers. So I tried to make sure that some of these missing details were in the above thread.
So thanks to those who helped answer my questions and for those who are thinking of doing this swap for the first time, I found it helpful to find a kit that is COMPLETE, and Dr D has provided us with one.
Thanks to all and especially Dr D.
If I have missed any details, please feel free to add to the thread.
Note: I should have the system bled this weekend and then all I need to do is reset the torsion bars and get the alignment done.
1970 YO7 A66 [Canadian Export] F8 Challenger
340 (Currently in shop for stroker assy.)
|
|
|
Re: Dr D Stage 2 Front Disc Brake Kit
[Re: YO7_A66]
#1583219
03/10/14 09:33 AM
03/10/14 09:33 AM
|
Joined: Jan 2003
Posts: 5,443
Indiana
YO7_A66
OP
master
|
OP
master
Joined: Jan 2003
Posts: 5,443
Indiana
|
I finished the brake install this weekend. After I got the system bled, I noticed that the 15/16" bore MC (manual disc brakes) gave the same pedal pressure as the previous manual drum brakes which is exactly what I wanted. This MC size was suggested my Dr D.
While setting the torsion bars, I noticed that the car set higher with the same turns on the adjuster as before. I assume that this is from the taller spindles. After 2 more turns outward on the torsion bar adjusters, I am at the same fender height as before and I am now ready for an alignment.
* Any alignment suggestions from anyone would be greatly appreciated!!
Thanks again Dr D. Nice kit!!
1970 YO7 A66 [Canadian Export] F8 Challenger
340 (Currently in shop for stroker assy.)
|
|
|
 Re: Dr D Stage 2 Front Disc Brake Kit
[Re: DoctorDiff]
#1583222
Re: Dr D Stage 2 Front Disc Brake Kit
[Re: DoctorDiff]
#1583222
10/27/14 07:14 AM
10/27/14 07:14 AM
|
Joined: Jan 2008
Posts: 2,592
None
71rm23
master
|
master
Joined: Jan 2008
Posts: 2,592
None
|
Quote:
I sell different calipers that can be mounted toward the rear due to the fluid port location.
As noted in this thread, the rubber bands wrap around the slider "ways" on the caliper bracket.
Cass:
If correct, can I exchange my calipers to mount the calipers on the rear of my spindles, instead of the front? Only why is on my car, I have a larger than factory sway bar.
Thanks
|
|
|
|
|


.jpg)
.jpg)