I decided to write up a how-to for lowering the front of a 1972-1993 Dodge half ton pickup. I found tons of misinformation on the internet concerning this topic and decided to put all the correct information in one place. It wasn't until last year that I found out about the van lower control arms. The intention of this is to provide information that I found hard to find. If I made a mistake, please let me know, so I can get it corrected.
Nobody makes much in the way of aftermarket parts for 1972-1993 Dodge trucks. Parts for lowering your Dodge pickup are not offered by the major aftermarket companies like Belltech or Eibach. There is one small manufacturer that makes some very expensive lower control arms, but I've had no luck getting in contact with them. What can you do if you want to lower your pickup? You can go the cheap route by cutting your coil springs. This may cause your spring rates to change or cause camber problems. You could go the expensive route by modifying a pair of lowering spindles made for a 1st generation Dakota. I've heard this works, but there are a few issues with this and it takes a lot of trouble to get them to work.
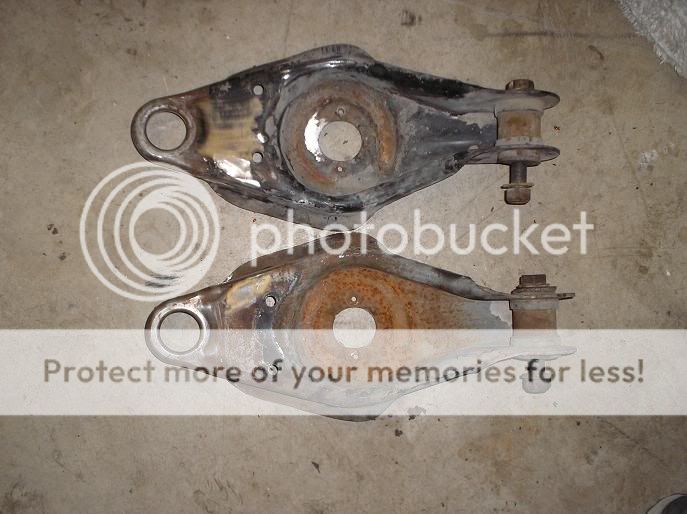
There is another option that is very simple, engineered by the factory, and is cost effective. Go to the junkyard and find a 1972-1993 Dodge B-series van and unbolt the lower control arms. Just swapping the van's lower control arms onto your 1972-1993 Dodge half ton truck lowers it roughly 3" due to the fact that the van lower control arms have a spring pocket that allows the coil springs to sit lower than they do in the truck's stock lower control arms. No shock or spring change is needed. It doesn't matter if it is a 1/2 ton, 3/4 ton, or 1 ton van. The van lower control arms are the same. I purchased a pair from a mid 80's B350 for $40 plus tax at my local Pull-A-Part.
I had trouble separating the steering knuckle from the lower control arm at the ball joint. In fact, I gave up and left the junkyard. I asked around and found out that the steering knuckle is a two-piece design. There are two 15/16 bolts/nuts that you will have to unbolt in order to separate the top piece from the bottom piece. You will have to take the brake caliper and rotor off to gain access to the bolts. Remove those steering knuckle bolts, take out the shock absorber, unbolt the control arm pivot bolt, remove the strut rod from the lower control arms, and separate the steering tie rod from the lower steering knuckle piece and you're done. The only parts you will need are the lower control arms and the control arm pivot bolts/nuts. Once you get the lower control arms home, take a large hammer and remove the lower steering knuckle piece from the ball joint and then knock the ball joint out. You cannot reuse the ball joints from the one ton van because they are larger in diameter than the ones on your truck. I do not know if the 1/2 ton or 3/4 ton ball joints are the same or not. New ball joints are $30 at NAPA, so you might as well replace them anyway.
There are a couple modifications you will need to make to the lower control arms and your truck. First, completely remove the steering stops. They are not needed and the arms will look cleaner without them. Next, you will need to drill two 1/2" holes in each arm for the strut rods. I pulled a stringline from the center of the ball joint to the center of the pivot bushing and found the holes in the truck arms are equal distance from the centerline of the arm. Measure the distance from the ball joint to the strut rod holes on the truck arms. Now, you can transfer this information onto the van arms, mark your holes, and drill. There is one modification you will need to make to the lower control arm pivot holes on your truck's frame. The truck's factory lower control arm bolts are 5/8" in diameter. The van's are 3/4" in diameter. You will need to drill these holes larger for the van's bolts to fit the truck. I was thinking that maybe I would be able to slide the sleeve from the truck arms into the sleeve on the van arms so I wouldn't have to drill the pivot holes. The truck sleeve is too large in diameter to fit inside the van's sleeve,so that will not work. From this point, you may be able to just bolt the van arms on your truck. I had a little problem with mine. I tried to install my driver's side arm and the holes wouldn't begin to line up. I found that the metal around the pivot bushing on the arm was up against the pivot bracket on the truck. Before you paint your lower control arms, you may want to grind a little off the arms around the pivot bushing.
When I put the wheels back on and dropped the truck onto the ground, I measured 1/2" between the bottom of the fender and top of the tire. Before the drop, I measured 3.5". I'm very pleased with that. To my surprise, the camber wasn't off too bad, however, the wheels were pointed in different directions. I also had to cut the bump stop brackets off because they were hitting the lower control arms. Another thing, any time you perform work like this to your vehicle, a front end alignment is necessary.

The steering knuckle is a two piece design on the truck and van. You will need a 15/16" socket for these.

Van arms with van lower steering knuckle
Van arms with steering bump stops and ball joint removed

Side by side comparison of the truck arm and van arm. Blue arrows point to the strut rod bolt holes that you need to drill.

Truck pivot bolt (5/8") on top and van pivot bolt (3/4") on bottom

Drilling the truck's pivot bolt bracket from 5/8" to 3/4"

Grind in the unpainted area shown by the arrows. The holes in the lower control arms would not line up with the ones on the truck's pivot bracket due to this area touching the pivot bracket.

Finished product

Before

After


